流水线使用说明书
- 格式:doc
- 大小:5.17 MB
- 文档页数:36

1.目的:规范流水线操作2.适用范围:流水线运行过程3.支持性文件:《全国临床检验操作规程》(第三版)、《临床检验操作规程编写要求》(WS/T227-2002)4.操作规程:Ⅰ日常启动程序1.标本前处理系统A起始平台运行及操作:i.装载样品至本系统入口模块的收集架上,每个收集架可以容纳50个标本,被连续装载到样品管输送器上,并在系统中传送。
在收集架为空时闪光标灯将起动。
操作人员便可装载其他已装满的收集架,提供连续的样品管,使其在系统中移动。
ii.样品在离开入口模块后,便进入条形码读取器(位于条形码校验模块和所有出口模块上)。
读取器对样品管条形码进行读取,并校验样品程序。
如果条形码标签已损坏、缺失或条形码标签长度或类型错误读取器将无法读取。
样品程序不被接受,样品管将被移送到入口模块的错误通道内。
iii.当错误通道内样品管堆满时,音响警报和闪光标灯闪动。
此时,操作人员必须将样品管从错误通道上移走。
注意:条形码校验模块将样品移送到错误通道上的原因有以下几个方面:条形码受损、缺失或不能读取。
样品程序不一致或无效。
样品条形码之前已被读取(条形码数字重复)。
条形码标签长度或类型错误。
样品管无样品程序。
由于设置信息上的归类出现冲突。
B自动离心模块运行及操作:智能自动机械臂可连续地将样品管移到离心机内四组样品固定装置中的一组。
每组样品固定装置有两排,每排5个,可装载10个样品管。
离心机转速范围为500~3000r/min,离心时间范围为60~999s,可设定最佳(时间和转速)程序,当标本量不足40个时,可按优先按钮,系统会自动根据实际标本量自动使用一个或多个装有水的平衡管平衡后进行离心。
C开盖模快运行及操作:i.开盖模块只可选用一种相同规格试管盖的试管,使用的试管长度也要求一致。
ii.如果盖子不能从样品管上去除,开盖装置将重复操作两次以上,但如果盖子仍然不能去除,音响警报和闪光标灯闪动,系统停止操作,操作人员应立刻进行检查原因,排除故障。
流水线使用说明书
. .高压隔离开关GW4-40.5、72.
5、126整体装配流水线设备使用说明书目录设备简介3概述3设备简介3安装及使用62-5、72.
5、126整体装配流水线设备使用说明书目录设备简介3概述3设备简介3安装及使用62:装配小车上线底架安装瓷瓶安装导电安装产品检测产品下线XXXX年,终生维修。
2、我们将以优惠的价格提供可更换的零件和进行扩展功能服务等其它技术支持。
下列情况不属于保修范围:
1、用户因使用、维修、保管不当造成损坏的;
2、由于用户自行运输、拆卸或连接不适当的配件,而非本公司技术机构维修或改装而造成损坏的;
3、自然灾害等不可抗力因素造成损坏的;
4、超过保修期的。
如果您在使用中有任何疑问和遇到异常现象,请与我公司联系,我们会及时给予答复和提供售后服务。
word 教育资料达到当天最大量API KEY 超过次数限制。
喷涂流水线工艺流程及说明书电子版下载温馨提示:该文档是我店铺精心编制而成,希望大家下载以后,能够帮助大家解决实际的问题。
文档下载后可定制随意修改,请根据实际需要进行相应的调整和使用,谢谢!并且,本店铺为大家提供各种各样类型的实用资料,如教育随笔、日记赏析、句子摘抄、古诗大全、经典美文、话题作文、工作总结、词语解析、文案摘录、其他资料等等,如想了解不同资料格式和写法,敬请关注!Download tips: This document is carefully compiled by theeditor.I hope that after you download them,they can help yousolve practical problems. The document can be customized andmodified after downloading,please adjust and use it according toactual needs, thank you!In addition, our shop provides you with various types ofpractical materials,such as educational essays, diaryappreciation,sentence excerpts,ancient poems,classic articles,topic composition,work summary,word parsing,copy excerpts,other materials and so on,want to know different data formats andwriting methods,please pay attention!喷涂流水线工艺流程及操作说明书一、前言喷涂流水线是现代工业生产中常见的一种高效、精准的涂装方式,广泛应用于汽车、家电、家具等制造行业。

STC12C2052AD 系列单片机器件手册 --- 1个时钟/机器周期8051 ---无法解密 ---低功耗,超低价 ---高速,高可靠 ---强抗静电,强抗干扰STC12C0552,STC12C0552ADSTC12C1052,STC12C1052ADSTC12C2052,STC12C2052ADSTC12C3052, STC12C3052ADSTC12C4052, STC12C4052ADSTC12C5052, STC12C5052ADSTC12LE0552,STC12LE0552ADSTC12LE1052,STC12LE1052ADSTC12LE2052,STC12LE2052ADSTC12LE3052,STC12LE3052ADSTC12LE4052,STC12LE4052ADSTC12LE5052,STC12LE5052AD技术支援:宏晶科技(深圳) www.MCU-Memory.com support@MCU-Memory.comUpdate date: 2005-10-4 (草案,请随时注意更新)宏晶科技:专业单片机/存储器供应商 www.MCU-Memory.com STC12C2052AD系列 1T 8051单片机中文指南2领导业界革命 覆盖市场需求宏晶科技是新一代增强型8051单片机标准的制定者,致力于提供满足中国市场需求的世界级高性能单片机技术,在业内处于领先地位,销售网络覆盖全国。
在保证质量的基础上,以极低的价格和完善的服务赢得了客户的长期信赖。
目前,全力推出“1个时钟/机器周期”的单片机,全面提升8051单片机性能。
欢迎海内外厂家前来洽谈合作!新客户请直接联系深圳,以获得更好的技术支持与服务。
STC 12C2052AD系列 1T 8051 单片机RST 1 20 VCCRxD/P3.0 2 19 P1.7/SCLK/ADC7TxD/P3.1 3 18 P1.6/MISO/ADC6XTAL2 4 17 P1.5/MOSI/ADC5INT0/P3.2 6 15 P1.3/ADC3INT1/P3.3 7 14 P1.2/ADC2ECI/T0/P3.4 8 13 P1.1/ADC1PWM1/PCA1/T1/P3.5 9 12 P1.0/ADC0Gnd 10 11 P3.7/PCA0/PWM0XTAL1 5 16 P1.4/SS/ADC4DIP-20,SOP-20,(超小封装TSSOP-20定货)STC12C2052、STC12C4052不带A/D转换STC12C2052AD、STC12C4052AD带A/D转换 新客户请直接联系深圳以获得更好的技术支持和服务 欢迎海内外厂家前来洽谈合作南京办:广州办: 传真至深圳申请STC单片机 样片及ISP下载线/编程工具1个时钟/机器周期,超小封装8051单片机在系统可编程,无需编程器,可远程升级可送STC-ISP下载编程器,1万片/人/天内部集成MAX810专用复位电路,原复位电路可以保留,也可以不用,不用时RESET脚直接短到地1个时钟/机器周期,可用低频晶振,大幅降低EMI超低功耗:1、掉电模式: 典型功耗 <0.1μA2、空闲模式: 典型功耗 <1mA3、正常工作模式: 典型功耗 4mA - 7mA4、掉电模式可由外部中断唤醒,适用于电池 供电系统,如水表、气表、便携设备等。
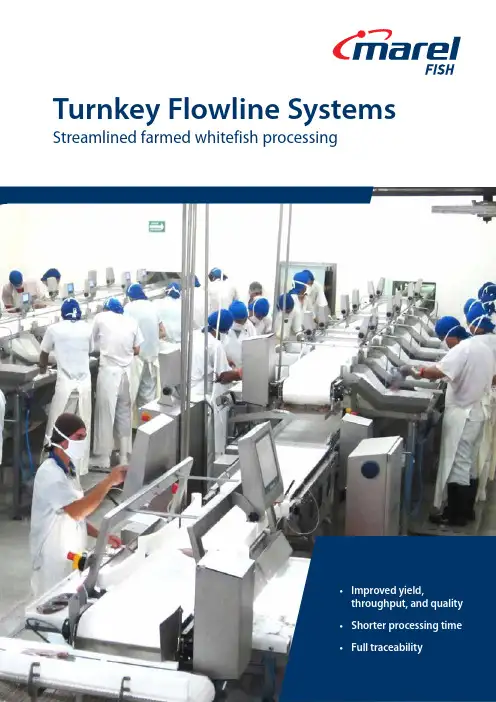
Turnkey Flowline Systems Streamlined farmed whitefish processing• Improved yield,throughput, and quality• Shorter processing time• Full traceabilityImproved processing performance15. Dual-function tunnel for freezing (IQF)or SuperChilling (for fresh packing)16. Glazing unit14. Chilling and brining1. Chilling of live fish(sleeping)2. Bleeding3. Bleeding tank4. Chilling and infeedto filleting6. Hand filleting flowlineWork station18. Box packingIQF grader can be customized for adifferent number of grades. Productis packed into fixed weight boxes andconveyed to packing station. Boxesare conveyed to checkweighing andlabeling station.17. Retail packingTargetBatcher is used for batchinginto fixed weight retail packs withminimum over-pack.5. Weighing whole fishto filleting stations19. Strapping, metal detectionand palletizingMarel whitefish processing equipment and solutions are designed to help processors address the factors that most affect final yield and performance. These factors include raw material quality, processing time, and the ability to monitor KPIs.Marel provides managers with the advanced production management technology they need in order to makeprofitable decisions along all stages of the value chain – from the reception of raw material and throughout processing to packing, including quality control and traceability.Marel flowlines are designed to replace manual table or conveyor based processing lines where the raw material is constantly being stacked and stored, and then manually transported between processes.Faster processing and better handlingMarel’s Standard Flowline is specifically designed for the filleting and trimming process for farmed whitefish species (tilapia, pangasius, catfish, and more) and enables a continuous flow of the raw material throughout processing. Combined with Marel’s Innova software, the system ensures 100% traceability while providing detailed and valuable information on throughput, yield, and quality.Automatic delivery to individual workstations and product take awayThe Standard Flowline operates on three conveyor levels with separate conveyors for all incoming and outgoing product: the top conveyor delivers the incoming product, a second conveyor transports all outgoing product, and a third conveyor the off-cuts. This involves far less product handling and significantly decreases processing time compared to a tray system, thereby greatly improving product quality.The continuous flow of raw material means a high volume of product can be conveyed to and from the work stations, which considerably increases capacity and helps increase worker productivity.All incoming and outgoing product is weighed accurately and all data is linked to individual operators. Each workstation is equipped with: a worktable with product buffers for primary and secondary product, a manual adjustable platform, a water gun, knife holder, and data terminal. The data terminals enable operators to monitor performance, both individually and incomparison with the line average.The ergonomic design, streamlining of processing, and continuous data collection enable processors to greatly reduce processing time and enhance worker performance, while enabling a much higher throughput with improvedyield and product quality.“With the new processing line from Marel, we managed to improve certain processes greatly, thereby enabling us to increase productivity and quality at the same time. We have all necessary certifications, which is important to us. Today, our product has the unique selling proposition that we have not only a sustainable product but also high quality. This gives us the strength to reach this target group and diversify to new markets.”Max Fernández M., Plant Manager, Terrapez S.A.Innova Filleting & Trimming SolutionThe Standard Flowline has data integration directly to the Innova Filleting and Trimming Solution,which can also operate standalone or in combination with a plant’s existing system. Whether integratedor stand-alone, the Innova system enables fish processors to monitor and control their trimming and/or filleting process.Innova gives managers more control by enabling them toidentify which products are being processed, which employee isworking at which station, and which lot is active, as well as tracethe raw material to its origin or original purchase order.Managers gain detailed information on all key data such asthroughput, yield, and individual employee performance,thereby enabling targets and criteria to be established andmeasured. The solution provides both real-time and historicaldata on a live display and in reports to evaluate systemperformance.Innova Filleting andTrimming enablesproduction managers togreatly improve overall yield,throughput, and quality.Marel is the leading global provider of advanced equipment and systems for the fish, meat, and poultry industries.With offices and subsidiaries in over 30 countries on six continents and a vast global network of agents and distributors, Marel's expertise in local markets and requirements helps it deliver the best processing innovation for its customers.Our dedicated R&D teams ensure that we provide the latest technology for all stages of the processing value chain; ranging from single scales to integrated production lines and turnkey systems./fish A p r i l 1 8 -E N GA powerful combinationInnova Filleting and Trimming Solutionwith RFID support1 System utilizes one input scale and one output scale per filleting and trimming line2 Input operator weighs each tray at input scale and attaches RFID tag to tray3 Trays are fed to filleting/trimming operators4 Operators log into work station manually or with ID tag at input scale5 Operators use individual ID cards for output product registration6 When filleting/trimming is completed, operators place finished product into traycontaining their station ID and RFID from input scale7 Operator at output scale puts tray on scale, scans station ID (to get employeeinformation), scans RFID from input scale (for input weight), and selectscorresponding output product from a list8 Product is weighed and registered, and yield and throughput informationis updated in the Innova system9 Tray is fed to next processing stepMarel is the leading globalprovider of advanced equipmentand systems for the fish, meat,and poultry industries.。
目录一、总体技术要求二、监测与指示三、电气主要联锁四、电气操作说明五、电气设备明细表一、总体技术要求1、概述本电气设备主回路采用了380伏,控制回路采用220伏。
为了操作与维修上的方便,电气设备集中安装在控制箱内,控制着各电动机和电磁阀的开停。
2、控制对象(1)除尘电机11kw 一台(2)分离器电机 2.2kw 一台(3)提升机电机7.5kw 一台(4)纵向螺旋输送电机 5.5kw 一台(5)辊道电机4kw 一台(6)抛丸器电机11kw 八台(7)气动电磁阀八只(8)电磁阀一只二、监测与指示1、电源及电机正常运转、停止,由绿、红指示灯指示;2、八台抛丸电机分别由八只电流表指示;3、抛丸机电机装有累时计时器,可以累计抛丸机工作时间;三、主要电气联锁1、风机、分离器、提升机、纵向螺旋输送器之间产生联锁,顺序为先启动风机、分离器、提升机、纵向螺旋,最后是辊道与抛丸机;2、辊道输送,前进、后退之间产生联锁。
3、8台抛丸机无论在手动还是在自动状态,都按延时5-8秒启动一台抛丸机程序启动,直到8台启动完毕。
4、为了便于维修及调整设备,在控制箱内设置解除联锁专用的钮子开关,合上某一个纽子开关,就能解除相应设备的联锁关系。
5、抛丸机在自动状态时,当工件进入抛丸室前,抛丸机自动按序启动工作;10分钟后(时间可调)如没有工件进入工作区域,8台抛丸机自动停止工作,其他设备照常工作;此时如果再有工件进入工作区域,抛丸机再自动按序启动工作。
四、电气操作说明1、启动前的准备工作(1)检查清理机内部及周围的场地,清除杂物;(2)检查各个轴承的润滑情况及各个齿轮箱的油位;(3)打开压缩空气总阀门,对除尘器及清理机供气;(4)合上电源空气开关QF,接通总电源,并转动钥匙式按钮ZJ,按下『启动』按钮,接通控制回路电源,信号灯DY亮。
合上控制箱内其他空气开关,并把所有联锁钮子开关扳向下方,处于联锁状态。
2、手动启动、停止(1)把转换开关ZH扳到手动位置,依次按下『风机』、『分离机』、『提升机』、『纵向绞笼』按钮,使它们逐个运转起来;注意:由于系统具有联锁装置,必须依次分级启动,如果越级启动是不能工作的!(2)按下『辊道』的正向运转的按钮(带自锁功能),启动辊道,同时调节变频器的工作频率,使辊道保持适当运转速度;(3)当辊道上的工件在进入清理机之前,启动『抛丸机』,此时8台抛丸机会逐一启动,对工件进行抛丸清理;(4)每当一台抛丸机启动时,相应一个气动电磁阀工作,推动气缸动作,把供丸闸打开,向抛丸机提供钢丸。


Cat® 320 GCHydraulic ExcavatorHigh Performance with Lower Fuel Consumption•The excavator uses up to 20 percent less fuel than the 320F insimilar applications.•Match the excavator to the job with power modes; let Smartmode automatically match engine and hydraulic power to diggingconditions.•The advanced hydraulic system provides the optimum balanceof power and effi ciency while giving you the control you needfor precise digging requirements.• Valve priority puts hydraulic pressure and fl ow where you commandit to go for fast light- to medium-load cycle times.•The engine meets U.S. EPA Tier 4 Final and EU Stage IV emissionstandards with an aftertreatment system that requires no operatorinput or downtime.•Add auxiliary hydraulics to do more work with a range ofCat attachments.•Product Link™ comes standard so you can remotely monitormachine health, location, hours, and fuel consumption on demandthrough the VisionLink® online interface.Reliable, High and Low, Heat and Cold• Work up to 3000 m (9,840 ft) above sea level without de-rating.•Standard high-ambient temperature capability is 52º C (125º F)with cold start capability at –32º C (–25º F).•Auto warm up speeds up hydraulic oil warming in cold temperaturesand helps prolong the life of components.• Three levels of fuel fi ltration protect the engine from dirty diesel fuel.• Grease sealed between track pins and bushings reduces travel noiseand prevents debris from entering to increase undercarriage life.•The center track guiding guard helps keep the excavator trackaligned when traveling and working on slopes.• The sloped track frame prevents mud and debris accumulation,helping reduce risk of track damage.Work in Comfort in the All-New Cab•The Comfort cab has a wide seat that adjusts for operators ofall sizes.•Control the excavator comfortably with easy-to-reach controlsall located in front of you.•Standard automatic climate control keeps you at the righttemperature all shift long.•Advanced viscous mounts reduce cab vibration by up to 50 percentover previous excavator models.•Stow your gear with plenty of in-cab storage beneath and behindthe seat, overhead, and in the consoles. A cup holder, documentholder, bottle holder, and coat hook are also provided.•Use the standard radio’s USB ports and Bluetooth® technologyto connect to personal devices.Simple to Operate•Start the engine with a push button; use a Bluetooth key fob,smartphone app, or the unique Operator ID function.•Program each joystick button, including response and pattern,using Operator ID; it will also remember climate control fanand radio settings.•Navigate quickly on the standard high-resolution 203 mm (8 in)touchscreen monitor or with the aid of the jog dial control.•Not sure how a function works or how to maintain the excavator?Always have the operator’s manual at your fi ngertips in thetouchscreen monitor.The Cat® 320 GC excavator balances productivity with easy-to-use controls, a new comfortable cab, reduced fuel consumption by up to 20percent, and longer maintenance intervals that reduce maintenance costs up to 15 percent – all to give you a durable, low-cost-per-hour excavator to meet your light- to medium-duty application requirements.Not all features available in all regions. Consult your Cat dealer for specifi c confi gurations available in your region.Cat® 320 GC Hydraulic ExcavatorMaintenance•Expect up to 15 percent less maintenance cost than the 320E. (Savings calculated over 12,000 machine hours.)•Do all daily maintenance at ground level.•Check engine oil level quickly and safely with the new ground-level engine oil dipstick; fi ll and check engine oil on top of the machine with a conveniently located second dipstick.•Track your excavator’s fi lter life and maintenance intervals via the in-cab monitor.• Do no required maintenance on the Cat Clean Emissions Module.•Change all fuel fi lters at a synchronized 500 hours.•Expect the new air intake fi lter with precleaner to last up to1,000 hours – a 100 percent increase over the previous fi lter.• The new hydraulic oil fi lter provides improved fi ltration performance, anti-drain valves to keep oil clean when the fi lter is replaced, and longer life with a 3,000 hour replacement interval – 50 percent longer than previous fi lter designs.• The new high-effi ciency electric cooling fans only run when needed and reverse to keep cores free from debris.•S·O·S SM ports simplify maintenance and allow for quick, easy extraction of samples for fl uid analysis.Safety•Access 100 percent of daily maintenance points from ground level –no need for you to climb on top of the excavator.•Keep your excavator secure with Operator ID. Use your PIN code on the monitor to enable the pushbutton starting feature.•The standard ROPS cab meets ISO 12117-2:2008 requirements.•Enjoy great visibility into the trench, in each swing direction, and behind you with the help of smaller cab posts and larger windows.• A rearview camera is standard, and a right-side-view camerais optional.•The new right-hand service platform design provides easy, safe, and quick access to upper service platform; the service platform steps use anti-skid punch plate to prevent slipping.•The handrails comply with ISO 2867:2011 requirements.•The lower frame meets ISO 15818:2017 lifting and tie-down requirements.Cat® 320 GC Hydraulic Excavator Standard and Optional EquipmentStandard and optional equipment may vary. Consult your Cat dealer for details.Standard Optional CABROPS, standard sound suppression9High-resolution 203 mm (8 in)LCD touchscreen monitor9 Mechanically adjustable seat9CAT CONNECT TECHNOLOGYCat Product Link9ENGINETwo selectable power modes9One-touch low idle with auto enginespeed control9Auto engine idle shutdown952° C (125° F) high-ambient cooling capacity9–32° C (–25° F) cold start capability9Double element air fi lter withintegrated precleaner9Reversing electric cooling fans9Biodiesel capability up to B209 HYDRAULIC SYSTEMBoom and stick regeneration circuits9Boom and stick lowering check valves9 Auto hydraulic warm up9Auto two-speed travel9Boom and stick drift reduction valve9Hammer return fi lter circuit9 Slider joysticks9 Combined fl ow/high-pressureauxiliary circuit9 Medium-pressure circuit9 Quick coupler circuit for Cat Pin Grabber9Standard Optional BOOM AND STICKS5.7 m (18'8") reach boom, 2.9 m (9'6") stick9 UNDERCARRIAGE AND STRUCTURES600 mm (24") triple grouser shoes9 700 mm (28") triple grouser shoes9 790 mm (31") triple grouser shoes9 Tie-down points on base frame94200 kg (9,300 lb) counterweight9 ELECTRICAL SYSTEMTwo 1,000 CCA maintenance-free batteries9 Programmable time-delay LEDworking lights9LED chassis light, left-hand/right-handboom lights, cab lights9SERVICE AND MAINTENANCESampling ports for Scheduled Oil Sampling(S·O·S)9Ground- and platform-level engineoil dipsticks9SAFETY AND SECURITYRearview camera9Right-hand-side camera9*9* Right-hand mirror9Ground-level engine shutoff switch9Right-hand handrail and hand hold9Signaling/warning horn9*Europe standard; other regions optional.Cat® 320 GC Hydraulic ExcavatorEngine Model Cat C4.4 ACERT™Gross Power – ISO 14396/SAE J199591 kW122 hp Net Power – ISO 9249/SAE J134990 kW121 hp Engine RPMOperation1,700 rpmTravel2,000 rpmBore105 mm 4 in Stroke127 mm 5 in Displacement 4.4 L269 in3Main System – Maximum Flow (Implement)442 L/min116 gal/min Maximum Pressure – Equipment35 000 kPa5,075 psi Maximum Pressure – Travel34 300 kPa4,974 psi Maximum Pressure – Swing26 800 kPa3,886 psiOperating Weight21 900 kg48,300 lb • 5.7 m (18'8") reach boom, 2.9 m (9'6") reach stick, 1.0 m3 (1.31 yd3) HD bucket, 790 mm (31") shoes.Fuel Tank345 L86.6 gal Cooling System35 L9.2 gal Engine Oil15 L 4 gal Swing Drive (each)7 L 1.8 gal Final Drive (each) 6 L 1.6 gal Hydraulic System (including tank)240 L63.4 gal Hydraulic Tank128 L33.8 gal DEF Tank40 L10.6 gal Boom Reach 5.7 m (18'8") Stick Reach 2.9 m (9'6") Bucket 1.0 m3 (1.31 yd3) Shipping Height (top of cab)2960 mm9'9" Handrail Height2950 mm9'8" Shipping Length9530 mm31'3" Tail Swing Radius2830 mm9'3" Track Length to Center of Rollers3270 mm10'9" Ground Clearance470 mm1'7" Track Gauge2380 mm7'9" Transport Width – 790 mm (31") Shoes3170 mm10'5" Counterweight Clearance1050 mm3'5"Boom Reach 5.7 m (18'8") Stick Reach 2.9 m (9'6") Bucket 1.0 m3 (1.31 yd3) Maximum Digging Depth6720 mm22'1" Maximum Reach at Ground Level9860 mm32'4" Maximum Cutting Height9450 mm31'0" Maximum Loading Height6490 mm21'4" Minimum Loading Height2170 mm7'1" Maximum Depth Cut for 2440 mm (8'0")Level Bottom6550 mm21'6" Maximum Vertical Wall Digging Depth5690 mm18'8" Bucket Digging Force (ISO)129 kN29,000 lbf Stick Digging Force (ISO)99 kN22,256 lbf Bucket Digging Force (SAE)115 kN25,853 lbf Stick Digging Force (SAE)96 kN21,581 lbfTechnical SpecificationsFor more complete information on Cat products, dealer services, and industry solutions, visit us on the web at © 2017 CaterpillarAll rights reservedMaterials and specifi cations are subject to change without notice. Featured machines in photos may include additional equipment. See your Cat dealer for available options.CAT, CATERPILLAR, , their respective logos, “Caterpillar Yellow” and the “Power Edge” trade dress, as well as corporate and product identity used herein, are trademarks of Caterpillar and may not be used without permission.AEXQ2191 (07-2017)Build Number: 07A (North America, Europe)。

鞋厂成型流水线流程说明书The shoe factory molding assembly line process manual is a crucial document that outlines the step-by-step procedures involved in producing shoes. It provides a detailed guide for workers to follow to ensure efficient and consistent production. This manual plays a key role in ensuring the quality of the shoes being manufactured, as it helps to maintain standards and minimize errors in the production process. Without this manual, there is a risk of inconsistency in the finished products, which can lead to customer dissatisfaction and loss of business.鞋厂成型流水线流程说明书是一个关键性文件,它详细地列出了生产鞋子所涉及的逐步程序。
它为工人提供了一个详细的指南,以确保生产的高效和一致性。
这个手册在确保生产的鞋子质量方面起着关键作用,因为它有助于保持标准并尽量减少生产过程中的错误。
如果没有这个手册,成品存在不一致的风险,这可能导致客户不满和业务损失。
The molding assembly line process involves a series of steps starting from the selection of raw materials to the final inspection of finished shoes. Each step is crucial and must be executed with precision toensure the quality of the shoes. The manual details the specific requirements for each step, including the type of materials to be used, the equipment required, and the techniques to be followed. This level of detail is essential for workers to understand their roles and responsibilities in the production process, and to ensure that they meet the required standards.成型流水线流程涉及一系列步骤,从原材料的选择到成品鞋子的最终检查。
高压隔离开关 GW4-40.5、72.5 、126整体装配流水线设备使用说明书目录设备简介 (3)概述 (3)设备简介 (3)安装及使用 (6)2-1 设备安装 (6)一、连接设备 (6)二、准备工序 (8)2-2 各工位装配工艺 (18)一、上线工位 (18)二、底架安装工位 (19)三、绝缘子检测工位 (22)四、导电安装 (24)五、隔离开关分合闸角度检测磨合试验及回路电阻测试工位 (26)2-3 生产进度显示及装配数据记录 (27)一、生产进度显示 (27)二、装配数据记录 (28)故障诊断 (31)设备使用时注意事项 (32)售后服务 (34)设备简介概述设备简介本使用说明书适应于高压隔离开关GW4-40.5、GW4-72.5、GW4-126此三种高压隔离开关整体装配、检测装配线设备操作、保养维护指导,总体上达到装配、检测一体化、检测数据信息化管理。
生产线总体工作流程图如下:产品下线产品检测导电安装瓷瓶安装底架安装装配小车2000mm2750mm2000mm2750mm2750mm2000mm工位6工位5工位4工位3工位2工位1总装线导电分装工位图 1 装配线工作流程图一、总装线功能简介:①GW4-40.5、GW4-72.5、GW4-126高压隔离开关整体装配、检测流水线以轨道为支撑,装配小车作为装配载体,人工推动小车进行工序间流转;②总装线由装配、检测线和装配小车回程线两部分组成,装配、检测线上设置以下六个工位:上线工位、底架装配工位、瓷瓶检测工位、导电安装工位、隔离开关分合闸角度检测磨合试验及回路电阻测试工位,六处分步装配在同一个装配周期内完成;③1 处:工装推动到回程线,装配小车从回程线滑动至装配始端,减速电机拖动工装至总装线;④ 2 处:在装配小车上完成底架装配,使用专用工装保证轴承座杠杆端面水平,中心距一致;⑤ 3 处:在装配小车上完成瓷瓶安装,垂直度测量;⑥ 4 处:在装配小车上完成导电安装;⑦ 5 处:在装配小车上完成出厂分合闸角度和回路电阻检测及产品磨合试验;⑧ 6 处:产品下线,吊装产品下线,装配小车从回程线返回至装配线始端;⑨传输周期: 6 处分步装配全部完成,分步完成按钮全部按下,所有装配小车方可推动至下一工位,在传输过程中完成数据采集(详见数据采集),开始下一节拍装配。
1.目的:规范流水线操作2.适用范围:流水线运行过程3.支持性文件:《全国临床检验操作规程》(第三版)、《临床检验操作规程编写要求》(WS/T227-2002)4.操作规程:Ⅰ日常启动程序1.标本前处理系统A起始平台运行及操作:i.装载样品至本系统入口模块的收集架上,每个收集架可以容纳50个标本,被连续装载到样品管输送器上,并在系统中传送。
在收集架为空时闪光标灯将起动。
操作人员便可装载其他已装满的收集架,提供连续的样品管,使其在系统中移动。
ii.样品在离开入口模块后,便进入条形码读取器(位于条形码校验模块和所有出口模块上)。
读取器对样品管条形码进行读取,并校验样品程序。
如果条形码标签已损坏、缺失或条形码标签长度或类型错误读取器将无法读取。
样品程序不被接受,样品管将被移送到入口模块的错误通道内。
iii.当错误通道内样品管堆满时,音响警报和闪光标灯闪动。
此时,操作人员必须将样品管从错误通道上移走。
注意:条形码校验模块将样品移送到错误通道上的原因有以下几个方面:条形码受损、缺失或不能读取。
样品程序不一致或无效。
样品条形码之前已被读取(条形码数字重复)。
条形码标签长度或类型错误。
样品管无样品程序。
由于设置信息上的归类出现冲突。
B自动离心模块运行及操作:智能自动机械臂可连续地将样品管移到离心机内四组样品固定装置中的一组。
每组样品固定装置有两排,每排5个,可装载10个样品管。
离心机转速范围为500~3000r/min,离心时间范围为60~999s,可设定最佳(时间和转速)程序,当标本量不足40个时,可按优先按钮,系统会自动根据实际标本量自动使用一个或多个装有水的平衡管平衡后进行离心。
C开盖模快运行及操作:i.开盖模块只可选用一种相同规格试管盖的试管,使用的试管长度也要求一致。
ii.如果盖子不能从样品管上去除,开盖装置将重复操作两次以上,但如果盖子仍然不能去除,音响警报和闪光标灯闪动,系统停止操作,操作人员应立刻进行检查原因,排除故障。
迈瑞CAL 8000PLUS血液细胞分析流水线标准操作程序CAL 8000PLUS样本处理系统与全自动血液细胞分析仪、特定蛋白免疫分析仪、糖化血红蛋白分析仪(以上均简称分析仪)、自动血涂片制备仪(简称推片机)连接成流水线,用于检测试验前/后样本的识别、分配、传输、存储等。
1.1开机前检查1. 检查试剂是否充足。
2. 检查废液桶是否已满(非直排)。
3. 确认样本处理系统轨道上、卸载平台无试管架。
1.2启动系统1. 打开CAL 8000PLUS总开关。
2. 打开装载模块柜体内电脑主机电源开关。
3. 登录labXpert系统操作端及审核端。
4. 等待CMU系统中各模块状态指示灯变绿。
1.3BC-6800plus血液细胞分析仪分析1.3.1BC-6800plus的检测原理及检验项目BC-6800plus采用鞘流阻抗法、激光散射结合荧光染色的流式细胞技术进行细胞分类、计数;采用比色法进行血红蛋白测定。
在实现白细胞五分类的基础上对血液中存在的幼稚细胞进行了精准的识别和检测。
同时采用激光流式细胞术结合荧光染色的技术手段,对体液中的有核细胞可进行识别和检测。
BC-6800plus血液检测输出37项报告参数加42项研究参数,两个直方图、五个二维散点图、三个三维散点图;体液检测输出7项报告参数加11项研究参数;1个直方图、1个散点图。
1.3.2BC-6800plus检测试剂BC-6800PLUS血液细胞分析仪专用试剂:M-68P DS稀释液、M-68P DR稀释液;M-68P FD染色液、M-68P FN染色液、M-68P FR染色液;M-68P LD 溶血剂、M-68P LH 溶血剂、M-68P LN溶血剂;探头清洁液。
所有试剂应参照试剂的使用说明进行保存。
变质、超过效期的所有试剂不能使用。
1.3.3检测标本要求血液标本支持抗凝全血及预稀释检测;体液标本支持脑脊液、胸水、腹水检测。
原始样品采集、制备、处理、检验和存放见检验科相关规范。
水稻育秧播种流水线控制系统摘要:作为水稻育秧机械化的主要研究装备,水稻秧盘育秧流水线经过30多年的发展历程,在满足不同地区水稻种植农艺要求的条件下,已有了较大发展,较完备的播种育秧流水线主要包括秧盘供送、铺底土、压实、播种(撒播、条播)、覆表土、淋洒水、取秧盘等关键工序。
本文设计了以AT89C51为核心的水稻育秧播种流水线控制系统,实现了覆土、播种、覆表土和喷淋过程的自动化控制,并从软、硬件两个方面进行系统抗干扰设计。
关键词:水稻育秧;自动控制;抗干扰Control System Design of Rice Seedling Sowing PipelineAbstract:As primary research equipment of rice seeding automation,it made great progress on condition that it meet different rice planting region agricultural demands after 30 years of development history.A complete seeding seedlings line mainly includes seeding disc for sending, spreading subsoiling, compaction,seeding (sowning,drilling,),the surface soil, watering, taking seeding disc shower key process.In this paper, based on A T89C51 single chip as the core of the rice planting seedings assembly line control system,it realized the turns the soil, sow, covering surface soiling and spraying process automation control, and was designed anti-interference from two aspects of hardware and software system.Key Words: Rice seeding; Automatic control; anti-interference1 前言1.1 课题研究的目的和意义水稻是世界上的重要粮食作物,在粮食安全中占有极其重要的地位。
高压隔离开关GW4-40.5、72.5、126 整体装配流水线设备使用说明书目录设备简介 (3)概述 (3)设备简介 (3)安装及使用 (3)2-1设备安装 (3)一、连接设备 (3)二、准备工序 (3)2-2各工位装配工艺 (3)一、上线工位 (3)二、底架安装工位 (3)三、绝缘子检测工位 (3)四、导电安装 (3)五、隔离开关分合闸角度检测磨合试验及回路电阻测试工位 (3)2-3生产进度显示及装配数据记录 (3)一、生产进度显示 (3)二、装配数据记录 (3)故障诊断 (3)设备使用时注意事项 (3)售后服务 (3)设备简介概述设备简介本使用说明书适应于高压隔离开关GW4-40.5、GW4-72.5、GW4-126此三种高压隔离开关整体装配、检测装配线设备操作、保养维护指导,总体上达到装配、检测一体化、检测数据信息化管理。
生产线总体工作流程图如下:一、总装线功能简介:装配小车底架安装 瓷瓶安装 导电安装产品检测 产品下线 2000mm 2750mm 2000mm 2750mm 2750mm 2000mm 工位3 总装线导电分装工位 工位4 工位6 工位5 工位2 工位1①GW4-40.5、GW4-72.5、GW4-126高压隔离开关整体装配、检测流水线以轨道为支撑,装配小车作为装配载体,人工推动小车进行工序间流转;②总装线由装配、检测线和装配小车回程线两部分组成,装配、检测线上设置以下六个工位:上线工位、底架装配工位、瓷瓶检测工位、导电安装工位、隔离开关分合闸角度检测磨合试验及回路电阻测试工位,六处分步装配在同一个装配周期内完成;③1处:工装推动到回程线,装配小车从回程线滑动至装配始端,减速电机拖动工装至总装线;④2处:在装配小车上完成底架装配,使用专用工装保证轴承座杠杆端面水平,中心距一致;⑤3处:在装配小车上完成瓷瓶安装,垂直度测量;⑥4处:在装配小车上完成导电安装;⑦5处:在装配小车上完成出厂分合闸角度和回路电阻检测及产品磨合试验;⑧6处:产品下线,吊装产品下线,装配小车从回程线返回至装配线始端;⑨传输周期:6处分步装配全部完成,分步完成按钮全部按下,所有装配小车方可推动至下一工位,在传输过程中完成数据采集(详见数据采集),开始下一节拍装配。
二、总装线满足的技术要求:①装配小车回程线应具有为一定斜度可以使装配小车平稳滑行至装配线始端;②总装线上具有检测数据与装配进度条码自动采集功能;③装配线总长约14250mm,宽度约1400mm,高度符合人体工程学立姿状态设计;④总装线与装配小车回程线用螺栓进行钢性连接放置于地面;⑤总装线各工位具有急停、报警、故障停止等功能;⑥上位机上设置生产进度显示装置;三、分装线满足的技术要求:①分装线包含导电分装工位和导电合闸工位;②导电分装工位上设置夹紧力测试仪、回路电阻测试仪,触指侧导电装配完后可进行夹紧力测试以及单个触指回路电阻的测量;③导电合闸工位将触头侧导电和触指侧导电通过手动方式进行合闸,该工位能实现导电快速装卸、定位,保证合闸一致性;④分装线导电合闸工装按照三种产品导电尺寸设计,可实现工装快速调整,高度按人体工程学立姿状态设计;⑤分装线静止放置于地面;⑥夹紧力测试数据、装配进度可自动采集;四、装配线数据采集功能满足的技术要求:①在各工位相应位置设置流水线数据采集装置;②数据采集、装配进度使用条码标识,装配过程进行自动扫码;③中控机、计调组、进度显示装置之间信号传输为有线线传输;④中控机有防砸外罩,带锁及加密功能;安装及使用2-1设备安装一、连接设备1.接通系统AC 220V电源;2.打开工控机,双击“监控软件.exe”打开监控软件,如图所示;图监控软件图监控软件界面3.打开显示器(电视机),并连接至工控机(与工控机显示同步),如图所示;图显示器监控软件界面4.接通气源,流水线各工位工作气压必须≥0.8MPa,如图所示;图气压压力表5.接通升降平台AC 380V电源。
6.将回路电阻测试仪检测连线正确安装在回路电阻测试仪上(注意:根据颜色配对),如图所示;图回路电阻测试仪检测连线示意图二、准备工序1.创建工程在图3界面内,点击“工程信息编辑”,进入工程信息编辑界面,如图4所示;图工程信息编辑界面分别将工程名称、产品型号、工程数量、接地方式、瓷瓶污秽等级、主刀机构、地刀机构信息填写完整,并将底架安装、瓷瓶安装、导电安装、试验检测、触指侧导电安装、触头侧导电安装人员选定后,然后点击确定按钮,工程信息编辑完成。
注:a)以上信息均可自由输入,不受下拉菜单内容限制;b)备选装配人员姓名可自由编辑,具体方法如下:打开:我的电脑/新加卷F//name文件夹//name.txt,如图所示。
图按照模板格式编辑完人员姓名后,保存该文档,例如:在原有人员名单内添加“张三”、“李四”后,保存该文档,则在工程信息配置界面中,安装人员选定内便会出现“张三”、“李四”人员,如图所示。
图原有人员名单图添加人员后名单图保存文档界面图备选装配人员名单界面2.条码生成在图3界面内,点击“工程信息编辑”,然后选定“条码生成”,进入条码生成编辑界面,如图5所示;图5 条码生成编辑界面将产品出厂铭牌上的出厂编号填写在“产品编号”栏,将A、B、C 选中,点击“确定”按钮,完成条码生成工序。
注:a)产品编号为10位数字,例如:1010160079;b)字母“A”、“B”、“C”分别表示一组产品中的A、B、C项。
3.条码打印在桌面点击“条码打印.exe”,进入条码打印界面,如图6、图7所示;图6图7 条码打印界面点击“通讯工具”按钮,进入数据传送界面,如图8所示。
图8 数据传送界面点击“传送档案”按钮,进入选择档案界面,如图9所示。
图9 选择档案界面选择“CodePrint.txt”文档打开,此时,条码打印机会自动打印产品条码,完成条码打印工序,如图所示。
图10 选择档案界面注:a)更换产品时,“CodePrint.txt”文档内容会自动覆盖以前信息,所以每次选择文档时,只有一个“CodePrint.txt”文档供选择;b)因为产品底架、触头、触指上必须贴有条码,而且编号统一,所以每项产品条码需重复打印3组。
即,底架1组、触头1组、触指1组,重复3次选择“CodePrint.txt”文档打开步骤,可完成产品所有条码的打印。
2-2各工位装配工艺一、上线工位如图10 底架安装示意图所示。
装配底座弯板(序号1零件),将底架弯板装入工装定位销内,注意孔位方向;装配底架槽钢(序号2零件),将底架槽钢装于底架弯板上,注意:安装接地标牌侧靠近立柱;装配弯板(序号5、序号8零件),分别将限位弯板及平弯板安装于底架槽钢上;装配轴承座(序号4、序号9零件),将轴承座正确装入底架槽钢梅花孔内,注意轴承座位置;贴产品条码,将产品条码张贴在底架槽钢固定位置;12543671098图10 底架安装示意图 二、底架安装工位将该工位置于自动模式,点击“自动”按钮,进入自动模式,如图所示。
图11图12在当前界面先点击系统归零按钮,待系统归零后(系统归零按钮后绿灯变红),点击“扫描”按钮,待按钮后红灯变绿后,再点击自动按钮,待按钮后红灯变绿后,将装配小车推至安装检测位置,若扫码器未能正常工作,需人为辅助操作,待识别特定产品后,按下“电机到位”按钮,待定位销进入轴承座对应孔内后,继续按下“下”键,使电磁铁吸紧轴承座,并保证产品中心距,紧固底架槽钢和弯板连接螺栓,最后紧固轴承座固定螺栓,按下电器柜面板上的“完成”按钮(如图所示)后,电磁铁安装板和装配小车限位电磁铁均归至零位,随即将装配小车推至绝缘子安装工位,继续绝缘子安装工序。
图12三、绝缘子检测工位接通绝缘子吊装工装气源,拨动开合开关至“开”,将工装放入绝缘子后,拨动开合开关至“合”,逐一吊装绝缘子至底座两侧,安装绝缘子至底座,吊装过程注意匀速,避免磕碰划伤。
将该工位置于自动模式,如图4、图5所示。
图13在图5界面先点击系统归零按钮,待系统归零后(系统归零按钮后绿灯变红),点击“扫描”按钮,待按钮后红灯变绿后,再点击自动按钮,待按钮后红灯变绿后,将装配小车从底架安装工位推至绝缘子安装检测位置,过程中,扫码器会自动扫描条形码识别对应产品,若扫码器未能正常工作,需人为辅助操作,待识别特定产品后,按下“电机到位”按钮,再按下“下一页”按钮进入垂直度显示界面,如图所示。
左上角参数从上往下分别为:基准MEMS(倾角传感器)的“X”、“Y”方向倾斜角度显示;左边MEMS(倾角传感器)的“X”、“Y”方向倾斜角度显示;右边MEMS(倾角传感器)的“X”、“Y”方向倾斜角度显示,如图所示。
下部四块显示区域分别表示:第一块区域:左边MEMS的“X”方向与基准MEMS的“X”方向倾斜角度之差;第二块区域:左边MEMS的“Y”方向与基准MEMS的“Y”方向倾斜角度之差;第三块区域:右边MEMS的“X”方向与基准MEMS的“X”方向倾斜角度之差;第四块区域:右边MEMS的“Y”方向与基准MEMS的“Y”方向倾斜角度之差;根据角度差值判别绝缘子的倾斜方向,从而添加垫片来调整绝缘子的垂直度,待垂直度调整至误差范围内后,拧紧绝缘子的紧固螺栓;装配轴装配管安装完成后,按下电器柜上绿色的“完成”按钮,绝缘子装配完成。
此时,各MEMS、装配小车限位电磁铁归至零位,随即将装配小车推至导电安装工位,继续导电安装工序。
四、导电安装(一)、导电辅线装配1.在车间原有的导电工装上分别装配触头及触指;2.分装完成后,分别给触头、触指贴对应产品条码;3. 在开机状态触摸屏显示界面先选择“自动”模式,在自动模式下点击系统归零按钮,待系统归零后(系统归零按钮后绿灯变红),点击“扫描”按钮,待按钮后红灯变绿后,再点击自动按钮,待按钮后红灯变绿后,将回路电阻测试仪的测量夹子,分别夹持在触头的接线板和触头上,用扫码器扫描触头上的产品条码,待触摸屏上产品条码更新至待测触头产品条码时,点击触摸屏上的“触头回阻测量”按钮,待触头回阻采集至触摸屏内,按下“下一页”,直至进入触指夹紧力测量界面,用扫码器扫描触指上的产品条码,待触摸屏上产品条码更新至待测触指产品条码时,点击触摸屏上的“触指夹紧力测量”按钮,待触指夹紧力采集至触摸屏内,按下“上一页”,直至进入“触指电阻测量”界面,将回路电阻测试仪的测量夹子,分别夹持在触指的接线板和触头上,点击“触指电阻测量”按钮,待触指回阻采集至触摸屏内,按下“下一页”,直至进入导电配对界面,点击“配对”按钮,分别用扫码器扫描触头、触指上的产品条码,当触头及触指上的产品条码被识别且“配对”按钮后面指示灯全部变红时,导电配对完成。
(二)、导电主线安装接通导电夹具电源及气源,并拨动开合开关至“开”,将锥销放入导电排工艺孔内,将工装放入配对好的导电后,拨动开合开关至“合”,安装导电。