Pretilt Angle Control with High Process Margin
- 格式:pdf
- 大小:380.46 KB
- 文档页数:3
Input 输入Indicator 显示器,指示灯INS insert 插入(信号),插入接口INSEL input select 输入选择INST instant 直接的,实时INST institution 建立,设置INST instrument 仪器,乐器Instrument 乐器Insulator 绝缘体INT intake 进入,入口INT intensity 强度,烈度INT interior 内部INT interrupter 断路器Integrated 组合的Integrated amplifier 前置-功率放大器,综合功率放大器Intelligate 智能化噪声门Intelligibility 可懂度Interactie 相互作用,人机对话,软拐点Interval 音高差别Integrated 集成的,完全的Intercom 对讲,通话Interconnect 互相联系Inter cut 插播Interface 接口,对话装置Interference 干扰,干涉,串扰Interim 临时的,过渡特征Intermodulation 互调,内调制Intermodulation distortion 交越失真Internal 内存,对讲机Internally 在内部,内存Inter parameter 内部参数Interval 音高差别Interplay 相互作用,内部播放Interval shifter 音歇移相器Intimacy 亲切感Intonation 声调INTRO introduction 介绍,浏览,引入,(乐曲的)前奏INTRO sacn 曲头检索(节目搜索)INTRO sensor 曲头读出器(节目查询)Introskip 内移,内跳ISS insertion test signal 插入切换信号ISS interference suppression switch 干扰抑制开关ITS insertion test signal 插入测试信号IV interval 间隔搜索IV inverter 倒相器IWC interrupted wave 断续波IX index 标盘,指针,索引K-L K key 按键Karaoke 卡拉OK,无人伴奏乐队KB key board 键盘,按钮Kerr 克耳效应,(可读写光盘)磁光效应Key 键,按键,声调Keyboard 键盘,按钮Key control 键控,变调控制Keyed 键控Key EQ 音调均衡kHz Kiloherts 千赫兹Kikll 清除,消去,抑制,衰减,断开Killer 抑制器,断路器Kit 设定Knee 压限器拐点Knob 按钮,旋钮,调节器KP key pulse 键控脉冲KTV karaoke TV 拌唱电视(节目)KX key 键控Lesion 故障,损害Leslie 列斯利(一种调相效果处理方式)LEV level 电平LEVCON level control 电平控制Level 电平,水平,级LF low frequency 低频,低音LFB local feedback 本机反馈,局部反馈LFE lowfrequency response 低频响应LFO low frequency oscillation 低频振荡信号LGD long delay 长延时LH low high 低噪声高输出LH low noise high output 低噪声高输出磁带L.hall large hall 大厅效果Lift 提升(一种提升地电位的装置)Lift up 升起Labial 唇音L left 左(立体声系统的左声道)L line 线路L link 链路L long 长(时间)LA laser 激光(镭射)Lag 延迟,滞后Lamp 灯,照明灯Land 光盘螺旋道的肩,接地,真地Lap dissolve 慢转换Lapping SW 通断开关Large 大,大型Large hall 大厅混响Larigot 六倍音Laser 激光(镭射)Latency 空转,待机Launching 激励,发射Layer 层叠控制,多音色同步控制LCD liquid crystal display 液晶显示LCR left center right 左中右LD laser vision disc 激光视盘,影碟机LD load 负载LDP input 影碟输入LDTV low definition television 低分辨率数字电视LCD projictor 液晶投影机Lead 通道,前置,输入Lead-in 引入线Leak 漏泄Learn 学习LED light emitting deivce 发光辐射器,发光器件LED litht emitting diode 发光二极管(显示)Legato 连奏Length 字长,范围Lento 慢板Light switch 照明开关M-N M main 主信道M master 主控M memory 存储器M mix 混频M moderate 适中的M music 音乐Mac manchester auto code 曼切斯特自动码MADI musical audio digital interface 音频数字接口Main 主要的,主线,主通道,电源MAG magnet 磁铁Magnetic tape 磁带Magnetic type recorder 磁带录音机Main 电源,主要的Major chord 大三和弦Make 接通,闭合Makeup 接通,选配Male 插头,插件MAN manual 手动的,手控Manifold technology (音箱)多歧管技术Manipulate 操作,键控MANP 手动穿插Manual 手动的,人工的,手册,说明书March 进行曲Margin (电平)余量Mark 标志,符号,标记Mash 压低,碾碎Masking 掩蔽Master 总音量控制,调音台,主盘,标准的,主的,总路MAR Matrix 矩阵,调音台矩阵(M),编组Match 匹配,适配,配对Matrix quad system 矩阵四声道立体声系统MAX maximum 最大,最大值MB megabytes 兆字节Mb/s megabytes per second 兆字节/秒MC manual control 手控,手动控制MCH multiple chorus 多路合唱MCR multiple cjhannel amplification reverberation 多路混响增强MD mini disc 光磁盘唱机,小型录放唱盘MD moving coil 动圈式MDL modulation delay 调制延时MEAS measure 测量,范围,测试Measure 乐曲的,小节Meas edit 小结编辑MECH mechanism 机械装置MED medium 适中,中间(挡位)Medley 混合Mega bass 超重低音MEM memory 存储器,存储,记忆Member 部件,成员Menu 菜单,目录,表格MEQ mono equalizer 单声道均衡器Merge 合并,汇总,融合Meridian 顶点的,峰值Measure 小结Megaphone 喇叭筒Mel 美(音调单位)Menu 菜单,节目表Message 通信,联系Metal 金属(效果声)Metal tape 金属磁带Meter 电平表,表头,仪表Metronome 节拍器MF matched filter 匹配滤波器MF maveform 波形MF middle frequency 中频,中音MFL multiple flange 多层法兰(镶边)效果MFT multiplprogramming with a fixed number of tasks 任务数量固定的多通道程序设计MIC micro 微米MIC microphone 话筒,麦克风,传声器Michcho level 话筒混响电平Micro monitor amp 微音监听放大器MICROVERB microcomputer reverb 微处理机混响MID middle 中间的,中部的,中音,中频MIDI music instrument digital interface 电子乐器数字接口MIN minimum 最小,最小值MIN minute 分钟MIND master integrated network device 一体化网络总装置Minitrim 微调Minitrue 微机调整Minor chord 小三和弦Mismatch 失配Mistermination 终端失配MIX 混合,音量比例调节Mixer 调音台,混音器MM moving magnet 动磁式MNTR monitor 监控器MNOS metallic nitrogen - oxide semiconductor 金属氮氧化物半导体MO magneto optical 可抹可录型光盘MOC magnet oscillator circuit 主振荡电路MOD mode 状态,方式,模式MOD model 型号,样式,模型,典型的MOD modulation 调制Mode 状态,(乐曲的)调式Mode select 方式选择Mush 噪声干扰,分谐波Mush area 不良接收区Music 音乐,乐曲Music center 音乐中心,组合音响Music conductor 音乐控制器MUT mute 静音,哑音,噪声控制Muting 抑制,消除Multiple 复合的,多项的,多重的MV mean value 平均值MV multivibrator 多谐振荡器MW medium wave 中波MXE mono exciter 单声道激励器MXR mixer 混频器Name 名称,命名Natural 自然的,天然的,固有的Naught 零,无价值NC network controller 网络控制器NC numberical control 数字控制NC needle chatter 唱针噪声Nazard 三倍音Near field 近场NEG negative 负,阴(极)NEMO 实况转播NEP noise equivalent power 噪声等效功率News 人声广播音响效果,新闻Next 下一个,唱片跳回下曲键NF NFB negative feedback 负反馈NG no go 不通,不工作NG noise generator 噪声发生器Ni-Cd nickel-cadmium 镍镉充电电池NICAM near instantaneous companded audio multiplex 准瞬时压扩声音多路复用,电视丽音,数字多路伴音系统NIL 零点Noise 噪音Noise gate 噪声门,选通器Noise suppressor 噪声抑制器NOM nominal 标称的,额定的Non-direction 全向的,无指向性的Nonieme 九倍音NOP no operation 无操作指令NOR(NORM) normal 普通的,标准的,正常的,常规的NORM 平均值Normal frequency 简正(共振)频率Notch 触点Note 符号,注释,音调,音律,记录Notice 注意事项,简介NO number 数字,号码NR noise ratio 噪声比NR noise reduction 降噪,噪声消除NR number 数字,编号NAB national association of broadcasters 国家广播工作者协会NTSC national television system committee (美国)国家电视系统委员会,正交平衡调幅制彩色电视制式Null 空位,无效的NV noise variance 噪声方差NVT network virtual terminal 网络虚拟终段MODEM modulator demodulator 调制解调器Moderato 中速Modifier 调节器Modify 修改,调试,摩机,限定Modulator 调制器Module 模块,组件,因数,程序片MOL maximum output level 最大输出电平MON monitor 监听,监视器MONI 监听,调音师Monkey chatter 串音,邻频干扰,交*失真Mono 单声道,单一Monopit 单声变调Motor cue 换机信号,切换信号MOS metal-oxide semiconductor 金属氧化物半导体Motor 马达,电机Movie theater 影剧院Moviola 声画剪辑机Moving-iron loudspeaker 舌簧扬声器MPEG motion picture coding experts group 活动图像编码专家组,数字声像信息压缩标准MPF master pre feed 主控前馈送MPH multiple phaser 多级移相器MPO maximum power output 最大输出功率MPO music power output 音乐输出功率MPR master pre return 主控前返回MPS main power switch 主电源开关MPS manual phase shifter 手控相移器MPS microphone power supply 话筒电源MPS microprocessor system 多用途取样系统MPX multiplex 多路传输,多次重复使用,多路转换,复合MPX multiplexer 多路转换器,多路调制器MPX VCO 多路解调压控振荡MQSS music quick select system 快速音乐选择系统MR memory read 存储器读出MS manual search 手动检索MS middle side 一种迭合录音技术MS(MSEC) millisecond 毫秒MSSS multi space ound system 多维空间声系统MST(MSTR) master 主控MSW microswitch 微动开关MT multi track 多轨MTD multiple delay 多次延时MTR magnetic tape redorder 磁带记录器MTR micro-wave transmission 微波传输MTR motor 电动机MTS multi-channel television sound 多声道电视伴音MTV music TV 音乐电视(节目)MUF maximum usable frequency 最高可用频率MULT multiplier 倍增器,光电倍增管Multi 并联的,多路系统Multidimention control 声场展宽控制,多维控制Multiband 多频段Multi-echo 多重回声Multi plex 多路传声Multitap 转接,(多插头)插座Multiple channel 多通道Multiple effects 综合效果处理装置Multiple jack 多眼插座Multisound 原始音色MUPO maximum undistorted power output 最大不失真输出功率MUSE multiple sub-Nyquist sompling encoding 多重奈奎斯特取样编码MIDI 格式文件MIDI 信息,全过程N normal 正常,普通,标准N negative 阴极,负极O-P ohm 欧姆(电阻的单位)Oboe 双簧管O/C open circuit 开路OCK operation control key 操作控制键OCL output capacitorless 无输出电容功率放大器OCL output control line 输出控制线OCT octave 倍频程,八度音OD operations directive 操作指示OD optical density 光密度OD over drive 过激励OFC office 职能OFC oxygen-free cupreous 无氧铜导线Off 关闭,断开Offering 填入,提供Offset (移相)补偿,修饰,偏置OFHC oxygen free high conductivity copper 高导电率无氧铜导线Ohm 欧姆OK 确认OL on line 在线,连机OL over load 过载Omnidirectional 无方向性的On 开,接通Once 一次,单次One-way relay play 单向替换放音Online 联机,联线Only 仅仅,只On-mike 正在送话,*近话筒One touch 单触连接OP output 信号输出OP over pressure 过压Open 打开,开启Opera 歌剧Operate 操作,运转Operation 操作,运转Operator 操纵器,合成器算子Optical 数码光缆接口Optical master 激光器Option 选型,选择Optimum 最佳状态OPTOISO optoisolator 光隔离器Or 或,或者ORC optimum recording current 磁头最佳记录电流Orchestra 管弦乐器Organ 风琴,元件Original 原(程序),初始(化)OSC oscillator 振荡器,试机信号(一千赫兹)OSC oscillograph 示波器OSS optimal stereo signal 最佳立体声信号OTL 无输出变压器功率放大器OTR one-touch time recording 单触式定时录像OTR operation temperature range 工作温度范围OTR overload time relay 过载限时继电器OUT output 输出Outage 中断Out-burst 脉冲,闪光,闪亮Outcome 结果,输出,开始Out let 输出端子,引出线Outline 轮廓线Out phase 反向OVDB 重叠录音Overall 轮廓,总体上Overcut 过调制Over drive 过激励Overdubs 叠录Overflow 信号过强Overhang (激励器)低音延伸调节Overhearing 串音OVLD over lode 过载,超负荷Over sampling 过取样Overtone 泛音OVWR overwrite 覆盖式录音Proximity effect 近距离效果Prwsnt 突出感PS position 位置,状态PSC program switching center 节目切换中心PSL phase sequence logic 相位顺序逻辑PSM peak selector memory 峰值选择存储器PSM phase shifter module 移相模件PSM pitch shift modulation 交频调制PST posterrior 后面PST preset 预置PSU power supply 供电Psychological acoustics 心理声学PT power transformer 电源变压器PT portable 便携式PT pulse timer 脉冲计时器PTD pan turnout piece delay 声像分支延时PTE private 专用的PTN pattern 模式,样式PTN procedure turn 程序变化PU pickup 拾音PU power unit 电源设备Pull 拉,趋向Pull-in 接通,引入Pumping 抽气效应Pure tone 纯音Purging 净化Push 推,按钮,压Push-pull 推挽式的PWM pulse width modulation 脉冲宽度调制PWR power 电源,功率PZM pressure zone microphone 压力区话筒P.P.Panoramic potentiometer 全景电位器P-P peak-Peak 峰-峰值PPD pingpong delay 乒乓延时PPG programme pulse generator 脉冲程序发生器PPI peak program indicator 峰值显示器PPI programmable peripheral interface 程序外部接口PPL peak program level 峰值音量电平PPM peak program meter 峰值节目表,峰值音量表PPM pulse phase modulation 脉冲相位调制Pr power rate 功率比PR program register 程序寄存器PRC precision 精确,精细,精密度Pre 前置,预备,之前Pre-delay 预延迟Pre echoes 预回声Pre emphasis 预加重PREAMP preamplifier 前置放大器Preselection 预选Presence 临场效果,现场感Present 当前日期,现时,即时Preserve 保存,维持Preset 预置,预调Press 按,压PREV 唱片跳回上曲键Preview 预演Previous 向前,前位的Prime 同度音PRM parameter 参量PRO professional 专业的Probe 传感器Process 处理,加工PROCR processor 处理器PROG program 程序,基本音色Program cartridge 程序盒式存储器Program set indicator 电脑选曲节目选定指示Prosody 韵律Protect 保护,防护Protocol 通信协议POSTF 后置(万分)POT potentiometer 电位器,电位计Potable 便携的,小型的Power 电源,功率Power amplifier 功率放大器Power dump 切断电源Power out 功率输出Piower supply 电源供给PP peak power 峰值功率PP personal preference 个人预置P plug 插头P positive 正极P pulse 脉冲P power 功率PA preamplifier 前置放大器PA public address 扩声Pace 步速,级数Packed cell 积层电池Packing 图像压缩P-I-P picture in picture 画中画PAD 定值衰减,衰减器,(打击乐大按键的)鼓垫Padding 统调,使……平直Paddle 开关,门电路Page 一面,(存储器)页面地址,寻找Pair (立体声)配对,比较PAL phase alternation line 逐行倒相彩色电视制式PAM pulse amplitude modulation 脉幅调制PAM pole amplitude modulation 极点调幅Pan panorama 声像调节,定位,全景Panel 面板,操纵板,配电盘Panotrope 电唱机Paper cone 纸盆Parallel 并联,平衡PAR(PARAM) parameter 参数,参量,系数Parametric 参量的Part 声部数,部分Partial tone 分音,泛音PAS public address system 扩声系统PASC precision adaptive subband coding 精密自适应分段编码Pass 通过Passive 被动,被动分频,功率分频Paste 粘贴PAT pattern 模仿,型号,图谱特性曲线Patch 临时,插接线,用连接电缆插入Patch bay 配电盘Patch board 插线板Patching 临时接线,补偿Patching cord system 调度塞绳系统Path 信号通路Pattern 样式,方式,样板Pause 暂停,间歇,停顿PB playback 播放,重放PB push button 按钮开关PBASS proper bass active supply system 最佳低音重放系统PBC play back control 重放控制,回放控制PC perceptual coding 感觉编码PC program control 程序控制PCB printed circuit board 印刷线路板PCC phase correlation cardioid microphone 相位相关心形话筒PCM precision capacitor microphone 精密电容话筒PCM pulse code modulation 脉冲编码调制PCM card 波形扩充卡(增加新音色)PC-COC pure copper continuous casting 连续铸造纯铜导线PD power divider 功率分配器PD power doubler 功率倍增器PD program directive 程序指令PD pro-digital 专业数字接口PD protective device 保护装置PDM pulse density modulation 脉冲密度调制PDP plasma display panel 等离子显示板PDS partitioned data set 分区数据组PDS programmable data system 程序可控系统PDS power distribution system 配电系统PE phase encoding 相位编码PE program execution 程序执行Peak 峰值,削波(灯)Peak and dip 峰式频率欧洲标准21脚A V接口Pedal 踏板PEM pulse edge molulation 脉冲边缘调制Pentatonic 五声调式PEQ parameter equalizer 参量均衡器PERC percussion 打击乐器PERCUS 打击乐器Performance 施行,表演,表现,演出Permalloy head 坡莫合金磁头Permutator 转换开关,变换器Perspective 立体感Perform 执行,完成,施行Period 周期PFL per fader louderspeaker 衰减前监听,预监听PG pulse generator 脉冲发生器PGM program 节目,程序Pgmno/Step 节目号码/步骤Pgmtime 节目时间PH phase 相位PH phasemeter 相位仪PHA phase 相位Phantom 幻像电源,幻象供电Phase 相位,状态Phase REV 倒相(电路)Phaser 移相器Phasing 相位校正,移相效果Phon 方(响度单位)Phone 耳机,耳机插口Phoneme 音素Phono(phonograph) 唱机PHS phaser 移相器Physiological acoustics 生理声学PI phase inversion 倒相PIA peripheral interface adapter 外围接口适配器Pianotron 电子钢琴Piano 钢琴Piano whine 钢琴鸣声Piccolo 短笛Pick-up 拾音器,唱头,传感器Piezoelectric polymer earphone 压电聚合物耳机Pilot 指示器,调节器Pilot jack 监听插孔Pin 针型插口,不平衡音频插口PIN position indercator 位置指示器PIN positive-intrinsic-negative 正-本-负Pinboard 转接板,插接板Ping 爆鸣声,声响Pink noise 粉红噪声Pipe 管,笛Pitch 音高,音调Pitch shifter 变调器,移频器PK peak 削波(灯),峰值PL parental lock 防止误动锁定PL phase lock 相位锁定,锁相PL pilot lamp 指示灯PL pre listen 预监听,衰减前监听Place 置入,起作用Placement 连接方式Plate 金属板效果,板混响器Play 播放,重放,弹奏Playback 播放Player 唱机,放音器Plesoelectric supper tweeters 压电式超高音喇叭PLL phase locked loop 锁相回路PLR plate reverb 金属板混响Plug 插头Plunge 切入PMPO peak music power output 音乐峰值功率输出PN pseudo noise 伪随机噪声Pneumatic loudspeaker 气动扬声器PNM pulse number modulation 脉冲数调制,脉冲密度调制Point 接点,位置,交汇点Point soure 点声源Pointer 指示器,指针Polarity 极性Poly 复音,多路,多Pop 突然,爆破音,(话筒近讲时的)气息噗噗声Pop filter 噗声滤除器Pops 流行音乐,流行音乐音响效果Portamento 滑音Ported reflex 预放映Position 位置,状态POSITVE positive 阳极Q-R Q quality factor 品质因数,Q值,频带宽度QD quadrant 象限QD quick disconnect 迅速断开Quack 嘈杂声QUAD quadriphonic 四声道立体声Quadrature 正交,90度相位差,精调Quality 音质,声音QUANT quantitative 定量的QUANT quantize 量化,数字化Quantizing 量化Quartz synthesized FM/AM digital tuner 石英晶体频率合成式调频/调幅数字调谐器Quartz PLL frequency synthesizer 晶体销相环频率Quaver 八分音符Quench 断开,抑制Quint 五度,次三倍音Quiver 颤动声Ribbon microphone 铝带话筒,压力带话筒Richness 丰满度Rhythm 节奏Right 右声道,垂直的,适当的Ring 环,大三芯环端,冷端接点,振铃Ring mode 声反馈临界振铃振荡现象Rit 渐慢RF radio frequency 射频,高频RM regular matrix record 正规矩阵式四路唱片RM ring modulation 环形调制器RMD fing mode decoupling (音箱)振铃退耦技术RMR room reverb 房间混响RMS random music sensor 随机音乐探测器Rms root mean square 有效值RND random 随机的RNG ring 振铃Roadrack 专业器材架Rock 摇滚乐、摇滚乐音响效果Rod antenna 拉杆天线RODS reverberation on demand system 混响请求系统Rolloff 高低频规律性衰减,滚降ROM read only memory 只读存储器Room 房间Rose 接线盒Rotary 旋转RT60 Reverberation time 混响时间Rough 粗的,粗糙的,近似的Routing 混合母线选择RP record playback 录放RP repeater 增音转发器RPLC replace 替换RSS Roland sound spaceprocessing system 罗兰声空间处理系统RT rael time 实时分析RT recovery time 恢复时间RT return 返回RTA real time analyzer 实时分析(仪),频谱分析(仪)RTS real time simulator 实时模拟RTS real time system 实时系统RTY rotary 旋转(扬声器)Rubber corrugated ri loudspeaker 橡皮边扬声器Ruby stylus 红宝石唱针Rumba 伦巴Rumble (低频)隆隆声RV rendezvous 会聚点RVS reverse shift 反向移动RZ return to zero 归零Reversal 反相,相反,反转,改变极性Reverse 回复,翻转,反混响Revert 复原,返回Review 检查,复查,重复Revolve 旋转,循环REW rewind 快速倒带RF radio frequency 射频RF reception fair 接收情况良好RFI RF interface 射频接口RFI RF interferece 射频干扰Revcolor 混响染色声RPS direct program 直接节目搜寻,卡拉OK搜索R(RD)radio 射频R(RD)read 读取R receiver 接收机R register 寄存器R right 右声道Rack 机架,支架,机柜,规定宽度,震动声Radiation 辐射Radio 无线电,惦音机,射频Ram random access memory 随机存储器RAM 填入,装入RAN random 随机的,任意的,无规则的Range 范围,最大提衰量,幅度Rate 比率,速率,变化率,频率Ratio 压缩比,扩展比,比,系数RCA radio corporation of America 美国无线电公司RCA jack 莲花接口R-CH 右声道R-DAT rotary head-DAT 旋转磁头式数字录音机RE rack earth 外壳接地RE reset 复位RE right end 右端Reactance 电抗Readjustment 重调Ready 预备,准备完毕Rear 背面,后部,后置REC recording 录音,记录,录制Recall 招回,调出,重录Receiver 接受机,接受器Recharge 再充电Record 记录,录制,唱片Recorder 录音机Recovery 恢复,复原Red 红色Redo 再执行操作Reduce 减少,降低,缩小Reduction 压缩,衰减,形成Reecho 回声REF Reference 说明书,参考,基准,定位REF Reflection 反射Refraction 折射Refresh 恢复REG register 寄存器REG regulate 控制,校准,调节REGEN regeneration 再生(混响声阵形成方式),正反馈Rehearsal 排练,预演Reject 除去,滤去Rejection 抑制Reinforcement 扩声Relay 继电器,重放,转放Release 恢复时间,释放,断路器Rename 改名,命名Remain 保持,剩余REM remote 遥控的,遥远的,远距离的REM removable 可拆装的REM remove 除去Remain 余量,状态保持Renumber 重写号码REP repeat 重复,反复,重放Repeat mode 双面反复放音(录音机)Replacing 替换,置换,复位REQ room equalizer 房间均衡器Reset 复位,恢复,归零,重复,重新安装Resolution 分辨率,分析Resonance 共振,回声RESP response 响应,特性曲线,回答Resistance 阻抗Resister 电阻Resonance 共鸣,谐振Rest 休止符,静止,停止Restraint 抑制,限制器RET return 返回,回送REV reverse 颠倒,反转REV reverberation 混响,残响Reverb depth control 混响深度控制RIAA recording industry association of America 美国录音工业协会S-T SAF Safety 安全装置,保险装置,保护装置Safeguard by 防护器SALT symmetry air load technique 对称空气负载技术Samba 桑巴Sample 声音信号样品,采样,取样,抽样Sampling 抽样,脉冲调制SAP second audio program 第二套音频节目SAT saturate 饱和效果处理Save 贮存Save 存储,保存Saxophoneb 萨克司管Saxophome 顶馈直线天线SC set clock 置位时钟SC sigmal control 信号控制SC subcarrier 副载波SC system controller 系统控制器SC scan 扫描Scale 音阶,刻度尺标Scale unit 标度单位,分频器Scan 搜索,记录,扫描Scar 激光唱片上的缺陷SCART connector 欧洲标准21脚A V接口Scattering 散射Scene 实况,场面SCH search 搜索,寻找Scheme 设计图,原理图SCMS serial copy management system 成套复制管理系统Screw 螺丝钉Scrollback 回找SCH stereochrous 立体声合唱Schmidt trigger 施密特触发器Scintillation 闪烁,调制引起的载频变化SCMS successive copy manage system 连续复制管理系统(DAT设备中防止多次转录节目的系统)Scoop 戽斗,收集器Scope 范围,显示器Scoring 音乐录音SCR signal to clutter ratio 信噪比SCR silicon controlled rectifier 晶闸管整流器Scraper 刮声器Screen 屏蔽SD space division 空间分布S-DAT stationary head DAT 固定磁头DA T机SDDS sony dynamic digital sound 索尼动态数字环绕声系统SDI standard data interface 标准数据接口SDLC synchronous data link control 同步数据链控制器SE single end 单端的SE sound effect 音响效果SE storage element 存储元件SE support equipment 支援设备SEA soond effect amplifier 音响效果放大器SEA special effects amplifier 特殊效果放大器Search 搜索,扫描Searcher 扫描器SEC Second 秒,第二SECAM sequential color and memory 调频行轮换彩色制式Section 单元,环节Sectoral horm 扇形号筒Security 保险,加锁SED system effectiveness demonstration 系统效果演示Seek 搜索SEL selector 选择装置,寻线器,转换开关Select 选择Selectivity (收音机)选择性Semi- 半- Semibreve 全音符Semioctave 半个八度音Semit 半音SEN sensor 传感器Send 送出,发送,发射SENS Sensitivity 灵敏度Sense 分辨率Sensor 传感器Sentinel 发射器,传送器SEP standard electronic package 标准电子组件SEP system engineering process 系统工程处理Separator 分离器,分解器Septieme 七倍音SEQ sequencer 音序器,定序器SEQ Stereo equalizer 立体声均衡器Sequence 排序,序列Series 系列,串连Service 维修,服务Servo 伺服机构,随机系统Servo motor 伺服马达SES spatial effect system 立体声空间效果系统Session 跟随自动伴奏Set 调整,设定,装置,定位,接收机Setout 开始,准备Setup 设定,构成,菜单,组合,调整SFC sound field composer 声场合成装置SFL stereo flange 立体声法兰镶边SFS sound field synthesis 声场合成SG signal generator 信号发生器SGL signal 信号S-hall small hall 小型厅堂效果Shake 震动Shape 波形,轮廊Shaper 整形器,脉冲成形Share drum 小军鼓Sharpness 清晰度,鲜明度,锐度Shelving 滤除,滤波处理SHG sub harmonic generator 次(分)谐波发生器Shield 保护,屏蔽Shift 转换,变调,移频,漂移Shock 冲击Short 短的Short gate 短时选通门(混响效果)Shower 指示器,显示器SHUF Shuffle 随机顺序节目播放Shunt 分路,并联SHUTT shuttle 变速搜索,往复SI sneak in 淡入Sibilance 齿音,咝音Sibilant 咝音Sibilation 咝音,高频声畸变SICS sound image control system 声像控制系统Side 边,面,侧面,方面Side chain 旁链SIG signal 声音信号Signature 特征,音乐的调号SIF 伴音中频Silencer 静噪器Silent 静噪调谐Simple tone 纯音Simplex 单工Simulate 模拟的Simultaneous 同步,联立SINAD signal to noise and distortion ratio 信号对噪声和失真比Sine wave 正弦波Single 单,单次的,单独的,单碟SIP solo in place 独奏入位SIP standard information package 标准信息包Siren 旋笛Size 尺寸Skew control 扭曲校正,菱形失真器Skip 跳跃,省略SL signal level 信号电平Slap 拍打效果Slap back 山谷回声Slap reverb 山谷混响效果Slate 预定,标记,(录音调音台)标记开关Slave 从属的,从机,从动的Sleep 睡眠定时开关,静止Sleeve(SLE) 接地点,袖端,套Slew rate 瞬态率Sliding tone 滑音Slope 斜率,坡度,跨导Slow 慢速SLP super long play 超长(三倍)时间播放Sliding tone 滑音SLS studio listen 演播室监听SM sequential machine 时序机SM signal meter 信号强度计SM storage mark 存储标志S/M speech/music 语言/音乐S/N signal-to-noise radio 信噪比Small club 小俱乐部效果Smear 曳尾,拖尾,浑浊不清Smear correction 拖尾校正SMF Standard MIDI File 标准SMP sampler 取样器SMPTE society of motion picture television engineers (美国)电影及电视工程师学会S/N signal/noise 信号/噪声,信噪比SND sound 声音,音响,伴音Snake 集体线Snapshot 片段,场景状态设置Snubber 缓冲器,减震器SO sneak out 淡出Socket 插座,插口Soft 软的,柔和的Soft click 柔性箝位Soft knee 软拐点(压限器)Soft-touch 轻触式Software 计算机软件Solo 独唱,独奏Sone 宋(响度单位)Song 乐曲Sound colum 声柱Sound field 声场Sound image 声像Sound intensity 声强Sound shadow region 声影区Sound cousole desk 调音台Source 声源SOS sound on sound 叠加录音SP speaker 扬声器SP speed 速度SP standard-play 标准走带速度录放SPA stereo pan allochthonous 立体声声像漂移Space 间隙,空间效果Spaciousness 空间感ST stereo 立体声,立体STI speech transmission index 语言传输系统Sticks 操作杆,安置,卡子Still 静止STM send test massage 发送测试信号STO stand point 位置STO stereo 立体声STO stop 停止STO store 存储,存储器STP shielded twisted pnir 屏蔽双绞线Strike note 击弦音,撞击声String instrument 弦乐器Strip 卸下附属设备,轨道,类别Strobe 选通脉冲,频闪放电管Strong 有力的Structure 装置,结构STU Studio 演播室效果SUB 副,辅助,附加,低音Subgroup 副,(调音台的通道集中控制网络)编组Suboctave 次八度Subsonic 次声,超低音Subwoofer 超低音Sum 和,总和,总数SUP Supply 电源Supper 超Super bass 超低音Super over drive 超激励Suppressor 抑制器Support programs 支援程序SUR Surround 环绕声,环绕,包围Sustain 保持,维持SVP surge voltage protector 浪肖电压保护器SW signal wire 信号线SW S-Wite 塞套引线SW switch 开关,切换SW short wave 短波S/W specification of wiring 布线规格Swap 交换,调动(等量齐观),调换Sweep 扫描,曲线Swell 增音器Swing 摆幅,摇摆舞Swishing 飕飕声SX simplex 单工SXE stereo exciter 立体声激励器Symphobass 调谐低音系统Symphonic 交响,谐音SYS Ex system expanding 系统扩展TRIG trigger 触发,触发器,触发脉冲Trim 调整,微调,调谐,削波TRK track 音轨TRK trunk 总线,母线,干线Trouble 故障Trumpet 小号TRS time reference system 时间基准系统TST test 测试TTY teleltypewriter 遥控打印机,电传机Tube 电子管,真空管Tune 调谐,和谐,调音Tuner 调谐器Tunetable (唱盘的)转盘Tunnel reverb 隧道混响效果Tupe 处理模式Turbo distortion 涡轮失真效果Turntable 电唱盘,转台TV television 电视Tweeter 高音扬声器· Twin channel 双通道Two complement 补码Two way mode 双面轮流放音模式(录音机)TX transmit 发送,发射TX transmitter 发射机TYP trpe 类型Typical 标准的,典型的TRIG trigger 触发触发器,触发脉冲Trim 调整,微调,调谐,削波TRK track 音轨TRK trunk 总线,母线,干线Trouble 故障Trumpet 小号TRS time reference system 时间基准系统TST test 测试TTY teletypewriter 遥控打印机,电传机Tube 电子管,真空管Tune 调谐,和谐,调音Tuner 调谐器Tunetable (唱盘的)转盘Tunnel reverb 隧道混响效果Tupe 处理模式Turbo distortion 涡轮失真效果Turntable 电唱盘,转台TV television 电视Tweeter 高音扬声器Twin channel 双通道Two complement 补码Two way mode 双面轮流放音模式(录音机)TX transmit 发送,发射TX transmitter 发射机TYP type 类型Typical 标准的,典型的T talk 呼叫,联络Tab 防误抹挡片TACH tachometer 测速器TADI time assigument digital tnterpolation 时分数据插空(技术)Tag 电缆插头Take 实录Takeoff 取出Takeover 恢复,话音叠入,商议Talkback 对讲,联络Tally 播出,提示,插入Tap 电流输出,节拍Tape 带,磁带Tango 探戈TB talkback 对讲回送TB terminal board 接线端子子板TB time base 时基TBC time base corrector 时基校正器TBK tallback 对讲TC telecine 电影电视机TC time code 时间码TC transmitter-tunning circuit 发射机调谐电路TC trim coil 微调线圈TCC tripl concentric cable 三芯同轴电缆TDE time domain equalizer 时域等化器TECH technique 技术,技能,技巧TED television disk 电视唱片TEL telescopic 拉杆天线TEMP temperature 温度Temp 节奏TEMOP temporary 中间(工作)单元TEMPO Tempo 节奏,连接,速度Terminal 终端,接线柱,引线,接头Tentelometer 张力表TER termination 终端Test 测试,试验,检验THD total harmonic distortion 总谐波失真Theater 剧场效果,现场Thermal noise 热噪声Thick 沈重,厚重度Thin 单薄声音Thinness 薄(打击乐)THR THRESH threshold 阈值,阈,门限Thresh thrash 多次反复Three dimension 3D音响,三维立体声音响系统Throat 高音号角的喉THRU through 通过,过桥,直接转送Trump 键击噪声,低频噪声,开机砰声Thrust 插入,强行加入THX tom holman"s eXpriment 汤·霍尔曼实验,家庭影院TI temperatun indicator 温度指示器TIE terminal interface exchange 终端接口交换Tie 连接符号,馈线,通信Tierce 第三音,五倍音Tight 硬,紧,硬朗TIM transient intermodulation 瞬态互调失真Timber 音质,音色Timbre 声部Time 时间,倍,次,定时的Timer 定时器,计时器Tininess 单薄Tint 色调TIP terminal interface processor 终端接口处理机Tip 头端,热端Title 标题,字幕TK track 音轨TL track loss 轨迹丢失TLE trunk line equipment 干线设备TM trade mark 注册商标TMS transmission mesurement set 电平表TMT transmit 发送TN tuning unit 调谐装置TOC 节目目录Tone 音调,声调,纯音Tone burst 猝发音Tone color 音色Tone quality 音色,音品Tonic 律音Top 最高TOS tape operating system 磁带操作系统Total 总,总共Total tune 整体协调,总调谐Touch 触,压,按Touch sens 键盘乐器指触的触感TPD turnout piece delay 分支延时TR tape recorder 磁带录音机TR telerecording 电视屏幕录像TR tracking 跟踪TR transfer 传输,转移TR trick 特技效果Track 曲目号,磁迹,音轨Tracking 寻迹,跟踪,统调Tracking monitor 调校监听Trad 陷。

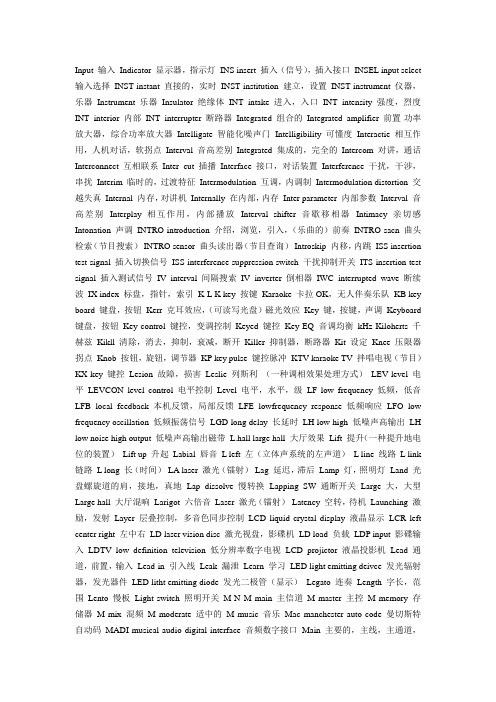
Camera and Electronic Products for Integrators© 2005 Vaddio 341-252 Rev. AVaddio™ IR Remote CommanderEnhanced IR Remote ControllerThe Vaddio IR Remote Commander was designed to work with the Vaddio camera packages based on the Vaddio HD-18, Sony® EVI-D70, EVI-D100 and BRC-300 Pan/Tilt/Zoom Cameras. The IR Remote is compatible with the following list of Vaddio camera systems:• Vaddio ClearVIEW HD-18 Systems (Camera, WallVIEW and CCU Versions) • WallVIEW™ 70 PTZ, WallVIEW 100 PTZ, WallVIEW 300 PTZ • CeilingVIEW™ 70 PTZ and CeilingVIEW 70 PTZ HideAway• Vaddio EZCamera™ series Model 100 PTZ and Model 70 PTZ systems • Vaddio 100 PTZ and 70 PTZ Integrator’s camera kitsThe Vaddio IR Remote Commander is also a 100% compatible replacement IR remote for the Sony PTZ CamerasThe information contained in this manual will help you install and operate you IR Remote Commander. If these instructions are lost or misplaced, Vaddio keeps copies of Specifications,SAVE THESE INSTRUCTIONSFigure 1:Vaddio IR Remote Commander Enhanced, ergonomically designed and user-friendly handheld remote control (Actual size)Power On/off (Green button) Back Light Compensation On/offData Screen for BRC Type Camera OSDCamera SelectThree IR Frequencies Standard PanDirection Reverse Pan DirectionPan/Tilt controls (burgundy buttons)Pan/Tilt ResetAuto FocusOn/off Zoom SpeedSLOW(Lt. Gray button) Zoom Speed FAST(Lt. Gray button) Manual Focus Control (Near- & Far+) Preset Set Press and hold,touch Preset 1thru 6 to set presetPreset Erase6-Presets Stored in the Camera forRecall Camera Home Positionⓒ2005 Vaddio - All Rights Reserved. Reproduction in whole or in part without written permission is prohibited. Specifications and pricing subject to change. CeilingVIEW, WallVIEW, EZCamera are registered trademarks of Vaddio, Inc. All other trademarks are property of their respective owners. Form Number 341-252 Rev. A.Installation and User Guides and most pertinent product drawings for the Vaddio product line on the Vaddio website. All manuals for the cameras mentioned in this manual can be found and can be downloaded from free of charge.Do not attempt to take the products in this system apart. There are no user-serviceable parts inside. • Do not spill liquids on the products and keep these devices away from food and liquid •For smears or smudges, wipe with a clean, soft cloth. Do not use any abrasive chemicals.Do not store or operate the IR Remote under the following conditions for any circumstance: • Temperatures above 40°C (104°F) or temperatures below 0°C (32°F) • High humidity, dusty, condensing or wet environments • In inclement weather or under severe vibrationHardware* Warranty - One year limited warranty on all parts. Vaddio warrants this product against defects in materials and workmanship for a period of one year from the day of purchase if Vaddio receives notice of such defects during the warranty. They will, at its option, repair or replace products that prove to be defective. See Warranty and RMA Policy documentation.Exclusions - The above warranty shall not apply to defects resulting from: improper or inadequate maintenance by the customer, customers applied software or interfacing, unauthorized modifications or misuse, operation outside the normal environmental specifications for the product, use of the incorrect power supply, or improper site operation and maintenance.Vaddio Customer service – Vaddio will test, repair, or replace the product or products without charge if the unit is under warranty. If the product is out of warranty, Vaddio will test then repair the product or products. The cost of parts and labor charge will be estimated by a technician and confirmed by the customer prior to repair. All components must be returned for testing as a complete unit. Vaddio will not accept responsibility for shipment after it has left the premises.Vaddio Technical support - Vaddio technicians will determine and discuss with the customer the criteria for repair costs and/or replacement. Vaddio Technical Support can be contacted through one of the following resources: e-mail support at ****************** or online at .Return Material Authorization (RMA) number - Before returning a product for repair or replacement request an RMA from Vaddio’s technical support. Provide a technician with a return phone number, e-mail address, shipping address, and product serial numbers. Describe the reason for repairs or returns as well as the date of purchase. Include your assigned RMA number in all correspondence with Vaddio. Write your assigned RMA number on the outside of the box when returning the product.Voided warranty – The warranty does not apply if the original serial number has been removed or if the product has been disassembled or damaged through misuse, accident, modifications, or unauthorized repair.Shipping and handling - Vaddio will not pay for inbound shipping transportation or insurance charges or accept any responsibility for laws and ordinances from inbound transit. Vaddio will pay for outbound shipping, transportation, and insurance charges all items under warranty but will not assume responsibility for loss and/or damage by the outbound freight carrier.• If the return shipment appears damaged, retain the original boxes and packing material forinspection by the carrier.o Contact your carrier immediately.Products not under warranty - Payment arrangements are required before outbound shipment for all out of warranty products.*Vaddio manufactures its hardware products from parts and components that are new or equivalent to new in accordance with industry standard practices.WARRANTYINFORMATIONOPERATING AND STORAGE CONDITIONSCARE AND CLEANING。

Preliminary Product InformationThis document contains information for a new product.Cirrus Logic reserves the right to modify this product without notice.30W Digital Audio Amplifier with Integrated ADCDigital Amplifier FeaturesFully Integrated Power MOSFETs No Heatsink Required–Programmable Power Foldback on Thermal Warning –High Efficiency>100dB Dynamic Range <0.1% THD+N @ 1WConfigurable Outputs (10% THD+N)– 1 x 30W into 4Ω, Parallel Full-Bridge – 2 x 15W into 8Ω, Full-Bridge–2 x 7W into 4Ω, Half-Bridge + 1 x 15W into 8Ω, Full-BridgeBuilt-In Protection with Error Reporting–Overcurrent /Undervoltage /Thermal Overload Shutdown–Thermal Warning ReportingPWM Popguard ® for Half-Bridge Mode Click-free Start-upProgrammable Channel Delay for SystemNoise & Radiated Emissions ManagementADC FeaturesStereo, 24-bit, 48kHz Conversion Multi-bit Architecture95dB Dynamic Range (A-wtd) -86dB THD+NSupports 2Vrms Input with PassiveComponentsSystem FeaturesAsynchronous 2-channel Digital Serial Port 32kHz to 96kHz Input Sample Rates Operation with On-chip Oscillator Driver orApplied SYS_CLK at 18.432, 24.576 or 27.000MHzIntegrated Sample Rate Converter (SRC)–Eliminates Clock-jitter Effects–Input Sample Rate Independent Operation –Simplifies System IntegrationSpread Spectrum PWM Modulation–Reduces EMI Radiated EnergyLow Quiescent Current(Features continued on page 2)CS4525Software Mode System FeaturesDigital Audio Processing– 5 Programmable Parametric EQ Filters–Selectable High-pass Filter–Bass/Treble Tone Control–Adaptive Loudness Compensation–2-channel Mixer– 2.1 Bass Management–24dB/octave Linkwitz-Riley Crossover Filters–De-emphasis FilterSelectable Serial Audio Interface Formats –Left-justified up to 24-bit–I²S up to 24-bit–Right-justified 16-, 18-, 20-, 24-bitsDigital Serial Connection to Additional CS4525 or DACs for SubwooferDigital Interface to External Lip-sync DelayPWM Switch Rate Shifting Eliminates AM Frequency InterferenceDigital Volume Control with Soft Ramp –+24 to -103dB in 0.5dB stepsProgrammable Peak Detect and Limiter2-Channel Logic-level PWM Output–Programmable Channel Mapping–Can Drive an External PWM Amplifier, Headphone Amplifier, or Line-out Amplifier –Integrated Headphone DetectionFlexible Power Output ConfigurationsThermal Foldback for Interruption-free Power-stage Protection–Supports Internal and External Power StagesOperation from On-chip Oscillator Driver or Applied Systems ClockSupports I²C® Host Control Interface Hardware Mode System Features2-Channel Stereo Full Bridge Power Outputs Analog and Digital InputsI²S and Left-justified Serial Input FormatsThermal Foldback for Interruption-free Protection of Internal Power StageOperation from Applied Systems ClockExternal Mute Input Common ApplicationsIntegrated Digital TV’sFlat Panel TV MonitorsComputer/TV MonitorsMini/Micro Shelf SystemsDigital Powered SpeakersPortable Docking StationsComputer Desktop AudioGeneral DescriptionThe CS4525 is a stereo analog or digital input PWM high efficiency Class D amplifier audio system with an integrated stereo analog-to-digital (A/D) converter. The stereo power amplifiers can deliver up to 15W per channel into 8 Ω speakers from a small space-saving 48-pin QFN package. The PWM amplifier can achieve greater than 85% efficiency. The package is thermally enhanced for optimal heat dissipation which eliminates the need for a heatsink.The power stage outputs can be configured as two full-bridge channels for 2x15W operation, two half-bridge channels and one full-bridge channel for 2x7W+1x15W operation, or one parallel full-bridge channel for 1x30W operation. The CS4525 integrates on-chip over-current, under-voltage, and over-tempera-ture protection and error reporting as well as a thermal warning indicator and programmable foldback of the output power to allow cooling.The main digital serial port on the CS4525 can support asynchronous operation with the integrated on-chip sample rate converter (SRC) which eases system inte-gration. The SRC allows for a fixed PWM switching frequency regardless of incoming sample rate as well as optimal clocking for the A/D modulators.An on-chip oscillator driver eliminates the need for an external crystal oscillator circuit, reducing overall design cost and conserving circuit board space. The CS4525 automatically uses the on-chip oscillator driver in the absence of an applied master clock.The CS4525 is available in a 48-pin QFN package in Commercial grade (0° to +70° C). The CRD4525-Q1 4-layer, 1oz. copper and CRD4525-D1 2-layer, 1oz. cop-per customer reference designs are also available. Please refer to “Ordering Information” on page97 for complete ordering information.TABLE OF CONTENTS1. PIN DESCRIPTIONS - SOFTWARE MODE (8)2. PIN DESCRIPTIONS - HARDWARE MODE (10)2.1 Digital I/O Pin Characteristics (12)3. TYPICAL CONNECTION DIAGRAMS (13)4. TYPICAL SYSTEM CONFIGURATION DIAGRAMS (15)5. CHARACTERISTICS AND SPECIFICATIONS (18)6. APPLICATIONS (26)6.1 Software Mode (26)6.1.1 System Clocking (26)6.1.1.1 SYS_CLK Input Clock Mode (26)6.1.1.2 Crystal Oscillator Mode (27)6.1.2 Power-Up and Power-Down (28)6.1.2.1 Power-Up Sequence (28)6.1.2.2 Power-Down Sequence (28)6.1.3 Input Source Selection (29)6.1.4 Digital Sound Processing (29)6.1.4.1 Pre-Scaler (30)6.1.4.2 Digital Signal Processing High-Pass Filter (30)6.1.4.3 Channel Mixer (30)6.1.4.4 De-Emphasis (31)6.1.4.5 Tone Control (31)6.1.4.6 Parametric EQ (33)6.1.4.7 Adaptive Loudness Compensation (34)6.1.4.8 Bass Management (35)6.1.4.9 Volume and Muting Control (36)6.1.4.10 Peak Signal Limiter (37)6.1.4.11 Thermal Limiter (39)6.1.4.12 Thermal Foldback (40)6.1.4.13 2-Way Crossover & Sensitivity Control (42)6.1.5 Auxiliary Serial Output (43)6.1.6 Serial Audio Delay & Warning Input Port (44)6.1.6.1 Serial Audio Delay Interface (44)6.1.6.2 External Warning Input Port (44)6.1.7 Powered PWM Outputs (45)6.1.7.1 Output Channel Configurations (45)6.1.7.2 PWM Popguard Transient Control (45)6.1.8 Logic-Level PWM Outputs (46)6.1.8.1 Recommended PWM_SIG Power-Up Sequence for an External PWM Amplifier (47)6.1.8.2 Recommended PWM_SIG Power-Down Sequence for an External PWM Amplifier 476.1.8.3 Recommended PWM_SIG Power-Up Sequence for Headphone & Line-Out (48)6.1.8.4 Recommended PWM_SIG Power-Down Sequence for Headphone & Line-Out (48)6.1.8.5 PWM_SIG Logic-Level Output Configurations (49)6.1.9 PWM Modulator Configuration (50)6.1.9.1 PWM Channel Delay (50)6.1.9.2 PWM AM Frequency Shift (51)6.1.10 Headphone Detection & Hardware Mute Input (51)6.1.11 Interrupt Reporting (53)6.1.12 Automatic Power Stage Shut-Down (53)6.2 Hardware Mode (54)6.2.1 System Clocking (54)6.2.2 Power-Up and Power-Down (54)6.2.2.1 Power-Up Sequence (54)6.2.2.2 Power-Down Sequence (55)6.2.3 Input Source Selection (55)6.2.4 PWM Channel Delay (55)6.2.5 Digital Signal Flow (56)6.2.5.1 High-Pass Filter (56)6.2.5.2 Mute Control (56)6.2.5.3 Warning and Error Reporting (56)6.2.6 Thermal Foldback (57)6.2.7 Automatic Power Stage Shut-Down (58)6.3 PWM Modulators and Sample Rate Converters (58)6.4 Output Filters (59)6.4.1 Half-Bridge Output Filter (59)6.4.2 Full-Bridge Output Filter (Stereo or Parallel) (60)6.5 Analog Inputs (61)6.6 Serial Audio Interfaces (62)6.6.1 I²S Data Format (62)6.6.2 Left-Justified Data Format (62)6.6.3 Right-Justified Data Format (63)6.7 Integrated VD Regulator (63)6.8 I²C Control Port Description and Timing (64)7. PCB LAYOUT CONSIDERATIONS (65)7.1 Power Supply, Grounding (65)7.2 Output Filter Layout (65)7.3 QFN Thermal Pad (65)8. REGISTER QUICK REFERENCE (66)9. REGISTER DESCRIPTIONS (69)9.1 Clock Configuration (Address 01h) (69)9.1.1 SYS_CLK Output Enable (EnSysClk) (69)9.1.2 SYS_CLK Output Divider (DivSysClk) (69)9.1.3 Clock Frequency (ClkFreq[1:0]) (69)9.1.4 HP_Detect/Mute Pin Active Logic Level (HP/MutePol) (70)9.1.5 HP_Detect/Mute Pin Mode (HP/Mute) (70)9.1.6 Modulator Phase Shifting (PhaseShift) (70)9.1.7 AM Frequency Shifting (FreqShift) (70)9.2 Input Configuration (Address 02h) (71)9.2.1 Input Source Selection (ADC/SP) (71)9.2.2 ADC High-Pass Filter Enable (EnAnHPF) (71)9.2.3 Serial Port Sample Rate (SPRate[1:0]) - Read Only (71)9.2.4 Input Serial Port Digital Interface Format (DIF [2:0]) (71)9.3 AUX Port Configuration (Address 03h) (72)9.3.1 Enable Aux Serial Port (EnAuxPort) (72)9.3.2 Delay & Warning Port Configuration (DlyPortCfg[1:0]) (72)9.3.3 Aux/Delay Serial Port Digital Interface Format (AuxI²S/LJ) (72)9.3.4 Aux Serial Port Right Channel Data Select (RChDSel[1:0]) (72)9.3.5 Aux Serial Port Left Channel Data Select (LChDSel[1:0]) (73)9.4 Output Configuration (Address 04h) (73)9.4.1 Output Configuration (OutputCfg[1:0]) (73)9.4.2 PWM Signals Output Data Select (PWMDSel[1:0]) (73)9.4.3 Channel Delay Settings (OutputDly[3:0]) (73)9.5 Foldback and Ramp Configuration (Address 05h) (74)9.5.1 Select VP Level (SelectVP) (74)9.5.2 Enable Thermal Foldback (EnTherm) (74)9.5.3 Lock Foldback Adjust (LockAdj) (74)9.5.4 Foldback Attack Delay (AttackDly[1:0]) (75)9.5.5 Enable Foldback Floor (EnFloor) (75)9.5.6 Ramp Speed (RmpSpd[1:0]) (75)9.6 Mixer / Pre-Scale Configuration (Address 06h) (75)9.6.1 Pre-Scale Attenuation (PreScale[2:0]) (75)9.6.2 Right Channel Mixer (RChMix[1:0]) (76)9.6.3 Left Channel Mixer (LChMix[1:0]) (76)9.7 Tone Configuration (Address 07h) (76)9.7.1 De-Emphasis Control (DeEmph) (76)9.7.2 Adaptive Loudness Compensation Control (Loudness) (76)9.7.3 Digital Signal Processing High-Pass Filter (EnDigHPF) (77)9.7.4 Treble Corner Frequency (TrebFc[1:0]) (77)9.7.5 Bass Corner Frequency (BassFc[1:0]) (77)9.7.6 Tone Control Enable (EnToneCtrl) (77)9.8 Tone Control (Address 08h) (78)9.8.1 Treble Gain Level (Treb[3:0]) (78)9.8.2 Bass Gain Level (Bass[3:0]) (78)9.9 2.1 Bass Manager/Parametric EQ Control (Address 09h) (78)9.9.1 Freeze Controls (Freeze) (78)9.9.2 Hi-Z PWM_SIG Outputs (HiZPSig) (79)9.9.3 Bass Cross-Over Frequency (BassMgr[2:0]) (79)9.9.4 Enable Channel B Parametric EQ (EnChBPEq) (79)9.9.5 Enable Channel A Parametric EQ (EnChAPEq) (79)9.10 Volume and 2-Way Cross-Over Configuration (Address 55h) (80)9.10.1 Soft Ramp and Zero Cross Control (SZCMode[1:0]) (80)9.10.2 Enable 50% Duty Cycle for Mute Condition (Mute50/50) (80)9.10.3 Auto-Mute (AutoMute) (80)9.10.4 Enable 2-Way Crossover (En2Way) (81)9.10.5 2-Way Cross-Over Frequency (2WayFreq[2:0]) (81)9.11 Channel A & B: 2-Way Sensitivity Control (Address 56h) (81)9.11.1 Channel A and Channel B Low-Pass Sensitivity Adjust (LowPass[3:0]) (81)9.11.2 Channel A and Channel B High-Pass Sensitivity Adjust (HighPass[3:0]) (82)9.12 Master Volume Control (Address 57h) (82)9.12.1 Master Volume Control (MVol[7:0]) (82)9.13 Channel A and B Volume Control (Address 58h & 59h) (83)9.13.1 Channel X Volume Control (ChXVol[7:0]) (83)9.14 Sub Channel Volume Control (Address 5Ah) (83)9.14.1 Sub Channel Volume Control (SubVol[7:0]) (83)9.15 Mute/Invert Control (Address 5Bh) (84)9.15.1 ADC Invert Signal Polarity (InvADC) (84)9.15.2 Invert Channel PWM Signal Polarity (InvChX) (84)9.15.3 Invert Sub PWM Signal Polarity (InvSub) (84)9.15.4 ADC Channel Mute (MuteADC) (84)9.15.5 Independent Channel A & B Mute (MuteChX) (84)9.15.6 Sub Channel Mute (MuteSub) (85)9.16 Limiter Configuration 1 (Address 5Ch) (85)9.16.1 Maximum Threshold (Max[2:0]) (85)9.16.2 Minimum Threshold (Min[2:0]) (85)9.16.3 Peak Signal Limit All Channels (LimitAll) (86)9.16.4 Peak Detect and Limiter Enable (EnLimiter) (86)9.17 Limiter Configuration 2 (Address 5Dh) (87)9.17.1 Limiter Release Rate (RRate[5:0]) (87)9.18 Limiter Configuration 3 (Address 5Eh) (87)9.18.1 Enable Thermal Limiter (EnThLim) (87)9.18.2 Limiter Attack Rate (ARate[5:0]) (87)9.19.1 Automatic Power Stage Retry (AutoRetry) (88)9.19.2 Enable Over-Current Protection (EnOCProt) (88)9.19.3 Select VD Level (SelectVD) (88)9.19.4 Power Down ADC (PDnADC) (88)9.19.5 Power Down PWM Power Output X (PDnOutX) (89)9.19.6 Power Down (PDnAll) (89)9.20 Interrupt (Address 60h) (89)9.20.1 SRC Lock State Transition Interrupt (SRCLock) (90)9.20.2 ADC Overflow Interrupt (ADCOvfl) (90)9.20.3 Channel Overflow Interrupt (ChOvfl) (90)9.20.4 Amplifier Error Interrupt Bit (AmpErr) (91)9.20.5 Mask for SRC State (SRCLockM) (91)9.20.6 Mask for ADC Overflow (ADCOvflM) (91)9.20.7 Mask for Channel X and Sub Overflow (ChOvflM) (91)9.20.8 Mask for Amplifier Error (AmpErrM) (92)9.21 Interrupt Status (Address 61h) - Read Only (92)9.21.1 SRC State Transition (SRCLockSt) (92)9.21.2 ADC Overflow (ADCOvflSt) (92)9.21.3 Sub Overflow (SubOvflSt) (92)9.21.4 Channel X Overflow (ChXOvflSt) (93)9.21.5 Ramp-Up Cycle Complete (RampDone) (93)9.22 Amplifier Error Status (Address 62h) - Read Only (93)9.22.1 Over-Current Detected On Channel X (OverCurrX) (93)9.22.2 External Amplifier State (ExtAmpSt) (93)9.22.3 Under Voltage / Thermal Error State (UVTE[1:0]) (94)9.23 Device I.D. and Revision (Address 63h) - Read Only (94)9.23.1 Device Identification (DeviceID[4:0]) (94)9.23.2 Device Revision (RevID[2:0]) (94)10. PARAMETER DEFINITIONS (95)11. REFERENCES (95)12. PACKAGE DIMENSIONS (96)13. THERMAL CHARACTERISTICS (97)13.1 Thermal Flag (97)14. ORDERING INFORMATION (97)15. REVISION HISTORY (98)LIST OF FIGURESFigure 1.Typical Connection Diagram - Software Mode (13)Figure 2.Typical Connection Diagram - Hardware Mode (14)Figure 3.Typical System Configuration 1 (15)Figure 4.Typical System Configuration 2 (15)Figure 5.Typical System Configuration 3 (16)Figure 6.Typical System Configuration 4 (17)Figure 7.Serial Audio Input Port Timing (21)Figure 8.AUX Serial Port Interface Master Mode Timing (22)Figure 9.SYS_CLK Timing from Reset (23)Figure 10.PWM_SIGX Timing (23)Figure 11.Control Port Timing - I²C (24)Figure 12.Typical SYS_CLK Input Clocking Configuration (26)Figure 13.Typical Crystal Oscillator Clocking Configuration (27)Figure 14.Digital Signal Flow (29)Figure 15.De-Emphasis Filter (31)Figure 17.Peak Signal Detection & Limiting (37)Figure 18.Foldback Process (40)Figure 19.Popguard Connection Diagram (46)Figure 20.2-Channel Full-Bridge PWM Output Delay (50)Figure 21.3-Channel PWM Output Delay (50)Figure 22.Typical SYS_CLK Input Clocking Configuration (54)Figure 23.Hardware Mode PWM Output Delay (55)Figure 24.Hardware Mode Digital Signal Flow (56)Figure 25.Foldback Process (57)Figure 26.Output Filter - Half-Bridge (59)Figure 27.Output Filter - Full-Bridge (60)Figure 28.Recommended Unity Gain Input Filter (61)Figure 29.Recommended 2V RMS Input Filter (61)Figure 30.I²S Serial Audio Formats (62)Figure 31.Left-Justified Serial Audio Formats (62)Figure 32.Right-Justified Serial Audio Formats (63)Figure 33.Control Port Timing, I²C Write (64)Figure 34.Control Port Timing, I²C Read (64)LIST OF TABLESTable 1. I/O Power Rails (12)Table 2. Bass Shelving Filter Corner Frequencies (31)Table 3. Treble Shelving Filter Corner Frequencies (32)Table 4. Bass Management Cross-Over Frequencies (35)Table 5. 2-Way Cross-Over Frequencies (42)Table 6. Auxiliary Serial Port Data Output (43)Table 7. Nominal Switching Frequencies of the Auxiliary Serial Output (43)Table 8. PWM Power Output Configurations (45)Table 9. Typical Ramp Times for Various VP Voltages (46)Table 10. PWM Logic-Level Output Configurations (49)Table 11. PWM Output Switching Rates and Quantization Levels (51)Table 12. Output of PWM_SIG Outputs (52)Table 13. SYS_CLK Frequency Selection (54)Table 14. Input Source Selection (55)Table 15. Serial Audio Interface Format Selection (55)Table 16. Thermal Foldback Enable Selection (57)Table 17. PWM Output Switching Rates and Quantization Levels (58)Table 18. Low-Pass Filter Components - Half-Bridge (59)Table 19. DC-Blocking Capacitors Values - Half-Bridge (59)Table 20. Low-Pass Filter Components - Full-Bridge (60)Table 21. Power Supply Configuration and Settings (63)1.PIN DESCRIPTIONS - SOFTWARE MODEPin Name Pin #Pin DescriptionINT 1Interrupt (Output) - Indicates an interrupt condition has occurred.SCL2Serial Control Port Clock (Input) - Serial clock for the I²C control port.SDA3Serial Control Data (Input/Output) -Bi-directional data I/O for the I²C control port.LRCK4Left Right Clock (Input) - Determines which channel, Left or Right, is currently active on the serial audio data line.SCLK5Serial Clock (Input) - Serial bit clock for the serial audio interface.SDIN6Serial Audio Data Input (Input) - Input for two’s complement serial audio data.HP_DETECT/ MUTE 7Headphone Detect / Mute (Input) - Headphone detection or mute input signal as configured via the I²C control port.RST 8Reset (Input) - The device enters a low power mode and all internal registers are reset to their default settings when this pin is driven low.VPOUT1PGNDPGNDOUT2VPVPOUT3PGNDPGNDOUT4VPVA_REGAGNFILT+VAFILTLAFILTAINAINOCREPGNPGNDRAMP_CATITOYS_CLKUX_LRCK/ADUX_SCLKUX_SDOUTLY_SDIN/EX_TWRLY_SDOUTWM_SIG1WM_SIG2GNDGNDLVD9VD Voltage Level Indicator (Input) - Identifies the voltage level attached to VD. When applying 5.0V to VD, LVD must be connected to VD. When applying 2.5V or 3.3V to VD, LVD must be DGND.DGND10Digital Ground (Input) - Ground for the internal logic and digital I/O.VD_REG11Core Logic Power (Output) - Internally generated low voltage power supply for digital logic. VD12Power (Input) - Positive power supply for the internal regulators and digital I/O.VA_REG13Analog Power (Output)- Internally generated positive power for the analog section and I/O. AGND14Analog Ground (Input) - Ground reference for the internal analog section and I/O.FILT+15Positive Voltage Reference (Output) - Positive reference voltage for the internal ADC sampling circuits.VQ16Common Mode Voltage (Output)-Filter connection for internal common mode voltage.AFILTL AFILTR 1718Antialias Filter Connection (Output) - Antialias filter connection for ADC inputs.AINL AINR 1920Analog Input (Input)-The full-scale input level is specified in the ADC Analog Characteristics specification table.OCREF21Over Current Reference Setting (Input) - Sets the reference for over current detection.PGND 22,2327,2833,3437,38Power Ground (Input) - Ground for the individual output power half-bridge devices.RAMP_CAP24Output Ramp Capacitor (Input) - Used by the PWM Popguard Transient Control to suppress the initial pop in half-bridge-configured outputs.VP 25,30,31,36High Voltage Power (Input) - High voltage power supply for the individual half-bridge devices.OUT4 OUT3 OUT2 OUT126293235PWM Output (Output) - Amplified PWM power outputs.PWM_SIG2 PWM_SIG13940Logic Level PWM Output (Output) - Logic Level PWM switching signals.DLY_SDOUT41Delay Serial Audio Data Out (Output) - Output for two’s complement serial audio data.DLY_SDIN/ EX_TWR 42Delay Serial Audio Data Input (Input) - Input for two’s complement serial audio data.External Thermal Warning (Input) - Input for an external thermal warning signal. Configurable via the I²C control port.AUX_SDOUT43Auxiliary Port Serial Audio Data Out (Output) - Output for two’s complement auxiliary port serial data.AUX_SCLK44Auxiliary Port Serial Clock (Output) - Serial clock for the auxiliary port serial interface.AUX_LRCK/ AD045Auxiliary Port Left Right Clock (Output) - Determines which channel, Left or Right, is currently active on the serial audio data line.AD0 (Input) - Sets the LSB of the I²C device address. Sensed on the release of RST.SYS_CLK46System Clock (Input/Output) -Clock source for the internal logic, processing, and modulators. This pin should be connected to through a 10kΩ to ground when unused.XTO47Crystal Oscillator Output(Output) - Crystal oscillator driver output. XTI48Crystal Oscillator Input (Input) - Crystal oscillator driver input.Thermal Pad-Thermal Pad - Thermal relief pad for optimized heat dissipation. See “QFN Thermal Pad” on page65 for more information.2.PIN DESCRIPTIONS - HARDWARE MODEPin NamePin #Pin DescriptionCLK_FREQ0CLK_FREQ112Clock Frequency (Input) - Determines the frequency of the clock expected to be driven into the SYS_CLK pin. CLK_FREQ1 must be connected to DGND.ADC/SP 3ADC/Serial Port (Input) - Selects between the Analog to Digital Converter and the Serial Port for audio input. Selects the ADC when high or the serial port when low.LRCK 4Left Right Clock (Input ) - Determines which channel, Left or Right, is currently active on the serial audio data line.SCLK 5Serial Clock (Input ) - Serial bit clock for the serial audio interface.SDIN 6Serial Audio Data Input (Input ) - Input for two’s complement serial audio data.MUTE 7Mute (Input ) - The PWM outputs will output silence as a 50% duty cycle signal when this pin is driven low.RST8Reset (Input ) - The device enters a low power mode and all internal registers are reset to their default settings when this pin is driven low.VP OUT1PGND PGND OUT2VP VP OUT3PGND PGND OUT4VPV A _R E GA G N F I L T +V A F I L T LA F I L T A I N A I N O C R E P G N P G N DR A M P _C ALVD9VD Voltage Level Indicator (Input) - Identifies the voltage level attached to VD. When applying 5.0V to VD, LVD must be connected to VD. When applying 2.5V or 3.3V to VD, LVD must be con-nected to DGND.DGND10Digital Ground (Input) - Ground for the internal logic and I/O.VD_REG11Core Logic Power (Output) - Internally generated low voltage power supply for digital logic. VD12Digital Power (Input) - Positive power supply for the internal regulators and digital I/O.VA_REG13Analog Power (Output)- Internally generated positive power for the analog section and I/O. AGND14Analog Ground (Input) - Ground reference for the internal analog section and I/O.FILT+15Positive Voltage Reference (Output) - Positive reference voltage for the internal ADC sampling circuits.VQ16Common Mode Voltage (Output)-Filter connection for internal common mode voltage.AFILTL AFILTR 1718Antialias Filter Connection (Output) - Antialias filter connection for ADC inputs.AINL AINR 1920Analog Input (Input)-The full-scale input level is specified in the ADC Analog Characteristics specification table.OCREF21Over Current Reference Setting (Input) - Sets the reference for over current detection.PGND 22,2327,2833,3437,38Power Ground (Input) - Ground for the individual output power half-bridge devices.RAMP_CAP24Output Ramp Capacitor (Input) - This pin should be connected directly to VP in hardware mode.VP 25,30,31,36High Voltage Power (Input) - High voltage power supply for the individual half-bridge devices.OUT4 OUT3 OUT2 OUT126293235PWM Output (Output) - Amplified PWM power outputs.TSTO 3940Test Output(Output) - These pins are outputs used for the Logic Level PWM switching signals available only in software mode. They must be left unconnected for hardware mode operation.TWR 41Thermal Warning Output (Output) - Thermal warning output.ERRUVTE 42Thermal and Undervoltage Error Output (Output) - Error flag for thermal shutdown and under-voltage.ERROC 43Overcurrent Error Output(Output) - Overcurrent error flag.EN_TFB44Enable Thermal Feedback(Input) - Enables the thermal foldback feature when high.I2S/LJ45I²S/Left Justified(Input) - Selects between I²S and Left-Justified data format for the serial input port. Selects I²S when high and LJ when low.SYS_CLK46System Clock (Input/Output) -Clock source for the delta-sigma modulators.TSTO47Test Output(Output) - This pin is an output used for the crystal oscillator driver available only in software mode. It must be left unconnected for normal hardware mode operation.TSTI48Test Input (Input) - This pin is an input used for the crystal oscillator driver available only in soft-ware mode. It must be tied to digital ground for normal hardware mode operation.Thermal Pad-Thermal Pad - Thermal relief pad for optimized heat dissipation. See “QFN Thermal Pad” on page65 for more information.2.1Digital I/O Pin CharacteristicsThe logic level for each input is set by its corresponding power supply and should not exceed the maximum ratings.Power SupplyPinNumberPin Name I/O Driver ReceiverSoftware ModeVD1INT Output 2.5V-5.0V, Open Drain2SCL Input- 2.5V-5.0V, with Hysteresis3 SDA Input/Output 2.5V-5.0V, Open Drain 2.5V-5.0V, with Hysteresis7HP_DETECTMUTE InputInput--2.5V-5.0V2.5V-5.0V41DLY_SDOUT Output 2.5V-5.0V, CMOS-42DLY_SDINEX_TWR InputInput--2.5V-5.0V2.5V-5.0V43AUX_SDOUT Output 2.5V-5.0V, CMOS-44AUX_SCLK Output 2.5V-5.0V, CMOS-45AUX_LRCK Output 2.5V-5.0V, CMOS-VD_REG39PWM_SIG2Output 2.5V, CMOS-40PWM_SIG1Output 2.5V, CMOS-Hardware ModeVD1CLK_FREQ0Input- 2.5V-5.0V 2CLK_FREQ1Input- 2.5V-5.0V3ADC/SP Input- 2.5V-5.0V7MUTE Input- 2.5V-5.0V41TWR Output 2.5V-5.0V, Open Drain-42ERRUVTE Output 2.5V-5.0V, Open Drain-43ERROC Output 2.5V-5.0V, Open Drain-44EN_TFB Input- 2.5V-5.0V45I²S/LJ Input- 2.5V-5.0V All ModesVD4LRCK Input- 2.5V-5.0V 5SCLK Input- 2.5V-5.0V6SDIN Input- 2.5V-5.0V8RST Input- 2.5V-5.0V9LVD Input- 2.5V-5.0V46SYS_CLK Input/Output 2.5V-5.0V, CMOS 2.5V-5.0V VP26OUT4Output8.0V-18.0V Power MOSFET-29OUT3Output8.0V-18.0V Power MOSFET-32OUT2Output8.0V-18.0V Power MOSFET-35OUT1Output8.0V-18.0V Power MOSFET-Table 1. I/O Power Rails3.TYPICAL CONNECTION DIAGRAMSFigure 1. Typical Connection Diagram - Software ModeFigure 2. Typical Connection Diagram - Hardware Mode4.TYPICAL SYSTEM CONFIGURATION DIAGRAMSFigure 3. Typical System Configuration 1Figure 4. Typical System Configuration 2Figure 5. Typical System Configuration 3Figure 6. Typical System Configuration 45.CHARACTERISTICS AND SPECIFICATIONS RECOMMENDED OPERATING CONDITIONSAGND = DGND = PGND = 0 V; all voltages with respect to ground.Notes:1.For VD =2.5 V, VA_REG and VD_REG must be connected to VD. See section 6.7 on page 63 fordetails.ABSOLUTE MAXIMUM RATINGSAGND =DGND =PGND =0V; all voltages with respect to ground.WARNING:Operation at conditions beyond the Recommended Operating Conditions may affect device reliability,and functional operation beyond Recommended Operating Conditions is not implied.Notes:2.Any pin except supplies. Transient currents of up to ±100 mA on the analog input pins will not causeSCR latch-up.3.The maximum over/under voltage is limited by the input current.ParametersSymbol Min Nom Max UnitsDC Power SupplyDigital and Analog Core(Note 1)VD 2.375 2.5 2.625V VD 3.135 3.3 3.465V VD4.755.0 5.25V Amplifier OutputsVP 8.0-18.0V TemperatureAmbient Temperature T A 0-+70°C Junction TemperatureT J-+125°CParametersSymbol Min Max UnitsDC Power SupplyPower Stage Outputs Switching and Under LoadPower StageNo Output SwitchingDigital and Analog CoreVP VP VD -0.3-0.3-0.319.823.06.0V V V InputsInput Current (Note 2)I in -±10mA Analog Input Voltage (Note 3)V INA AGND - 0.7VA_REG + 0.7V Digital Input Voltage(Note 3)V IND-0.3VD + 0.4VTemperatureAmbient Operating Temperature - Power AppliedCommercialT A -20+85°C Storage TemperatureT stg-65+150°C。


Version:1.2I MPORTANT S AFETY I NFORMATIONThis section presents important information intended to ensure safe and effective use of this product.Read this section carefully and store it in an accessible location.S AFETY P RECAUTIONS●When the device cannot be exited or terminated,you can reset and restart it by powering off and on again.●When using the device,try to avoid hard objects from impact and knock,and do not scratch with sharpobjects to prevent damage to the device casing.●Wipe the display and panel lightly with a soft cloth and other materials.Avoid using water and detergent.●In the installation and use of this product,all national and regional electrical regulations must be strictlyobserved.●If the equipment does not work properly,please do not disassemble it for repair,otherwise it will affect theequipment warranty.●Avoid extreme high temperature(or low temperature),high humidity,vibration,radiation,chemicalcorrosion and other harsh or extreme environments during installation and use.CONTENTS1.OVERVIEW (4)1.1INTRODUCTION (4)1.2PACKING LIST (4)1.3APPEARANCE AND COMPONENTS (5)⏹APPEARENCE (5)⏹PARTS NAME (5)2.INSTALLATION AND USAGE (6)2.1POLE STAND INSTALLATION (6)⏹DIMENSION (6)⏹GATE POSITION OPEN HOLE (7)⏹INSTALLATION AND FIXING (8)2.2WALL-MOUNTED INSTALLATION (9)⏹DIMENSION (9)⏹INSTALLATION AND FIXING (9)2.3MOBILE INSTALLATION (11)⏹INSTALLATION AND FIXING (11)2.4DEVICE WEB TERMINAL OPERATION (11)⏹DEVICE NETWORKING (11)⏹LOGIN INTERFACE (11)⏹CHECKING DEVICE INFORMATION (12)⏹PERSONNEL MANAGERMENT (12)⏹DEVICE MANAGEMENT (14)⏹NETWORK SETTINGS (14)⏹SYSTEM SETTINGS (15)3.SPECIFICATION (15)3.1PRODUCT FEATURES (15)3.2THECHNICAL SPECIFICATIONS (16)⏹DETECTION PARAMETERS (16)⏹FACIAL RECOGNITION PARAMETERS (17)⏹CAMERA PARAMETERS (17)⏹INTEERFACE (17)⏹GENERAL PARAMETERS (18)3.3MODEL TYPE (18)1.OVERVIEW1.1I NTRODUCTIONThe FaceTick Pro facial recognition and body temperature abnormity detection device is capable ofdetecting temperature abnormity without actual physical contact at different applicable scenes,alerting people with abnormal body temperature ,recognize facial identity while wearing the mask,or without mask.In the meantime,it obtains and analyzes relevant data from open source and able to trace it back to its original,and well facilitates the management in making better decision based on scientific evidence,ensure safety and significantly improve operational efficiency.1.2P ACKING LISTPackaging components vary according to different application forms,which include gate companion ,wall-mounted,desktop,and mobile stand applications.Enclosed accessories are listed in the following table:The actual device is shown atbelow:1.3A PPEARANCE AND COMPONENTS⏹APPEARENCE⏹P ARTSNAME●Dimension :252(L)*136(W)*26(H)mm(8inches)●Weight :1.7KG2.INSTALLATION AND USAGE2.1P OLE STAND INSTALLATIONDIMENSIONG ATE POSITION OPEN HOLEThe stand pole mounted at back of the device has a diameter of36mm,which needs to be embedded in a40mm diameter hole on top of the gate station surface,centered in position within40cm either side of the edge.Whendevice being installed,it can be inclined to about5°.Refer to the following diagram for the hole positioning.I NSTALLATION AND FIXINGPlug the main unit into the opening of the steel plate and fix it with a gasket and a nut.The perspective view is shown below.The details are shown at below:2.2W ALL-MOUNTED INSTALLATION⏹D IMENSION⏹I NSTALLATION AND FIXING1Loosen the screws and remove the wall bracket from the device.2Ascertain the installation height of the face recognition monitor,it is recommended to be about1.5m high, and then have the bracket mounted on the wall.3Carefully align and push the main unit into the bracket mounted on the wall.4Align the bracket holes and gently slide it down to tight,After connecting the wires,fix the bottom cover with screws.Note:The selected installation height should be able to scan face within reach.The instruction is shown at below diagram:2.3M OBILE INSTALLATIONMobile installation is mainly used for quick and easy deployment and for simple and temporary applications. The universal1/4interface port is used to install the face recognition temperature-detection device on the tripod for the purpose of fast deployment.⏹I NSTALLATION AND FIXINGThe installation diagram is shown at below.You can quickly set up by adjusting the height of the tripod and the angle of the tripod head.2.4D EVICE WEB TERMINAL OPERATION⏹D EVICE NETWORKINGThe device is firstly connected to the local area e DHCP to obtain a valid IP or set a static IP.⏹L OGIN INTERFACEMake sure that the computer and the device are in the same network.Open the browser on the computer side (360or QQ browser compatibility mode is recommended),enter the device IP address in the URL bar,then the password“admin345”,select the language,and log in.(The IP address can be queried through the IP search tool or entered into the device network settings page,and the IP search tool can be provided by the manufacturer). Note:If clicking the login button not responding,you can switch the browser mode or change another browser to try again.Currently supported language are:Chinese Simplified,Chinese Traditional,English,Japanese,Korean,and Spanish.⏹C HECKING DEVICE INFORMATIONPlatform management function are shown at below,the information page shows the device software version and mac address.⏹P ERSONNEL MANAGERMENT1.Personnel registrationRegistering the face data on the device by uploading a photo,and entering the name(English recommended),sel ecting the permanent authorization,and click"Confirm Registration".You can search the relevant information of a registered personnel based on its ID or name.You can view the access records stored in the device.⏹D EVICE MANAGEMENT1.Intelligent modeThis mode has been configured as the initial settings of the device which comprises three models:recognition mode,body temperature setting,and mask setting,which can be adjusted according to the needs of the actual applicable scenes.2.Custom settingsYou can customize the device interface logo,which has a default setting.If you choose to have a customized logo,you can upload it and save the settings following the instruction.⏹N ETWORK SETTINGSBusiness server address:The default setting is the cloud platform address and port.If chooses private deployment,it can be modified accordingly based on the private server address.⏹S YSTEM SETTINGSDevice can be manually reboot,restored factory settings,and upgraded.Note:The software upgrade work is suggested to be carried out under the instruction of the manufacturer.3.SPECIFICATION3.1P RODUCT FEATURES●Enables live body recognition●Enables track of the movement of a human face in backlit environment●Patent owned facial recognition algorithm,able to recognize faces with high accuracy,response time<0.5s●Enables body temperature detection,range is between30℃~45℃,with discrepancy±0.5℃●Enables recognition of facial identity wearing the mask【1】●Enables mask detection,alert people who is not wearing a mask●Built-in high-performance NPU●Linux operating system,high reliability●MTBF>50,000h●Capable of storing24,000+facial image and up to50,000capture record●Operating temperature:15℃~35℃●Supports multiple interfaces(I/O\WG26\WG34\RJ45)●8inches HD display,image display without delay●Automatic gain and auto white balance,able to exhibit the true color of the image●Built-in black light level sensor,low-light recognition is in high accuracy●2D/3D noise reduction anti-fog technology,low-light recognition smoothening capability●Supports intelligent light filled setting3.2T HECHNICAL SPECIFICATIONS⏹D ETECTION PARAMETERS⏹F ACIAL RECOGNITION PARAMETERS⏹C AMERA PARAMETERS⏹I NTEERFACEG ENERAL PARAMETERS3.3M ODEL TYPENote:【1】May affact recognition accuracy.。

ULTRA High Accuracy – X/Y .25+L/1000µm, Z 1.5+2L/1000 Ultra High Resolution = .01µm (.0000004") scalesThe structural design is optimized through the use of infinite element method (FEM) analysis. This results in maximum rigidity for minimum weight, minimizing deformations due to loading and guaranteeing excellent geometrical accuracy at all times.If a normal air pad is used for the Y axis, it is necessary to increase the mass of the work stage to obtain appropriate rigidity. ULTRA QV (Quick Vision) employs a special air pad called a self-suction type that floats the air pad with compressed air and also generates an absorption power with a vacuum zone provided under negative pressure at the center of the pad. This achieves greater Y-axis rigidity and stage weight reduction concurrently, thus enabling stable stage drive.air temperature on the measuring system structure, the air server supplies air always The thermometer unit installed in the main body reads temperatures at each axis and calculates the amount of expansion and contraction of the body to compensate the measuring accuracy. This function allows the accuracy to be guaranteed in a wide range of 20˚C±2˚C.Additionally, the thermometer unit measures in real time, the workpiece temperatures with two sensors, outputting the results in which dimensions are converted to those at 20˚C.Advanced Technologies Supporting Ultra High-Accuracy SystemsOptimal Structural Design through FEM AnalysisSelf-Suction Air PadTemperature Compensation Function (Option)Conventional glass scaleUltra high-accuracy crystallized glass scaleUltra high-accuracy glass scales are manufactured at the underground laboratory of Mitutoyo Kiyohara Production Department.Compressed airCompressed air Guide planeAir padVacuum suction regionSuctionand in the middle of measuring stroke on a plane using the 5X objective and 1X tube lenstemperature compensation is performed.Those in the case where temperature compensation is*5: An air source is required to maintain the original air pressurebetween 0.5 and 0.9MPa.Unit: Inch (mm)Specifications"Ultra-High Accuracy" Measurement Achieved by Mitutoyo's "ULTRA"Quick VisionThe Ultimate FlagshipMachine NewlyRedesigned withIncreased Speed andHigher AccuracyMitutoyo has NowAttained the Summit ofVision MeasurementOne-Click Point Tool This is a basic tool for capturing one point.One-Click Circle ToolThis tool is appropriate for capturing a full feature circle.One-Click Line ToolThis tool is appropriate for capturing a line feature.One-Click Arc ToolThis tool is appropriate for capturing an arc and theradius of a corner.Pattern SearchT h i s t o o l c a p t u re s t h e position of a pattern that has been registered beforehand. It is optimal for positioningArea Centroid ToolThis tool evaluates the position of a fe a ture's centroid. It is appropriate for capturing the center of a Maximum/Minimum Tool This tool evaluates the maximum or minimum pointwithin the range.Auto Trace ToolThis is a form measuring tool that can autonomously track an unknown feature.The most diverse set of measuring tools available for edge detectionMulti-point auto-focusTargeting the auto-focus tool (surface and pattern) on separate areas allows multiple heights (1344 points at max.) to be measured. Maximum and minimum heights as well as theaverage height can be found.automatically set with one click of the mouse.The removal threshold detection level can be set arbitrarily.Surface Focus Tool This is a general visionfocusing tool.Pattern Focus ToolThis focusing tool is optimal for transparent or low-contrastsurfaces.Edge Focus ToolThis is a tool for focusing on a beveled edge.Noisy edgeNoisy edge Brightness analysisExample of individual layout of focus toolsExample of multiple-height measurement Example of display with the QV graphicsBrightness analysisEdge of Screen Morphological Filterchanges in brightness and differences in texture on the target surface.Advanced edge filtering capabilities including texture, brightness and morphology.alignment, an edge detection error or auto-focus error may result during part program execution.The Smart Recovery function corrects the illumination condition or the position and angle of a tool to automatically perform remeasurement.light intensity correction at procedure creation time, thereby increasing detection repeatability.QV Part ManagerQV Part Manager is the execution program management software for multiple workpieces arranged on the measurement stage.FORMPAK-QV performs contour tolerancing and form analysis from formdata obtained with the QV Auto Trace tool and laser probe.CAD Option displays CAD data on the Graphic window to enhance ease of measurement.A real-time display of measure-mentresults and statistical analysis on the shop floor, with data saved in a database. Includes SPC and statistical analysis, data filtering and reporting systems for complete control of your manu-facturing processes. MeasurLink includes modules for shop floor data collection, QC room data analysis and reporting, gage R&R studies, and gage tracking.QV EioFacilitates external control interface between a PC and QVPAK.QV Eio-PCQVPAK can be controlled from an external PC via RS-232C. QV status can be output using an external I/O board.QV 3DCAD allows the machine to travel to the position specified on a 3DCAD model and execute measurement. This drastically improves the operability and part program creation efficiency compared with operations under joystick control.EASYPAG creates measurement part programs for QVPAK using 2D CAD data. It reduces the number of man-hours for creating part programs, thus allowing a decrease in lead time.PAGPAKPAGPAK is the offline teaching software for creating QVPAK part programs using NC data, CAD data and Gerber data.Pitch circle measurementTool Edit ScreenMeasurement can be performed even if Multiple kinds of workpieces can beQV Eio-PC usage example (System using PATLITE)This hardware allows high-speed focusing or height measurement in a microscopic region with the objective transmission TTL laser.This unit detects temperatures with the main body temperature sensors attached to each axis and two sensors dedicated to a workpiece. The unit finally outputs data converted to dimensions at 20˚C after calculating the expansion and contraction quantities of each main body and workpiece.It is also possible to output dimensions at a reference temperature of 23˚C used in electric and electronics industry although 20˚C is generally assumed as the reference temperature at measurementCalibration Glass ChartThis is a chart for calibration of CCD pixel sizes and offsets between power turrets.Compensation Glass ChartThis is a glass chart of "on-screen compensation" for compensating on-screen distortions an optical system has an "auto-focus compensation" for reducing auto-focus variations resulting from the difference innation or programmable ring light in Quick Vision models that use a hal-ogen light source. This function enhances the visibility of low-reflection surfaces on colored workpieces, facilitating edge detection. This function can also be retrofitted to a conventional Quick Vision. In addition, a yel-low filter enables vision measurement in the yellow light region, which provides high sensitivity.QV-10X, QV-25X: Depending on the workpiece the illumination may be insufficient at aturret lens magnification of 2X and 6X.QV-25X: The PRL illumination is restricted in its usable position.。
G E N E R A L I N F O R M A T I O NIon Xe 20 provides complete control of conventional and moving lights, LEDs and media servers. It supports multiple users with partitioned parameter control and full backup, multiple playback faders and cue lists in a tracking, move-fade environment. The desk includes backlit buttons and 20 45mm non-motorized faders with associated displays.FEATURES• 2,048 or 12,288 outputs• 32,768 control channels (any number from 1 - 99,999)• Up to 99 discrete users• Partitioned control• Master playback pair with 100mm faders• 20 45mm faders x 100 pages for configurable faders,submasters, masters and grandmaster control with twoassociated high-contrast monochrome LCD displays• User-definable direct selects• Four discrete palette types (IFCB)• Presets function as “all palette”• E ffects provide dynamic relational and absolute progressivebehavior• C entral information area (CIA) accesses the browser andother controls• F our pageable encoders for non-intensity parameter control• C onfigurable high-density channel display, with format andflexi-channel modes• U p to six abstract color spaces, tinting, spectrum and fadepath tools.• User configurable, interactive Magic Sheets• E TCNet2™ and Net3™ (powered by ACN), ArtNet and Avab®UDP network output protocols• S how import from Obsession, Express™, Expression®,Emphasis®, Congo®, Cobalt®, Grand MA1, Grand MA2, Safariand Strand 500/300 Series• T wo individually configurable Ethernet ports• M ultiple MIDI and/or SMPTE TimeCode Inputs, Analog/SerialInputs, OSC transmit/recieve• V irtual Media Server function for pixel mapped effects,images, animations• S upport for multiple languages, including English, German,Spanish, French, Italian, Japanese, Korean, Russian andChinese (Simplified and Traditional)O R D E R I N G I N F O R M A T I O NIon Xe 20MODEL DESCRIPTIONIon Xe 20 - 2K Ion Xe 20, 2,048 outputs (minimum)Ion Xe 20 - 12K Ion Xe 20, 12,288 outputs (maximum)Ion Xe RPU - 2K Ion Xe Remote Processor, 2,048 outputsIon Xe RPU - 12K Ion Xe Remote Processor, 12,288 outputs Ion Xe 10K After-sale 10K upgradeETCnomad 512Client for Mac/PCO utput protocols are distributed using ETCNet2 DMX Nodes or Net3 DMX/RDM Gateways. I/O Gateways and Show Control Gateways provide switch closure functionality, MIDI and SMPTE TimeCode.Ion Xe 20 AccessoriesMODEL DESCRIPTIONEos MFW 10Eos Motorized Fader Wing 10Eos MFW 20Eos Motorized Fader Wing 20Eos FW 20Eos Standard Fader Wing 20Eos FW 40Eos Standard Fader Wing 40Net3 RVI3Net3 Remote Video InterfaceETCpad ETC Portable Access DeviceIon Xe - FC Ion Xe FlightcaseEos Family Offline Editor software for Mac and PC platforms is called ETCnomad and is available for download from Ion Xe 20 requires Windows 7 compatible external monitors,1280x1024 minimum resolution, standard, touch or multi-touch SHIPS WITH:• Dust cover• One Littlite• Mouse and mousepad• External alphanumeric keyboard• Two active display-port to DVI adapters•One locking IEC power cordS P E C I F I C A T I O N SSYSTEM CAPACITY• 2,048 or 12,288 Outputs• 32,768 Control Channels (devices)• 10,000 Cues• 999 Cue Lists• 200 Active Playbacks• 999 Submasters• 100 Fader Pages• 4 x 1,000 Palettes (Intensity, Focus, Color, Beam)• 1,000 Presets (all palette)• 1,000 Groups• 1,000 Effects (relative, absolute or step)• 99,999 Macros• 1,000 Snapshots• 1,000 Curves• 1,000 Color Paths• S upports two external display-port monitors at 1280x1024minimum resolution, with optional touch or multi-touchcontrol• Solid-state hard drive• Five USB ports for flashdrives, pointing devices, keyboards DISPLAY FUNCTIONS• A ll show data may be viewed on a single external monitor.External views may be posted separately or expanded acrossa maximum of two monitors. Three user-configurableworkspaces per display, with split-screen/sizing controls.• The Central Information Area accesses:-Browser-File Management-System Defaults-Show Defaults-Desk Defaults-Partition Definitions-Network Configuration-Show Data Utilities-Print to PDF-Record Target Lists-Patch functions-Help-Electronic alpha-numeric keyboard-Command Line-Selected Cue-Error messages-Context-Sensitive Control-Parameter Categories and individual parameters-Filters• Channel Displays-Live channel or table view-B lind cue, palette, preset and group views, in list, channel,table and spreadsheet formats-U ser-configurable to show required parameters and/orparameter categories (IFCB)-Flexi-channel to determine which channels to display-Zoom allows user to define how many channels are viewed-Color-coded intensity levels indicate direction of move S P E C I F I C A T I O N S-C olor-coded non-intensity levels indicate change fromprevious state-G raphic differentiation of moving lights, single parameterdevices and unpatched channels• Magic Sheets-User-defined interactive display layouts-O bjects and images may be imported• Patch Views-Patch by channel-Patch by address-Patch by Device List (RDM)-A ssign proportional patch value, curve and, preheat valuefor intensity-Swap pan and tilt-Invert pan and tilt-Custom fixture editor-User configurable shutter order• Playback Status Display-Accesses status of 100 fader pages-E xpanded cue list for selected cue, optional dynamiccountdown of active cues• Cue List Index• Effect Editor• Group Editor• Park Display• Dimmer Monitoring• Submaster List• Fader Config DisplayPLAYBACK CONTROLS• M aster Playback crossfade pair with two 100mmpotentiometers, Go, Stop/Back and Load• 50 pages of 20 45mm faders, each configurable as:-IFCB Palette/Preset Lists or single instances-Cue Playback, with user-configurable button/slider behavior-Grand Master with Blackout-A dditive or Inhibitive Submaster, with user-configurablebutton/slider behavior-Filtered Manual Timing Master• Rate Controller• Playback fader controls include:-Load to assign cue lists-Timing Disable-Off/On-Release-Freeze-Assert-Manual Override-Rate-Go To Cue 0-Spread-Background Enable/Disable-10 Priority States-10 Background Priority States-Parameter and channel filters• Macros-May be set to play background or foreground-Startup and Shutdown Macros-Disconnect MacrosS P E C I F I C A T I O N SMANUAL CONTROL• C hannel selection from keypad and/or multi-touchdirect selects• Lists constructed with +, -, thru• I ntensity set with level wheel, keypad, level button, fulland out• Select Last recalls last sequential channel selection set• Select Manual selects all channels with manual values• Select Active selects all channels with intensity above zero• Ordered groups• Offset; including even, odd, random and reverse• Fan• Sneak• User-definable home• H ome by parameter, parameter category or all non-intensityparameters• Capture• Park at level• Scaled park for temporary percentage adjustment• Recall-from and Copy-to commands• A bout provides detailed view of selected channels orrecord targets• Undo• Highlight and Lowlight, with optional user-definable Rem Dim • L amp controls to strike and douse arc sources,calibrate devicesPROGRAMMING FEATURES• Channel Functions-N on-intensity parameters set via numeric entry orpageable encoders-Encoders support software-controlled tactile response-Local display of color and gobo images-C olor matching to gel selector-Color Path, color tinting and color spectrum tools.-Apply discrete time and delay per channel parameter• Palette and Preset Functions-Record and Update-Toggle display to absolute data-U p to 999 decimal values may be inserted between anytwo whole numbers• Effects-Create live or blind-Pattern-based relative dynamic effects-Absolute effects-Step effects-Channel level overrides-Cue level overrides-Entry mode determines how parameters enter effects-Exit mode determines how parameters depart effects• Cue Recording-Cue List HTP/LTP Intensity-Cue List Priority and Background Priority-Cue List Assert-Fader as progress controller, manual or intensity master-Record manual values or channels in use-Auto playback of recorded cues-Referenced or auto-mark instructions-Block at cue or parameter level-Assert at cue or parameter level-All-fade flag S P E C I F I C A T I O N S-Follow or hang times-Out of sequence link-Loop functions-Cue level parameter category timing-20-part multi-part cues-Cue-level rate override-M ark flags for Auto or Referenced and Referenced PriorityMarks-U p to 999 decimal cues between each twowhole-numbered cues-Execute List·Triggers snapshot·Triggers macros·Triggers go of other cues·Syncs go to multiple cue lists·Show-control triggers·Analog triggers-Update and Update Trace functions-Undo record and delete• Submaster Recording and Playback-999 additive or inhibitive submasters-Bump button timing for fade up/dwell/fade out-Assert/Channel select button-Exclusive or Shielded Mode-Background enable/disable-Restore to background or minimum value-LTP/HTP intensity-Fader as progress controller or intensity master-Bump button to mark NPs-Priority and Background Priority status-M otorized faders match level across all devices andwhen paging-Submaster mapping on the fly• Curves-Assignable in patch to modify dimmer output ramp-A ssignable at cue or cue part level to modify intensitycrossfade profile or non-intensity parameter ramping INTERFACES• T wo individually configurable ethernet ports• E TCNet2, Net3 (powered by ACN), ArtNet and Avab UDPoutput protocols• Four DMX/RDM ports• Contact-closure triggers via D-Sub connector• T wo video connectors support display-port external displays(1280x1024) with optional single-touch or multi-touch screencontrol• USB multipurpose (five ports)• OSC Transmit/Receive• UDP Transmit/Receive• MIDI TimeCode, MIDI Show Control through Gateway• SMPTE TimeCode through Gateway• C ontact closure (12 analog inputs, 12 SPDT contact outputs,RS-232) through GatewayELECTRICAL• AC input (100 - 240V at 50/60 Hz)• P ower consumption (less external monitors) approximately 1amp at 120V or 230/240VP H Y S I C A LIon Xe 20 Dimensions*MODEL HEIGHT WIDTH DEPTHinches mm inches mm inches mm Ion Xe 20 4.1010429.3074414.24362 Ion Xe 20in shippingcontainer7.7519736.5092718.50470Ion Xe 20 in roadcase 8.3421245.121,14619.45494Ion Xe 20 Weights*MODEL WEIGHTlbs kgsIon Xe 20 console16.67.35Ion Xe 20 in shipping container22.59.98Ion Xe 20 in roadcase46.7TBD*Weight and dimensions typicalCorporate Headquarters 3031 Pleasant View Rd, PO Box 620979, Middleton WI 53562 0979 USA +1 608 831 4116London, UK Unit 26-28, Victoria Industrial Estate, Victoria Road, London W3 6UU, UK +44 (0) 20 8896 1000Rome, IT Via Pieve Torina, 48, 00156 Rome, Italy +39 (06) 32 111 683Holzkirchen, DE Ohmstrasse 3, 83607 Holzkirchen, Germany +49 (80 24) 47 00-0Hong Kong Room 1801, 18/F, Tower 1 Phase 1, Enterprise Square, 9 Sheung Yuet Road, Kowloon Bay, Kowloon, Hong Kong +852 2799 1220Web Copyright©2018 ETC. All Rights Reserved. All product information and specifications subject to change. 4311L1002 Rev C 02/18。
PA-701 PREAMPLIFIER VORVERSTÄRKER PREAMPLIFICADOR PRÉAMPLIFICA TEURPREAMPLIFICA TOREPage 2Congratulations on purchasing a Gemini model PA-701 rack mountablepreamplifier. This state of the art unit includes the latest features backed by athree year warranty. Prior to use, we suggest that you carefully read all theinstructions.1.All operating instructions should be read before using this equipment.2.To reduce the risk of electrical shock, do not open the unit. There are NOUSER REPLACEABLE PARTS INSIDE. Please refer servicing to a qualifiedservice technician.3.Do not expose this unit to direct sunlight or to a heat source such as aradiator or stove.4.This unit should be cleaned only with a damp cloth. Avoid solvents or othercleaning detergents.5. When moving this equipment, it should be placed in its original carton andpackaging. This will reduce the risk of damage during transit.6.DO NOT EXPOSE THIS UNIT TO RAIN OR MOISTURE.7.DO NOT USE ANY SPRA Y CLEANER OR LUBRICANT ON ANY CONTROLSOR SWITCHES.1.Be sure the POWER (1) switch is in the OFF position. All connections mustbe made with all equipment OFF.2 .For best sound, use only high quality RCA cables when hooking upequipment to the PA-701. Make sure that all cables are pushed in securely.3.Connect the OUTPUT LINE (22) jacks of the PA-701 to your amplifier(s).4.Plug your microphone into the MIC (5) jack on the front panel of thePA-700.5.Plug your headphone into the PHONE (11) jack on the front panel.6.Plug your turntable into the PHONO (16) jacks and attach the ground wirefrom the turntable to the GND (23) screw.7.Plug your CD player into the CD (17) jacks.8.Plug your tuner into the TUNER (18) jacks.9.Any other line level output device (such as a mixer) may be connected tothe AUX (19) jacks.10.You will require two sets of RCA cables to connect your tape deck to thePA-701. Use one set of RCA cables to connect the tape deck’s playbackor output jacks to the PLAY (20) jacks on the rear of the PA-701. Use theother set of RCA cables to connect the tape deck’s record or input jacks tothe REC (21) jacks on the PA-701.NOTE: Any line level device can be connected to the PLAY (20) jacks andthen can be accessed by the TAPE MONITOR (3) button.1.POWER: Once you have made all source connections to the PA-701, andyou have made sure that the VOLTAGE SELECTOR (24) switch is in theproper position, plug the power cord into a power source and press thePOWER (1) button (LED lights).2.INPUT SELECTION: The INPUT SELECTION (2) switch determines whichinput source goes through the PA-701 to the amplifier. If the PHONO positionis selected on the INPUT SELECTION (2) switch, then the sourceconnected to PHONO (16) jack on the back panel will be selected. If the CDposition is selected, then the source connected to the CD (17) jack on theback will be selected.3.TAPE MONITOR: Pressing the TAPE MONITOR (3) button (the LED is lit)allows you to hear the playback signal of your tape deck or whatever youhave connected to the PLAY (20) jacks on the rear panel. Pressing theTAPE MONITOR (3) button a second time (the LED is off), disengages thetape monitor circuit.4.MIC LEVEL: The MIC LEVEL (4) control adjusts the volume of themicrophone.5.MIC JACK: 1/4" microphone input jack (5).6.VOLUME: Overall volume is controlled by the VOLUME (6) control.7.BALANCE: Use this control to adjust the relative levels of the left and rightchannels. The 12 o’clock position is the point of equal BALANCE (7).8.TREBLE: The TREBLE (8) control adjusts the relative level of the highfrequencies in the sound.9.MID: The MID (9) control adjusts the relative level of the mid rangefrequencies in the sound.10.BASS: The BASS (10) control adjusts the relative level of the lowfrequencies in the sound.11.PHONE JACK: 1/4" headphone input jack (11).12.MONO: When the MONO (12) button is activated (LED is lit), the two stereochannels are blended together to produce monophonic sound. This blendminimizes rumble and surface noise in old monophonic records. Push thebutton a second time (LED goes out) to get back to stereo mode.13.MUTE: Pushing this button reduces the volume of the amplifier outputsignal by approximately 20 dB. Pressing the button a second time removesthe muting. The MUTE (13) has no effect on the microphone volume.14.LOW CUT: The output from a turntable usually contains strong but inaudibleimpulses at infrasonic frequencies (below 20Hz) due to disc warps,stylus/tonearm resonance, and vibrations that reach the turntable. If theseare amplified at full strength, they may waste amplifier power and muddythe sound. The LOW CUT FILTER (14) attenuates these unwanted signals.15.LOUDNESS: When pressed, the LOUDNESS (15) button engages a“loudness compensation” circuit which, at low-to-medium volume, booststhe bass and treble response.Depending on your system configuration, sometimes applying the ground willcreate a quieter signal path. Sometimes lifting the ground can eliminate groundloops and hum to create a quieter signal path.1.With the unit on, listen to the system in idle mode (no signal present) withthe ground applied (the GROUND LIFT SWITCH (25) in the left position).2.Then turn the power off before moving the GROUND LIFT SWITCH(25). Lift the ground by moving the GROUND LIFT SWITCH to the right,turn the power back on and listen to determine which position will providea signal devoid of background noise and hum. Keep the GROUND LIFTSWITCH in the ground position if the noise level remains the same in eitherposition.CAUTION: Do n ot termin ate the AC groun d on the un it in any way. Termin ationof the AC ground can be hazardous.INPUTS SENSITIVITY/IMPEDANCEMic..................................................................................................1mV / 3 KohmsPhono.........................................................................................3mV / 47 KohmsTape,Tuner,CD, Aux......................................................................150mV / 22 KohmsOUTPUT/IMPEDANCETape Rec.....................................................................................150mV / 3 KohmsPre Output..................................................................................max. 11V / 1 KohmsTOTAL HARMONIC DISTORTIONMic................................................................................................less than 0.02%Phono...........................................................................................less than 0.04%Tape,Tuner,CD, Aux................................................................less than 0.01%SIGNAL TO NOISE RATIOMic.........................................................................................more than 70dBPhono....................................................................................more than 90dBTape,Tuner,CD, Aux............................................................more than 100dBGENERALFrequency Response..................................................5Hz - 30 KHz +0, - 3dBBass..........................................................................................+/-12dB at 100HzMidrange..........................................................................................+/-9dB at 1KHzTreble..................................................................................+/-12dB at 10KHzLoudness.........................................................................+9/0/+9dB at 100/1K/10KHzMute........................................................................................................-20dBPower.........................................................................120V or 230V, 50/60HzPower Consumption....................................................................................15WDimensions...................................................................483mm x 45mm x 248 mm19" x 1.75" x 9.75"Weight................................................................................................4 kg (9 lbs.)。
FEI Titan (S)TEM Operation ManualBefore and after starting a session, check:Good column vacuum (< 20 log, <10-7 Torr)Good nitrogen level (> 10%)Close the column valve before sample holder insertion/removalReset the stage before sample holder insertion/removalFig. 1 Vacuum OCX (left) display themicroscope vacuum status. Stage OCX(right) allows one to reset the stage andactivate the Wobber functionSample HolderWear gloves when handling a sample holder to prevent contamination. Never touch the brass part of the holder. There are three types of sample holder available for different application:1.Single-tilt: morphology observation, EDS acquisition2.Double-tilt: morphology observation, detailed crystalline material study, EDS acquisition3.Tomography: similar to single-tilt holder but with lower holder profile allowing high alpha tilt angle Holder Insertion/RemovalCheck the microscope status on the system display located on the right of the access door. Holder insertion/removal can be carried only when the microscope is “Available”1.Align and insert the holder straight in to the stage load lock area2.Wait for the load lock to pump down (3 mins)3.Rotate the holder and fully insert it to the microscope column area4.Reverse the above steps to remove the holderMicroscope User InterfaceThe microscope operation interface consists of three programs:1.TEM User Interface: general microscope operation and the display of live TEM image (Flucam)2.TEM Imaging & Analysis (TIA): image acquisition and analysis3.Esprit: EDS acquisition and analysis (Bruker spectrometer system)Fig. 2 Overview of the microscope user interface, TEM User Interface on the left and TIA on the rightFig. 3 Flucam displays the live image projected on the phosphor screenFig. 4 Microscope status panel and function assignments of the physical buttons on the controllerFig. 5 FEG Register OCX, set the microscope in a desired modeFig. 6 Aperture OCX, useful for TEM imaging and selective area diffraction workFig. 7 CCD/TV Camera OCX for image acquisitionFig. 8 STEM Imaging OCX, for STEM image acquisitionFig. 9 STEM Detector OCX, for detector selection. Note that BF, DF4, and DF2 detectors work only with the screen is retracted as they are located under the screen.Eucentric PositionIn order to get the optimal microscope performance and reliable diffraction results one needs to set the sample at the eucentric height. To set the eucentric Z height:1.At some low magnification (~1,000x) and find a reference object2.Activate the stage “Wobbler” and observe object movement3.Reduce the movement by moving the Z up or down (for regular grid with single-tile holder the eucentric Zposition is around -40 um; with double-tilt holder the eucentric Z is around -120um)4.Iteration steps 1 – 3 at higher magnification (~50,000x) to fine tune the z positionTEM OperationUsers need to go through a five-minute alignment procedure to optimize the performance while the microscope is routinely maintained by IAC staff. Follow the items on “Direct Alignment” panel:1.Set the microscope in TEM mode by loading TEM200kV on FEG Registers2.Make sure the sample is on its eucentric height and click on Eucentric Focus button3.Beam tilt pp X and Y•Set the microscope at some moderate magnification (>50,000x)•Converge the beam and use MF-X and -Y knobs to make the beams overlap4.Rotation Center•Set the microscope at some moderate magnification (>50,000x)•Expand the beam to illuminate the entire screen area•Minimize the image movement by turning MF-X and -Y knobsa-free Pivot Point X and Y•Same procedure as in Beam tilt pp X and Ya-free Alignment X and Y•Turn on FFT and defocus the microscope until ring patterns are visible•Use MF-X knob to make the ring patterns concentric7.Enjoy your TEM session (fine tune Obj Stig and Focus as needed)STEM OperationUsers need to go through a five-minute alignment procedure to optimize the performance while the microscope is routinely maintained by IAC staff. Follow the items on “Direct Alignment” panel:1.Set the microscope in STEM mode by loading appropriate STEM setting on FEG Registers2.Make sure the sample is on its eucentric height and click on Eucentric Focus button3.On STEM Imaging OCX, select an appropriate camera length (~205mm) and start Search4.Move the stage to vacuum area and set the probe parking position to the frame center5.On STEM Imaging OCX, stop Search6.Escape from the diffraction mode to carry out the probe alignment7.Beam Shift•Use MF-X and -Y knobs to center the probe, decrease the magnification if the probe is not visible8.Intensity focus•At some moderate magnification (390,000x) use the focus knob to focus the probe9.Beam tilt pp X and Y•Use MF-X and -Y knobs to make the probes overlap10.Rotation Center (Intensity)•This step is not required for uP STEM•Use the Focus Step knob to freeze the probe motion•Use MF-X and -Y to center the hot spot within the halo11.Enjoy your STEM session (fine tune Condenser Stig and Focus as needed)Data Saving and Exporting•Save the data on the support PC (network attached Z drive)•It is recommended to save the images in FEI’s raw format (.emi) as the format contains information about the experimental condition (magnification, camera length, voltage, etc.)•Use TIA Folder Export function to batch convert the files to .jpg, .tif, etc.o Use “Settings” to set up the export parameters (Source and Target folder path, image type, scale bar, etc) o Click “Export” to executeFig. 10 TIA user interfaceFig. 11 Setting options under Folder ExportEmergency Information:Medical Emergencies: Contact 911 and Public Safety (609) 258-1000Room / facility emergencies: Contact Public Safety (609) 258-1000Issues related to the instrument:1.Contact IAC Staff.2.Leave system as is, Do Not disable vacuum system.3.Try to shut off the High Tension/Close Vacuum valve.Audible/Siren Emergency Alerts:Follow previous steps 2 & 3 and leave the building.Emergency Contact Information:Nan Yao: Office (609)258-6394; Cell (908) 922-2236 Email: ******************John Schreiber: Office (609)258-0034; Cell (215) 431-4670 Email: ******************Paul Shao: Office (609)258-3851; Cell (847) 721-086 Email: *******************。