电话会议操作说明书
- 格式:doc
- 大小:514.50 KB
- 文档页数:14

HT96 会议电话分机用户手册北京海天佳和通信技术有限公司目录目录 (1)1.概述 (2)1.1 应用范围 (2)1.2 技术特点 (2)2.主要技术指标 (2)3.使用说明 (4)3.1 设备俯视图 (4)3.2 设备后视图 (5)3.3 设备底视图 (6)4.安装开通 (9)4.1 接通电源 (9)4.2 二线开通 (9)4.3 四线开通 (10)1.概述1.1 应用范围HT96 会议电话分机是与会议电话总机配套使用的会议终端设备,可供铁路有关部门、工矿企业召开电话会议使用。
会议电话网终端的会议参加者可以通过本设备以扬声对讲的方式收听或发言。
1.2 技术特点可靠性高:设备采用高性能单片机和大规模集成电路技术,集成度高,可靠性好。
稳定性好:为防止振鸣,发信通路设有自动音量控制,收信通路设有讲话扳键,可根据具体使用情况工作在单工、双工、半双工状态。
电源工作范围宽:本机使用电源为交流220V或直流12V,交流电压在85V~265V,直流电压在9V~12V范围内可正常工作。
2.主要技术指标端口阻抗二线口阻抗:600Ω四线口阻抗:600Ω发信通路发信电平:发信入-45dB(600Ω)、800Hz正弦波信号,二线端输出+5dB,四线端输出-4dB。
幅频特性:300HZ~3400HZ与800HZ相比较,其电平差不超过±2dB。
非线性失真:发信入-35dB(600Ω)、400Hz正弦波信号,外线端信号失真应小于3%。
杂音电平:外线端杂音电平小于-52dB。
收信通路输出功率:外线入-18dB、800HZ正弦波信号,扬声器输出功率不小于500mW(4Ω,电压电平+5dB)。
幅频特性:300HZ~3400HZ与800HZ相比较,其电平差不超过±2dB。
非线性失真:外线入-18dB、400HZ正弦波信号,扬声器额定输出时,失真应小于3%。
杂音电平:扬声器两端杂音电平应小于-52dB。
串音电平扬声器输出额定功率时,发信入-45dB、800Hz正弦波信号,扬声器输出端串音电平应小于-52dB。


电话会议使用手册 263下载及账号管理入口登录顺丰ECP系统点击电话网络会议选择263会议进入账号管理页面/sfLogin电话会议——主持人操作细则1.登陆会议平台点击桌面PC客户端或登陆,输入用户名密码,点击立即登陆。
注:主持人从“用户登录”进入,参会人从“快速入会”进入2.立即开会进入主页面后,点击会议-立即开会。
满足即刻开会需求。
温馨提示:手动添加主持人/参会人时,手机号码书写格式为:手机号,异地号码不用加0;座机号码书写格式为:区号座机–分机号,如************-12,无分机号直接写:区号座机3.安排会议进入主页面后,点击会议-安排会议。
满足预先安排会议需求。
温馨提示:手动添加主持人/参会人时,号码书写格式参照“立即开会”4.会中控制A-角色:对勾选中的人员,赋予“主持人”或“参会人”身份;B-呼叫:对勾选中的待入会人员,再次呼叫;C-添加:临时添加通讯录外部人员入会(添加通讯录内部人员入会,请点右下角的“通讯录”) D-静音/发言/挂断:对勾选中的已入会人员,进行静音/发言/挂断等管控;E-开始暖场:会议尚未开始前,点此播放暖场音乐,再次点击即关闭音乐;F-全部静音:点击“全体静音”后,参会人可按*6自我解除静音,进行发言;G-超级静音:点击“超级静音”后,参会人可按*6也无法自我解除静音;H-会议问答:点击“会议问答”后,进入全体静音状态,主持人可点名某参会人发言;I-通讯录:临时添加通讯录内部人员入会5.电话号码按键,变身会议控制快捷键:(温馨提示:主持人需先外呼自己手机号进行电话入会才可使用)*0:寻求会议助理人工服务*1:收听操作功能使用提示*2:会场播放语音报名(仅主持人可用):收听在大厅报名的参会人*3:单独收听语音报名*4:会场全体静音状态切换(仅主持人可用):全部禁言戒全部解除禁言*5:主持人退出会议控制模式切换(仅主持人可用)*6:自我静音状态切换(即切换使用者本人的静音状态)*7:会议加锁状态切换(仅主持人可用)*8:主持人外呼不会者(仅主持人可用)*9:录音(仅主持人可用)6.海外接入号码可通过以下链接查询:/263/download/access2.html7.会后服务会议结束后点击“会后服务”按钮,可查看会议记录报告及使用情况记录。


Operating Instructions1.9 GHz Digital Wireless Microphone System Operations Support Software (Conference mode)IntroductionAbout this manualOperations Support Software (hereinafter referred to as “this software”) is software for configuring various settings and acquiring statuses of the following devices from a PC via a network connection.Wireless receiver: WX-SR202P, WX-SR204P, WX-SR202DNP, WX-SR204DNP (hereinafter referred to as “receiver”) Extension Receiver: WX-SE200P, WX-SE200DNPWireless antenna: WX-SA250PWireless microphone: WX-ST200P, WX-ST400P, WX-ST700PWireless Transmitter: WX-ST600P●This manual describes how to operate Operations Support Software for use of Conference mode in 1.9 GHz digital wireless systems. For information other than Conference mode, such as installation and initial setup of Operations Support Software, refer to the operating instructions of Operations Support Software. For information on the functions of the related equipment, refer to the operating instructions supplied with the products.●The instructions in this manual are explained with the example of using Microsoft Windows 10 Pro. Screen display may differ when using another operating system or depending on the settings of the operating system. When using another operating system, refer to the instruction manual for the corresponding operating system.●The software version information and other screen images shown in this manual are display examples and may differ from the actual screens.AbbreviationsThis manual uses the following abbreviations.●“Microsoft Windows” is referred to as “Windows”.●“Wireless Receiver (WX-SR202P/WX-SR204P/WX-SR202DNP/WX-SR204DNP)” is referred to as “receiver”.●“Extension Receiver (WX-SE200P/WX-SE200DNP)” is referred to as “extension receiver”.●“Wireless Antenna (WX-SA250P)” is referred to as “antenna”.●“Gooseneck Microphone (WM-KG645)” that is connected to “Wireless Transmitter (WX-ST600P)” are referred to as “gooseneck microphone”.●“Wireless Microphone (WX-ST200P/WX-ST400P/WX-ST700P)” is referred to as “microphone”.●“Personal computer” is referred to as “PC”.All information on separately-sold products contained in this manual is up-to-date as of Oct. 2022. Contact a retailer for the latest information.System overviewThe 1.9 GHz digital wireless microphone system series WX-SR200P conforms to the DECT standard*. The WX-SR200P series is comprised of the devices described on page 4, and can receive audio from up to 8 wireless microphones per system.* DECT (Digital Enhanced Cordless Telecommunications) is a digital cordless communication standard.Charger (WX-SZ200P)2 microphones per chargerUp to 8 wireless antenna (WX-SA250P)Up to 8 audio output channelsUp to 8 wireless microphonesWX-ST200P , WX-ST400P , WX-ST700P gooseneck microphones (WX-ST600P+WM-KG645)Charger (WX-SZ600P)4 microphones per charger *Up to 2 WX-ST600P/700P when placed horizontallyRelated devicesThe related products of the1.9 GHz digital wireless microphone system series are as follows:✹ W ireless receiverWX-SR202P✹ W ireless receiverWX-SR204P✹ E xtension ReceiverWX-SE200P✹ W ireless microphone (handheld)WX-ST200P ✹ W ireless microphone (tie pin type)WX-ST400P✹ W ireless antennaWX-SA250P✹ W ireless microphone WX-ST700P ✹W ireless Transmitter WX-ST600P ✹C hargerWX-SZ200P✹C harger WX-SZ600P ✹ G ooseneck microphoneWM-KG645What is Conference mode?This function enables flexible wireless microphone operation by assigning wireless microphones to multiple channels on wireless receivers and extension wireless receivers.Features of Conference mode●By turning on Conference mode, you can share 2 channels on a receiver with 8 microphones, for example (which channel a microphone uses depends on the availability of the channel at that time).●Association of shared channels and microphones can be freely set in the matrix using the Operations Support Software. This allows for flexible microphone operation in various situations, such as setting microphones dedicated to one channel or grouping microphones for each channel.●Associations can be switched all at once based on the use case because association between shared channels and microphones can be saved and loaded as a settings file with the Operations Support Software.●You can turn communication on and off remotely by using the Wireless Transmitter (WX-ST600P) and Wireless Microphone (WX-ST700P). Also, if the microphones registered in the same channel consist only of Wireless Transmitters (WX-ST600P) and Wireless Microphones (WX-ST700P), you can set the operation priority setting to interruptible to interrupt a channel that is already in use with another microphone.Software.●To use Conference mode with wireless receivers, extension wireless receivers, and wireless antennas earlierthan V6.00, update all the firmware to V6.00 or later. To update, please refer to the manual of the OperationsSupport Software.●Do not downgrade a V6.00 device to a version earlier than V6.00. Operation is not guaranteed.Maximum number of registered microphonesWhen Conference mode is on, 7 or more wireless microphones can be paired with each channel of a receiver or extension receiver. The maximum number of registrations is as follows.* W X-SR202P does not support Conference mode, so you cannot turn on Conference mode from the Operations Support Software.Number of microphones that can be used simultaneouslyRegardless of whether Conference mode is on or off, the number of microphones that can be used simultaneously is as follows.* W X-SR202P does not support Conference mode, so you cannot turn on Conference mode from the Operations Support Software.Example of using Conference mode (when participant microphones arenot grouped)6 microphones cancommunicate on any channel from 5 to 8 (up to 4 lines)You can use as a dedicated microphone by registering only one microphone in onechannel.Example of using Conference mode (when participant microphones aregrouped)5 microphones cancommunicate on any channel from 6 to 8 (up to 3 lines in Group B)4 microphones cancommunicate on any channel from 3 to 5 (up to 3 lines in Group A)You can use as a dedicated microphone by registering only one microphone in one channel.Capabilities when Conference mode is onThis section describes the list of functions that can be used with Conference mode. Functions that are only available from this software are indicated by a black circle.ConnectionsThis software can be connected with a receiver.TermsMicrophone sensitivityOutput sound sensitivity for sound captured by a microphone.The microphone sensitivity can be set with the tie-pin type Wireless Microphone (WX-ST400P) and boundary type Wireless Microphone (WX-ST700P).Low cut settingSetting to reduce low-frequency noise during microphone use.The low-cut filter setting can be set on a handheld wireless microphone (WX-ST200P).Push-to-talk (PTT) settingSetting to switch between communication start/end modes.This can be set on a Wireless Transmitter (WX-ST600P) and Wireless Microphone (WX-ST700P).Communication standbyRefers to the state in which a Wireless Transmitter (WX-ST600P) and Wireless Microphone (WX-ST700P) are turned on and not communicating.Registered channelRefers to a channel for which a microphone is paired (wireless or wired) to a receiver or extension receiver in Conference mode.Extended channelRefers to a channel that allows microphone communication other than registered channels in Conference mode. It can be edited only from Operations Support Software.Extended channel registration tableA table that indicates registered channels with ● and extended channels with ○, and sets extended channels for each microphone.This manual uses the following symbols in explanations.Table of contentsIntroduction (2)About this manual (2)Abbreviations (2)System overview (3)Related devices (4)What is Conference mode? (5)Capabilities when Conference mode is on (9)Connections (9)Terms (10)Symbols (10)Flow for setting Conference mode (12)STEP 1: Turn on Conference mode (13)STEP 2: Pair (14)STEP 3: Edit the extended channel registration table (17)STEP 4: Communicate (18)Confirming the operation status (19)Confirming the operation status from a microphone (19)Confirming the operation status from a receiver (20)Confirming the operation status from the Operations Support Software (21)Operation priority setting (22)Setting the operation priority (22)Communication on/off control (23)Communication on/off control (23)Saving the Conference mode settings data (24)Exporting the settings data (24)Importing the settings data (25)Screen explanation (26)Troubleshooting (29)Flow for setting Conference modeSTEP 1: Turn on Conference mode (page 13)Configure settings to use Conference mode.STEP 2: Pair (page 14)Pair the microphone to be used in Conference mode.STEP 3: Edit the extended channel registration table (page 17)Set the extended channel settings for the microphone used in Conference mode.STEP 4: Communicate (page 18)Start communication.STEP 1: Turn on Conference modeTo use Conference mode, first turn it on.To switch Conference mode on/off, this software and the receiver must be connected to a network.1 Log in to this software.2 The [List] screen appears. Click the [Set] button of the receiver for which you wish toturn on Conference mode.[Settings] button3 Change Conference mode to [ON] in the mic settings on the [Settings] screen.[Update] buttonTurn Conference mode on/off4 Click the [Update] button.A restart confirmation message will be displayed when switching. Click [Yes] to restart the receiver.When Conference mode is on, the [Microphone] tab on the setting screen switches to the screen for Conference mode.Also, “Conference” is displayed for the target receiver on the status details display screen.STEP 2: PairA microphone and receiver must be paired with each other in order to establish a connection.The receiver uses different microphone pairing information when Conference mode is on and off. Therefore, to use Conference mode, you must pair separately for Conference mode.Pairing can be performed from the receiver or the Conference mode setting screen of the Operations Support Software.This manual describes the procedure using the Operations Support Software and wireless microphone (WX-ST700P) as an example.Pairing1 In the mic settings on the [Settings] screen, click the channel number button youwish to register from the [Channel number] buttons.Channel number buttons2 The registration indicator for the corresponding channel on the receiver blinksorange. The pairing mode lasts for 30 seconds.3 When the power switch of the microphone to be paired is [ON] and the [Register]button on the microphone is pressed for at least 2 seconds, the status indicator of the microphone blinks orange and pairing starts.If pairing completes successfully, the status indicator on the microphone lights green, and the [Register] indicator for the paired channel on the receiver lights green for 1 second and then turns off.Microphone (WX-ST200P)Microphone (WX-ST400P)Wireless transmitter (WX-ST600P)Wireless microphone 45 Pairing is now complete.●If you pair a paired microphone to another channel, the pairing information of the original channel will be deleted.●After pairing is complete, “Mic*” (where * is a number) is set automatically for the name. Change the name ifnecessary and click the [Update] button.STEP 3: Edit the extended channel registration table With Conference mode, you can set extended channels that allow communication on channels other than paired channels.Extended channel registration table1 Click the intersection of the paired microphone and the channel you wish to allowcommunication with that microphone.2 “○”indicatingtheextendedchannelisdisplayed.To cancel the extended channel, click “○” again.3 Click the [Update] button.In the extended channel registration table, you can select extended channels at once by dragging the table while clicking.STEP 4: CommunicateStart communication by turning on the microphone (WX-ST200P/400P) or pressing the talk button (WX-ST600P/700P). When the power is [On], the audio collected by the microphone will be amplified.Squares on the extended channel registration table are displayed in green for channels being used.Confirming the operation status The current status of each device can be confirmed from the microphones, receivers, and Operations Support Software.Confirming the operation status from a microphone You can confirm the paired channel by pressing the microphone registration button.1 With the receiver and microphone paired, put the microphone into pairing confirmation mode.With the microphone [On], press the registration button once briefly to go into pairing confirmation mode. The power indicator turns orange and green alternately for 5 seconds.Microphone (WX-ST200P)Microphone (WX-ST400P)Wireless transmitter (WX-ST600P)Wireless microphone 2Confirming the operation statusConfirming the operation status from a receiverYou can confirm the communicating microphone by pressing the registration button for each channel of the receiver. The following are differences between Conference mode off/on.Conference mode off: Y ou can confirm the microphones paired on the channel by pressing the registration button on the receiver.Conference mode on: Y ou can confirm the microphones that are actually communicating from the channels set in the extended channel registration table by pressing the registration button on the receiver.1 With the receiver and microphone paired, put the receiver into pairing confirmationmode.Of the channels during microphone communication, press the registration button of the channel you wish to confirm once briefly to go into pairing confirmation mode. The [Register] indicator turns orange and green alternately for 5 seconds.2 Check the [Power] indicator of the microphone.While the receiver is in pairing confirmation mode, the target channel of the receiver and the power indicator of the communicating microphone light up alternately (orange/green) for confirmation of registration.The pairing confirmation mode lasts for 5 seconds and then returns to the normal state.Confirming the operation statusConfirming the operation status from the Operations Support SoftwareYou can confirm the communicating microphone by pressing the [Confirm] button for each channel from the Operations Support Software. The following are differences between Conference mode off/on.Conference mode off: Y ou can confirm the microphones paired on the channel by pressing the [Confirm] button.Conference mode on: Y ou can confirm the microphones that are actually communicating from the channels set in theextended channel registration table by pressing the [Confirm] button.This section describes how to confirm with Conference mode on.1 With the receiver and microphone paired, put the receiver into pairing confirmationmode.Click the [Confirm] button of the channel for which you wish to confirm the registration information in the mic settings of the [Settings] screen to go into pairing confirmation mode. The [Register] indicator of the corresponding channel of the receiver turns orange and green alternately for 5 seconds.[Confirm] button2 Check the [Power] indicator of the microphone.While the receiver is in pairing confirmation mode, the target channel of the receiver and the power indicator of thecommunicating microphone light up alternately (orange/green) for confirmation of registration.The pairing confirmation mode lasts for 5 seconds and then returns to the normal state.Operation priority settingSetting the operation priorityThe operation priority setting is a function that allows you to set the operation priority when the microphones registered on the same channel consist only of Wireless Transmitters (WX-ST600P) and Wireless Microphones (WX-ST700P). Uninterruptible: I f a microphone is already communicating on a channel, you cannot start communicating on that channel with another microphone.Interruptible: I f a microphone is already communicating on a channel, you can end communication on that microphone and start communicating with another microphone.Operation priority selection1 Turn on Conference mode with the same procedure as “Flow for setting Conferencemode”.2 Switch the operation priority setting.Communication on/off controlCommunication on/off controlCommunication on/off control is a function that allows you to control communication on/off for paired microphones from the Operations Support Software.Communication on/off control is a function enabled only for WX-ST600P/700P. It is disabled for WX-ST200P/400P.Communication switch1 Turn on Conference mode with the same procedure as “Flow for setting Conferencemode”.2 In the mic settings on the [Settings] screen, if the microphone of the communicationchannel is WX-ST600P/700P, communication on/off switches each time you click the Communication switch.3 If a microphone is communicating, the [Switch OFF all] button is enabled, andclicking it forcibly ends the communicating microphone of the channel.Saving the Conference mode settings dataThe Conference mode settings data can be saved and then be imported when this software is used on another computer.This section describes the procedure.Exporting the settings dataTo export settings data, perform the following procedure.Settings file [Save]/[Open] button1 Turn on Conference mode with the same procedure as “Flow for setting Conference mode”.2Click the settings file [Save] button in the mic settings on the [Settings] screen. The folder selection dialog box appears. Select the location to export the Conference mode settings data.3A file with the name ***.msf is created in the location specified in step 2 and the Conference mode settings data is exported into that file. The following settings aresaved in the settings data.Saving the Conference mode settings dataImporting the settings dataTo import settings data, perform the following procedure.1 Turn on Conference mode with the same procedure as “Flow for setting Conferencemode”.2 Click the settings file [Open] button in the mic settings on the [Settings] screen. Thefolder selection dialog box appears. Select the location to import the Conference mode settings data.3 You can confirm the data in advance by selecting a file to import and clicking[Confirm].Select the file to import and then click [Set] to overwrite all of the current Conference mode settings data.4 Click the [Update] button. Wait for the receiver to restart (takes about 1 minute for thereceiver to restart).●Setting data is not loaded for microphones that are not paired with the receiver.Screen explanationRegistered device list display<Receiver display>Information displayed for each receiver or charger in the registered device list display.The background of the selected receiver is displayed in red.This section describes the Conference mode settings screen.TroubleshootingRefer to this table for issues before requesting repair.If the issue is not resolved even after taking these actions, or if an issue other than shown in this table occurs, please contact the dealer where you purchased the product.Panasonic Corporation of North AmericaTwo Riverfront Plaza, Newark, NJ 07102-5490https:///us/Panasonic Canada Inc.5770 Ambler Drive, Mississauga, Ontario, L4W 2T3 Canada1-877-495-0580https:///ca/C0722-0 PUQP1016ZA© Panasonic Connect Co., Ltd. 2022。
Umeeting电话会议WEB 客户端使用说明书Umeeting运营中心2011年[1.0第一版]目录第一部分 UMeeting华通电话会议简介 (3)一、业务介绍 (3)二、使用环境 (3)三、会议资费 (3)第二部分 UMeeting华通电话会议使用说明 (4)一、打开官网 (4)二、帐号注册 (4)三、帐号登录 (5)四、召开会议-即时会议 (6)五、召开会议-预约会议 (7)六、召开会议-历史会议 (8)七、短信发送 (8)八、通讯录 (9)九、账号管理 (11)十、详单查询 (12)十一、录音试听 (13)十二、软件下载 (13)十三、充值转账 (14)十四、帮助中心 (15)第一部分 UMeeting华通电话会议简介一、业务介绍UMeeting华通电话会议是华科数通(北京)科技有限公司经国家授权许可经营的电信增值服务。
UMeeting华通是一种基于传统PSTN公共交换电话网,通过电脑或手机进行操作管理的完全自助式的多方语音通讯电话会议产品。
华通电话会议满足了集团客户、企业、政府、分支机构的沟通需求,提高了工作效率,节省了时间、差旅费及通讯成本,是满足现代企业高效率、低成本的办公需求的首选。
通过华通电话会议,您可以随时随地召开电话会议,手机、座机、小灵通等其它通信终端都可加入到电话会议中,会议单场容量可达到255方。
Umeeting华通让您使用更便捷,沟通更自由!二、使用环境用户使用Umeeting华通电话会议不需要购买任何硬件设施,只需用电脑登陆Umeeting华通电话会议的官方网站或直接下载Umeeting的PC客户端安装后即可使用。
如用户不方便使用电脑,则可以用手机下载Umeeting的手机客户端使用。
UMeeting官方网站:UMeeting PC客户端下载地址:/soft/umeetingPCInstall.exeUMeeting JAVA通用版手机客户端下载地址:/soft/umeeting.jarUMeeting 安卓系统手机客户端下载地址:/soft/umeeting.apkUMeeting 塞班系统手机客哀端下载地址:/soft/umeeting.sisxUMeeting 苹果系统手机客户羰下载地址:苹果手机用户在itunes搜索“会议宝”即可直接下载。
T21E2使用说明书1、连接会议电话主机电源。
把电源的八芯主机连接线插入主机的八芯线接口即可。
2、将电源的4芯电话线与标准模拟电话线插座连接。
3、如果会议电话有扩展麦克风的话,需要扩展麦克风连接。
4、将电源的交流电源线与室电220V标准电源插座连接。
5、插入电话线。
直接接上普通电话线就可以了。
6、打开免提,进行拨号通话即可。
如带手柄的会议电话,可以拿起手柄,象普通电话一样拨号通话即可,需要免提通话时,再按一下免提按键,放下手炳即转入免提通话状态。
7、根据会议电话品牌不同会议电话按键功能都有所不同。
8、拨打与接听电话。
在待机状态下,按下免提键,听到拨号音后,即可进行拨号。
在通话状态下,按下免提键就切换到待机状态。
当有来电时,电话响铃,通话状态灯闪烁红色,此时按下免提键即可与对方通话。
9、快速拨号设定与拨打。
可以预先设定20组(01-20)快速拨号号码,每组最多可存储31位电话号码。
编辑存储快速拨号。
在待机状态下:按下存储键(STORE),输入你想储存电话号码,再次按下存储键,再按下两位数NM作为编号。
快速拨号,在待机状态下,按下快速拨号键(MEMO),再按下两位数字键NM。
需要注意事项:按下的两位数字NM是在01到20之间的数,以上的操作都是在待机状态下进行的,在存储快速拨号号码或快速拨号过程中,如果有非法操作,此时功能建由绿色变成红色。
10、闪断键的使用,在通话状态下,按下此键,此时电话线路进入保持状态;当你申请电话服务运营商提供的电话会议业务时,你可以用闪断键连接各参与方。
11、保持健的使用。
通话状态下,按下此键,此时电话线路进入保持状态。
通话的双方都将听不到对方的语音,但是仍然保持线路连通状态,再按一次保持健就可以恢复正常状态。
12、音量控制。
电话会议终端有12个音量等级,当调节至最大或最小音量时,音量状态灯变为红色,表示不可以继续加大或减少音量,中间状态的音量则为绿色。
用户可以根据实际情况通过音量加键(vol+)或音量减键(VOL-)来调节音量至合适水平。
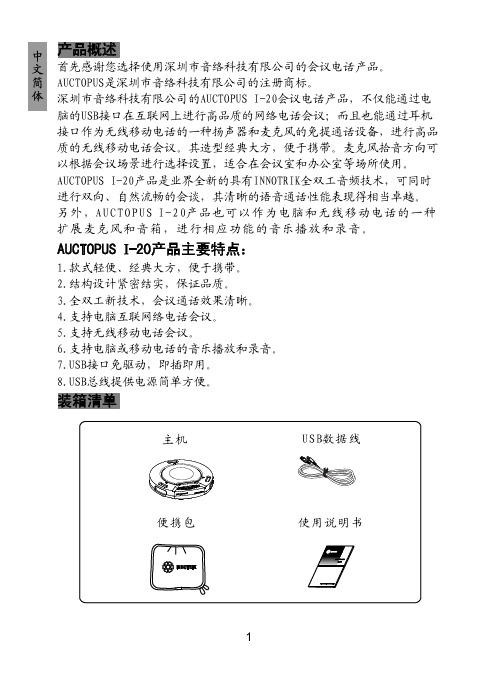
电话使用说明
拨打外线:摘机按9+电话号码
拨打内线:摘机直接按分机号码
代接响铃话机:*30——代答任何呼叫
*31——代答连选组呼叫
*32*N#——代答分机呼叫(N代表分机号)
IP话机按键简介:
IP话机转接:专用话机按TRANSFER——再按分机号码——挂机注:IP话机具体使用功能详见“Awaya 1608 中文使用说明书”
多方通话
(1)I P话机呼出式会议电话:在通话过程中按(TRANSFER)键,再拨分机号码或按9+外线号码,拨通后按*47键即可进入多方通话。
(2)宝利通SoundStation2呼出式会议电话:在通话过程中按键,再拨分机号码或按9+外线号码,拨通后按*47键即可进入多方通话。
(3)普通话机呼出式会议电话:在通话过程中按插簧,拨通第三方号码后按*47键即可进入多方通话。
(4)外部话机呼入式会议电话:用户拨打前台总机号码,听到提示音后,直拨所需分机号即可进入多方通话。
(5)内部分机呼入式会议电话:内部分机直接拨所需分机号即可进入多方通话。
通话录音有线扩展麦克风亿联五边形虚拟会议室可外接音箱设备USB 连接重点特征全新的外观设计新款CP960拥有独特的Y 型外观,象征亿联(Yealink )的英文首字母Y ,同时配有5英寸的触摸屏,您只要轻轻动动手指,即可自由灵活地操作话机。
高清音质CP960拥有超高清音质,内置三麦矩阵,主机拾音距离可达6米,保证360°全方位无死角拾音效果,加上亿联先进的噪音消除技术,为您带来优质的会议通话体验,使您可以清晰的聆听每一个与会者的发言,会议沟通更加顺畅,犹如面对面沟通。
此外,您还可以将CP960与CP 有线扩展麦克风CPE90相连接,拾音距离可达20米,且可为您免去接线的烦恼,会议桌面更加简洁干净,为您树立优质的企业形象。
强大的功能和扩展性在亿联五边形虚拟会议室中,您可一次性邀请多方成员入会,且最多可以支持邀请5方成员,有效帮助您节省相关差旅费用;同时,在会议过程中,您可自由邀请他人入会,无需中断会议。
另外,CP960支持语音激励功能,多方会议中,可以帮助您清楚地分辨发言者。
作为新一代高清IP 会议电话,CP960支持多种模式UC 混合会议,您可以通过蓝牙将CP960与您的智能手机连接通话,或通过USB 将CP960与您的PC 设备连接通话,并可将蓝牙通话,PC 通话及SIP 通话三种模式合并成会议电话。
同时,CP960可通过3.5mm 音频输出口与外置音箱设备连接,满足较大培训室的需求;且CP960支持本地和USB 录音功能,本地录音时长可达100小时。
CP960高清音质安卓触控会议电话亿联新一代旗舰级高清IP 会议电话CP960,基于安卓5.1操作系统,充满科技感的全新Y 型设计以及金属银外观效果,为您带来耳目一新的时尚外观视觉体验。
CP960配备全新开发的麦克风,拥有超高清华丽音质,且可以外接音箱设备,为您提供清晰自然的会议通话体验。
此外,您还可通过蓝牙或USB 将CP960与您的移动设备(例如:智能手机,PC 设备等)相连,实现多种模式UC 混合会议。
电话会议操作说明书一.打开会议操作界面 (2)二、获取帐户 (2)三、召集会议 (3)(一)、召开一个会议 (3)(二)、同时召开多个会议 (7)(三)、主叫型会议 ......................................... 错误!未定义书签。
四、预约会议 (8)(一)、预约未来会议 (8)(二)同时召开多个会议 (9)(三)有效余额 (10)五、充值 ................................................................. 错误!未定义书签。
六、电话簿 (10)七、历史会议 (102)八、控制面板 (11)九、登出 (12)一.打开会议操作界面1.打开17IP商务娱乐网首页,点击”电话会议系统”或者在地址栏输入“/conference.html”,进入电话会议管理界面图1-1二、获取帐户1.如果没有帐户,如图1-1,点击“获取帐户”,进入注册界面,正确填写”用户帐号”、”密码”和”用户Email”,点击“注册”按键提交注册信息,如图2-1。
图2-13.注册成功后直接进入“召集会议”界面。
如图2-1所示。
三、召集会议本会议系统支持同时召开一个或多个会议,要建立第一会议时,直接点击“当前会议”进入“召集会议”界面;要在同一时间召集多个会议时,第二个之后的会议要点击“预约会议”来召集。
下面分别介绍一下同时召开一个会议和同时召开多个会议的方法。
(一)、召开一个会议1.首先要建立一个会议室,点击“当前会议”进入“召集会议”界面。
图3-12.填写会议主题、会议时长和主持人电话名字及成员电话名字等信息,下面对每个字段进行详细说明。
估计消耗费用:是根据会议时长和参加会议的人数及电话号码初步确定的本次会议的消耗费用。
会议主题:必须填写的项目,会议结束后,可以在“历史会议”中,根据会议主题找到相关会议。
会议号码:系统自动生成的会议ID号。
在作为主叫型会议时,主持人和与会者都通过输入该会议号码进入到会议中。
保存录音:选择此项,表示当前会议的所有通话即将被录音。
录音文件可以通过“历史会议”列表找到并下载。
(录音文件将保留三天,三天后会自动删除,需要下载请及时下载。
)主持人电话/名字:主持人的电话和名字。
作为主持人可以按“9”终止此次会议,使所有与会者自动挂断电话。
成员电话/名字:参加会议人员的电话和名字。
作为成员按“9”则本成员从会议中退出;如果成员处于静音状态下,可以按“1”表示要发言。
增加成员:如果参加会议的人员超过10人,按此键可以增加参会成员数量。
提交》开始会议:按此按键表示开始会议。
会弹出以下界面有效余额:在邀请会议或者邀请成员进入会议,以及成员通过接入号加入时,都会判断有效余额是否足够:有效余额= 用户余额—所有进行中以及未进行会议的大约花费总额。
必须要“估计消耗费用”小于“有效余额”,才能邀请会议和成员或是成员通过接入号加入。
3.邀请成员可以在电话簿中选择成员号码,打开“全选开关”则选择所有号码。
也可以在成员电话、名字栏中手动输入。
把光标停在主持人/成员电话栏,选中右边电话本任意电话前面的复选框,左边的会被替换。
如果左边已经有右边的号码了,那这个号码会被清空,并且移到光标停留项;另外点左边成员或者主持人电话栏,名字前面会出现红色图标,点击这个红色图标,就会把电话栏目清空。
如果成员超过10人点击“增加成员”可以增加成员数量。
会议成员确定后,点击“提交》开始会议”,本次会议开始进行。
图3-2注意:如果全选的话,主持人不会添写,一般是电话会议管理员的电话,需要手动填写或在电话簿中选择。
4.进入会议状态图3-3邀请成员:在会议进行中可以再次邀请其他成员进入会议室,点击“电话簿”选择成员号码,或在“姓名”“电话号码”栏中填写,然后点击“邀请”就可以邀请新成员进入会议室了。
静音:可以控制这个成员是否可以发言,如果会议室成员较多,暂时不需要发言的成员可以设置为静音状态,如果需要发言,成员可以按“1”键请求发言。
主持人在界面上可以看到该成员前面有一个问号,表示该成员请求发言,如下显示:图3-4主持人按下“取消静音”后,该成员可以发言。
成员按“9”退出会议并且在右下角成员面板上可以看到该成员自动离开字样,过5秒钟该字样消失;主持人按“9”结束整个会议。
会议面板:包括开始会议、结束会议、所有人员静音、所有人员取消静音等操作。
开始会议,如果要邀请成员面板中所有成员,可以点该链接,邀请所有成员;结束会议,点该链接挂断所有电话并且离开会议;所有人员静音,点该链接当前会议室中所有人员都处于静音状态,只能听不能发言;所有人员取消静音,点该链接当前会议室所有人员都处于非静音状态,既可以听也可以发言。
会议成员:所有曾经参加过这个会议的成员都会在这里显示,同时可以邀请或删除这些成员。
所有第一次加入的成员,都会预算花费,并且加入整个会议的大约消费金额,如果删除成员,该成员再次加入时,被当成第一次加入。
注意:如果一个会议设定的会议时长是一小时,该会议在50分钟时结束,如果是主持人按“9”退出的会议,则该会议室关闭;如果主持人和成员都是挂断电话退出的会议,则该会议室内没有人了,但是该会议室没有关闭,需要按“会议面板”下的“结束会议”来关闭会议室。
(二)、同时召开多个会议如果要同时召开多个会议,要采用以下步骤实现:1.按照(一)中的介绍先召开第一个会议。
2.通过“预约会议”召开第二个、第三个、多个会议,其中预约会议中的“会议开始时间”改为当前时间,其他的具体操作步骤参看《四、预约会议》。
3.注意,在召开多个会议时要注意到“有效余额”。
有效余额是指在邀请会议或者邀请成员进入会议,以及成员通过接入号加入时,都会判断有效余额是否足够:有效余额= 用户余额—所有进行中以及未进行会议的大约花费总额。
必须要“估计消耗费用”小于“有效余额”,才能邀请会议和成员或是成员通过接入号加入。
4.召开多个会议后,点击“当前会议”按键,则显示当前电话会议列表。
图3-5四、预约会议(一)、预约未来会议预约会议在两种情况下可以应用到,第一种就是真正的设置在未来某一时间内需要召开的会议,如果您的会议开始时间不是当前,在指定时间到来后,系统2分钟内也会自动呼叫所有成员;由于与会人员不方便通过web方式管理控制,可以通过电话打入,作为会议召集者有足够的时间通知所有与会人员“会议号码”,下面先介绍一下这种情况的操作。
1.在“会议开始时间”栏里选择会议的预约时间,然后再选择成员的号码,点击“提交>>预约会议”按键,会议预约成功。
图4-12.再次进入“预约会议”界面,可以查看已经预约成功的会议。
图4-2如果要再预约其他会议,可以点击右边的“创建会议”按钮。
3.预约会议成功后,会议有两种召开方式,第一种是在设定的会议开始时间主持人到“会议面板”点击“开始会议”按键开始该会议;第二种是如果主持人没有进行开始会议的操作,则系统会在设定的会议开始时间2分钟后自动召开会议。
(二)同时召开多个会议预约会议应用的第二种情况就是在同一时间内召开多个会议,第二、第三、第N个会议需要在“预约会议”中建立,同时把“会议开始时间”改为当前时间。
就是说如果该用户已经有进行中的会议,想再开一个当前需要进行的会议,可以通过预约会议创建,时间可以保持默认当前时间,如果会议开始时间已经到来,表示该会议为当前会议,马上进入会议状态面板,但是不会立即邀请所有成员,用户必须通过右上角的“开始会议”来邀请所有成员,系统2分钟内也会自动呼叫所有成员;此时如果有多个进行的会议,通过“当前会议”将看到所有进行中的会议列表,点主题进入相应会议控制面板。
(三)有效余额在预约会议时要注意有效余额的判断,有效余额是指在邀请会议或者邀请成员进入会议,以及成员通过接入号加入时,都会判断有效余额是否足够:有效余额= 用户余额—所有进行中以及未进行会议的大约花费总额。
必须要“估计消耗费用”小于“有效余额”,才能邀请会议和成员或是成员通过接入号加入。
五、充值1.点击“充值”,进入充值界面。
图6-12.输入从运营商那里购买的卡的卡号,点击“充值”按键,充值成功后,会提示“充值成功,充值金额为**.**元”。
图6-2六、电话簿1.点击“电话簿”进入电话簿界面图7-12.输入姓名、电话号码和所属分组,点击填加,此号码加入到电话簿中。
图7-2点击“修改”可以修改联系人、电话号码和组别。
点击“删除”可以删除此成员。
3.在“请选择组”中选择不同的组,在号码簿中显示不同组的成员信息。
七、历史会议1.点击“历史会议”,显示该帐号的所有已完成的会议记录。
图8-12.点击会议主题,如“1111”,显示该会议的通话详单。
图8-23.点击“声音下载”,可以下载当前会议主题的录音。
文件格式为gsm格式。
八、控制面板1.点击“控制面板”,此项只在具有最高权限的admin账户中可以看到,普通的账户中是没有的。
图9-12.点击右侧的“用户列表”,进入用户列表界面。
图9-2基本费:是指每召开一个会议扣除的基础服务费。
主叫会议成员费用:如果成员电话作为主叫拨入到会议系统中,则每一个成员每分钟的费用。
被叫成员前缀、名称、每分钟费用:如果成员电话作为被叫进入到会议系统中,则依据此设置进行收费。
3.登陆密码设置,可以修改当前密码图9-34.修改E-mail地址图9-4九、登出1.点击登出退出当前帐户操作。
2.用户如果登出系统,并重新登陆后,如果有进行中的会议,将进入最近一个进行中的会议控制面板;如果没有会议,直接进入召集会议,并且发起会议。