USB to RS232 changeover application
- 格式:pdf
- 大小:368.82 KB
- 文档页数:9
如今呢是使用笔记本的人越来越多了,可是呢买了笔记本对于学习很多单片机比如说51或者AVR就不方便了。
因为大多数电脑都不带串并口了。
但是呢新出的笔记本上的USB接口是足够用的。
因而都想用USB转了串口或者并口就能方便单片机学习开发时的ISP编程或者JTA G仿真了。
其实很多单片机开发商和销售商都早就有了USBisp的配套软件和硬件了的,只不过都比较昂贵,而且技术资料多是保密的,对于自己小本学习单片机的人而言不免都希望能与价廉物美的USBISP烧写器,而且也多想自己动手做一个了。
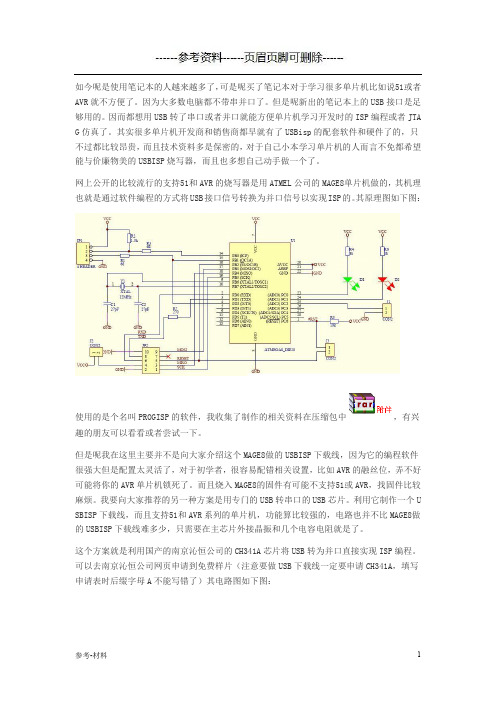
网上公开的比较流行的支持51和AVR的烧写器是用ATMEL公司的MAGE8单片机做的,其机理也就是通过软件编程的方式将USB接口信号转换为并口信号以实现ISP的。
其原理图如下图:使用的是个名叫PROGISP的软件,我收集了制作的相关资料在压缩包中,有兴趣的朋友可以看看或者尝试一下。
但是呢我在这里主要并不是向大家介绍这个MAGE8做的USBISP下载线,因为它的编程软件很强大但是配置太灵活了,对于初学者,很容易配错相关设置,比如AVR的融丝位,弄不好可能将你的AVR单片机锁死了。
而且烧入MAGE8的固件有可能不支持51或AVR,找固件比较麻烦。
我要向大家推荐的另一种方案是用专门的USB转串口的USB芯片。
利用它制作一个U SBISP下载线,而且支持51和AVR系列的单片机,功能算比较强的,电路也并不比MAGE8做的USBISP下载线难多少,只需要在主芯片外接晶振和几个电容电阻就是了。
这个方案就是利用国产的南京沁恒公司的CH341A芯片将USB转为并口直接实现ISP编程。
可以去南京沁恒公司网页申请到免费样片(注意要做USB下载线一定要申请CH341A,填写申请表时后缀字母A不能写错了)其电路图如下图:CH341 是一个USB 总线的转接芯片,通过USB总线提供异步串口、打印口、并口以及常用的2线和4 线等同步串行接口。
在异步串口方式下,CH341提供串口发送使能、串口接收就绪等交互式的速率控制信号以及常用的MODEM 联络信号,用于为计算机扩展异步串口,或者将普通的串口设备直接升级到USB 总线。


亲:由于有的电脑没有串口线的驱动程序,因而需要我们自己安装驱动程序,以下方法为自己亲测的,与大家分享
方法一:
1.查看USB转RS232串口驱动设备有没连接:
注:先从网上下载驱动程序,然后解压出来
右键选择我的电脑,选择“管理”,弹出计算机管理窗口,在系统工具中选择“设备管理”,在右边菜单栏中有“其它设备”-USB Serial Converter 查看其有没连接。
如下图:
2.右击“USB Serial Port”在弹出的快捷菜单中选择“更新驱动程序”,在弹出的“硬件更
新向导”中选择“从列表或指定位置安装(高级)”选项,点击下一步,勾选“在搜索中包括这个位置”,在“浏览”中找到驱动程序,如放在F盘下,选择路径“F:\download\06\usbzhuanchikou\USB 2.0 TO RS232 Cable\USB 2.0 TO RS232 Cable\PC Driver”,如下图所示:
再点击下一步,即可完成自动搜索。
方法二:
采用此方法比较直接有效,前提是要知道你的RS232串口线为哪个牌子的
如自己所用的串口线为Z-TEK,那么直接在网上搜索Z-TEK串口程序驱动,下载文件如下:
对上面的驱动程序直接双击开安装即可。
其他型号的串口线可参考方法二的实施例。

pl2303hxa 2008 -回复PL2303HXA是一款USB转RS232的芯片,于2008年问世。
这款芯片非常受欢迎,因为它提供了一种简便的方法,将传统的RS232串口设备连接到现代的计算机。
USB(Universal Serial Bus)是一种常见的数据传输接口,被广泛用于连接各种外部设备,如打印机、键盘、鼠标等。
而RS232则是一种传输数据的标准,通常用于连接计算机和串口设备,如调制解调器、工业设备等。
在现代计算机中,很少会找到RS232串口。
然而,仍然有许多使用RS232的设备和应用程序。
这就是为什么PL2303HXA芯片非常有用的原因。
它作为一个中间转换器,连接传统的RS232设备到计算机的USB接口上。
PL2303HXA芯片具有很多特性,使其成为RS232到USB转换的理想选择。
首先,它支持高速传输率,最高可达12Mbps。
这确保了数据能够快速、稳定地从串口设备传输到计算机。
其次,PL2303HXA还支持低功耗模式,从而延长设备的使用寿命。
另外,这款芯片是插即用的,无需安装任何驱动程序,从而节省了时间和精力。
PL2303HXA芯片的设计也是非常简单的。
它只需要几个外部元件,如晶体振荡器、电容器和电感器,就能完成转换。
因此,它非常适合嵌入式系统设计,甚至可以集成在其他电路板上。
此外,PL2303HXA还具有丰富的软件支持,可以在多种操作系统上运行,如Windows、Mac和Linux。
使用PL2303HXA芯片连接RS232设备到计算机是非常简单的。
首先,我们需要一个PL2303HXA的模块,该模块包含了芯片以及与之相关的电路元件。
然后,我们将RS232设备连接到PL2303HXA模块的串口引脚上,通过RS232数据线进行连接。
接下来,我们将模块的USB接口连接到计算机的USB端口上。
在连接完成后,PL2303HXA芯片将识别为一个虚拟串口设备,我们可以像操作普通串口设备一样使用它。

1、安装USB转RS232驱动:点击“autorun”应用程序,然后根据类型选择相应的“Product
Driver”点击安装,如图1所示。
安装完成后重启计算机。
图1
2、将通信电缆的两端分别插到PLC通信端口与计算机的USB接口,打开“我的电脑-属性
-设备管理器-端口(COM)”,在下拉菜单中可以看到“USB Serial Port(COM X)”,如图2.1所示。
点击鼠标右键选择“属性-端口设置”可以设置相应的波特率等项,如图2.2,设定完成后点击“确定”。
图2.1 设备管理器
图2.2 COM端口设置
3、打开S7-200编程软件“STEP7 Micro/WIN V4.0”,单击左侧“查看-设置PG/PC接口-双
击PC/PPI cable(PPI)”,图3.1。
在“PPI”属性选项中的站地址、时间等一般使用默认值,波特率与端口设置时的数值相同,图3.2。
在“本地连接”中选择“COM X”,如图
3.3所示。
图3.1 访问路径选择
图3.2 PPI属性参数设置
图3.3 本地连接设置
4、单击左侧“查看-通信”打开通信设置,远程地址一般采用默认,双击右侧“双击刷新”
项,搜索到目标项如“地址2,9.6kbps”,然后点击确认。
图4 通信项参数设置
5、程序编写完成后,选择菜单栏“文件-下载”,点击“下载”,下载完成。
图5 下载程序。
电脑USB转TTL串口/RS232串口模块对于一些学校、工业、科研客户来说,电脑的串口非常重要,很多设备都必须采用串口和电脑端软件连接,很多电路模块可以非常直观方便地利用串口调试软件进行调试,很多仪器必须通过串口进行通讯和数据交换。
但是目前笔记本电脑因为空间的限制和其他方面考虑的原因都没有串口,甚至一些台式电脑也取消了串口配置,这让我们迫切需要串口的客户非常苦恼。
USB转串口模块全称为USB to Serial port Module,它可以将USB接口虚拟成一个串口,解决客户无串口的苦恼。
现在市面上的USB转串品的设备可谓是琳琅满目,质量也是参差不齐。
造成这种现象的根本原因就在于控制芯片的不同。
现在USB转串口桥接芯片有很多,比如CP2102、FT232、PL2303等等。
但并非每一种芯片都可以用作ISP下载。
经过测试CP2102是不能下载的,而FT232可以下载,但其价格实在不菲。
最为适中的就是台湾生产的PL2303,可以稳定下载,并可以支持多种操作系统。
PL2303HX采用28脚贴片SOIC封装,工作频率为12MHZ,符合USB 1.1通信协议,可以直接将USB信号转换成串口信号,波特率从75~1228800,有22种波特率可以选择,并支持5、6、7、8、16共5种数据比特位,是一款相当不错的USB转串口芯片。
产品1:采用PL2303芯片的USB转TTL串口模块每个12元含一根4芯杜邦连接线这是我们用PL2303芯片开发的USB转串口模块,采用机器自动焊接都经人工检测,电路板只有30*16*7毫米,模块一共引出5根脚,引脚电平为TTL,引脚定义如下:+5V、P3.0 TXD 、P3.1 RXD 、GND 地线、+3.3V 。
其中+5V和+3.3V电源输出线一般情况下都不用的,不需要连接。
现在购买PL2303模块我们还赠送一根30厘米长的杜邦连接线,它一头是四位一体的插座可以直接插到我们的2303模块上,另一头是四个独立的杜邦头,可以灵活插到设备上,非常方便。
I-7561USB to RS-232/422/485 ConverterQuick Start GuideProduct Info:/i_7561.html1. IntroductionI-7561 is a cost-effective module for transferring serial data via USB. You can connect your serial devices to systems that use a USB interface. There is one RS-232/422/485 port where the I-7561 could act as a RS-232 to USB converter, RS-485 to USB converter, and RS-422 to USB converter. A "Self-Tuner" chip auto-tunes the Baud Rate and data format to the RS-485 networks. The I-7561 module is self-powered through USB. The I-7561 acts as a RS-232 to USB converter, an RS-485 to USB converter, and an RS-422 to USB converter.2. System Network ConfigurationMultiple Baud Rate-Multiple Data Format3. Block Diagram4. Output Types5. Driver InstallationInstalling the DeviceDownload driver files and install1. Package CD \Napdos\7000\756x\75612. /documents/drivers/756x/756x.zipThe following steps will show how to install the device under Windows 7.1. Power on your computer and boot to Windows.2. Locate the USB port of your computer and plug in the I-7561.3. Windows will detect the new device and will initiate the Found New Hardware Wizard prompting you to install the software for the detected USB Device. Select to install from a list or specific location. Click Next to continue.Verify driver installationThis section will show you on how to verify whether the I-7561 was properly installed. You will also need to determine the COM port assignment made by Windows for the USB to RS-232/422/485 converter.Note: Before you connect the I-7561 for the first time, ensure that you do not attach any serial devices to the converter. You must only connect the I-7561 itself.To verify whether the device is properly installed and determine the COM port assignment for the device:1. Click “Start” > “Control Panel” > “Device Manager” button. Double-click on Ports(COM & LPT). If the device was correctly installed, you should now see the I-7561 USB-to-RS232/422/485 (COM10) device listing. This also means thatWindows has assigned the device to the COM10 port.2. Once you have verified that the device has been properly installed, you may nowproceed to use the USB-to-RS232/422/485 Converter to connect to serialdevices. Attach the serial device to the serial port of the adapter and thenconnect the USB connector to the USB port of your computer. Use the supplied driver for the serial device if needed.。
USB Serial Converter (Micro USB B type)2014.02Rev. 1.01Contents1.Introduction (2)1-1. Overview (2)1-2. Package Contents (2)1-3. System Requirements and Restrictions (2)1-4. RS-232C connector Pin Assignment (3)2.Installation and Operation on Android OS (4)2-1. Installation of USB60Term application (4)2-2. How to operate USB60Term (5)3. Specifications (8)*All trademarks and logos are the properties of their respective holders. *The specifications and pictures are subject to change without notice.11.Introduction1-1. Overview● REX-USB60MB is a USB to serialconverter. Compatible with UniversalSerial Bus specifications Rev. 1.1.● Up to 230.4Kbps data transfer rate.●Micro USB (B type Male)Easy to connect Android tablet or smartphone.●Power/Transmit/Receive LED indicatorsfor monitoring communication status.1-2. Package ContentsThis product is shipped with the following items:● REX-USB60MB USB Serial Converter● Warranty Card in JapaneseNote: Not include the printed document of User’s manual and Software CD. 1-3. System Requirements and RestrictionsHost machine●Android tablet/smart phone with free Micro USB B type portOperating System● Android OS 3.2、Android OS 4.0 or laterNote:The Android driver software for this product is not provided from RATOC Systems, Inc.The FTDI Java D2xx for Android Library which is provided by FTDI Ltd, “D2xx.jar” works with this product.And we made the terminal application “USB60Term” using “D2xx.jar”, published at Google Play.21-4. RS-232C connector Pin AssignmentThe pin assignment of the connector is below:This DB9pin connector is compatible with ANSI/EIA/TIA-574 specifications.1 2 3 4 5Signal NameDirectionDTE – DCE. Meaning1 DCD <--- Data Carrier Detected2 RXD <--- ReceivedData3 TXD ---> TransmittedData4 DTR ---> Data Terminal Ready5 GND - SignalGround6 DSR <--- DataSetReady7 RTS ---> Request to Send8 CTS <--- Clear to Send9 RI <--- RingIndicator6 7 8 932. Installation and Operation on Android OS Please make sure that the Android tablet meets the following specifications: •USB port is Micro-USB B or AB•Android OS version is 3.2, 4.0 or later•USB Host mode is available2-1. Installation of USB60Term applicationDownload the terminal application “USB60Term” from Google Play.1) Start Google Play. Type “USB60” to the search box on Google Play.2) Select “USB60Term” from the search result, and install it.3) After USB60Term application is installed, connect USB Serial Converter. Then, the below window will show:Set the check to the checkbox “[ ] Useby default for this USB device”.If you set the uncheck to the abovecheckbox, the above popup windowshows up at each time attaching USBserial converter.4) Select “OK”, and then start USB60Term. The below window will show:After the USB Serial Converter is recognized, the “Connected” message shows up on the left of “USB Serial”. And then, it will be ready for use.42-2. How to operate USB60TermWhen the USB60Term starts, the below window will show:1Status of detecting USBSerial Converter Display the status of detecting USB SerialConverter, this status shows “Connected” or “Not connected”.2 “To setting” buttonThe button for changing serial parameter.After changing the parameter values, tap the“Configure” button to enable new values.3 Send data fieldAfter tapping this field, enter the send data.4 Receive data fieldDisplay the received data.The displayed data is holding till the “Clear ”buttonis tapped.5 Option menuOption menu shows up6 “Send” buttonTransmit the data of the “send data field “ 7 “Send with CR+LF” buttonTransmit the send data with CR code(0x0D) and LF code(0x0A) 8“new line [CR+LF]” checkbox Before transmitting the send data, an LF(0x0A)code in the send data will be replaced with the CR+LF(0x0D+0x0A) code.9 “Clear” buttonErase the data of the “Receive data field ” Option menuRTS_clear checkboxWhen checked the “RTS_clear” checkbox, then the RTS signal will be stable to clear (off). If unchecked this checkbox, the RTS signal will be unstable after opening serial port.5How to send dataWhen tapping the send data field, the software keyboard shows up. Then, enter the send data.You can set multiple lines with a new-line.After entering the send data, tap the “Send” button or the “Send with CR+LF” button at the upper-right of screen. Then, the send data will be transmitted.How to receive dataThe data from USB Serial Converter will be always received.And the received data will show at the “receive data field”.When tapping the “Clear” button, the data of the “Receive data field” will be erased.6How to change serial parameterAfter tapping the “To setting” button, you can change serial parameter values. When edit is ready, the “To setting” button will be changed to the “Configure” button. And the back-ground color of serial parameter values will be changed in light blue.Baud Rate Stop Bit Data Bit Parity Flow ControlAfter finishing editing the parameter values, tap the “Configure ” button for changing values.73. SpecificationsProduct Name REX-USB60MBSerial Input/Output level RS-232C levelUSB Specification USB(Universal Serial Bus) Specifications Rev. 1.1 Connector USB :Micro-USB B maleRS-232C:D-Sub9 male (with anchor [#4-40]) Number of I/O ports 1 portUnit Dimensions 3.35[L] x 1.1[W] x 0.43[H] in (85[L] x 28[W] x 11[H] mm) Cable Length Approx. 2.83 ft (85 cm)Weight 0.194 oz (55 g)Data transfer mode Asynchronous (Start stop synchronization)Data transfer Rate (Baud) 300/600/1,200/2,400/4,800/9,600/19,200/38,40057,600/115,200/230,400 bpsTransmit Distance Within 50ft (15m)Power Voltage DC+5V (Powered for USB Bus)Power Consumption Average: 36mA(5V) Max.: 60mA(5V)Serial Parameter Data bit: 7/8 Start bit:1 Stop bit: 1/2Parity bit: even/odd/noneRS-232C connector D-SUB9PIN RS-232C connector MaleANSI/EIA/TIA-574LED Indicators PWR:Power LEDIf 5V power from USB bus is properlysupplied from USB bus, this indicator LEDwill be on.TXD:Transmit data indicator (Host to Device)RXD:Receive data indicator (Device to Host) Operating Environment Temperature: 32ºF to 122ºF (0ºC to 50ºC)Humidity: 10 to 90% (non condensing)Storage Environment Temperature: -4ºF to 149ºF (-20ºC to 65ºC)Humidity: 10 to 90% (non condensing)Note:1.Do not remove while the application is communicating. System will beunstable.2.Do not operate to suspend while the application is communicating.System will be unable to resume properly.3.This product does not support the serial mouse for connecting to RS-232Cport.89。
USB转RS232原理USB(Universal Serial Bus)是一种常见的计算机接口标准,用于连接计算机和外部设备。
RS232(Recommended Standard 232)是一种常见的串行通信标准,用于在计算机和其他设备之间传输数据。
USB转RS232是一种将USB接口转换为RS232接口的技术,可以使计算机与不支持USB接口的设备进行通信。
USB转RS232的原理是通过将USB信号转换为RS232信号来实现数据传输。
USB信号和RS232信号之间存在显著的差异,因此需要使用转换器来进行信号转换。
转换器通常由芯片组成,这些芯片能够将USB信号转换为RS232信号,并在计算机和设备之间建立起连接。
在USB转RS232的过程中,转换器首先接收来自计算机的USB信号。
USB信号是一种数字信号,由高低电平表示。
转换器将USB信号转换为RS232信号,RS232信号是一种模拟信号,由正负电压表示。
转换器通过改变电压的方式将USB信号转换为RS232信号,并将其发送到与其连接的设备上。
设备接收到转换器发送的RS232信号后,会将其解码为数据。
设备根据RS232信号的电压变化来解读数据。
正电压和负电压分别表示不同的二进制位。
设备根据电压的变化将RS232信号解码为相应的数据,并对其进行处理。
当设备需要向计算机发送数据时,它会将数据转换为RS232信号,并通过转换器将其发送到计算机。
转换器将RS232信号转换为USB 信号,并将其发送到计算机上。
计算机接收到USB信号后,通过相应的驱动程序将其转换为可读的数据,并将其显示在屏幕上。
USB转RS232的原理可以使计算机与不支持USB接口的设备进行通信。
这种技术广泛应用于各种领域,如工业自动化、通信设备、医疗设备等。
通过使用USB转RS232技术,可以简化设备的连接方式,提高设备之间的数据传输效率。
总结起来,USB转RS232的原理是通过转换器将USB信号转换为RS232信号,实现计算机与不支持USB接口的设备之间的数据传输。
USB转RS232转换器的应用USB to RS232 changeover application
关键词USB转换到RS232 驱动软件
Key Words USB to RS232 drive software
A&D Service & Support Page 2-9
USB转RS232转换器的应用
现在有的电脑没有RS232串口,只有USB接口。
但有的设备只能用RS232串口进行通讯,此时,需要将USB接口转换到RS232串口的方式进行通讯。
具体实现如下:首先,在没有安装USB转换RS232驱动软件情况下,当插入USB转RS232转换器时将弹出下面的对话框,按照下面的指示顺序操作,安装USB转换RS232驱动软件。
1
2
对话框选择驱动软件的位置。
驱动软件可从网上下载,在这里已下载了驱动软件如下图所示
3
4
此时,开始安装驱动软件。
如下图,
A&D Service & Support Page 3-9
5
6
7
当安装完驱动软件之后,可以到硬件检测对话框中,查看USB转RS232转换接口的位置,如下图所示,
A&D Service & Support Page 4-9
下面以6SE70为例,进行串口连接通讯实验。
建立Masterdrives Plus 项目,点击OK按钮
A&D Service & Support Page 5-9
当打开DRIVEMONITOR软件后,在Tools菜单中选择,如下图
选择COM3口点击OK按钮,
A&D Service & Support Page 6-9
点击"RAM Online"按钮,出现搜索对话框;
"Device status "状态框中出现OK状态,表示已经建立起通讯连接。
在安装完USB转RS232驱动软件之后,在查找硬件驱动COM口时,有可能出现超出Drivemonitor串口COM1~ COM4以外的名称,比如:COM5 等,在这种情况下,要把该串口改成Drivemonitor本身已存在的串口。
具体如下面更改操作的例子:
在计算机系统属性对话框中的硬件驱动管理器中,鼠标右击串口USB到RS232连接的属性对话框,点击”Properties”按钮
A&D Service & Support Page 7-9
选择”Port Setting”标签,点击”Advanced”按钮
选择计算机本身所携带的COM口,然后点击OK按钮,即可完成COM口的设置。
A&D Service & Support Page 8-9
附录-推荐网址
Drive
西门子(中国)有限公司
自动化与驱动集团客户服务与支持中心
网站首页:/Service/
专家推荐精品文档:/Service/recommend.asp
驱动技术常问问题:/CN/view/zh/10803928/133000 “找答案”驱动技术版区:
/service/answer/category.asp?cid=1038
A&D Service & Support Page 9-9。