火拼俄罗斯键盘加速器使用方法.doc
- 格式:doc
- 大小:22.50 KB
- 文档页数:2
欧卡联机键盘操作方法
1. 连接键盘:将欧卡联机键盘的USB接口连接到计算机的USB接口上。
2. 开机:按下键盘上的电源开关,等待键盘启动完成。
3. 登录:在计算机屏幕上输入用户名和密码,登录到操作系统桌面。
4. 打开应用程序:打开所需的应用程序,例如文本编辑器或浏览器。
5. 输入文本:使用键盘输入文本、命令或快捷键。
键盘上的常用键包括字母键、数字键、符号键和功能键。
特殊键包括Enter、Shift、Ctrl、Alt、Windows键、Esc、Tab、Backspace、Delete等。
6. 复制和粘贴:可以使用键盘快捷键进行复制和粘贴操作。
例如,按下Ctrl + C 快捷键可以将选定的文本复制到剪贴板中,按下Ctrl + V快捷键可以将剪贴板中的文本粘贴到光标位置。
7. 切换输入法:如果需要输入其他语言,可以使用键盘快捷键切换输入法。
例如,在Windows操作系统中,按下Alt + Shift可以在中文输入法和英文输入法之间切换。
8. 退出程序和关机:完成任务后,可以使用键盘快捷键退出当前程序或直接关
机。
例如,在Windows操作系统中,按下Alt + F4可以关闭当前程序,按下Ctrl + Alt + Del可以打开Windows安全选项屏幕,可以选择关闭计算机或注销用户。
俄罗斯rutracker使用方法哎呀,说起俄罗斯 rutracker 呀,那可真是个宝藏之地呢!不过要想好好使用它,可得有点小窍门哦。
首先呢,你得找到能进入这个网站的途径呀。
这就好比你要去一个神秘的地方探险,得先找到入口不是。
然后呀,你可能会发现界面全是外文,别慌,这时候就需要你有点语言小本事啦,或者借助一些翻译工具。
等你好不容易弄明白了界面,就可以开始探索啦!就像在一个巨大的宝库中淘宝一样,里面有各种各样的资源,音乐呀、电影呀、游戏呀等等。
但是呢,可别像个没头苍蝇一样乱撞哦,要有目的性地去找你想要的东西。
你看呀,这就好比你去超市买东西,你得知道自己想买啥,然后直奔那个货架。
在 rutracker 上也是一样,你得清楚自己是来找音乐的还是电影的,不然可就容易迷失在这资源的海洋里啦。
找到你心仪的资源后,下载也是个技术活呢。
有时候可能下载速度会有点慢,这时候你可别着急上火呀,耐心等等,就像等一朵花慢慢开放一样。
而且呀,下载的时候也要注意版权问题哦,可别稀里糊涂地就触犯了法律。
还有啊,在这个过程中可能会遇到一些小问题,比如链接失效呀,
文件损坏呀,别灰心丧气,这都是很正常的。
就像你走路的时候偶尔
会绊一下脚一样,拍拍土继续走就行啦。
哎呀呀,使用俄罗斯 rutracker 是不是还挺有意思的呀?虽然过程可
能有点小曲折,但当你找到自己想要的东西时,那种满足感可真是没
法形容呢!所以呀,大家要有耐心,有探索精神,相信你们一定能在
这个神秘的网站里找到属于自己的宝贝!总之,去尝试吧,去发现吧,去享受这个过程吧!。

火拼俄罗斯键盘加速器使用方法.doc
预览说明:预览图片所展示的格式为文档的源格式展示,下载源文件没有水印,内容可编辑和复制
火拼俄罗斯键盘加速器使用方法
调整好键盘速度和首次延迟以后,确认启用加速选项打上勾,然后进入QQ火拼俄罗斯,你就可以体验到键盘飞一般的速度了:) 如果你还想知道自己游戏的速度,只要勾上Q块测速选项,便会在游戏的提示块窗口上方显示你的游戏时间和游戏速度。
同时也会在变速器窗口内显示速度曲线。
如果想在游戏中不想来回切换窗口就能随时看到速度曲线,只要让游戏窗口盖着变速器窗口的上半部分即可。
如果自己就有快键盘,并且想用自己的键盘速度打,只要把启用变速前的钩去掉便可,同样也能测速。
火拼俄罗斯键盘加速器功能修改键盘速度
自定义键位功能
进行按块统计,加快响应,Q块测速,启用变速等操作调整首次延迟,普通键盘的键盘速度一般为1800字节/分,首次延迟为250毫秒左右
火拼俄罗斯键盘加速器术语解释键盘速度:是指按住一个键不放,一分钟能打出的字符个数,用来表示键盘速度的快慢首次延迟:是指当按住键盘某个键不放时,出现第一个字符与出现第二个字符的时间间隔
普通键盘的键盘速度一般为1800字节/分,首次延迟为250毫秒左右。
加速器的使用方法
加速器(Accelerator)是一种网络工具,用于改善网络连接速度和稳定性。
以下是加速器的使用方法:
1. 下载和安装:在应用商店中搜索并下载合适的加速器应用,然后按照安装提示完成安装。
2. 注册和登录:打开应用,根据提示注册一个新账户,并通过邮箱或手机号码验证身份。
然后使用注册的账户登录加速器。
3. 选择服务器:登录后,你会看到一个服务器列表。
根据需要选择一个最适合的服务器地点,通常选择离你近且速度较快的服务器。
4. 连接加速器:在服务器列表上点击连接按钮,等待加速器连接成功。
一旦连接成功,你的网络流量将经过加速器服务器,进而提高你的网络速度。
5. 加速设置:根据个人需求可以对加速设置进行调整,如选择加速模式、选择加速协议等。
通常可以选择全局加速,或者根据应用或网站的需要进行分应用或分网站加速。
6. 运行加速器:连接成功后,加速器将在后台运行,你可以继续使用其他应用或浏览网页。
7. 断开连接:当你不再需要使用加速器时,可以在应用中点击断开按钮,断开与加速器服务器的连接。
请注意,加速器的使用效果可能会因地理位置、网络环境等因素而有所不同。
此外,一些加速器需要收取费用或提供付费服务,需要在使用之前了解清楚。
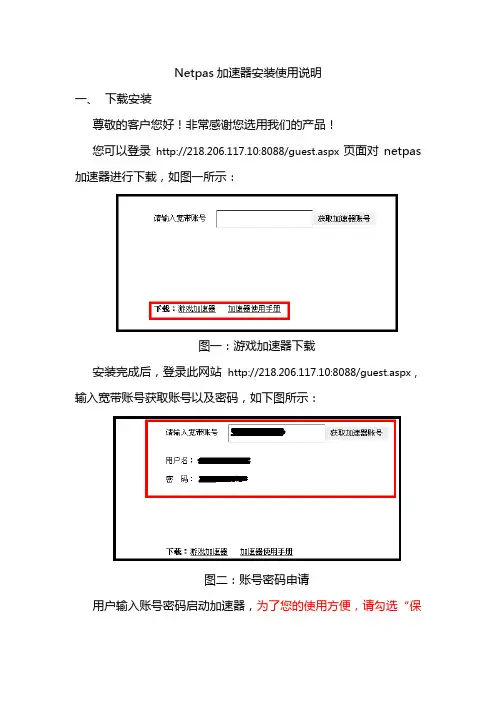
Netpas加速器安装使用说明
一、下载安装
尊敬的客户您好!非常感谢您选用我们的产品!
您可以登录http://218.206.117.10:8088/guest.aspx页面对netpas 加速器进行下载,如图一所示:
图一:游戏加速器下载
安装完成后,登录此网站http://218.206.117.10:8088/guest.aspx,输入宽带账号获取账号以及密码,如下图所示:
图二:账号密码申请
用户输入账号密码启动加速器,为了您的使用方便,请勾选“保存登陆信息”以及“保存登陆密码”。
如下图三所示:
图三:加速器启动
加速器启动时会出现掉包现象,QQ等工具将暂时掉线,启动后将恢复正常,此为正常现象。
Netpas启动后便对网络进行加速,无需进行其他操作。
若您在使用过程中突然断线,加速器将进行出错提醒,重新连接可能需要2-5分钟
二、用户账号寻回
客户忘记账号密码后可以登录账号申请网站http://218.206.117.10:8088/guest.aspx,输入自己的宽带账号重新获取加速器账号信息。

9999合一俄罗斯方块键盘说明键盘是玩这款游戏最常用的输入设备之一、通过键盘上的不同按键来控制方块的移动、旋转和下落。
本文将为大家详细介绍9999合一俄罗斯方块游戏的键盘按键及其功能。
1.上箭头(↑)键:使用上箭头键可以旋转方块。
每次按下上箭头键,方块将顺时针旋转90度。
玩家可以通过反复按下上箭头键来使方块得到不同的旋转角度。
2.下箭头(↓)键:使用下箭头键可以加速方块的下落速度。
通常,方块会以一定的速度自动下落,但是通过按下下箭头键,玩家可以加速方块的下落,使方块更快地堆叠在底部。
3.左箭头(←)键:使用左箭头键可以将方块向左移动一个单位。
每次按下左箭头键,方块将水平移动一个单位。
玩家可以通过反复按下左箭头键来将方块移动到所需的位置。
4.右箭头(→)键:使用右箭头键可以将方块向右移动一个单位。
每次按下右箭头键,方块将水平移动一个单位。
玩家可以通过反复按下右箭头键来将方块移动到所需的位置。
5.空格键:使用空格键可以直接将方块放置在堆中的最底部。
按下空格键后,方块将立即下落并堆叠在底部。
6. Enter键:使用Enter键可以重新开始游戏。
当玩家输掉游戏或者想要重新开始时,可以按下Enter键重新开始。
7.P键:使用P键可以暂停游戏。
按下P键后,游戏会暂停,玩家可以选择继续游戏或者退出。
除了上述常用的按键之外,不同的游戏版本和不同的平台可能还有其他一些特殊按键或功能。
玩家可以根据自己所使用的游戏平台和设备来了解和使用这些特殊功能。
总的来说,9999合一俄罗斯方块游戏的键盘说明非常简单明了。
通过上下左右箭头键来控制方块的移动和旋转,通过空格键来快速放置方块。
希望这份键盘说明能够帮助到你,玩得愉快!。
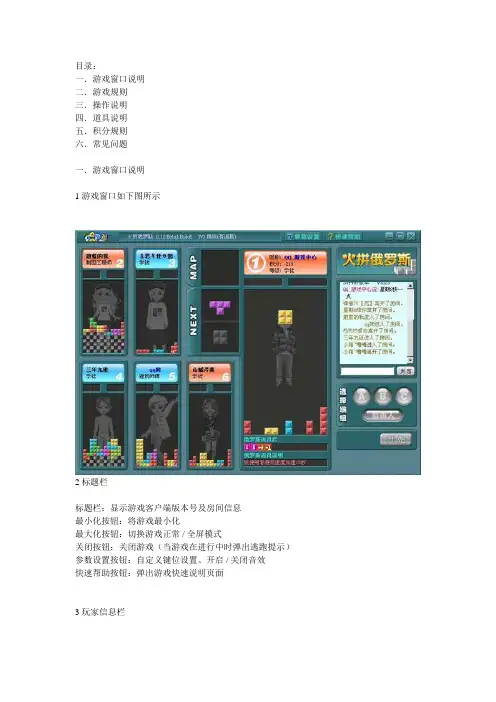
目录:一.游戏窗口说明二.游戏规则三.操作说明四.道具说明五.积分规则六.常见问题一.游戏窗口说明1 游戏窗口如下图所示2 标题栏标题栏:显示游戏客户端版本号及房间信息最小化按钮:将游戏最小化最大化按钮:切换游戏正常 / 全屏模式关闭按钮:关闭游戏(当游戏在进行中时弹出逃跑提示)参数设置按钮:自定义键位设置、开启 / 关闭音效快速帮助按钮:弹出游戏快速说明页面3 玩家信息栏信息栏显示玩家座编号、昵称、积分和等级(玩家只能看见自己的积分情况)。
以颜色区分玩家组队情况(红色:红队,蓝色:蓝队,黄色:黄队,绿色:自由人)4 游戏区游戏区将显示玩家 QQ 秀形象:游戏开始前玩家形象以黑白形式显示,举手后以彩色形式表现,游戏开始后以黑白半透明形式显示。
游戏开始后游戏区将显示玩家目前游戏情况,玩家自己可以看到已落下的方块和正在落下的方块,旁观者和其他游戏者界面则只能看到已落下方块,看不到正在下落的方块。
方块落到底后表以闪光形式表现,消层时以爆炸粉碎效果显示。
5 next 区域next 区域显示即将落下的下一块方块,和下下块方块。
即将落下的第二块方块以灰色形式显示。
6 道具栏道具栏显示玩家所获得的道具7 道具说明栏道具说明栏显示玩家获得的第一个道具(道具栏最左端)的简要说明,进攻性道具以红色文字显示,防御性道具以蓝色文字显示。
8 组队按钮按下队伍相应按钮表示加入该队伍,当服务器收到组队信息并成功将玩家加到该队后会将组队的其他按钮弹起。
(如果与服务器失去联系,则任意组队按钮都有可能被同时按下,等收到服务器的确认组队信息后,其他按钮会弹起。
)默认状态下玩家为自由人队(自由人与自由人之间是对立的,与其他的组队也是对立的)。
在游戏中时这些按钮为灰色,游戏结束允许选队时才亮起(旁观者界面也为灰色)。
9 开始按钮选择好队伍后(或者默认为自由人队)按开始按钮开始一局游戏。
在游戏中开始按钮为灰色,游戏结束后允许开始新的游戏时该按钮亮起。

火拼俄罗斯方块新手入门教程俄罗斯方块是一款经典的益智游戏,相信很多人小时候都玩过。
对于新手来说,可能对游戏规则和策略还不太熟悉。
下面是一个针对新手的入门教程,帮助你快速上手并提高游戏水平。
一、游戏规则俄罗斯方块是由七种不同形状的方块组成,玩家需要操作方块使其拼成完整的一行或多行,拼满的行会消除,并获得相应的得分。
随着游戏进行,方块会逐渐加速下降,难度也会相应增加。
二、操作方式1.左右移动:使用键盘的左右箭头键来左右移动方块的位置,可以将方块移动到你需要的位置。
2.加速下降:按下键盘的下箭头键,可以加速方块的下降速度。
3.旋转方块:使用键盘的上箭头键或者空格键来旋转方块,适当的旋转可以使得方块更好地拼接到已有的方块上。
三、基本策略1.空隙利用:当方块下降时,不要着急将它放在最下方,可以先让方块悬空,留出空隙,以便更好地进行拼接。
2.消除优先:尽量将方块放在已有方块上方的空隙中,这样能够优先消除行。
消除行有助于释放出更多的空间,并提高得分。
3.高层建筑:尽量将方块放在下方,能够确保在后续拼接中有更多的空间可供利用。
4.预判下落点:在方块下降过程中,要学会预判方块下落的位置,做好相应调整,以便更好地拼接。
5.快速下降:当方块已经到达合适的位置时,可以加速下降,以便快速进入下一个方块的拼接。
四、高级技巧1.T字型方块的利用:T字型方块能够将一些较小的空隙填满,是非常有用的方块之一,合理利用它能够获得更高的得分。
2.横向拼接:当出现一块凸起的方块时,可以尝试从侧面将方块填充进去,这样能够释放更多的空间,并获得消除行的机会。
3.节奏感:将游戏节奏掌握好,避免因为匆忙而操作失误。
可以通过连续消除行来延长方块下降的时间,提高游戏的连贯性。
4.留存空隙:在游戏进行到较高难度时,留存一些空隙,以备后续方块的拼接。
注意控制空隙的分布,避免一些无法填充的空白区域。
五、注意事项1.不要等待完美:不要一直等待完美的方块状态,相信自己的判断,及时行动。
用户手册User ManualMod 005组合键功能1目录Mod 005 HotKeysMod 005 System Commands (Windows)Mod 005 System Commands (Mac)Mod 005 Backlight SettingsKey/Lighting Effects Customization Instruction Akko Warranty and Service Statement 7 8 9 10 11 12Menu1 Mod 005 组合键功能Fn+ W将 W A S D 与↑↓ ← → 键对调Fn + 左Win 锁Win键长按 Fn + ~ 5秒恢复出厂设置长按Fn + Q 3秒进入Windows系统长按Fn + O 3秒进入Mac系统1 2 3降低显示屏亮度增加显示屏亮度开放任务控制78910向后跳(音频)暂停/播放(音频)向前跳过(音频)静音-+调低音量调高音量OptionCommand右Alt Command左Win左Alt注:Mod 005 背光调节41. 键盘按键/灯光自定义需配合驱动进行。
2. 键盘有线模式下灯光可搭配驱动实现音乐律动。
3. 按键/灯光自定义及调用说明;请在我司官网下载“Akko Cloud”驱动。
4. 驱动下载地址 5按键 / 灯光自定义说明和调用说明售后电话:*************1.Akko机械键盘享受非人为损坏1年保修服务,即从购买日起,1年以内免费维修。
2.如超过条款1的保修期限,Akko官方将收取不超过市场平均价格的费用提供维修服务。
3.用户自行拆开键盘视为放弃免费维修服务,即使1年内损坏,也按照售后服务条款2执行。
4.不同销售平台的特殊服务条款,以购买平台规则为准。
*官方售后服务时间为每周一至周五上午10:00至下午18:00,节假日以国家法定节日休息为准。
*因受维修时间,物流时间,零件采购时间等不可控因素,售后时间会有不同,以实际损坏情况评估为准, 请用户耐心等待。

yandere simulator键盘使用翻译
YandereSimulator是一款为PC而设计的模拟游戏,可以让玩家体验一次从Yandere的角度看到的学校生活。
Yandere Simulator游戏中的键盘设定,可以帮助玩家更有效地进行操作。
下面来看看Yandere Simulator键盘的使用方法:
移动:
W:向前移动
A:向左移动
S:向后移动
D:向右移动
动作:
Shift:运行
Space:跳跃
Ctrl:蹲伏
X:俯卧撑
C:相机模式
照相:
B:拍照
武器:
Z:拿起武器
功能:
Tab:游戏菜单
Yandere Simulator键盘使用方法:
一开始,玩家可以使用W、A、S、D四个按键来控制角色的移动,Shift键可以使角色运行,Space键可以使角色跳跃,Ctrl键可以使角色蹲伏,而X键可以使角色进行俯卧撑,C键可以使角色进入相机模式。
斥力拿起武器时,玩家可以使用Z键来拿起武器,B键可以拍照,而Tab键可以打开游戏菜单,查看游戏的选项、成就、任务等信息。
以上就是Yandere Simulator的键盘使用方法,玩家可以根据自己的喜好对键盘的设置进行调整,以便更好地完成游戏任务。
Yandere Simulator是一款非常有趣的游戏,玩家可以以Yandere的角度欣赏这个世界,不断探索,去完成游戏任务。
正确使用Yandere Simulator 键盘,可以提高游戏的体验,有助于提升游戏水平。
玩pubg普通键盘操作方法
玩PUBG时,使用普通键盘的操作方法如下:
1. 移动角色:使用W键向前走,使用S键向后走,使用A键向左走,使用D 键向右走。
2. 跳跃:使用Space键进行跳跃。
3. 下蹲:使用C键下蹲。
4. 趴下:使用Z键蹲伏。
5. 全速奔跑:按住Shift键可以进行全速奔跑。
6. 切换武器:使用数字键1-9来切换不同的武器。
7. 开火:使用鼠标左键进行开火。
8. 瞄准:按住右键可以进行瞄准,同时使用鼠标滚轮可以调节瞄准倍数。
9. 拾取物品:使用F键来拾取地面上的物品。
10. 打开背包:使用Tab键可以打开背包查看背包内的物品。
11. 切换视角:使用V键可以切换第一人称和第三人称视角。
12. 使用医疗道具:使用数字键7-9来使用不同的医疗道具。
13. 使用投掷物品:使用G键可以进行投掷物品,按住鼠标左键可以调节投掷的距离和角度。
14. 打开地图:使用M键可以打开地图查看游戏地图。
这些是PUBG游戏中的一些基本的键盘操作方法,可以根据自己的喜好进行修改和调整。
火拼俄罗斯键盘加速器在当前竞争激烈的市场中,高效率和快速响应是成功的关键。
对于许多专业人士和高级技术人员来说,键盘速度是完成任务和工作的关键因素之一。
而在键盘速度领域,俄罗斯键盘加速器是一种备受推崇的工具。
本文将介绍俄罗斯键盘加速器的原理、应用场景以及使用俄罗斯键盘加速器的好处。
俄罗斯键盘加速器是一种软件或硬件工具,被广泛用于俄罗斯的打字比赛和职业打字员之间的竞争。
它的主要原理是通过配置和调整键盘布局,提高输入速度和准确性。
俄罗斯键盘加速器的主要特点是将常用字母和符号放置在更容易访问的位置,以便用户能够更快地输入文字。
通过使用俄罗斯键盘加速器,用户可以在保持相同打字习惯的同时极大地提高打字速度。
俄罗斯键盘加速器的应用场景非常广泛。
在办公环境中,职业打字员和数据输入员可以使用俄罗斯键盘加速器来提高工作效率。
在金融和证券行业,交易员通常需要以最快的速度输入大量数据,因此他们也经常使用俄罗斯键盘加速器。
此外,软件开发人员和程序员也可以受益于俄罗斯键盘加速器,因为他们经常需要较快地输入代码和指令。
使用俄罗斯键盘加速器的好处是显而易见的。
首先,它可以大大提高打字速度。
通过将常用字母和符号放置在更容易访问的位置,用户可以快速准确地输入文字,从而提高工作效率。
其次,俄罗斯键盘加速器可以减少打字错误。
由于常用字母和符号的位置更容易访问,用户更容易找到正确的按键,从而减少打字错误的概率。
这对于需要准确和快速的数据输入非常重要。
最后,使用俄罗斯键盘加速器还可以减轻手部和手指的压力。
由于用户更少地需要移动手指,手部和手指的负担会减轻,减少了患上手部和手指疾病的风险。
尽管俄罗斯键盘加速器带来了许多好处,但它也需要一定的学习和适应过程。
对于那些已经习惯于传统键盘布局的人来说,切换到俄罗斯键盘加速器可能需要一段时间来适应新的布局和键位。
然而,随着时间的推移和练习的增加,用户将逐渐掌握俄罗斯键盘加速器,并从中受益。
总结一下,俄罗斯键盘加速器是一种提高打字速度和准确性的工具,被广泛应用于各个行业。
Instruction ManualINDEX1 Product Introduction (1)1.1 Package Contents (1)1.2 Main Functions (2)1.3 Specification (3)2 Installation (4)2.1 Dimension (4)2.2 External Connection (5)3 Operation (7)3.1 Keyboard Self-detection (7)3.2 Joystick Operation (8)3.3 Key Operation (9)3.4 Menu Operation on LCD (10)3.4.1 Menu Operation Mode (11)3.4.2 Index of Menu (11)3.5 Menu Operation (12)3.6 Keyboard Short Commands (14)AppendixⅠAnalysis and Solution of Common Problem (15)Copyright Statement (16)1 Product Introduction1.1 Package ContentsKeyboard 1 pc Power supply 1pc 4Pin Line Pressing Terminals 1pc User manual 1pc1.2 Main FunctionsThe address range of PTZ or dome camera or decoder can be set from 0~255. At most, 128 devices can be connected in parallel.All input and output communication ports are lightning protection design and the anti-jamming ability is strong. The standard transmission distance is up to 1.2KM.Control all the functions of PTZ or dome camera, such as on / off of back light compensation.Set and run the preset point of PTZ or dome camera. 255 preset points are settable in all.Run PTZ or dome camera scan at a fixed speed or variable speed.Control PTZ or dome camera manually or automatically. Change factory default setting of special camera by adjusting camera menu.Control zoom, focus and aperture of camera manually.Control multiple PTZ or dome cameras at the same time.Built-in protocols are selectable.Built-in multiple languages OSD.Key sound on/off function.1.3 SpecificationProduct Vector Keyboard Power Supply DC12V+10%/50HZ 500mAOperatingTemperature-20℃~+55℃OperatingHumidity≤90% Non Condensing Communication RS-485Interface 4PIN Line Pressing TerminalsBaud Rate 1200bps, 2400bps, 4800bps, 9600bps, 19200bpsCommunication Protocol PELCO-D, PELCO-P,SAMSUNG,YAAN, SAECommunication between Camera and Keyboard One point to multi-pointsHalf-duplexJoystick Vector variable speed joystick Display LCD CommunicationDistance1.2KmControl CameraQuantity128OSD Menu EnglishDimension 220x130x10(mm)2 InstallationAfter open keyboard package, please keep the original packaging materials, so that when there is a problem, keyboard with original packaging materials can be sent back to the agent or the manufacturer for reparation. Non-original packaging material may lead to an unexpected transit damage, which may cause additional costs.2.1 DimensionFront side of KeyboardBackside of KeyboardPower Supply Interface: Connect to external stable voltage DC12V input through this interface.Communication interface: RS-485 communication interface. Indicator light of power: It shows the present power status. Light on means power connected well.Indicator light of communication interface: When keyboard connect to dome camera or PTZ, this light is on.2.2 External ConnectionPlease read the user manual carefully before any connection. Any wrong connection may cause the device damaged permanently. When you connect the device, please make sure the powers of all devices are off. Communication cable used between the devices connection must be twisted-pair cable with shielding. When cable is set up, high voltage line or other interfering line should be avoided as much as possible. Keyboard cannot be cross-connected when connecting with other communication devices. Anode must be to anode, cathode to cathode. As shown below:below:please make sure the address, protocol, baud rate of thekeyboard is set the same to the dome or PTZ camera. Otherwise, the dome or PTZ camera can’t be controlled.3 Operation3.1 Keyboard Self-detectionFig 3.1.1 Fig 3.1.2After power on, the keyboard take the following actions automatically:A. Self-detecting: The first line of LCD display shows“SYSTEM STARTUP”.The second line shows “<” and “<” increases successively till it fills the screen with one sound “di” as Fig 3.1.1.If sound is turned on, “<” increases successively with sound “di,di…” as Fig 3.1.1.B. After self-detection finishes: Get the current parametersautomatically and clear the contents of the second line onthe LCD display.The first line of LCD display shows “PELCO-D 2400 000”.They are communication protocol, baud rate, addressrespectively as Fig 3.1.2.3.2 Joystick OperationUsing joystick can control PTZ or dome camera’s rotation, pan-tilt direction and speed. Changing the tilt angle of joystick can adjust speed even.Vector joystick dimension is as below:Vector Joystick has three main functions as following:(1) Control dome camera rotation: Rocking the joystick in any direction, camera moves in appropriate direction. At the same time, the LCD displays "PTZ <<<<<". Controlling rocker of rotary speed of inclination can control the speed of the camera. More "<" displays on LCD screen, joystick tilts more, and the speed of camera is faster. Less "<" displays on LCD screen, joystick tilts less, and the speed of camera is slower.(2) Zoom Adjust (special function of 3D keyboard): Rotate the joystick grip to adjust focal length of the lens. Clockwise rotation of Joystick grip, zoom in and the image gets closer and larger; Counterclockwise rotation of joystick grip, zoom out and image gets farther and smaller.While rotating the joystick, the LCD displays "PTZ<<<<<".The number of "<" stands for the speed of zoom. More "<", zoom speed is faster. Less "<", zoom speed is slower.(3). The menu setting of controlled object: When setting menu, joystick up is to select previous menu and joystick down is to select the next menu. Joystick left or right can change parameters of the selected menu (as described in the LCD menu operation).3.3 Key Operation【Focus+】: Manual focus on far object. The far objects come clear and the near objects come blurring.【Focus-】: Manual focus on near object. The near objects come clear and the far objects come blurring.【Zoom+】: Zoom in to enlarge object.【Zoom-】: Zoom out the lens to larger view field. The object becomes smaller.【Iris+】: Increase aperture gradually. The picture becomes brighter.【Iris-】: Downsize aperture. The picture becomes darker. 【Setup】: Set key, [Setup]+number+[Enter] to set the preset point of the camera or set the short commands of thekeyboard(See 3.5).【Preset】: Run key, [Preset]+number+[Enter] to run the presetpoint.【Menu】: Menu key, to enter Menu.【Addr】: Address key, [Addr]+number+[Enter] to choose the communication address.【0】~【9】: Number keys [0], [1], [2], [3], [4], [5], [6], [7], [8], [9]. 【Clear】: Delete key, [Clear]+number+[Enter] to delete the preset point.【Enter】: Confirm key, to confirm the present operation.【Aux ON】: Aux ON.【Aux OFF】: Aux OFF.3.4 Menu Operation on LCDEnter the menu on LCD: Press【Menu】key to enter menu,as Fig 3.4.1.Fig 3.4.1Exit menu on LCD: Select random function keys except 【Menu】key to exit menu and enter corresponding operation. For example, press 【Focus+】to exit menu and enter focus setting. As Fig 3.4.2.Fig 3.4.23.4.1 Menu Operation ModeThere are two modes of menu operation:(1) Joystick operation: Joystick up and down to flip the menu.Joystick left and right + [Enter] to set theparameters of the menu.(2) Key operation: Press [2], [8] to flip the menu.Press [4], [6]+ [Enter] to set the parametersof the menu.Notice: When flipping to address page, [2], [8] can’t flip the menu page, and just function as number keys. [4], [6] can’t set parameters of menu, and just function as number keys.3.4.2 Index of MenuThe above menus are displayed in the second line on LCD. Only one menu is displayed at one time. The display mode is as below (e.g communication address):Menu Setting Range:PROTOCOL: PELCO-P/ PELCO-D/ SAMSUNG/ YAAN/SAELANGUAGE: ENGLISHSOUND: ON/OFFADDRESS: 000 ~255BAUD RATE: 1200/2400/4800/9600/19200 BPS3.5 Menu OperationWhen joystick and keys are operated at the same time, joystick operation is preferred.Rotating the joystick to any direction can exit the present setting page (except on menu page).When setting parameters in menu, pressing [Enter] can make the setting effective. The key [Enter] just store the latestchanged parameters of menu. For example,if you change protocol, address and baud rate in order, then press [Enter]. Only baud rate is changed successfully.When there is nothing in the second line on LCD as Fig3.5.1, number keys [2], [8], [4], [6] can be used as up, down, left and right keys to control PTZ or dome camera left and right rotation as the function of joystick. But the rotation speed is the fastest and no grades to select. Show as 3.5.2 (e.g key [2]).After entering menu, joystick has no function to control PTZ or dome camera. It can only be used as up or down to flip the menu page and left or right to change the parameters of menu. Number keys [0], [1], [3], [5], [7], [9] are invalid. [2], [8], [4], [6] are used as up, down, left and right keys. They are not used as number keys at this time. Their functions are just to flip the menu page but not to control PTZ or dome camera’s up, down, left or right rotation. Only after exiting menu and when there is nothing in the second line on LCD, they can control dome cameras up, down, left and right rotation.When setting [ADDRESS], number keys [0], [1], [3], [5], [7], [9] restore the number keys’ function. [2], [8], [4], [6] restore thenumber keys’ function and don’t have up, down, left and right functions.When pressing [Enter] after address setting on menu finishes, it will enter baud rate setting [BAUD RATE 2400]. When go back to [ADDRESS] again, the menu interface displays [ADDRESS 000]. The present set value can’t be seen. When exit menu, the first line on LCD displays the present communication address. Joystick up or down can exit address setting.Address range is 000-255. The number above 255 can’t be set.3.6 Keyboard Short CommandsCombination key: [Setup]+number+[Enter]Number Function700 Turn off sound701 Turn on sound812 Set baud rate to 1200bps824 Set baud rate to 2400bps848 Set baud rate to 4800bps896 Set baud rate to 9600bps819 Set baud rate to 19200bpsAppendixⅠ Analysis and Solution of Common ProblemIssue PossibleReasonSolutionCheck power cable connectionand connect it wellNothing onLCD after item is turnedon No powerMake sure power is DC12V Protocol iswrongCheck protocol of keyboard.Make sure it is the same to thedome or PTZ camera.Baud rateis wrongCheck baud rate of keyboard.Make sure it is the same to thedome or PTZ camera.Can’t control the target dome cameraAddress is wrongCheck address of keyboard. Make sure it is the same to the dome or PTZ camera.Notice: The above solutions of common issues are just for your reference. If there are some special issues, please contact your dealer to get technical support.Copyright StatementThis copyright merely belongs to the manufacturer. Without permission, please don’t plagiarize or copy the contents of this book in any form or by any means.The company follows the policy of continuous development. Therefore, the company reserves the right to modify or improve the products described in this manual without notice.The content of manual is offered according to the "current state". Unless applicable law specified, otherwise the company does not make any kind of clear or tacit assurance about the accuracy, reliability and contents of this manual. The company reserves the right to revise or recoup this manual at any time without notice.Distributed by :Challenger Security Products10 Sandersons Way Marton Blackpool FY4 4NBGeneral Enquiries : e.mail: ***********************.uk - web: Sales Tel No : 01253 791 888 Fax No : 01253 791887 Technical No : 01253 792898VKFJ V2。
键盘使用及指法训练1、结构:按功能划分,键盘总体上可分为四个大区,分别为:功能键区,打字键区,编辑控制键区,付键盘区。
2、基本键:打字键区是我们平时最为常用的键区,通过它,可实现各种文字和控制信息的录入。
打字键区的正中央有8个基本键,即左边的“Ф、Ы、В、А”键,右边的“О、Л、Д、Ж”键,其中俄文键盘中的А、О两个键上都有一个凸起的小棱杠,以便于盲打时手指能通过触觉定位。
3、基本键指法:开始打字前,左手小指、无名指、中指和食指应分别虚放在“Ф、Ы、В、А”键上,右手的食指、中指、无名指和小指应分别虚放在“О、Л、Д、Ж”键上,两个大拇指则虚放在空格键上。
基本键是打字时手指所处的基准位置,击打其他任何键,手指都是从这里出发,而且打完后又须立即退回到基本键位。
4、其他键的手指分工:掌握了基本键及其指法,就可以进一步掌握打字键区的其他键位了。
左手食指负责的键位有4、5、К、Е、А、П、М、И共八个键,中指负责3、У、В、С共四个键,无名指负责2、Ц、Ы、Ч键,小指负责1、Ё、Й、Ф、Я及其左边的所有键位。
右左手食指负责6、7、Н、Г、Р、О、Т、Ь八个键,中指负责8、Ш、Л、Б,四个键,无名指负责9、O、Щ、Д、Ю、。
四键,小指负责0、Ж、Э、З、Х及其右边的所有键位。
这么一划分,整个键盘的手指分工就一清二楚了,击打任何键,只需把手指从基本键位移到相应的键上,正确输入后,再返回基本键位即可。
左手键位上移下移小拇指ФЙЯЁ无名指ЫЦЧ中指ВУС食指АП КМИ右手键位上移下移食指Р ОН ГТЬ中指ЛШБ无名指ДЩЮ小拇指ЖЭЗХ左食指右移П右上移Е右下移И右食指左移Р左上移Н左下移Т。
键盘用户手册User ManualBenutzerhandbuch快速开始指南包装内容系统需求Window s®XP / Vista / 7 / 8 / 10或更高版本安装步骤将键盘USB连接线插入电脑的USB接口即可开始使用。
ACR T OP40 QMK 组合键功能ACR T OP40 QMK 系统功能 (Wind ows)FN + 左Win锁Win键长按 FN+ESC 5秒恢复出厂设置FN + BWIN系统MA C系统ACR T OP40 QMK 系统功能 (Mac)左Alt Command左WIN Option ACR T OP40 QMK 灯光调节灯光关闭/开启切换18种灯效FN+;FN+ENTER 灯光变亮灯光变暗循环切换速度循环切换灯光饱和度FN+↑FN+↓FN+←FN+→1.2.3.4.5.Akk o保修和服务声明Akko为中国大陆的客户提供一年保修。
对于其他地区,请联系您的卖家(Akko分销商)以了解具体的保修政策。
如果保修期到期,客户需要支付维修费用。
如果用户喜欢自己修理键盘,Akko也会提供说明。
用户应对自行修复过程中发生的任何损失承担全部责任。
在未经制造商/卖方指示的情况下拆开键盘将立即导致保修无效官方售后服务时间为每周一至周五上午10:00至下午18:00节假日以国家法定节日休息为准。
退货和保修政策在不同的平台上可能有所不同,并在购买时取决于具体的经销商。
公司:深圳银宸科技有限公司地址:深圳市宝安区松岗街道碧头第一工业区朗碧路33号电话:0755-******** 网址: 产地:中国•深圳Compa n y: Shenzhen Yinchen Technology Co., L tdA ddr ess: 33 Langbi Rd, Bi tou Fir st Industrial Z one, Bao'an District, Shenzhen, China中国制造/Made in China人为损坏不局限于键盘进水、高处坠落、过度用力拉扯线材等,键盘为电子产品请按照电子产品保护方式爱惜使用。
键盘加速键是什么你们用电脑这么久知道什么是键盘加速键吗?不知道的话跟着店铺一起来学习键盘加速键。
什么是键盘加速键?加速键是产生WM_COMMAND消息(有些情况下是WM_SYSCOMMAND)的键组合。
许多时候,程序使用加速键来重复常用菜单项的动作(然而,加速键还可以用于运行非菜单功能)。
例如,许多Windows程序都有一个包含“Delete”或“Clear”选项的“Edit”菜单,这些程序习惯上都将Del键指定为该选项的加速键。
使用者可以通过“ Alt 键”从菜单中选择“ Delete ”选项,或者只需按下加速键 Del 。
当窗口消息处理程序收到一个WM_COMMAND消息时,它不必确定使用的是菜单还是加速键。
为什么要使用加速键?您也许会问:为什么我应该使用加速键?为什么不能直接拦截WM_KEYDOWN或WM_CHAR消息而自己实现同样的菜单功能呢?好处又在哪里呢?对于一个单窗口应用程序,您当然可以拦截键盘消息,但是使用加速键可以得到一些好处:您不需要把菜单和加速键的处理方式重写一遍。
对于有多个窗口和多个窗口消息处理程序的应用程序来说,加速键是非常重要的。
正如我们所看到的,Windows将键盘消息发送给目前活动窗口的窗口消息处理程序。
然而对于加速键,Windows把WM_COMMAND消息发送给窗口消息处理程序,该窗口消息处理程序的代号在Windows函数TranslateAccelerator中给出。
通常这是主窗口,也是拥有菜单的窗口,这意味着无须每个窗口消息处理程序都把加速键的操作处理程序重写一遍。
如果您在主窗口的显示区域中,使用了非系统模态对话框(在下一章中会讨论)或者子窗口,那么这种好处就变得非常重要。
如果定义一个特定的加速键以便在不同的窗口之间移动,那么,只需要一个窗口消息处理程序有这个处理程序。
子窗口就不会收到加速键引发的WM_COMMAND消息。
什么是键盘加速键?。
Copyright 2020 © Embedded Artists ABGet started with Google Coral M.2 and USB AcceleratorsEmbedded Artists ABJörgen Ankersgatan 12SE-211 45 MalmöSwedenhttps://Copyright 2020 © Embedded Artists AB. All rights reserved.No part of this publication may be reproduced, transmitted, transcribed, stored in a retrieval system, or translated into any language or computer language, in any form or by any means, electronic, mechanical, magnetic, optical, chemical, manual or otherwise, without the prior written permission of Embedded Artists AB.DisclaimerEmbedded Artists AB makes no representation or warranties with respect to the contents hereof and specifically disclaim any implied warranties or merchantability or fitness for any particular purpose. Information in this publication is subject to change without notice and does not represent a commitment on the part of Embedded Artists AB.FeedbackWe appreciate any feedback you may have for improvements on this document. Send your comments by using the contact form: /contact.TrademarksAll brand and product names mentioned herein are trademarks, services marks, registered trademarks, or registered service marks of their respective owners and should be treated as such.Table of Contents1Document Revision History (4)2Introduction (5)2.1Supported hardware (5)2.2Additional documentation (5)2.3Conventions (6)3Get started (7)3.1Setup hardware (7)3.1.1M.2 Accelerator (7)3.1.2USB Accelerator (7)3.2Download and flash pre-built Yocto image (8)3.3Enable PCIe support (9)3.3.1iMX8M COM board (9)3.3.2iMX8M Mini uCOM board (9)3.4Install Edge TPU runtime (9)3.5Install TensorFlow Lite (10)3.6Example: Image classification (10)3.6.1Run example (11)3.7Example: Image detection (13)3.7.1Run example (13)3.8Example: Camera (16)3.8.1Run classification example (17)3.8.2Run detection example (17)4Troubleshooting (19)4.1Cannot find libedgetpu.so.1 (19)4.2ValueError: Failed to load delegate from libedgetpu.so.1 (19)4.3Cannot identify device '/dev/video0' (19)5Yocto image (21)5.1Debian package manager (21)5.2Additional packages (21)1 Document Revision History2 IntroductionThis document provides you with step-by-step instructions for how to get stared with the Google Coral M.2 and/or USB accelerators on Embedded Artists iMX8 based COM boards.Coral is a technology from Google that accelerates the processing of TensorFlow models used with machine learning. At its core there is the Edge TPU coprocessor that executes neural networks at high speed. This coprocessor is available in multiple form factors such as the M.2 Accelerator with PCIe interface or USB accelerator.More information about Coral is available on the link below.https://coral.ai/technology/The models used by the examples in this document all come from https://coral.ai/models/ and can be divided into two categories:•Classification, where the model can recognize a set of objects and the demo scripts will print which (if any) objects are found and with what probability. Examples in 3.6 and 3.8.1 •Detection, where the model can recognize a set of objects and the demo scripts will draw a rectangle in the image/video around the detected object. Examples in 3.7 and 3.8.2It should be possible to run classification/detection using any of the models fromhttps://coral.ai/models/ but that is left as an exercise for the reader.2.1 Supported hardwareThe instructions in this document work wi th the following Developer’s Kits from Embedded Artists as the board needs to have a 64-bit core.•iMX8M Developer’s Kit V2 (EAK00330)•iMX8M Mini uCOM Developer’s Kit V2 (EAK00347)•iMX8M Nano uCOM Developer’s Kit V2 (EAK00360). Note: This board doesn’t support PCIe. You also need a Coral M.2 Accelerator with A+E key or a Coral USB Accelerator.https://coral.ai/products/m2-accelerator-ae/https:///new/google-coral/coral-m2-accelerator-ae/https://coral.ai/products/acceleratorhttps:///ProductDetail/Coral/G950-01456-01?qs=u16ybLDytRbcxxqFKdbhgQ%3D%3D2.2 Additional documentationAdditional documentation you might need is.•Working with Yocto to build Linux– found on Embedded Artists website.•How to use a Camera with an iMX Developer’s Kit – found on Embedded Artists website.•Getting started guide - https:///getting-started/•Get started documentation from Coral: https://coral.ai/docs/m2/get-started/2.3 ConventionsA number of conventions have been used throughout to help the reader better understand the content of the document.Constant width text– is used for file system paths and command, utility and tool names.3 Get started3.1 Setup hardware3.1.1 M.2 AcceleratorNote 1: You need a COM Carrier board V2 for these instructions.Note 2: The iMX8M Nano doesn’t have a PCIe interface. Use the USB accelerator instead.All you need to do is insert the Coral M.2 Accelerator to the M.2 E-key connector on the COM Carrier board V2 as shown in Figure 1.Figure 1 - M.2 Accelerator attached to COM Carrier board V23.1.2 USB AcceleratorFor iMX8M Mini uCOM and iMX8M Developer’s Kits you can connect the USB accelerator directly to USB Host Type A connector (J12) on the carrier board, see Figure 2.The iMX8M Nano uCOM only has one USB port which by default is connected to USB OTG connector (J11). You need a micro-B (male) to USB A (female) adapter similar to the one shown in Figure 3.It is possible to change a slider switch, S3:8, on the back of the uCOM adapter board and thereby connecting the USB port on the iMX8M Nano to the USB Host Type A connector (J12) on the carrier board. See section 7.2 in the iMX8M Nano uCOM datasheet for details.Note: If you want to try the camera related examples, described in section 3.8 together withthe iMX8M Nano you need to change the slider switch. The reason is both the acceleratorand the camera need a USB interface.Figure 2 - USB connectors on carrier boardFigure 3 - USB micro-B (male) to USB A (female) adapter3.2 Download and flash pre-built Yocto imageTo be able to setup and use Coral you need software (mostly Python packages) that is not normally installed on a standard ea-image-base distribution. Images with as many as possible of the needed packages have been prepared and are available on . Go to this website and download the zip file that ends with _coral.zip for the board you are using.Unpack this zip file on your computer and setup your iMX Developer’s Kit for OTG boot mod e (see the document Working with Yocto for details). Flash the full image by using UUU and thefull_tar.uuu script file.3.3 Enable PCIe supportReset the board and boot into the U-boot console. You need to hit any key on your keyboard to stop autoboot. Go to the section below that corresponds to the board you are using.3.3.1 iMX8M COM boardChange to the device tree file that enables PCIe support.3.3.2 iMX8M Mini uCOM boardChange to the device tree file that enables PCIe support.3.4 Install Edge TPU runtimeThe Edge TPU runtime is available as a Debian package. Support for Debian package manager has been added to the Yocto image, but you also have to add a Google repository so the package can be found.Update the package index.You will most likely get several errors while running update since the main package feed probably don’t exist. The prebuilt image from section 3.2 was created on a computer with IP address 192.168.1.11 and that is where apt-get will look for the package feed.You will also get warnings regarding the Google repository about it having an invalid signature. You can ignore this for now.Download and install the Edge TPU runtime environment. Enter ‘y’ to acknowledge that you want to install the package without verification. The warning comes as the signature of the Google repository is not known (could have been fixed by adding / using apt-key).3.5 Install TensorFlow LiteTensorFlow Lite is used to run machine learning models. Here we will install TensorFlow Lite for Python. There are different packages for different versions of Python and also for different platforms. The original instructions are available at the link below.https:///lite/guide/pythonThe Python version installed in the pre-built image for Linux 5.4.24 is 3.7 and for iMX8 based boards the platform is Linux (ARM 64):The Python version installed in the pre-built image for Linux 4.14.98 is 3.5 and for iMX8 based boards the platform is Linux (ARM 64):3.6 Example: Image classificationFollow the steps below to install example model that can be used to classify images of certain birds.Get started with Google Coral M.2 and USB Accelerators Page 11 # cd && mkdir -p coral && cd coral# git clone https:///google-coral/tflite.git# cd tflite/python/examples/classification# bash install_requirements.shThe last instruction will install the example’s dependencies. It will also download a photo of a Parrotthat will be classified.The downloaded model files include a text file containing a list of all the birds that the model canclassify.# less models/inat_bird_labels.txt0 Haemorhous cassinii (Cassin's Finch)1 Aramus guarauna (Limpkin)...3.6.1 Run exampleTo classify the parrot in Figure 4 run the instructions below.Figure 4 - Parrot that will be classified by the example modelFirst, we must make sure Python can find the Edge TPU library.# export LD_LIBRARY_PATH=/usr/lib/aarch64-linux-gnu/Now run the classify model on the Edge TPU. The script will run the model 5 times and the first time it will be a bit slower since it has to load the model into the Edge TPU memory.# python3 classify_image.py \--model models/mobilenet_v2_1.0_224_inat_bird_quant_edgetpu.tflite \--labels models/inat_bird_labels.txt \--input images/parrot.jpgTo get a sense of how much the Edge TPU accelerates the classification, you can also try to run this model directly on the processor to see the how much slower it is.Both runs above correctly detect the bird as an Ara macao with the same probability (77%) which is the expected result given that the input image and the model is the same. The accelerator does it about 50 times faster (2.9ms vs 147.2ms).We can also try to classify other images of birds. Try for example to download this image of a Rook.Get started with Google Coral M.2 and USB Accelerators Page 133.7 Example: Image detectionFollow the steps below to install an example model that can be used to detect objects in an image. The git repository is the same as in the previous example so if you have followed the instructions in 3.6then skip the git clone command below.# cd && mkdir -p coral && cd coral# git clone https:///google-coral/tflite.git# cd tflite/python/examples/detection# sed -i 's/mobilenet_ssd/ssd_mobilenet/g' install_requirements.sh# bash install_requirements.shThe sed command above will correct the name of the model. That error has been reported and fixedbut is not yet released. The last instruction will install the example’s dependencies. It will alsodownload a photo of Grace Hopper that will be used for image detection.The downloaded model files include a text file containing a list of all the objects that the model candetect.# less models/coco_labels.txt0 person1 bicycle2 car...3.7.1 Run exampleTo detect objects in Figure 5 run the instructions below.Figure 5 – Photo of Grace Hopper used by the example modelFirst, we must make sure Python can find the Edge TPU library.# export LD_LIBRARY_PATH=/usr/lib/aarch64-linux-gnu/Now run the classify model on the Edge TPU. The script will run the model 5 times and the first time it will be a bit slower since it has to load the model into the Edge TPU memory.To get a sense of how much the Edge TPU accelerates the detection, you can also try to run this model directly on the processor to see the how much slower it is.Both runs above correctly detect both the person and the tie in the image with the same probabilities (84%) but the accelerator does it about 20 times faster (15.43ms vs 312.41ms). Download the output image (grace_hopper_processed.bmp) to a PC to view it or, if you have a display connected use the framebuffer image viewer:# fbi –a -T 1 images/grace_hopper_processed.bmpNote 1: On Linux 4.14.98 using the image viewer breaks the desktop. Run the followingcommand after viewing the image to restart the desktop:#systemctl restart WestonNote 2: If nothing is shown on the display when running fbi this can be because of anunsupported resolution for the framebuffer. From within u-boot you can set the kernelparameter video like this# setenv extra_bootargs video=1280x720The image will look like this:Figure 6 –Processed photo of Grace Hopper showing the found “person” and “tie” objectsWe can also try to detect objects from the list in other images. Try for example to download this image of an apple and an orange.# curlhttps:///wikipedia/commons/thumb/a/a8/Apple_an d_Orange_-_they_do_not_compare.jpg/220px-Apple_and_Orange_-_they_do_not_compare.jpg --output images/ao.jpg# python3 detect_image.py \--model models/ssd_mobilenet_v2_coco_quant_postprocess_edgetpu.tflite \ --labels models/coco_labels.txt \--input images/ao.jpg \--output images/ao_processed.jpg----INFERENCE TIME----Note: The first inference is slow because it includes loading themodel into Edge TPU memory.53.10 ms16.93 ms15.12 ms16.69 ms15.81 ms-------RESULTS--------orangeid: 54score: 0.96484375bbox: BBox(xmin=109, ymin=29, xmax=213, ymax=134)appleid: 52score: 0.93359375bbox: BBox(xmin=41, ymin=18, xmax=121, ymax=105)Figure 7 – Image of apple and orange3.8 Example: CameraNote: For the iMX8M Nano you need to change a slider switch to be able to connect both the camera and the USB accelerator, see section 3.1.2 above.This example requires a camera (described in the document How to use a Camera with an iMX Developer’s Kit) and a display. The instructions in this document were tested on a Logitech QuickCam Pro USB camera and the Embedded Artists 7-inch HDMI Display Kit(https:///products/7-inch-hdmi-display-kit/) but any HDMI display should work.Follow the steps below to prepare the example that can be used to classify or detect objects in a live camera feed.The first sed command above is needed as the file system is using Wayland and not the X Window System. The second sed command prevents the gstreamer.py script from thinking that the iMX8M COM board is the Google Coral Dev Board.3.8.1 Run classification exampleFirst, we must make sure Python can find the Edge TPU library.Now run the classify model on the Edge TPU. It will take a couple of seconds to start and then the video feed should appear on the display. The console will print out what is foundStop the demo with Ctrl+C.To test without the Edge TPU:Note that the inference is 34 times slower without the acceleration (4.16 vs 141.43ms). With the accelerator the frame rate is limited by the camera’s capture rate to 15fps but without acceleration the inference time limits the frame rate to a maximum of 1000/141.43 = 7fps.3.8.2 Run detection exampleFirst, we must make sure Python can find the Edge TPU library.Now run the detect model on the Edge TPU. The script will take a couple of seconds to start and then the video feed should appear on the display. The console will only print out statisticsStop the demo with Ctrl+C.To test without the Edge TPU:Note that the inference is 20 times slower without the acceleration (15.62 vs 316.46ms). With the accelerator the frame rate is limited by the camera’s capture rate to 15fps but without acceleration the inference time limits the frame rate to a maximum of 1000/316.46 = 3fps.4 Troubleshooting4.1 Cannot find libedgetpu.so.1If you get an error message similar to below the most likely problem is that you have forgotten to set LD_LIBRARY_PATH as explained in section 3.6.1 above. You could also have forgot or failed to install the TPU Edge runtime library as explained in section 3.4 above.4.2 ValueError: Failed to load delegate from libedgetpu.so.1Error message:Reason 1:PCIe is not enabled. Please make sure you have followed the instructions in section 3.3 above. Reason 2:You could also get this error message if the M.2 A ccelerator isn’t inserted into the M.2 connector on the COM Carrier board V2.You can check if the M.2 Accelerator is detected on the PCI bus by using lspci.You should get a result similar to below.You can also check if the PCI driver (Apex) is loaded and available.4.3 Cannot identify device '/dev/video0'Error message:Reason 1:The camera is not connected. Check that the camera is connected correctly, reboot and test again Reason 2:The camera is not mapped as /dev/video0. Check which video device is in use:Use the found device when running the camera examples by passing the -videosrc parameter like this:5 Yocto imageThis chapter shows how the pre-built Yocto image has been created in case you need to build ityourself.5.1 Debian package managerSupport for the Debian package manager (apt) is needed in order to install the Edge TPU runtime.Do the following modifications to your conf/local.conf.Change package class from rpm to deb.Enable package-management.You can also set a default package feed. Replace the IP address below with your own.Add apt to the image.This program is added in IMAGE_INSTALL_append, see section 5.2 below.5.2 Additional packagesAlso make sure the following packages are added to your build.Copyright 2020 © Embedded Artists AB Rev A。
火拼俄罗斯键盘加速器使用方法
调整好键盘速度和首次延迟以后,确认启用加速选项打上勾,然后进入QQ火拼俄罗斯,你就可以体验到键盘飞一般的速度了:)
如果你还想知道自己游戏的速度,只要勾上Q块测速选项,便会在游戏的提示块窗口上方显示你的游戏时间和游戏速度。
同时也会在变速器窗口内显示速度曲线。
如果想在游戏中不想来回切换窗口就能随时看到速度曲线,只要让游戏窗口盖着变速器窗口的上半部分即可。
如果自己就有快键盘,并且想用自己的键盘速度打,只要把启用变速前的钩去掉便可,同样也能测速。
火拼俄罗斯键盘加速器功能修改键盘速度
自定义键位功能
进行按块统计,加快响应,Q块测速,启用变速等操作调整首次延迟,普通键盘的键盘速度一般为1800字节/分,首次延迟为250毫秒左右
火拼俄罗斯键盘加速器术语解释键盘速度:是指按住一个键不放,一分钟能打出的字符个数,用来表示键盘速度的快慢首次延迟:是指当按住键盘某个键不放时,出现第一个字符与出现第二个字符的时间间隔
普通键盘的键盘速度一般为1800字节/分,首次延迟为250毫秒左右
超级快键盘:一种在理论上平移速度是无限,只能进行点移和贴边操作,而绝不可能平移到一半的地方停下的键盘。
火拼俄罗斯键盘加速器快捷键TipsF2键:开始游戏;
F3键:开始练习,只有当练习模式可用时可以按F3键启用而不需要再按鼠标,但只在开启本变速器进行加速的时候有效。
F12键:极速响应模式和超流畅模式切换快捷键。