3D计步器手表中文使用说明书
- 格式:doc
- 大小:966.00 KB
- 文档页数:7


详细的操作手册© 2022 Garmin Ltd. 或其子公司保留所有权利。
根据版权法,未经 Garmin 的书面同意,不得复制此手册的全部或部分内容。
Garmin 保留更改或改善其产品并对此手册的内容进行更改的权利,但没有义务向任何人或任何组织通知此类变更或改善。
有关本产品的使用的最新更新和补充信息,请访问。
Garmin和 Garmin 徽标是 Garmin Ltd. 或其分公司在美国和其他国家/地区注册的商标。
未经 Garmin 明确许可,不得使用这些商标。
Garmin Drive™和 Garmin Express™是 Garmin Ltd. 或其子公司的商标。
未经 Garmin 明确许可,不得使用这些商标。
Android™是 Google LLC 的商标。
Apple、iPhone和Mac是 Apple Inc. 在美国和其他国家/地区的注册商标。
BLUETOOTH字标和徽标归 Bluetooth SIG, Inc. 所有,Garmin 使用这些字标和徽标前已获得许可。
Foursquare是 Foursquare Labs, Inc. 在美国和其他国家/地区的商标。
microSD和 microSDHC 徽标是 SD-3C, LLC 的商标。
Tripadvisor是 Tripadvisor LLC 的注册商标。
Windows是 Microsoft Corporation 在美国和其他国家/地区的注册商标。
目录使用入门 (1)Garmin Drive 53 设备概述 (1)安装注意事项 (1)在车中安装 Garmin Drive 设备并对其通电 (2)与您的智能手机配对 (3)打开或关闭设备 (3)获取 GPS 信号 (4)状态栏图标 (4)使用屏幕按钮 (4)调节音量 (4)使用音频混音器 (4)启用或禁用声音和音频源 (5)调整屏幕亮度 (5)驾驶员提醒功能和警报 (5)启用或禁用驾驶员警报 (5)查找和保存位置 (6)使用搜索栏查找位置 (6)查找地址 (6)位置搜索结果 (7)更改搜索区域 (8)兴趣点 (8)按类别查找位置 (8)Foursquare® (8)Tripadvisor (9)导航到地点中的兴趣点 (9)搜索工具 (9)查找路口 (9)查找加油站及价格 (10)使用经纬度查找位置 (10)停车场 (10)查找当前位置附近的停车场 (10)查找指定位置附近的停车场 (10)查看最近找到的位置 (10)清除最近找到的位置列表 (10)查看当前位置信息 (10)查找紧急服务和加油站 (11)得到您的当前位置的方向 (11)添加快捷方式 (11)删除快捷方式 (11)保存位置 (11)保存位置 (11)保存当前位置 (11)编辑保存的位置 (12)为已保存的位置分配类别 (12)删除已保存的位置 (12)遵循路线 (12)路线 (12)开始路线 (13)使用地图开始路线 (13)回家 (13)地图上的路线 (14)查看转弯和方向 (15)在地图上查看完整路线 (15)即将到达目的地 (15)目的地附近的停车场 (15)更改当前路线 (15)向路线添加位置 (15)描绘路线 (16)绕路行驶 (16)更改路线计算模式 (16)停止路线 (16)避开交通堵塞、收费道路和特定区域 (16)避过路线上的交通堵塞 (16)避让收费道路 (16)避开道路功能 (16)定制避让 (17)使用地图 (17)地图工具 (18)查看地图工具 (18)向前 (18)查看前方位置 (18)定制向前类别 (18)前方到达城市 (19)查看前方到达城市和出口服务区 (19)行程信息 (19)在地图上查看行程数据 (19)查看行程数据 (19)查看里程历史记录 (19)重置行程信息 (19)查看前方交通 (19)查看地图上的交通信息 (20)搜索交通事故 (20)定制地图 (20)定制地图图层 (20)更改地图数据字段 (20)更改地图视角 (20)实时服务、交通信息和智能手机功能 (20)断开 Bluetooth® 设备连接 (20)删除配对的手机 (20)交通 (21)使用智能手机接收交通数据 (21)启用交通 (21)查看地图上的交通信息 (21)搜索交通事故 (21)使用应用程序 (21)在设备上查看用户手册 (21)photoLive 交通摄像头 (21)查看和保存 photoLive 交通摄像头 (22)在地图上查看 photoLive 交通摄像头 (22)保存交通摄像头 (22)路线规划器 (22)规划路线 (22)编辑和重新排序路线中的位置 (23)更改一条路线的路线选项 (23)按照已保存的路线导航 (23)编辑和保存活动的路线 (23)无线摄像头 (23)将 BC 40 相机与Garmin导航设备配对 (24)将 BC 50 摄像头与 Garmin 导航设备配对 (24)查看无线摄像头 (24)查看之前的路线和目的地 (25)设置 (25)地图和车辆设置 (25)启用地图 (26)导航设置 (26)计算模式设置 (26)设置模拟位置 (26)无线网络设置 (27)驾驶员辅助设置 (27)接近报警设置 (27)备用摄像头设置 (27)显示设置 (27)交通设置 (27)单位和时间设置 (28)设置时间 (28)语言和键盘设置 (28)设备和隐私设置 (28)重置数据和设置 (28)设备信息 (29)查看电子标签的法规和合规信息 (29)规格 (29)给设备充电 (29)设备维护 (29)Garmin支持中心 (29)地图和软件更新 (29)连接至 Wi‑Fi 网络 (30)使用 Wi‑Fi 网络更新地图和软件 (30)使用 Garmin Express 更新地图和软件 (31)设备保养 (32)清洁外壳 (32)清洁触摸屏 (32)防窃 (32)重新启动设备 (32)取下设备、固定架和吸盘 (32)从固定架上取下设备 (32)从吸盘上取下固定架 (33)从挡风玻璃上取下吸盘 (33)常见问题解答 (33)我无法调整设备的屏幕亮度 (33)吸盘吸不住挡风玻璃 (33)我的设备无法获取卫星信号 (33)我的电池电量短时间内会耗完 (33)我的设备未连接到手机 (33)附录 (34)安装用于存储地图和数据的存储卡 (34)数据管理 (34)关于存储卡 (34)将设备连接至计算机。

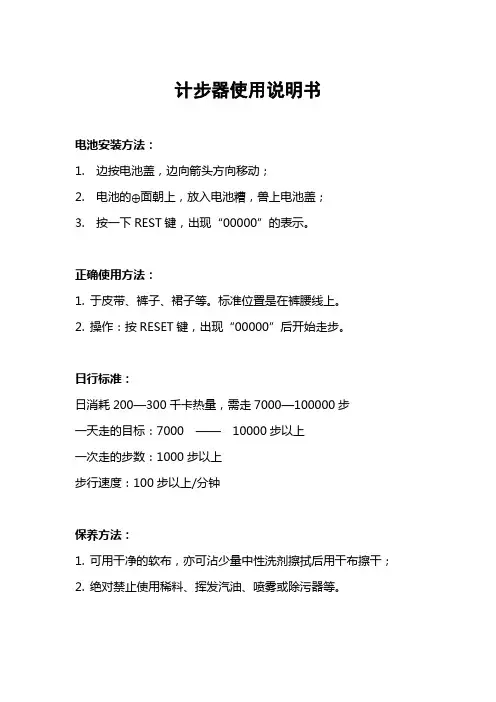
计步器使用说明书
电池安装方法:
1. 边按电池盖,边向箭头方向移动;
2. 电池的⊕面朝上,放入电池糟,兽上电池盖;
3. 按一下REST键,出现“00000”的表示。
正确使用方法:
1.于皮带、裤子、裙子等。
标准位置是在裤腰线上。
2.操作:按RESET键,出现“00000”后开始走步。
日行标准:
日消耗200—300千卡热量,需走7000—100000步
一天走的目标:7000 ——10000步以上
一次走的步数:1000步以上
步行速度:100步以上/分钟
保养方法:
1.可用干净的软布,亦可沾少量中性洗剂擦拭后用干布擦干;
2.绝对禁止使用稀料、挥发汽油、喷雾或除污器等。
注意事项:
本产品是根据走路时腰部上下运动而自动测量,精确度很高。
如步法不当,会产生很大误差。
例如:
1.轻走,穿拖鞋,草鞋,在人多拥挤的地方走,上下坡等;
2.除行走以外的上下运动,反复站立,坐下,打球等激烈运动;放在腰部以外的地方,如有静电仪器会返回“00000”状态。
体育行业运动手表使用说明书欢迎您购买我们的体育行业运动手表。
为了更好地为您提供产品的使用指南,我们为您准备了本使用说明书。
阅读本说明书,您将了解如何正确使用和保养您的运动手表,以便获得更好的使用体验和持久的使用寿命。
一、产品简介我们的体育行业运动手表是专为运动爱好者和专业运动员设计的。
具有时尚外观和多项智能功能,可以满足您日常运动和训练的需求。
产品主要特点包括:1. 高精度定时功能,准确记录运动时间;2. 心率监测,实时监测心率变化;3. 运动模式选择,适应不同运动项目;4. 睡眠监测,分析您的睡眠质量;5. 防水设计,适应各种户外环境;6. 督促健康提醒,帮助您养成良好的生活习惯。
二、使用前准备在开始使用您的运动手表之前,请确保已完成以下准备工作:1. 充满电:将运动手表与充电器连接并充电,直到手表显示电池已满。
2. 下载APP:根据说明下载我们提供的APP,并将运动手表与手机连接。
3. 调整个性化设置:根据个人需求,在APP中设置您的身体信息、运动目标等。
三、基本操作方法1. 开关机:长按手表侧面的开关键,手表将开机或关机。
开机后,手表将自动显示时间。
2. 切换菜单:轻触手表屏幕,切换到不同的功能菜单。
3. 手势唤醒:在菜单界面,轻轻抬起手腕,手表将自动唤醒屏幕。
4. 返回主屏:在菜单界面,从屏幕底部向上滑动,手表将返回主屏。
5. 确认选择:在菜单界面,点击屏幕上的相应选项,进行确认选择。
四、功能介绍1. 时钟功能:手表显示当前时间,并具有闹钟、倒计时等功能。
在主屏上左右滑动可切换不同的时间界面。
2. 运动记录:选择运动模式后,手表将记录您的运动时间和运动轨迹,并可显示运动数据信息,如距离、速度、卡路里消耗等。
3. 心率监测:手表支持实时心率监测。
在运动过程中或在睡眠状态下,手表将自动监测您的心率变化,并生成心率曲线图供您查看。
4. 睡眠监测:手表可监测您的睡眠质量,并统计您的睡眠时长、深睡眠时间、浅睡眠时间等,以便您调整睡眠习惯。
TIMEX® Ironman R300 GPS Watch Quick Start Guide Revision 1.1WelcomeCongratulations on the purchase of your TIMEX® Ironman R300 GPS Watch. This Quick Start Guide will get you started with pairing your watch to your phone and setting up your app and profile to begin using your watch.TIMEX® Ironman R300 Features•Long battery life•Compatible with iOS and Android smartphones•GPS for accurate outdoor distance, pace and speed•Barometer for accurate elevation measurement•Highly accurate optical heart rate sensor•Daily activity tracking of steps, distance, calories & sleep•Supports multiple types of notifications (calls, text messages, inactivity)•Workout modes provides time, distance, heart rate, as well as pace, speed, cadence, calories and time of day•Workout coaching mode•Timing features: Alarms, Stopwatch & Timer•Music control of connected phone•Many watch faces to choose fromProduct OverviewChargingYour watch should be fully charged before using. Attach the magnetic charging cable to the watch’s charging port as shown below. Plug the USB end of the cable into any powered USB port or USB charger.Turning on WatchPush and hold the On/Off/Back button for 3 seconds to power on the watch WearingComfortably, but snugly, tighten the watch around your wrist, at least 1 finger width away from your wrist bone.Note: Wearing the watch too loosely may impact the accuracy of the heart rate measurement.ConnectingWhile the watch is charging, download and install the latest version of the TIMEX® Smart APP from the Google Play or Apple App Store.If the watch is off, power it on by pressing and holding the On/Off/Back button for three seconds. If the watch is on the charger it will remain powered on. When watch charging indicates FULLY CHARGED remove it from the charger. The watch will display the list of language options. Use the scroll keys to highlight your language choice and press the SELECT button to proceed.If the watch displays the time of day screen, rather than the language selection, you will need to factory reset the watch before connecting it to your phone. To do so press the SELECT button to get to the menu, press the Scroll Down button to get to settings, press the SELECT button to enter settings, press SELECT with DEVICE highlighted, press the Scroll Down button to get to FACTORY RESET, then press the SELECT button. Press the Scroll Down button to highlight the check mark on the “Are you sure” screen and press the SELECT bu tton to confirm. The watch will then reset and will reboot to the language selection screen.Note: Before launching the TIMEX® Smart app, make sure the Bluetooth is enabled on your phone by going to settings, Bluetooth and verifying that Bluetooth is on. Keep your watch close to your phone during the pairing process.Launch the TIMEX® Smart app and create your Timex Smart account. You can use your email address, phone number, Google, or Facebook account for setting up your account.Once your account is setup and you have logged into it, you will be prompted to enter your use profile information. Note that gender, age, height and weight data is used for calculation of calories burned and gender and height are used for calculating stride length for distance measurement for non-GPS workouts and daily activity distance.Once you have completed your user profile you will be prompted to select the watch to pair. After selecting the correct watch, press READY TO PAIR. Your phone will scan for available watches and will list all compatible watches found. Select your watch from the list. The watch will then prompt you to “ACCEPT PAIRING REQUEST?” Press the SELECT button to pair to the watch. Once paired, follow the screens in the mobile app to complete the setup of your watch.UsageAfter successfully pairing with your phone, the watch will start tracking and analyzing your daily activities and sleeping habits.You can access the functions of the watch via the buttons or via the touchscreen.The SELECT button and touching a selection on the screen have the same functionThe On/Off/Back button and swiping right have the same functionThe Scroll Up and swiping down have the same functionThe Scroll Down and swiping up have the same functionPress the SELECT button to light up the screen. Once the screen is illuminated you can access the following functions:Main Menu - Swipe left (or press the SELECT button). Once in the menu, you can scroll up or down and then can select the desired item.Status Screen - Swipe down (or press the Scroll Up button). This screen shows the status indicators and allows you to turn airplane mode and do not disturb mode on or off.Notifications Center - Swipe down (or press the Scroll Up button). Once in the notifications center, you can scroll up or down through your notifications and then can select the desired item to see more information.Shortcuts (Weather, World Time and Tide) – Swipe right (or press the On/Off/Back button)Swipe right (or press the On/Off/Back button) to return to return to previous page.To power the watch off (or restart it), after pressing SELECT to light up the screen, press and hold the On/Off/Back button for three seconds and the power options screen will be displayed.Compliance & RegulatoryWhen using the watch to measure your heart rate, please keep your wrist still as motion of the wrist will adversely affect the accuracy of heart rate measurement.Water ResistanceWARNING: TO MAINTAIN WATER RESISTANCE, DO NOT PRESS ANY BUTTONS UNDER WATER.•Your Timex Ironman R300 GPS watch is water resistant to a depth of 30 meters. The watch is water resistant only as long as lens, push buttons and case remain intact.•The watch is not a diver watch and should not be used for diving.•Rinse the watch with fresh water after exposure to salt water.The function of the buttons and touchscreen are not accessible during underwater use. When your watch comes in contact with water, use a soft cloth to wipe away excess water from its surface before using it.During daily use, avoid wearing the watch too tightly and try to keep its contact area dry. Please clean the wristband regularly with water. Please stop using the product immediately and seek medical assistance if the contact area on your skin shows signs of redness or swelling.FCC Notice (U.S.) / IC Notice (Canada):Warning: Changes or modifications to this unit not expressly approved by the party responsible for compliance could void the user’s authority to operate the equipment. NOTE: This equipment has been tested and found to comply with the limits for a Class B digital device,pursuant to Part 15 of the FCC Rules. These limits are designed to provide reasonable protection against harmful interference in a residential installation. This equipment generates, uses and can radiate radio frequency energy and,if not installed and used in accordance with the instructions,may cause harmful interference to radio communications. However, there is no guarantee that interference will not occur in a particular installation. If this equipment does cause harmful interference to radio or television reception, which can be determined by turning the equipment off and on, the user is encouraged to try to correct the interference by one or more of the following measures:-Reorient or relocate the receiving antenna.-Increase the separation between the equipment and receiver.-Connect the equipment into an outlet on a circuit different from that to which the receiver is connected.-Consult the dealer or an experienced radio/TV technician for help.This device complies with Part 15 of the FCC Rules. Operation is subject to the following two conditions: (1) this device may not cause harmful interference, and (2) this device must accept any interference received, including interference that may cause undesired operation.This device complies with Industry Canada licence-exempt RSS standard(s).•Operation is subject to the following two conditions: (1) this device may not cause interference, and(2)this device must accept any interference, including interference that may cause undesiredoperation of the device.•Le présent appareil est conforme aux CNR d'Industrie Canada applicables aux appareils radio exempts de licence. L'exploitation est autorisée aux deux conditions suivantes : (1) l'appareil nedoit pas produire de brouillage, et (2) l'utilisateur de l'appareil doit accepter tout brouillageradioélectrique subi, même si le brouillage est susceptible d'en compromettre le fonctionnement.•This equipment complies with Industry Canada radiation exposure limits set forth for an uncontrolled environment.•Cet équipement est conforme à l'exposition aux rayonnements Industry Canada limites établies pour un environnement non contrôlé.DECLARATION OF CONFORMITYManufacturers Name: Manufacturers Address:Anhui Huami Information Technology Co., Ltd.Room 1201, Building A4, National Animation Industry Base, No. 800 Wangjiang West Road, Gaoxin District, Hefei, Anhui, Chinadeclares that the product:Product Name: TIMEX® Ironman R300Product Description: SmartwatchModel Numbers: M04Fis in conformity with the relevant EU harmonized legislations. This declaration is issued under the sole responsibility of the manufacturer and conforms to the following:RED Directive 2014/53/EUStandards:ETSI EN 301 489-1: V2.2.0ETSI EN 301 489-17: V3.2.0EN 300 328: V2.1.1EN 62479: 2010LVD: 2014/35/EUStandards:EN 60950-1: 2006+A11:A1:A12:A2ANSI/UL 60950-1CSA C22.2 No. 60950-1IEC 60950-1Electromagnetic Compatibility (EMC) – Radio Frequency (RF)Standards:FCC 47CFR 15, Subpart B and CIC RSS GEN Issue 5 April 2018IC RSS 247; Issue 2 February 2017ICES-003; Issue 6 January 2016Agent:。

健步之星使用说明书C.设置时间和日期. 在时间模式,长按MODE(模式键)3秒钟直到显示屏开始闪烁. 点击MODE(模式键)在以下设置中转化:秒>分钟>小时>年>月>天>月/天格式>12/24 小时格式>主警报声. 编辑这些设置时,点击+或-键. 长按MODE(模式键)3秒钟,保存这些新设置D.设置双重时间. 在双重时间模式,长按MODE(模式键)3秒钟直到显示屏开始闪烁. 点击MODE(模式键)在以下设置中转化:小时>分钟. 编辑这些设置时,点击+或-键. 长按MODE(模式键)3秒钟,保存这些新设置E. 设置警报和每小时报时. 在报警模式,长按MODE(模式键)3秒钟直到显示屏开始闪烁. 点击MODE(模式键)在以下设置中转化:小时>分钟. 编辑这些设置时,点击+或-键. 长按MODE(模式键)3秒钟,保存这些新设置在报警模式,点击STR/STP(开始/停止键)开启/关闭警报;点击RESET(重置键)开启/关闭每小时报时声。
F.个人信息为了准确的计算您的最高心率,你必须输入自己的个人信息。
. 在心率目标区域模式,长按MODE(模式键)3秒钟直到显示屏开始闪烁. 点击MODE(模式键)在以下设置中转化:>(Hi)最高目标区域>(lo)最低目标区域>年龄>性别(男/女)>单位格式(英制/公制)>体重(磅/公斤)>高度(英尺/厘米)>每步行走长度(英尺/厘米). 长按MODE(模式键)3秒钟,保存这些新设置每步距离计算方法:行走10步,测量距离,然后除以10得到每步的平均行走距离。
8秒钟后,读书将会改变,请等待几分钟后再次阅读。
请确保:. 手表紧贴您的手腕。
. 按键时,请柔和地平按,不要敲击。
. 在启动心率测量模式时,请适量用力按住按键,过于用力将导致无法测量。
. 表的金属背面必须与您的皮肤紧贴. 你手腕和手指的皮肤必须清洁,没有油膏脂类。
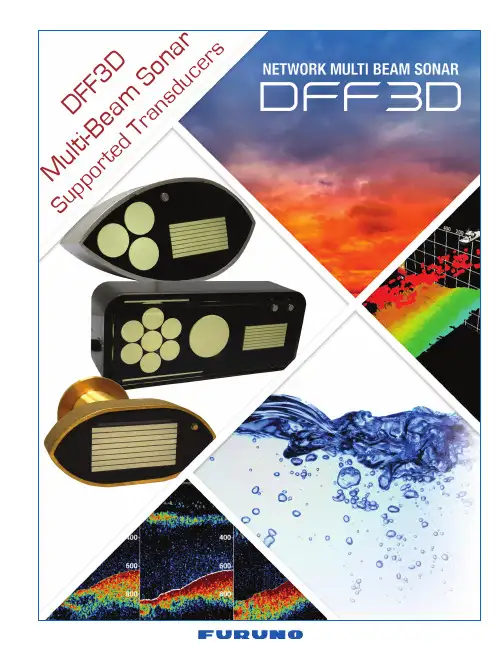
D F F 3D M ul t i -B e a m S o n a r S u p p o r t e d T r a n s d u c e r sSingle Frequency (DFF3D only)TransducersThese transducers have specific DFF3D elements. They are only for use with the DFF3D Multi-Beam Sonar. Four transducers fall into this category: A bronze thru-hull, a stainless thru-hull, a pocket or keel mount, and a transom mount.165T-B54 Bronze Thru-Hull Multi-beam TransducerThe 165T-B54 is a multi-beam transducer for the DFF3D that affords a 120-degree port-starboard view of the underwater world. A built-in motion sensor stabilizes the display to give clear and stable images.Standard Features•Bronze Thru-Hull with high speed fairing block. Can be flush mounted in keel without using fairing block.•DFF3D Elements 165khz•10M Cables with 7pin connector and pigtail cable•Compact design•Built-in motion sensor•Built in temp sensor165T-SS54 Stainless Thru-Hull Multi-beam TransducerStandard Features•Stainless Thru-Hull with high speed fairing block. Can be flush mounted in keel without using fairing block.•DFF3D Elements 165khz•10M Cables with 7pin connector and pigtail cable•Compact design•Built-in motion sensor•Built in temp sensor165T-TM54 Transom Mount Multi-Beam TransducerThe 165T-TM54 is a multi-beam transducer for the DFF3D that affords a 120-degree port-starboard view of the underwater world. A built-in motion sensor stabilizes the display to give clear and stable images.Standard Features•DFF3D Elements 165khz•Transom mount with stainless steel kick-up bracket•10M Cables with 7pin connector and pigtail cable•Built-in motion sensor•Built in temp sensor165T-CM54 Pocket or Keel Mount Multi-BeamTransducerThe 165T-CM54 is a multi-beam transducer for the DFF3D that affords a 120° port-starboard view of the underwater world. A built-in motion sensor stabilizes the display to give clear and stable images. It can be keel or pocket mounted.Standard Features•DFF3D Elements 165khz•Designed for keel or pocket mounts•10M Cables with 7pin connector and pigtail cable•Built-in motion sensor•Built in temp sensorC ombination TransducersThese transducers have the DFF3D elements along with either the B265 L/H CHIRP, B275 L/H CHIRP wide elements, B164 50/200 kHz elements, or 30-60 kHz L, 80-130 kHz M and temp. They can be connected to the DFF3D Multi-Beam Sonar along with one Fish Finder. These transducers save money and space compared to purchasing and installing two separate transducers.165T-50/200-SS260 DFF3D 50/200 Stainless CombinationThru-HullStandard Features•Stainless Thru Hull with high speed fairing block. Can be flush mounted in keel without using fairing block.•DFF3D Elements (165khz)•Built-in motion sensor•1kW, 50/200 kHz, 20/6 ° beam angles for Fish Finder elements. Same elements as an AIRMAR B164 transducer.•12M Cables with 10-Pin Connector for Fish Finder, 7 pin connector and a pigtail cable for the DFF3D.•Recommended for a TZtouch3, TZtouch2, or a TZtouch/DFF1/BBDS1 and DFF3D installation. If using with a TZtouch3, use TZtouch3 suppliedadapter cable to convert from 12p to 10pin.•Built in temp sensor165T/265LH-PM488 DFF3D/CHIRP Combination PocketMountThis is a new size housing (12 LX 5 W X 3.5 H) that contains the DFF3D elements along with the same CHIRP elements contained in B265LHStandard Features•DFF3D Elements (165khz)•Low—CHIRPS from 42 kHz to 65 kHz, Beamwidth 25° to 16°•High—CHIRPS from 130 kHz to 210 kHz, Beamwidth 10° to 6°•Bottom discrimination and Accu-fish compatible (without TID)•12M Cables, Pigtail cable for DFF1-UHD, 7 pin connector and a pigtail cable for the DFF3D•Recommended for a DFF1-UHD and DFF3D installation•Built-in motion sensor•Built in temp sensor165T/265LH-PM488-12P DFF3D/CHIRP Combination PocketMountThis is the same transducer as the 165T/265LH-PM488 but it has a 12pin connector instead of a pigtail for connection to the internal Fish Finder of a TZT12F, TZT16F, or TZT19F. It contains the DFF3D elements along with the same CHIRP elements contained in B265LHStandard Features•DFF3D Elements (165khz)•Low—CHIRPS from 42 kHz to 65 kHz, Beamwidth 25° to 16°•High—CHIRPS from 130 kHz to 210 kHz, Beamwidth 10° to 6°•Bottom Discrimination and Accu-fish compatible (without TID)•12M Cables, 12Pin cable for TZT12F, TZT16F, and TZT19F, 7 pin connector and a pigtail cable for the DFF3D•Recommended for a TZtouch3 MFDs (not TZT9F) and DFF3D installation.•Built-in motion sensor•Built in temp sensor165T/275LH-PM488 DFF3D/CHIRP Combination PocketMountThis is a new size housing (12 LX 5 W X 3.5 H) that contains the DFF3D elements along with the same CHIRP elements contained in B275LHWStandard Features•DFF3D Elements (165khz)•Low—CHIRPS from 42 kHz to 65 kHz, Beamwidth 25° to 16°•High—CHIRPS from 150 kHz to 250 kHz, Beamwidth 25°•12M Cables, Pigtail cable for DFF1-UHD, 7pin connector and a pigtail cable for the DFF3D•Recommended for a DFF1-UHD and DFF3D installation•Built-in motion sensor•Built in temp sensor165T/275LH-PM488-12P DFF3D/CHIRP Combination PocketMountThis is the same transducer as the 165T/275LH-PM488 but it has a 12pin connector instead of a pigtail for connection to the internal Fish Finder of a TZT12F, TZT16F, or TZT19F. It contains the DFF3D elements along with the same CHIRP elements contained in B275LH.Standard Features•DFF3D Elements (165khz)•Low—CHIRPS from 42 kHz to 65 kHz, Beamwidth 25° to 16°•High—CHIRPS from 150 kHz to 250 kHz, Beamwidth 25°•12M Cables. 12pin cable for TZT12F, TZT16F, and TZT19F, 7pin connector and a pigtail cable for the DFF3D.•Recommended for a TZtouch3 MFDs (Not TZT9F) and DFF3D installation.•Built-in motion sensor•Built in temp sensor165T/PM542LM DFF3D/CHIRP Combination Pocket Mount Low/Medium TruEcho CHIRP (30-60khz and 80-130khz), use with DI-FFAMP, FCV1900B, FCV295, FCV1150, or DFF3, and DFF3D Multi-Beam Sonar.Standard Features•DFF3D Elements (165khz)•2kw Low—CHIRPS from 30 kHz to 60 kHz, Beamwidth10° port/18° starboard beamwidth at the center of the band.•2kw Medium—CHIRPS from 80 kHz to 130 kHz, Beamwidth 13° to 8°•12M Cables, Pigtail cable for DI-FFAMP, 7pin connector and a pigtail cable for the DFF3D.•Recommended for a DI-FFAMP, FCV1900B and DFF3D installation.•Built-in motion sensor•Built in temp sensor•Previously called 165T/PM111LM165T-50/200-TM260 DFF3D 50/200 Combination TransomMountStandard Features•DFF3D Elements (165khz)•1kW, 50/200 kHz, 20/6 ° beam angles for Fish Finder elements. Same as an AIRMAR B164 transducer.•12M Cables, with 10pin connector for Fish Finder, 7 pin connector for the motion sensors, and pigtail cable for the DFF3D elements.•Recommended for a TZtouch2 or a TZtouch/DFF1, and DFF3D installation.•Built-in motion sensor•Built in temp sensorDFF3D Transducer Extension Cable KitsThere are three available kits depending on the installation. One kit to extend a DFF3D installation that uses just the DFF3D transducer. The other two kits are for combo transducers. One kit for a DFF3D transducer along with a 50/200 CW transducer. The third kit is to extend the DFF3D transducer along with a CHIRP transducer.Note: To extend either the 165T/265LH-PM488-12P or the 165T/275LH-PM488-12P DFF3D Combo Transducers use part # AIR-033-755 and 12pin transducer extension cable (part # available May of 2021). These combo transducers include a 12pin connector for use with the TZT12F, TZT16F, or TZT19F.Rev 3/24/2021。
智能手表操作规程智能手表是一种集时钟、计时、计算、信息传递以及健康管理等多种功能于一身的便携设备。
为了充分利用智能手表的各种功能,确保正常使用并获得更好的用户体验,以下是智能手表操作规程的详细说明:一、基本操作1. 开机与关机:长按电源按钮,直到屏幕亮起或出现关机提示,即可开机或关机。
2. 解锁与锁定屏幕:触摸或轻按屏幕,滑动手指或使用密码或手势解锁。
3. 主页界面:进入主页后可以轻触或滑动屏幕,切换不同的功能页面。
通常主页会包括时钟、日期、天气预报等基本信息。
4. 返回上一级页面:通常可以通过上滑或从左侧边缘向右滑动手指来快速返回上一级页面。
二、时钟和计时功能1. 时间调整:打开设置界面,找到日期和时间设置,手动或选择自动校准时间。
2. 闹钟设置:进入时钟应用,在闹钟选项中添加或编辑闹钟。
可以设置时间、重复模式和闹钟铃声。
3. 计时功能:打开计时器应用,设置特定的计时时间和提醒方式。
三、通讯和信息传递1. 通知提醒:进入设置选项,根据个人需求开启或关闭来电、短信、社交媒体等通知提醒。
2. 来电操作:当有来电时,手表会振动或发出声音,并在屏幕上显示来电信息。
可通过滑动手指或按下接听或挂断按钮进行操作。
3. 短信操作:当有新的短信到达时,手表会进行振动或发出声音,并在屏幕上显示短信内容。
可以通过滑动手指或按下按钮来查看或回复短信。
4. 应用通知:手表可以与手机应用进行连接,当手机上的应用有新消息或提醒时,手表会进行相应的提醒。
四、健康管理功能1. 计步器:手表内置计步器可以实时监测步数,并记录步行、跑步等运动数据。
在健康管理应用中可以查看详细的运动记录和统计信息。
2. 心率监测:手表可以通过传感器实时监测心率,并记录心率变化。
在健康管理应用中可以查看心率的历史数据和变化趋势。
3. 睡眠监测:手表可以通过睡眠监测功能追踪睡眠质量和睡眠时间。
在健康管理应用中可以查看睡眠数据和分析报告。
五、其他功能1. 导航功能:手表可以与手机导航应用进行连接,实现智能导航和路线规划功能。
智能手表操作手册智能手表的使用已经越来越普及,它不仅可以作为一个时尚的配饰品,还能帮助我们管理日常生活、健康、运动等方面的数据。
本篇操作手册将全面介绍智能手表的基本功能和操作方法,以帮助用户更好地使用智能手表。
一、开机与关机使用智能手表之前,首先需要了解如何开机和关机。
1. 开机确保智能手表已经充电后,按住电源按钮直至屏幕亮起,手表即可开机。
2. 关机长按电源按钮,屏幕会出现关机选项,选择关机即可完成关机操作。
二、屏幕解锁与基本操作智能手表的屏幕一般为触摸屏,解锁并进行基本操作是我们使用手表的第一步。
1. 屏幕解锁触摸屏幕上的锁屏图标或按下侧面按钮,手表即可解锁。
2. 基本操作- 滑动手势:在主屏上向左右滑动可以切换不同的功能界面。
- 点击手势:轻触屏幕上的图标或功能区域可以进入相应的功能页面或设置界面。
三、功能介绍与操作方法1. 电话与消息通过智能手表可以接听和拨打电话,收发短信。
以下是相关操作方法:- 接听来电:当手机接听电话时,智能手表会同步显示来电信息,通过手表上的接听按钮即可接听来电。
- 拨打电话:进入电话功能页面后,点击拨号盘图标,输入电话号码,点击拨号按钮即可拨打电话。
- 发送短信:进入消息功能页面后,点击新建短信按钮,选择联系人后输入短信内容,点击发送即可。
2. 健康与运动智能手表通常配备了多种健康与运动监测功能,以下是操作方法:- 心率监测:点击健康功能,进入心率监测页面,将手指轻轻放在屏幕上的心率检测区域,等待几秒钟即可显示心率数据。
- 步数计算:智能手表内置计步器,可以记录用户的步数,点击运动功能,进入计步页面,轻轻晃动手腕即可触发计步功能。
- 睡眠监测:进入健康功能,选择睡眠监测,手表会自动记录用户的睡眠时间和质量。
3. 提醒与日程智能手表可以提醒用户日程安排、闹钟等重要事项,以下是操作方法:- 设置闹钟:进入日程功能,点击添加闹钟图标,设置闹钟的时间和重复模式,保存后即可生效。
3B SCIENTIFIC® PHYSICSInstruction sheet12/19 SD/UD1 Measuring probe1a Finger guards2 Measurement socket “10 A”for current measurement in10-A range (positive)3 Measurement socket “COM“(negative)4 Measurement socket “A/Ω/hFE”for resistance and current meas-urement for up to 2 A (positive)5 Measurement socket “V“ forvoltage measurement (posi-tive)6 Adapter for transistor test7 Measurement range dial8 Hold function button9 On/Off switch10 DisplayDigital multimeter E conforms to safety regula-tions for electrical measurement, control and la-boratory equipment, as specified in DIN EN 61010-1, protection class 2 and to excess voltage category CAT I for up to 600 V. It is intended for measurements on experiments and laboratory apparatus. It is not approved for measurements on low-voltage mains distribution equipment, such as sockets, fuses, etc.The meter is intended for measurements within its measuring ranges and in a measuring environ-ment as described in detail in the course of this manual. Safe operation of the multimeter is guar-anteed if it is solely used as specified. Safety can-not be guaranteed, however, if the multimeter is used incorrectly or handled without due care and attention. In order to avoid serious injury due to current or voltage shocks, the following safety instructions are to be observed at all times.The multimeter may only be used by persons who are able to recognise the risks of contact and take due precautions to avoid them. Voltages in ex-cess of 33 V AC (RMS) or 70 V DC are to be re-garded as actively dangerous if the current, charge or energy stored should exceed certain values (see DIN EN 61010-1).∙Carefully read the instruction manual before using the multimeter and obey the instruc-tions therein.∙The multimeter may only be used in a dry, dust-free environment with no risk of explo-sions occurring.The assumption needs to be made that unfore-seen voltages may be present in the vincinity of objects being measured (e.g. faulty equipment). ∙Before using the multimeter, check the hous-ing and measuring leads for damage and if there should be any malfunctions or visible damage, the multimeter is not to be used.Pay specific attention to the insulation for the measuring sockets.∙The multimeter may not be used to make measurement on circuits which exhibit co-rona discharge (high voltage).∙Particular care is to be taken when making measurements on high-frequency circuits where dangerous voltages may arise due to superimposition of components.∙The authorised measuring range is not to be exceeded. If measurements are made when the magnitude of the variable is unknown, al-ways select a large measuring range before shifting down to lower ones.∙Make very sure that the voltage value be-tween the measured contact and earth or be-tween the ground socket and the measure-ment socket does not exceed 600 V.∙Before using the multimeter to check that a voltage source is not exhibiting any actual voltage, check that the meter is working properly by selecting the battery test function. ∙When measuring current, make sure the electricity is turned off before the multimeter is connected into the circuit.∙When making measurements, always con-nect the ground lead first. Disconnect the sig-nal measurement lead before unplugging the ground.∙Turn off the multimeter before opening the casing, disconnect the power to the circuit and the measuring leads from the multimeter. ∙If measurements are made where there are any risks of coming into contact with electric-ity, a second person is to be informed.∙The multimeter should not be stored, set up or operated within reach of children.∙When the multimeter is used by teenagers, trainees etc., a suitable person should super-vise to ensure the equipment is used safely. ∙If measurements are to be made where volt-ages exceed 33 V AC (RMS) or 70 V DC, be especially careful and only use safety experi-ment leads.∙When using the measuring leads always hold them with your fingers behind the finger guard. ∙To avoid false readings, which may result in electric shocks or injuries, always replace thebattery as soon as the flat battery indicator (∙Never use the multimeter when its casing is open.Measuring categories according to DIN EN 61010-1.∙CAT I or unstipulated: Approved for measure-ments in circuits which are not directly con-nected to the low voltage mains grid (e.g. bat-teries).∙CAT II: Approved for measurements in cir-cuits which are directly connected, by a mains lead and plug for instance, to the low voltage mains grid (e.g. household or office appliance and lab equipment).∙CAT III: Approved for measurements in cir-cuits which are part of a building’s wiring in-stallation (e.g. stationary consumers, distri-bution terminals, appliances connected di-rectly to the distribution box).∙CAT IV: Approved for measurements in cir-cuits which are directly connected to the source of the low voltage mains (e.g. electric-ity meters, main service feed, primary excess voltage protection).1 Digital multimeter1 Pair of measuring probes1 Adapter for transistor test1 Battery1 Instruction manualHazard, read instruction sheetDangerous voltagesV DC voltageA DC currentV AC voltageA AC currentDiode and continuity testhFE Current amplifying factor of a transistor + -ΩResistanceFlat batteryCAT Measuring category as per IEC EN 61010-1Double insulated casingCE EU conformity markEarth symbolDimensions: 90x190x35 mm approx.Weight: 310 g approx. (with bat-tery)Display: 3½-digit LCD,24 mm, max. 1999Operating voltage: 9-V battery, 6F22Fuse: F 2 A / 600 VF10 A / 600 VConnectors: 4-mm safety socketsMeasurements/second: 2 – 3 timesOverload display: “1” shown on d isplayOverload protection:Voltage limits: 1000 V DC or 750 V AClong-term in all voltagerangesCurrent limits:2 A range: max. 2 A10 A range: max. 10 A for 10 s withminimum interval 15minsOperating temperature: 0°C – 40°C with0 – 75% humidityStorage temperature: -10°C – 50°C with0 – 75% humidityElectrical safety:Safety specifications: EN 61010-1Excess voltagecategory: CAT I: 600 VContamination level: 2Protection type: IP20Electromagnetic compatibility:Interference emission: EN 55011:2009Interference resistance: EN 61326-1:2013Input impedance: 10 MΩInput impedance: 10 MΩFrequency range: 40 – 400 HzMeasuring voltage drop: 200 mVMeasuring voltage drop: 200 mVFrequency range: 40 – 400 Hz + -Accuracy is given for 1 year after calibration at 23°C ±5°C, RH<75%.Digital multimeter E is a robust, battery operated multimeter with a 3½-digit LCD display for meas-uring voltage, current and resistance as well as for diode and hFE gain testing.All measurement ranges are selected by means of a rotary dial. All measurement ranges are pro-tected against overload.The meter is equipped with a hold function, neg-ative polarity indication, over range indication and low battery indication.On the backside there is a fold out prop for stand-ing the device on a table.Note: The multimeter switches into an indetermi-nate state if the Hold button is activated (Hold function button (8) pressed). After it is switched on, the display will then show “1.666” (where the position of the decimal point is dependent on the selected measuring range). If this case should arise, deactivate the Hold function while the equipment is switched on (deactivate Hold func-tion by pressing the button one more time). 6.1 Method of measurementWarning! Dangerous voltages may be present at the input terminals and may not be displayed.6.1.1Voltage measurement∙ Set the measurement range dial at the re-quired position or .∙Connect the black test lead to the measure-ment socket "COM" and the red test lead to the "V" socket. The meter is connected paral-lel to the measuring point. The polarity of the red lead connection will be indicated at the same time as the voltage when making a DC measurement.Note∙lf the voltage to be tested is unknown before-hand, set the measurement range dial to the highest range and work down.∙When only the figure "1" is displayed, over range is being indicated and the measure-ment range dial has be set to a higher range. ∙Never measure voltages higher than 600 V.6.1.2Current measurement∙ Set the measurement range dial at the re-quired position or .∙Connect the black test lead to the measure-ment socket "COM" and the red test lead to the " A/Ω/hFE" socket for measurements up to 2 A. For measurements over 2 A connect it to the socket “10 A”. The meter is connected in series to the measuring object. The polarity of the red lead connection will be indicated at the same time as the current when making a DC measurement.Note∙lf the current to be tested is unknown before-hand, set the measurement range dial to the highest range and work down.∙When only the figure "1" is displayed, over range is being indicated and the measure-ment range dial has be set to a higher range. ∙Limit measurements in the 10-A range to max. 10 s.6.1.3 Resistance measurementWarning! To avoid electrical shockor damage to the meter whenmeasuring resistance in a circuit,make sure the power to the circuitis turned off and all capacitors aredischarged.∙Set the measurement range dial to the Ω range.∙Connect the black test lead to the measure-ment socket "COM" and the red test lead to the " A/Ω/hFE" socket. Measurement is done parallel to the resistorNote∙lf the resistance to be tested is unknown be-forehand, set the measurement range dial to the highest range and work dowWhen only the figure "1" is displayed, over range is being indicated and the measurement range dial has be set to a higher range.When the input is not connected, i.e. at open cir-cuit, the figure "1" will be displayed for the over range condition.6.1.4 Diode test∙Set the measurement range dial to .∙Connect the black test lead to the measure-ment socket "COM" and to the cathode of the diode. Connect the red test lead to the "A/Ω/hFE" socket and the anode of the diode. Note: The meter displays the forward voltage drop and displays figure "1" for overload when the diode is reversed.6.1.5 Continuity testWarning! To avoid electrical shockor damage to the meter whenmeasuring continuity in a circuit,make sure the power to the circuitis turned off and all capacitors aredischarged.∙Set the measurement range dial to .∙Connect the black test lead to the measure-ment socket "COM" and the red test lead to the " A/Ω/hFE" socket.A built-In buzzer sounds if the resistance is less than 30 ± 10 Ω.6.1.6 Transistor hFE test ∙Set the measurement range dial to hFE.∙Insert the adapter for transistor test into the the measurement sockets "COM" and "A/Ω/hFE".∙Make sure the transistor is "NPN" or "PNP"type. Insert the transistor correctly into the corresponding transistor test socket. Display reading is approx. transistor hFE value (0 – 1000). Base current approx. 10 µA, V CE ap-prox.2.8 V.Turn off the meter and remove the testleads before you service or clean thedevice.Beyond replacing batteries and fuses, do not at-tempt to repair or service your meter unless you are qualified to do so and have the relevant cali-bration, performance test, and service instruc-tions.7.1Battery and fuse replacementReplace the battery as soon as the flatbattery icon ( ) appears.Remove from the multimeter any bat-teries which are flat or starting to disin-tegrate.Also remove batteries from the multi-meter if it has not been used for a longperiod of time.Turn off the meter and remove the testleads before opening the case.∙Loosen screws with suitable screwdriver and remove case bottom.∙Replace the battery or the fuse.∙Replace the case bottom and reinstall the three screws. Never operate the meter unless the case bottom is fully closed.∙Do not dispose of thebattery in regularhousehold refuse.Follow the local regu-lations (In Germany:BattG; EU:2006/66/EG).+ -Cleaning∙Periodically wipe the case with a damp cloth and mild detergent.∙Do not use abrasives or solvents.Dirt or moisture in the measurement sockets can affect readings.∙Shake out any dirt that may be in the meas-urement sockets.∙Soak a new swab with isopropyl alcohol and work around the inside of each measurement socket.∙The packaging should be disposed of at local recycling points.∙Should you need todispose of the equip-ment itself, neverthrow it away in nor-mal domestic waste.Local regulations forthe disposal of elec-trical equipment willapply.∙Do not dispose of the battery in regular household refuse. Follow the local regula-tions (In Germany: BattG; EU: 2006/66/EG).3B Scientific GmbH ▪ Ludwig-Erhard-Str. 20 ▪ 20459 Hamburg ▪ Germany ▪ 。
颂拓山雄中文说明完整版zh SUUNTO ELEMENTUM TERRA用户指南A B CTIMESETTINGS MEMORY COMPASSCHRONOGRAPH / DATEALTITUDE RECORDING CALIBRATIONzh入门教程感谢您选用 Suunto Elementum Terra 这一款适用于登山和户外活动的数字运动手表。
开始操作:1. 按任意按钮将您的手表激活。
2. 按住 [A] 进入设置。
活动设置将在显示屏上闪动。
3. 旋转 [A] 可更改值。
4. 按下 [A] 接受更改并移至下一设置。
设置更改完毕后,您将返回 time (时间)模式。
请务必于/register 注册您的手表,以获得Suunto 的全方位支持。
您还可访问 /support 获得完整的用户指南和其他信息。
功能:_时间、日期、闹铃_背光灯_高度计_气压趋势_3D 指南针_计时器_累计上升/下降_日志:最近 8 次上升/下降,最大高度zhCOmPASS (指南针)按 [C] 进入。
? 按住 [C] 可以启动指南针校准。
? 校准指南针时,请在旋转时将设备保持水平和稳定。
如果设备不处于水平和稳定状态,显示屏上的“水平”将会闪烁。
? 按 [B] 或 [C] 可以退出指南针。
time /Altitude reCOrding (时间/高度记录)按 [B] 可以在 time (时间)与 Altitude reCOrding (高度记录)记录模式之间切换。
秒表(计时器)1. 在 time (时间)模式下,向上旋转 [A] 可以在秒表和日期之间切换。
2. 按 [A] 开始/停止秒表。
3. 按住 [C] 重置当前时间。
SettingS (设置)1. 在 time (时间) 模式下,按住 [A] 进入/退出 SettingS (设置)。
2. 旋转 [A] 更改值。
3. 按 [A] 确认。
4. 按 [B] 或 [C] 或者按住 [A] 退出。
Amazfit智能运动手表使用手册目 录外观和操作说明手表佩戴及充电方式运动功能介绍手表功能使用手表日常保养 010*******外观和操作说明以下使用说明内容基于WOS2.0系统,请升级到最新版本使用。
手表锁屏与操作状态手表在不进行操作一段时间后自动进入低功耗锁屏状态,并显示表盘界面。
可以通过按键短按来解锁手表,解锁后如果不进行操作,会再次自动进入低功耗锁屏状态。
系统状态符号说明系统状态符号会出现在解锁后的表盘上,每种符号会代表手表处于不同的状态。
触摸屏手势操作按键短按解锁手表返回表盘锁屏长按秒手表开机长按秒弹出手表重启、关机界面长按秒手表关机4610点击屏幕使用该功能、进入下一项或选中当前项左右滑动屏幕横向切换界面上下滑动屏幕上下滚动界面长按屏幕在表盘界面下长按激活表盘选择功能快捷设置菜单在表盘界面下滑,可以在该界面进行一些常用功能的开关和模式切换,以及进入更多设置界面。
语音控制功能说明见“语音助手”部分。
电池状态充电状态充满状态低电量保护状态当手表电量在5%及以下时会进入低电量保护模式,此时需要将手表充电超过5%之后才可以解除保护模式。
与手机连接断开当手表与手机距离过远断开了蓝牙连接或手机关闭了蓝牙广播,。
已开启勿扰模式已开启飞行模式已连接蓝牙耳机此时会增加系统功耗。
音乐播放中如果音乐播放已经结束,。
手表佩戴及充电方式日常佩戴建议将手表以适中的松紧度佩戴在离手腕两指距离的位置上,以确保光学心率监测器正常监测数据。
运动中佩戴进行跑步或者其他运动时,建议将手表以贴合、舒服且不会滑动的松紧度佩戴。
不要过于拉紧,也不要让手表自由晃动。
充电将手表与充电底座进行连接。
将另外一头的USB插头插入USB电源适配器,此时手表上会显示充电状态,安装时注意底座上充电触点的方向和手表上金属触点的方向一致,压紧后手表不会松脱出底座。
充电要求:建议使用电脑端USB充电或者品牌手机充电头进行充电,手机充电头额定输入电压必须是DC 5.0v,且输入电流大于500mA以上;运动功能介绍开启运动解锁后在表盘状态向右滑动可以快速打开运动列表。
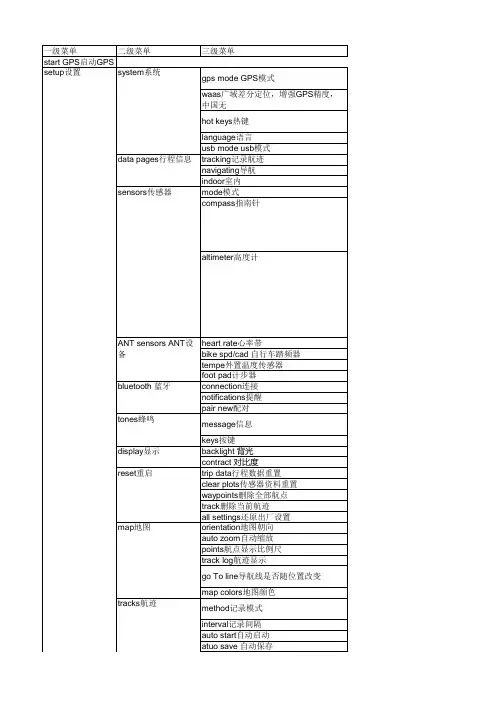
3D计步器手表使用说明书(中文版)
EL UP
MODE DOWN
A . 功能简介
1. 时间万年历功能:
时间范围:2000 年1 月1 日~2099 年12 月31 日;12/24 小时制选择;星期自动显示。
2. 2组闹铃功能:
响闹时间:1 分钟;整点报时i
3. 秒表功能:
最大值为:59' 59" 99;SPL 功能。
4. 倒计时功能:
最大值为:23:59.00
5. 计步功能:
7秒智能计步;三种计步模式显示:计步/时间显示模式→计步/运动时间显示模式→卡路里/里程显示模式;用户资讯设置:公制/英制→体重→步距→G-Sensor 灵敏度。
6. 50天自动记忆存步功能
7. 心跳测量功能:
心跳测量范围:30~200;通过接触式量测,显示动态脉搏次数。
8. 背光:EL
B . 按键说明
【MODE】按键
切换界面显示:时间模式→计步模式→记忆存步模式→心跳测试模式;长按进入设置模式;
切换设置项。
【UP】按键
上调加1,长按快调;在时间模式,短按循环顺序切换模式:闹铃1(AL1)→闹铃2(AL2)→秒表(STW)→倒计时(TMR);
在计步模式,短按循环顺序切换显示:计步/时间显示→计步/运动时间显示→卡路里/里程显示;向上查询历史运动记录;长按加锁/解除。
【DOWN】按键
下调减1,长按快调;快速开/关闹铃;开启/暂停秒表、倒计时;向下查询历史运动记录。
【EL】按键
点亮背光4 秒;开启/取消SPL 功能;短按返回默认值。
C、操作及显示说明
1、复位或上电默认显示:
上电/复位,点亮背光1 秒,全显2 秒,响“Bi”一声,进入时间显示模式。
上电默认值:12 小时制,12:00:00,FRI,2011-1-01。
时间模式显示界面
短按【UP】键可循环顺序切换模式:闹铃1(AL1)→闹铃2(AL2)→秒表(STW)→倒计时(TMR),如图所示:
按【UP】或【DOWN】键向上/下调整设置项的值,长按【UP】或【DOWN】键2 秒有快调功能。
调整年、月、日,星期自动更新。
在时间设置状态,30 秒无按键操作,自动退出设置状态,返回时间显示模式。
3、闹铃模式
在时间显示模式,按【UP】键切换至闹铃模式。
短按【DOWN】键可快速开/关闹铃,开启闹铃,在所有模式下,显示闹铃图标。
长按【MODE】键2 秒进入闹铃设定状态,短按【MODE】键切换设置项:时→分,如图所示:
按【UP】或【DOWN】键向上/下调整设置项的值,长按【UP】或【DOWN】键2 秒有快调功能。
闹铃时间到达,闹铃图标闪烁,1 分钟“BiBi”响闹提醒,按任意键可停止响闹。
30 秒无按键操作,自动退出闹铃设置状态,返回时间显示模式。
在闹铃显示模式,无按键操作,不会自动返回时间显示模式。
注:进入闹铃设定状态,自动开启闹铃,显示闹铃图标。
4、秒表模式
按【UP】键切换至秒表界面,显示秒表初始值:00′00″00。
短按【DOWN】键开启/暂停跑秒计时,在跑表暂停计时状态,按【EL】键清零数据。
在跑表计时状态,按【EL】键开启SPL 功能,界面上会闪烁显示“SPL”字样,跑表功能还在继续运行,再次按下【EL】键回到计时器。
跑表到达最大值(59′59″99)时,无响闹提示,继续重新开始跑表计时。
停止计时状态,无按键操作不会自动返回时间显示模式。
注:开启SPL,切换到其他功能显示界面,自动取消SPL 功能,跑表继续计时。
5、倒计时模式
倒计时显示开启倒计时显示 按【UP】键切换至倒计时界面,初始值显示为00:00.00。
长按【MODE】键2 秒进入倒计时设置状态,短按【MODE】键切换设置项:时→分,如图所示:
按【UP】或【DOWN】键向上/下调整设置项的值,长按【UP】或【DOWN】键2 秒有快调功能。
在倒计时为0 的情况下,不能启动倒计时;倒计时时间非0 时,按【UP】键开启/暂停倒计时。
在倒计时暂停状态,按【EL】键返回显示倒计时设置值。
开启倒计时,在所有模式下,闪烁显示倒计时图标;停止倒计时,倒计时图标消失。
倒计时结束,显示00:00.00,倒计时图标消失,1 分钟“DiDi”响闹提醒,按任意键停止响闹。
停止响闹,显示倒计时设置值。
倒计时结束时间与闹铃时间同时到达时,只响倒计时提示。
在倒计时设置状态,30 秒无按键操作,自动退出设置状态,返回倒计时模式。
在倒计时模式,无按键操作,不会自动返回时间显示模式。
注:进入倒计时设置状态,倒计时自动清零。
6、计步模式
按【MODE】键切换至计步模式,步数ii显示为0。
短按【UP】键循环顺序切换显示:计步/时间模式→计步/运动时间模式→卡路里/
里程模式,如图所示:
计步/时间模式计步/运动时间模式卡路里/里程模式 计步/时间模式:步数和时间同屏显示,LCD 上屏显示步数,下屏显示时间,最大步数为:999999 步;
计步/运动时间模式:计步和运动时间同屏显示,LCD 上屏显示步数,下屏显示运动时间,最大值为:999999 步/23 小时59 分59 秒;
卡路里/里程模式:卡路里和里程同屏显示,LCD 上屏显示卡路里,下屏显示里程,最大值为:99999.9 千卡/ 9999.99KM 或9999.99 Mile(卡路里显示1 位小数,里程显示2 位小数)。
在计步/时间模式或计步/运动时间模式,长按【MODE】键2 秒进入设置或查询用户资讯状态,默认:公制设置项闪烁。
在用户资讯设置状态,短按【MODE】键切换设置项:公制/英制→体重→步距→G-Sensor 灵敏度,如图所示:
公制或英制:默认为公制,按【UP】或【DOWN】键切换选择公制/英制。
调整公制/英制设置项,体重和步距自动恢复默认值;
设定体重:默认为60KG(132LB),可调范围:30-200KG/66-440LB;
设定步距:默认步距为70CM(28INCH),可调范围:30-150CM/12-59INCH ;
按【UP】或【DOWN】键向上/下调整设置项的值,长按【UP】或【DOWN】键2 秒有快调功能;
G-Sensor 灵敏度:默认为:MIDDLE,灵敏度等级选择:LOW→MIDDLE→HI。
在计步/时间模式,长按【EL】键2 秒,闪烁显示“ERASE”,提示是否要清零;短按【EL】键,步数、卡路里,距离的数值自动清零,如图所示:
在用户资讯设置状态,30 秒无按键操作,自动退出设置状态。
在计步清零模式,4 秒无按键操作或按任意键(除EL 键外),自动退出计步清零模式,返回计步显示模式。
注:在三种计步显示模式,均可计步。
7、记忆存步模式
按【MODE】键切换至记忆存步模式,默认显示:00。
上屏显示历史运动记录日期,下屏显示历史运动记录的步数、卡路里和距离并以
1 秒为周期自动切换显示(卡路里不显示小数位,里程显示
2 位小数),如图所示:
按【UP】或【DOWN】键向上/下查看历史运动记录。
长按【EL】键2 秒,闪烁显示“ERASE”,提示是否要清零所有记录数据;短按【EL】键,自动清空历史运动记录,如图所示:
在记忆清零状态,4 秒无按键操作或按任意键(除EL 键外),自动退出清除历史运动记录状态,返回记忆存步显示模式。
30 秒无按键操作,自动退出记忆存步模式,返回时间显示模式。
8、心跳测量模式
心跳模式显示
按【MODE】键进入心跳测量模式,显示“PULSE”字样和心形标志。
检测到心跳讯号后,心形标志开始跳动,心跳显示数值会同步心跳频率实时更新。
心跳频率显示
在心跳测量模式下,如果连续10 秒内侦测不到心跳讯号,则返回时间显示模式。
<<心跳测量注意事项>>
1.测量时手表要戴在手上,手指尽可能的覆盖测量点(感应片),保持力道均匀,并且避免抖动,以保证量测的准确性。
2.当气温较低或气侯比较干燥时,人体的阻抗会比较高,生理电信号比较弱,进而影响量测的结果,可借助磨擦双手的方法,使手温升高并保持湿润,再进行测量。
9、模式保护功能:
在手表模式或计步器模式下,长按【UP】键2 秒可开启/关闭锁定MODE 键切换到其他主界面,防止在手表模式误触发到计步器模式,导致耗电;
防止用户在测量计步时,退出计步模式,从而导致计步失败;
在计步器模式下,若取消加锁功能,10 分钟无动作自动返回时间模式;若开启加锁功能,则不会返回时间模式。
注:开启加锁功能,显示图标。