MPE720使用方法基础
- 格式:ppt
- 大小:6.42 MB
- 文档页数:70

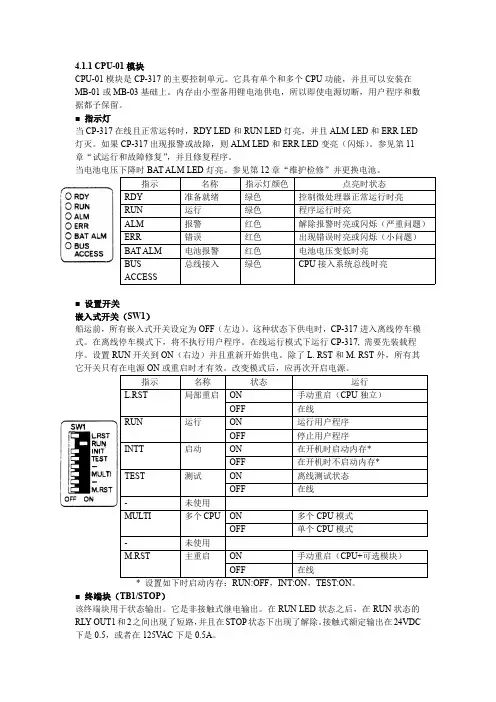
Engineering Tool for MP2000 Series Machine Controller MPE720 Version 6USER'S MANUALNew Features of Version 6.04ContentsChapter 1 Motion Command Assist Function.............................................1-1 1.1 Motion Command Assist Function..........................................................1-21.1.1 Insert the Motion Command....................................................................1-2( 1 ) Input Motion Instruction..........................................................................1-21.1.2 Insert Servo Enable, Servo Disable, Alarm Clear Instruction.................1-4 Chapter 2 System Sub-window..................................................................2-12.1 System Sub-window...............................................................................2-2 Chapter 3 Test Run.....................................................................................3-13.1 Test Run..................................................................................................3-23.1.1 T est Run Procedure.................................................................................3-2 3.2 Servo Enable, Servo Disable.................................................................3-53.2.1 Servo Enable............................................................................................3-53.2.2 Servo Disable...........................................................................................3-5 3.3 Jog Operation.........................................................................................3-6( 1 ) Set the speed reference........................................................................3-63.3.1 Jog Forward.............................................................................................3-73.3.2 Jog Reverse.............................................................................................3-7 3.4 Step Operation........................................................................................3-83.4.1 Step Operation Procedure.......................................................................3-9 Chapter 4 Axis Monitor................................................................................4-1 4.1 Axis Monitor............................................................................................4-2 4.2 Axis Monitor Display...............................................................................4-34.2.1 T oolbar......................................................................................................4-34.2.2 Circuit and Axis Display...........................................................................4-3( 1 ) Circuit Display........................................................................................4-3 ( 2 ) Axis Display............................................................................................4-34.2.3 Status Display..........................................................................................4-4( 1 ) Ready, Enabled......................................................................................4-4 ( 2 ) Alarm, Warning.......................................................................................4-4 ( 3 ) Profile Complete, In Position.................................................................4-4 ( 4 ) Motion Command...................................................................................4-44.2.4 Monitor Parameter Display......................................................................4-5( 1 ) Monitoring the Monitor Parameters.......................................................4-5 Chapter 5 Alarm Monitor.............................................................................5-1 5.1 Alarm Monitor.........................................................................................5-25.1.1 Alarm Monitor Display..............................................................................5-3( 1 ) T oolbar....................................................................................................5-3 ( 2 ) Status......................................................................................................5-3 ( 3 ) Show, Hide the Circuit............................................................................5-35.1.2 When Alarm, Warning Occurs.................................................................5-4( 1 ) Alarm, Warning Information...................................................................5-5 Chapter 6 Additional Function of Compile Options.....................................6-1 6.1 Additional Function of Compile Options.................................................6-2 Chapter 7 Troubleshooting..........................................................................7-1 7.1 Troubleshooting......................................................................................7-2 7.2 Troubleshooting Flow.............................................................................7-37.2.1 Start Troubleshooting...............................................................................7-37.2.2 Troubleshooting Details...........................................................................7-4( 1 ) An operation error occurs in the program..............................................7-4 ( 2 ) I/O error occurs......................................................................................7-87.2.3 Complete the Troubleshooting (710)7.3 Error Codes..........................................................................................7-11 Chapter 8 Communications Setting............................................................8-1 8.1 Communication Setting..........................................................................8-2 8.2 Connect Using Ethernet.........................................................................8-28.2.1 Computer Setting.....................................................................................8-2( 1 ) Setting the IP Address...........................................................................8-28.2.2 Ethernet Port Setting................................................................................8-5( 1 ) How to Set an Ethernet Port..................................................................8-5 ( 2 ) How to Set an Ethernet (LP) Port..........................................................8-5 8.3 Connect Using Serial Port......................................................................8-78.3.1 Serial Port Settings..................................................................................8-7( 1 ) Setting of Serial Port..............................................................................8-7Chapter 1 Motion Command Assist FunctionThis chapter describes the "motion command assist function".1.1 Motion Command Assist Function...................................................1-21.1.1 Insert the Motion Command.......................................................................1-21.1.2 Insert Servo Enable, Servo Disable, Alarm Clear Instruction.....................1-41.1 Motion Command Assist FunctionThe Motion Command Assist Function helps to input motion instructions when creating the motion program.The motion program is described with a text-type Motion Language. Motion instructions should be input complying with their own format.Using the Motion Command Dialog Box, motion instructions will be easier to input.1.1.1 Insert the Motion CommandRight-click the mouse in the motion program editor. The pop-up menu will appear. The motion instructions can be selected and inserted from the pop-up menu. There are two methods to access the Motion Command Assist Function.● Select “Motion command assist...” from the pop-up menu :The Motion Command Assist Dialog Box is displayed. Select an instruction from the "command" column.● Select “Insert motion command” – “Instruction” from the pop-up menu :The Motion Command Assist Dialog Box is displayed. Select a motion instruction from the pop-up menu and itis displayed in the "command" column.( 1 ) Input Motion Instruction1. Right-click the mouse in the motion program editor and select “Insert motion command” from the pop-upmenu.The Motion Command Assist Dialog Box is displayed.2. Complete all settings and click the Insert button.The following two types of dialog boxes appear.Select Command ( )When clicking , the instructions which can be inserted are displayed. Select the instruction to be inserted.Motion instruction Format ( )The format of the selected instruction is displayed.Number of Axes ()Set the number of controlled axes. When the number of axes of selected instruction is a fixed number, the fixed number is displayed automatically and shown in gray.Refresh ( )Click the button to update the Motion Command Assist Dialog Box.Setting the arguments ( )The arguments of each motion instruction are displayed. Set the “axis name” and the “setting value” in the table.Arguments: The argument names are displayed.Axis: Set the logical axis name which is defined in the "group definition".Setting value: The constant and the register number can be input. If the setting value can be omitted, "Optional" is displayed as default.Unit: The unit of each argument is displayed.When the units are not set, is displayed. The tool tip help is displayed when the mouse pointer is held over the unit. Set the unit according to the instruction.Program code ( )This program code is displayed when the motion instruction does not need the "axis name" and "setting value".Comment ( )Comment column ( )If "Comment" is selected, it is possible to add and edit comments in the "Comment column" for each instruction. If not, "Comment column" is shown in gray.Insert ( )Click the button to insert the instruction.Close ( )Click the button to close the Motion Command Assist Dialog Box.Help ( )Click the button to display the "Machine Controller MP2200/MP2300 Motion Module User's Manual".1.1.2 Insert Servo Enable, Servo Disable, Alarm Clear InstructionThe Servo Enable, Servo Disable, and Alarm Clear instruction can be easily inserted without considering the motion register.1. Right-click the mouse in the motion program editor. Then select “Insert Motion Command” – “ServoEnable”, “Servo Disable” or “Alarm Clear” from the pop-up menu.The Axis Dialog Box is displayed.2. Select logical axis name from the Axis combo box. Then click the Insert button.3. The instruction (Servo Enable, Servo Disable or Alarm Clear) is inserted at the cursor position.Chapter 2System Sub-window This chapter describes the System Sub-window.2.1 System Sub-window........................................................................2-22.1 System Sub-windowThe System Sub-window manages the following functions.● Module configuration● Axis configuration- Test Run- Axis Monitor- Alarm Monitor- Motion Parameter ListChapter 3 Test RunChapter 3Test RunThis chapter describes how to use the Test Run function.3.1 Test Run...........................................................................................3-23.1.1 Test Run Procedure....................................................................................3-23.2 Servo Enable, Servo Disable...........................................................3-53.2.1 Servo Enable..............................................................................................3-53.2.2 Servo Disable..............................................................................................3-53.3 Jog Operation..................................................................................3-63.3.1 Jog Forward................................................................................................3-73.3.2 Jog Reverse................................................................................................3-73.4 Step Operation.................................................................................3-83.4.1 Step Operation Procedure..........................................................................3-93.1 T est RunThe Test Run function is for checking if the machine controller can operate an axis. It has three functions.- Servo Enable, Servo Disable: Enable or Disable the specified axis.- JOG: Jogs the specified axis with specified speed and direction.- STEP: Runs the specified axis a specified distance.The following two functions are implemented for monitoring.- Axis Monitor: Monitors the status of each axis.- Alarm Monitor: Monitors the "Alarm information" of all axes in one screen.♦ The Test Run function can be operated when the target axis has the following status.AxisMotion ControllerOperation ReadyServo ReadyMotion CommandResponse CodeServo ON ON NOPSVB built-in CPUSVB-01 Inverter - ON NOP SV A-01 ON ON NOP SVR ON - NOP PO-01 ON - NOPThe Test Run function may not work correctly when a motion program or sequence program operates theaxis.3.1.1 T est Run Procedure1. Double-click the T est Run Folder in the System Sub-window.A Test Run warning window will be displayed.2. Confirm the contents. Then click the Agree button.The Test Run Window and Axis Dialog Box is displayed.3. Select the target axis from the Axis Dialog Box. Then click the OK button.The following message is displayed.4. The selected Axis name is displayed in the right side of the “Axis...” button when clicking the “Yes” button.♦ The Test Run function can operate only one axis at a time.Axis monitor ( )The Axis Monitor Window is displayed in the Main Window.Alarm monitor ( )The Alarm Monitor Window is displayed in the Main Window.Update ( )Updates the display of the Test Run Window.Axis ( )The Axis Dialog Box is displayed.Status ( / ) The status of the axis is displayed.Enable ( )Click the button to enable the axis.Disable ( )Click the button to disable the axis.Monitor Status ( / / ) The operating status of the monitor will be displayed.Monitor ( )The Alarm Warning Dialog Box is displayed.3.2 Servo Enable, Servo DisableThe axis can be enabled and disabled with this function. The status of the axis can also be monitored in the Test Run Dialog Box.The way to operate and monitor the axis is described below.3.2.1 Servo EnableEnabling the axis and monitoring the status.1. Click the Enable button.The axis is enabled.Axis status is changed to "Enabled".The operation of Jog and Step becomes available.3.2.2 Servo DisableDisabling the axis and monitoring the status.1. Click the Disable button.The axis is disabled.The status is changed to "Disabled".Jog and Step cannot be used.3.3 Jog OperationThe Jog operation is a function to run the forward or reverse direction of the axis. The running speed can be set in theSpeed reference Dialog Box.Jog is available only while the axis is enabled.The axis will run while the Forward or Reverse button is pressed. The axis will stop when the Forward or Reversebutton is released.Speed reference ( )The Speed reference Dialog Box is displayed, and the running speed (speed reference) is set in the dialog box. Forward ()The axis runs forward. Reverse ()The axis runs reverse.( 1 ) Set the speed reference1. Click the Speed reference button.Speed reference Dialog Box is displayed.2. Input speed reference. Then click the Set button.♦When the unit is not set, the following dialog box is displayed. Click the Open button to set the unit.3.3.1 Jog ForwardThe axis runs forward while the button is held down.1. Hold down the Forward button with the mouse.The axis runs forward.2. Release the button.The axis stops.3.3.2 Jog ReverseThe axis runs reverse while the button is held down.1. Hold down the Reverse button with the mouse.The axis runs reverse.2. Release the button.The axis stops.3.4 Step OperationThe step operation moves the axis a specified distance and then stops.The axis starts moving when the Run button is clicked. Motion can be aborted with the Stop button.The step operation can also repeat round trip motion several times.The step operation operates under the following conditions.● Servo is enabled.● The speed reference and step distance must be set.The "---" is displayed by default. If the Forward Reverse button is operated before setting them, the following error message is displayed.● The unit for speed reference and step distance must be set.The unit of speed reference and step distance is related to some fixed parameters. If changing the unit of one, theunit of the other is also changed.The following error message is displayed if the unit is not set. To set the unit, click the Open button.3.4.1 Step Operation ProcedurePlease refer to "3.2 Servo Enable, Servo " to learn how to enable or disable servo.1. Click the “Step” T ab.The Step Setting Dialog Box is displayed.2. Click the “Speed reference”, “Step distance” and “Direction setting” button and set them.Speed reference ( )Display Speed reference Dialog Box and set speed reference.Step distance ( )Display the Step distance Dialog Box and set the step distance.♦ When the Step distance unit is not set, a fixed parameter of the Motion module is automatically read.Direction setting ( )Display the Direction Setting Dialog Box and set the direction.Direction: Set the direction for first motion.Repetitive running: Check it for repeat operation.Repeat time: Set the number of times to repeat.i.e. Repeat time is 2.Forward -> Reverse -> Forward -> Reverse.Repeat stop time: Set the interval time between motion.Forward Reverse (/ , / ) " " shows the direction of motor.Repeat time ( )"Current repeat time/ Setting repeat time" is displayed.Run ( )To start the step operation.Stop ( )To stop the step operation. The following message is displayed when stopped.3. Click the Run button.The step operation starts.Chapter 4Axis Monitor This chapter describes how to use the Axis Monitor.4.1 Axis Monitor.....................................................................................4-2 4.2 Axis Monitor Display........................................................................4-34.2.1 Toolbar........................................................................................................4-34.2.2 Circuit and Axis Display..............................................................................4-34.2.3 Status Display.............................................................................................4-44.2.4 Monitor Parameter Display.........................................................................4-54.1 Axis MonitorThe axis monitor is a function to monitor the status of each axis in the "Axis Monitor" window.The status (Ready, Enable, Alarm, Warning, Profile Complete, In Position, Motion Command) and other extended monitoring parameters can be monitored.The axis monitor updates when displayed in the Main Window. Scrolling displays other axes and parameters which are out of the window.♦ The axes displayed:SVB: The axes which are connected via MECHATROLINK.SVA-01: 2 axes.PO-01: 4 axes.SVR: 16 axes.4.2 Axis Monitor DisplayThe display of the Axis Monitor Window is described below.4.2.1 T oolbarCircuit ( )Monitoring the selected circuit.Monitor type ( / / )The update cycle can be chosen from "High Speed, Normal Speed, Low Speed".Monitoring ( / )Click the button to select stop or start monitoring.Alarm monitor ( )Click the button to display the Alarm Monitor window.Refresh ( )Click the button to update the Axis Monitor window.4.2.2 Circuit and Axis Display( 1 ) Circuit DisplayThe motion module number (SVB, SV A, PO-01, SVR) of the axis and module name are displayed. ( 2 ) Axis DisplayThe axis name and the product type of axis are displayed.4.2.3 Status DisplayThe status of the Ready, Enable, Alarm, Warning, Profile Complete, In Position and Motion Command are displayed. ( 1 ) Ready, EnabledThe status is displayed.Ready ( / ) : The status if the axis is ready to operate.Enabled ( / ) : The status if the axis is enabled.( 2 ) Alarm, WarningThe status of the alarm and warning are displayed.[Alarm, warning status]No Alarm ( ) : No alarm or warning.Alarm ( ) :Alarm has occurred.Warning ( ) : Warning has occurred.Clicking the "status" displays the Alarm Warning Dialog Box. Details of the alarm and warning are displayed. Refer to "Chapter 5: Alarm Monitor" for more information on the Alarm/Warning monitoring function.( 3 ) Profile Complete, In PositionThe status of Profile Complete and In Position are displayed. When Profile Complete or In Position signal is ON, the lamp is displayed in blue.Profile Complete ( / ) :The status of the Profile Complete.In Position ( / ) :The status of the In Position.( 4 ) Motion CommandThe status of the motion command response code is displayed. The background is displayed in blue except "---"(NOP).4.2.4 Monitor Parameter DisplayThe monitor parameters are displayed. The displayed parameters are chosen by selecting from the list or inputting the register number (Only I/O).In default, Machine coordinate feedback position (APOS), Position error (PERR), Feedback speed, and Feedback torque/ thrust are displayed. Eight parameters can be displayed at the same time.The selection of displayed parameters is saved in the project file. Therefore, when opening the Axis Monitor window again, the same parameters will be displayed.( 1 ) Monitoring the Monitor Parameters1. Click the Monitor Parameter button ().The Monitor Parameter Dialog Box is displayed.2. Select a parameter from the combo box or input a register number (Only I/O) directly.Monitor parameters which are selectable from the combo boxMonitor Parameter Register UnitMachine coordinate target position (TPOS) ILxx0E Reference unitTarget position (CPOS) ILxx10 Reference unitMachine coordinate system position (MPOS) ILxx12 Reference unitMachine coordinate feedback position (APOS) ILxx16 Reference unitunit Machine coordinate latch position (LPOS) ILxx18 ReferencePosition error (PERR) ILxx1A Reference unitPOSMAX number of turns ILxx1E [rev]Speed reference output monitor ILxx20 [pulse/sec]Feedback speed ILxx40 Speed unit selectionFeedback torque/ thrust ILxx42 Torque unit selection3. Click the OK button.The monitor parameters are displayed.Chapter 5Alarm Monitor This chapter describes how to use the Alarm Monitor.5.1 Alarm Monitor...................................................................................5-25.1.1 Alarm Monitor Display.................................................................................5-35.1.2 When Alarm, Warning Occurs....................................................................5-45.1 Alarm MonitorThe Alarm Monitor window displays the alarm information of all axes in one window. The status of alarm, warning and alarm code are displayed.When an alarm or warning occurs, status is displayed as or . When no alarm or warningoccurs, it is displayed as .Clicking "status" displays the Alarm Warning Dialog Box. As a result, detailed information of the alarm and warning can be confirmed.♦ All the monitor data displays by “-----" when off-line.The status and alarm code are displayed in each circuit number. The Alarm Monitor can display the information of up to eight axes horizontally.5.1.1 Alarm Monitor Display( 1 ) T oolbarIn the toolbar, there are two icons to refresh manually and start/stop monitoring.Manually refresh ( )Alarm and warning information in the Alarm Monitor window is updated manually.♦ The Alarm Monitor Window is not refreshed automatically.Monitoring ( / )Click the button to stop or start the monitoring.( 2 ) StatusWhen an alarm or warning occurs, the status of the alarm or warning is displayed as shown below.Alarm ( ) :Alarm is occurring.Warning ( ) : Warning is occurring.No Alarm ( ) : No alarm or warning.( 3 ) Show, Hide the CircuitThe monitoring data of each circuit can be shown or hidden by clicking the circuit number. As a result, only selected axes can be displayed.i.e. Showi.e. Hide5.1.2 When Alarm, Warning OccursClick the status in the Alarm Monitor window. The Alarm/ Warning Dialog Box is displayed.Clicking the "Help" button displays detailed information of the alarm or warning. Correct the alarm by checking"help". Then click the Alarm Clear button to reset the alarm.Axis name ( )"Axis number", "comment" and "product type" are displayed in order. Alarm, warning name ()The Alarm or Warning name is displayed. Alarm clear ()To clear the alarm.Help ( )The description of the occurring alarm in the manual "Machine Controller MP2200/MP2300 Motion Module User's Manual" is displayed.Refresh ( )To update the Alarm, Warning Dialog Box. Alarm, Warning ()The BIT number, the parameter name, and the status are displayed. Close ( )To close the Alarm, Warning Dialog Box.( 1 ) Alarm, Warning InformationAll alarms and warnings are displayed in the Alarm, Warning display Dialog Box.Chapter 6 Additional Function of Compile OptionsThis chapter describes an additional function of compile options.6.1 Additional Function of Compile Options..........................................6-26.1 Additional Function of Compile OptionsThe ladder program "Compile Options" can be set without displaying the ladder program in this version or later.Select "Ladder" – "General" from the tree in the Environment Setting Dialog Box and the Compile Option settings are displayed.ProgramCreate new CP ladderWhen "Use" is selected, "Create new CP ladder" is displayed in Ladder Sub-window popup menus.Compile OptionThe option for compiling the ladder program is selected. The Compile Option can be set without displaying the ladder program.Enable Multiple Coil Check:When "Enable" is selected, duplicate coils in the target program are checked during the compile.Compile to Ver.5 Compatible:When "Enable" is selected, ladder programs compiled with MPE720 version 6 can be displayed and editedwith MPE720 version 5 (V ersion 5.34 or later).Chapter 7Troubleshooting This chapter describes how to use the System Monitor function to find errors in the program.7.1 Troubleshooting...............................................................................7-2 7.2 Troubleshooting Flow......................................................................7-37.2.1 Start Troubleshooting..................................................................................7-37.2.2 Troubleshooting Details..............................................................................7-47.2.3 Complete the Troubleshooting (710)7.3 Error Codes...................................................................................7-11。


720云台使用方法
720云台是一款功能强大的摄影设备,能够帮助摄影师实现更加丰富多彩的拍
摄效果。
下面,我们将为大家介绍720云台的使用方法,希望能帮助大家更好地利用这款设备进行摄影创作。
首先,使用720云台之前,我们需要确保设备已经充电并且连接好了相机。
在
使用过程中,我们需要注意避免720云台与其他物体发生碰撞,以免对设备造成损坏。
其次,我们需要熟悉720云台的操作方式。
通过对云台上的按钮和摇杆进行操作,我们可以实现对相机的远程控制,包括水平旋转、垂直旋转等功能。
在操作时,我们需要轻柔地按压按钮和摇杆,避免用力过猛导致设备损坏。
另外,720云台还配备了手机App,通过手机App我们可以实现对云台的远程
控制。
在使用手机App时,我们需要确保手机与云台连接稳定,以免出现控制不
灵敏的情况。
在实际拍摄过程中,720云台能够帮助我们实现更加流畅的画面转换和稳定的
拍摄效果。
无论是拍摄风景、人物还是运动场景,720云台都能够为我们带来更加
出色的拍摄体验。
最后,使用完720云台后,我们需要及时进行清洁和保养。
在拍摄过程中,
720云台可能会受到一些灰尘和污垢的影响,因此我们需要用干净柔软的布对设备
进行清洁,并注意避免在使用过程中将云台暴露在恶劣的环境中,以免影响设备的使用寿命。
总的来说,720云台是一款非常实用的摄影设备,通过熟练掌握其使用方法,
我们可以实现更加丰富多彩的拍摄效果。
希望以上介绍能够帮助大家更好地使用720云台,为自己的摄影创作带来更多的乐趣和惊喜。

MPE720使用方法培训资料
首先,MPE720的开机操作很简单。
按下电源键即可打开设备,屏幕
会显示欢迎界面。
接下来,您可以通过触摸屏幕上的图标进入各种应用程序。
MPE720配备了内置摄像头,可以用于拍摄照片和录制视频。
您可以
在主屏幕上找到相机应用程序的图标,点击进入后,您可以选择相机模式(照片、视频)以及调整相机设置(拍摄模式、曝光、白平衡等)。
然后,您可以点击拍照按钮或录像按钮进行操作。
此外,MPE720还支持多任务处理。
您可以同时打开多个应用程序,
并在屏幕上进行切换。
通过长按主屏幕或使用任务管理器,您可以查看所
有正在运行的应用程序,并选择切换到您需要的应用程序。
最后,MPE720还配备了电池,可供您使用。
在使用过程中,如果电
池电量低,您可以使用附带的充电器将其连接到电源插座进行充电。
在设
置中,您还可以查看电池电量以及调整电源管理设置。
总结:。
MPE720使用方法基础首先,要使用MPE720进行测量,首先要将其连接到要测量的电路中。
可将MPE720的继电器和功率线缆连接到电源上,并用电压夹和电流夹连接到电源线上。
确保连接安全可靠,并遵循相关的安全操作规程。
一旦连接好了,打开MPE720的电源,然后选择要测量的参数。
MPE720可以通过其易于使用的触摸屏界面来选择测量参数。
在主界面中,可选择电压、电流、功率和电能等测量类型,并进一步设置相关参数,如测量范围、采样频率和数据记录间隔等。
在测量参数设置好后,可以开始进行实时测量。
MPE720可以显示电压、电流、功率因数、功率和电能等参数。
在测量过程中,可通过触摸屏上的菜单和按钮进行数据记录、查看曲线图和峰值记录等操作。
此外,还可以设置报警功能,以便在测量值超出设定范围时进行警报。
除了基本的测量功能外,MPE720还具有电力质量分析和故障诊断功能。
电力质量分析可用于检测和分析电压和电流的波形畸变、频率偏移、谐波、闪烁等问题。
通过设置相关的参数,MPE720可以实时监测这些电力质量问题,并生成相应的报告和图表。
故障诊断功能可用于检测和分析电路中的故障,如短路、断路、地故障等。
MPE720可以通过检测电路中的电流和电压变化,分析电源的稳定性和电路元件的状态,以确定可能的故障原因。
通过这些故障诊断功能,可以提高电力系统的可靠性和安全性。
除了上述的基本使用方法外,MPE720还具有其他高级功能和选项,如数据存储和导出、通信接口和控制、报表和统计分析等。
这些功能可以根据具体的应用需求进行定制和调整。
综上所述,MPE720是一种功能齐全的电力仪表,用于监测和分析电力系统的参数和性能。
只需连接到电路,并设置相关的参数,即可开始进行实时测量。
此外,MPE720还具有电力质量分析和故障诊断功能,以及其他高级功能,以满足不同应用需求。
124101高清摄像笔使用说明书图片仅供参考,请以实物为准一、结构示意图指示灯开关复位键二、 产品简介 本产品是具有高清影音拍摄功能的数码笔,可以拍摄和存储高画质有声视频。
具有操作简便,小巧精致,美观实用,便于携带的特点,是商务、教育、安防、媒体、司法、旅游、医疗,生活等领域必备的实用工具,深受广大用户青睐。
三、 操作说明四、1. 开关机:长按按钮2秒钟,完成开机,进入待机状态,此时摄像机指示灯绿灯长亮;在有指示灯点亮的任意状态下,长按开关键,摄像机将自动保存当前摄录文件并关机。
2. 录制视频:摄像机进入摄像等待状态,此时绿灯长亮,长按按钮,绿灯闪烁三下,开始录像;再次短按按钮,停止录像,保存文件,此时红绿恢复长亮;为了保证拍摄文件的大小和安全,系统将每隔50分钟自动保存一次文件,并继续录像。
图片仅供参考,请以实物为准 摄像头 麦克风插卡处USB 接口3.拍照:开机后,摄像机进入摄像等待状态,此时绿灯长亮,短按按钮,绿灯闪烁一下,开始拍照并保存;再按一次,绿灯闪烁一下,开始拍照并保存;周而复始。
4.5.PC摄像头:在任意模式的开机状态下,连接电脑USB接口,即可进入PC Camera (网络摄像头)模式,在该模式下,你可以将摄像机作为电脑摄像头使用,与好友网上视频聊天,拍摄大头贴,等等。
6.7.连接电脑:在关机状态时,可以连接电脑,此时,电脑将会弹出可移动磁盘标识,影像文件保存目录为:*盘\ _REC\100MEDIA;当摄像机与电脑交换数据时,绿灯会快速闪烁;需要卸载摄像机时,请点击任务栏右下角的可移动设备管理图标,在里面卸载该可移动存储设备,待系统确认可以安全拔出硬件后,再断开摄像机与电脑的连接。
8.9.充电:连接电脑USB接口或充电器,即可对摄像机进行充电,当电池处于充电状态时,红灯将慢速闪烁,当电池充满电后,红灯变为长亮;10.11.设置时间:摄像机提供了在视频文件中显示录像时间的功能,你可以根据实际需要设置时间的值;时间显示格式为:“年.月.日时:分:秒”,设置时间方法如下:12.a.关闭摄像机——》连接电脑——》打开摄像机可移动磁盘——》在摄像机根目录下面空白处单击鼠标右键——》把鼠标移至弹出菜单的“新建”选项上方——》选择“文本文档”——》给该文本文档取名为“time”,需要注意它的扩展名为“.txt”——》时间设置文件建成;你也可以按照上述步骤在电脑桌面、其他磁盘分区、其他文件夹下建好后再拷贝到可移动磁盘的根目录。
PCL-720快速安装使用手册PCL-720快速安装使用手册 (1)第一章产品介绍 (2)1.1 概述 (2)1.2 特点 (2)1.3 规格 (2)1.4 一般特性 (2)第二章 安装与测试 (3)2.1 初始检查 (3)2.2 开关和跳线的设置 (3)2.2.1 基址的选择 (3)2.2.2时钟频率的设置 (4)2.3 引脚图 (5)2.4 Windows2K/XP/9X下板卡的安装 (7)2.4.1 软件的安装: (6)2.4.2硬件的安装: (9)2.5 测试 (15)2.5.1 数字量输入功能测试 (16)2.5.2数字量输出功能测试 (16)2.5.3计数器功能测试 (17)第三章 信号的连接 (18)3.1 计数器/定时器信号连接焊盘 (18)3.2 时钟源焊盘 (19)3.3 数字量输入的闸门位“STROBE” (19)第四章 例程使用详解 (20)4.1 板卡支持例程..........................................................................错误!未定义书签。
4.2 常用例子使用说明 (20)4.2.1 DIGOUT(数字量输出): (20)4.2.2 COUNTER(计数程序) (22)4.2.3 Digin (数字量输入例程) (22)4.2.4 PULSE(脉冲输出例程) (23)第五章 遇到问题,如何解决? (24)第一章 产品介绍1.1 概述PCL-720数字量I/O和计数器卡是一款PC兼容的插入式板卡,该卡提供32路数字量输入、32路数字量输出和3个计数器/定时器通道。
所有的数字量I/O 通道是TTL/DTL兼容的,每一个数字量输入/输出通道对应一个特定的PC I/O 端口位,易于编程。
PCL-720的8253可编程计数器/定时器提供了3个灵活的16位计数器/定时器通道,可以为各种应用提供时钟源。