Bootstrap模态对话框:动态载入内容
- 格式:docx
- 大小:23.78 KB
- 文档页数:4
Bootstrap实现模态框Bootstrap实现模态框什么是模态框模态框就是覆盖在⽗窗体上的⽗窗体,有点像弹出框,只不过这个弹出框是⽗⽗做出来的,可以显⽗⽗⽗设置的内容。
模态框的常⽗事件⽗的事件实例调⽗show ⽗法后触发show.bs.modal$("#myModel").on(‘show.bs.modal’,function () {//执⽗的操作})模态框对⽗户可见时触发shown.bs.modal$("#myModel").on(‘shown.bs.modal’,function () {//执⽗的操作})调⽗hide 实例⽗法时触发hide.bs.modal$("#myModel").on(‘hide.bs.modal’,function () {//执⽗的操作})模态框完全对⽗户隐藏时触发hidden.bs.modal$("#myModel").on('hidden.bs.modal ',function () {//执⽗的操作})实现触发模态框的按钮<button class="btn btn-primary btn-lg" data-toggle="modal" data-target="#myModel">模态</button> 这个按钮其实可以是button,也可以是任意的其他标签,只要data-toggle、data-target对应就可以,例如使⽗a标签<a data-toggle="modal" data-target="#myModel"> 查看照⽗</a> 模态框的设计<!--模态框--><div class="modal fade" id="myModel" tabindex="-1" role="dialog" aria-labelledby="myModalLabel" aria-hidden="true"><div class="modal-dialog"><div class="modal-content" id="content"><img src="../车体2.png" /></div></div></div>触发模态框$("#myModel").on('show.bs.modal',function () { alert("进来了");})。
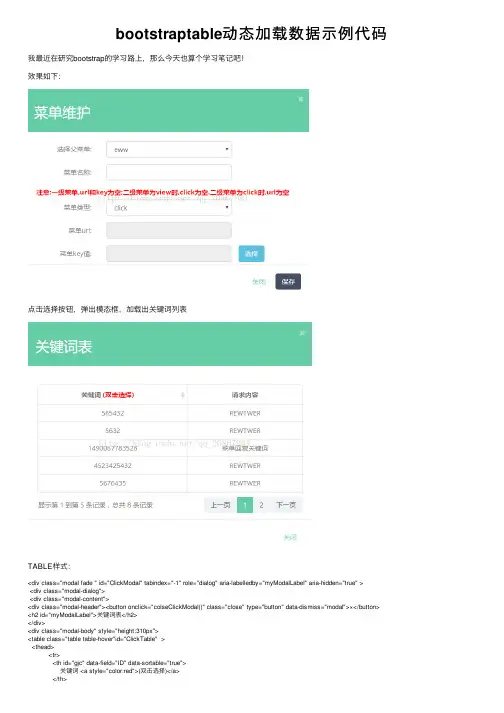
bootstraptable动态加载数据⽰例代码我最近在研究bootstrap的学习路上,那么今天也算个学习笔记吧!效果如下:点击选择按钮,弹出模态框,加载出关键词列表TABLE样式:<div class="modal fade " id="ClickModal" tabindex="-1" role="dialog" aria-labelledby="myModalLabel" aria-hidden="true" ><div class="modal-dialog"><div class="modal-content"><div class="modal-header"><button onclick="colseClickModal()" class="close" type="button" data-dismiss="modal">×</button> <h2 id="myModalLabel">关键词表</h2></div><div class="modal-body" style="height:310px"><table class="table table-hover"id="ClickTable" ><thead><tr><th id="gjc" data-field="ID" data-sortable="true">关键词 <a style="color:red">(双击选择)</a></th><th data-field="REQUESTCONETENT" >请求内容</th></tr></thead></table></div><div class="modal-footer"><a href="JavaScript:void(0)" rel="external nofollow" onclick="colseClickModal()" class="btn">关闭</a></div></div></div></div>JAVASCRIPT脚本:function chooseBtn1(){$.ajax({type:"POST",url:'wxgl/findKey',success:function(data){var dataJson = eval('(' + data + ')');var datalist = dataJson.keys;$('#ClickTable').bootstrapTable('destroy').bootstrapTable({ //'destroy' 是必须要加的==作⽤是加载服务器// //数据,初始化表格的内容Destroy the bootstrap table. data:datalist, //datalist 即为需要的数据dataType:'json',data_locale:"zh-US", //转换中⽂但是没有什么⽤处pagination: true,pageList:[],pageNumber:1,pageSize:5,//每页显⽰的数量paginationPreText:"上⼀页",paginationNextText:"下⼀页",paginationLoop:false,//这⾥也可以将TABLE样式中的<tr>标签⾥的内容挪到这⾥⾯:columns: [{checkbox: true},{field: 'ID',title:'关键词 ',valign: 'middle',},{field: 'REQUESTCONETENT',title:'请求内容'}]onDblClickCell: function (field, value,row,td) {console.log(row);$('#msgId').val(row.ID);$('#ClickModal').modal('hide');}});$('#ClickModal').modal('show');},error:function(data){Modal.confirm({title:'提⽰',msg:"刷新数据失败!"});}})}在脚本中调⽤的findKey⽅法:@RequestMapping(value="findKey")@ResponseBodypublic void findKey(HttpServletResponse response,HttpServletRequest request) throws IOException{List<Key> keys = null;keys=menuService.findKey(wxid);Map<String, Object> jsonMap = new HashMap<String, Object>();// 定义mapjsonMap.put("keys", keys);// rows键存放每页记录 listJSONObject result = JSONObject.fromObject(jsonMap);// 格式化resultresponse.setContentType("text/html;charset=utf-8");PrintWriter writer = response.getWriter();writer.write(result.toString());writer.flush();}以上就是本⽂的全部内容,希望对⼤家的学习有所帮助,也希望⼤家多多⽀持。
bootstrap 使用方法
Bootstrap是一种流行的前端开发框架,可以帮助开发者快速构建响应式和移动优先的网站。
以下是Bootstrap的使用方法:
1. 安装Bootstrap:可以通过下载压缩包或使用包管理器(如npm或yarn)来安装Bootstrap。
安装完成后,将Bootstrap的CSS和JavaScript文件
引入到HTML文件中。
2. 创建HTML骨架结构:先正常搭建一个HTML页面,然后根据需要选择Bootstrap提供的组件,将其复制到HTML页面中。
3. 引入相关样式文件:使用link标签引入Bootstrap的CSS文件。
也可以通过Sass工具对Bootstrap进行深度定制。
4. 书写内容:正常输入内容,如果发现内容没有了浏览器默认的内外边距,则证明CSS文件引入成功。
5. 利用Bootstrap组件:Bootstrap提供的组件不仅减少了开发工作量,
而且统一了设计风格。
例如,可以使用Navbar组件创建导航菜单,使用模态框创建对话框,使用Carousel组件添加动态轮播图等。
总之,使用Bootstrap可以快速构建出美观、响应式的网站,提高开发效率。
如需了解更多关于Bootstrap的使用方法,建议访问相关社区或论坛,或参考官方文档。
Bootstrap模态框模态框(Modal)是覆盖在⽗窗体上的⼦窗体。
通常,⽬的是显⽰来⾃⼀个单独的源的内容,可以在不离开⽗窗体的情况下有⼀些互动。
⼦窗体可提供信息、交互等。
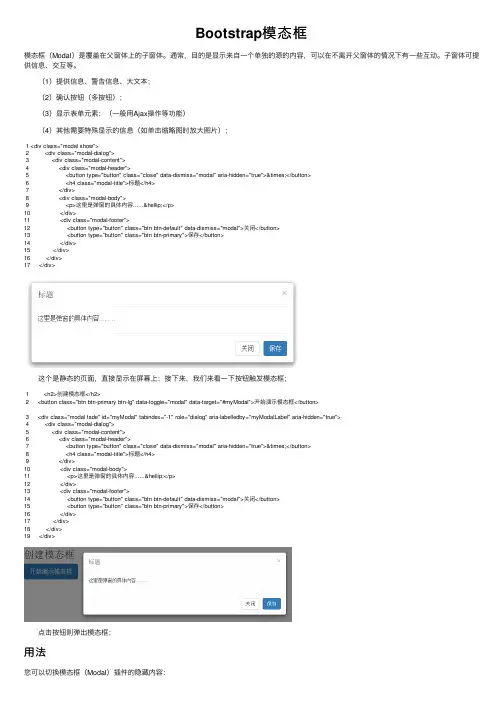
(1)提供信息、警告信息、⼤⽂本; (2)确认按钮(多按钮); (3)显⽰表单元素;(⼀般⽤Ajax操作等功能) (4)其他需要特殊显⽰的信息(如单击缩略图时放⼤图⽚);1 <div class="modal show">2 <div class="modal-dialog">3 <div class="modal-content">4 <div class="modal-header">5 <button type="button" class="close" data-dismiss="modal" aria-hidden="true">×</button>6 <h4 class="modal-title">标题</h4>7 </div>8 <div class="modal-body">9 <p>这⾥是弹窗的具体内容......…</p>10 </div>11 <div class="modal-footer">12 <button type="button" class="btn btn-default" data-dismiss="modal">关闭</button>13 <button type="button" class="btn btn-primary">保存</button>14 </div>15 </div>16 </div>17 </div> 这个是静态的页⾯,直接显⽰在屏幕上;接下来,我们来看⼀下按钮触发模态框;1 <h2>创建模态框</h2>2 <button class="btn btn-primary btn-lg" data-toggle="modal" data-target="#myModal">开始演⽰模态框</button>3 <div class="modal fade" id="myModal" tabindex="-1" role="dialog" aria-labelledby="myModalLabel" aria-hidden="true">4 <div class="modal-dialog">5 <div class="modal-content">6 <div class="modal-header">7 <button type="button" class="close" data-dismiss="modal" aria-hidden="true">×</button>8 <h4 class="modal-title">标题</h4>9 </div>10 <div class="modal-body">11 <p>这⾥是弹窗的具体内容......…</p>12 </div>13 <div class="modal-footer">14 <button type="button" class="btn btn-default" data-dismiss="modal">关闭</button>15 <button type="button" class="btn btn-primary">保存</button>16 </div>17 </div>18 </div>19 </div> 点击按钮则弹出模态框;⽤法您可以切换模态框(Modal)插件的隐藏内容: 通过 data 属性:在控制器元素(⽐如按钮或者链接)上设置属性 data-toggle="modal",同时设置 data-target="#identifier"(标识符)或href="#identifier"(标识符)来指定要切换的特定的模态框(带有 id="identifier")。
tp3.2和Bootstrap模态框导⼊excel表格数据导⼊按钮<button class="btn btn-info" type="button" id="import" data-toggle="modal" data-target="#myModal">导⼊</button>模态框<!-- Modal --><div class="modal fade" id="myModal" tabindex="-1" role="dialog" aria-labelledby="myModalLabel"><div class="modal-dialog" role="document"><div class="modal-content"><div class="modal-header"><button type="button" class="close" data-dismiss="modal" aria-label="Close"><span aria-hidden="true">×</span></button> <h4 class="modal-title" id="myModalLabel">导⼊</h4></div><div class="modal-body"><div>导⼊格式如下</div><table class="table table-bordered"><tr><th>编号</th><th>姓名</th><th>⼿机号</th><th>性别</th><th>出⽣⽇期</th></tr><tr><td>1</td><td>⼩李</td><td>188********</td><td>男</td><td>2013年12⽉20⽇</td></tr></table><form action="#" method="post" id="file-form" enctype="multipart/form-data"><div class="form-group"><label class=" control-label" style="width:85px;">上传⽂件<sup>*</sup></label><div class=""><input type="file" name="excel" style="display:block;"/></div></div></form></div><div class="modal-footer"><button type="button" class="btn btn-default" data-dismiss="modal" id="file-import">确定</button><!--<button type="button" class="btn btn-danger" id="editUser">确定</button>--></div></div></div></div>弹出模态框,选择⽂件,点击确定//导⼊$('#file-import').on('click',function(){var fileFlag = false;fileFlag = $("input[name='excel']").val();if(!fileFlag) {alert( '请选择⽂件!');return false;}// 创建var form_data = new FormData();// 获取⽂件var file_data = $("input[name='excel']").prop("files")[0];// 把所以表单信息form_data.append("excel", file_data);$.ajax({url:'/Admin/import',type:'post',dataType:'json',processData: false, // 注意:让jQuery不要处理数据contentType: false, // 注意:让jQuery不要设置contentTypedata: form_data,success:function(info){console.log(info);alert(info.msg);if(info.code == 1){window.location.reload();}}})});PHP控制器/*** 导⼊*/public function import(){$name = substr(strrchr($_FILES['excel']['name'], '.'), 1);$file = $_FILES['excel']['tmp_name'];$data = $this->excel($name,$file);if(!$data){return$this->ajaxReturn(['code'=>-1,'msg'=>'⽂件格式不正确!']);}foreach($data as &$v){$dateArr = date_parse_from_format('Y年m⽉d⽇',$v['time']);if(!$dateArr['year']){$v['time'] = '';continue;}$v['time'] = $dateArr['year'].'-'.$dateArr['month'].'-'.$dateArr['day'];}$allID = M('user')->addAll($data);if($allID){return$this->ajaxReturn(['code'=>1,'msg'=>'导⼊成功']);}$this->ajaxReturn(['code'=>-2,'msg'=>'导⼊失败']);}/*** 读表格信息*/public function excel($name,$files){//导⼊PHPExcel类库,因为PHPExcel没有⽤命名空间,只能inport导⼊import("Common.Vendor.Excel.PHPExcel");//创建PHPExcel对象,注意,不能少了\$PHPExcel=new \PHPExcel();if ($name == 'xls') {//如果excel⽂件后缀名为.xls,导⼊这个类import("Common.Vendor.Excel.PHPExcel.Reader.Excel5");$PHPReader=new \PHPExcel_Reader_Excel5();}if ($name == 'xlsx') {//如果excel⽂件后缀名为.xlsx,导⼊这下类import("Common.Vendor.Excel.PHPExcel.Reader.Excel2007");$PHPReader=new \PHPExcel_Reader_Excel2007();}//载⼊⽂件$PHPExcel=$PHPReader->load($files);$currentSheet=$PHPExcel->getSheet(0);$allColumn=$currentSheet->getHighestColumn();$allRow=$currentSheet->getHighestRow();//循环读取数据for($currentRow=2;$currentRow<=$allRow;$currentRow++){$arr['name'] = $PHPExcel->getActiveSheet()->getCell('B'.$currentRow)->getValue();$arr['mobile'] = $PHPExcel->getActiveSheet()->getCell('C'.$currentRow)->getValue();$arr['sex'] = $PHPExcel->getActiveSheet()->getCell('D'.$currentRow)->getValue();$arr['time'] = gmdate("Y年m⽉d⽇",\PHPExcel_Shared_Date::ExcelToPHP($PHPExcel->getActiveSheet()->getCell('F'.$currentRow)->getValue()));$data[] =$arr;}return$data; }。
BootstrapBootstrapDialog使⽤详解这⾥有两种展现⽅式写在前⾯:⾸先你要引⼊的库有css : bootstrap.min.css bootstrap-dialog.cssjs : jquery-1.11.1.min.js bootstrap.min.js bootstrap-dialog.js1、通过html代码显⽰<!-- Button trigger modal 弹出框的触发器 --><button type="button" class="btn btn-primary btn-lg" data-toggle="modal" data-target="#myModal">Launch demo modal</button><!-- Modal 弹出框的结构 --><div class="modal fade" id="myModal" tabindex="-1" role="dialog" aria-labelledby="myModalLabel"><div class="modal-dialog" role="document"><div class="modal-content"><div class="modal-header"><button type="button" class="close" data-dismiss="modal" aria-label="Close"><span aria-hidden="true">×</span></button> <h4 class="modal-title" id="myModalLabel">Modal title</h4></div><div class="modal-body">...</div><div class="modal-footer"><button type="button" class="btn btn-default" data-dismiss="modal">Close</button><button type="button" class="btn btn-primary">Save changes</button></div></div></div></div>这种⽅式简单直观;但会增加html的‘重量',⽽且不够灵活,⼤量使⽤时不建议使⽤2、通过js的⽅式展现(需要注意的地⽅我都写在注释⾥了)(1)最简单的实现⽅式:BootstrapDialog.show({message: 'Hi Apple!'});还有⼀种更简单的实现⽅式:BootstrapDialog.alert('I want banana!'); //异步加载适合⽤在⽅法的最后(2)buttonsBootstrapDialog.show({message : "message",buttons : [{label : "btn1",cssClass : "btn-primary" //给按钮添加类名可以通过此⽅式给按钮添加样式},{label : "btn2",icon : "glyphicon glyphicon-ban-circle" //通过bootstrap的样式添加图标按钮},{label : "btn3",action : function(dialog){ //给当前按钮添加点击事件dialog.close();}}]});(3)操作title、message 可以通过 setTitle 和 setMessage 操作title和messageBootstrapDialog.show({title : "this is a title!", //titlemessage : "Document Comtent",buttons : [{label : "cancel",action : function(dialog){dialog.setTitle("title2"); //操作titledialog.setMessage("message1"); //操作messagedialog.close();}},{label : "Ok",action : function(dialog){dialog.close();}}]})(4)按钮热键(本⼈认为不常⽤)BootstrapDialog.show({title: 'Button Hotkey',message: 'Try to press some keys...',onshow: function(dialog) {dialog.getButton('button-c').disable(); //通过getButton('id')获得按钮 },buttons: [{label: '(A) Button A',hotkey: 65, // Keycode of keyup event of key 'A' is 65.action: function() {alert('Finally, you loved Button A.');}}, {label: '(B) Button B',hotkey: 66,action: function() {alert('Hello, this is Button B!');}}, {id: 'button-c',label: '(C) Button C',hotkey: 67,action: function(){alert('This is Button C but you won\'t see me dance.');}}]})(5)动态加载messageBootstrapDialog.show({//message : $("<div></div>").load('content.html') //第⼀种⽅式message : function(content){ //第⼆种⽅式var $message = $("<div></div>");var loadData = content.getData("contentFile");$message.load(loadData);return $message; //⼀定记得返回值!},data : {"contentFile" :"content.html"}});(6)控制弹出框右上⾓的关闭按钮BootstrapDialog.show({message: 'Hi Apple!',closable: true, //控制弹出框拉右上⾓是否显⽰ ‘x' 默认为truebuttons: [{label: 'Dialog CLOSABLE!',cssClass: 'btn-success',action: function(dialogRef){dialogRef.setClosable(true);}}, {label: 'Dialog UNCLOSABLE!',cssClass: 'btn-warning',action: function(dialogRef){dialogRef.setClosable(false);}}, {label: 'Close the dialog',action: function(dialogRef){dialogRef.close(); //总是能关闭弹出框}}]});(7)弹出框的尺⼨BootstrapDialog.show({title: 'More dialog sizes',message: 'Hi Apple!',size : BootstrapDialog.SIZE_NORMAL //默认尺⼨buttons: [{label: 'Normal',action: function(dialog){dialog.setTitle('Normal');dialog.setSize(BootstrapDialog.SIZE_NORMAL);}}, {label: 'Small',action: function(dialog){dialog.setTitle('Small');dialog.setSize(BootstrapDialog.SIZE_SMALL);}}, {label: 'Wide',action: function(dialog){dialog.setTitle('Wide');dialog.setSize(BootstrapDialog.SIZE_WIDE);}}, {label: 'Large',action: function(dialog){dialog.setTitle('Large');dialog.setSize(BootstrapDialog.SIZE_LARGE);}}]});以上就是本⽂的全部内容,希望对⼤家的学习有所帮助,也希望⼤家多多⽀持。
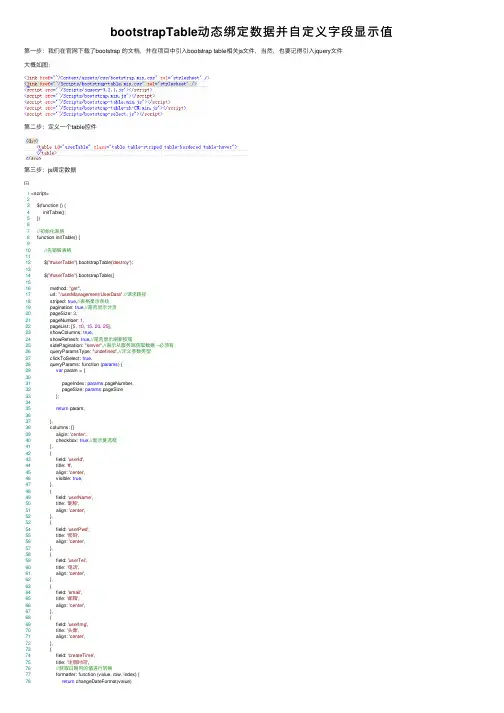
bootstrapTable动态绑定数据并⾃定义字段显⽰值第⼀步:我们在官⽹下载了bootstrap 的⽂档,并在项⽬中引⼊bootstrap table相关js⽂件,当然,也要记得引⼊jquery⽂件⼤概如图:第⼆步:定义⼀个table控件第三步:js绑定数据1 <script>23 $(function () {4 initTable();5 })67//初始化表格8 function initTable() {910//先销毁表格1112 $("#userTable").bootstrapTable('destroy');1314 $("#userTable").bootstrapTable({1516 method: "get",17 url: "/userManagement/UserData",//请求路径18 striped: true,//表格显⽰条纹19 pagination: true,//是否显⽰分页20 pageSize: 3,21 pageNumber: 1,22 pageList: [5, 10, 15, 20, 25],23 showColumns: true,24 showRefresh: true,//是否显⽰刷新按钮25 sidePagination: "server",//表⽰从服务端获取数据 --必须有26 queryParamsType: "undefined",//定义参数类型27 clickToSelect: true,28 queryParams: function (params) {29var param = {3031 pageIndex: params.pageNumber,32 pageSize: params.pageSize33 };3435return param;3637 },38 columns: [{39 aligin: 'center',40 checkbox: true,//显⽰复选框41 },42 {43 field: 'userId',44 title: '#',45 align: 'center',46 visible: true,47 },48 {49 field: 'userName',50 title: '昵称',51 align: 'center',52 },53 {54 field: 'userPwd',55 title: '密码',56 align: 'center',57 },58 {59 field: 'userTel',60 title: '电话',61 align: 'center',62 },63 {64 field: 'email',65 title: '邮箱',66 align: 'center',67 },68 {69 field: 'userImg',70 title: '头像',71 align: 'center',72 },73 {74 field: 'createTime',75 title: '注册时间',76//获取⽇期列的值进⾏转换77 formatter: function (value, row, index) {78return changeDateFormat(value)79 },80 align: 'center',81 },82 {83 field: 'lastTime',84 title: '最后更新时间',85//获取⽇期列的值进⾏转换86 formatter: function (value, row, index) {87return changeDateFormat(value)88 },89 align: 'center',90 },91 {92 field: 'isAble',93 title: '是否可⽤',94 formatter : function (value, row, index) {95if (row['isAble'] === 1) {96return'正常';97 }98if (row['isAble'] === 2) {99return'禁⽤';100 }101return value;102 },103 align: 'center',104105 },106 {107 field: 'isLine',108 title: '是否在线',109 formatter: function (value, row, index) {110if (row['isLine'] === 1) {111return'在线';112 }113if (row['isLine'] === 2) {114return'下线';115 }116return value;117 },118 align: 'center',119 },120 {121 field: 'remark',122 title: '备注信息',123 align: 'center',124 }],125 onLoadSuccess: function (data) {126 console.log(data);127128 },129 onLoadError: function (data) {130 console.log(data);131 }132 })133134 $("#add").click(function ()135 {136 $("#myModal").modal('show');137 })138 $("#edit").click(function () {139 $("#myModal").modal('show');140 })141 $("#close").click(function () {142 $("#myModal").modal('hide');143 });144 }145146//转换⽇期格式(时间戳转换为datetime格式)147 function changeDateFormat(cellval) {148var dateVal = cellval + "";149if (cellval != null) {150var date = new Date(parseInt(dateVal.replace("/Date(", "").replace(")/", ""), 10));151var month = date.getMonth() + 1 < 10 ? "0" + (date.getMonth() + 1) : date.getMonth() + 1;152var currentDate = date.getDate() < 10 ? "0" + date.getDate() : date.getDate();153154var hours = date.getHours() < 10 ? "0" + date.getHours() : date.getHours();155var minutes = date.getMinutes() < 10 ? "0" + date.getMinutes() : date.getMinutes();156var seconds = date.getSeconds() < 10 ? "0" + date.getSeconds() : date.getSeconds();157158return date.getFullYear() + "-" + month + "-" + currentDate + "" + hours + ":" + minutes + ":" + seconds; 159 }160 }161162 </script>js绑定数据第四步:得到数据库数据1///<summary>2///⽤户数据列表3///</summary>4///<param name="pageIndex"></param>5///<param name="pageSize"></param>6///<returns></returns>7public ActionResult UserData(int pageIndex=1,int pageSize=5)8 {9 EFHelper<FileDBEntities> fileDB = new EFHelper<FileDBEntities>();10var result = fileDB.GetList<userInfo>();11var dataList = (from user in result12orderby erId13select new14 {15 erId,16 erName,17 erPwd,18 erTel,19 user.email,20 erImg,21 user.createTime,22 stTime,23 user.isAble,24 user.isLine,25 user.remark26 }).Skip(pageSize * (pageIndex - 1)).Take(pageSize); 27long totalCount = result.Count();28var jsonResult = new { total = totalCount, rows = dataList }; 29return Json(jsonResult, JsonRequestBehavior.AllowGet);303132 }得到数据库数据源显⽰效果如图:备注:如果表内有外键关系,可直接查询,⽆需连表,如图js绑定数据如下图:。
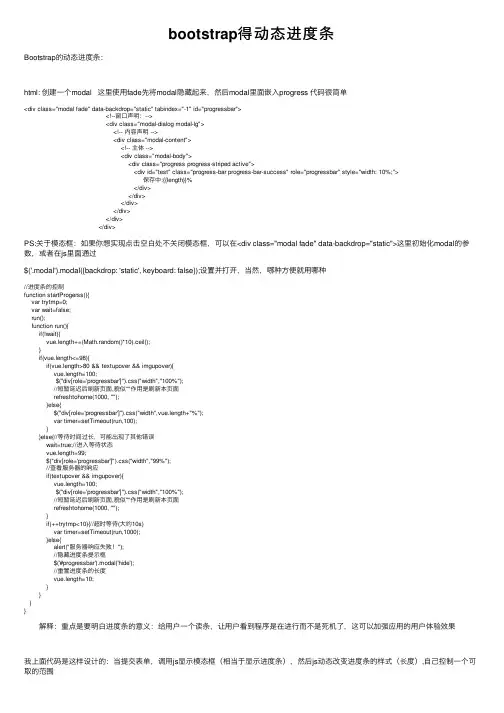
bootstrap得动态进度条Bootstrap的动态进度条:html: 创建⼀个modal 这⾥使⽤fade先将modal隐藏起来,然后modal⾥⾯嵌⼊progress 代码很简单<div class="modal fade" data-backdrop="static" tabindex="-1" id="progressbar"><!--窗⼝声明:--><div class="modal-dialog modal-lg"><!-- 内容声明 --><div class="modal-content"><!-- 主体 --><div class="modal-body"><div class="progress progress-striped active"><div id="test" class="progress-bar progress-bar-success" role="progressbar" style="width: 10%;">保存中:{{length}}%</div></div></div></div></div></div>PS:关于模态框:如果你想实现点击空⽩处不关闭模态框,可以在<div class="modal fade" data-backdrop="static">这⾥初始化modal的参数,或者在js⾥⾯通过$('.modal').modal({backdrop: 'static', keyboard: false});设置并打开,当然,哪种⽅便就⽤哪种//进度条的控制function startProgerss(){var trytmp=0;var wait=false;run();function run(){if(!wait){vue.length+=(Math.random()*10).ceil();}if(vue.length<=98){if(vue.length>80 && textupover && imgupover){vue.length=100;$("div[role='progressbar']").css("width","100%");//短暂延迟后刷新页⾯,貌似""作⽤是刷新本页⾯refreshtohome(1000, "");}else{$("div[role='progressbar']").css("width",vue.length+"%");var timer=setTimeout(run,100);}}else{//等待时间过长,可能出现了其他错误wait=true;//进⼊等待状态vue.length=99;$("div[role='progressbar']").css("width","99%");//查看服务器的响应if(textupover && imgupover){vue.length=100;$("div[role='progressbar']").css("width","100%");//短暂延迟后刷新页⾯,貌似""作⽤是刷新本页⾯refreshtohome(1000, "");}if(++trytmp<10){//超时等待(⼤约10s)var timer=setTimeout(run,1000);}else{alert("服务器响应失败!");//隐藏进度条提⽰框$('#progressbar').modal('hide');//重置进度条的长度vue.length=10;}}}} 解释:重点是要明⽩进度条的意义:给⽤户⼀个读条,让⽤户看到程序是在进⾏⽽不是死机了,这可以加强应⽤的⽤户体验效果我上⾯代码是这样设计的:当提交表单,调⽤js显⽰模态框(相当于显⽰进度条),然后js动态改变进度条的样式(长度),⾃⼰控制⼀个可取的范围当前台接收到后台的响应的时候,让进度条加载到100%,关闭模态框(隐藏进度条),刷新数据。

bootstrapselect下拉框动态数据来源于 https:///jokewinl/article/details/88355857需引⼊bootstrap-select.js和bootstrap-select.min.css,地址:https:///jolone/source.gitselect class=“selectpicker” multiple selectpicker和multiple属性的搭配使⽤可实现多选data-live-search=“true” 这个属性的默认值是false,作⽤是打开模糊筛查搜索框。
data-max-options 这个属性表⽰最多可选⼏个,搭配multiple使⽤,data-selected-text-forma缩略模式,⽤法:data-selected-text-format=“count > 3”,当选中值⼤于3个的时候只显⽰选中项的个数,注意只对多选⽣效。
data-style 表⽰默认选中样式,data-size data-size=“6”,表⽰下拉框显⽰的下拉列表数量。
data-dropup-auto=“false”,表⽰下拉框默认向下展开;“true”,表⽰下拉框默认向下展开;1 <li>2 <label class="label_name" th:text="${model.customer}"></label>3 <div class='col-xs-8 col-sm-8'>4 <select id ="customer"class="selectpicker" data-live-search="true">5 <option data-tokens="ketchup mustard" value="0" th:text="${model.selectCustomer}"></option>6 </select>7 </div>8 </li>910//检索客户11 $("#customer").on('shown.bs.select',function(e){12var deviceStr="" ;13 $.ajax({14 type: "GET",15 url: "cuSelectCustomer",16 data: {},17 async: false,18 dataType: "json",19 success: function (result) {20if (result.ok) {21for (var i = 0; i < result.data.length; i ++){22 deviceStr+='<option value="' + result.data[i].customerId + '">' +result.data[i].name + '</option>';23 }24 }25 },26 error: function (XMLHttpRequest) {27 layer.alert(messages.systemE, {28 title: messages.promptBox,29 icon: 0,30 btn: messages.btn,31 });32// alert("error" + XMLHttpRequest.readyState);33 }3435 });36 $("#customer").html("");37 $('#customer').append(deviceStr);38 $('#customer').selectpicker('refresh');39 });。
bootstrap模态框动态加载数据1.页⾯中添加modal<!-- 模态框(Modal) --><div class="modal fade" id="showModal" tabindex="-1" role="dialog"aria-labelledby="myModalLabel" aria-hidden="true"><div class="modal-dialog" style="width:900px;"><div class="modal-content">//内容动态填充</div><!-- /.modal-content --></div><!-- /.modal --></div>2.数据格式。
页⾯动态⽣成a 标签<a data-toggle='modal' data-target='#showModal' onclick=targetto('" + row.id + "')>"+ row.title+"</a>";3.单击事件function targetto(id){$("#showModal").modal({remote: "showAction.action?id="+id});}4.每次隐藏时,清除数据。
确保点击时,重新加载$("#showModal").on("hidden.bs.modal", function() {$(this).removeData("bs.modal");});5.基于bootstrap3.其他版本,请⾃⼰Google,如有雷同,纯属巧合,如有需要,欢迎分享。
Bootstrap模态对话框中显⽰动态内容的⽅法⾸先引⼊bootstrap的js和css,在引⼊对应版本的jquery;添加按钮,点击弹出模态窗体:<button class="btn btn-primary btn-lg" data-toggle="modal" data-target="#modal" href="/Home/Test" rel="external nofollow" ></button>创建模态对话框:<div class="model fade" id="modal" tabindex="-1" role="dialog" aria_labelledby="myModelLabel" aria-hidden="true"><div class="modal-dialog"><div class="modal-content"></div><button class="btn btn-primary btn-lg" onclick="btnSaveClick()" data-dismess="modal">确定</div><button class="btn btn-primary btn-lg" data-dismess="modal">取消</div></div></div><script>var modelResult;$(function(){$("#model").on("hide.bs.modal"), function(){//在这⾥应⽤⼆级窗体返回的内容})});function btnSaveClick(){modelResult = this.parent.$("#txtName").val();}</script>注意:如果发现⼆级窗体打开⼀次后再打开失败,请看看href引⽤的界⾯中,是否在header中引⼊了css或js,这⾥不需要再进⾏引⽤,动态加载后会继承⽗窗体的js和样式以上这篇Bootstrap模态对话框中显⽰动态内容的⽅法就是⼩编分享给⼤家的全部内容了,希望能给⼤家⼀个参考,也希望⼤家多多⽀持。
Bootstrap模态对话框:动态载入内容Bootstrap官方文档给出了一个模态对话框的例子:<div class="modal fade"><div class="modal-header"><h3>模态框header </h3></div><div class="modal-body"><p>模态框body</p></div><div class="modal-footer"><p>模态框footer</p></div></div>这是一个静态案例,写在页面上可以通过href或者js调用显示。
现在,当前页面上可能有多个模态对话框。
如果使用静态的方式,那么有多少模态对话框就要重写上面的代码多少遍。
一个页面中填满了类似的代码,非常不友好。
于是希望,页面上只保留一个<div>用于容器,每个模态对话框的具体内容抽出来,单独写到一个页面中。
当需要显示哪个模态对话框时,只需要将该模态对话框对应页面的内容载入到<div>容器中即可。
Bootstrap的modal本身就提供了这种能力。
Bootstrap主要分两部分:①最外层<div>,含modal与fade类。
②内层的内容,有3个<div>,分别含modal-header,modal-body和modal-footer类。
有的模态对话框如下:<div class="modal fade"tabindex="-1"role="dialog"> <div class="modal-dialog"><div class="modal-content"><div class="modal-header"><h4>模态框header</h4></div><div class="modal-body"><p>模态框body</p></div><div class="modal-footer"><p>模态框footer</p></div></div></div></div>这样的模态对话框有四个部分:①最外层<div>,含modal与fade类。
BootStrap的动态模态框及静态模态框1.要⽤bootStrap这个框架就必须要重载它的class类,也就是说class要⼀样代码如下:有疑问的可以在下⾯留⾔,欢迎⼤家⼀起交流1.1动态模态框<!DOCTYPE html><html lang="en"><head><meta charset="UTF-8"><meta name="viewport" content="width=device-width, initial-scale=1.0"><meta http-equiv="X-UA-Compatible" content="ie=edge"><title>Document</title><link rel="stylesheet" href="bootstrap-3.3.7/css/bootstrap.css"><script src="bootstrap-3.3.7/js/jquery.min.js"></script><script src="bootstrap-3.3.7/js/bootstrap.min.js"></script><script src="bootstrap-3.3.7/js/docs.min.js"></script></head><body><div class="container"><div class="page-header"><div class="h2">bootstrap框架<small>s</small></div></div><!-- 动态框 --><div class="modal"><!-- modal默认是隐藏的 --><div class="modal-dialog"><div class="modal-content"><!-- 头部关闭按钮 --><div class="modal-header"><button type="button" class="close myclose" data-dismiss="modal"><span >×</span></button><div class="h3 modal-title">标题部分</div><!-- 内容部分 --><div class="modal-body"><P>这是内容部分</P></div><!-- 页脚 --><div class="modal-footer"><button type="button" class="btn btn-primary myclose" data-dismiss="modal">Close</button><button type="button" class="btn btn-warning myclose">save</button></div></div></div></div></div><a href="#" class="btn btn-success" id="show">显⽰对话框</a></div></body></html><script>$(function(){$('#show').click(function(){$('.modal').modal('show')})})</script>1.2静态模态框<!DOCTYPE html><html lang="en"><head><meta charset="UTF-8"><meta name="viewport" content="width=device-width, initial-scale=1.0"><meta http-equiv="X-UA-Compatible" content="ie=edge"><title>Document</title><link rel="stylesheet" href="bootstrap-3.3.7/css/bootstrap.css"><script src="bootstrap-3.3.7/js/jquery.min.js"></script><script src="bootstrap-3.3.7/js/bootstrap.min.js"></script><script src="bootstrap-3.3.7/js/docs.min.js"></script></head><body><div class="container"><div class="page-header"><div class="h2">bootstrap框架<small>s</small></div><!-- 静态模态框官⽅有⼀个bug就是在写静态框的时候在按钮上要绑定同⼀个class--> <div class="modal-dialog"><div class="modal-content"><div class="modal-header"><button type="button" class="close myclose" data-dismiss="modal"><span>×</span></button><h3>Model标题</h3></div><!-- body部分 --><div class="modal-body"><p>这是⾝体部分</p></div><!-- footer部分 --><div class="modal-footer"><button class="btn btn-info myclose" data-dismiss="modal">close</button><button class="btn btn-primary myclose">save</button></div></div></div></div></div></div></div></body></html><script>$(function(){$('.myclose').click(function(){$('.modal-dialog').css('display','none')})})</script>。
[原]经典bootstrap模态框使⽤⽂章1,Bootstrap 模态对话框和简单使⽤<div id="myModal" class="modal hide fade"><div class="modal-header"><button type="button" class="close" data-dismiss="modal">x</button><h3>对话框标题</h3></div><div class="modal-body"><p>对话框主体</p></div><div class="modal-footer"><a href="#" class="btn" data-dismiss="modal">取消</a><a href="#" class="btn btn-primary" data-dismiss="modal">确定</a></div></div>可以使⽤按钮或链接直接调⽤模态对话框,这是简单的⽤法:<a href="#modal1" role="button" class="btn btn-primary btn-sm" data-toggle="modal">合同添加</a>另外,当你需要让对话框能够在每次打开时表单数据清空,如下:$('#modal1').modal('hide');$("#modal1").on("hidden", function() {$('#form1')[0].reset();}); //添加合同后,清空表单操作。
Bootstrap模态对话框:动态载入内容Bootstrap官方文档给出了一个模态对话框的例子:<div class="modal fade"><div class="modal-header"><h3>模态框header </h3></div><div class="modal-body"><p>模态框body</p></div><div class="modal-footer"><p>模态框footer</p></div></div>这是一个静态案例,写在页面上可以通过href或者js调用显示。
现在,当前页面上可能有多个模态对话框。
如果使用静态的方式,那么有多少模态对话框就要重写上面的代码多少遍。
一个页面中填满了类似的代码,非常不友好。
于是希望,页面上只保留一个<div>用于容器,每个模态对话框的具体内容抽出来,单独写到一个页面中。
当需要显示哪个模态对话框时,只需要将该模态对话框对应页面的内容载入到<div>容器中即可。
Bootstrap的modal本身就提供了这种能力。
Bootstrap主要分两部分:①最外层<div>,含modal与fade类。
②内层的内容,有3个<div>,分别含modal-header,modal-body和modal-footer类。
有的模态对话框如下:<div class="modal fade"tabindex="-1"role="dialog"> <div class="modal-dialog"><div class="modal-content"><div class="modal-header"><h4>模态框header</h4></div><div class="modal-body"><p>模态框body</p></div><div class="modal-footer"><p>模态框footer</p></div></div></div></div>这样的模态对话框有四个部分:①最外层<div>,含modal与fade类。
②第二层<div>,含modal-dialog类。
③第三层<div>,含modal-content类。
④第四层内容,有3个<div>,分别含modal-header,modal-body和modal-footer类。
实际上,起主要作用的是最外层<div>,modal类是必须的。
modal-dialog,m odal-content以及内层的3个<div>的类主要是用于样式,因此是可以缺少和修改的。
不过,建议维持原格式。
Bootstrap的modal.options.remote属性可以指定一个渲染页面,或者一个请求,只要这个请求最终也是返回一个渲染页面即可。
当用js来启动modal时,就会获取到指定的渲染页面,并填充到modal-body部分的内容里。
这种方法有个问题,那就是模态对话框的渲染页面只会初始化一次,直到再次刷新页面为止。
目前普遍的一个解决方法是在隐藏模态窗的时候去除数据:$("#myModal").on("hidden", function() {$(this).removeData("modal");});但该方法在某些情况下并不好用。
而实际上,除了上述方法外,还可以调用jQuery的load()函数来为<div>加载渲染页面。
直接调用jQuery的load()会将指定的<div>所有的子内容全部清除,替换为渲染页面。
使用jQuery的load(),同样需要在隐藏模态窗的时候去除数据,但不会出现失灵的情况。
以下为Bootstrap中Modal的源码:var Modal = function (element, options) {this.options = optionsthis.$element = $(element).delegate('[data-dismiss="modal"]', 'click.dismiss.modal ', $.proxy(this.hide, this))this.options.remote && this.$element.find('.modal-body').l oad(this.options.remote)}可以看到最后一行,当this.options.remote存在时,会调用this.$elem ent.find('.modal-body').load(this.options.remote),也就是说会找到含modal-body类的<div>,对该<div>调用jQuery的load(),来将remote所指向的渲染页面加载到该<div>中。
现在使用jQuery的load()方式。
要创建一个动态加载的模态对话框,可以使用如下方式:1.在主页面中,:<div class="modal fade" id="myModal"></div><script>// 模态对话框隐藏时移除数据$("#myModal").on("hidden", function() {$(this).removeData("modal");});// 显示模态对话框var showModal = function() {var remote = "/test/showModal";if (remote != "") {$("#myModal").load(remote, function() {$("#myModal").modal('show');});}};</script>其中showModal()函数可以由按钮等控件进行调用。
2.在模态对话框页面中只填写内容部分:<div class="modal-header"><h3>模态框header </h3></div><div class="modal-body"><p>模态框body</p></div><div class="modal-footer"><p>模态框footer</p></div>这样,当调用主页面的showModal()函数时,就会请求模态对话框页面(即2中的内容)。
该模态对话框页面会以jQuery.load()的方式加载到$("#myModal")中,也就显示出了模态对话框。
注意要将页面加载给哪个<div>,就由哪个<div>调用jQuery.load()。
这个<div>不一定是最外层的<div>。
但调用jQuery. modal('show')的一定是最外层的<div>。
可以与下面的代码进行对比:1.在主页面中,:<div class="modal fade" id="myModal"><div class="modal-dialog"><div class="modal-content" id="modalContent"></div></div></div><script>// 模态对话框隐藏时移除数据$("#myModal").on("hidden", function() {$(this).removeData("modal");});// 显示模态对话框var showModal = function() {var remote = "/test/showModal";if (remote != "") {$("#modalContent").load(remote, function() { $("#myModal").modal('show');});}};</script>2.在模态对话框页面中只填写内容部分:<div class="modal-header"><h3>模态框header </h3></div><div class="modal-body"><p>模态框body</p></div><div class="modal-footer"><p>模态框footer</p></div>。