petrel快捷键
- 格式:pdf
- 大小:360.45 KB
- 文档页数:4

PROE常用快捷键大全
PRO/E 常用快捷命令大全br-重命名patr cc-切减总目录
do-偏移基准面
fc-实体总目录
ii -测量分析
pa -加胶总目录
tc -中曲线拔模
ui -曲面圆角
be-删除进程数据
ce-切减拉伸
dx-基准轴总目录
fp-阵列
im -特征分析
tf -偏移
ua -高级曲面
qu-退出part
cr-切减旋转
dt-两面建轴
dz-删除
ro -倒圆角目录
tp -曲面片
uj -边界曲面
vv-视图
cs-切减扫描
de-曲线总目录
fd-删除阵列
ll -图层总目录
ra -高级倒圆角
cu-切减面组
dk-草绘曲线
fr-恢复
rl -模型关系
uu -曲面总目录
ut -曲面修剪
en-环境总目录
ca-切减高级总目录
dn-投影曲线
fv-重定义
po -实体总目录
ue -拉伸曲面
ux -曲面延拓
ed -隐藏面
cg-倒角
dg-基准点总目录fn-插入模式
pe -拉伸加胶
sh -抽壳
ur -旋转曲面
uk -曲面拔模
ep-隐藏点
co-复制总目录dh-曲线+面
fm-镜像几何
pr -旋转加胶
tw -扭曲总目录us -扫描曲面
xz -截面总目录ea-隐藏轴
dy-坐标系总目录pw -扫描加胶
td -中平面拔模uo -曲面偏移
zz -设置总目录ec-隐藏坐标系da-基准面总目录hh -孔总目录
tr -替换
uc -曲面复制zn -设置名称。
br-重命名patr cc-切减总目录 do-偏移基准面
fc-实体总目录 ii -测量分析
pa -加胶总目录 tc -中曲线拔模
ui -曲面圆角 be-删除进程数据 ce-切减拉伸
dx-基准轴总目录 fp-阵列 im -特征分析 tf -偏移 ua -高级曲面
qu-退出part cr-切减旋转
dt-两面建轴 dz-删除
ro -倒圆角目录 tp -曲面片
uj -边界曲面 vv-视图
cs-切减扫描 de-曲线总目录
fd-删除阵列 ll -图层总目录
ra -高级倒圆角 um -曲面合并
cu-切减面组 dk-草绘曲线
fr-恢复 rl -模型关系
uu -曲面总目录 ut -曲面修剪
en-环境总目录 ca-切减高级总目录
dn-投影曲线 fv-重定义
po -实体总目录 ue -拉伸曲面
ux -曲面延拓 ed -隐藏面
cg-倒角 dg-基准点总目录
fn-插入模式 pe -拉伸加胶
sh -抽壳 ur -旋转曲面 uk -曲面拔模
ep-隐藏点 co-复制总目录
dh-曲线+面 fm-镜像几何
pr -旋转加胶 tw -扭曲总目录
us -扫描曲面 xz -截面总目录
ea-隐藏轴 dy-坐标系总目录
pw -扫描加胶 td -中平面拔模
uo -曲面偏移 zz -设置总目录
ec-隐藏坐标系 da-基准面总目录 hh -孔总目录 pu -面组加胶
tr -替换 uc -曲面复制
zn -设置名称。
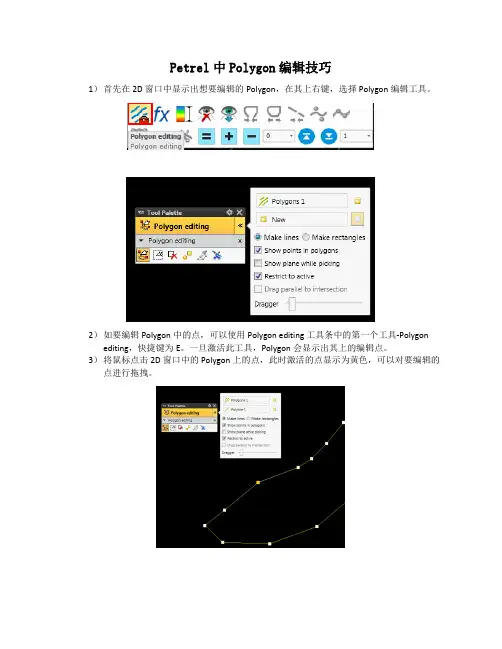
Petrel中Polygon编辑技巧1)首先在2D 窗口中显示出想要编辑的Polygon,在其上右键,选择Polygon编辑工具。
2)如要编辑Polygon中的点,可以使用Polygon editing 工具条中的第一个工具-Polygon editing,快捷键为E。
一旦激活此工具,Polygon会显示出其上的编辑点。
3)将鼠标点击2D 窗口中的Polygon上的点,此时激活的点显示为黄色,可以对要编辑的点进行拖拽。
4)如要对Polygon进行切断,则选择工具条的最后一个工具,Cut Polygon,此时鼠标变为类似刀锋的模式,用刀锋尖点击要剪断处,此时点击出会添加一个点,用上一步的工具去拖动此点,此时可以发现Polygon已断开。
5)如要在切断的Polygon上继续编辑或者画此Polygon,需要先激活画Polygon的工具-Add point to polygon工具,快捷键为A。
6)激活Add point 工具后,在所要编辑的Polygon上直接点击,查看切断的Polygon的首尾点,一般此时点击Petrel默认是从Polygon的末尾点继续来画,直接点击鼠标左键即可编辑。
7)如要从断开的Polygon的首点开始画,则需要将首点选中为黄色(可以使用第一步中的工具来选中),选中Add Point工具,按住Shift键,在靠近选中的黄色的点附近点击鼠标左键,即可继续以首点来画。
(注意此处,根据测试,按住Shift后点击鼠标左键时距离Polygon上点的位置越近,其越能编辑其附近的点。
)8)最后编辑完,如要闭合,则可以直接右键点击,在弹出的工具条上选择Close工具即可。
9)对于两条Polygon需要进行连接的,如果两条Polygon没有在同一个文件中,首先需要将两条Polygon合并到一个Polygon文件中。
此时可以使用Polygon Setting中的Operation中Polygon Operation中的Append工具来完成。

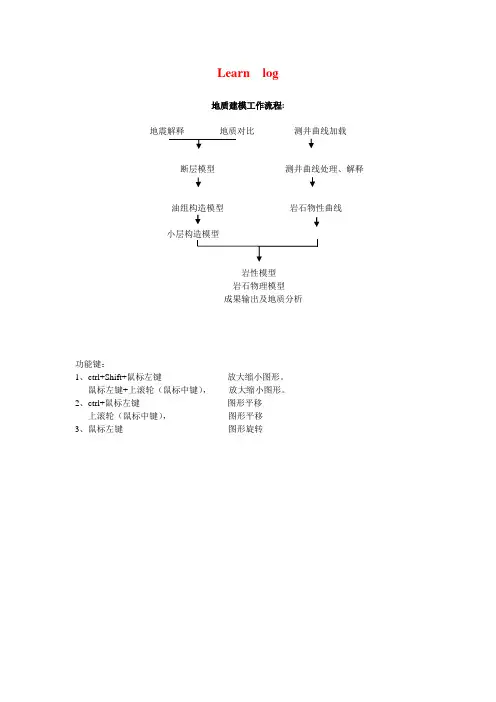
Learn log地质建模工作流程:地震解释地质对比测井曲线加载断层模型测井曲线处理、解释油组构造模型岩石物性曲线岩性模型岩石物理模型成果输出及地质分析功能键:1、ctrl+Shift+鼠标左键放大缩小图形。
鼠标左键+上滚轮(鼠标中键),放大缩小图形。
2、ctrl+鼠标左键图形平移上滚轮(鼠标中键),图形平移3、鼠标左键图形旋转建新工区lxj1 .pet一、建井文件夹new well folder在Insert的new folders→点New Well Floders1、加头文件在lxj1.pet Input窗下,右健点Wells→选Import (on select)…出现Import File输入窗中,点Petrel projects –-> cha19 → Well-data目录, 选文件名:文件类型:well heads(*.*)文件格式例子:WellName X-Coord Y-Coord KB TopDepth BottomDepth Symbol0 2534 Oil34/10-A-15 61757.5 30147.1 23.6 0 3133 Gas34/10-A-21 62165.3 32653.8 12.6 0 2431 Dry34/10-A-27 66552.1 31629.3 23.6 0 2986 MinorOil ......按打开,出现Import Well Heads窗,图如下:在窗口中参考Header info提供的列位置,填好列号,例如井名Name 1列X-坐标X-coordina 2列Y-坐标Y-coordina 3列补心Kelly bushing 4列井符号Well symbol 7列顶界深Top depth 5列底界深Bottom depth 6列在Extend well处选顶扩展或底扩展多少米,例如20米。
按OK,确定。
如果有不合适的井数据,会有提示指出,表示那些井不被加入。
![[阿果石油网]petrel教程](https://uimg.taocdn.com/aa73d6c949649b6649d7470a.webp)
1、导入数据Wellheads井头数据Welltop分层数据Welllog测井数据附测井名称2、分层Map windowSection window显示测井曲线层拉平,比例尺去掉充填:填充颜色把单一颜色调为彩色制作、应用模板调整分层线位置、增加分层线插入一个地层3、聚类分析设置分成几类岩性加入聚类改名,改数据类型填充显示填充把岩相解释放到曲线之间手动调整岩相(可不用吸管,选中刷子,在岩相上右键)4、断层分析加载断层数据(faultsticks)加载网格文件定义断层模型制作断层模型(选中下图的faultmodeling,并选中导入的fault,然后点击下图中最右边那个快捷键)微调断层模型连接两个断层自动连接断层划定范围可用划定范围5、分层调整颜色显示边框显示网格细分小层细分第二个小层插入第三个小层制作平面制作边界1制作边界方法2(画边界)制作surface设置颜色做另外两个层的surface6、make zones Make zonesLayering7、属性建模建立模型数据分析调整网格框住所有井建立相模型(点击“ok”后,一直点“是”)建立孔隙度模型(注意把两条曲线拉在一起,与前面的相模型建立时的数据分析拉动曲线一样)(此处如果在zones那里选择的是所有层一起调整,调整时不好调,则可复制zones,再粘贴到每个小层里面去,方法同这一步复制face一样)建立物性参数模型NTG的计算(右边的快捷按钮可以播放显示相关信息)可选择性显示(只显示砂岩、泥岩)制作、播放、显示剖面平滑数据Polygons为map窗口分小层平滑处理。

Petrel地质建模部分实用操作手册目录第一章Petrel简介 (1)1.1 关于本手册 (5)1.2 Petrel Workflow Tools功能简介 (6)1.3 安装并启动Perel (7)1.4 Perel用户界面简介 (8)1.5 菜单及工具条 (10)第二章数据格式说明及加载 (11)2.1 数据准备 (11)2.2 数据输入 (15)练习2-1 创建一个工区 (16)练习2-2 加载井数据 (16)练习2-3 加载分层数据 (20)练习2-4 加载地震数据 (21)2.3 编辑整理数据 (22)2.3.1 自动生成断层多变形 (22)2.3.2 生成/编辑Polygons (23)2.3.3 生成/编辑Surface (24)2.3.4 面体积计算 (27)2.4 井数据的管理 (27)2.4.1归类引擎(Saved searches) (28)2.4.2井滤波(well filter) (29)第三章聚类分析与井相关 (30)3.1 属性(地震、测井)聚类分析和判断 (30)3.2 井相关(Well Correlation) (37)第四章速度模型与域转换............................................................................. 错误!未定义书签。
4.1 构建速度模型.................................................................................. 错误!未定义书签。
4.2 时间-深度转换 ................................................................................ 错误!未定义书签。
第五章框架模型............................................................................................. 错误!未定义书签。
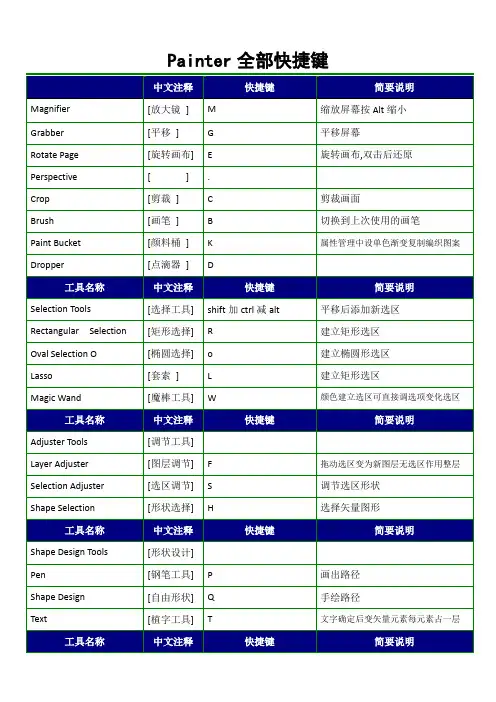
painter快捷键!数字键0~9:opacity (与PS、Illustrator一样) Q 曲线shape W 魔术棒E 旋转页面R 方形选择(Ctrl+Alt+R :方形选择+) T 文字输入P 钢笔Y 节点编辑A 钢笔+X 钢笔-I 方形状O 椭圆选择(Ctrl+Alt+o:圆选择+) S 调整选域(Ctrl+Alt+S :复制选域+) F 调整layer H shape选择D 吸管G 平移(Ctrl+Alt+G :缩小) J 圆形状K 填充桶L 索套E 剪刀C 裁剪V 直线brush 重要B 自由brush 重要U clone color的应用/否重要N color talk对话框M 放大镜[ 笔刷尺寸缩小与PS、Illustrator一样] 笔刷尺寸缩小与PS、Illustrator一样Ctrl与其它键组合的快捷键Ctrl+1 工具板+2 Brush面板+3 Art Materials 材料设定面板重要+4 Object 图层等面板重要+5 Contrals 控制面板+6 Color 色彩面板+7 Brush contrals 笔刷控制面板重要+“+”放大与PS、Illustrator一样+“-”缩小与PS、Illustrator一样+“[” 设定stroke属性的对话框+“]” 复制shape (或按Alt键移动,与PS一样)+E (+/) Equalize 色阶变化对话框+R Reselect再次选择+I File Infornation 文件信息+F(+“;”) Fill设定对话框+H 所有浮动面板显/隐Shift+Ctrl+其它键的组合快键Shift+Ctrl++R Resize 重新定义尺寸+T Color Set +A Adjust Color调整色彩+F Color Correction对话框+L Lighting Mover 光线设定对话框+B Brightness/Contrast对话框+M Auto Mask对话框7箭头工具【V】7工具:Macromedia flash MX快捷键铅笔工具7矩形工具【R】7椭圆工具【O】7文本工具【T】7钢笔工具【P】7套索工具【L】7线条工具【N】7部分选取工具【A】橡皮擦工具7滴管工具【I】7颜料桶工具【K】7墨水瓶工具【S】7填充变形工具【F】7任意变形工具【Q】7画笔工具【B】7【Y】7打开FLA文件【Ctrl】+【O】7新建FLASH文件【Ctrl】+【N】7菜单命令:缩放工具【Z】,【M】7手形工具【H】7【E】7另存为【Ctrl】+【Shift】+【S】7保存【Ctrl】+【S】7关闭【Ctrl】+【W】7作为库打开【Ctrl】+【Shift】+【O】发布预览7发布设置【Ctrl】+【Shift】+【F12】7导出影片【Ctrl】+【Shift】+【Alt】+【S】7导入【Ctrl】+【R】撤消命令7退出FLASH 【Ctrl】+【Q】7打印【Ctrl】+【P】7发布【Shift】+【F12】7【Ctrl】+【F12】粘贴到当前位置7粘贴剪贴板内容【Ctrl】+【V】7拷贝到剪贴板【Ctrl】+【C】7剪切到剪贴板【Ctrl】+【X】7【Ctrl】+【Z】取消全选7全部选取【Ctrl】+【A】7复制所选内容【Ctrl】+【D】7清除【退格】7【Ctrl】+【Shift】+【V】粘贴帧7拷贝帧【Ctrl】+【Alt】+【C】7剪切帧【Ctrl】+【Alt】+【X】7【Ctrl】+【Shift】+【A】首选参数7编辑元件【Ctrl】+【E】7选择所有帧【Ctrl】+【Alt】+【A】7清除贴【Alt】+【退格】7【Ctrl】+【Alt】+【V】放大视图7转到最后一个【END】7转到下一个【PGDN】7转到前一个【PGUP】7转到第一个【HOME】7【Ctrl】+【U】全部显示7缩放到帧大小【Ctrl】+【2】7 100%显示【Ctrl】+【1】7缩小视图【Ctrl】+【-】7【Ctrl】+【+】7高速显示【Ctrl】+【Shift】+【Alt】+【F】7按轮廓显示【Ctrl】+【Shift】+【Alt】+【O】7【Ctrl】+【3】显示隐藏时间轴7消除文字锯齿【Ctrl】+【Shift】+【Alt】+【T】7消除锯齿显示【Ctrl】+【Shift】+【Alt】+【A】显示隐藏标尺7显示隐藏工作区以外部分【Ctrl】+【Shift】+【W】7【Ctrl】+【Alt】+【T】编辑网络7对齐网格【Ctrl】+【Shift】+【’】7显示隐藏网格【Ctrl】+【’】7【Ctrl】+【Shift】+【Alt】+【R】对齐辅助线7锁定辅助线【Ctrl】+【Alt】+【;】7显示隐藏辅助线【Ctrl】+【;】7【Ctrl】+【Alt】+【G】7对齐对象【Ctrl】+【Shift】+【/】7编辑辅助线【Ctrl】+【Shift】+【Alt】+【G】7【Ctrl】+【Shift】+【;】新建元件7转换为元件【F8】7显示隐藏面板【F4】7显示隐藏边缘【Ctrl】+【H】7显示形状提示【Ctrl】+【Alt】+【H】7删除关键帧【Shift】+【F6】7删除贴【Shift】+【F5】7新建关键贴【F6】7新建空白贴【F5】7【Ctrl】+【F8】添加形状提示7优化【Ctrl】+【Shift】+【Alt】+【C】7修改文档属性【Ctrl】+【J】7显示隐藏场景工具栏【Shift】+【F2】7顺时针旋转90度【Ctrl】+【Shift】+【9】7缩放与旋转【Ctrl】+【Alt】+【S】7【Ctrl】+【Shift】+【H】7移至顶层【Ctrl】+【Shift】+【↑】7取消变形【Ctrl】+【Shift】+【Z】7逆时针旋转90度【Ctrl】+【Shift】+【7】7锁定【Ctrl】+【Alt】+【L】7移至底层【Ctrl】+【Shift】+【↓】7下移一层【Ctrl】+【↓】7上移一层【Ctrl】+【↑】7水平居中【Ctrl】+【Alt】+【2】7左对齐【Ctrl】+【Alt】+【1】7解除全部锁定【Ctrl】+【Shift】+【Alt】+【L】底对齐7垂直居中【Ctrl】+【Alt】+【5】7顶对齐【Ctrl】+【Alt】+【4】7右对齐【Ctrl】+【Alt】+【3】设为相同宽度7按高度均匀分布【Ctrl】+【Alt】+【9】7按宽度均匀分布【Ctrl】+【Alt】+【7】7【Ctrl】+【Alt】+【6】相对舞台分布7设为相同高度【Ctrl】+【Shift】+【Alt】+【9】7【Ctrl】+【Shift】+【Alt】+【7】取消组合7组合【Ctrl】+【G】7转换为空白关键帧【F7】7转换为关键帧【F6】7【Ctrl】+【Alt】+【8】字体样式设置为正常7分散到图层【Ctrl】+【Shift】+【D】7打散分离对象【Ctrl】+【B】7【Ctrl】+【Shift】+【G】7字体样式设置为斜体【Ctrl】+【Shift】+【I】7字体样式设置为粗体【Ctrl】+【Shift】+【B】7【Ctrl】+【Shift】+【P】7文本右对齐【Ctrl】+【Shift】+【R】7文本居中对齐【Ctrl】+【Shift】+【C】7文本左对齐【Ctrl】+【Shift】+【L】7减小文本间距【Ctrl】+【Alt】+【←】7增加文本间距【Ctrl】+【Alt】+【→】7文本两端对齐【Ctrl】+【Shift】+【J】单步向前【7后退【Ctrl】+【Alt】+【R】7播放停止动画【回车】7重置文本间距【Ctrl】+【Alt】+【↑】> 单步向后7】【<7测试场景【Ctrl】+【Alt】+【回车】7调试影片【Ctrl】+【Shift】+【回车】7测试影片【Ctrl】+【回车】7】显示隐藏时间轴7显示隐藏工具面板【Ctrl】+【F2】7新建窗口【Ctrl】+【Alt】+【N】7启用简单按钮【Ctrl】+【Alt】+【B】显示隐藏对齐面板7显示隐藏解答面板【Ctrl】+【F1】7显示隐藏属性面板【Ctrl】+【F3】7【Ctrl】+【Alt】+【T】7显示隐藏信息面板【Ctrl】+【I】7显示隐藏颜色样本面板【Ctrl】+【F9】7显示隐藏混色器面板【Shift】+【F9】7【Ctrl】+【K】显示隐藏调试器面板7显示隐藏动作面板【F9】7显示隐藏变形面板【Ctrl】+【T】7显示隐藏场景面板【Shift】+【F2】7显示隐藏输出面板【F2】7显示隐藏脚本参考【Shift】+【F1】7显示隐藏影版浏览器【Alt】+【F3】7【Shift】+【F4】显示隐藏库面板7显示隐藏组件参数面板【Alt】+【F7】7显示隐藏组件面板【Ctrl】+【F7】7显示隐藏辅助功能面板【Alt】+【F2】【F11】工具名称中文注释快捷键简要说明++++++++++++++++++++++++++++++++++++++++++++++++++++++++++++++++ Magnifier [放大镜] M 缩放屏幕按Alt缩小Grabber [平移] G 平移屏幕Rotate Page [旋转画布] E 旋转画布,双击后还原Perspective [ ] .Crop [剪裁] C 剪裁画面Brush [画笔] B 切换到上次使用的画笔Paint Bucket [颜料桶] K 属性管理中设单色渐变复制编织图案Dropper [点滴器] D++++++++++++++++++++++++++++++++++++++++++++++++++++++++++++++++ Selection Tools [选择工具] shift加ctrl减alt平移后添加新选区Rectangular Selection [矩形选择] R 建立矩形选区Oval Selection O [椭圆选择] o 建立椭圆形选区Lasso [套索] L 建立矩形选区Magic Wand [魔棒工具] W 颜色建立选区可直接调选项变化选区++++++++++++++++++++++++++++++++++++++++++++++++++++++++++++++++ Adjuster Tools [调节工具]Layer Adjuster [图层调节] F 拖动选区变为新图层无选区作用整层Selection Adjuster [选区调节] S 调节选区形状Shape Selection [形状选择] H 选择矢量图形++++++++++++++++++++++++++++++++++++++++++++++++++++++++++++++++ Shape Design Tools [形状设计]Pen [钢笔工具] P 画出路径Shape Design [自由形状] Q 手绘路径Text [植字工具] T 文字确定后变矢量元素每元素占一层++++++++++++++++++++++++++++++++++++++++++++++++++++++++++++++++ Shape Object Tools [形状对象]Rectangular Shape [矩形对象] I 画矩形Oval Shape [椭圆对象] J 画椭圆++++++++++++++++++++++++++++++++++++++++++++++++++++++++++++++++ Shape Edit Tools [形状调节]Scissors [形状剪刀] Z 对于填充的删除填充,线对象则断开Add Point [添加节点] A 对路径添加节点Convert Point [曲线调节] Y 对手柄调节Remove Point [删除节点] X 删除路径节点++++++++++++++++++++++++++++++++++++++++++++++++++++++++++++++++ Palette Commands [调色板]Toolbox [工具箱] Ctrl+1 显隐工具箱Brushes [画笔选择] Ctrl+2 显隐选择画笔Art Materials [艺术原料] Ctrl+3 显隐颜色图案渐变纸纹布纹等Objects [对象] Ctrl+4 显隐层蒙板图像元件选择元件动态层Controls [属性控制] Ctrl+5 显隐控制当前工具的属性Color Set [方格色板] Ctrl+6 显隐以方格显示的选色斑Brush Controls [画笔控制] Ctrl+7 显隐常规尺寸间隔角度硬度厚涂等等++++++++++++++++++++++++++++++++++++++++++++++++++++++++++++++++File Menu Commands [文件菜单]New [新建文档] Ctrl+N 新建文档对话框可选图形还是动画Open [打开文档] Ctrl+O 打开以存在的文档Close [关闭文档] Ctrl+W 关闭当前文档Save [保存文档] Ctrl+S 保存当前文档Get Info [文档信息] Ctrl+I 为文档添加信息?www map default URLPrint [打印文档] Ctrl+P 打印当前文档Quit [退出软件] Ctrl+Q 退出本软件++++++++++++++++++++++++++++++++++++++++++++++++++++++++++++++++Edit Menu Commands [编辑菜单]Undo [撤消操作] Ctrl+Z 撤消上次操作Redo [重做操作] Ctrl+Y 重做操作Cut [剪切] Ctrl+X 剪切Copy [拷贝] Ctrl+C 拷贝Paste [粘贴] Ctrl+V 粘贴++++++++++++++++++++++++++++++++++++++++++++++++++++++++++++++++ Canvas Menu Commands [画布菜单]Tracing Paper [描图纸] Ctrl+T 配合文件菜单的克隆和克隆来源使用Resize Image [图像尺寸] S+Ctr+R 重定义图像强制选项可以还原尺寸++++++++++++++++++++++++++++++++++++++++++++++++++++++++++++++++++++++ ++++++++++Effects Menu Commands [效果菜单]Last Effect [上次效果] Ctrl+/ 显示上一次使用的效果名称Second to Last Effect [二次效果] Ctrl+; 上次被新效果代替上次下移到二次Fill [填充] Ctrl+F 填充原色图案渐变布纹Equalize [层次调节] Ctrl+E 通过定义最亮值最暗值来调节图像++++++++++++++++++++++++++++++++++++++++++++++++++++++++++++++++ Select Menu Commands [选择菜单]Select All [全选] Ctrl+A 全选Deselect [取消选择] Ctrl+D 取消选取框Reselect [重复选择] Ctrl+R 重复上次选择++++++++++++++++++++++++++++++++++++++++++++++++++++++++++++++++ Shapes Menu Commands [形状菜单]Join Endpoints [加结束点] Ctrl+J 选择开放路径的两个端点使之封闭Duplicate [复制形状] Ctrl+] 复制形状结果比原来的大一些Set Shape Attributes [设置形状] Ctrl+[ 设置形状的描边和填充效果++++++++++++++++++++++++++++++++++++++++++++++++++++++++++++++++ Window Menu Commands [窗口菜单]Hide/Display Palettes [隐调色板] Ctrl+H 控制调色板的显示和隐藏Zoom In [放大视图] Ctrl++ 放大Zoom Out [缩小视图] Ctrl+- 缩小Full Screen Window [全屏显示] Ctrl+M 全屏++++++++++++++++++++++++++++++++++++++++++++++++++++++++++++++++ Screen Navigation [屏幕导航]Center Image [居中显示] Spacebar+Click 空格加单击滚动条Zoom In [放大视图] Spacebar+Ctrl+Click 等同于Ctrl++Zoom Out [缩小视图] Spacebar+Ctrl+Alt +Click等同于Ctrl+-Rotate Image [旋转画布] Spacebar+Alt+Drag 旋转画布Constrain Rotate to 90 [90度旋转] Space+Alt+Shift+Drag 强迫画布90度旋转Screen to Default View [恢复视图] Space+Alt+Click 恢复旋转后的视图++++++++++++++++++++++++++++++++++++++++++++++++++++++++++++++++ Expandable Palette [面板导航]Scroll Contents [面板滚动] Alt+Click+Drag 不会误改面板设置onOpen/Close triangle [面板三角] Shift+Click 面板上所有三角开++++++++++++++++++++++++++++++++++++++++++++++++++++++++++++++++++++++ ++++++++++Brush Tool [画笔工具]Brush Controls [画笔控制]Dropper ctrl 变成点滴器原文是AltLayer Adjuster Shift+Alt+Ctrl 移动图层原文CtrlResize Brush Alt+Ctrl 画笔直径大小原文Shift+Alt+CtrlIncrease Current Brush ] 扩大当前画笔尺寸原文]]Decrease Current Brush [ 缩小当前画笔尺寸原文[[Constrain to 45 degrees Alt+Shift 强制45度或垂直Adjust opacity 1 to 0 keys 调节画笔透明度每次百分之10Unconstrained Draw Shift+1 画笔绘画不受选择区域的限制Draw Outside Shift+2 画笔绘画在选择区域的外面Draw Inside Shift+3 画笔绘画在选择区域的里面Load Nozzle Ctrl+L 读取喷嘴用图案++++++++++++++++++++++++++++++++++++++++++++++++++++++++++++++++ Cloning [克隆工具]Set Clone Source Alt 克隆点与画笔相对位置不变模式Set Clone Destination Alt+Shift 选择来源点原文Alt+Shift++++++++++++++++++++++++++++++++++++++++++++++++++++++++++++++++++++++ ++++++++++Colors [画笔颜色]Correct Colors Shift+K 颜色修正对话框原文Ctrl+Shift+KToggle Between 1 and 2 Colors Shift+X 在主颜色和次颜色之间切换++++++++++++++++++++++++++++++++++++++++++++++++++++++++++++++++ Gradations [画笔渐变]Edit Gradient Ctrl+Shift+G 前景和背景渐变设置对话框Adjust Spiral Ctrl+Angle Adjuster按Ctrl键按圈数调节否则按角度++++++++++++++++++++++++++++++++++++++++++++++++++++++++++++++++++++++ ++++++++++Paint Bucket [颜料桶]Limit Fill Extent Drag 拖动鼠标出现可变矩形区域进行填充Dropper ctrl 变成点滴器原文是AltLayer Adjuster Shift+Alt+Ctrl 移动图层原文Ctrl++++++++++++++++++++++++++++++++++++++++++++++++++++++++++++++++ Selection Tools [选择工具]Rectangle, Oval,Lasso 包括矩形,椭圆,套索Constrain to Square or Circle Shift 强迫正方形和正圆Add to Selection Shift 添加选择区域Subtract from Selection Alt 减选择区域++++++++++++++++++++++++++++++++++++++++++++++++++++++++++++++++ Magic Wand [魔棒工具]Add Color to Selection Shift+Click 添加颜色选择Contiguous选项打开Add Range of Colors toSelection Shift+Drag 拖动鼠标框选区域内颜色都选中Remove Color from Selection Ctrl+Click 减选择原文Alt+ClickRemove Range of Colors from Sel Alt+Drag 拖动鼠标从存在的选择区减框选颜色++++++++++++++++++++++++++++++++++++++++++++++++++++++++++++++++ Adjuster Tools [调节工具]Layer Adjuster Shift+Alt+Ctrl 移动图层原文Ctrl除导航形状选择Selection Adjuster Shift+Alt+Ctrl 移动图层部分被选择的区域Shape Selection Tool Ctrl 使用形状工具时变形状选择++++++++++++++++++++++++++++++++++++++++++++++++++++++++++++++++Layer Adjuster [调节工具]Duplicate Alt+Drag 复制图层成同名图层Move Layer by One Screen Pixel Arrow keys 按方向间移动图层1像素Hide/Display Marquee Ctrl+Shift+H 显示隐藏定界框Attribute Dialog Box for Current Layer Enter 回车显示当前图层信息Adjust Opacity in 10% increment 1 to 0 keys 按数字1-0控制图层透明度Select All Layers Shift+Alt+A 选择全部图层适用MAC,Shift选每层Deselect Layers Shift+Alt+D 取消选中的层,选择Canvas层Mac用Select/Deselect Mode Ctrl+Shift 通过单击,跳转到画面内容所在图层++++++++++++++++++++++++++++++++++++++++++++++++++++++++++++++++ Selection Adjuster [选区调节]Reposition Click 选区内部拖动移动选区Duplicate Alt+Drag 复制选区Move Selection by One Screen Pi Arrow keys 选择canvas,按方向键移动选区1像素Delete Current Selection Delete Backspace 删除当前选区Select/Deselect Mode Shift 选择调节模式++++++++++++++++++++++++++++++++++++++++++++++++++++++++++++++++Free Transform [自由变形]Resize Corner handles 调节控制点Resize/Preserve Aspect Shift+Corner handles强制比例Resize/One Dimension Side handles 在四个中点上向单独方向变形Skew Ctrl+Side handles在四个中点上-切变Rotate Ctrl+Corner handles在四个顶点上-旋转++++++++++++++++++++++++++++++++++++++++++++++++++++++++++++++++ Shape Tools [形状工具]Shape Selection Tool Toggle Ctrl 变形状选择工具++++++++++++++++++++++++++++++++++++++++++++++++++++++++++++++++ Shape Design Tools [形状编辑]Pen [钢笔工具]Add to Current Point Click last point添加曲线先点击最后一点Shape Design [形状设计]Add to Current Endpoint Click and draw from endpoint添加最后一点++++++++++++++++++++++++++++++++++++++++++++++++++++++++++++++++ Shape Objects Tools [形状对象]Rectangle Constrain to Square Shift 强制正方形Circle Constrain to Circle Shift 强制正圆形++++++++++++++++++++++++++++++++++++++++++++++++++++++++++++++++ Shape Selection Tool [形状选择]Direct Selection [直接选择]Select Start Point of Shape Home 当曲线其中一点选中时,选择开始点Select End Point of Shape End 当曲线其中一点选中时,选择结束点Select Previous Point in Shape Page Up 当曲线其中一点选中时,选择上一点Select Next Point in Shape Page Down 当曲线其中一点选中时,选择结束点Move Path by One Screen Pixel Arrow keys 用方向键移动1像素Delete Selected (closed) Shape Backspace 删除一点++++++++++++++++++++++++++++++++++++++++++++++++++++++++++++++++ Animation [动画控制] 可一读入avi文件并保存成frm格式Play Movie Ctrl+Shift+P 播放动画First Frame of Stack Home 跳到起始帧Last Frame of Stack End 跳到结束帧Next Frame Page Up 上一帧Previous Frame Down 预览就是下一帧Stop at Current Frame Alt+Stop 更新帧堆栈面板上显示的帧Stop and Return to Current Starting Frame Ctrl 停止在帧堆栈当前指定的帧++++++++++++++++++++++++++++++++++++++++++++++++++++++++++++++++ Lighting [灯光控制]Lighting Mover Shift+Ctrl+L 灯光管理++++++++++++++++++++++++++++++++++++++++++++++++++++++++++++++++++++++ ++++++++++Layer Section Tools [图层片断]Group Ctrl+G 成组Ungroup Ctrl+U 打开组++++++++++++++++++++++++++++++++++++++++++++++++++++++++++++++++ Mosaics [马赛克] 在画布菜单打开建立马赛克对话框Get Tile Color Ctrl+Click 改变瓦片前景色原文Alt+ClickGet Tile Shape Ctrl+Click 或取点击处的瓦片形状设置Delete Tile Shift+Click 删除瓦片Select All Tiles A 选择全部瓦片Deselect All Tiles D 取消选择瓦片Change Selected Tiles to Current Color C 选中瓦片改变前景色,按cTint Selected Tiles with Current Color T 选中瓦片逐渐变为前景色Vary Color of Selected Tiles V 屏幕重绘在填色或绘制时的选择状GNOMON视频上扒的.绝对受用抓手空格画笔笔头大小[ ]按住Ctrl + Alt 在画布上拉圆形.圆形直径即是画笔直径.画笔不透明度10% - 100% 数字键1 - 0放大缩小视图按住ctrl 点+ 和- (这个我设在数位板的按键上)后退Ctrl+Z [只能后退32步]切换到移动工具按住Ctrl切换到吸管工具按住Alt画直线shift显示整个画面ctrl+0 [数字键零]自由旋转画布E 旋转后锁定G 还原画布鼠标双击放大缩小M自由画笔 B 直线画笔V油漆桶K前景色背景色切换Shift+X隐藏所有面版Tabctrl+/ ctrl+F 是自动默认快捷键.重复上一次操作.一般常用水平翻转.填充.缩放.旋转注:水平翻转很有用.长时间做画容易产生视觉疲劳.水平翻转后会很容易发现画面出现的问题.在Effects - Orien tation自由旋转画布空格+ Alt 再加上shift 90-180度之间切换晾干数码水彩ctrl + shift + L新建图层ctrl + shift + N图片储存ctrl + shift + S调整颜色ctrl + shift + A自由变换ctrl + alt + T (选区选取然后用移动工具选取出来.这时选取的部分就自动建立一个新图层.因为PT部分功能还不完善.所以局部调整比较麻烦.图层蒙版通道远没有PS做的完善)亮度对比度ctrl + shift + B反向ctrl + i调整局部位置ctrl + C ctrl + shift + Vpinter数码水彩的干燥问题.pt9.5之前的版本.文件保存RIF格式.再打开时画面自动干燥.画面不能再修改.只能以颜色叠加的模式继续作画. 9.5以后这个问题得到了解决.保存RIF文件后.数码水彩不会自动干燥.可以继续修改.所以推荐使用IX 9.5之后的版本.关于Painter的BUG.BUG 1:使用水彩笔(生成了水彩图层)如果再使用橡皮(N)擦除,这是当使用撤销命令(ctrl+z)撤销了橡皮的擦除时,再使用笔画会出现擦除部位变成白色一个方框,形成一个不可逆的破坏.此时只能合并图层才能解决(Painter IX.5德丰工作室汉化版和Painter X英文版都出现一样的情况.非汉化问题)解决方法是在使用橡皮擦时,最好不好使用工具条中的橡皮擦工具(默认快捷键N)!而应该使用“对应画笔笔头的橡皮擦笔头”才可以正常显示!也就是说在使用水彩笔的时候,如果想擦除就要在“水彩笔”的笔头列表中选择Eraser 开头的笔头,比如Eraser Wet、Eraser Dry等等,擦除完后想继续画就再更改回正常的绘画笔头就OK了!其它的笔头一样的道理,无乎每种画笔笔头中都有专用的橡皮擦笔头的!所谓的每种笔头的专用橡皮擦,与其说是“擦除掉”画布上的颜色,不如说是“涂”上了白色而已!BUG 2:用套索工具选取选区.然后移动工具选取出来.建立了一个新图层.这时缩放或旋转.会发现选取缩放后的部分会形成一个白方框.合并图层后白框依然存在.解决方法是用自由变换.不要用缩放.旋转那就没办法了(只有旋转和缩放纯在这样的BUG.扭曲.自由变换.水平翻转...都没有出现问题)剩下的嘛.......就只能意会不能言传。
1、导入数据Wellheads井头数据Welltop分层数据Welllog测井数据附测井名称2、分层Map windowSection window显示测井曲线层拉平,比例尺去掉充填:填充颜色把单一颜色调为彩色制作、应用模板调整分层线位置、增加分层线插入一个地层3、聚类分析设置分成几类岩性加入聚类改名,改数据类型填充显示填充把岩相解释放到曲线之间手动调整岩相(可不用吸管,选中刷子,在岩相上右键)4、断层分析加载断层数据(faultsticks)加载网格文件定义断层模型制作断层模型(选中下图的faultmodeling,并选中导入的fault,然后点击下图中最右边那个快捷键)微调断层模型连接两个断层自动连接断层划定范围可用划定范围5、分层调整颜色显示边框显示网格细分小层细分第二个小层插入第三个小层制作平面制作边界1制作边界方法2(画边界)制作surface设置颜色做另外两个层的surface6、make zones Make zonesLayering7、属性建模建立模型数据分析调整网格框住所有井建立相模型(点击“ok”后,一直点“是”)建立孔隙度模型(注意把两条曲线拉在一起,与前面的相模型建立时的数据分析拉动曲线一样)(此处如果在zones那里选择的是所有层一起调整,调整时不好调,则可复制zones,再粘贴到每个小层里面去,方法同这一步复制face一样)建立物性参数模型NTG的计算(右边的快捷按钮可以播放显示相关信息)可选择性显示(只显示砂岩、泥岩)制作、播放、显示剖面平滑数据Polygons为map窗口分小层平滑处理。
PROTLE快捷键、PROTEL99SE快捷键⼤全要成为PCB⾼⼿,就要熟练常⽤的快捷键按Shift点器件,选择Ctrl+insert 复制pcbShift+insert 粘贴Shift+delete 删除已选部分+ -切换lay空格旋转X x⽅向镜像Y y⽅向镜像V、U单位切换Shift+空格线的拐⾓⽅式选择%%%%%%%%%%%%%%%%%%%%%%%%%%%%%%%%%%%%%%%%%%%%protel 99 快捷键2006/10/26 13:35Page Up 以⿏标为中⼼放⼤Page Down 以⿏标为中⼼缩⼩。
Home 将⿏标所指的位置居中End 刷新(重画)* 顶层与底层之间层的切换+ (-)逐层切换:“+”与“-”的⽅向相反Q mm(毫⽶)与mil(密尔)的单位切换IM 测量两点间的距离E x 编辑X ,X为编辑⽬标,代号如下:(A)=圆弧;(C)=元件;(F)=填充;(P)=焊盘;(N)=⽹络;(S)=字符;(T)=导线;(V)=过孔;(I)=连接线;(G)=填充多边形。
例如要编辑元件时按E C,⿏标指针出现“⼗”字,单击要编辑的元件即可进⾏编辑。
P x 放置 X,X为放置⽬标,代号同上。
M x 移动X,X为移动⽬标,(A)、(C)、(F)、(P)、(S)、(T)、(V)、(G)同上,另外( I )=翻转选择部份;(O)旋转选择部份;(M)=移动选择部份;(R) =重新布线。
S x 选择 X,X为选择的内容,代号如下:(I)=内部区域;(O)=外部区域;(A)=全部;(L)=层上全部;(K)=锁定部分;(N)=物理⽹络;(C)=物理连接线;(H)=指定孔径的焊盘;(G)=⽹格外的焊盘。
例如要选择全部时按 S A ,所有图形发亮表⽰已被选中,可对选中的⽂件进⾏复制、清除、移动等操作。
PROTLE快捷键enter——选取或启动esc——放弃或取消f1——启动在线帮助窗⼝tab——启动浮动图件的属性窗⼝pgup——放⼤窗⼝显⽰⽐例pgdn——缩⼩窗⼝显⽰⽐例end——刷新屏幕del——删除点取的元件(1个)ctrl+del——删除选取的元件(2个或2个以上)x+a——取消所有被选取图件的选取状态x——将浮动图件左右翻转y——将浮动图件上下翻转space——将浮动图件旋转90度crtl+ins——将选取图件复制到编辑区⾥shift+ins——将剪贴板⾥的图件贴到编辑区⾥shift+del——将选取图件剪切放⼊剪贴板⾥alt+backspace——恢复前⼀次的操作ctrl+backspace——取消前⼀次的恢复crtl+g——跳转到指定的位置crtl+f——寻找指定的⽂字alt+f4——关闭protelspacebar——绘制导线,直线或总线时,改变⾛线模式v+d——缩放视图,以显⽰整张电路图v+f——缩放视图,以显⽰所有电路部件home——以光标位置为中⼼,刷新屏幕esc——终⽌当前正在进⾏的操作,返回待命状态backspace——放置导线或多边形时,删除最末⼀个顶点delete——放置导线或多边形时,删除最末⼀个顶点ctrl+tab——在打开的各个设计⽂件⽂档之间切换alt+tab——在打开的各个应⽤程序之间切换a——弹出edit\\align⼦菜单b——弹出view\\toolbars⼦菜单e——弹出edit菜单f——弹出file菜单h——弹出help菜单j——弹出edit\\jump菜单l——弹出edit\\set location makers⼦菜单m——弹出edit\\move⼦菜单o——弹出options菜单p——弹出place菜单r——弹出reports菜单s——弹出edit\\select⼦菜单t——弹出tools菜单v——弹出view菜单w——弹出window菜单x——弹出edit\\deselect菜单z——弹出zoom菜单左箭头——光标左移1个电⽓栅格shift+左箭头——光标左移10个电⽓栅格右箭头——光标右移1个电⽓栅格shift+右箭头——光标右移10个电⽓栅格上箭头——光标上移1个电⽓栅格shift+上箭头——光标上移10个电⽓栅格下箭头——光标下移1个电⽓栅格shift+下箭头——光标下移10个电⽓栅格ctrl+1——以零件原来的尺⼨的⼤⼩显⽰图纸ctrl+2——以零件原来的尺⼨的200%显⽰图纸ctrl+4——以零件原来的尺⼨的400%显⽰图纸ctrl+5——以零件原来的尺⼨的50%显⽰图纸ctrl+f——查找指定字符ctrl+g——查找替换字符ctrl+b——将选定对象以下边缘为基准,底部对齐ctrl+t——将选定对象以上边缘为基准,顶部对齐ctrl+l——将选定对象以左边缘为基准,靠左对齐ctrl+r——将选定对象以右边缘为基准,靠右对齐ctrl+h——将选定对象以左右边缘的中⼼线为基准,⽔平居中排列ctrl+v——将选定对象以上下边缘的中⼼线为基准,垂直居中排列ctrl+shift+h——将选定对象在左右边缘之间,⽔平均布ctrl+shift+v——将选定对象在上下边缘之间,垂直均布f3——查找下⼀个匹配字符shift+f4——将打开的所有⽂档窗⼝平铺显⽰shift+f5——将打开的所有⽂档窗⼝层叠显⽰shift+单左⿏——选定单个对象crtl+单左⿏,再释放crtl——拖动单个对象shift+ctrl+左⿏——移动单个对象按ctrl后移动或拖动——移动对象时,不受电器格点限制按alt后移动或拖动——移动对象时,保持垂直⽅向按shift+alt后移动或拖动——移动对象时,保持⽔平⽅向各种版本PROTEL的常⽤快捷键⼀览:在设计过程中,速度是很重要的,如果单⽤⿏标进⾏操作,不但单⼿负担太重容易⿇⽊疲劳⽽且效率低下。
PROTEL99SE快捷键大全1.常用快捷键Z-A 、V-F:调整到满屏显示全视图Z-W:区域选择V-R:刷新END:当前视屏刷新Q:公英制转换CTRL+M 、R-M:测量距离CTRL+X 、E-D:鼠标进入删除状态CTRL+C:复制CTRL+V:粘贴CTRL+DEL 、SHIFT+DEL+鼠标单击:全体删除选中的目标DEL:删除点取的元件(1个)CTRL+F:查找元件(SCH中)SHIFT+S:看单面板X:将浮动图件左右翻转Y:将浮动图件上下翻转SPACE:将浮动图件旋转90度ENTER:选取或启动ESC:放弃或取消F1:启动在线帮助窗口TAB:启动浮动图件的属性窗口PGUP:放大窗口显示比例PGDN:缩小窗口显示比例X+A:取消所有被选取图件的选取状态CRTL+INS:将选取图件复制到编辑区里SHIFT+INS:将剪贴板里的图件贴到编辑区里SHIFT+DEL:将选取图件剪切放入剪贴板里ALT+BACKSPACE:恢复前一次的操作CTRL+BACKSPACE:取消前一次的恢复CRTL+G:跳转到指定的位置CRTL+F:寻找指定的文字SPACEBAR:绘制导线,直线或总线时,改变走线模式V+D:缩放视图,以显示整张电路图V+F:缩放视图,以显示所有电路部件HOME:以光标位置为中心,刷新屏幕ESC:终止当前正在进行的操作,返回待命状态BACKSPACE:放置导线或多边形时,删除最末一个顶点DELETE:放置导线或多边形时,删除最末一个顶点CTRL+TAB:在打开的各个设计文件文档之间切换ALT+TAB:在打开的各个应用程序之间切换A:弹出EDIT\ALIGN子菜单B:弹出VIEW\TOOLBARS子菜单E:弹出EDIT菜单F:弹出FILE菜单H:弹出HELP菜单J:弹出EDIT\JUMP菜单L:弹出EDIT\SET LOCA TION MAKERS子菜单M:弹出EDIT\MOVE子菜单O:弹出OPTIONS菜单P:弹出PLACE菜单R:弹出REPORTS菜单S:弹出EDIT\SELECT子菜单T:弹出TOOLS菜单V:弹出VIEW菜单W:弹出WINDOW菜单X:弹出EDIT\DESELECT菜单Z:弹出ZOOM菜单左箭头:光标左移1个电气栅格SHIFT+左箭头:光标左移10个电气栅格右箭头:光标右移1个电气栅格SHIFT+右箭头:光标右移10个电气栅格上箭头:光标上移1个电气栅格SHIFT+上箭头:光标上移10个电气栅格下箭头:光标下移1个电气栅格SHIFT+下箭头:光标下移10个电气栅格CTRL+1:以零件原来的尺寸的大小显示图纸CTRL+2:以零件原来的尺寸的200%显示图纸CTRL+4:以零件原来的尺寸的400%显示图纸CTRL+5:以零件原来的尺寸的50%显示图纸CTRL+F:查找指定字符CTRL+G:查找替换字符CTRL+B:将选定对象以下边缘为基准,底部对齐CTRL+T:将选定对象以上边缘为基准,顶部对齐CTRL+L:将选定对象以左边缘为基准,靠左对齐CTRL+R:将选定对象以右边缘为基准,靠右对齐CTRL+H:将选定对象以左右边缘的中心线为基准,水平居中排列CTRL+V:将选定对象以上下边缘的中心线为基准,垂直居中排列CTRL+SHIFT+H:将选定对象在左右边缘之间,水平均布CTRL+SHIFT+V:将选定对象在上下边缘之间,垂直均布F3:查找下一个匹配字符SHIFT+F4:将打开的所有文档窗口平铺显示SHIFT+F5:将打开的所有文档窗口层叠显示SHIFT+单左鼠:选定单个对象CRTL+单左鼠,再释放CRTL:拖动单个对象SHIFT+CTRL+左鼠:移动单个对象按CTRL后移动或拖动:移动对象时,不受电器格点限制按ALT后移动或拖动:移动对象时,保持垂直方向按SHIFT+ALT后移动或拖动:移动对象时,保持水平方向2.通用快捷键在这里介绍一种快捷键的学习方式:菜单名-菜单项的快捷方式举个例子吧,PLACE菜单内有个VIA菜单项,功能是放置过孔,可以看到其菜单项的快捷方式是V。
Shortcut Keys in PetrelThere are a number of shortcut keys in Petrel. The shortcut keys allow the user to increase speed and efficiency in their daily work. Some of them are process restricted and will be available only when certain process steps are active.Shortcut keys related to Microsoft Windows:F3 sets focus to Work areaPress ALT and TAB to switch between applications open in Windows.CTRL and ESC will open the Windows Start menu.TAB will move between edit boxes in an open menu.Arrow keysThe arrow keys on the keyboard can be used to move data around in the Display window. If nothing has been selected in the Display window, the arrow keys will move the camera, i.e. the position from which you are moving the data.If you select a point, a Shape Point in the Display window, the arrow keys and the Page Up and Down will move the selected point. Go to the Project pull-down menu (in the Menu bar), select Project Settings and go to the Settings 1 tab- here the translation increment can be changed.Shortcut keys in the Menu barThe different menus can be opened by clicking on them or by using ALT and the underlined letter in the name, for example, ALT and F to open the File menu.To select something from an open menu, either click on it, or type the letter underscored in the selection you want, e.g. O for opening a project from the File menu.Opening a Project:z CTRL and N will start a new project.z CTRL and O will open an existing project.z CTRL and open project from project link will open a project with no windows.z CTRL and open project will open a project with no windows.z CTRL and double-click on project in file browser will open a project with no windows.z CTRL and single-click on project in file browser + Open will open a project with no windows.z Other shortcuts:z CTRL and I will import a selected data file and place it at the bottom of the Input pane.z CTRL and M will open the Reference project tool.z CTRL and S will save the current project.z CTRL and E to export selected files (files selected in the Explorer panes).z CTRL and P to print what is displayed in the Display Window.z CTRL and Z will undo the last editing action in process steps such as Fault Modeling, Seismic interpretation, etc.z CTRL and Y will redo the last editing action in process steps such as Seismic interpretation, etc.z CTRL and X will cut the active (selected) item in the Explorer panes.z CTRL and C will copy the active (selected) item in the Explorer panes.z CTRL and V will paste a previously Cut or Copied item in the active (selected) folder in the Explorer panes.If a folder is not selected, the item will be pasted at the bottom of the Explorer pane.z Delete will delete an object selected in Petrel Explorer or in the Display window.z CTRL and A will select all items in the Display window, e.g. all polygons if a file with polygons is displayed (in Select/Pick Mode).z F1opens the Online manual in windows format for explanation and examples.z F11View full screen (of the active window in Petrel).Shortcut keys related to the Explorer panesz Minus key or Left arrow key collapses the selected iconz Plus key or the Right arrow key expand the selected iconz CTRL and Up selects previous siblingz CTRL and Down selects next siblingz Space bar toggles selected icon (visualize)z Enter activates objects and foldersz ALT and Enter opens Settings dialog for highlighted object or itemz Menu key opens context menu of the activated object or folder. To close, hit Escz F2 (or two single mouse clicks) for renaming active object or folderCTRL and T activates the Inpu t paneCTRL and L activates the Mode l s paneCTRL and R activates the P r ocesses paneShortcut keys related to the Display windowSee also the shortcut keys related to the Menu bar.z V switches to Viewing Modez Z activates the Magnifyz P activates the Select/Pick Mode.z Esc toggles between Viewing Mode last selected action in 2D and 3D windows.z SHIFT and Esc toggles between Viewing Mode and Select/Pick Modez Arrows on the keyboard will scroll the view of an item in the Display window (in Viewing Mode).z Home will bring the displayed item back to home position if the Set Home Position tool has been used.z S activates the Target Zoom (works in Viewing Mode in a 3D window).z CTRL and U activates the View all option; centers all data in the middle of the display window.z CTRL and J activates the selected Map view position.z CTRL and Tab opens a short cut menu for panes and open display windows in Petrel.Shortcut keys related to the IntersectionTherethe Manipulate Plane Select/Pick Mode.z M activates the Manipulate Plane tool.z D activates the Measure Distancez CTRL and B toggles the Toggle Visualization on Planez Arrows left and right will turn the plane around vertically with a constant tilt. Note that the plane cannot move if it is aligned North to South or East to West.z Arrows up and down will change the tilt of the plane. The alignment will be kept constant. Note that the plane cannot be tilted if it is aligned vertically or horizontally.z Page Up and Down will move the plane along its normal.Shortcut Keys related to Make/Edit Polygonsz N to start a New Polygon.z SHIFT and P to Show Pointsz P activates the Select/Pick Mode.z E to Select and Edit/Add Pointsz B to activate the Bounding Box Select tool (2D window only).Shortcut Keys related to Well Correlationz A to activate the Paint discrete log class .z F to activate the Flood discrete log class.z SHIFT and S to Pick up discrete log class.z L to activate Create/Edit continuous logs.z SHIFT and C to activate Create/Edit Comment log.Shortcut Keys related to Make/Edit Well Topsz T to activate Create/Edit Well Tops tool.z N to Add New Well Tops Surface .Shortcut keys related to Seismic InterpretationSince the seismic interpretation is performed on an intersection, the shortcut keys for General Intersection will also function in the Seismic Interpretation process step.z B- to activate the Bounding Box Selectz SHIFT and B- to activate the Selection Paintbrush tool (All windows)z Del-to delete selection.z P-activates the Select/Pick Mode.z X-to activate eraser mode.z(+) / (-)- increase / decrease the size of the eraser (when active)z PgUp / PgDn- Move the active seismic section by a given increment (All windows)z SHIFT and S- Activates fault or horizon (All windows)z F- Fault interpretation (All windows)z N- New Fault stick/interpretation (All windows)z H- Horizon Interpretation (All windows)z U- to set manual drawing mode .z A- to set 2D seeded autotracking mode .z SHIFT and A- to set 3D seeded autotracking mode .z G- to set 2D guided autotracking mode .z R-to set paintbrush autotracking mode (2D window only).z SHIFT and R- to set active box autotracking modez Y- select parent pointsz SHIFT and Y- select child points (3d window).z Z-Zoom (Interpretation window).z CTRL and Z will undo the last editing action.z CTRL and Y will redo the last editing action.z SHIFT and Z will unmagnify (only if magnifier has been used in the Interpretation window.z(+) / (-)- Zoom in/out (Interpretation window).z L- Select Inline Intersection (Base map and 3D windows).z SHIFT and L- Select Crossline Intersection (Base map and 3D windows).z K- Select any visible line, i.e. inline, crossline, general vertical intersection or 2d line (Base map and 3D windows) or redisplay previous intersectionz SHIFT and K- redisplay next intersectionz C- Create Arbitrary Polyline Intersection (Base map and 3D windows).z SHIFT and C- Create Seismic Aligned Polyline Intersection (Base map and 3D windows).z O- select composite selection (Base map and 3D windows) or compose with intersecting line (Interpretation window).z W- draw arbitrary composite intersectionsz SHIFT and W- draw aligned composite sectionsz I- compose with inline (Interpretation window).z SHIFT and I- compose with crosslinez Q- clip and extend composite (Interpretation window).Shortcut Keys related to Pillar Griddingz SHIFT and A activates the Set Arbitrary Directionz SHIFT and B activates the Set Part of Grid Boundaryz SHIFT and I activates the Set I-Directionz SHIFT and J activates the Set J-Direction tool.z N activates the Set Number of Cells for the Selected Connection tool.z B activates the Create External Grid Boundaryz I activates the New I-Trendz J activates the New J-Trend tool.z SHIFT and P activates the Show Points in PolygonsShortcut Keys related to Facies Modelingz L activates Pencil tool .z B activates 3D Brush tool .z A activates Airbrush tool .z F activates Fill Selected Facies Code tool .z SHIFT and S activates Adapt facies code from Image tool .Shortcut Keys related to Workflow editorz CTRL and W will open the active workflow.。