宜家家具装配图leksvik
- 格式:pdf
- 大小:1.36 MB
- 文档页数:12

IKEA宜家家私.ppt1、新产品品牌塑造创意宜家家私*名目CONTENTS资讯对比定位形象延长3591011品牌塑造:强调环保,同时也表达人文,为群众创造更美妙的日常生活。
品牌资产盘点:物美价廉,吸引广大中低收入家庭和中低收入消费者的目光。
前期由于它的产品许多来自海外,价格问题使得购置力少,如今加大了本地选购本地销售的力度,使得其产品运行本钱大大降低。
品牌塑造观点:种类繁多、美观有用、老百姓买得起的家居用品品牌定位:高度融合市场经济、产品经济,明确人们追求的生活观念远远不是耐用,而是美观经济实惠,以表达主人的思想素养和精2、神品位为定位点关注消费者*品牌联想:适合,舒适,家居,温馨,色彩上黄色象征明朗,开心,自由蓝色象征明晰,沉静,温顺,描述自然——充满阳光和新奇的空气,却又不失内敛与本真。
品牌优势:注重好的设计和功能以及低价格品牌对比:百安居:推行“安全、健康、环保”的绿色家装理念,装修与建材超市相结合的“一站式服务”模式索菲亚:以量尺定做的理念,向全世界提供了一种无法仿照的“法国式生活艺术”的精髓推广策略:进入中国后,宜家调整了市场定位,精确的市场定位使得“宜家家具”在中国白领阶层成为一种时尚符号品牌规划**对3、比品牌对比百安居装修与建材超市相结合的“一站式服务”模式要求量身定做,需要肯定的工期索菲亚以量尺定做的理念,向全世界提供了一种无法仿照的“法国式生活艺术”的精髓价格相对昂贵*品牌塑造观点以低价格制造好产品,提倡节省本钱又富有创新的方法。
宜家设计师通过与阅历丰富的制造商合作,找到最大限度地利用原材料的方法。
确保产品和材料能够最大限度地削减对环境的不利影响,确保从健康的角度来看对顾客是安全的。
优势塑造功能上种类繁多:从植物和客厅家居用品,到玩具和整个厨房,你可以找到布置你的家所需要的一切;风格上种类4、繁多,浪漫主义者会与简约主义者一样找到自己需要的东西。
互为和谐的产品系列在功能和风格上种类繁多。
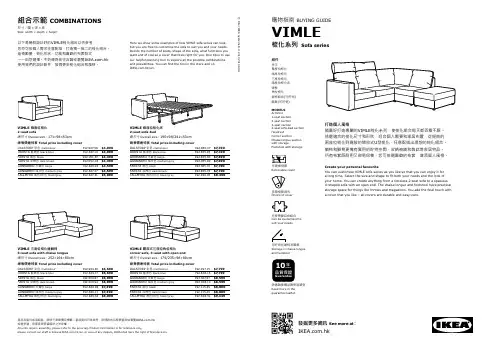
購物指南 BUYING GUIDEVIMLE梳化系列 Sofa series以下是幾款設計好的VIMLE梳化組合以供參考,您亦可按個人需求任意配搭,打造獨一無二的梳化組合。
座椅數量、梳化形狀、功能和喜歡的布套款式,一一由您選擇。
不妨親身前往店舖或瀏覽, 使用我們的設計軟件,發掘更多梳化組合和風格。
Here we show some examples of how VIMLE sofa series can look, but you are free to customise the sofa to suit you and your needs. Decide the number of seats, shape of the sofa, what functions you want and of course a cover that feels right for you. One tip is to use our helpful planning tool to explore all the possible combinations and possibilities. You can find the tool in the store and on /en.VIMLE 兩座位梳化2-seat sofa總尺寸 Overall size :171×98×83cm 總售價連椅套 Total price including coverDALSTORP 彩色 multicolour 592.987.58$4,090 ORRSTA 藍黑色 black-blue 692.847.13$4,090 FARSTA 黑色 black992.051.87$4,390FARSTA 深褐色 dark brown 292.052.04$4,390GUNNARED 米黃色 beige 092.846.93$4,590 GUNNARED 暗灰色 medium grey 892.847.07$4,590 TALLMYRA 黑色/灰色 black/grey892.847.31$5,090VIMLE 三座位梳化連躺椅3-seat sofa with chaise longue總尺寸 Overall size :252×164×80cm 總售價連椅套 Total price including coverDALSTORP 彩色 multicolour 592.994.80$6,690 ORRSTA 藍黑色 black-blue 392.849.17$6,690 FARSTA 黑色 black192.069.87$6,890FARSTA 深褐色 dark brown 192.069.92$6,890GUNNARED 米黃色 beige 592.848.98$7,390 GUNNARED 暗灰色 medium grey 692.849.11$7,390 TALLMYRA 黑色/灰色 black/grey092.849.33$8,090VIMLE 兩座位梳化床2-seat sofa-bed總尺寸 Overall size :190×98/241×83cm 總售價連椅套 Total price including coverDALSTORP 彩色 multicolour 092.988.07$7,390 ORRSTA 藍黑色 black-blue 692.855.95$7,390 GUNNARED 米黃色 beige 292.855.83$7,890GUNNARED 暗灰色 medium grey 992.855.89$7,890FARSTA 黑色 black992.855.70$7,700FARSTA 深褐色 dark brown 692.855.76$7,700TALLMYRA 黑色/灰色 black/grey192.856.06$8,390VIMLE 開放式三座位角位梳化corner sofa, 3-seat with open end總尺寸 Overall size :179/235×98×80cm 總售價連椅套 Total price including coverDALSTORP 彩色 multicolour 492.997.15$7,799 ORRSTA 藍黑色 black-blue 792.848.16$7,799 GUNNARED 米黃色 beige 992.847.97$8,599GUNNARED 暗灰色 medium grey 092.848.10$8,599FARSTA 黑色 black192.115.35$8,880FARSTA 深褐色 dark brown 192.115.40$8,880TALLMYRA 黑色/灰色 black/grey492.848.32$9,449組合示範 COMBINATIONS尺寸:闊 × 深 × 高Size: width × depth × height打造個人風格隨喜好打造專屬的VIMLE梳化系列,使梳化組合每天都百看不厭。

宜家家居中客餐厅设计课程学习汇报IKEA2023.04.03IKEA furniture Guest Restaurant designfurnitureguest restaurant design目录CONTENTS01.Cabinet furniture 柜类家具02.Tablefurniture桌台类03.Sitting&Lying坐卧类04.AnotherRelevant其它CabinetPart 01柜类 cabinet•Glass door cabinet 玻璃门吊柜ØMaterial: Imitation White Oak Grain ;tempered glass 材质: 仿白色橡木纹;钢化玻璃ØWith the attachment, several frames can be hung side by side at the same height.内附连接件,可在同一高度,将几个框架并排悬挂。
• Bottom cabinet 底柜电视柜BESTA/SINDVIK贝达/欣维ØThe panel is made of particleboard,Plastic trim; 面板采用刨花板;塑料封边ØThe backboard is made of fiberboard,Plastic film;背板采用纤维板;塑料贴膜连接件:阻尼;铰链;悬挂杆,三合一偏心连接件• Connectors:damper;hinge;Suspension rod;Three-in-one eccentric connectorMaterial Green panels;Solid Wood sidebar 环保板材,实木边条Technology•Multi-hole adjustment, dismountable partition.•Three-dimensional relief stitching process.•Solid wood edge strip and rounded corner grinding design.02.Shoe cabinet鞋柜•立体浮雕拼接工艺。

The step-by-step guide to installing your new kitchen rightThis brochure is your guide to preparing and installing your new kitchen. Inside you’ll find tips and ideas, clear steps to follow, and the tools you’ll need. Use this guide along with your assembly instructions to make sure your kitchen is installed correctly.You can do it yourself but you don’t have toOur kitchens are designed to be simple to install and assemble yourself, but we’re here to help as muchas you would like along the way. Whether you’d like a hand with delivery or a complete installation service, we’re happy to put together a service package that suits you. For more details, see the kitchen section of or contact your local IKEA store. Before you beginTake a look at this brochure to see what steps are involved in installing your new kitchen and organize what tools you’ll need.Once you’ve received your kitchen, double-check that all the parts have arrived. A good way to do this is by checking what packages you have at home against the order list. You should only dismantle your old kitchen when you have all your new parts and appliances. Your kitchen parts and countertop should be stored indoors, with normal room temperature and humidity levels. It’s helpful if you arrange your cabinets in the order you will be installing them. Use your shopping list and IKEA home planner drawing to help you. Remove your old kitchen making sure that electric, water and gas are off before you begin. Use a qualified, licensed professional to disconnect and connect your gas, water, and electricity.23The tools you’ll need depend on how much of yourkitchen you are doing yourself. See the assemblyinstructions for the tools you’ll need to use. It’s a goodidea to wear safety glasses when using power tools.Miter box and saw Fine-toothed handsawBar clampsElectric screwdriver/drill JigsawCircular saw LevelAwl Square Pencil Rubber mallet Claw Hammer Phillips screwdriver Flat screwdriver Hole cutter – for drilling the hole for the faucet in the sink.4Prepare your roomOnce you have removed your old kitchen, prepareyour room by making sure your walls and floorare even, and that your walls are suitable forsupporting your new kitchen. Now is also thetime to prime and paint your walls, put in tiles orchange your flooring.Marking cabinet positionsDraw a layout of your new kitchen directlyon the wall. Check that everything fits withthe measurements from your plan and yourelectricity, water, gas, and ventilation connectionsare where you want them. Also mark where toattach your new kitchen’s suspension rails.Prepare your space by making sure your corners are even and your walls and floor are squareand plumb. Use your square for the corners and a level for the walls and floor. Make sure younote the highest point of the floor and where the corners are not square.Check that your wall is strong enough tohang your suspension rail and cabinets.Depending on your wall material, it’s bestSet your suspension railWith the new IKEA kitchen system, your cabinets can be hung directly onto a suspension rail making them easier to install and easier to adjust.It’s important to make sure your suspension rail is straight and level, and to secure it with the right screw type for your wall.Marking the right height for your suspension rail Your base suspension rail needs to be hung 32 3/16" above your floor’s highest point (measure to the underside of the rail). You should allow 22 5/16" between the bottom of your wall cabinets and the bottom of your base rail when measuring for your upper rail.Fasten your rails, base rail first. Make sureyou’ve found suitable points in the wallwhere the rails can be fastened and that therails are level before drilling.If your wall is uneven use shims between the rail and the wall to make sure the rail is e a level to check that each rail is level.6Install your cabinetsIn most kitchens it’s best to install your wallcabinets first. This will allow you to move aroundwithout base cabinets in the way. One exceptionis if you are installing a single line kitchen with ahigh cabinet at one end. In this case install thehigh cabinet first.Before you begin, mark down all plumbing andother utilities. Some cabinets have ready-madeopenings for plumbing and utilities, but you canuse a jigsaw to create your own openings, ifneeded. Do this before fitting the cabinet in place.Be aware that these openings can affect how youcan arrange drawers in a cabinet.to the assembly instructions. Wait until laterbefore fitting drawers, doors, and internalfittings.corner. Hang all remaining cabinets in thesame way. If you’re installing a cornercarousel now is the time to place it in thecabinet.aligned with your plumbing.tightening the screws. Hang the remainingcabinets and connect them with the includedscrews. Wait to tighten the screws untilthe base cabinets are in place and you canensure alignment.previous cabinet by adjusting the legs.assembly instructions. Make sure to havethe legs attached in the order the cabinetswill be installed.installing. Remember to use the distance ring included with the legs.cover panel first.Filler piecesFiller pieces are used between yourcabinets and walls for a streamlinedappearance and to ensure there isenough room to fully open doors anddrawers. They are especially useful ifyour walls are not perfectly straight.If the wall is not level and flat, the filler piece must be cut to fit to the wall’s shape. To do this,you’ll need a filler piece, measuring tape, small block of wood about 1 1/4" thick and a pencil.Cut the filler piece so it’s the same height as the cabinet. Place the edge of the filler pieceagainst the wall. Hold the block of wood flat against the wall with the pencil against it. Keepthem pressed against the wall as you slide them down the length of the filler piece. Now youhave traced the shape of the wall onto the filler piece. Cut along your trace line.Place the newly cut edge of the filler piece against the wall, it should fit perfectly. Mark theedge of the cabinet on the top and bottom of the filler piece. Draw a straight line from theseCheck the wall with your level to see if it is straight. If the wall is even, measure between the wall and the cabinet and mark this distance at the top and bottom of the filler piece.To ensure the filler piece stays in place, first attach a support strip to the wall. Drill holes in the cabinet for the screws you’ll use to attach the cabinet and filler piece together.Put the filler piece into place. Put screws through the holes you have drilled. When all your filler pieces are in, caulk around each one with silicone for an airtight seal.8Install your worktop, sink, lighting, appliances, and kitchen island.With your cabinet frames in, it’s time to installyour countertop, sink, lighting, and appliances.Check that your countertop is the correct sizebefore fitting it in place. Now is also the time ifyou need to customize your countertop for a sinkor cooktop, see your assembly instructions forhelp.Once your countertop is in, you’re ready toget your water, gas, lighting and appliancesconnected. All water, gas, and electricityconnections must be done by qualified, licensedprofessionals according to valid local safetyregulations.All electrical connections must be made by aqualified, licensed electrician.straight-edge to your pre-cut countertopwhen you cut to customize the size. It’shelpful to use a pair of sawhorses.countertop apply polyurethane siliconeacross the sawn edges.Install your lighting and appliances.the assembly instructions.Measure your countertop. If you have a pre-cut countertop, now is the time to cut itto the right length.countertop in place. Trace the inside ofthe base cabinet onto the underside of thecountertop. This helps you align your sink.Turn your countertop over and trace theoutline of your sink onto masking tape.the assembly instructions.It’s helpful to drill a hole on the insidecorners of your outline before cutting, soyou can make a cleaner cut.9Customize your countertop for your cooktopin the same fashion as for your sink. Seeyour cooktop’s assembly instructions forhelp.Install the extractor hood. The extractor hoods from IKEA can be installed in two ways: either vented to the outside, called extraction, or used in recirculation mode fitted with a charcoal filter. Each installation option is described in the assembly instructions that come with the product.Saw the hole either in the back panel or in the top of the cabinet. See the assembly instructions.For safety and functionality reasons, follow precise measurements in the instructions forinstallation that come with the extractor hood/fan.Supporting brackets are used to fasten kitchen islands to the floor.Legs/toe kicks must then be fitted around the outside of the island.The kitchen island assembly kit is used to connect cabinets back toback, or for attaching a cover panel to the back of cabinets.10Install your shelves, drawers, doors, knobs, and handles.Now that the cabinet frames, countertops andappliances are in, attach the drawer slides intothe cabinets. Remember that the slides for innerand standard drawers are attached differently,see the assembly instructions for help.Once the slides are in, attach the drawers beforethe doors and shelves. Finish by adding knobsand handles as well as any other internalsolutions, like wire baskets.outer drawers. Outer drawer slides shouldbe attached to the outer row of holes in thecabinet.the inner drawer slides. The inner drawerslides are attached to the inner row of holesin the cabinet.assembly instructions.cabinets.width by adjusting the screws on the hingeplate.Now its time to attach a toe kick. Follow theassembly instructions for help.If using a ventilation grill, place it betweentwo pieces of toe kick.You’re done! Congratulations on your new kitchen!Caring for your cabinetsClean the doors, cabinet interiors, and wood surfaces with a soft, damp cloth. Only use cleaning products intended for these materials. Do not use products that contain ammonia, alcohol, bleach, or abrasives. Rinse with clean water, then dry with a clean, dry cloth. Make sure to clean up spills quickly.Keep your sink sparklingAfter each use, wipe the sink clean with a cloth or sponge damped in water or a non-abrasive scratch the stainless steel surface. The damp surface can be discolored if substances containing iron are allowed to remain on it.Long-lasting countertopsKeep your countertop in top condition by cleaning up spills quickly with water and a mild detergent. Be sure to keep them as dry as possible after use. For wood and solid wood countertops use BEHANDLA wood treatment oil. The oil protects the wood from marks, stains, and cracks, and prevents water from penetrating the surface.11Services and prices may vary, please see /services or your local IKEA store for details.ALL THE HELP YOU NEED TO MAKE YOUR DREAM KITCHEN A REALITYAt IKEA we believe everyone has the right to a new kitchen. Apart from offering a wide range of kitchens, we also offer a wide range of services, including measuring, planning, and installation. Everything you need to make getting your dream kitchen as easy as possible. And at your local IKEA store you’ll find our team of kitchen experts who are on hand to answer questions, give practical advice, and help you through the buying process.Save time and effort with professional installation. Kitchen Installation isprovided by an Independent Service Provider and is priced per cabinet.INSTALLATION SERVICEWe can arrange for an Independent Service Provider to deliver your newkitchen directly to your home or office. Prices are based on distance.DELIVERY SERVICEA professional Measurement Technician will visit you in your home toprovide all measurement services. A Kitchen Planner will then contact youto discuss the details of your kitchen plan, and start the planning process.Performed by an Independent Service Provider. The Measurement andPlanning fee is refunded to you when you purchase your IKEA kitchen.MEASUREMENT AND PLANNING SERVICE MEASUREMENT SERVICEAn experienced professional from an Independent Service Provider willcome to your home to assess the conditions and provide accuratemeasurements. This service is available to customers living in our servicearea. The Measurement fee is refunded to you when you purchase your IKEAkitchen.© Inter IKEA Systems B.V. 2015/August 2018。


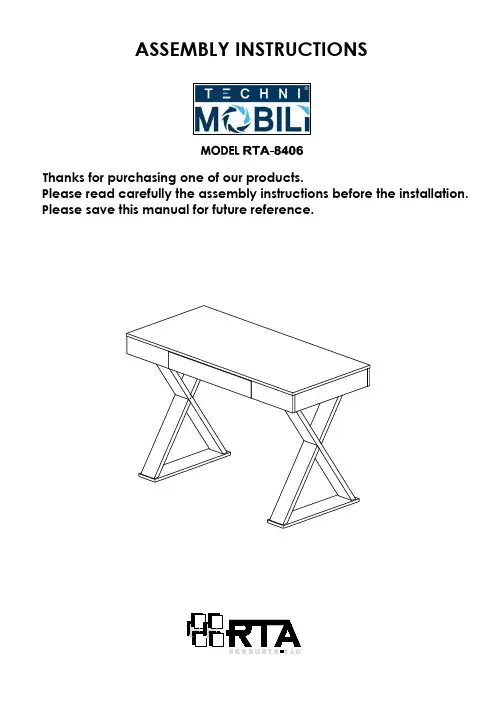
ASSEMBLY INSTRUCTIONSThanks for purchasing one of our products.Please read carefully the assembly instructions before the installation. Please save this manual for future reference.▪☛This unit uses cam bolts and locks. The following explains how to use them.This is not an assembly step; it is a guide for when you are actually doing the assembly using thiskind of hardware.Cam BoltCam Lock 1. Screw the bolt into thecorresponding panel. 2. In the other panel, insert the cam lock and align it soit can properly receive thebolt, then join both panels.ALIGNMENTDIRECTION3. The panels might have a very small gap which is normal; turn the cam lock clockwise to lock the partstogether and the gap will alsoclose.78Assemble the Back Panel (B) to panels (E) using the Cam Locks (2)as shown and as explained in page 4.2x22B2Assemble the Exterior Side Panels (C) to the Back Panel (B) using the Cam Locks (2) as shown and as explained in page 4.2x2CCH1213Using screws (6), assemble the Left Stand Panel (F) and the Right Stand Panel (G) to the Middle Panel (D) in their respective sides as shown.Assemble the Left Front Panel (H) and the Right Front Panel (I) to the respective sides on the frame using Cam Locks (2) as shown and as explained in page 4.6x26FG2x6I2PAY ATTENTION TO THE ORIENTATION OF THE PANELS!14 15Carefully place the Tabletop (A) upside-down, then with the help of another person, place the frame over the tabletop making sure the wooden pins enter in the holes. Then using screws (4), assemble the Tabletop (A) to the brackets on the frame. Carefully turn the table to its normal upright position.4x232x2A4ANOQ1819(12) with the wheels towards the back. VERY IMPORTANT: Make sure to install them won't fit in the desk.11x2Insert the drawer into the desk as shown. Then attach the Screw Caps (11) to the Cross Legs (J) as shown.M11JJLeft 44444。


KITCHEN CABINET Installation Guide• Tools Required• Layout and Planning the Installation • Cabinet Installation Order • Installing Cabinets Level • Fastening Cabinets to the Wall • Fastening Cabinets Together • Installing Fillers • Installing Trim• Adjusting Hinges and DrawersAdditional tools that make the job easier:• Small T able saw • Power Miter Saw • Laser Level • Stud FinderLAYOUT AND PLANNING THE INSTALLATION1. T ake inventory of the cabinets as per the plan or order.2. Find the high spot in the floor using a level as shown below.3. M easure up the wall 34 ½� above the high spot and draw a level line anywhere that base cabinets will be installed. (This means that this line will measure greater than 34 ½� above the floor in most places along the wall.)4. F ind and mark the studs. This can be done by trial and error of driving a nail in the wall until you find a stud or use an electronic stud finder. Studs will usually be every 16�center to center.nThe instructions given here serve as a general guideline on how to install frameless cabinets in a reasonably simple installation. Many cabinet designs and installations may be far more complex andbeyond the scope of these instructions and require a professional installer.Warning: Kitchen installations typically involve gas, high voltage wiring, plumbing and mechanical details like heating and AC vents. This guide only covers cabinet installation. At a minimum, if you’re not well versed in these areas make sure that all power is shut offto exposed wiring and gas valves are closed to gas supply lines.TOOLS REQUIRED• T ape Measure • Pencil• 3 to 4 foot Level • 3/16� Drill Bit• Phillips Head Screwdriver • #2 Square Drive Bit • Electric Drill • Hammer• Wood Shims• Phillips Head Screw Gun • Handsaw • Chalk Line • Step Ladder • Extension Cord• Pry Bar• Clamps• Carpenter’s Square• N OTE: If “C” clamps are used,protect material between fin -ished case of the cabinetand the clamp.c Place a mark 34 ½up from the high spot in floor STEP 1:Locate the highpoint on the floor for a wall1STEP 2:Locate the highpoint on the floor for an adjacent wall2STEP 3:Locate the highpoint on the floor between two walls3drawer box. Then slide the drawer out.d the floor.CABINET INSTALLATION ORDER1. D etermining the installation order of the cabinets depends on the plan. As a general rule it is better to start with wall cabinets in the corner and work out. However, if you have “tall” cabinets, like a pantry or oven cabinet in the plan, it is critical to make sure that the tall cabinet is used to determine the top alignment of wall cabinets.INSTALLING CABINET LEVEL2. C abinets should be shimmed up from the floor level to the 34 ½� line with wood or composite shims.!3. C abinets should also be shimmed out from the wall to maintain a straight line. Hampton Bay Designer Seriessure to place screws 1� below the top and 1� above the bottom. Measure and mark the stud location on thecabinet before drilling. Use #8 x 2-1/2� flat head screws when fastening through a single layer of drywall intowood studs.2. P lace a screw at thetop of the cabinetand the bottom of acabinet in as manystuds as can be locat-ed in the cabinetwidth.FASTENING CABINETS TOGETHER1. A lign cabinet frames togethercarefully.2. C abinet cases can be clamped to-gether using various kinds of clamps,however use caution with any kindof steel clamp to not damage thesurface material of the cabinet.3. S crew cabinets together with#7 x 1-1/8� flat head screws.INSTALLING FILLERS1. C abinets come is 3� increments in width, therefore fillers willbe required when cabinets are to fit between walls.2. M easure the space between the wall and the cabinet at thetop, middle and bottom. If the dimensions are close to thesame you can rip (saw) the filler in a straight line to the properwidth to fit.3. N ext, predrill holes for 1 ¼� screws and screw the fillers fromthe inside of the cabinet.4. I n a case where the wall is not plumb, the filler will have to becut to fit to the uneven wall.Place screws1� belowthe insidetop ofcabinetPlace screws1� abovethe insidebottom ofcabinet2.Measure the space between tap¼fncbetween walls.angle Box facesnot alignedangle BoxnotBoxes are at an angleto each otherBox faces arenot alignedW3036W3036Boxesto each W3036angleINSTALLING TRIM1. I nstalling crown molding can be accomplished in a variety of ways depending on the application. Using “frame-less cabinets” means that a sub-crown molding will always have to be screwed to the top of the cabinet case to LIGHT RAILIn the same way, installing light rail will have to be screwed to the bottom of the case. Light Rail Screw Placementcabinet case to attach the crown molding to.!!!!!!"#$%&'"()('*+,+-%./',0(+123!&4'-523DRAWER ADJUSTMENT DOORS AND DRAWERSDovetail Drawer AdjustmentTo Adjust the dovetail drawer for alignment, roll the orange adjustment wheel on the under side of the drawerback and forth to raise and lower the left and right side of the drawer.Limited Lifetime Warranty___________________________________________This warranty covers defects in materials and workmanship in your Hampton Bay Designer Series Kitchen products under normal home use. This warranty is offered only to the original residential consumer purchaser (“the Consumer”) and may not be transferred.WHAT THIS WARRANTY COVERS: American Woodmark Corporation (“AWC”), the manufacturer of these Hampton Bay Designer Series products, warrants its parts and products to be free of defects in materials and workmanship from the orig-inal date of purchase under normal home use. This warranty is offered to the original residential consumer purchaser only and may not be transferred.HOW LONG THE WARRANTY LASTS: The coverage of this warranty lasts for the lifetime of the original purchaser, so long as he or she owns the home in which the product was first installed.WARRANTOR:American Woodmark Corporation561 Shady Elm RoadWinchester, VA 22602(800) 230-5661WHAT AMERICAN WOODMARK WILL DO UNDER THE WARRANTY: During the warranty period, AWC, at its option,will repair or replace any part or product that proves to have substantial defects in materials or workmanship, or AWC will provide an equivalent replacement product, at no cost to the Consumer. AWC reserves the right to change specifications in design and materials without notice and with no obligation to retrofit products we previously manufactured.DUTIES OF THE CONSUMER: If you purchased Hampton Bay Designer Series cabinetry and need a replacement part orwouldliketofileawarrantyclaim,IMMEDIATELYNOTIFYAWCBYE-MAIL(********************************)OR TELEPHONE (800-230-5661) OF THE ISSUE. You must provide a copy of the original sales receipt fromyour purchase.HAND CARVING, WOOD, AGING AND PRINTING LIMITATIONS: Because of the varying natural characteristics of wood and the effects of aging, product shown in displays and/or printed materials will not be an exact match to new cabinetry you will receive. Depending on the wood characteristics, the age of a sample and the environment of the showroom, samples will show some degree of variation from new product. In addition, you should not expect all doors, drawer fronts, trim or molding to match exactly in either finish or grain. Variation in wood is normal and unavoidable. In addition, it is not possible to match our colors exactly in printed materials. Therefore, you should view the actual samples when making your color selection. Slight variation in size and design is also characteristic of individually hand-carved items. This variation can occur from carv-ing to carving, which only adds to their uniqueness and beauty.LIMITATIONS AND EXCLUSIONS: This warranty does not cover defects or damage which result from commercial use, improper transportation, improper installation, use of unauthorized parts, mishandling, misuse, abuse, neglect, abnormal use, improper maintenance, non-AWC repairs, accidents, impact, or acts of God, such as hurricanes, fire, earthquakes or floods, normal wear and tear, alterations, environmental conditions, humidity absorption, or mold. This warranty, and any applicable implied warranties, does not cover incidental or consequential damages arising from any defects in the product, such as labor charges for installation or removal of the product or any associated products. In addition, variations in hand carved items, wood grain, finish color, aging or other natural wood and stain characteristics are not considered defects and are not covered by this warranty.DISCLAIMERS AND RIGHTS: AWC disclaims any implied warranty of merchantability, and there are no express warran-ties other than those set forth herein. ANY WARRANTY IMPLIED BY STATE LAW (WHETHER OF MERCHANTABILITY OR FITNESS FOR A PARTICULAR USE OR OTHERWISE) SHALL BE EFFECTIVE FOR ANY PRODUCT ONLY FOR THE DURATION OF THE APPLICABLE LIMITED WARRANTY PERIOD LISTED ABOVE. SOME STATES DO NOT ALLOW THE EXCLUSION OR LIMITATION OF INCIDENTAL OR CONSEQUENTIAL DAMAGES, SO THE ABOVE LIMITATION OR EXCLUSION MAY NOT APPLY TO YOU. THIS WARRANTY GIVES YOU SPECIFIC LEGAL RIGHTS, AND YOU MAY ALSO HAVE OTHER RIGHTS THAT VARY FROM STATE TO STATEU180215 08/21。
宜家白色铁床安装方法
宜家白色铁床的安装步骤如下:
1.准备工具
在安装宜家白色铁床之前,需要准备好一些工具,包括螺丝刀、橡皮锤、扳手、电钻、尺子、垂直仪、开口扳手等。
2.排序零件
仔细地把每个零配件拆包并进行分类。
确保您了解每个元件的名称和使用方式,以便正确安装。
3.按照说明书组装
现在,可以按照说明书的指示开始组装床架,步骤如下:
步骤1:安装床架端部(两个)
使用电钻在床架的底部孔中钻一个小洞,然后用扳手将螺丝固定住。
每个角落都要重复这个过程。
步骤2:安装床架条
安装床架条时,需要将其紧固在床架端部上。
这里需要使用螺丝刀和扳手,确保床架条牢固地固定在床架端部的孔中。
步骤3:安装床板支撑条
床板支撑条有两种类型,一种是长型的,一种是短型的。
在床架的中央,需要紧固长型支架,而在床架的两侧则紧固短型支架。
确保使用橡皮锤将支架紧贴于床架。
步骤4:安装床板
现在,床架已经安装好了,可以进入下一步,即安装床板。
将床板放在床架支撑条上,然后对准这些条的孔,使用螺丝刀将床板固定在床架上。
确保床板紧贴在床架上。
步骤5:安装床垫
最后一步是安装床垫。
将床垫轻轻地放在床板上,确保其均匀地分布在床架上。
以上是安装宜家白色铁床的步骤。
如果需要,也可以参考安装说明书来完成安装。
安装完成后,您就可以在舒适的床上享受好的睡眠时光了!。