乐泰胶水使用说明
- 格式:pdf
- 大小:60.27 KB
- 文档页数:2
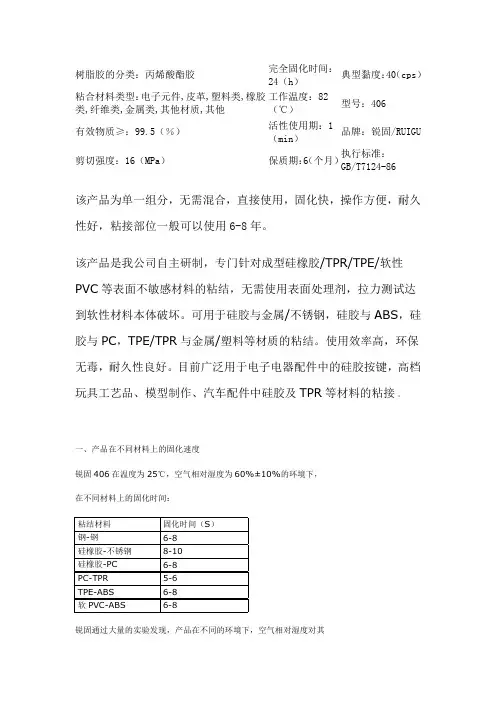
树脂胶的分类:丙烯酸酯胶 完全固化时间:24(h )典型黏度:40(cps ) 粘合材料类型:电子元件,皮革,塑料类,橡胶类,纤维类,金属类,其他材质,其他 工作温度:82(℃)型号:406 有效物质≥:99.5(%)活性使用期:1(min ) 品牌:锐固/RUIGU 剪切强度:16(MPa ) 保质期:6(个月) 执行标准:GB/T7124-86 该产品为单一组分,无需混合,直接使用,固化快,操作方便,耐久性好,粘接部位一般可以使用6-8年。
该产品是我公司自主研制,专门针对成型硅橡胶/TPR/TPE/软性PVC 等表面不敏感材料的粘结,无需使用表面处理剂,拉力测试达到软性材料本体破坏。
可用于硅胶与金属/不锈钢,硅胶与ABS ,硅胶与PC ,TPE/TPR 与金属/塑料等材质的粘结。
使用效率高,环保无毒,耐久性良好。
目前广泛用于电子电器配件中的硅胶按键,高档玩具工艺品、模型制作、汽车配件中硅胶及TPR 等材料的粘接 。
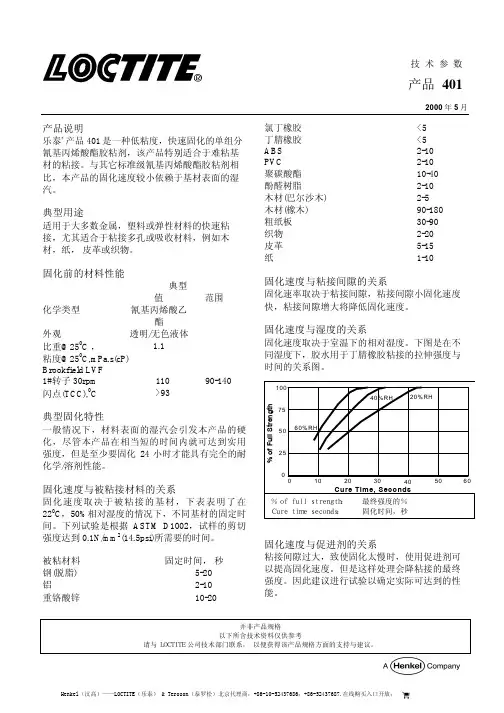
一、产品在不同材料上的固化速度锐固406在温度为25℃,空气相对湿度为60%±10%的环境下,在不同材料上的固化时间:锐固通过大量的实验发现,产品在不同的环境下,空气相对湿度对其固化时间有一定的影响,湿度越大,产品达到初始粘结效果的时间越短,但这并不影响产品的最终固化强度。
二、产品对部分材料的粘结强度在正常情况下,该产品利用材质表面微量的水分快速固化,达到初始强度;粘结效果和强度需要在2小时后达到最大值。
强度测试按照国家标准:GB/T7124-86三、使用建议1.粘结前将材料表面的灰尘、油脂等除去,效果更佳。
2.涂胶量不易过多,过多易产生白化,且粘结强度下降。
3.请在通风的条件下操作,这样可以减轻白化现象。
4.请放置在干燥、低温、避光的环境下保存。
5.儿童不可接触,如不慎溅到皮肤上,立即用大量水冲洗。
四、包装规格20g/只288只/箱1000g/瓶12瓶/箱。
Loctite 乐泰胶使用方法Loctite 乐泰胶乐泰工业胶黏剂螺纹锁固乐泰螺纹锁固剂是螺纹锁固及密封的一次革命,从精巧的电子零件到重型的结构设备,乐泰液态螺纹锁固胶和乐泰厌氧密封胶的用途十分广泛。
乐泰预涂螺纹锁固剂是一种触摸干燥的胶膜,由紧固件生产厂涂到螺纹紧固件上。
特别适用于工业生产,因为它们省去了在生产线上涂胶过程,提高了装配的速度,并确保了质量。
Loctite 220 螺纹锁固剂中强度,触变性粘度适合于防止震动而引起的松动和泄漏。
特别适合于应用于固定螺丝,小直径或长度紧固件,拆装方便,需要在不破坏螺丝。
符合军标Mil-S-46163A。
Loctite 221 螺纹锁固剂低强度,触变性粘度适合于防止震动而引起的松动和泄漏。
特别适合于应用于固定螺丝,小直径或长度紧固件,拆装方便,需要在不破坏螺丝。
Loctite 222 螺纹锁固剂低强度,触变性粘度适用于大多数金属表面,可用普通工具拆卸。
用于M2-M12 螺纹的锁固与密封。
应用于紧固件直径为1/4quot(6mm)或更小比较理想,具有一定的润滑性以达到精确的夹持负荷。
Loctite 225 螺纹锁固剂低强度,触变性粘度适用于大多数金属表面,可用普通工具拆卸。
用于M2-M12 螺纹的锁固与密封。
应用于紧固件直径为 1/4quot(6mm)或更小比较理想,具有一定的润滑性以达到精确的夹持负荷。
Loctite 241 螺纹锁固剂中强度特别适合于应用程序不太活跃基体如不锈钢,镀面,其中手工工具拆卸,需要进行维修。
符合军标 Mil-S-46163A。
Loctite 242 螺纹锁固剂中强度通用型,触变性粘度。
用于M6-M20 螺纹的锁固于密封。
是一种可用普通工具拆卸的螺纹锁固剂。
具有一定的润滑性以达到精确的夹持负荷Loctite 243 螺纹锁固剂耐机油/中强度快速固化,可用于惰性表面,容油性好。
易拆卸,可在轻微油质污染的工作表面上使用。
用于乐泰预涂剂Dri-Loc螺栓拆装后重新时锁固。
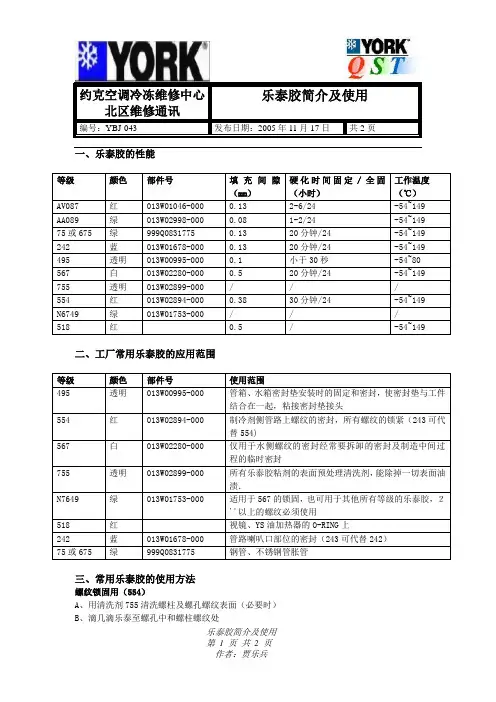
约克空调冷冻维修中心北区维修通讯乐泰胶简介及使用编号:YBJ-043发布日期:2005年11月17日共2页乐泰胶简介及使用 一、乐泰胶的性能 等级 颜色 部件号 填充间隙(mm ) 硬化时间固定/全固 (小时) 工作温度 (℃) AV087 红 013W01046-000 0.13 2-6/24 -54~149 AA089 绿 013W02998-000 0.08 1-2/24 -54~149 75或675 绿 999Q0831775 0.13 20分钟/24 -54~149 242 蓝 013W01678-000 0.13 20分钟/24 -54~149 495 透明 013W00995-000 0.1 小于30秒 -54~80 567 白 013W02280-000 0.5 20分钟/24 -54~149 755 透明 013W02899-000 / // 554 红 013W02894-000 0.38 30分钟/24 -54~149 N6749 绿 013W01753-000 / / / 518红0.5/-54~149二、工厂常用乐泰胶的应用范围 等级 颜色 部件号 使用范围495 透明 013W00995-000 管箱、水箱密封垫安装时的固定和密封,使密封垫与工件结合在一起,粘接密封垫接头554 红 013W02894-000 制冷剂侧管路上螺纹的密封,所有螺纹的锁紧(243可代替554)567 白 013W02280-000 仅用于水侧螺纹的密封经常要拆卸的密封及制造中间过程的临时密封755 透明 013W02899-000 所有乐泰胶粘剂的表面预处理清洗剂,能除掉一切表面油渍.N7649 绿 013W01753-000 适用于567的锁固,也可用于其他所有等级的乐泰胶,2''以上的螺纹必须使用 518 红视镜、YS 油加热器的O-RING 上242 蓝 013W01678-000 管路喇叭口部位的密封(243可代替242) 75或675绿999Q0831775钢管、不锈钢管胀管三、常用乐泰胶的使用方法螺纹锁固用(554)A 、用清洗剂755清洗螺柱及螺孔螺纹表面(必要时)B 、滴几滴乐泰至螺孔中和螺柱螺纹处约克空调冷冻维修中心北区维修通讯乐泰胶简介及使用编号:YBJ-043发布日期:2005年11月17日共2页乐泰胶简介及使用 C 、旋入螺栓,上紧至规定力矩 D 、在螺栓头部滴几滴乐泰E 、旋入螺母至规定力矩,拆卸时应对螺纹啮合处局部加热,趁热拆卸。
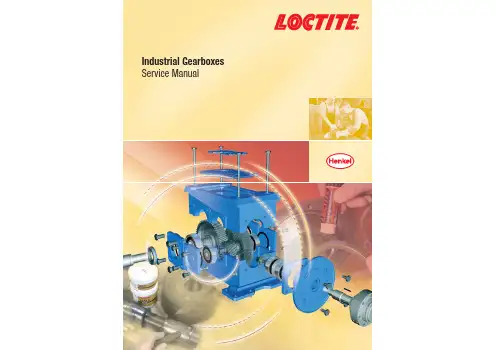
Industrial GearboxesService ManualFor further technical details refer to selection chart on page XX.1For further technical details refer to selection chart on page XX.32IntroductionGEARBOX SERVICE MANUAL SOLVES REAL PROBLEMSThe applications described in the Gearbox Service Manual are based on a bevel helical gearbox configuration.They apply equally for helical gearboxes,worm gear units and geared motors.Applications on planetary gearboxes,due to their different construction,are shown in a separate illustration.The Gearbox Service Manual is designed as a practical guide to provide essential information in a logical and systematic manner.It is structured in major sections covering key gearbox assembly groups,coupling and mounting,as well as general maintenance aids.The manual is based on the real world,and on solving real problems:you’re bound to find service and repair solutions you can use every day – quickly and conveniently.FEASIBILITY CONFIRMEDThe recommendations given in this Gearbox Service Manual are based on collaboration withcustomers,institutes and universities to establish their validity and confirm that these methods are operable,practicable and indeed the best solutions for servicing and repairing gearbox assemblies.PROFIT FROM RELIABILITYAt Henkel,we understand the problems you face in ensuring reliability,safety and durability.We provide products for cost-efficient,easy and effective gearbox maintenance and repair.Gears and gearboxes are generally robust and reliable devices.However,problems do occur,and need to be corrected.When gearboxes and ancillary equipment fails,the greatest concern is getting it running again,but spare parts may not always be readily available.Loctite ®products notonly provide reliable on-site repair capability,but emergency repair and service solutions that last or even extend the life time of equipment.Contact your local Henkel representative for help to meet your specific product application needs.This guide has been designed to provide quick and easy assistance to the professionals who service industrial gearboxes and look for reliability,longevity and cost reduction.With the help of this guide,you can:•Easily select the right Loctite ®products to help you service the wide variety of gearbox assemblies•Prevent wear proactively•Pinpoint the most suitable solution for servicing worn parts,or•Determine the best product for your particular service or repair problemIndustrial gearboxes play an important role in processing and manufacturing facilities.Performance must be tailored to an endless diversity of demands,and reliable operation over a long service life with minimum maintenance is a key requirement.For plant professionals,the ultimate goal is to maximise machinery output,reliability and efficiency.That’s why a gearbox failure can be a costly setback to overall plant operations.Proactive maintenance will minimise expensive downtime,enhance reliability and dramatically cut costs.Loctite ®products are used in gearbox manufacturing worldwide to enhance quality and extend end-product life.The same high quality Loctite ®technologies and products are also available to the people who maintain,repair and service gearboxes.There is a comprehensive range of Loctite ®products to •Repair and prevent gearbox failures – on site,to minimise downtime•Reclaim worn or damaged assemblies to avoid scrap and replacement costs •Assist in assembly,installation and disassembly•Ensure reliability and smooth running by restoring performance to ”as new“ conditionFor further technical details refer to selection chart on page XX.54Table of Contents• Prevent bearing spin,corrosion and housing damage 10• Repair and rebuild worn bearing housing12• Prevent gasket failure between the upper and lower housing of a split gearbox 16• Prevent loosening and corrosion of the cover fasteners 18• Prevent leaks between the gearbox covers and housing20• Removal of cured chemical gaskets from dismantled flange surfaces24• Lubrication Fittings:Oil drain plug,oil inlet,housing ventilation,gauge glass• Cooling Fittings:Flange pump,coarse filter,pressuremonitor,temperature control valve,air cooling unit ,pipework• Repair of axial score marks on cylindrical shaft at the position of a bearing34• Prevent and repair keyway wear40GEARBOX COUPLING AND MOUNTING44COUPLINGS44• Protect the spline assembly to prevent unnecessary fretting 45• Repair spline backlash46• Prevent couplings moving due to loose set screws 48• Increase the load capacity for flange couplings50MOUNTING GEARBOX TO MOTOR52GENERAL MAINTENANCE AIDS54MAINTENANCE – LUBRICATION54assembling and dismantling54• Free rusted and seized parts during dismantling 55• Assembly aid for all assembly jobs56• Long term protection for fasteners and alignment pins57MAINTENANCE CLEANERS58• Cleaning and degreasing of machined parts58• Cleaning and degreasing of surfaces prior to bonding58SURFACE PROTECTION60• Corrosion Protection:Long term protection of ferrous 61metals against rustingPRODUCT INDEX 62SELECTION CHART6776Gearbox Service and Proactive MaintenancePrevent corrosion and seizure of dowel pins with Loctite ®8009Heavy Duty Anti-seize See page 14Repair housing cracks,porosities and defects with Loctite ®Hysol 3471 Metal filled Epoxy See page 8Rebuild and repair the bearing housing seat with Loctite ®Hysol 3478 Superior Metal See page 12Prevent bearing spin and fretting with Loctite ®603 or Loctite ®641 Retaining Compound See page 30Prevent the mounting bolts loosening with Loctite ®2701 High Strength Threadlocker See page 52Seal and lock fittings atany angle with Loctite ®577 or Loctite ®572 Thread Sealants.See page 26Make any size or shape gasket:Forflexible covers and covers with large bolt spacing use Loctite ®5910 Flange Sealant; For rigid assemblies use Loctite ®518 Flange Sealant See page 20Prevent pinion and all other gear movement with Loctite ®648 Retaining Compound See page 36Prevent keyway wear with Loctite ®243Threadlocker or repair keyway wear with Loctite ®660 Retaining Compound See page 44Increase the torque capacity of flange coupling with Loctite ®638See page 50Seal rigid parts without gasket shimming using Loctite ®518 or Loctite ®128068See page 16Prevent corrosion,seizure and boltloosening with Loctite ®243 or Loctite ®248 Medium Strength ThreadlockerSee page 14 and 18Secure and prevent leakage between oil seal and housing with Loctite ®248Threadlocker,Loctite ®480 or Loctite ®435 Instant Adhesive See page 28Removal of cured chemical gaskets from dismantled flange surface with Loctite ®7200 Gasket RemoverCleaning and degreasing of surfaces prior to bonding with Loctite ®7063Cleaner and Degreaser See page 58For further technical details refer to selection chart on page XX.98SOLUTION #1Sealing porosity (up to 0.05 mm) using wicking grade adhesive Loctite ®290Steps1.Thoroughly clean and dry the components with Loctite ®7063 Cleaner & Degreaser,insuring the porosity is oil free2.Brush Loctite ®290 into the porosities3.Allow to cure,typically for 3 hours4.Clean of excess productSOLUTION #2Filling damaged areas with Loctite ®Hysol 3471 Metal filled EpoxySteps1.Thoroughly clean and dry the components with Loctite ®7063 Cleaner & Degreaser,insuring the repair area is oil free2.Mix and apply Loctite ®Hysol 3471 onto the area to be repaired3.Allow to cure,typically for 12 hours to achieve functional strength4.Machine to original size if requiredCHALLENGE Repair housing and cover defects Seal oil leaks due to damaged housingCause•Gearbox housings may be porous•Service or repair work may cause damage to gearbox housings and coversYOUR ADVANTAGE•Quick return to service•Reduce scrap by salvaging and extending the life of gearbox housing and coverFor further technical details refer to selection chart on page 69.For further technical details refer to selection chart on page XX.1110SOLUTION•Apply a film of Loctite ®641 Retaining Compound to the outside diameter of the bearing •Loctite ®641 Retaining Compound is a medium strength,allowing for easy disassembly during future overhauls•Alternatively use Loctite ®603 for a high strength joint or Loctite ®640 for longer assembly timeSteps1.Clean the mating surfaces with Loctite ®7063 Cleaner & Degreaser Note:Loctite ®603 is oil tolerant and cleaning is less critical2.Apply a film of Loctite ®Retaining Compound to the outside diameter of the bearing3.Assemble using normal techniques4.Functional cure in 6 hours at room temperatureCHALLENGE Prevent bearing spin,corrosion and housing damageCause•Bearing outer races are prone to spinning within their housings,resulting in damage to the housing (regardless of whether or not they have been pressed or shrink fitted in place)•The air space between a bearing and housing is an area susceptible to rust and fretting corrosion,thus causing damage to the partsYOUR ADVANTAGE•Bearing movement is eliminated•Bearing can be easily removed with standard tools•Corrosion is eliminated because the air space between the bearing and the housing is sealedFor further technical details refer to selection chart on page 68.CHALLENGERepair and rebuild worn bearinghousingCause•Worn components lead to micro movement andadditional wear•Load produces axial forces that are higher than originalcalculations•Spun bearing caused by seizure or inappropriate loads12SOLUTIONYOUR ADVANTAGE•Rebuilding of the worn surface of the housing with Loctite®Hysol 3478 Superior MetalStepsing a machining centre,undercut the housing bore by 1.5 mmin the worn area,leaving the surface rough2.Clean parts with Loctite®7063 Cleaner and Degreaser3.Mix and apply a layer of Loctite®Hysol 3478 Superior Metal and force it into the rough surface finish.Build thesurface above the final desired level4.Allow the adhesive to cure for 12 hours at room temperature5.Machine the repair to the required dimensions (in general press fit) using diamond cutting inserts6.Clean the rebuilt surface and the outer bearing ring with Loctite®70637.Retain the joint between the housing and the outer bearing race with Loctite®2701• Assembly is restored,unitised,and ready for service without a major overhaul• Easy and fast repair method,compared to alternative repair methods• Joint between housing and bearing outer race is strengthened by using Loctite®Anaerobic Adhesive13For further technical details refer to selection chart on page 68 and 69.SOLUTIONYOUR ADVANTAGE•Apply Loctite ®243 or 248 Medium Strength Threadlocker to the housing fastener •Use Loctite ®2701 for high strength or on stainless steel and plated fasteners•Before assembly,apply a thin film of Loctite ®8009 Heavy Duty Anti Seize to the dowel pinsSteps1.Clean the threads and pins with Loctite ®7063 Cleaner and Degreaser2.Apply Loctite ®8009 Heavy Duty Anti Seize onto the dowel pinNote:If a liquid gasket is in use,ensure only a very thin layer of Anti Seize is applied 3.Apply Loctite ®243 Medium Strength Threadlocker into lower third of the blind hole Apply Loctite ®2701 High Strength Threadlocker if stainless steel fasteners are in use 4.Assemble and tighten•Prevention of rust and seizure of these close fitting parts •Easy and consistent disassembly •Prevents fasteners from loosening15For further technical details refer to selection chart on page 67.CHALLENGE Prevent loosening and corrosion of split gearbox housing fasteners to ensure reliability of the gasket between the upper housing and the base Prevent corrosion and seizure of split gearbox alignment pinsCause• Fasteners can work loose when subjected to torque,vibration,thermal expansion and shock loads• Once the fasteners become loose,the preload for the gasketwill be lost and the gasket will fail• Dowel pins can rust and seize into component,makingdisassembly very difficult14SOLUTIONYOUR ADVANTAGE•Use Loctite ®518 Flange Sealant for standard gearbox size or Loctite ®128068 Flange Sealant for large gearboxes•Optimum stiffness between mating parts means movement is minimizedSteps1.Remove old gasketing material and other heavy contaminants with Loctite ®7200 Gasket Remover2.Clean both flange surfaces with Loctite ®7063 Cleaner and Degreaser3.Apply a continuous bead of Loctite ®518 Flange Sealant.Circle bolt holes with sealant if appropriateNote:Use Loctite ®128068 Flange Sealant for large gearbox flanges.Loctite ®128068 is designed to cure slowly to allow extra time for assembly 4.Assemble parts and tighten as required 5.Allow to cure•High shear strength transmits forces from one part to the other •Reliable seal17For further technical details refer to selection chart on page 68.CHALLENGE 16Prevent gasket failure between the upper and lower housing of a split gearboxEnsure close tolerance control of the assemblySealing of damaged surfacesCause•Leaks occur because liquids migrate out of the joint •Damaged flanges can result in a leak path•Incomplete sealing of T-joints,where three parts come together (upper and lower housing and cover)SOLUTIONYOUR ADVANTAGE•Apply Loctite ®243 or 248 Medium Strength Threadlocker to the housing fasteners •Use Loctite ®2701 for high strength or on stainless steel and plated fasteners •If locking of the fasteners is not required use Loctite ®8009 Anti-SeizeSteps1.Clean the threads and pins with Loctite ®7063 Cleaner and Degreaser2.Apply Loctite ®243 or 248 Medium Strength Threadlocker to the housing fastenersApply Loctite ®2701 High Strength Threadlocker if stainless steel or plated fasteners are in use 3.Assemble and tighten•Correct clamp load is maintained •Elimination of rust and seizure•Easy disassembly with normal hand tools19For further technical details refer to selection chart on page 67.CHALLENGE Prevent loosening and corrosion of the cover fasteners to ensure the reliability of the gasket between the housing and coversTypical applications are fasteners for inspection cover,bearing cover and input/output flangesCause•Cover fasteners that are rusted and seized make gearbox maintenance difficult and create additional labour associated with drilling and tapping the fastener hole•Fasteners can work loose when subjected to torque,vibration,thermal expansion and shock loads18Prevent leaks between the inspection cover / bearing cover / input – output flange and housing Eliminate cut gasketsOptimize sealing performance of cut gasketsCause•The use of cut gaskets is associated with several inherent problems,such as gasket relaxation,shrinkage,extrusion,and breakage which can lead to leaksSOLUTION #121CHALLENGE20Replacing cut gaskets •Sealing of rigid flangesReplace the cut gasket and apply Loctite ®518 Flange Sealant to the flange surface of the housing •Sealing of flexible flangesReplace the cut gasket and apply Loctite ®5910 Flange Sealant to the flange surface of the housing Rigid flanges are designed:•To achieve optimum stiffness between •To minimize movement between two parts •To transmit forces from one part or another Flexible flanges are normally used:•To cover an opening in a housing two mating parts •To cover moving parts•To encapsulate components to reduce noiseSteps1.Remove old gasket material with Loctite ®7200 Gasket Remover2.Clean both flanges with Loctite ®7063 Cleaner & Degreaser3.Apply a continuous bead of Loctite ®Flange Sealant onto the housing,circle holes if appropriate4.Assemble and tighten as requiredNote:If you are using Loctite ®5910,assemble parts within the skin over time (10 min)5.Allow to cureFor further technical details refer to selection chart on page 68.SOLUTION #2YOUR ADVANTAGE2322When the existing gasket needs to be used as a shim:For increasing the sealing reliability and accurate positioning of the pre-cut gasket,use one of following products:•Loctite ®5922 Flange Sealant,non hardening pre-cut gasket dressing •Loctite ®534,hardening pre-cut Gasket PositionerSteps1.Remove old gasket material with Loctite ®7200 Gasket Remover2.Clean both flanges with Loctite ®7063 Cleaner & Degreaser3.Coat flange face on both sides (cover and housing) with Loctite ®5922 non hardening Flange Sealant or Loctite ®534 hardening Flange Sealant.Note:Although Loctite ®534 is a hardening Flange Sealant,the product allows a pre-cut gasket to be positioned on a gasket surface.It holds aggressively yet still allows for repositioning of the pre-cut gasket4.Position the pre-cut gasket5.Assemble and tighten as requiredNote:Accurate re-positioning,component assembly and tightening should be handled in a continuous workflow without interruptions6.Assembly is operational after 6 hours•Eliminate gasket leaks•Eliminate corrosion and damage on the flange surfaceFor further technical details refer to selection chart on page 68.SOLUTIONYOUR ADVANTAGEUse Loctite ®7200 Gasket Remover to soften the gasket material on the flanges,reducing need for scraping and avoiding possible damage to the machine surfacesSteps1.Protect painted surfaces thoroughly from over-spray,as Loctite ®7200 will attack the paint2.For best results,spray a heavy coat onto the flange or surfaceNote:Remove any surface oil using Loctite ®7063 prior applying Loctite ®72003.Allow 10 to 15 minutes to soften the gasket4.Remove gasket with soft scraper and wipe flange or surface clean5.Repeat procedure if necessary6.Before application of new gasketing material,it is essential to clean the flange or surface with Loctite ®7063 Cleaner & Degreaser•Components are well prepared for assembly and flange sealing •Ideal surface preparation for chemical gaskets is ensured25CHALLENGE Removal of cured chemical gaskets from dismantled flange surfacesCause•After dismantling the gearbox components the flanges must be cleaned before reassembly24SOLUTIONYOUR ADVANTAGELubrication and Cooling System•Seal threaded assemblies with Loctite ®577,572 or 561 Thread Sealants•When cured,Loctite ®Thread Sealants are resistant to oil and water/glycol and ensure zero leakage•Thread sealants prevent fittings from loosening,yet allow easy disassembly with normal hand toolsSteps1.Clean parts with Loctite ®7063 Cleaner & Degreaser2.Apply a bead of Loctite ®Thread Sealant to the leading threads of the male fitting3.Assemble parts and allow to cure•Elimination of all leaks•No hazards and clean up associated with oil leaks •No loss of coolant27For further technical details refer to selection chart on page 67.CHALLENGEPrevent leaks from threaded fittings of lubrication and cooling systemsLubrication System•Prevent oil leaks on oil drain plug,oil inlet,housing ventilation,oil pump,oil filter and gauge glassCooling System•Prevent leakage on the coolant pump,pressure and temperature control unit and all pipe workCause•Traditional thread sealants a susceptible to weeping•Constant pressure and temperature changes within a gearbox system can aggravate any leakage •Vibration between the gearbox and lubrication/cooling system leads to stress on the pipe work26SOLUTION #1SOLUTION #2YOUR ADVANTAGEShaft Seals• A sealed assembly eliminates leaks,contamination and corrosion •Movement of oil seal during running is eliminated•The oil seal can still be easily removed with a screwdriver during the next overhaul29For further technical details refer to selection chart on page 69.CHALLENGE Prevent leaks between the gearbox housing and oil sealPrevent movement of oil seal in housingCause•As with any press fit,there are small air spaces between the housing and the oil seal.This air space can create a leak path•In the case of a split gearbox housing,T-joints are potential leakage points28For oil seals with elastomer press fit•Fill the air spaces by applying Loctite ®435Instant Adhesive to the outside diameter of the oil seal•For longer positioning time and oil sealdiameter larger than 60 mm use Loctite ®480•In the case of a cassette seal,also bond the inside diameter to the shaft using Loctite ®435Instant AdhesiveSteps1.Clean the bonding surfaces of the oil seal and the gearbox with Loctite ®7063 Cleaner & Degreaser2.Apply the adhesive recommended for the different kinds of oil seals to the outside diameter of the oil seal Note:In the case of a cassette seal apply adhesive onto the cleaned shaft as well3.Press the oil seal into position using normal techniques and wipe off any excessFor oil seal with metallic clamping part•Fill the air spaces by applying Loctite ®243 or 248Medium Strength Threadlocker to the outside diameter of the oil sealSOLUTION #131For further technical details refer to selection chart on page 68.CHALLENGEPrevent bearing spin Repair worn cylindrical shafts Prevent downtime and scrap costsCause•Bearings are prone to spinning on their shaft,this results in damage •Load produces axial forces that are higher than original calculations •Spun bearing caused by insufficient interference or inappropriate loads Depending on the extent of wear,the following adhesives are recommended:30For gaps up to 0.05 mm:•Retain joint using Loctite ®603 (oil tolerant,high strength) or Loctite ®641 (medium strength,easy to dismantle) Retaining CompoundSteps1.Clean parts with Loctite ®7063 Cleaner and Degreaser2.Apply a bead of Loctite ®603 or Loctite ®641 to the circumference of the shaft3.Mount the bearing onto the shaft using normal techniques4.Wipe off excess material5.Allow adhesive to cure for 6 hoursSOLUTION #3YOUR ADVANTAGEFor gaps which exceed 0.25 mm:•Rebuild with Metal filled Epoxy Loctite ®Hysol 3478 Superior Metal to the original diameter + bond the bearing onto the rebuilt shaft with Loctite ®2701Stepsing a lathe,undercut the shaft in the worn area 1.5 mm deep2.Dovetail the ends of the worn area to lock the application into place and leave a rough surface3.Clean parts with Loctite ®7063 Cleaner and Degreaser4.Apply a layer of Loctite ®Hysol 3478 Superior Metal,build the surface above the final desired level5.Allow the adhesive to cure for 12 hours at room temperature6.Machine the repair with a diamond tipped tool to the required dimensions7.Apply Loctite ®7649 Activator to the rebuilt area of the shaft8.Apply Loctite ®2701 to the inner bearing raceNote:In the case of a shrink fit between the shaft and the bearing,apply Loctite ®638 Retaining Compound•Cylindrical joint is strengthened by using a Loctite ®Retaining Compound •Shaft is repaired to provide full surface contact33For further technical details refer to selection chart on page 68 and 69.SOLUTION #232For gaps up to 0.25 mm:•Bond using Loctite ®660 + Loctite ®7649 ActivatorSteps1.Clean parts with Loctite ®7063 Cleaner and Degreaser2.Apply Loctite ®7649 Activator to the inner bearing race3.Apply a bead of Loctite ®660 to the circumference of the shaft4.Assemble the components5.Wipe off excess6.Allow adhesive to cure for 12 hours before putting the equipment back into serviceFor further technical details refer to selection chart on page 68.SOLUTION #1SOLUTION #2YOUR ADVANTAGE•Cylindrical joint is strengthened by using a Loctite ®Retaining Compound •Shaft is repaired to provide full surface contactFor further technical details refer to selection chart on page 68 and 69.CHALLENGE Repair of axial score marks on cylindrical shafts Strengthen the retaining joint on worn shaftsCause•Disassembly of bearings and gear wheels frequently causes damage to shafts by scoring•Bearings and gear wheels are mounted with a shrink fit.If they are dismantled without application of heat,friction results in axial score marks34Moderate scoring• Strengthen the joint between the damaged shaft and the bearing with Retaining Compound Loctite ®603Steps1.Remove any raised burs2.Clean the parts with Loctite ®7063 Cleaner and Degreaser3.Apply a bead of Loctite ®603 Retaining Compound to the circumference of the shaft4.Press the bearing onto the shaft using normal techniques5.Wipe off excess materialHeavy scoring• Fill the grooves with Loctite ®Hysol 3478 Superior Metal to rebuild a uniform surface and ensure that the bearing will be mounted on a smooth shaft surfaceSteps1.Remove any raised burs2.Clean parts with Loctite ®7063 Cleaner and Degreaser3.Apply Loctite ®Hysol 3478 Superior Metal into the groove.Build the surface slightly above the desired diameter4.Allow the adhesive to cure for 12 hours at room temperature.5.Grind the excess material with abrasive paper6.Apply Loctite ®7649 Activator to the rebuild area of the shaft7.Apply Loctite ®603 to the inner bearing race and assemble35SOLUTION #1Bonding of gear wheels directly onto the shaft with high strength Retaining Compound Loctite ®Steps1.Clean parts with Loctite ®7063 Cleaner and Degreaser2.Apply a bead of Loctite ®648 to the circumference of the shaft3.Press the gear onto the shaft using normal techniques4.Wipe off excess material5.Allow adhesive to cure for 6 hours37CHALLENGE Increase reliability and strength of a gear mounted on a shaft Repair worn taper jointsCause•Incorrect reassembly during maintenance leading to micro movements•Overload conditions and elevated operating temperatures36SOLUTION #3YOUR ADVANTAGERebuilding the worn shaft with ceramic filled epoxy Loctite ®Hysol 3478 Superior Metal and bonding the gear wheel onto the shaft with Loctite ®638 Retaining CompoundStepsing a lathe,undercut the shaft in the worn area 1.5 mm deep and leave a rough surface over the entire machined surface2.Dovetail the ends of the worn area to lock the application into place3.Clean parts with Loctite ®7063 Cleaner and Degreaser4.Apply a layer of Loctite ®Hysol 3478 Superior Metal,building the surface above the final desired level5.Allow the adhesive to cure for 12 hours at room temperature6.Machine the repair with a diamond tipped tool to the original dimensions7.Apply Loctite ®638 Retaining Compound to the components8.Assemble using normal procedures•Taper joint is strengthened by using a Retaining Compound•Assembly is restored and ready for service without a major overhaul39For further technical details refer to selection chart on page 68 and 69.SOLUTION #238Bonding a sleeve on the worn shaft with Loctite ®648Steps•Determine an appropriate size of sleeve and machine the shaft to match•Clean parts with Loctite ®7063 Cleaner & Degreaser•Apply a bead of Loctite ®648 to the circumference of the shaft •Assemble sleeve on to the shaft •Wipe off excess•Allow adhesive to cure for 6 hours•Apply the same product between the sleeve and the gear wheel。

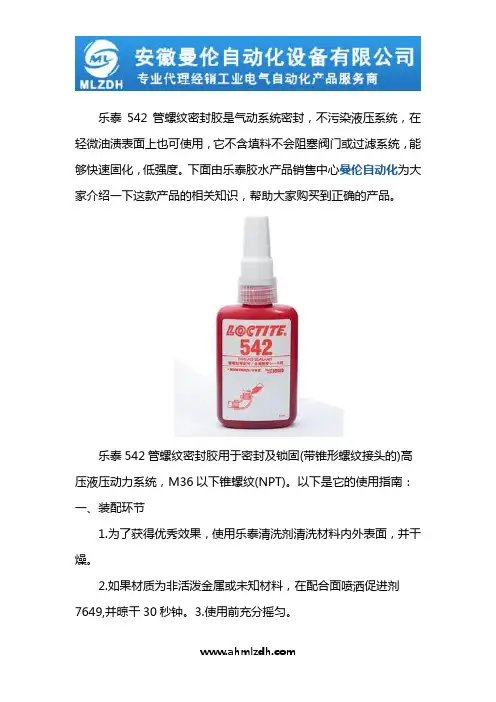
乐泰542管螺纹密封胶是气动系统密封,不污染液压系统,在轻微油渍表面上也可使用,它不含填料不会阻塞阀门或过滤系统,能够快速固化,低强度。
下面由乐泰胶水产品销售中心曼伦自动化为大家介绍一下这款产品的相关知识,帮助大家购买到正确的产品。
乐泰542管螺纹密封胶用于密封及锁固(带锥形螺纹接头的)高压液压动力系统,M36以下锥螺纹(NPT)。
以下是它的使用指南:一、装配环节1.为了获得优秀效果,使用乐泰清洗剂清洗材料内外表面,并干燥。
2.如果材质为非活泼金属或未知材料,在配合面喷洒促进剂7649,并晾干30秒钟。
3.使用前充分摇匀。
3.为纺织胶水阻塞施胶嘴,应避免姣嘴接触金属物质。
5.对于通孔,在螺栓和螺母配合部位点胶。
4.对于盲孔,在盲孔地步滴胶,当装配时,内部空气会排出5.对于密封应用,将产品涂在外螺纹上(360°) 第-个螺纹不涂,将胶粘剂填满整个的螺纹间隙,对于更大的螺纹和间隙,可以调整涂胶量并且将产品应用在内螺纹上。
8.按正常操作装配螺栓,当需要.上紧到所需力矩时,力矩补偿并不需要。
二、拆卸环节1.用标准拆卸工具拆卸,2.在极少情况下,由于配合长度很长导致常温下无法拆卸,可以局部加热螺栓和螺母到232"C,趁热进行拆卸清洗3.对于固化的胶水,可将其浸泡在溶剂中或使用钢刷等工具进行机械打磨。
安徽曼伦自动化设备有限公司是一家专业代理经销品牌工业电气自动化产品服务商,集科工贸于一体的系统集成商,公司代理汉高旗下经营汉高旗下乐泰Loctite、泰罗松teroson等厌氧胶、快干胶、聚氨酯、硅橡胶等粘合剂。
同时,该公司广泛服务于汽车、电力、电子、冶金、化工、太阳能、水泥、造纸、船舶、卷烟、纺织、机床、包装机械、印刷机械、橡胶机械、物流设备等行业,以货期快,服务好,价格优惠等优势赢得了广大客户的支持与信任。
如果您想进一步了解,可以直接点击官网曼伦自动化进行在线咨询。
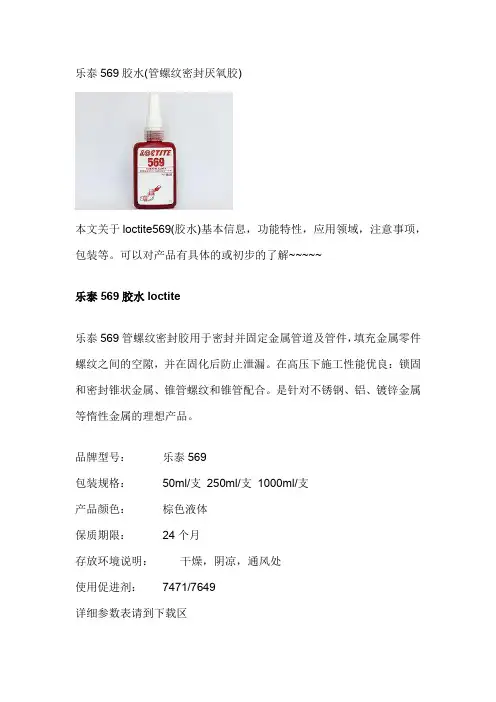
乐泰569胶水(管螺纹密封厌氧胶)本文关于loctite569(胶水)基本信息,功能特性,应用领域,注意事项,包装等。
可以对产品有具体的或初步的了解~~~~~乐泰569胶水loctite乐泰569管螺纹密封胶用于密封并固定金属管道及管件,填充金属零件螺纹之间的空隙,并在固化后防止泄漏。
在高压下施工性能优良:锁固和密封锥状金属、锥管螺纹和锥管配合。
是针对不锈钢、铝、镀锌金属等惰性金属的理想产品。
品牌型号:乐泰569包装规格:50ml/支250ml/支1000ml/支产品颜色:棕色液体保质期限:24个月存放环境说明:干燥,阴凉,通风处使用促进剂:7471/7649详细参数表请到下载区loctite乐泰569应用领域:乐泰管螺纹密封剂可用于密封并固定金属管路及管件,填充金属零件螺纹之间的空隙,并在固化后避免走漏。
用于高、低压力环境中的密封。
乐泰569特性:适合于永久性锁固和密封螺纹紧固件,在阻隔氧气的金属密封面间固化,能够避免因为震动或冲击而引起的松动或走漏。
液体密封剂可用于低压即时密封实验,彻底固化后,对大多数的管路体系能密封至爆裂强度。
Loctite使用指南:1.为了获得最佳效果,使用诸如乐泰清洗剂彻底清洗材料内外表面,待表面干燥后再进行下一步操作;2.如果材料是惰性金属或者固化速度过慢,使用促进剂7471或7649并晾干;3.将产品涂施一圈于外螺纹前端螺纹上,不要涂施第一节螺纹。
4.利用可接受的经验安装和拧紧配件,直到装配位置合适为止;5.完全装配好的连接件具有一定的即时密封能力,为了确保具有最大的耐压和耐溶剂性能,要确保密封胶至少固化24小时,以确保固化完全。
6.上紧螺纹,从而完全填充空隙。
对于较大的螺纹与空隙,相应调整产品用量并且同时在内螺纹上也涂施一圈产品;乐泰569胶水(管螺纹密封厌氧胶)价格,性能,批发代理应用案例可参考此处!乐泰胶。
乐泰胶使用方法乐泰胶是一种常见的螺纹锁固与密封胶,主要用于防松、密封和抗震。
它在工业和家庭使用中广泛应用,如汽车、机械、建筑等领域。
以下是乐泰胶的使用方法。
第一步:准备工作在使用乐泰胶之前,需要确保工作区域干净、干燥,没有油脂和灰尘。
清洁工作区域可以使用清洁剂或酒精来清除污垢。
第二步:选择适当的乐泰胶根据需要,选择适合的乐泰胶型号。
乐泰胶有多种型号,每种型号都有不同的特性和用途。
在选择乐泰胶时,需要考虑材料的性质、温度范围、应力和环境条件等因素。
第三步:涂布乐泰胶使用刷子或喷雾器将乐泰胶涂布在需要密封或锁固的部件上。
确保乐泰胶均匀涂布,并覆盖整个表面。
根据需要,可以使用适量的乐泰胶。
第四步:固化时间乐泰胶需要一定的时间来固化。
在涂布乐泰胶后,根据产品说明书上的指示,等待固化时间。
固化时间根据乐泰胶的型号和环境条件而变化,一般在几分钟到几小时之间。
第五步:装配部件在乐泰胶固化后,可以开始装配所需的部件。
确保部件正确安装,并应用适当的扭矩以确保部件锁紧。
根据需要,可以使用手工工具或扳手进行装配。
第六步:清洗和存储在使用乐泰胶后,应立即清洗未固化的乐泰胶。
使用酒精或专用的清洗剂来清洗表面。
清洗时应密切关注安全事项,如佩戴手套和眼镜等。
乐泰胶应存放在干燥、阴凉的地方,并避免曝露在阳光下。
在存储乐泰胶时,可以使用密封盖或密封袋来防止空气和水分进入。
总结:乐泰胶是一种常见的螺纹锁固与密封胶,在使用方法上需要注意准备工作、选择适当的胶水、涂布胶水、固化时间、装配部件、清洗和存储等步骤。
正确使用乐泰胶可以提供良好的防松、密封和抗震效果,从而延长部件的使用寿命。
1.用樂泰®清洗劑755清晰螺栓及螺母螺紋表面,晾干。
2.將樂泰®促進劑7649噴到螺紋表面,晾干。
3.選擇合适強度的樂泰®鎖固膠。
4.將零件組裝,螺栓穿過螺孔。
5.滴几滴鎖固膠至螺栓与螺母嚙合處。
6.擰上螺母,上緊至規定力矩。
盲孔(螺釘)1.用樂泰®清洗劑755清洗螺栓及螺母螺紋表面,晾干。
2.將樂泰®促進劑7649噴到螺紋表面,晾干30秒。
3.選擇合适強度的樂泰®鎖固膠。
4.滴几滴鎖固膠到內螺紋孔底。
5.再滴几滴鎖固膠到螺釘的螺紋上。
6.擰入,上緊至規定力矩。
注:樂泰®鎖固膠可避免鋁或鎂質零件的螺孔由于電化學腐蝕而產生的螺紋剝离問題。
盲孔(雙頭螺釘)1.用樂泰®清洗劑755清洗螺柱及螺孔螺紋表面,晾干。
2.將樂泰®促進劑7649噴到螺紋表面,晾干。
3.滴几滴樂泰®鎖固膠262至螺孔中。
注:o可以用樂泰®271o M25以上用樂泰®2774.滴几滴樂泰®鎖固膠262至螺柱的螺紋處。
5.將螺柱擰入,上緊至規定力矩。
6.裝上其它零件。
7.滴几滴樂泰®鎖固膠243至螺柱的螺紋處。
8.擰上螺母,上緊至規定力矩。
用膠后難以拆開時的處理方法一般情況下,用普通方法即可拆開。
當選用膠的強度過高時,用普通方法(如扳手、螺絲刀)不能拆時,可采用局部加熱法,講螺紋嚙合處局部加熱,即局部加熱螺母或螺釘至232℃5分鐘,趁熱拆卸。
預先裝配好的螺紋緊固件1.用樂泰®清洗劑755清洗螺栓及螺母,晾干。
2.裝配好零件。
3.擰緊螺母至規定力矩。
4.將樂泰®鎖固膠290滴入螺栓、螺母嚙合處。
5.不要讓膠瓶的嘴碰到金屬,以免污染瓶中的膠液。
注:檢修時,先复緊螺母,再將樂泰®鎖固膠290滴在螺栓─螺母嚙合處。
可調螺釘1.將可調螺釘調整到合适位置。
2.滴几滴樂泰®290螺紋鎖固劑到螺釘─螺孔結合處。
乐泰胶使用指南范文乐泰胶是一种多功能胶粘剂,适用于各种材料的粘接。
在这篇文章中,我将为您提供乐泰胶的使用指南,帮助您正确地使用它。
1.准备工作在使用乐泰胶之前,您需要做一些准备工作。
首先,确保要粘接的表面是干燥、清洁和无油污的。
如果有必要,可以使用洁净剂或酒精清洁表面。
然后,您需要准备好所需的工具和材料,包括乐泰胶、胶刮、刷子或棉签等。
2.开始粘接将乐泰胶挤出到需要粘接的表面上。
如果表面较大,可以使用胶刮均匀涂抹。
如果需要粘接的部位较小或需要精确涂抹,可以使用刷子或棉签。
3.等待时间乐泰胶需要一定的时间来干燥和固定。
根据不同的材料和环境条件,等待时间可能会有所不同。
一般情况下,等待时间在5-15分钟左右。
请参考乐泰胶的说明书或包装上的指导。
4.压紧在乐泰胶开始干燥之前,将要粘接的材料加以压紧。
这可以确保乐泰胶充分接触并获得最佳粘接效果。
可以使用夹子、胶带或重物来提供压力。
5.干燥和固定在等待时间结束后,乐泰胶应该已经干燥和固定。
这时可以轻轻用手触摸粘接处,如果感觉干燥而坚固,说明固化已经完成。
然而,实际的干燥时间可能会更长,通常需要24小时或更长时间。
6.修整和清洁如果在粘接过程中有任何冗余的乐泰胶,可以在它开始干燥之前进行修整。
使用剪刀或刮刀小心刮除多余的胶水。
如果胶水已经干燥,可以使用刮刀小心刮除,并使用洁净剂或酒精清洁表面。
7.其他注意事项-乐泰胶只适用于一些特定的材料,如木材、金属、瓷器、塑料等。
在使用前,请确保所使用的材料是乐泰胶所能粘接的。
如对于低表面能材料,如聚乙烯和聚丙烯等,建议使用专用胶水。
-乐泰胶只能在室温下使用,并且应避免直接阳光照射。
-在使用乐泰胶时,请保持通风良好的环境,并避免吸入胶水的气味。
-避免将乐泰胶接触到眼睛或口腔。
如果不慎接触,请立即用清水冲洗,并寻求医生的帮助。
这就是乐泰胶的使用指南。
通过正确地使用乐泰胶,您可以实现各种材料的粘接,从而完成各种工程和DIY项目。
乐泰胶使用指南范文乐泰胶是一种多功能的胶水,具有广泛的应用领域。
它可以用于各种不同类型的材料粘接,如木材、金属、陶瓷、玻璃、塑料等。
本文将介绍乐泰胶的使用指南,帮助您正确地使用和存放乐泰胶。
乐泰胶的使用步骤如下:第一步:准备工作在使用乐泰胶之前,您需要确保工作面干净、平整,无灰尘、油脂和杂质。
您可以使用清洁剂或酒精将工作面清洁干净,并用干净的布擦拭干燥。
第二步:涂敷胶水将乐泰胶均匀地涂敷在待粘接的两个物体的表面上。
可以使用刮板或专用的胶棒将胶水均匀地涂敷在整个接触面上。
注意不要在使用完之前将胶水涂抹在多余的区域上,以免产生不必要的浪费和清洁困难。
第三步:等待和调整涂敷完胶水后,需要等待一段时间,让胶水变得微黏。
这个等待时间取决于您所粘接的材料和环境条件。
通常情况下,等待时间在5-30分钟之间。
在这段时间内,如果需要对物体进行调整,可以进行微调,直到达到所需的位置和效果。
第四步:加压固定完成微调后,将两个物体加压固定。
可以使用夹具、胶水适用的重物等方式施加适当的压力,以确保物体在固化过程中始终保持接触。
压力大小也取决于您所粘接的材料和尺寸。
第五步:固化等待适当的固化时间,以确保乐泰胶完全干燥和固化。
固化时间也取决于您所粘接的材料和环境条件。
通常情况下,固化时间为24小时。
在此期间,请避免移动或扰动粘接的物体,以免影响胶水的固化效果。
使用乐泰胶时需要注意以下几点:1.温度和湿度乐泰胶的粘接效果受到温度和湿度的影响。
一般情况下,较高的温度和湿度有助于加快固化速度,而较低的温度和湿度会延长固化时间。
在使用乐泰胶之前,您可以参考产品包装上的温度和湿度标准,选择适当的环境条件。
2.预先测试在将乐泰胶应用于重要的工程或实验中之前,建议先进行一次小型试验以确保胶水的粘接效果符合您的需求。
3.储存和保管乐泰胶应储存在干燥、阴凉和通风良好的地方,远离火源和高温。
同时,请确保盖子紧闭,避免胶水的挥发和固化。
4.使用时的安全措施在使用乐泰胶时,请遵循相关的安全措施。
乐泰胶使用指南乐泰胶使用指南1.简介乐泰胶是一种多功能胶水,广泛应用于日常生活和工业领域。
本文档将为您提供乐泰胶的使用指南,包括使用方法、注意事项和常见问题解答。
2.使用方法2.1 准备工作在使用乐泰胶之前,请确保以下准备工作已完成:- 清洁:将需要粘合的表面清洁干净,去除污垢和油脂等物质。
- 干燥:确保表面完全干燥,以获得最佳的粘合效果。
- 整理材料:准备好需要粘合的材料,并确保它们放置在易于操作的位置。
2.2 应用乐泰胶以下是使用乐泰胶的步骤:1.打开乐泰胶的盖子。
2.将胶水适量挤压到需要粘合的表面上。
3.使用乐泰胶的刷子或其他适当的工具将胶水均匀地涂在整个粘合区域上。
4.将需要粘合的材料贴合在一起,并用适当的压力保持一段时间,以确保胶水充分粘合。
2.3 使用注意事项使用乐泰胶时,请注意以下事项:- 避免直接接触皮肤和眼睛,如不慎接触,请立即用清水冲洗。
- 使用乐泰胶时,请保持通风良好的环境,避免吸入胶水挥发物。
- 使用乐泰胶时,请避免火源附近,以防止发生火灾。
3.常见问题解答3.1 乐泰胶可以粘合哪些材料?乐泰胶适用于各种材料,例如塑料、木材、金属、玻璃等。
3.2 乐泰胶需要多长时间才能完全干燥?乐泰胶的干燥时间取决于温度和湿度等环境因素。
通常情况下,它需要大约24小时才能完全干燥。
3.3 乐泰胶可以在水中使用吗?乐泰胶不适用于水中使用。
它是一种水溶性胶水,在水中容易溶解。
4.附件本文档附带以下附件,以供参考和进一步了解:- 乐泰胶产品说明书- 乐泰胶安全数据表5.法律名词及注释- 乐泰胶:商标注册,指乐泰公司生产的胶水产品。
- 粘合:将两个或多个材料通过胶水粘接在一起的过程。
特灵空调系统(江苏)有限公司方针 文件号 12P5006-CTV 核心 修订号 A操作文件 工作 日 期 2005-11-4编制: 王凤超审核: 批准:乐泰(Loctite )使用范围、使用方法以及规则1.0 目的本操作文件叙述了乐泰的特性以及使用范围、使用方法、使用规则等以及使用技巧等。
2.0 范围本操作文件适用于特灵空调系统(江苏)有限公司主机产品以及其他所有使用乐泰的地方。
本文件只是通用的规定,如果与工位的OMS 等工艺文件中规定有不同,按OMS 等文件的规定。
3.0 乐泰的种类以及其特性和使用范围3.1 液体螺纹锁固剂3.1.1 乐泰242 螺纹锁固剂 中强度通用型,触变性粘度。
用于M6-M20螺纹的锁固与密封。
是一种可用普通工具拆卸的螺纹锁固剂,具有一定的润滑性以达到精确的夹持负荷。
适用温度:-54℃ – 149℃ ,固化速度:10分钟-24小时。
3.1.2 乐泰243 螺纹锁固剂 耐机油/中强度快速固化,可用于惰性表面,油溶性好。
易拆卸,可在轻微油质污染的工作表面上使用。
用于乐泰预涂剂Dri-Loc 螺栓拆装后重装时锁固。
特灵空调系统(江苏)有限公司方针文件号12P05006-CTV核心修订号 A操作文件工作日期2005-11-4 可以用于M20以下螺纹的锁固与密封。
适用温度:-54℃– 149℃,固化速度:10分钟-24小时。
3.1.3 乐泰271 螺纹锁固剂高强度中低粘度;用于M36以下螺纹的永久锁固与密封。
适用温度:-54℃–149℃,固化速度:10分钟-24小时。
3.1.4 乐泰277 螺纹锁固剂高强度高粘度。
耐化学性优良。
用于M36以下螺纹的永久性锁固与密封。
可防止螺纹生锈及腐蚀,用加热及工具拆开。
3.1.5 乐泰290 螺纹锁固剂渗透级中强度,低粘度,快速固化。
用于已装配好的M2-M12螺纹的锁固与密封。
也可用于密封焊缝,铸件砂眼等(¢0.10mm以下)微孔。
防止螺纹生锈及腐蚀,拆开时需局部加热及工具。
Loctite 乐泰胶使用方法Loctite 乐泰胶乐泰工业胶黏剂螺纹锁固乐泰螺纹锁固剂是螺纹锁固及密封的一次革命,从精巧的电子零件到重型的结构设备,乐泰液态螺纹锁固胶和乐泰厌氧密封胶的用途十分广泛。
乐泰预涂螺纹锁固剂是一种触摸干燥的胶膜,由紧固件生产厂涂到螺纹紧固件上。
特别适用于工业生产,因为它们省去了在生产线上涂胶过程,提高了装配的速度,并确保了质量。
Loctite 220 螺纹锁固剂中强度,触变性粘度适合于防止震动而引起的松动和泄漏。
特别适合于应用于固定螺丝,小直径或长度紧固件,拆装方便,需要在不破坏螺丝。
符合军标Mil-S-46163A。
Loctite 221 螺纹锁固剂低强度,触变性粘度适合于防止震动而引起的松动和泄漏。
特别适合于应用于固定螺丝,小直径或长度紧固件,拆装方便,需要在不破坏螺丝。
Loctite 222 螺纹锁固剂低强度,触变性粘度适用于大多数金属表面,可用普通工具拆卸。
用于M2-M12 螺纹的锁固与密封。
应用于紧固件直径为1/4quot(6mm)或更小比较理想,具有一定的润滑性以达到精确的夹持负荷。
Loctite 225 螺纹锁固剂低强度,触变性粘度适用于大多数金属表面,可用普通工具拆卸。
用于M2-M12 螺纹的锁固与密封。
应用于紧固件直径为 1/4quot(6mm)或更小比较理想,具有一定的润滑性以达到精确的夹持负荷。
Loctite 241 螺纹锁固剂中强度特别适合于应用程序不太活跃基体如不锈钢,镀面,其中手工工具拆卸,需要进行维修。
符合军标 Mil-S-46163A。
Loctite 242 螺纹锁固剂中强度通用型,触变性粘度。
用于M6-M20 螺纹的锁固于密封。
是一种可用普通工具拆卸的螺纹锁固剂。
具有一定的润滑性以达到精确的夹持负荷Loctite 243 螺纹锁固剂耐机油/中强度快速固化,可用于惰性表面,容油性好。
易拆卸,可在轻微油质污染的工作表面上使用。
用于乐泰预涂剂Dri-Loc螺栓拆装后重新时锁固。