FEA3可视化327地图涟漪散点图插件说明文档
- 格式:docx
- 大小:165.94 KB
- 文档页数:2

FChart图形插件使用手册第一章配置FChart图形插件1.1 部署FChart图形插件文件将FChart图形插件文件夹FCharts复制粘贴到部署目录下的\charisma\ 文件夹中;粘贴到的实际路径例:D:\gat\charisma\1.2 FChart图形插件基础数据导入使用ORACLE 中执行SQL\oracle\oracle_FChart.sql 脚本,创建数据库表;导入FChart图形插件基础数据,在MS SQL Server 中创建一新数据库,执行charisma.sql。
执行mssql_FChart_data.sql脚本,然后使用MS SQL Server导出工具讲数据库表中的数据导入ORACLE数据库中,注意:导入ORACLE使一定要使用追加方式导入。
注意:在执行本操作之前请做好数据库的备份工作!导入数据完成后,智能报表维护查找exteSub外部插件子系统中表1(FCHART图形设置),在报表数据表格报表容器数据表格内容中添加下列代码:<script language="javascript">if(FCWidth<=0){FCWidth = [%=repField(width)%];}if(FCHeight<=0){FCHeight = [%=repField(height)%];}FC_[%=repField(subsys)%]_[%=repField(repid)%]_[%=repField(chartno)%].ShowChart("[ %=repField(subsys)%]",[%=repField(repid)%],[%=repField(chartno)%],[%=repField(charttype)% ],"[%=repField(title)%]",[%=repField(chartmode)%],FCWidth,FCHeight,"[%=repField(chartdivid )%]","[%=repField(chartpar)%]","[%=repField(datasetpar)%]","[%=repField(setpar)%]","[%=rep Field(chartchildtag)%]","[%=repField(link)%]","[%=repField(linkcond)%]","[%=repField(dataset condexp)%]","[%=repField(datasetcondvaluet)%]","[%=repField(datasetcondvaluef)%]","[%=rep Field(setparcondexp)%]","[%=repField(setparcondvaluet)%]","[%=repField(setparcondvaluef)%] ","[%=repField(setchildtagcondexp)%]","[%=repField(setchildtagcondvaluet)%]","[%=repField(s etchildtagcondvaluef)%]","[%=repField(colorgroup)%]");</script>1.3 FChart图形插件相关配置文件修改将report.jsp文件复制粘贴到部署目录下的\charisma\syspub\report文件复制粘贴到部署目录下的report.jsp。

peakview用法-回复Peakview是一种强大的数据可视化工具,广泛应用于各个领域,包括商业、科学研究、市场分析等。
在本文中,我们将一步一步介绍Peakview 的用法和功能,以及如何使用它来创建令人印象深刻的数据可视化。
第一步:安装和设置Peakview首先,您需要下载并安装Peakview软件。
在您的计算机上安装好后,打开软件并进行初始化设置。
您需要选择您想要使用的语言和主题,以及设置数据源和目标。
第二步:导入数据Peakview支持各种数据源的导入,包括Excel、CSV、数据库等。
在菜单中选择导入数据选项,并选择您希望导入的数据文件。
Peakview将自动解析和识别数据,并将其显示在一个数据视图中。
第三步:选择可视化类型一旦数据导入成功,您可以开始选择适合您数据类型和需求的可视化类型。
Peakview提供了许多选项,如柱状图、折线图、散点图、饼图等。
根据您的数据种类和所要传达的信息,选择相应的可视化类型。
第四步:配置可视化在选择了合适的可视化类型后,您可以开始配置可视化。
Peakview提供了一系列的配置选项,使您能根据需要对可视化进行个性化定制。
您可以调整颜色、字体、标签等,以及设置轴线、网格线和图例。
第五步:添加交互式功能Peakview还支持交互式功能,使用户能够主动与数据可视化进行互动。
您可以为图表添加筛选器、滑块、下拉菜单等交互元素,使用户能够通过选择特定的参数来改变可视化效果。
第六步:应用样式和主题为了使您的数据可视化更加吸引人,您可以选择适当的样式和主题。
Peakview提供了各种内置样式和主题,并允许用户进行定制。
通过添加背景图片、更改配色方案和使用自定义图标,您可以为您的数据可视化增添个人风格。
第七步:分享和嵌入可视化一旦您满意了所创建的数据可视化,您可以选择将其分享给他人。
Peakview提供了多种分享选项,包括生成静态图像、导出为PDF或SVG文件,以及嵌入到网页或博客中。

ECharts实现地图散点图上(转载)ECharts 实现地图散点图(上)⼩红 2016-04-28 , ,ECharts 作为国内应⽤最⼴泛的前端可视化⽣成⼯具,提供了丰富的图表展现⽅式和便捷的图表操作。
ECharts ⽀持 geoJson 格式的地图,并且官⽹上提供了现成的world,china 及全国34个省市⾃治区地图的下载。
这篇⽂章中我们将会讲解如何使⽤ ECharts 实现⼀个中国地图上绘制的散点图。
⼀、初始准备1. 新建html⾸先,新建项⽬⽬录 echartsMapDemo,在其中新建⼀个 html ⽂件index.html。
echartsMapDemo/index.html:<!DOCTYPE html><html lang="en"><head><meta charset="UTF-8"><title>ECharts map Demo</title></head><body></body></html>2.引⼊echarts⽂件从下载最新完整开发包(⽬前最新版本是3.1.4)。
将下载好的包放置在echartsMapDemo/dep⽬录下并在 html 中以 script 标签引⼊:<!DOCTYPE html><html lang="en"><head><meta charset="UTF-8"><title>ECharts map Demo</title></head><body></body><script src="/dep/echarts.min.js"></script></html>3.创建图标容器在 html 中定义⼀个 div 作为地图的容器,⾼度设为 500px 。

qcustomplot 分散点绘制曲线QCustomPlot是一个开源的绘图库,用于在Qt应用程序中绘制各种图表。
其中包括折线图、散点图、柱状图、饼图等。
在这篇文章中,我们将介绍如何使用QCustomPlot绘制散点图,并将其曲线化。
散点图是一种用于显示不同变量之间关系的图表。
它通过在坐标系中绘制一组点来表示数据。
每个数据点都由两个数值变量表示,其中一个对应横坐标,另一个对应纵坐标。
散点图可以帮助我们发现变量之间的关联性、分布情况和异常点。
首先,我们需要在Qt项目中添加QCustomPlot库。
你可以从官方网站上下载最新版本的QCustomPlot并按照它的说明进行安装。
安装完成后,我们可以在Qt Creator中创建一个新的Qt Widgets应用程序,并在.pro文件中添加以下行来链接QCustomPlot库:```cppLIBS += -L/path/to/qcustomplot -lqcustomplot```将"/path/to/qcustomplot"替换为你的QCustomPlot库所在的路径。
接下来,我们需要在主窗口类中添加一个QCustomPlot对象。
打开主窗口头文件(通常是mainwindow.h),在类的私有部分添加以下行:```cpp#include <qcustomplot.h>class MainWindow : public QMainWindow{Q_OBJECTpublic:MainWindow(QWidget *parent = nullptr);~MainWindow();private:QCustomPlot *m_plot;};```在主窗口的构造函数中,我们将创建一个QCustomPlot对象并将其设置为主窗口的中心部件:```cppMainWindow::MainWindow(QWidget *parent): QMainWindow(parent){m_plot = new QCustomPlot(this);setCentralWidget(m_plot);}```现在,我们已经准备好在散点图中绘制数据点了!我们将使用QCustomPlot的addGraph()函数来添加一个图层,然后使用其graph()函数来获取该图层的指针。
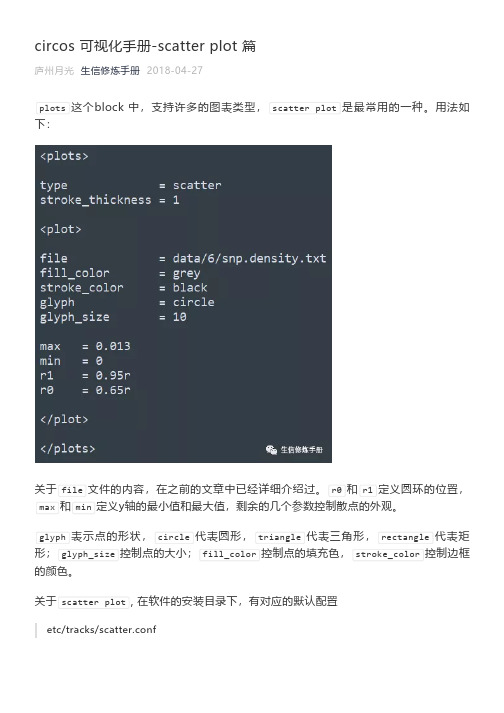
oritenation表示方向,in表示从r0到r1, out表示从r1到r0
在plot中,可以插入backgrounds, axes, rules3种block
1. backgrounds
用法如下:
backgrounds 定义背景色,每个定义一个区域的背景色,这个区域由y0和y1定义。
在plot中, max和min分别定义了y轴的最大值和最小值,这里的y0和y1对应的就是y轴的值;y0代表起始位置,y1代表终止位置;如果只指定了y0和y1中的一个,需要参考邻近区域和max,min的值作出判断
在上图的第一个background中,只指定了y0 = 0.006,从其他结果background的设置可以推测出,此时的y1 = max;
rules代表规则,由多个rule构成;在每个rule中,conditioon设置规则,var(value) > 0.006 表示 y轴的值大于0.006,当满足这个条件时,执行rule中的其他语句,下面的示例中,调整了value > 0.006的点的外观。
最后看一个实例
这张图中,除了染色体的圆环外,还有3圈圆环,每一个圆环都是一张scatter plot, 而且都设置了背景色和刻度线。
结合整幅图的结构和散点图的用法,理解下面的配置文件就非常简单了
<<include colors_fonts_patterns.conf>>
<<include ideogram.conf>>
<<include ticks.conf>>
<image>
<<include etc/image.conf>>。

Seaborn分布数据可视化---散点分布图散点分布图综合表⽰散点图和直⽅分布图。
Jointplot()绘制⼆变量或单变量的图形,底层是JointGrid()。
sns.jointplot(x,y,data=None,kind='scatter',stat_func=None,color=None,height=6,ratio=5,space=0.2,dropna=True,xlim=None,ylim=None,joint_kws=None,marginal_kws=None,annot_kws=None,**kwargs,)Docstring:Draw a plot of two variables with bivariate and univariate graphs.This function provides a convenient interface to the :class:`JointGrid`class, with several canned plot kinds. This is intended to be a fairlylightweight wrapper; if you need more flexibility, you should use:class:`JointGrid` directly.Parameters----------x, y : strings or vectorsData or names of variables in ``data``.data : DataFrame, optionalDataFrame when ``x`` and ``y`` are variable names.kind : { "scatter" | "reg" | "resid" | "kde" | "hex" }, optionalKind of plot to draw.stat_func : callable or None, optional*Deprecated*color : matplotlib color, optionalColor used for the plot elements.height : numeric, optionalSize of the figure (it will be square).ratio : numeric, optionalRatio of joint axes height to marginal axes height.space : numeric, optionalSpace between the joint and marginal axesdropna : bool, optionalIf True, remove observations that are missing from ``x`` and ``y``.{x, y}lim : two-tuples, optionalAxis limits to set before plotting.{joint, marginal, annot}_kws : dicts, optionalAdditional keyword arguments for the plot components.kwargs : key, value pairingsAdditional keyword arguments are passed to the function used todraw the plot on the joint Axes, superseding items in the``joint_kws`` dictionary.Returns-------grid : :class:`JointGrid`:class:`JointGrid` object with the plot on it.See Also--------JointGrid : The Grid class used for drawing this plot. Use it directly ifyou need more flexibility.#综合散点分布图-jointplot#创建DataFrame数组rs = np.random.RandomState(3)df = pd.DataFrame(rs.randn(200,2), columns=['A','B'])#绘制综合散点分布图jointplot()sns.jointplot(x=df['A'], y=df['B'], #设置x和y轴的数据data=df, #设置数据color='k',s=50, edgecolor='w', linewidth=1, #散点⼤⼩、边缘线颜⾊和宽度(只针对scatter)kind='scatter', #默认类型:“scatter”,其他有“reg”、“resid”、“kde”space=0.2, #设置散点图和布局图的间距height=8, #图表的⼤⼩(⾃动调整为正⽅形)ratio=5, #散点图与布局图⾼度⽐率stat_func= sci.pearsonr, #pearson相关系数marginal_kws=dict(bins=15, rug=True)) #边际图的参数sns.jointplot(x=df['A'], y=df['B'],data=df,color='k',kind='reg', #reg添加线性回归线height=8,ratio=5,stat_func= sci.pearsonr,marginal_kws=dict(bins=15, rug=True))sns.jointplot(x=df['A'], y=df['B'],data=df,color='k',kind='resid', #residheight=8,ratio=5,marginal_kws=dict(bins=15, rug=True))sns.jointplot(x=df['A'], y=df['B'],data=df,color='k',kind='kde', #kde密度图height=8,ratio=5)sns.jointplot(x=df['A'], y=df['B'],data=df,color='k',kind='hex', #hex蜂窝图(六⾓形)height=8,ratio=5)g = sns.jointplot(x=df['A'], y=df['B'],data=df,color='k',kind='kde', #kde密度图height=8,ratio=5,shade_lowest=False)#添加散点图(c-->颜⾊,s-->⼤⼩)g.plot_joint(plt.scatter, c='w', s=10, linewidth=1, marker='+')JointGrid()创建图形⽹格,⽤于绘制⼆变量或单变量的图形,作⽤和Jointplot()⼀样,不过⽐Jointplot()更灵活。
FEA3飞象大数据分析系统之操作手册地址:杭州市滨江区滨安路1180号华业高科技产业园3号楼网址:◆文档信息◆版本历史目录第1章关于本手册 (6)第2章在您操作之前 (6)第3章FEA3入门 (7)3.1体系结构 (7)3.2登入与退出 (7)3.2.1登入 (7)3.2.2登出 (9)3.2.3修改密码 (9)3.3操作流程 (9)第4章可视分析 (10)4.1可视分析概述 (10)4.2操作目标 (10)4.3选取工作区 (10)4.4功能实现 (11)4.4.1 新建空表 (11)4.4.2 克隆DF表 (11)4.4.3 数据增加 (12)4.4.4 数据过滤 (13)4.4.5 数据选择 (13)4.4.6 数据排序 (14)4.4.7 数据去重 (15)4.4.8 列类型更改 (16)4.4.9 字符串处理 (17)4.4.10 单字段分组统计 (18)4.4.11 行列互换 (18)4.4.12 填充空值 (19)4.4.13 设置索引 (20)4.4.14 重置索引 (20)4.4.15 分组统计 (21)4.4.16 UDF函数 (21)4.4.17 机器学习 (22)4.4.18 lambda函数 (23)4.4.19 简要信息 (23)4.4.20 绘图 (24)4.4.21 存储数据 (24)第5章自助分析 (25)5.1操作目标 (25)5.2操作步骤 (25)第6章交互分析 (27)6.2操作步骤 (27)第7章可视化设计 (33)7.1操作目标 (33)7.2操作步骤 (33)7.2.1 静态面板管理 (33)7.2.2 动态面板管理 (37)7.2.3 交互面板管理 (38)7.2.4 多屏互动管理 (43)7.2.5 导航管理 (48)7.2.6 门户展示 (52)第8章数据加载 (54)8.1操作目标 (54)8.2操作步骤 (54)8.2.1 装载CSV类型数据 (54)8.2.2 装载PKL类型数据 (55)8.2.3 装载UDB(scan)数据源 (55)8.2.4 装载UDB(query)数据源 (56)8.2.5 装载JDBC数据源 (56)8.2.6 装载NOSQL数据源 (57)第9章UDB连接 (57)第10章JDBC连接 (57)10.1操作目标 (58)10.2操作步骤 (58)第11章对象管理 (61)第12章脚本运行 (63)12.1上传脚本 (63)12.2执行脚本 (63)第13章系统管理 (64)13.1用户管理 (64)13.1.1 搜索功能 (64)13.1.2 新增功能 (65)13.1.3 编辑功能 (66)13.2应用管理 (68)13.3图片管理 (71)13.4方案管理 (72)13.5授权码管理 (73)第14章分析中心 (74)14.1登录 (74)第15章预警中心 (77)15.1登录 (77)15.2功能介绍 (77)15.3预警数据的产生 (78)15.4存储预警数据 (79)第16章IPAD导航 (79)16.1登录 (80)16.2导航切换 (80)附录1 交互分析操作流程 (81)附录2 可视化分析操作流程 (93)附录3常见问题处理 (99)第1章关于本手册本手册,适用于使用“飞象大数据分析系统”产品的客户。
Package‘sinaplot’October14,2022Type PackageTitle An Enhanced Chart for Simple and Truthful Representation ofSingle Observations over Multiple ClassesVersion1.1.0Date2017-04-10Maintainer Nikos Sidiropoulos<**********************>Description The sinaplot is a data visualization chart suitable for plottingany single variable in a multiclass data set.It is an enhanced jitter stripchart,where the width of the jitter is controlled by the densitydistribution of the data within each class.Depends R(>=3.1.0),plyr(>=1.8.4)Suggests rmarkdown,knitr,RColorBrewerImportsLicense GPL(>=2)LazyData TRUEVignetteBuilder knitrRoxygenNote6.0.1NeedsCompilation noAuthor Nikos Sidiropoulos[aut,cre],Sina Hadi Sohi[aut],Nicolas Rapin[aut],Frederik Otzen Bagger[aut]Repository CRANDate/Publication2017-04-2117:58:31UTCR topics documented:blood (2)sinaplot (2)Index61blood Expression data from2095AML/ALL and healthy bone marrow cells.DescriptionExpression data from2095AML/ALL and healthy bone marrow cells.Usagedata(blood)FormatA data frame with2095rows and2columns(Class(AML/ALL subtype),Gene expression values).Sourcehttp://servers.binf.ku.dk/bloodspot//geo/query/acc.cgi?acc=GSE13159/geo/query/acc.cgi?acc=GSE15434/geo/query/acc.cgi?acc=GSE61804/geo/query/acc.cgi?acc=GSE14468/sinaplot sinaplotDescriptionThe SinaPlot is a data visualization chart suitable for plotting any single variable in a multiclass dataset.It is an enhanced jitter strip chart,where the width of the jitter is controlled by the density distribution of the data within each class.Usagesinaplot(x,...)##Default S3method:sinaplot(x,groups=NULL,method=c("density","counts"),scale=TRUE,adjust=0.75,bins=50,bin_limit=1,maxwidth=1,seed=NULL,plot=TRUE,add=FALSE,log=FALSE,labels=NULL,xlab="",ylab="",col=NULL,pch=NULL,...)##S3method for class formulasinaplot(formula,data=NULL,...,subset,na.action=NULL,xlab,ylab)Argumentsx numeric vector or a data frame or a list of numeric vectors to be plotted....arguments to be passed to plot.groups optional vector of length(x).method choose the method to spread the samples within the same bin along the x-axis.Available methods:"density"and"counts".See Details.scale a logical that indicates whether the width of each group should be scaled relative to the group with the highest density.Default:TRUE.adjust adjusts the bandwidth of the density kernel when method=="density"(see density).bins number of bins to divide the y-axis into when method=="counts".Default:50.bin_limit if the samples within the same y-axis bin are more than bin_limit,the sam-ples’s X coordinates will be adjusted.maxwidth control the maximum width the points can spread into.Values between0and1.seed a single value that controls the random sample jittering.Set to an integer to enable plot reproducibility.Default NULL.plot logical.When TRUE the sinaplot is produced,otherwise the function returns the new sample coordinates.Default:TRUE.add logical.If true add boxplot to current plot.log logical.If true it uses a logarihmic scale on the y-axis.labels labels for each group.Recycled if necessary.By default,these are inferred from the data.xlab,ylab axis labels.pch,col plotting characters and colors,specified by group.Recycled if necessary.formula a formula,such as y~grp,where y is a numeric vector of data values to be split into groups according to the grouping variable grp(usually a factor).data a data.frame(or list)from which the variables in formula should be taken.subset an optional vector specifying a subset of observations to be used for plotting.na.action a function which indicates what should happen when the data contain NAs.The default is to ignore missing values in either the response or the group.DetailsThere are two available ways to define the x-axis borders for the samples to spread within:•method="density"A density kernel is estimated along the y-axis for every sample group.The borders are thendefined by the density curve.Tuning parameter adjust can be used to control the density bandwidth in the same way it is used in density.•method="counts":The borders are defined by the number of samples that occupy the same bin and the parameter maxwidth in the following fashion:xBorder=nsamples*maxwidthValuex discrete x-coordinates,split by groupy input valuesgroup input groupsscaledfinal x-coordinates,adjusted by sinaplotNULLNULLExamples##sinaplot on a formula:data("blood",package="sinaplot")boxplot(Gene~Class,data=blood)sinaplot(Gene~Class,data=blood,pch=20,add=TRUE)##sinaplot on a data.frame:df<-data.frame(Uni05=(1:100)/21,Norm=rnorm(100),5T =rt(100,df=5),Gam2=rgamma(100,shape=2)) boxplot(df)sinaplot(df,add=TRUE,pch=20)##sinaplot on a list:bimodal<-c(rnorm(300,-2,0.6),rnorm(300,2,0.6))uniform<-runif(500,-4,4)normal<-rnorm(800,0,3)distributions<-list(uniform=uniform,bimodal=bimodal,normal=normal) boxplot(distributions,col=2:4)sinaplot(distributions,add=TRUE,pch=20)##sinaplot on a vector:x<-c(rnorm(200,4,1),rnorm(200,5,2),rnorm(400,6,1.5))groups<-c(rep("Cond1",200),rep("Cond2",200),rep("Cond3",400))sinaplot(x,groups)par(mfrow=c(2,2))sinaplot(x,groups,pch=20,col=2:4)sinaplot(x,groups,scale=FALSE,pch=20,col=2:4)sinaplot(x,groups,scale=FALSE,adjust=1/6,pch=20,col=2:4)sinaplot(x,groups,scale=FALSE,adjust=3,pch=20,col=2:4)#bloodpar(mfrow=c(1,1))sinaplot(blood$Gene,blood$Class)old.mar<-par()$marpar(mar=c(9,4,4,2)+0.1)groups<-levels(blood$Class)sinaplot(blood$Gene,blood$Class,pch=20,xaxt="n",col=rainbow(18)) axis(1,at=1:length(groups),labels=FALSE)text(1:length(groups),y=par()$usr[3]-0.1*(par()$usr[4]-par()$usr[3]), xpd=TRUE,srt=45,adj=1,labels=groups)par(mar=old.mar)Index∗datasetsblood,2blood,2density,3plot,3sinaplot,26。
surfer11教程05散点图数据点和图形图层的使⽤Surfer 11教程(第五课)程贤辅翻译2012/11/18第五课散点图数据点和图形图层的使⽤在⼀幅图形上,通过将X、Y数据点的位置⽤符号来代表,这样就创建了散点图。
在⼀个散点图形确定的数据点上,有这些特定点的分布数据,以及其他⽂本信息,这对以后图形⽣成是⾮常有⽤的。
⼀个数据⽂件包含了⽤于在图形上定位的点的X、Y 坐标,也可以包含与每个点相关联的标注信息。
图形的图层设计允许你添加多个图形映射到当前的图形上,⽤于创建⼀个同时显⽰不同类型的图形对象。
所有图层使⽤单⼀的⼀组数轴,并按照⽬标坐标系统统⼀定位。
例如,你如果有⼀个建⽴了⽓象数据的等值线图,那么你可以添加⼀个图形图层来显⽰每个数据采集点的位置和站名的散点图。
如何将⼀个图形图层添加到现有的图形上?图形图层有多种办法添加到现有的图形上。
选择图形并通过“图形|添加”命令;通过从现有的图层拖动⼀个对象到另外⼀个对象上;或者通过选择所有的图形,并使⽤“图形|按坐标覆盖图形”命令。
添加⼀个散点图图层当⼀个新的散点图被⽤“Map|New|Post Map(图形|新建|散点图)”命令创建完成时,它在场景窗⼝中是独⽴于其它任何图形的。
当两个图形都显⽰时,两套数轴也同时显⽰,每个图形有⼀套。
当你选择⼀个图形时,使⽤“Map|Add(图形|添加)”命令,⼀个新的图形图层、数轴、或者⽐例尺,就会被添加到选定的图形中。
如果已经存在两个以上的图形,你可以在对象管理器中拖拽⼀个图层到另⼀个不同的图形对象上。
另外,可以选择这两个图层并点击“Map|Overlay Maps(图形|按坐标覆盖图形)”命令,所有选中的图层都会移动合并为单⼀的图形对象。
要删除⼀个图层,可以在对象管理其中选中该图层,接着按下删除键。
要从⼀个图形对象中移除⼀个图层,⾸先你要选中该图层,再右键菜单中选择“Break Apart Map Layer(拆分图形层)”。
地图涟漪散点图
概念
地图涟漪散点图,在地图上以涟漪散点的方式展示坐标点信息。
一行数据代表一个点,可移动鼠标显示具体内容。
数据格式要求
数据格式要求
将原始数据ditulianyisandiantu_world.csv,通过“静态面板管理”、“动态面板管理”或“多屏互动管理”模块,用地图涟漪散点图的方式绘制出下图:
我们需要将原始数据进行如下配置:
1、将原始数据导入FEA
在“原语分析”窗口执行如下命令:
a =load csv by ditulianyisandiantu_world.csv
dump a
2、执行如下语句,将a表中的数据存储到ssdb数据库,并定义KEY为baidudituxiangsuge:
store a to ssdb by ssdb0 with ditulianyisandiantu_world
在静态面板、动态面板或多屏互动中,输入此处的KEY “ditulianyisandiantu_world”,选择类型为“地图涟漪散点图”,就可绘制出世界类型的地图涟漪散点图。