RAD7说明书
- 格式:pdf
- 大小:1.58 MB
- 文档页数:58
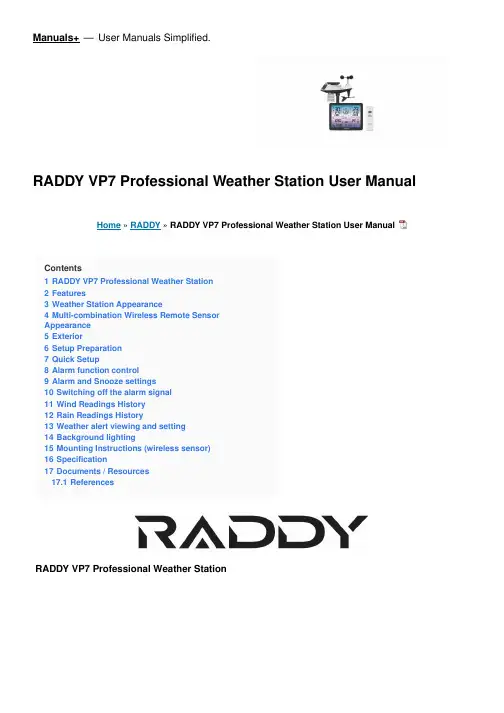
Manuals+— User Manuals Simplified.RADDY VP7 Professional Weather Station User Manual Home » RADDY » RADDY VP7 Professional Weather Station User ManualContents1 RADDY VP7 Professional Weather Station2 Features3 Weather Station Appearance4 Multi-combination Wireless Remote SensorAppearance5 Exterior6 Setup Preparation7 Quick Setup8 Alarm function control9 Alarm and Snooze settings10 Switching off the alarm signal11 Wind Readings History12 Rain Readings History13 Weather alert viewing and setting14 Background lighting15 Mounting Instructions (wireless sensor)16 Specification17 Documents / Resources17.1 ReferencesRADDY VP7 Professional Weather StationThank you for your purchase.Wind speed range: 0 to 180 km/h (0 to 111 mph)Wind direction range: 0 to 359 degreesWireless Outdoor Sensor.433.92MHz RF transmitting frequency100 meters (300 feet) transmission range in an open area, not including walls or floorsRecord of temperature, humidity, wind speed and rainfallAlert of temperature, humidity, wind speed, rainfallDisplay of feels-like temperature, wind chill temperature, heat index, and dew point temperature The weather forecasting functionLevel 3 display backlightUSB charging functionPower Supply:Weather station:Power Adapter: DC5V 1.2ABattery: 2 x LR3 AAA 1.5VMulti-combination Wireless Remote Sensor: Battery: 3 x LR6 AA 1.5VTemperature Humidity Wireless Remote SensorBattery: 2 x LR6 AA 1.5VF.Y.l.:The wireless remote sensor can work at -30°C to +70°C. Please choose the right battery according to the limited temperature of the wireless sensor:Alkaline zinc manganese battery can work at -20°C to +60°CPolymer lithium-ion rechargeable battery can work at -40°C to +70°CWeather Station Appearance Part A – Positive LCDExteriorC1: Hanging holeMulti-combination Wireless Remote Sensor AppearanceExteriorD1: Solar panelD3: Wind cupsD5: Temperature | humidity induction boxD7: Reset buttonE1: Hanging holemanually, you need to press and hold the ” ” button to exit the radio time mode, and then continue to the nextPress and hold the ” ” button for 3 seconds to enter the time setting mode.Press and release the “ ” or “ ” button to adjust the value. Hold the ” ” or ” ” button to adjust After 20 seconds without pressing any button or touching the” ” location button at any time toRCC signal, press and hold the ” ” button for 3 seconds to exit.The weather station will automatically perform an RCC signal search at 1:00 / 2:00 / 3:00 every day to correct lf you need to manually search for RCC signals, press and hold the “ ” button for 3 seconds to enter thePress and release the ” ” button to view the alarm 1 time, press and release the button to view the alarm 2 ln the mode of viewing the alarm 1 time or the alarm 2 time, press and release the “ ” button to control itsWhen the function of Alarm 1 or Alarm 2 is turned on, the symbol ” ” or “ ” is displayed. At the same time, the relevant alarm repeat symbol “ ” | ” ” is displayedAfter 20 seconds without pressing any button or touching the “ ” location button at any time toPress and hold the ” “button for 3 seconds to enter the alarm and snooze setting mode.Press and release the “ ” or ” ” button to adjust the value. Hold the “ ” or ” ” button to adjustPress and release the “ ” button to confirm and move to the next item.After 20 seconds without pressing any button or touching the location button at any time toThe alarm sounds when the trigger, presses any buttons except the ” ” touch button or touches and holds the ” ” button for more than 3 seconds to stop the alarm signal.When the time is up to the alarm, touch and release the ” ” touch button, the alarm signal stops, and In snooze timing mode, press any buttons except the ” ” touch button or hold down the ” ”Press and release the ” ” button to view High | Low temperature and humidity and feel like temperature,In the mode of viewing temperature | Humidity history, press and hold the “ “button for 3 seconds to clear all Note: After 20 seconds without pressing any button or touching the ” ” location button at any time toln the main display interface, press and hold the “ ” button for 3 seconds to convert the display to windPress and release the “ ” button to view the maximum wind historic values: 1 Hour (default) |ln the mode of viewing wind speed history, press and hold the “ ” button for 3 seconds to clear all history of After 20 seconds without pressing any button or touching the ” ” location button at any time to exit the ln the main display interface, press and hold the “ ” button for 3 seconds to convert the display to thePress and release the ” ” button to view the rain historyIn the mode of viewing rain history, press and hold the ” ” button for 3 seconds to clear all the history of rain.After 20 seconds without pressing any button or touching the “ ” location button at any time to exitPress and release the ” ” button to view the weather alerts mode. Continue to press and release the “ ”Note: After 20 seconds without pressing any button or touching the ” ” location button at any time toln each weather alert view item, press and hold the “ ” button to turn the alert on or off.Press and hold the ” ” button for 3 seconds to enter the weather alert setting mode.Press and release the ” ” or ” ” button to adiust the value. Hold the ” ” or ” ” button to adjust After 20 seconds without pressing any button or touching the “ ” location button at any time tocancel, press and release the “ ” button to set to OFF The weather station displays the following weather icon:If the product is powered by batteries, Touch the ” ” location button. The backlight lit for 15 seconds. disconnect the power supply. and the backlight will always be bright. Press the ” ” button to adiust theWhen the backlight brightness is not at the maximum brightness. press the “ ” button. Backlight tums If the “indoor sensor” column displays the battery icon ” “, you need to replace the weather station’s5. Reinstall the rainwater bucket.6. Note: Do not apply oil to the rain sensor.Note: Make sure the wireless sensor is installed within 100 meters of the weather station (empty, unobstructed). According to the thickness of the obstacle between the wireless sensor and the weather station, the distance should be shortened as much as possible(the distance after the wireless signal penetrates the obstacle will be shortened), otherwise, the data transmission may be disturbed.Temperature Humidity Wireless Remote Sensor (Optional sensor)Documents / ResourcesRADDY VP7 Professional Weather Station [pdf] User ManualVP7, VP7 Professional Weather Station, Professional Weather Station, Weather Station, StationReferencesRaddy Outdoor | Be prepared, get RaddyManuals+,。

智能套筒用户手册全球领先的扭力工具制造商44444触摸屏设计迅速方便设置扭矩值和角度。
数字扭矩控制显示器能更精确、直观的查看设置扭矩值和实际扭矩值。
轻便,符合人机工学的手枪式握把设计先进的便携把手,可减少操作的疲劳感,提高工作效率。
超低噪音,只有75分贝世界上噪音最低的扭矩抢,特殊敏感环境的理想扭力工具。
LED 绿色(通过)或者红色(失败)指示灯直观的视觉信号以反应扭矩进程状态。
4444专利行星齿轮减速技术实现了最高的扭矩/重量输出比。
平稳输出可控扭矩消除了破坏性冲击力轻便,符合人机工学的手枪式握把先进稳固的手柄减轻了操作者疲劳感,提高了工作效率。
无与伦比的可靠性与高质量市场上最先进的齿轮箱设计。
44444快速调整扭矩设置数字显示扭矩值,可快速调节“输出扭矩”。
软启动变速开关防止操作者误操作,造成伤害。
正转反转相同功率可拆可紧螺栓,一机两用更加方便划算。
想象一下––没有空气管路,不用电线!针对气源和电源不方便的环境,B系列的轻便设计是您最佳的选择先进的齿轮箱设计行星齿轮减速扭矩放大专利技术,实现了最高的扭矩/重量输出比。
44444迅速调整扭矩设置迅速精确调整“输出扭矩”,功能强大,准确度高。
软启动开关防止操作者误操作,造成伤害。
正转反转相同功率可拆可紧螺栓,一机两用更加方便划算。
先进的、超耐用电机设计超强耐受力设计,降低维修费用,提高可靠性先进的齿轮箱设计行星齿轮减速扭矩放大专利技术,实现了最高的扭矩/重量输出比电池系列(B-RAD)气动系列电动系列(V-RAD)值得信赖的行业标准!扭矩范围150-3400N.m.扭矩范围100-4000N.m.扭矩范围70-15000 N.m.4444测量和显示峰值扭矩传感器技术结合定制套筒,可以测量扭矩循环中施加到螺栓上的实际扭矩。
通过或失败指示数字显示,准确无误的显示出所达到的峰值扭矩。
蓝牙技术查看和下载数据到您的智能手机或电脑。
理想的现场校准工具尺寸与标准套筒相当,是检测螺栓实际扭矩的最佳工具,并可以作为一个扭矩工具校准器。
RAD-7电子测氡仪操作指南Nano电子商城联系人:Mark Zhu电话:400-660-9565手机:138****6563传真:021-5206-1832企业QQ:400-660-9565E-mail:*******************网址:上海市天目西路547号恒基不夜城1号楼2203室简介RAD7 是具有非常多功能的仪器,是综合氡气测试系统的基础仪器,可以在不同的模式下操作和用于不同的目的。
本手册采用进阶方法,即开始是简单的逐步的描述怎样得到a)实时监测和b)吸气实验的读数。
接着是更详细地介绍仪器的各种特征和如何使用仪器。
手册的其余章节包括一系列主题,其顺序可能有点随意性。
我们建议你应尽可能读完整本手册,以彻底弄懂整个操作程序。
虽然,在你的一天使用RAD7 时就能够很好的测量出所需数据,但是要掌握氡气和钍气的细微变化、理解仪器的全部功能可能还需要好几年的时间。
手册尽量为你编写得容易读懂,包括有目录,交叉参考,并有综合索引。
请告知该手册编写的质量如何,是否还有一些主题没有包含在内,我们会及时更新。
请注意!RAD7 是一个很结实的、耐久的仪器。
有些已经买了七年或更久的仪器现在仍然每天使用着。
同时,它也是复杂的、精密的电子设备,因此要很小心使用。
请不要让水、其它液体或者灰尘进入机器。
如果在可能会溅水、损坏或雨淋的地方使用,请做好保护措施。
最后,有一个安全特性有时可能会被没有经验的但却是有权使用的人疏忽设置的,这就是键盘锁住。
如果键盘停止工作,您所看到的只是显示―DURRIDGE RAD7‖,请这样做:一直按住[回车]键和两个箭头键,直到您听到了嘟嘟声,然后松开三个键并立即按住[菜单]键。
之后您会看到显示[测试]命令。
如果声调设置为―OFF‖,您就听不到嘟嘟声,因此在按下三个键三到四秒才松开,再按[菜单]键。
如果还没能成功开锁,请试试按住的时间长一点或是短一点。
第一章1.开始工作:您与RAD7的第一天1.1开箱首先您应该明确您已经有了您应该有的一切东西。
美国GSSI公司RADAN7地质雷达处理软件说明书劳雷公司邓新生2013年1月1日Radan 7 guide for data processingRadan 7数据处理指南1.设置数据路径。
菜单Home->window->properties对话框properties->global parameters ->File parameters->Source Directory2.数据文件加载与显示。
选择菜单->open或者快捷方式Ctrl+O,打开文件。
菜单Home->Color tables, color Xforms,设置颜色表格和颜色对比对。
3.数据编辑。
菜单processing->adjust scans->edit block设置start scan和end scan,选择block operation选项save保存,delete删除。
4.文件反向。
菜单G->Save as->radan file reversed.删除dzx数据库文件,并重新打开翻转后的dzt数据文件。
5.距离归一化。
6.添加里程信息。
Home状态下,选择tables。
Tables->profiles->start Dist(m),输入起始里程。
Tables->profiles->Dist decrem,选择此项,桩号从大到小。
7.水平刻度调整。
Processing->adjust scans->horizontal Scaling。
8.地面调整。
9.地面时间调整。
10.设置介电常数11.调整增益。
Processing->Gain->range gain。
Range gain->gain type选择automatic. # of points设置为5.Range gain->gain type选择Exponential. 手动设置增益值.12.水平信号增强。
新仪仪器有限公司Science Laboratories Limited香港总部:香港文咸东街16至20号至德商业大厦14字楼电话:(852)25437442(8线)传真:(852)25414089 广州公司:广州市天河北路233号中信广场1116室电话:(020)87520273(3线)传真:(020)87520538RAD7氡气测量应用参考操作空气中氡气测量1、正确连接仪器。
2、PURGE五分钟:在TEST中选择PURGE,再按ENTER。
3、设置运行方案:在SETUP中选择Protocol, 再按ENTER,从中选One day测试方案后,再按ENTER。
再在SETUP中选择Recycle,设定为4次再在SETUP中选择Format,设定为Short。
4、关闭RAD7,打开打印机,开启RAD7:可打印设置情况。
5、开始测试:在TEST中选择start,再按ENTER。
土壤中氡气测量1、正确连接仪器。
2、PURGE(净化)五分钟:在TEST中选择PURGE,再按ENTER。
3、设置运行方案:在SETUP中选择Protocol(协议), 再按ENTER,从中选Sniff测试方案后,再按ENTER。
再在SETUP中选择Cycle,将时间设定为5分钟(或设定更长时间)再在SETUP中选择Recycle,设定为4次(建议只取第三、四个结果)4、关闭RAD7,打开打印机,开启RAD7:可打印设置情况。
5、开始测试:在TEST中选择start,再按ENTER。
注意:每次更换地点测量时,应先PURGE五分钟。
RAD7 操作命令列表Test(测试)Data按“Menu ”键则进入主菜单状态,或返回到主菜单状态;“ ”“ ”键则往左或往右浏览不同的命令或内容;“Enter ”键则进入子菜单目录或确认你的选择。
D U R R I D GE C O M PA N Y I N C.7 Railroad A ve., Suite D. P.O.Box 71, Bedford, MA 01730. Tel/Fax: (781)687-9556From the desk of:Derek Lane-Smith, Ph.D.Email: Derek@RAD7 电子氡气检测仪目录简介11.开始工作:您与RAD7的第一天11.1 开箱11.2 一般安全指导21.3 概貌21.4开始两天的测试31.5 开始吸气实验62.RAD7操作基本知识82.1 简介82.1.1 键盘82.1.2 命令列表92.2 测试92.2.1 测试状态92.2.1a 快速保存和重新启动112.2.2 测试开始和测试停止112.2.3 测试保存122.2.4 测试清除122.2.5 测试净化132.2.6 测试锁住132.2.7 测试睡眠132.2.8 测试打印142.2.9 测试命令142.3 数据142.3.1数据阅读142.3.2 数据打印152.3.3 数据通讯162.3.4 数据总结162.3.5 数据自由内存172.3.6数据删除172.3.7 数据重编号182.3.8 数据清除182.4 设置182.4.1 设置协议192.4.2 设置周期192.4.3 设置循环192.4.4 设置模式202.4.5 设置钍气212.4.6 设置泵体212.4.7 设置声调222.4.8 设置格式222.4.9 设置单位222.4.10 设置保存用户232.4.11 设置时钟232.4.12 设置预览232.5 特别情况232.6 红外线打印机243. RAD7技术的基本知识:工作原理26 3.1 简介263.2 氡衰变链273.2.1 氡-222(氡)293.2.2氡-220(钍)293.3 连续监测器303.4 吸气器313.5 工作浓度313.6 RAD7 固态探测器323.7 RAD7图谱323.8 窗口333.9 同位素平衡343.10 模式:吸气和自动353.11 背景、干扰和污染353.11.1 短寿命的氡和钍的继承元素363.11.2 被吸收的氡气363.11.3 内在的背景363.11.4 长寿的氡气继承元素373.11.5 产生氡气或者钍气的固体的污染37 3.11.6 其它的α粒子发射器373.11.7 β粒子和γ粒子发射器373.12精密度&正确度373.13 图谱例子383.13.1 可操作的氡气图谱383.13.2 钍气图谱403.13.3 组合图谱413.13.4 病态图谱434. 使用RAD7:良好的操作程序454.1.简介454.2.连续监测464.2.1.准备464.2.2.净化464.2.3.测试位置474.2.4.测试协议474.2.5.打印或者不打印484.2.6.运行测试484.2.7.安全性和质量控制484.2.8.完成运行494.2.9.检查数据504.2.10.非常短期监测504.3.吸气504.3.1.为什么吸气?504.3.2.定位氡气进入点504.3.3.准备514.3.4.净化514.3.5.运行测试514.3.6.钻孔取样点524.3.7.点读数524.4.抓取采样534.4.1适应性534.4.2准备534.4.3协议534.4.4接受样品534.4.5分析534.5.水里的氡气544.5.1RAD H2O544.5.2 4.5.2 RAD AQUA544.6.土壤空气采样544.6.1应用544.6.2土壤空气探针544.6.3准备554.6.4运行测试554.6.5解释数据554.7.发射测量554.7.1 应用554.7.2 开环或者闭环结构564.7.3 批量发射564.7.4 表面发射564.8.钍气测量574.8.1钍气和氡气574.8.2钍气测量问题574.8.3计算与干涉更正584.8.4避开更长寿命半衰期的衰变产物58 4.8.5衰变更正、流动速率和钍气校准58 4.8.6计算样品衰变584.8.7计算内腔浓度594.8.8内腔钍气灵敏度校准594.8.9设置钍气测量594.8.10钍气模式604.9.管理背景605. PC连接615.1 RS-232串口615.1.1 能力615.1.2 硬件桥接器615.1.3 软件桥接器615.1.4 应用615.1.5 RAD7串口的技术规格62 5.1.6 串口输出625.2 捕捉1.2645.3 传输655.4 RADLINK655.4.1能力655.4.2 要求655.4.3 RAD7远程指挥格式66 5.4.4 特别键665.4.5 特别命令676. 维修686.1 附件-使用和维护686.1.1 干燥剂686.1.1.1 实验干燥设备696.1.1.2小干燥管(小管)69 6.1.1.3 层叠式干燥管696.1.2 过滤器706.1.3 电池706.1.4 实时时钟和非易失内存71 6.1.5 打印机和适配器716.2 操作范围716.3 服务和维修726.3.1 校准726.3.2 维修726.3.3 运输736.3.4 升级736.4 RAD7规格73简介RAD7是具有非常多功能的仪器,是综合氡气测试系统的基础仪器,可以在不同的模式下操作和用于不同的目的。
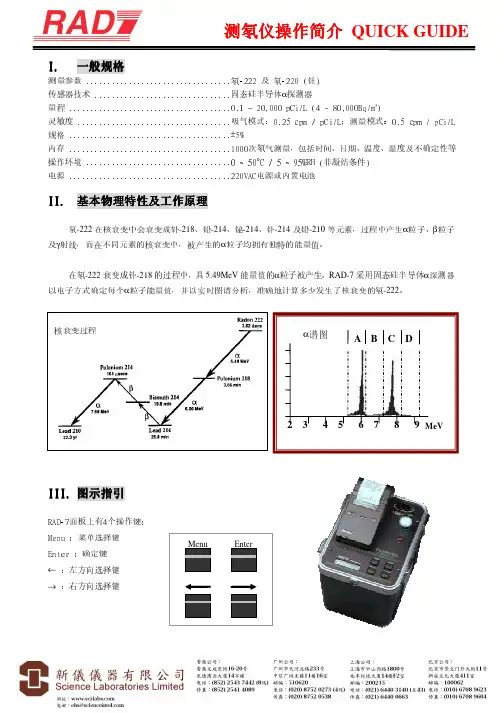
RAD-7测氡仪操作规程一、仪器工作原理及性能:RAD-7测氡仪是利用α能谱测定法的原理,来对空气中的氡含量进行测定的仪器,可对氡进行全面测量,能在多种模式下工作以完成不同测试目的。
二、仪器操作:1. 开机前的准备使用前电池应充足电,干燥筒中应有足量的干燥剂,将RAD-7与各部件连接好,准备开机。
2. 正常操作步骤2.1打开RAD-7电源,按下“meau”键,再按“Enter”进入“Test”选项,用方向键选择“Test Purge”(测试净化),按“Enter”键进入,气泵工作,开始净化,让仪器净化5分钟以上,净化好后,按“meau”键,停止净化。
2.2设置运行方案2.2.1在“Setup”选项中选择“Protocol”(预置协议),按“Enter”确认后,从中选择测试方案One day,再按“Enter”确认。
2.2.2在“Setup”中选择“Cycle”(周期时间),设定所需周期时间,可设为30min。
2.2.3在“Setup”中选择“Recycle”(循环次数),按需要设定次数,可设为4次。
2.2.4在“Setup”中选择“mode”(模式),选择所需模式,可以选择Auto(自动)。
2.2.5在“Setup”中选择“Thoron”(钍气),选择“off”(关)。
2.2.6在“Setup”中选择“Pump”(泵体),选择泵工作模式,可以选择Auto(自动)。
2.2.7在“Setup”中选择“Format”(格式),选择打印格式(有短、中、长、关四种格式)。
选择short(短),则打印出来的第一行第二个数据就是氡浓度。
2.2.8关闭RAD-7,打开打印机,开启RAD-7即可打印设置情况,如无需打印,可略过这步3. 开始测试3.1在“Test”中选择“Start”(开始),按“Enter”确认,仪器开始工作,测量完成后,测量数据将自动被存储,如连接打印机,将自动打印在打印纸上。
3.2将一次运转的数据的总结报告和时间图表打印出来,Data(选择)>Summary(数据总结),并输入二位数的运行序号,就可以打印出信息。
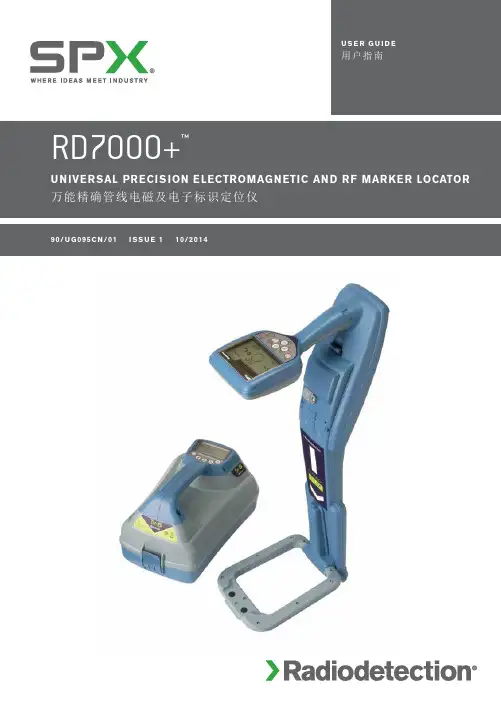
中文28E N G L I S PrefaceAbout this guideCAUTION: This guide provides basic operating instructions for the RD7000+ locator and transmitter. It also contains important safety information and guidelines and as such should be read in its entirety before attempting to operate the RD7000+ Locator and transmitter.This guide is intended as a quick reference guide only. For detailed instructions, includingthe use of accessories, help with eCert ™, CALSafe ™*, SurveyCERT ™ and automatic logging* please refer to the RD7000+ locator operation, SurveyCERT and RD Manager ™ manuals, which are available for download from . The online User Manual library also contains links to the SurveyCERT and RD Manager manuals.*Logging models only.E N G L I RD7000+ locatorLocator features1. Keypad2. LCD with auto backlight3. Speaker4. Battery compartment5. Battery charger connector6. Accessory connector7. Headphone connector8. Bluetooth ® module antenna 9. Marker loop antennaLocator keypad10. Power key : Switches the unit onand off. Opens the locator menu.11. Frequency key : Selects frequency.Closes submenu.12.13. null and null (PLM and TLM models) modes. With antenna folded down, toggles marker and combined (marker/line) modes. Opens a submenu.14. Graph key : Saves SurveyCERTmeasurements.15. Transmitter key : Not used.Locator screen icons16. Indicates the signal strength and peak marker.17. Signal strength: Numerical indicationof signal strength.18. Peak / Proportional arrows: Indicatesthe location of the line relative to the locator.19. Battery icon: Indicates the battery level.20. Volume icon: Displays the volume level.21. Fault-Find arrows (PLM and TLMmodels only).22. Radio Mode: Indicates when RadioMode is active.23. Power Mode: Indicates when PowerMode is active.24. Accessory or Measurement indicators:Indicate when an accessory is connected or if measurements are active 25. A-Frame icon: Indicates when theA-Frame is connected.26. Operating mode indicator.27. Bluetooth icon: Indicates status ofBluetooth connection. Flashing icon means pairing is in progress. Solid icon indicates an established connection is active.28. Antenna mode icon: Indicates antennaselection: Peak, Null and combined Peak/Null.29. Sonde icon: Indicates that sonde signalsource is selected (DLM, PLM and TLM models).30. Line icon: Indicates that line signalsource is selected.31. Compass/Marker mode indicator:Shows the direction of the located cable relative to the locator. Also used as a graphical indication for Marker mode active32. Current /depth indicator.567932481161718182130321920222324252627283129E Tx-1, Tx-5 and Tx-10 transmitters132Transmitter features 1. Keypad.2. LCD.3. Removable accessory tray.4. D-cell battery tray.5. Rechargeable battery pack(Optional).Transmitter keypad6.Power key : Switches the unit onand off. Opens the transmitter menu.7. Frequency key : Selects frequency.Menu navigation key.8. menu options.9. Measure key : Opens a sub menu.Used to take voltage and impedance measurements.Transmitter screen icons10. Battery icon: Indicates the battery level.11. Alphanumeric description of selectedoperation mode.12. Standby icon: Appears when thetransmitter is in Standby mode.13. Output level: Displays transmitteroutput power.14. Clamp icon: Indicates when a clamp orother plug is connected.15. DC icon: Appears when the transmitteris powered from a DC source.16. Induction indicator: Appears when thetransmitter is in Induction mode.17. A-Frame (Tx-5 and Tx-10 only):Indicates when the transmitter is in Fault-Find mode.18. CD Mode indicator (Tx-10 only):Indicates that the transmitter is in Current Direction mode. For use with RD8000™ locators only.19. Voltage warning indicator: Indicatesthat the transmitter is outputting potentially hazardous voltage levels.20. Volume icon: Displays the volume level.21. Pairing icon (Tx-5B and Tx-10B only):For use with RD8000 locators only.22. Bluetooth icon (Tx-5B and Tx-10B only).For use with RD8000 locators only.54Before you beginIMPORTANT! This guide is intended to be a quick reference guide. We recommend you read the operation manual before you attempt to operate the RD7000+ locator! First useFor safety reasons RD7000+ locators are shipped with the Li-Ion battery packs disconnected and transmitters with no D cells in the battery tray.To connect the Li-Ion battery pack open the RD7000+ battery compartment and plug the battery lead into the battery connector.To fit the D cell batteries in the transmitter, unlatch the accessory tray. The battery compartment is located underneath the transmitter body. Use the turnkey to unlatchthe battery compartment. Insert eight D-Cell Alkaline or NiMH batteries.System setupIt is important that you set up the system according to your personal preferences and operating requirements before you conduct your first survey. Y ou can set the system up using the RD7000+ menu as described below.NOTE: These procedures refer to both the transmitter and locator unless stated otherwise.Before changing settings, switch the locator or transmitter on by pressing the key. NOTE: Once the system is switched on, pressing the key momentarily will activate the locator or transmitter menu.Using the menusThe RD7000+ locator and transmitter menus allow you to select or change system options. Once entered, the menu is navigated using the arrow keys. Navigation is consistent on both the transmitter and the locator. When in the menu, most on-screen icons will temporarily disappear and the menu options will appear in the bottom left-hand corner of the display. Note that when browsing the locator menu, the andWhen browsing the transmitter menu the and keys act as left and right arrows. The right arrow enters a submenu and the left arrow returns to the previous menu.NOTE: When you select an option and press the key, the option will be enabled automatically.Locator menu options• VOL: Adjust the speaker volume from 0 (mute) to 3 (loudest).• BT: Enable, disable, reset or pair Bluetooth connections. Also defines the protocol used when connecting to a PC or PDA.• UNITS: Select metric or imperial units.• CAL: Displays the date of original factory calibration and the most recent service calibration or eCert calibration validation.• MARKR: Enable or disable individual utility markers.• LANG: Select menus language.• POWER: Select power frequency: 50 or 60Hz.• ANT: Enable or disable any antenna mode with the exception of Peak.• FREQ: Enable or disable individual frequencies.• ALERT: Enable or disable Strike Alert™.• BATT: Set battery type: ALK, NiMH or Li-ION.• COMP: Enable or disable display of the Compass feature.To navigate the locator menu:1. Press the key to enter the menu.2.or3.4. or5. Press the key to confirm a selection and return to the previous menu.6. Press the key to return to the main operation screen.Transmitter menu options• VOL: Adjust the speaker volume from 0 (mute) to 3 (loudest).• FREQ: Enable or disable individual frequencies.• BOOST: Boost transmitter output for a specified period of time (in minutes).• LANG: Select menus language.•OPT F: Enable or disable SideStep auto™.• BATT: Set battery type: ALK, NiMH or Li-ION – Also select Eco mode for alkaline batteries only.• MAX P: Allow the transmitter to output its maximum wattage.• MODEL: Specify the model of your locator.• MAX V: Set the output voltage.• BT: Enable, disable or pair Bluetooth connections to a RD8000 locator (Bluetooth models only).To navigate the transmitter menu:1. Press thekey to enter the menu.2.or3.4.5. Press the key to return to the previous level or exit the menu.6. Press the key to return to the main operation screen.Examples of using the menu, selecting options and making changes:LanguageTo select your preferred menu language:1. Press the key to enter the menu.2.3. key (on the locator) or the key (on the transmitter) to enter the LANG menu.4. Scroll up or down to select your preferred language.5. Press the key to accept your selection and return to the main menu.6. Press the key to return to the main operation screen.Power / mains frequency (locator only)To select the correct frequency (50 or 60Hz) for your country or region’s power supply:1. Press the key to enter the menu.2.3.4. Scroll up or down to select the correct frequency.5. Press the key to accept your selection and return to the main menu.6. Press the key to return to the main operation screen.Units (locator only)The RD7000+ locator allows you to work in Metric or Imperial (US customary) units. To select your preferred units of measurements:1. Press the key to enter the menu.2.3.4. Scroll up or down to select Metric or Imperial units.5. Press the key to accept your selection and return to the main menu.6. Press the key to return to the main operation screen.BatteriesThe locator and transmitter are battery powered.The RD7000+ locators are provided with a rechargeable Lithium-ion (Li-Ion) battery pack as standard. The RD7000+ locators can also be powered using good quality D-cell alkaline or NiMH batteries.Transmitters can be powered by D-cell alkaline batteries (as standard), D-cell NiMH batteries, or by an optional accessory Li-Ion battery pack. Alternatively, you can power the transmitter from a mains or vehicle power source using a Radiodetection supplied optional accessory adapter.If using D-Cells it is important to set the system to match the currently installed battery type to ensure optimal performance and correct battery level indication.To set your battery type:1. Press the key to enter the menu.2.3. key (on the locator) or the key (on the transmitter) to enter the4. Scroll up or down to select the correct battery type.5. Press the key to accept your selection and return to the main menu.6. Press the key to return to the main operation screen.When using alkaline batteries Eco mode can be selected to maximize their usage. When Eco mode is selected the transmitter automatically reduces its max power output when the batteries cannot longer supply enough energy.Shutting downTo switch the locator or the transmitter off, press and hold the key until the screen goes blank.Locating pipes and cablesPassive FrequenciesPassive frequency detection takes advantage of signals that are already present on buried metallic conductors. The RD7000+ supports three types of passive frequencies: power, radio, CPS (DL models only). Y ou can detect these frequencies without the aid of the transmitter.Active FrequenciesActive frequencies are applied direct to the pipe or cable using the transmitter. The transmitter can apply a signal using three methods:Direct connectionIn direct connection, you connect the transmitter directly to the pipe or cable you wish to survey. The transmitter will then apply a discrete signal to the line, which you can trace using the locator. This method provides the best signal on an individual line and enables the use of lower frequencies, which can be traced for longer distances.Connecting the transmitter to a pipe or line requires the use of a direct connection lead and a ground stake to complete the circuit.WARNING! Direct connection to live conductors is POTENTIALL Y LETHAL. Direct connections to live conductors should be attempted by fully qualified personnel only using the relevant products that allow connections to energized lines.InductionThe transmitter is placed on the ground over or near the survey area. Y ou select the appropriate frequency. The transmitter will then induce the signal indiscriminately toany nearby metallic conductor. In induction mode, using higher frequencies is generally recommended as they are induced more easily onto nearby conductors.ClampThe optional signal clamp can be used to apply the transmitter signal to an insulated live wire or pipe up to 8.5"/215mm in diameter.WARNING! Do not clamp around uninsulated live conductors.WARNING! Before applying or removing the clamp around a power cable ensure that the clamp is connected to the transmitter at all times.Refer to the Signal Clamps paragraph in the Using Accessories section.Locating RF MarkersThe RD7000+ locator enables users to locate most common RF utility markers. These are also referred to as Electronic Marker System (EMS) and Omni markers.To enable marker locate mode lower the marker loop antenna. To disable the marker locate mode fold the loop antenna up.Marker typesThe RD7000+ can detect 9 different RF Markers, as shown in the table below.*Use of the red Electrical Power (PWR) marker locate mode is subject to radio licensing restrictions for Short Range Devices in the EU and possibly other countries. It is the responsibility of the userto ensure that the red Power (PWR) marker locate mode is only enabled in countries where radio licensing restrictions do not apply at the operating frequency of 169kHz.If required and permitted use RD Manager to enable this frequency.Using accessoriesThe locator and transmitter are compatible with a wide range of accessories. For detailed information on using any of the accessories below please refer to the RD7000+ locator operation manual.Signal clampsWhen it is not possible to connect directly onto a pipe or cable, or induction mode is unsuitable, a transmitter signal clamp may be used. The clamp is plugged into the output of the transmitter and provides a means of applying a locate signal to an insulated live wire. This is particularly useful with live insulated cables as it removes the need to disable the power and break the line.WARNING! Do not clamp around uninsulated live conductors.WARNING! Before applying or removing the clamp around a power cable ensure that the clamp is connected to the transmitter at all times.To locate or identify individual lines a locator signal clamp can be connected to the accessory socket of the locator and can be clamped around individual pipes or cables. StethoscopesAt times, it may not be possible to use a clamp around a cable because of congestionor inaccessibility. A stethoscope antenna should be used in place of a clamp to identify cables.Radiodetection supplies a range of stethoscopes to suit most applications.To use a stethoscope, connect it to the locator’s accessory socket. The locator will automatically detect the device and filter out location modes that are irrelevant. Sondes and FlexiTraceSondes are battery powered transmitters that are useful for tracing non-metallic pipes. The RD7000+ can detect a range of sonde frequencies, including those transmitted by Flexisondes, GatorCam™4 or flexiprobe™ pushrod systems and P350 flexitrax™ crawlers. For a detailed guide on locating sondes, please refer to the operation manual.A FlexiTrace is a traceable fiberglass rod incorporating wire conductors with a sondeat the end. It is connected to the output of the transmitter and is typically used in small diameter, non-metallic pipes. The user has the option of locating the entire length of the cable or choosing to locate only the tip of the cable.The FlexiTrace has a maximum power rating of 1W. When using the FlexiTrace with a Radiodetection Tx-5(B) or Tx-10(B) transmitter the output limit must be set to 1W in the MAX P menu and the output voltage limit set to LOW in the MAX V menu.personal injury and damage to the equipment.Fault-finding with an A-FrameThe RD7000+ PLM and TLM models have the ability to detect cable sheath faults accurately using an A-Frame accessory. The Tx-5 and Tx-10 provide a fault finding signal that can be detected by the A-Frame as a result of the signal bleeding to ground through damaged cable sheaths.For a detailed guide to fault-finding, please refer to the operation manual.Plug / L ive cable connectorThe plug connector is connected to the output of the transmitter and is used to put a signal onto a line and trace it from a domestic mains plug to the service cable in the street.The live cable connector can be used to apply a signal to a live cable. Only suitably qualified personnel should use this equipment.Submersible Double Depth AntennaThis antenna is connected to the locator and used to locate pipes and cables underwater at depths down to 100 metres.WARNING: use of the submersible antenna should be by fully licensed and experienced personnel only, and only after fully reading the operation manual! Transmitter Rechargeable battery packsRechargeable battery packs for the transmitter are available and are supplied with suitable chargers. The rechargeable battery packs provide superior performance over traditional alkaline batteries.Bluetooth wireless connectionsRD7000+ locators feature a Bluetooth wireless module, as standard, providing the ability to connect to compatible devices such as PCs, laptops or handheld devices running a compatible application.NOTE: The RD7000+ locator wireless features may be subject to national and or local regulations. Please consult your local authorities for more information.WARNING! Do not attempt any wireless connection in areas where such technology is considered hazardous. This may include: petrochemical facilities, medical facilities or around navigation equipment.Switching bluetooth onBy default RD7000+ locators and Bluetooth enabled transmitters are shipped with the Bluetooth wireless connection module disabled.1. Press the key to enter the menu.2.3. key (locator) or the key (transmitter) to enter the BT menu.4. Scroll up or down to the ON option.5. Press the key to switch Bluetooth ON and return to the previous menu. Switching bluetooth offY ou can switch Bluetooth off to prolong battery life or comply with regulations in areas where wireless communications are considered hazardous.1. Press the key to enter the menu.2.3. key (locator) or the key (transmitter) to enter the BT menu.4. Scroll up or down to the OFF option.5. Press the key to switch Bluetooth off and return to the previous menu. Pairing to a PDA or PCConnection requirements:• Any RD7000+ locator.• A compatible Bluetooth enabled PDA or Bluetooth enabled PC or Laptop.NOTE: The procedure below describes the pairing process between a RD7000+ locator and a PDA. Pairing to a PC follows the same steps for the RD7000+ locator and similar steps for your PC or laptop. Consult your PC or laptop Bluetooth pairing instructions to pair with the RD7000+ locator.Pair the RD7000+ locator to your PDA using your PDA’s Bluetooth software.NOTE: The procedure for pairing your PDA may differ depending on the PDA make and model. The following procedure should apply to most PDAs.On the locator:1. Press the key to enter the menu.2.3.4. Scroll up or down to the PAIR menu.E N G L I S 5.6. Scroll up or down to the BT-PC option.7. Press thekey and the locator will attempt to pair with your PDA.On your PDA:8. From the PDA’s Start menu , select Settings then select the Connections Tabfollowed by the Bluetooth icon.9. Ensure the Bluetooth radio is switched on and make the PDA visible to other devices.10. Select the Devices tab and scan for new partnerships.11. Create a partnership with the RD7M_xxx device.12. If asked for a passkey, enter 1234.13. Select the COM Ports tab and make a New Outgoing Port with the RD7000+locator. Note the port number of the selected COM port.TroubleshootingSuccessful wireless communication depends on a number of factors including: battery life, electromagnetic interference, device memory and physical obstructions.Ensure that the RD7000+ locator and any other wireless device is sufficiently charged for wireless communication. Note that many PDAs will suspend wireless connections when their battery capacity drops below a threshold percentage. Consult your device’s documentation for more information.Excessive electromagnetic interference can effectively limit the range of wireless communication and / or corrupt data.Y our PDA device may have insufficient memory to maintain a wireless link, particularly if the connection is sustained over an hour or longer. Make sure you quit applications on your PDA using the method described in your device’s documentation.Resetting connectionsIf you experience problems with the RD7000+ wireless Bluetooth technology features, Radiodetection recommends resetting the connection and then pairing your device again:1. Press thekey to enter the menu.2.3.4. Scroll up or down to the RESET menu.5. Press the key and the locator will purge all current connections.6.Re-pair your devices. bluetooth error codesIf an error occurs when attempting to perform any Bluetooth command using the locator to the transmitter or the locator to a PC or PDA, the LCD will display a code to help you resolve the problem on the locator.The codes are as follows:Survey MeasurementsThe RD7000+ locator models can transmit survey measurements to a paired Pocket PC (or PDA) with GPS, running a compatible application such as SurveyCERT.Saving measurementsTo save survey measurements, press thekey.To achieve accurate results the locator must be kept as still as possible during the saving process.If your PC or PDA is out of reach the locator will display an error code. To avoid these errors disable the Bluetooth survey measurements transmission or ensure that your PC or PDA is within range and correctly paired.NOTE: A flashing depth and/or current reading display means that themeasurement is poor and should be taken again. Poor readings may be caused by nearby conductors or sources of electromagnetic interference.To obtain SurveyCERT for PDA:SurveyCERT for PDAs and its operation manual are available as a free download from the Radiodetection website:1. Visit .2. Using the menu bar, go to Support -> SurveyCERT.3. Click on the RD7000+ SurveyCERT link to get to the SurveyCERT download pageand follow the instructions.CALSafeCALSafe enabled RD7000+ (PLM and TLM models only) are equipped with a system which does not permit them to function once they are beyond the expected service/ calibration date.When the unit is within 30 days of the service due date the unit will display at startup the number of days left. The locator will stop functioning on the service due date.Y ou can edit the CALSafe service due date or disable this function using the RD Manager PC software. Refer to its operation manual for further information. Automatic LoggingRD7000+ logging models (PLM and TLM) offer a powerful data logging system which records all the instrument’s critical parameters and warnings in its internal memory at the rate of 1/sec.The automatic logging system is always active and cannot be disabled. Its memory is capable of storing at least 1 year’s worth of normal usage data – based on 4 hours operation per day, 5 days per week, 20 days per month.Logs can be retrieved using the RD Manager PC application for usage analysis and survey validation. Refer to its operation manual for further information. Important noticesWhen reporting any problems to your Radiodetection Dealer or Supplier it is important to quote the unit serial number and the purchase date.This instrument, or family of instruments, will not be permanently damaged by reasonable electrostatic discharge and has been tested in accordance with IEC 801-2. However,in extreme cases temporary malfunction may occur. If this happens, switch off, wait and switch on again. If the instrument still malfunctions, disconnect the batteries for five seconds and then reinstall and switch the unit on.ComplianceEU ComplianceThis equipment complies with the following EU Directives:• R&TTE Directive: 1999/5/EC• Low Voltage Directive: 2006/95/EC• EMC Directive: 2004/108/EC FCC Compliance StatementThis equipment complies with Part 15 of the FCC Rules. Operation is subject to the following two conditions:• The equipment may not cause harmful interference.• The equipment must accept any interference received, including interference that may cause undesired operation.NOTE: This equipment has been tested and found to comply with the limitsfor a Class A digital device pursuant to Part 15 of the FCC Rules. These limitsare designed to provide reasonable protection against harmful interferencewhen the equipment is operated in a commercial environment. This equipment generates, uses, and can radiate radio frequency energy and, if not installedand used in accordance with the manufacturer’s instruction manual, may cause harmful interference with radio communications. Operation of this equipment in a residential area is likely to cause harmful interference, in which case you will be required to correct the interference at your own expense.Modifications:Any modifications made to this equipment not approved by Radiodetection may void the authority granted to the user by the FCC to operate this equipment.Industry Canada Compliance StatementsICES-003 Class A Notice:This Class A digital apparatus complies with Canadian ICES-003.Avis NMB-003, Classe A: Cet appareil numérique de la classe A est conforme à la norme NMB-003 du Canada.TrainingRadiodetection provides training services for most Radiodetection products. Our qualified instructors will train equipment operators or other personnel at your preferred location or at Radiodetection headquarters. For more information go to or contact your local Radiodetection representative.2021Care and maintenanceThe RD7000+ locator and transmitter are robust, durable and weatherproof. However you can extend your equipment’s life by following these care and maintenance guidelines. GeneralStore the equipment in a clean and dry environment.Ensure all terminals and connection sockets are clean, free of debris and corrosion and are undamaged.Do not use this equipment when damaged or faulty.batteries and power supplyUse good quality Alkaline or NiMH batteries only.When using an AC adapter, use only Radiodetection approved adapters.Only use Radiodetection approved Li-Ion battery packs.Batteries should be disposed of in accordance with your company’s work practice, and/ or any relevant laws or guidelines in your country.CleaningWARNING! Do not attempt to clean this equipment when it is powered or connected to any power source, including batteries, adapters and live cables. Ensure the equipment is clean and dry whenever possible.Clean this equipment with soft, moistened cloth.If using this equipment in foul water systems or other areas where biological hazards may be present, use an appropriate disinfectant.Do not use abrasive materials or chemicals as they may damage the casing, including the reflective labels.Do not use high pressure hoses.DisassemblyDo not attempt to disassemble this equipment under any circumstances. The locator and transmitter contain no user serviceable parts.Disassembly may damage the equipment and or reduce its performance and may void the manufacturer’s warranty.Service and maintenanceThe locator and transmitter are designed so that they do not require regular calibration. However, as with all safety equipment, it is recommended that they are serviced at least once a year either at Radiodetection or an approved repair center.Regularly check your equipment using eCert; this automatic validation test ensures the equipment is valid according to its original factory calibration.NOTE: Service by non-approved service centers or operators may void the manufacturer’s warranty.Radiodetection products, including this guide, are under continuous development and are subject to change without notice. Go to or contact your local Radiodetection representative for the latest information regarding the RD7000+ locator or any Radiodetection product.RD ManagerThe RD Manager is the RD7000+ locator system PC companion and it allows you to manage and customize your locator. It also allows software upgrades to both the locator and transmitter.Y ou can use RD Manager to register your products to obtain 2 years extended warranty, setup your locator by performing a number of maintenance tasks such adjusting date and time, activating and de-activating active frequencies or RF markers, or by setting-up functions like CALSafe or Strike Alert.RD Manager is also used to retrieve and analyze internal logged data (PLM and TLM only).RD Manager is compatible with PCs running Microsoft Windows XP, Vista, Windows 7 and Windows 8.For more information about RD Manager refer to its operation manual.To obtain RD Manager:1. Go to /RDManager.2. Follow the instructions.Software UpgradesFrom time to time, Radiodetection may release software upgrades to enhance features and improve performance of the RD7000+ locator or transmitter.Software upgrades are free of charge.Y ou can check if your products are up-to-date or upgrade them by using the RD Manager software upgrade screen. Refer to its operation manual for further information.E-mail alerts and notification of new software releases are sent to all registered users. NOTE: To be able to upgrade your products software you need to have created an account using RD Manager and you need a live internet connection. An optional special PSU adaptor may be required to update your transmitter software.2223。
RAD-7测氡仪操作规程一、仪器工作原理及性能:RAD-7测氡仪是利用α能谱测定法的原理,来对空气中的氡含量进行测定的仪器,可对氡进行全面测量,能在多种模式下工作以完成不同测试目的。
二、仪器操作:1. 开机前的准备使用前电池应充足电,干燥筒中应有足量的干燥剂,将RAD-7与各部件连接好,准备开机。
2. 正常操作步骤2.1打开RAD-7电源,按下“meau”键,再按“Enter”进入“Test”选项,用方向键选择“Test Purge”(测试净化),按“Enter”键进入,气泵工作,开始净化,让仪器净化5分钟以上,净化好后,按“meau”键,停止净化。
2.2设置运行方案2.2.1在“Setup”选项中选择“Protocol”(预置协议),按“Enter”确认后,从中选择测试方案One day,再按“Enter”确认。
2.2.2在“Setup”中选择“Cycle”(周期时间),设定所需周期时间,可设为30min。
2.2.3在“Setup”中选择“Recycle”(循环次数),按需要设定次数,可设为4次。
2.2.4在“Setup”中选择“mode”(模式),选择所需模式,可以选择Auto(自动)。
2.2.5在“Setup”中选择“Thoron”(钍气),选择“off”(关)。
2.2.6在“Setup”中选择“Pump”(泵体),选择泵工作模式,可以选择Auto(自动)。
2.2.7在“Setup”中选择“Format”(格式),选择打印格式(有短、中、长、关四种格式)。
选择short(短),则打印出来的第一行第二个数据就是氡浓度。
2.2.8关闭RAD-7,打开打印机,开启RAD-7即可打印设置情况,如无需打印,可略过这步3. 开始测试3.1在“Test”中选择“Start”(开始),按“Enter”确认,仪器开始工作,测量完成后,测量数据将自动被存储,如连接打印机,将自动打印在打印纸上。
3.2将一次运转的数据的总结报告和时间图表打印出来,Data(选择)>Summary(数据总结),并输入二位数的运行序号,就可以打印出信息。
美国GSSI公司RADAN7地质雷达处理软件说明书劳雷公司邓新生2013年1月1日Radan 7 guide for data processingRadan 7数据处理指南1.设置数据路径。
菜单Home->window->properties对话框properties->global parameters ->File parameters->Source Directory2.数据文件加载与显示。
选择菜单->open或者快捷方式Ctrl+O,打开文件。
菜单Home->Color tables, color Xforms,设置颜色表格和颜色对比对。
3.数据编辑。
菜单processing->adjust scans->edit block设置start scan和end scan,选择block operation选项save保存,delete删除。
4.文件反向。
菜单G->Save as->radan file reversed.删除dzx数据库文件,并重新打开翻转后的dzt数据文件。
5.距离归一化。
6.添加里程信息。
Home状态下,选择tables。
Tables->profiles->start Dist(m),输入起始里程。
Tables->profiles->Dist decrem,选择此项,桩号从大到小。
7.水平刻度调整。
Processing->adjust scans->horizontal Scaling。
8.地面调整。
9.地面时间调整。
10.设置介电常数11.调整增益。
Processing->Gain->range gain。
Range gain->gain type选择automatic. # of points设置为5.Range gain->gain type选择Exponential. 手动设置增益值.12.水平信号增强。
建筑材料放射性和室内氡浓度检测技术γ谱仪与建筑材料放射性比活度检测技术对于执行GB6566和 GB50325的检测实验室来说,一般不必购买价格昂贵的高纯锗γ谱仪,只须配备合格的碘化钠γ谱仪就能完成检测任务.碘化钠Nal(TI)γ谱仪由探测器、数据采集系统(包括数据采集软件)及γ谱分析软件组成。
其中探测器由碘化钠晶体、光电倍增管、前置放大器及铝壳组成;数据采集系统由高低压电源。
放大器、多道分析器组成;而多道分析器由模数变换器(AD C)、多道数据采集卡和多道仿真软件组成.(1)选用合格的低本底多道碘化钠γ能谱仪现在国内涉及到碘化钠γ谱仪使用的相关标准有2个,即GBll743-89《土壤中放射性核素的γ能谱分析方法》和GB/T16143—1995《建筑物表面氡析出率的活性炭测量方法》,标准中规定碘化钠晶体尺寸不小于7.5cmX7.5cm,屏蔽室的等效铅当量不小于10cm。
因为γ谱仪要测量的镭—226、钍—232、钾一40核素在地球上任何一个地方都存在,实验室的地面、天花板、四面墙壁都会产生这些核素的γ光子。
这些γ光子能穿透铅室进入碘化钠探测器,如铅室厚度不够,γ谱仪本底会很高;碘化钠晶体尺寸小,γ谱仪探测效率低,γ谱仪测样品时的计数接近γ谱仪测本底时的计数,γ谱仪测得的样品净计数的统计误差大,根据样品净计数计算出的样品比活度分散性很大,测量结果达不到GB6566和GB50325的要求.①探测器:一般用中Φ 7.6cm X 7.6cm碘化钠晶体,分辨率应小于 9%(分辨率是指137Cs的661.66keV峰的半高宽(FWHM)除以661.66keV峰的峰位)。
一般进口探测器的分辨率小于7.5%,实际测量7%左右;国产探测器的分辨率7%~10%。
为此建议用户购买进口探测器。
②铅室:屏蔽层铅厚度应不小干10cm。
内腔大的因散射小,屏蔽效果较好,内腔直径Φ220mm的铅室比较适宜.本底计数率应不大干5cps(每秒计数),测本底计数率用3”X3"(7。
RESPECT IS EVERYTHINGRESPECT IS EVERYTHINGRESPECT IS EVERYTHINGRESPECT IS EVERYTHINGRESPECT IS EVERYTHINGRESPECT IS EVERYTHINGRESPECT IS EVERYTHINGRESPECT IS EVERYTHINGRESPECT IS EVERYTHINGRESPECT IS EVERYTHING ENGLISHUses Miles Sound System. Copyright © 1991-1999 by RAD Games Tools, Inc. Uses Bink Video.Copyright © 1994-1999 by RAD Games Tools, Inc.W ARNING!Some people are susceptible to epileptic seizures or loss of consciousness when exposed to certain flashing lights or light patterns in everyday life. Such people may have a seizure while watching television images or playing certain video games. This may happen even if the person has no medical history of epilepsy or has never had any epileptic seizures. If you or anyone in your family has ever had symptoms related to epilepsy (seizures or loss of consciousness) when exposed to flashing lights, consult your doctor prior to playing. If you or your child experience any of the following symp-toms: dizziness, blurred vision, eye or muscle twitches, loss of consciousness, disori-entation, any involuntary movement or convulsion, while playing a video game, IMME-DIA TEL Y discontinue use and consult your doctor.PRECAUTIONS- Always play in a well lit room and sit as far away from the monitor screen as possible. - A void playing if you are tired or have not had much sleep.- Rest for at least 10 to 15 minutes in every hour of playing.GRAND THEFT AUTO 2Grand Theft Auto and G.T.A. are trademarks of Rockstar Games.Rockstar Games is a division of Take Two Interactive Software Inc. DMA and theDMA logo are trademarks of DMA Design Ltd. For home use only. Unauthorized copy-ing, adaptation, rental, leasing, re-sale, arcade use, charging for use, broadcast, cable transmission, public performance, distribution or extraction of this product or any trademark or copyright work that forms part of this product are prohibited. Developed by DMA Design Ltd. Published in North America by Rockstar Games. All trademarks are protected. Other copyrights are property of their respective holders. © 1999 Rockstar Games. All rights reserved.IF YOU W ANT TO IMAGINE THE FUTURE, IMAGINE A BOOT STAMPING ON AHUMAN FACE FOREVER.- George Orwell: 1984。