3实训三交换机VLAN配置
- 格式:doc
- 大小:53.50 KB
- 文档页数:4

实验 3 VLAN基本配置一、实验目的掌握交换机上创建VLAN、分配静态VLAN 成员的方法。
二、实验任务1、配置两个VLAN:VLAN 2 和VLAN 3 并为其分配静态成员。
2、测试VLAN 分配结果。
三、实验设备Cisco 交换机一台,工作站PC 四台,直连网线四条,控制台电缆一条。
四、实验环境实验环境如图所示。
五、实验步骤1、运行Cisco Packet Tracer 软件,在逻辑工作区放入一台交换机和四台工作站PC,用直通线(CopperStraight-Through)连接交换机和工作站PC。
2、分别点击工作站PC0~PC3,进入其配置窗口,选择桌面(Desktop)项,选择运行IP 设置(IPConfiguration),如图所示,设置IP 地址和子网掩码分别为:3、划分VLAN 之前测试工作站PC 间的连通性:从PC0 到PC1 的测试,点击工作站PC0,进入其配置窗口,选择桌面(Desktop)项,选择运行DOS 命令行(Command Prompt),打开DOS 命令行窗口,在DOS 提示符下输入:ping 192.168.1.2 后,回车确认,测试结果表示连通。
同理,从PC0 到PC2 的测试结果也为连通。
而从PC0 到PC3 的测试结果不连通,因为不在同一网段。
4、创建VLAN 2 和VLAN 3点击交换机进入其配置界面,选择命令行(CLI)项。
输入命令,创建VLAN 2 和VLAN 3。
5、输入如图所示命令,静态分配VLAN 成员,将交换机上的端口2、3、4 分配成VLAN 2的成员,端口5、6、7 分配成VLAN 3 的成员。
6、测试划分VLAN 后工作站PC 间的连通性从PC0 到PC1 的测试,点击工作站PC0,进入其配置窗口,选择桌面(Desktop)项,选择运行DOS命令行(Command Prompt),打开DOS 命令行窗口,在DOS 提示符下输入:ping 192.168.1.2 后,回车确认,如图所示。


计算机网络实验三——交换机VLAN配置实验一、实验目的1.进一步熟悉华为S3026交换机基本命令;2.了解VLAN的作用及其分类;3.掌握划分VLAN的方法;4.跨交换机的VLAN配置方法;5.理解生成树协议STP的作用。
二、实验原理2.1VLAN原理虚拟LAN(Virtual Local Area Networks,VLAN)是一个在物理网络上根据用途,工作组、应用等来逻辑划分的局域网络,是一个广播域,与用户的物理位置没有关系。
VLAN中的网络用户是通过LAN交换机来通信的。
同一个VLAN中的所有成员共同拥有一个VLAN ID,组成一个虚拟局域网络;同一个VLAN中的成员均能收到同一个VLAN中的其他成员发来的广播包,但收不到其他VLAN中成员发来的广播包;不同VLAN成员之间不可直接通信,需要通过路由支持才能通信,而同一VLAN中的成员通过VLAN交换机可以直接通信,不需路由支持。
2.2 交换机S3026视图及命令交换机上电后,将首先运行BOOTROM程序,终端屏幕上显示一系列信息。
最后回车后,终端屏幕显示如下用户视图,用户可以开始对交换机进行配置。
<Quidway>2.2.1 S3026有如下配置视图●用户视图:查看交换机简单运行状态,使用system命令进入系统视图。
●系统视图:配置交换机系统参数,并通过该视图进入其他功能视图。
●以太网端口视图:配置交换机接口相关参数●VLAN视图:配置Vlan2.2.3以太网端口配置命令三、实验内容3.1单交换机VLAN配置1.按照图3-1所示连接好设备;2.为计算机配置相应的IP地址;3.通过超级终端对交换机A作如下设置把端口2—4设置为VLAN2,把端口5—7设置为VLAN3;[SwitchA]vlan 2[SwitchA-vlan2]port e0/2[SwitchA-vlan2]port e0/3 to e0/4[SwitchA-vlan2]vlan 3[SwitchA-vlan3]port e0/5 to e0/7[SwitchA]dis vlan all[SwitchA]dis current4.验证同一VLAN中的两台计算机能否通信,不同计算机之间的计算机能否通信,并记录结果3.2 跨交换机VLAN配置1.按照图3-2所示连接好设备;2.为每台主机配置相应的IP地址;3.通过超级终端对交换机A作如下设置把端口2—4设置为VLAN2,把端口5—7设置为VLAN3;[SwitchA]vlan 2[SwitchA-vlan2]port e0/2[SwitchA-vlan2]port e0/3 to e0/4[SwitchA-vlan2]vlan 3[SwitchA-vlan3]port e0/5 to e0/7[SwitchA]dis vlan all[SwitchA]dis current交换机互联端口设置:[SwitchA] interface e0/8[SwitchA-Ethernet0/8] port link-type trunk[SwitchA-Ethernet0/8] port trunk permit vlan all4.通过超级终端对交换机B作同样设置;5.验证同一VLAN中的两台计算机能否通信,不同计算机之间的计算机能否通信,并记录结果;6.在交换机之间增加一根连线,在主机上用ping 命令测试同一VLAN上两台主机的连通性,此时有什么现象。

实验三虚拟局域网配置在当今数字化的时代,网络技术的发展日新月异,虚拟局域网(VLAN)作为一种重要的网络技术,在提高网络性能、增强安全性和简化管理方面发挥着关键作用。
本次实验的主要目的就是深入了解并掌握虚拟局域网的配置方法,通过实际操作来感受其在网络架构中的应用和优势。
一、实验背景与目的随着企业规模的不断扩大和网络应用的日益复杂,传统的局域网架构已经难以满足需求。
不同部门之间的网络访问需求各异,对安全性和性能的要求也不尽相同。
虚拟局域网技术的出现,为解决这些问题提供了有效的手段。
本次实验的目的在于:1、理解虚拟局域网的工作原理和概念,包括 VLAN 的划分方式、VLAN 间的通信机制等。
2、掌握在交换机上进行虚拟局域网配置的具体步骤和命令。
3、观察并分析虚拟局域网配置对网络性能和安全性的影响。
4、培养解决实际网络问题的能力,提高网络管理的技能水平。
二、实验设备与环境本次实验所需的设备包括:1、若干台支持 VLAN 功能的交换机,如 Cisco、Huawei 等品牌。
2、若干台计算机,用于连接到交换机进行测试和验证。
3、网络线缆若干,用于连接设备。
实验环境搭建在一个局域网内,确保所有设备能够正常通信,并为每台设备分配了相应的 IP 地址。
三、实验原理虚拟局域网(VLAN)是一种将局域网内的设备逻辑地划分成不同网段的技术。
通过 VLAN 的划分,可以将一个物理的局域网在逻辑上划分成多个不同的广播域,从而有效地控制广播风暴的传播范围,提高网络的性能和安全性。
VLAN 的划分方式有多种,常见的有基于端口的划分、基于 MAC 地址的划分、基于网络层协议的划分等。
在本次实验中,我们主要采用基于端口的划分方式,即将交换机的不同端口划分到不同的 VLAN 中。
VLAN 间的通信需要通过三层设备(如路由器或三层交换机)来实现。
在配置 VLAN 时,需要为每个 VLAN 分配一个 VLAN ID,并设置相应的端口模式(如 Access 端口和 Trunk 端口)。
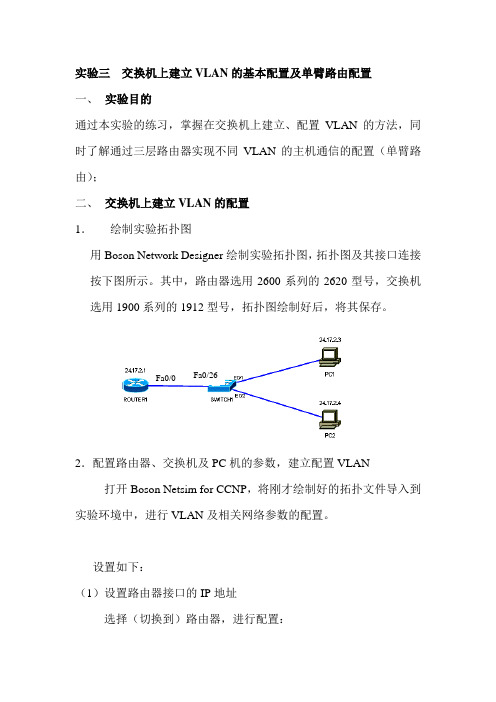
实验三 交换机上建立VLAN 的基本配置及单臂路由配置一、 实验目的通过本实验的练习,掌握在交换机上建立、配置VLAN 的方法,同时了解通过三层路由器实现不同VLAN 的主机通信的配置(单臂路由);二、 交换机上建立VLAN 的配置1. 绘制实验拓扑图用Boson Network Designer 绘制实验拓扑图,拓扑图及其接口连接按下图所示。
其中,路由器选用2600系列的2620型号,交换机选用1900系列的1912型号,拓扑图绘制好后,将其保存。
2.配置路由器、交换机及PC 机的参数,建立配置VLAN打开Boson Netsim for CCNP ,将刚才绘制好的拓扑文件导入到实验环境中,进行VLAN 及相关网络参数的配置。
设置如下:(1)设置路由器接口的IP 地址选择(切换到)路由器,进行配置: Fa0/26Fa0/0命令如下:Router>enableRouter#Router#conf tRouter(config)#hostname Router 1Router 1(config)#Router 1(config)#interface Fast0/0Router 1(config-if)#ip add 24.17.2.1 255.255.255.0Router 1(config-if)#no shut(2)设置两台PC机的IP地址、子网掩码和默认网关命令如下:C:>winipcfgPC1的设置如下:24.17.2.3 255.255.255.0 24.17.2.1PC2的设置如下:24.17.2.4 255.255.255.0 24.17.2.1(3)在PC2机上试着Ping路由器和PC1机,验证其结果。
C:>ping 24.17.2.1C:>ping 24.17.2.3(4)切换到交换机上,在交换机上建立一个VLAN(编号为22,名称为pcs),并将以太网端口1分配给这个VLAN命令如下:>en#config t(config)#vlan 22 name pcs(config)#int e0/1(config-if)#vlan-membership static 22(5)此时,再回到PC2机上试着Ping路由器和PC1机,验证其结果,与上次有何不同。
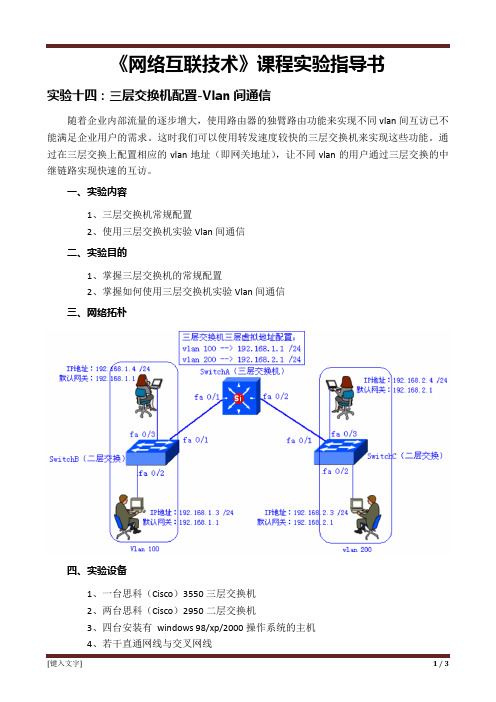
《网络互联技术》课程实验指导书实验十四:三层交换机配置-Vlan间通信随着企业内部流量的逐步增大,使用路由器的独臂路由功能来实现不同vlan间互访已不能满足企业用户的需求。
这时我们可以使用转发速度较快的三层交换机来实现这些功能。
通过在三层交换上配置相应的vlan地址(即网关地址),让不同vlan的用户通过三层交换的中继链路实现快速的互访。
一、实验内容1、三层交换机常规配置2、使用三层交换机实验Vlan间通信二、实验目的1、掌握三层交换机的常规配置2、掌握如何使用三层交换机实验Vlan间通信三、网络拓朴四、实验设备1、一台思科(Cisco)3550三层交换机2、两台思科(Cisco)2950二层交换机3、四台安装有windows 98/xp/2000操作系统的主机4、若干直通网线与交叉网线5、思科(Cisco)专用控制端口连接电缆五、实验过程(需要将相关命令写入实验报告)1、根据上述图示进行交换机与主机的连接2、设置主机的IP地址、子网掩码和默认网关3、在二层交换机上添加VLAN,并按如上图示进行端口的划分,同时设置与三层交换机相连的端口为trunk模式(1)配置二层交换机BSwitch> enableSwitch# vlan databaseSwitch(vlan)# vlan 100Switch(vlan)# exitSwitch# configure terminalSwitch(config)# hostname SwitchBSwitchB(config)# interface fastethernet 0/1SwitchB(config-if)# switchport mode trunkSwitchB(config-if)# switchport trunk encapsulation dot1qSwitchB(config-if)# exitSwitchB(config)# interface fastethernet 0/2SwitchB(config-if)# switchport mode accessSwitchB(config-if)# switchport access vlan 100SwitchB(config-if)# exitSwitchB(config)# interface fastethernet 0/3SwitchB(config-if)# switchport mode accessSwitchB(config-if)# switchport access vlan 100SwitchB(config-if)# exit(2)配置二层交换机CSwitch> enableSwitch# vlan databaseSwitch(vlan)# vlan 200Switch(vlan)# exitSwitch# configure terminalSwitch(config)# hostname SwitchCSwitchC(config)# interface fastethernet 0/1SwitchC(config-if)# switchport mode trunkSwitchC(config-if)# switchport trunk encapsulation dot1qSwitchC(config-if)# exitSwitchC(config)# interface fastethernet 0/2SwitchC(config-if)# switchport mode accessSwitchC(config-if)# switchport access vlan 200SwitchC(config-if)# exitSwitchC(config)# interface fastethernet 0/3SwitchC(config-if)# exit4、在三层交换机上添加Vlan,并设置各Vlan的虚拟三层地址,同时设置与二层交换机相连的端口为Trunk模式Switch> enableSwitch# vlan databaseSwitch(vlan)# vlan 100Switch(vlan)# vlan 200Switch(vlan)# exitSwitch# configure terminalSwitch(config)# hostname SwitchASwitchA(config)# interface vlan 100SwitchA(config-if)# ip address 192.168.1.1 255.255.255.0SwitchA(config-if)# exitSwitchA(config)# interface vlan 200SwitchA(config-if)# ip address 192.168.2.1 255.255.255.0SwitchA(config-if)# exitSwitchA(config)# interface fastethernet 0/1SwitchA(config-if)# switchport mode trunkSwitchA(config-if)# switchport trunk encapsulation dot1qSwitchA(config-if)# exitSwitchA(config)# interface fastethernet 0/2SwitchA(config-if)# switchport mode trunkSwitchA(config-if)# switchport trunk encapsulation dot1qSwitchA(config-if)# exit5、启动三层交换机的IP路由转发功能(请在启动IP路由功能5分钟后再进行ping连通测试)SwitchA(config)# ip routing六、思考问题1、请简述三层交换机的工作原理。
实验十三:Vlan间通信—单臂路由配置实现单臂路由需要在路由器的一个物理接口上设置多个逻辑子接口,并且每个逻辑子接口应该对应于一个VLAN,最终路由器通过一个物理接口的多个逻辑子接口实现多个Vlan间数据包的转发。
由于物理路由接口只有一个,各子接口的数据在物理链路上传递要进行标记封装。
Cisco 设备支持ISL和802.1q协议。
华为设备只支持802.1q。
一、实验内容1、Vlan添加及端口划分2、路由器子接口配置3、实现单臂路由二、实验目的1、掌握路由器子接口配置2、掌握单臂路由的实现原理和操作过程三、网络拓朴四、实验设备1、一台思科(Cisco)3620路由器2、一台思科(Cisco)2950二层交换机3、四台安装有 windows 98/xp/2000操作系统的主机4、若干直通网线与交叉网线,思科(Cisco)专用控制端口连接电缆五、注意事项1、必须在路由器的 fastethernet 端口中做单臂路由实验,而不能使用路由器的ethernet 端口。
2、在本实验中,同一个VLAN中的主机IP地址在同一网络内,不同VLAN中主机的IP 地址不在一个网络内。
3、配置子接口的情况下,物理接口上绝不能有第三层地址,而且必须打开接口。
六、实验过程(需要将相关命令写入实验报告)1、根据上述图示进行交换机、路由器、主机的连接2、设置主机的IP地址、子网掩码和默认网关3、在二层交换机上添加VLAN,并按如上图示进行端口的划分Switch> enableSwitch# vlan dataSwitch(vlan)# vlan 100 name vlan100Switch(vlan)# vlan 200 name vlan200Switch(vlan)# exitSwitch# configure terminalSwitch(config)# interface fastethernet 0/2Switch(config-if)# switchport mode accessSwitch(config-if)# switchport access vlan 100Switch(config-if)# exitSwitch(config)# interface fastethernet 0/3Switch(config-if)# switchport access vlan 100Switch(config-if)# exitSwitch(config)# interface fastethernet 0/6Switch(config-if)# switchport mode accessSwitch(config-if)# switchport access vlan 200Switch(config-if)# exitSwitch(config)# interface fastethernet 0/7Switch(config-if)# switchport mode accessSwitch(config-if)# switchport access vlan 200Switch(config-if)# exit4、设置与路由器相连交换机端口为Trunk端口Switch# configure terminalSwitch(config)# interface fastethernet 0/1Switch(config-if)# switchport mode trunkSwitch(config-if)# switchport trunk encapsulation dot1qSwitch(config-if)# exit5、配置与交换机相连路由器接口(有多少个VLAN就需要添加多少子接口)Router> enableRouter# configure terminalRouter(config)# interface fastethernet 0/0Router(config-if)# no ip addressRouter(config-if)# no shutdownRouter(config-if)# interface fastethernet 0/0.1Router(config-subif)# encapsulation dot1q 10Router(config-subif)# ip address 192.168.1.1 255.255.255.0Router(config-subif)# exitRouter(config)# interface fastethernet 0/0.2Router(config-subif)# encapsulation dot1q 20Router(config-subif)# ip address 192.168.2.1 255.255.255.0Router(config-subif)# exit6、VLAN间进行通信(PC1→PC3)●ipconfigBoson BOSS 5.0 IP ConfigurationEthernet adapter Local Area Connection:IP Address. . . . . . . . . . . . : 192.168.1.3Subnet Mask . . . . . . . . . . . : 255.255.255.0Default Gateway . . . . . . . . . : 192.168.1.1●ping 192.168.2.3Reply from 192.168.2.3: bytes=32 time=60ms TTL=241Reply from 192.168.2.3: bytes=32 time=60ms TTL=241Reply from 192.168.2.3: bytes=32 time=60ms TTL=241Reply from 192.168.2.3: bytes=32 time=60ms TTL=241Reply from 192.168.2.3: bytes=32 time=60ms TTL=241Ping statistics for 192.168.2.3: Packets: Sent = 5, Received = 5,Lost = 0 (0% loss),Approximate round trip times in milli-seconds:Minimum = 50ms, Maximum = 60ms, Average = 55ms七、思考问题1、请简述单臂路由的原理。
实验三:交换机基本配置和VLAN配置⏹实验目的1、掌握交换机和vlan的工作原理2、学习配置交换机基本配置命令和步骤3、学习配置vlan命令和步骤⏹实验要求1、拓扑与地址规划;2、交换机基本配置和vlan配置3、验证配置并给出配置清单⏹实验拓扑⏹实验设备(环境、软件)交换机2台,直通线4条,交叉线1条,Pc机4台。
⏹实验设计到的基本概念和理论交换机的基本概念:1、交换机使用下面的两种转发方法之一来进行网络端口间的数据交换:存储转发交换或直通交换。
.2、配置执行模式口令:- enable password 命令存在的一个问题是,它将口令以可阅读文本的形式存储在startup-config 和running-config 中。
- 在全局配置模式提示符下输入enable secret 命令以及所要的口令,这样即可指定加密形式的enable口令。
如果配置了enable secret口令,则交换机将使用enable secret口令,而不使用enable password口令。
3、enable口令恢复:- 万一遗失或遗忘了访问口令,Cisco 提供了口令恢复机制以便于管理员仍能访问其Cisco 设备。
口令恢复过程需要实际接触设备。
-并不能实际恢复Cisco 设备上的口令,尤其是在已启用口令加密的情况下,但是可以将口令重设为新值。
-系统在初始化闪存文件系统之前已中断。
以下命令将初始化闪存文件系统,并完成操作系统软件的加载:flash_initload_helperbootvlan(虚拟局域网)的基本概念:1、VLAN 交换机端口模式-静态VLAN -交换机上的端口以手动方式分配给VLAN-动态VLAN-使用VMPS 可以根据连接到交换机端口的设备的源MAC 地址,动态地将端口分配给VLAN-语音VLAN -将端口配置到语音模式可以使端口支持连接到该端口的IP 电话 实验过程和主要步骤地址规划如下所示:1、交换机Switch0上的配置如下:Switch>enableSwitch#config tEnter configuration commands, one per line. End with CNTL/Z.Switch(config)#line con 0Switch(config-line)#password ciscoSwitch(config-line)#loginSwitch(config-line)#exitSwitch(config)#enable secret yaoSwitch(config)#end%SYS-5-CONFIG_I: Configured from console by consoleSwitch#config tEnter configuration commands, one per line. End with CNTL/Z.Switch(config)#vlan 10Switch(config-vlan)#exitSwitch(config)#vlan 20Switch(config-vlan)#exitSwitch(config)#interface f0/1Switch(config-if)#switchport access vlan 10Switch(config-if)#endSwitch#%SYS-5-CONFIG_I: Configured from console by consoleSwitch#config tEnter configuration commands, one per line. End with CNTL/Z.Switch(config)#interface f1/1Switch(config-if)#switchport mode accessSwitch(config-if)#switchport access vlan 20Switch(config-if)#exitSwitch(config)#interface f2/1Switch(config-if)#switchport mode trunkSwitch(config-if)#end%SYS-5-CONFIG_I: Configured from console by consoleSwitch#copy running-config startup-configDestination filename [startup-config]?Building configuration...[OK]Switch#2、交换机Switch1上的配置如下:Switch>enableSwitch#config tEnter configuration commands, one per line. End with CNTL/Z.Switch(config)#vlan 10Switch(config-vlan)#exitSwitch(config)#vlan 20Switch(config-vlan)#exitSwitch(config)#interface f0/1Switch(config-if)#switchport mode accessSwitch(config-if)#exitSwitch(config)#interface f1/1Switch(config-if)#switchport mode accessSwitch(config-if)#switchport access vlan 20Switch(config-if)#exitSwitch(config)#interface f2/1Switch(config-if)#switchport mode trunk%LINEPROTO-5-UPDOWN: Line protocol on Interface FastEthernet2/1, changed state to down%LINEPROTO-5-UPDOWN: Line protocol on Interface FastEthernet2/1, changed state to upSwitch(config-if)#end%SYS-5-CONFIG_I: Configured from console by consoleSwitch#copy running-config startup-configDestination filename [startup-config]?Building configuration...[OK]Switch#3、验证交换机上相同vlan的通信情况PC0与PC1位于同一个vlan中,验证如下:PC2与PC3位于同一个vlan中,验证如下:心得体会如下问题的解决方案:1、给出同一交换机上相同vlan通信方案;同一交换机上相同vlan之间的通信与同一局域网之间的通信是一样的。
设置VTP domain(核心、分支交换机都设置)Switch>enSwitch#config tSwitch(config)#hostname switch-hxswitch-hx(config)#exitswitch-hx#vlan dataswitch-hx(vlan)#vtp domain comswitch-hx(vlan)#vtp serverswitch-hx(vlan)# exitswitch-hx#copy run startSwitch>enSwitch#config tSwitch(config)#hostname switch-fz1switch-fz1(config)#exitswitch-fz1#vlan dataswitch-fz1(vlan)#vtp domain comswitch-fz1(vlan)#vtp clientswitch-fz1(vlan)#exitswitch-fz1#copy run startSwitch>enSwitch#config tSwitch(config)#hostname switch-fz2switch-fz2(config)#exitswitch-fz2#vlan dataswitch-fz2(vlan)#vtp domain comswitch-fz2(vlan)#vtp clientswitch-fz2(vlan)#exitswitch-fz2#copy run startSwitch>enSwitch#config tSwitch(config)#hostname switch-fz2switch-fz4(config)#exitswitch-fz4#vlan dataswitch-fz4(vlan)#vtp domain comswitch-fz4(vlan)#vtp clientswitch-fz4(vlan)#exitswitch-fz4#copy run startSwitch>enSwitch#config tSwitch(config)#hostname switch-fz5Switch-fz5(config)#exitSwitch-fz5#vlan dataSwitch-fz5(vlan)#vtp domain comSwitch-fz5(vlan)#vtp clientSwitch-fz5(vlan)#exitSwitch-fz5#copy run start将端口设置为trunk端口switch-hx>enswitch-hx#config tswitch-hx(config)#int g0/1switch-hx(config-if)#switchport mode trunk switch-hx(config-if)#exitswitch-hx(config)#int g0/2switch-hx(config-if)#switchport mode trunk switch-hx(config-if)#exitswitch-hx#copy run startswitch-fz1>enswitch-fz1#config tswitch-fz1(config)#int g1/1switch-fz1(config-if)#switchport mode trunk switch-fz1(config-if)#exitswitch-fz1(config)#int f0/1switch-fz1(config-if)#switchport mode trunk switch-fz1(config-if)#exitswitch-fz1(config)#int f0/2switch-fz1(config-if)#switchport mode trunk switch-fz1(config-if)#endswitch-fz1#copy run startswitch-fz2>enswitch-fz2#config tswitch-fz2(config)#int f0/1switch-fz2(config-if)#switchport mode trunk switch-fz2(config-if)#endswitch-fz2#copy run startswitch-fz3>enswitch-fz3#config tswitch-fz3(config)#int f0/1switch-fz3(config-if)#switchport mode trunk switch-fz3(config-if)#endswitch-fz3#copy run startswitch-fz3#switch-fz4>enswitch-fz4#config tswitch-fz4(config)#int g1/1switch-fz4(config-if)#switchport mode trunk switch-fz4(config-if)#exitswitch-fz4(config)#int f0/1switch-fz4(config-if)#switch mode trunk switch-fz4(config-if)#endswitch-fz4#copy run startswitch-fz4#switch-fz5>enswitch-fz5#config tswitch-fz5(config)#int f0/1switch-fz5(config-if)#switchport mode trunk switch-fz5(config-if)#endswitch-fz5#copy run startswitch-fz5#在核心交换机上建立VLANswitch-hx(vlan)#vlan 10 name aaaVLAN 10 added:Name: aaaswitch-hx(vlan)#vlan 11 name bbbVLAN 11 added:Name: bbbswitch-hx(vlan)#将交换机端口划入VLANswitch-fz1>enswitch-fz1#config tswitch-fz1(config)#int f0/3switch-fz1(config-if)#switchport access vlan 10 switch-fz1(config-if)#exitswitch-fz1(config)#int f0/4switch-fz1(config-if)#switchport access vlan 11 switch-fz1(config-if)#endswitch-fz1#copy run startswitch-fz2>enswitch-fz2#config tswitch-fz2(config)#int f0/3switch-fz2(config-if)#switchport access vlan 10 switch-fz2(config-if)#exitswitch-fz2(config)#int f0/4switch-fz2(config-if)#switchport access vlan 11 switch-fz2(config-if)#endswitch-fz2#copy run startswitch-fz2#switch-fz3>enswitch-fz3#config tswitch-fz3(config)#int f0/3switch-fz3(config-if)#switchport access vlan 10 switch-fz3(config-if)#exitswitch-fz3(config)#int f0/4switch-fz3(config-if)#switchport access vlan 11 switch-fz3(config-if)#endswitch-fz3#copy run startswitch-fz3#switch-fz4>enswitch-fz4#config tswitch-fz4(config)#int f0/3switch-fz4(config-if)#switchport access vlan 10switch-fz4(config-if)#exitswitch-fz4(config)#int f0/4switch-fz4(config-if)#switchport access vlan 11switch-fz4(config-if)#endswitch-fz4#copy run starswitch-fz5>enswitch-fz5#config tswitch-fz5(config)#int f0/3switch-fz5(config-if)#switchport access vlan 10switch-fz5(config-if)#exitswitch-fz5(config)#int f0/4switch-fz5(config-if)#switchport access vlan 11switch-fz5(config-if)#endswitch-fz5#copy run startswitch-fz5#配置三层交换switch-hx>enswitch-hx#config tswitch-hx(config)#int vlan 10upswitch-hx(config-if)#ip add 192.168.91.254 255.255.255.0switch-hx(config-if)#exitswitch-hx(config)#int vlan 11switch-hx(config-if)#ip add 192.168.92.254 255.255.255.0switch-hx(config-if)#三层交换机默认已启动路由,ip routing命令可暂时不用,如路由被关掉,可用此命令。
登录3100,输入如下命令:System-viewInterface vlan-interface 1 //进入默认的VLAN端口,vlan 1 Ip address 24 //设置本机在VLAN 1 中的IP 地址Quitsave登录5100,输入如下命令:System-viewInterface vlan-interface 1Ip address 24Quitsave登录5600,输入如下命令:System-viewInterface vlan-interface 1Ip address 24Quitsave在3100上输入:PingPing同理在5100上也输入:PingPing同理在5600上也输入:PingPing至此,交换机之间的管理vlan 就可以互相通信。
三、开启TELNET登录3100,输入如下命令:System-viewUser-interface vty 0 4 //进入用户端口Authenticate-mode scheme //设置认证模式Protocol inbound all //允许telnet 和RSH 访问User privilege level 3 //设置访问级别QuitLocal-user iamcat //创建本地用户Password simple xxxxxx //设置密码Service-type telnet //访问服务类型:telnetLevel 3 //设置授权访问级别Save在5100或5600上,即可用telnet 配置3100交换机。
登录5100,输入如下命令:System-viewUser-interface vty 0 4Authenticate-mode schemeProtocol inbound allUser privilege level 3QuitLocal-user iamcatPassword simple xxxxxxService-type telnetLevel 3QuitSave在3100或5600上,即可用telnet 配置5100交换机。
实训三交换机的VLAN配置(一)
一、实训目的和要求
1、掌握交换机VLAN的概念、原理、划分方法。
2、掌握交换机配置VLAN的方法。
二、实训内容
1、在一台计算机上配置VLAN。
2、在多台交换机上配置VLAN,但交换机不跨VLAN。
三、命令格式
1、定义VLAN并设置VLAN名称
设置VLAN共有两个步骤,这是第一步。
VLAN的号码要从2开始,因为在默认情况下,交换机的所有端口都已经在VLAN1上。
VLAN名称由用户定义。
Switch#vlan database ;进入VLAN配置模式
Switch(vlan)#vlan [vlan号码] name [vlan名称] ;设置VLAN名称和号码
2、将VLAN设置应用到端口
设置VLAN共有两个步骤,这是第二步。
Switch(config)#int [端口号] ;指定VLAN适用的端口
Switch(config-if)#switchport mode access ;设置该接口为ACCESS模式
Switch(config-if)#switchport access [vlan号码] ;把端口分配给VLAN
3、查看VLAN设置情况
Switch#show vlan ;查看VLAN的设置情况
4、删除一个VLAN
Switch(vlan)#no vlan [vlan号码] ;删除VLAN
四、实训步骤
(1)pc机地址如下
ip address subnet mask default gateway HostA 10.65.1.1 255.255.0.0 10.65.1.100 HostB 10.65.1.2 255.255.0.0 10.65.1.100 HostC 10.65.1.3 255.255.0.0 10.65.1.100 HostD 10.65.1.4 255.255.0.0 10.65.1.100
(2)将这台交换机命名为Switch,其ip地址是10.65.1.10,子网掩码是255.255.0.0,缺省网关是10.65.1.100。
(3)测试4台pc之间的连通性,并解释原因。
HostA——HostB
HostA——HostC
HostA——HostD
HostB——HostC
HostB——HostD
HostC——HostD
通,都在同一物理网段和逻辑网段
(4)设置2个VLAN。
(5)将交换机的1、2号端口划分到新设置的第1个VLAN,将交换机的3、4号端口划分到新设置的第2个VLAN。
(6)再次测试pc之间的连通性,并解释原因。
HostA——HostB
HostA——HostC
HostA——HostD
HostB——HostC
HostB——HostD
HostC——HostD
(7)按照下面的图和表格在多台交换机上设置不跨交换机的VLAN。
某公司有100台计算机左右,主要使用网络的部门有:生产部、财务部、人事部和信息中心四大部分,如下图所示。
通过VLAN的划分,可以把公司主要网络划分为:生产部、财务部、人事部和信息中心四个主要部分,对应的VLAN组名为:Prod、Fina、Huma、Info,各VLAN组所对应的网段如下表所示。
其他端口如上配置,注意将端口号进行相应设置
其他端口如上配置,注意将端口号进行相应设置
其他端口如上配置,注意将端口号进行相应设置
五、思考问题
1.如果不同VLAN之间需要进行通信应该如何解决?。