SSL环境配置
- 格式:doc
- 大小:39.50 KB
- 文档页数:3

全球服务器证书SSL配置手册Lotus Domino R5北京数字证书认证中心BEIJING CERTIFICATE AUTHORITY目录1设置流程概述 (3)2设置“Server Certificate Admin”应用程序 (3)3创建密钥集文件 (4)4申请S S L服务器证书 (6)5作为信任根合并验证机构证书到服务器密钥集文件 (8)6合并以批准的服务器证书到密钥集文件 (9)7配置S S L端口 (9)1设置流程概述要设置Domino 服务器使用S S L,您需要执行下列步骤:1) 设置“Server Certificate Admin” 应用程序( C E RT S RV. N S F ),Domino 在服务器安装时自动创建该应用程序。
2) 创建服务器密钥集文件用来保存服务器证书。
3) 向验证机构申请SSL 服务器证书。
4) 作为信任根合并验证机构证书到服务器密钥集文件中。
5) 验证机构批准服务器证书请求并发送可提取证书的通知。
6) 合并已批准的服务器证书到密钥集文件。
7) 配置SSL 端口。
8) 如果使用客户机验证,则将客户名称添加到数据库的存取控制列表和设计元素的存取列表中。
2设置“Server Certificate Admin”应用程序1) 确保已设置服务器为Domino Web 服务器。
2) 按下述说明编辑“Server Certificate Admin”应用程序的存取控制列表:z如果服务器管理员使用Domino Administrator 访问该数据库,而客户机与服务器不在同一台机器上运行,则添加他们的名称,并指定“ m a n a g e r”存取级别。
z将- D e f a u l t -存取级别设置为“No Access”以防止他人使用此数据库。
z将“Maximum Internet name & password” 域设置为“No Access”,这样可以防止授权的Internet 客户访问该数据库。

操作手册安全分册 SSL 目录目录第1章 SSL配置......................................................................................................................1-11.1 SSL简介.............................................................................................................................1-11.2 SSL配置任务简介...............................................................................................................1-21.3 配置SSL服务器端策略.......................................................................................................1-21.3.1 配置准备..................................................................................................................1-21.3.2 配置SSL服务器端策略.............................................................................................1-31.3.3 SSL服务器端策略典型配置举例..............................................................................1-31.4 配置SSL客户端策略...........................................................................................................1-51.4.1 配置准备..................................................................................................................1-51.4.2 配置SSL客户端策略................................................................................................1-61.5 SSL显示和维护..................................................................................................................1-61.6 常见配置错误举例..............................................................................................................1-71.6.1 SSL握手失败...........................................................................................................1-7本文中标有“请以实际情况为准”的特性描述,表示各型号对于此特性的支持情况可能不同,本节将对此进行说明。

SSL证书配置指南在互联网发展的今天,网络安全问题越来越受到重视。
为了保障网站的安全性和用户的信任度,越来越多的网站开始使用SSL证书来加密数据传输和保护用户隐私。
本文将为您提供一份简明的SSL证书配置指南,帮助您正确地配置SSL证书,确保网站的安全性。
一、SSL证书简介SSL证书(Secure Sockets Layer Certificate)是一种由可信任的证书颁发机构(Certificate Authority)认证的数字证书,用于验证网站的身份并加密数据传输。
通过使用SSL证书,可以建立起网站与用户之间安全、加密的传输通道,防止敏感信息被窃取或篡改。
二、SSL证书购买与申请1.选择可信赖的证书颁发机构(CA),如Symantec、Comodo或Let's Encrypt。
2.根据您的需求选择证书类型,常见的有域名验证型(DV)、组织验证型(OV)和增强验证型(EV)。
3.填写并提交证书申请表格,提供所需的域名和相关信息。
4.完成验证流程,可以通过电子邮件验证、DNS记录验证或文件验证等方式获得证书。
三、SSL证书安装与配置1.根据您所使用的服务器类型,选择相应的安装和配置方法。
- Apache服务器:将证书文件和私钥文件上传到服务器,并在配置文件中指定证书路径和端口。
- Nginx服务器:将证书文件和私钥文件上传到服务器,并在配置文件中指定证书路径和端口。
- Microsoft IIS服务器:使用IIS管理工具导入证书,配置绑定和服务端口。
2.配置HTTPS强制跳转,将HTTP请求自动重定向到HTTPS。
3.配置SSL/TLS协议版本,建议只允许使用TLS 1.2及以上版本,禁用过时的SSL 2.0和SSL 3.0。
4.启用HTTP严格传输安全(HSTS),通过响应头信息告知浏览器使用HTTPS进行访问。
5.更新您的网站代码和资源,确保网站内部链接和外部资源链接使用HTTPS。

思科路由器SSL配置指导Example: Configuring a Generic SSL VPN GatewayThe following output example shows that a generic SSL VPN gateway has been configured in privileged EXEC mode: Router# show running-configwebvpn gateway SSL_gateway2ip address 10.1.1.1. port 442ssl trustpoint TP_self_signed _4138349635inservice!webvpn context SSL_gateway2ssl authenticate verify all!!policy group defaultdefault-group-policy defaultgateway SSL_gateway2inserviceExample: Configuring an ACLThe following output example shows the ACL is "acl1." It has been associated with policy group "default."Router# show running-configwebvpn context context1ssl authenticate verify all!acl "acl1"error-msg "warning..."permit url "/doc/2b0cf496ed3a87c24028915f804d2b160b4e8644.html "deny url "/doc/2b0cf496ed3a87c24028915f804d2b160b4e8644.html "permit http any any!nbns-list l1nbns-server 10.1.1.20!cifs-url-list "c1"heading "cifs-url"url-text "SSL VPN-SERVER2" url-value "\\SSL VPN-SERVER2" url-text "SSL-SERVER2" url-value "\\SSL-SERVER2"!policy group defaultacl "acl1"cifs-url-list "c1"nbns-list "l1"functions file-accessfunctions file-browsefunctions file-entrydefault-group-policy defaultgateway publicinservice!Example: Configuring HTTP ProxyThe following output example shows that HTTP proxy has been configured and that the portal (home) page from URL "/doc/2b0cf496ed3a87c24028915f804d2b160b4e8644.html " will automatically download the home page of the user:Router# show running-configwebvpn context myContextssl authenticate verify all!!port-forward "email"local-port 20016 remote-server "ssl-server1.SSL/doc/2b0cf496ed3a87c24028915f804d2b160b4e8644.html " remote-port 110description "POP-ssl-server1"!policy group myPolicyport-forward "email" auto-download http-proxy proxy-url"/doc/2b0cf496ed3a87c24028915f804d2b160b4e8644.html "inserviceExample: Configuring Microsoft File Shares for Clientless Remote AccessNBNS Server List ExampleThe following example, starting in global configuration mode, configures a server list for NBNS resolution:Router(config)# webvpn context context1Router(config-webvpn-context)# nbns-list SERVER_LISTRouter(config-webvpn-nbnslist)# nbns-server 172.16.1.1 masterRouter(config-webvpn-nbnslist)# nbns-server 172.16.2.2 timeout 10 retries 5Router(config-webvpn-nbnslist)# nbns-server 172.16.3.3 timeout 10 retries 5Router(config-webvpn-nbnslist)# exitFile Share Permissions ExampleThe following example attaches the server list to and enables full file and network access permissions for policy group ONE: Router(config-webvpn-context)# policy group ONERouter(config-webvpn-group)# nbns-list SERVER_LISTRouter(config-webvpn-group)# functions file-accessRouter(config-webvpn-group)# functions file-browseRouter(config-webvpn-group)# functions file-entryRouter(config-webvpn-group)# endExample: Configuring Citrix Application Support for Clientless Remote AccessThe following example, starting in global configuration mode, enables Citrix application support for remote users with a source IP address in the 192.168.1.0/24 network: Router(config)# access-list 100 permit ip 192.168.1.0 0.255.255.255 any Router(config)# webvpn context context1Router(config-webvpn-context)# policy group ONERouter(config-webvpn-group)# citrix enabledRouter(config-webvpn-group)# filter citrix 100Example: Configuring Application Port ForwardingThe following example, starting in global configuration mode, configures port forwarding for well-known e-mail application port numbers:Router(config)# webvpn context context1Router(config-webvpn-context)# port-forward EMAILRouter(config-webvpn-port-fwd)# local-port 30016 remote-server/doc/2b0cf496ed3a87c24028915f804d2b160b4e8644.htmlremote-port 110 description POP3Router(config-webvpn-port-fwd)# local-port 30017 remote-server/doc/2b0cf496ed3a87c24028915f804d2b160b4e8644.htmlremote-port 25 description SMTPRouter(config-webvpn-port-fwd)# local-port 30018 remote-server/doc/2b0cf496ed3a87c24028915f804d2b160b4e8644.htmlremote-port 143 description IMAPRouter(config-webvpn-port-fwd)# exitRouter(config-webvpn-context)# policy group ONERouter(config-webvpn-group)# port-forward EMAILRouter(config-webvpn-group)# endExample: Configuring VRF VirtualizationThe following example, starting in global configuration mode, associates the VRF under the SSL VPN context configuration: Router(config)# ip vrf vrf1Router(config-vrf)# rd 10.100.100.1:1Router(config-vrf)# exitRouter(config)# webvpn context context1Router(config-webvpn-context)# policy group group1Router(config-webvpn-group)# exitRouter(config-webvpn-context)# default-group-policy policy1Router(config-webvpn-context)# vrf-name vrf2Router(config-webvpn-context)# endNote When you configure the VRF Virtualization feature in Cisco IOS Release 12.4(24)T1 and later releases, the following message is displayed:% IP VRF vrf1 configuration applied.% But please use Virtual-Template to configure VRF.See the "Examples: SSL VPN DVTI Support" section for an example on how to use a virtual template to configure a VRF. Example: RADIUS Accounting for SSL VPN SessionsThe following output example shows that RADIUS accounting has been configured for SSL VPN user sessions:Router# show running-configversion 12.4service timestamps debug datetime msecservice timestamps log datetime msecno service password-encryption!hostname host1!aaa new-model!!aaa accounting network SSL VPNaaa start-stop group radius aaa accounting update periodic 1aaa session-id commonip subnet-zeroip cef!!no ip domain lookupip domain name /doc/2b0cf496ed3a87c24028915f804d2b160b4e8644.htmlip name-server 172.16.2.133ip name-server 172.16.11.48!line con 0exec-timeout 0 0line aux 0line vty 0 4!!webvpn gateway GW1ip address 172.19.216.141 port 443inservice!webvpn gateway SSL VPNno inservice!webvpn install svc flash:/webvpn/svc.pkgwebvpn aaa accounting-list SSL VPNaaa!webvpn context Default_contextssl encryptionssl authenticate verify all!no inservice!!Example: URL Obfuscation (Masking)The following output example shows that URL obfuscation (masking) has been configured for policy group "gp_urlobf." Router: show running-config!!policy group gp_urlobfmask-urlsdefault-group-policy gp_urlobfgateway gw domain dominservice!!Example: Adding a CIFS Server URL List and Attaching It to a Policy ListThe following output example shows that the CIFS server URLs "SSLVPN-SERVER2" and "SSL-SERVER2" have been added as portal page URLs to which a user has access. The output also shows that the two servers have been attached to a policy group.webvpn context context_1ssl authenticate verify all!acl "acl1"error-msg "warning..."permit url "/doc/2b0cf496ed3a87c24028915f804d2b160b4e8644.html "deny url "/doc/2b0cf496ed3a87c24028915f804d2b160b4e8644.html "permit http any any!nbns-list l1nbns-server 10.1.1.20!cifs-url-list "c1"heading "cifs-url"url-text "SSLVPN-SERVER2" url-value "\\SSLVPN-SERVER2" url-text "SSL-SERVER2" url-value "\\SSL-SERVER2"!policy group defaultacl "acl1"cifs-url-list "c1"nbns-list "l1"functions file-accessfunctions file-browsefunctions file-entrydefault-group-policy defaultgateway publicinservice!Example: Typical SSL VPN ConfigurationThe following output is an example of an SSL VPN configuration that includes most of the features that are available using SSL VPN:Router# show running-confighostname sslvpn!!aaa new-model!!aaa authentication login default local group radius !!crypto pki trustpoint Gatewayenrollment selfsignedip-address 192.168.22.13revocation-check crlrsakeypair keys 1024 1024!!crypto pki certificate chain Gatewaycertificate self-signed 02!!interface Loopback0ip address 10.10.10.1 255.255.255.0!!interface GigabitEthernet0/1ip address 192.168.22.14 255.255.255.0 secondary ip address 192.168.22.13 255.255.255.0duplex autospeed automedia-type rj45!!ip local pool svc-pool 10.10.10.100 10.10.10.110 !!ip radius source-interface FastEthernet1/1!!webvpn gateway ssl-vpnip address 192.168.22.13 port 443http-redirect port 80ssl trustpoint Gatewayinservice!! The following line is required for SSLVPN Client.webvpn install svc flash:/webvpn/svc.pkg!! The following line is required for Cisco Secure Desktop. webvpn install csd flash:/webvpn/sdesktop.pkg!webvpn context ssl-vpnssl authenticate verify all!url-list "sslvpn-dt"url-text "sslvpn-dt" url-value "http://10.1.1.40"url-text "Exchange Server" url-value"http://10.1.1.40/exchange"!sso-server "netegrity"web-agent-url "http://10.1.1.37/vpnauth/"secret-key "sslvpn1"retries 3timeout 15!nbns-list cifsnbns-server 10.1.1.40!port-forward "mail_test"local-port 30016 remote-server "/doc/2b0cf496ed3a87c24028915f804d2b160b4e8644.html " remote-port 143 description "IMAP-test"local-port 30017 remote-server "/doc/2b0cf496ed3a87c24028915f804d2b160b4e8644.html " remote-port 110 description "POP3-test"local-port 30018 remote-server "/doc/2b0cf496ed3a87c24028915f804d2b160b4e8644.html " remote-port 25 description "SMTP-test"!policy group default! The following line applies the URL list.url-list "sslvpn-dt"! The following line applies TCP port forwarding.port-forward "mail_test"! The following line applies CIFS.nbns-list "cifs"! The following line enables CIFS functionality.functions file-access! The following line enables CIFS functionality.functions file-browse! The following line enables CIFS functionality.functions file-entry! The following line enables SSLVPN Client.functions svc-enabled! The following line enables clientless Citrix.citrix enableddefault-group-policy default! The following line maps this context to the virtual gateway and defines the domain touse.gateway ssl-vpn domain sslvpn! The following line enables Cisco Secure Desktop.csd enableinservice!!endExample: Cisco Express Forwarding-Processed PacketsThe following output example from the show webvpn stats command shows information about Cisco Express Forwarding-processed packets:Router# show webvpn statsUser session statistics:Active user sessions : 56 AAA pendingreqs : 0Peak user sessions : 117 Peaktime : 00:13:19Active user TCP conns : 0 Terminated user sessions : 144Session alloc failures : 0 Authentication failures : 0VPN session timeout : 0 VPN idletimeout : 0User cleared VPN sessions : 0 Exceeded ctx user limit : 0Exceeded total user limit : 0Client process rcvd pkts : 1971 Server process rcvd pkts : 441004Client process sent pkts : 921291 Server process sent pkts : 2013Client CEF received pkts : 1334 Server CEF received pkts : 951610Client CEF rcv punt pkts : 0 Server CEF rcv punt pkts : 779Client CEF sent pkts : 1944439 Server CEF sent pkts : 0Client CEF sent punt pkts : 21070 Server CEF sent punt pkts : 0Example: Multiple AnyConnect VPN Client Package FilesThe following example shows that three AnyConnect VPN Client packages have been installed to a gateway and shows the resulting show webvpn install command output:Router(config)# webvpn install svc vpn1_i386-Release-2.0.0077-k9.pkg sequence 6Router(config)# webvpn install svc vpn2_powerpc-Release-2.0.0077-k9.pkg sequence 8Router(config)# webvpn install svc svc_1.pkg sequence 4Router# show webvpn install status svcSSLVPN Package SSL-VPN-Client version installed:CISCO STC win2k+2,0,0148Fri 12/29/2006 19:13:56.37SSLVPN Package SSL-VPN-Client version installed:CISCO STC Darwin_i3862,0,0Wed Nov 8 04:01:57 MST 2006SSLVPN Package SSL-VPN-Client version installed:CISCO STC Darwin_powerpc2,0,0Wed Nov 8 03:54:50 MST 2006The following example shows that three AnyConnect VPN client packages have been configured and typical output from the show-running config command:Router# show running-config | begin webvpnwebvpn install svc flash:/webvpn/svc_4.pkg sequence 4!webvpn install svc flash:/webvpn/svc_6.pkg sequence 6!webvpn install svc flash:/webvpn/svc_9.pkg sequence 9 Example: Local AuthorizationThe following example shows that local authorization has been configured:aaa new-model!aaa authentication login default localaaa authorization network default local!aaa attribute list l2attribute type banner "user2"!aaa attribute list l1attribute type banner "user1"attribute type urllist-name "my-url-list"!username user1 password 0 passwd1username user1 aaa attribute list l1username user2 password 0 passwd2username user2 aaa attribute list l2!webvpn context bestssl authenticate verify all!url-list "my-url-list"heading "external url"url-text "example" url-value "/doc/2b0cf496ed3a87c24028915f804d2b160b4e8644.html " ! policy group defaultdefault-group-policy defaultaaa authorization list defaultgateway public domain d1inserviceExample: URL Rewrite SplitterThe following example shows that URL mangling has been configured for a specific host and IP address. The unmatched action has been defined as direct access.webvpn context e1!url rewritehost "/doc/2b0cf496ed3a87c24028915f804d2b160b4e8644.html "ip 10.1.0.0 255.255.0.0unmatched-action direct-access!Example: Backend HTTP ProxyThe following example shows that a backend HTTP proxy has been configured:webvpn context e1!policy group g1http proxy-server "192.0.2.0" port 2034default-group-policy g1Example: Stateless High Availability with HSRPFigure 15 shows the topology of a typical stateless high availability with HSRP setup. Router 1 and Router 2 are configured for HSRP on gateway Webvpn. The example following Figure 15 shows the actual configuration.Figure 15 Stateless High Availability with HSRP SetupRouter 1 ConfigurationRouter# configure terminalRouter(config)# interface gateway 0/1Router(config-if)# standby 0 ip 10.1.1.1Router(config-if)# standby 0 name SSLVPNRoute(config-if)# exitRouter(config)# webvpn gateway WebvpnRouter(config-webvpn-gateway)# ip address 10.1.1.1 port 443 standby SSLVPNRouter 2 ConfigurationRouter# configure terminalRouter(config)# interface gateway 0/0Router(config-if)# standby 0 ip 10.1.1.1Router(config-if)# standby 0 name SSLVPN2Router(config-if)# exitRouter(config)# webvpn gateway WebvpnRouter(config-webvpn-gateway)# ip address 10.1.1.1 port 443 standby SSLVPNigh2Examples: InternationalizationThe following configuration and output examples display various aspects of the Internationalization feature. This section contains the following examples:Example: Generated Browser Attribute TemplateExample: Copying the Browser Attribute File to Another PC for EditingExample: Copying the Edited File to flashExample: Output Showing That the Edited File Was ImportedExample: Copying the Language File to Another PC for EditingExample: Copying the Edited Language File to the Storage DeviceExample: Language Template CreatedExamples: URL ListExample: Generated Browser Attribute TemplateThe following is an example of a generated browser attribute template:#003333#336666whiteblackWelcome toCisco Systems WebVPN Service#003333Example: Copying the Browser Attribute File to Another PC for EditingThe following example shows how to copy a browser attribute file to another PC for editing:Router# copy flash: tftp:Source filename [battr_tpl.xml]?Address or name of remote host []? 10.1.1.30Destination filename [battr_tpl.xml]?!!677 bytes copied in 0.004 secs (169250 bytes/sec) Example: Copying the Edited File to flashThe following example shows how to copy an edited attribute file to flash:Router# copy tftp://directory/edited_battr_tpl.xmlflash:Example: Output Showing That the Edited File Was ImportedThe following show running-config output shows that the browser attribute file was correctly copied to flash:Router# show running-configwebvpn context gbrowser-attribute import flash:battr_tpl.xmlssl authenticate verify allExample: Copying the Language File to Another PC for EditingThe following example shows how to copy a language file to another PC for editing: Router# copy flash: tftp:Source filename [lang.js]?Address or name of remote host []? 10.1.1.30Destination filename [lang.js]?!!10649 bytes copied in 0.028 secs (380321 bytes/sec) Example: Copying the Edited Language File to the Storage Device The following example shows how to copy the edited language file to flash:Router# copy tftp://directory/edited_lang.js flash:Example: Language Template CreatedThe following show running-config command output shows that the language file "lang.js" has been imported correctly: Router# show running-configpolicy group defaultfunctions file-accessfunctions file-browsefunctions file-entryfunctions svc-enabledmask-urlssvc address-pool "mypool"svc keep-client-installedsvc split include 10.1.1.0 255.255.255.0default-group-policy defaultgateway glanguage customize mylang flash:lang.jsinserviceExamples: URL ListThe following example shows that the URL list template file has been copied to another PC for editing:Router# copy flash: tftp:Source filename [url_list_tpl.xml]?Address or name of remote host []? 10.1.1.30Destination filename [url_list_tpl.xml]The following example shows that the URL template file has been copied to flash:Router# copy tftp://directory/edited_url_list_tpl.xmlflash:The following show running-config command output shows that URL list file has been imported into the url-list and that it has been bound to the policy group:Router# show running-configpolicy group defaulturl-list "test"functions file-accessfunctions file-browsefunctions file-entryfunctions svc-enabledmask-urlssvc address-pool "mypool"svc keep-client-installedsvc split include 10.1.1.0 255.255.255.0default-group-policy defaultgateway glanguage customize mylang flash:lang.jsinserviceExamples: Virtual TemplateThe following configuration and output examples display various aspects of the Virtual Template feature. The following example, starting in global configuration mode, creates a virtual template and associates it with an SSL VPN context configuration. It also configures the virtual template for VRF and NAT:Router(config)# interface virtual-template 100Router(config-if)# ip unnumbered GigabitEthernet 0/0Router(config-if)# ip vrf forwarding vrf1Router(config-if)# ip nat insideRouter(config-if)# exitRouter(config)# webvpn context context1Router(config-webvpn-context)# virtual-template 100Router(config-webvpn-context)# exitThe following example creates a virtual template and associates it with a security zone: Router(config)# interface virtual-template 200Router(config-if)# ip unnumbered GigabitEthernet 0/0Router(config-if)# zone-member security vpnRouter(config-if)# exitRouter(config)# webvpn context context2Router(config-webvpn-context)# virtual-template 200Router(config-webvpn-context)# exitExamples: SSL VPN DVTI SupportExamples: Configuring per-Tunnel Virtual TemplatesExample: Configuring per-Context Virtual TemplatesExamples: Configuring per-Tunnel Virtual TemplatesFigure 16 shows an example network where remote users User1 and User2 belong to a context called Context1, User3 belongs to a context called Context2, and they connect to the SSL VPN gateway and access the backend server in the corporate network.Figure 16 Topology Showing a per-Tunnel Virtual TemplateExample: Configuring in the per-Tunnel Context Using Virtual TemplatesExample: Configuring in the per-Tunnel Context Using Virtual Templates and a AAA ServerExample: Configuring in the per-Tunnel Context Using Virtual TemplatesThe following example shows how to apply VRF, a firewall policy, and ACLs to each user based on the virtual template configuration.If the VRF, firewall policy, and ACL features are configured in the virtual template and user policies are not configured on the AAA server, then only the IP features configured in the virtual template are applied to the users. In this example, User1 and User2 belonging to Context1 have zone1, vrf1, and ACL 1 configured whereas User3 belonging to Context2 has zone3, vrf3, and ACL 3 configured. Hence, different users have different IP features configured.Virtual Template for User1 and User2configure terminalinterface virtual-template 1zone-member security zone1ip vrf forwarding vrf1ip access-group 1 inip unnumbered GigabitEthernet 0/1Virtual Template for User3configure terminalinterface virtual-template 3zone-member security zone3ip vrf forwarding vrf3ip access-group 3 inip unnumbered GigabitEthernet 0/1WebVPN Context for User1 and User2configure terminalwebvpn context context1virtual-template 1 tunnelinserviceWebVPN Context for User3configure terminalwebvpn context context2virtual-template 3 tunnelinserviceExample: Configuring in the per-Tunnel Context Using Virtual Templates and a AAA ServerThe following example shows how to apply the IP feature configuration to the users based on the user-specific configuration available on the AAA server. The user-specific attributes configured on the AAA server are applied to the users when an SSL VPN session establishes a virtual tunnel. The configuration applied to the users will be a combination of the configurations in the virtual template and the AAA server, where AAA attributes have a higher priority when there is a configuration conflict.In this example, ACL 1 is configured for User1, ACL 2 is configured for User2, and ACL 3 is configured for User3 on the AAA server using the inacl attribute. Even though ACL 4 is applied to all the users in the virtual template, User1 has ACL 1, User2 has ACL 2, and User3 has ACL 3 configured along with zone and VRF configurations available in the virtual template.Virtual Template for User1 and User2configure terminalinterface virtual-template 1zone-member security zone1ip vrf forwarding vrf1ip access-group 4 inip unnumbered GigabitEthernet 0/1Virtual Template for User3configure terminalinterface virtual-template 3zone-member security zone3ip vrf forwarding vrf3ip access-group 4 inip unnumbered GigabitEthernet 0/1WebVPN Context for User1 and User2 configure terminalwebvpn context context1virtual-template 1 tunnelinserviceWebVPN Context for User3 configure terminalwebvpn context context2virtual-template 3 tunnelinservice。
Tomcat 7.0 SSL配置(https)
1.Java key tool 方式配置
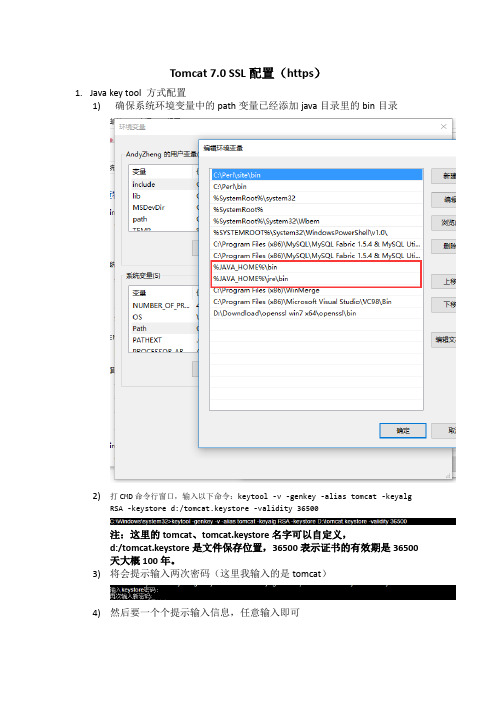
1)确保系统环境变量中的path变量已经添加java目录里的bin目录
2)打CMD命令行窗口,输入以下命令:keytool -v -genkey -alias tomcat -keyalg RSA
-keystore d:/tomcat.keystore -validity 36500
注:这里的tomcat、tomcat.keystore名字可以自定义,d:/tomcat.keystore
是文件保存位置,36500表示证书的有效期是36500天大概100年。
3)将会提示输入两次密码(这里我输入的是tomcat)
4)然后要一个个提示输入信息,任意输入即可
5)输入完后进行确认:输入y即可
6)然后会提示输入这个证书的密码和keystore的密码相同,按回车就行了,
这里直接回车就行了。
7)完成后到文件保存位置复制文件放tomcat主目录里的bin目录下
8)返回到tomcat主目录,进入conf目录,编辑service.xml文件
9)找到下图位置,把原本注释着的<Connector……的注释解开或复制一份
放在下面,并添加keystoreFile(证书文件位置),keystorePass(证书密码)
10)配置完成,启动服务器测试,到bin目录打开tomcat7.exe
11)打开浏览器访问https://localhost:8443,能够进入tomcat的首页就是成功
了。
12)。

linux下ssl环境配置1. 配置apache时把ssl模块载入进来./configure \--with-ldap \--prefix=/usr/local/apache_smart_static \--enable-include \--enable-rewrite \--enable-ssl \--with-ssl=/usr/local/OpenSSL/ \--enable-proxy \--enable-ldap \--enable-auth-ldap=======================================检查模块有没装进去,可以用命令:bin/apache -l=======================================2. 安装数字证书使用https方式验证vi /usr/local/apache/conf/http.conf# Secure (SSL/TLS) connectionsInclude conf/extra/httpd-ssl.conf //把此处的#去掉 (Include conf/ssl.conf 版本问题,有些版本是没有httpd-ssl.conf这个属性,只有ssl.conf,效果是一样的)## Note: The following must must be present to support# starting without SSL on platforms with no /dev/random equivalent# but a statically compiled-in mod_ssl.## cd /usr/local/apache2# ./bin/apachectl startSyntax error on line 108 of /usr/local/apache2/conf/ssl.conf:SSLCertificateFile: file '/usr/local/apache2/conf/server.key' does not exist or is empty 这又是什么原因呢?因为我们没有配置ssl,需要生成ssl需要的证书。
windows server 2012+IIS8.0安装配置ssl证书方法(温馨提示:安装ssl证书前请先备份您需要修改的服务器配置文件)1.1 ssl证书安装环境简介安装windows server 2012 IIS8.0操作系统服务器一台;web站点一个;SSL证书一张(备注:本指南使用域名OV SSL证书进行操作)1.2 网络环境要求请确保站点是一个合法的外网可以访问的域名地址,可以正常通过或进行正常访问。
2.1 获取ssl证书成功在沃通CA申请SSL证书后,会得到一个有密码的压缩包文件,输入证书密码后解压得到五个文件:for Apache、for IIS、for Ngnix、for Other Server,这个是证书的几种格式,解压for IIS压缩包,会得到一个.pfx格式的证书,IIS8.0上需要用到pfx格式的证书。
2.2 导入ssl证书开始-〉运行-〉MMC,启动控制台程序->选择菜单“文件-〉添加/删除管理单元”->列表中选择“证书”->点击“添加”->选择“计算机帐户” ->点击完成。
在控制台的左侧显示证书树形列表,选择“个人”- “证书”,右键单击,选择“所有任务-〉导入”,根据“证书导入向导”的提示,将.pfx格式文件导入,注意导入过程选择“根据证书内容自动选择存储区”。
(注意导入过程中需要输入密码)导入成功后,刷新,可以看到如下图所示的证书信息图:2.3 分配服务器证书打开IIS8.0管理器面板,找到待部署证书的站点,点击“绑定”如图3选择“绑定”->“添加”->“类型选择https” ->“端口443” ->“ssl证书【导入的证书名称】” ->“确定”,SSL缺省端口为443端口,(请不要随便修改。
如果您使用其他端口如:8443,则访问时必须输入:https://:8443)。
如下图:2.4 测试是否安装成功重启IIS8.0服务,在浏览器地址栏输入:https:// (申请证书的域名)测试您的ssl证书是否安装成功,如果成功,则浏览器下方会显示一个安全锁标志。
网络安全基础和网络安全配置SSL步骤1 配置Xp的ip步骤2 将Windows 2000 Server配置成证书颁发机构服务器。
1) 在控制面板里选择添加/删除程序,再选择安装/删除Windows组件。
2) 在组件对话框中选择“证书服务”选项,打开Windows组件安装向导开始安装证书3) 在证书颁发机构类型窗口中选中“独立根CA(S)”,如图1-3,单击“下一步”继续。
4) 在CA标识信息窗口,参照图1-4进行CA名称、组织、部门、城市、省份、国家、邮件等信息的填写。
5) 在数据存储路径窗口,保持默认选项,单击“下一步”,继续。
6) 指定数据存储位置之后,会出现警告窗口,提示你将停止Internet信息服务,选择“确定”,继续安装证书。
7) 插入系统盘或选择ISO文件路径,完成证书服务的安装。
步骤3 创建证书请求1) 在控制面板内打开“管理工具”,选择“Internet服务管理器”。
2) 在树型窗格中,右击“默认Web站点”并选中属性。
3) 单击“目录安全性”选项卡,单击“服务器证书”,打开Web服务器证书向导的欢迎界面并单击“下一步”继续。
4) 在服务器证书界面,选中“创建一个新证书”选项,继续。
5) 在稍后或立即请求界面,选中“现在准备请求,但稍后发送”选项,继续。
6) 在命名和安全设置界面:单击下一步,继续7) 在组织信息界面:c) 单击下一步,继续8) 在证书请求文件名界面,接受默认的C:\certreq.txt,继续。
这个文件将是用来从证书服务器请求证书的文件。
步骤4 提交证书请求1) 在桌面上双击Internet Explorer图标打开浏览器,在地址栏中输入http://192.163.03.1/certsrv/并回车确认。
2) 在打开的证书服务欢迎页面上,选择“申请证书”,3) 在选择申请类型页面上,选择“高级申请”,继续。
4) 在高级证书申请页面上,选中“使用base64编码的……更新证书申请”,单击“下一步”继续。
在windows server 2008下配置SSL实现https准备一台服务器A和一台服务器B以及一台客户机C。
一.在服务器A上安装域服务(我就不细说了具体操作网上都有)0.配置ip,将ip设置为静态ip,待会以便我们的客户端入域1.打开服务器管理器,点击角色2.添加角色,服务器角色3.Active Directory 域服务,然后几个下一步,安装,完成4.win+r键输入dcpromo5.不断地下一步,是,完成net user administrator /passwordreq:yes这个解决办法没有用啊,真正有用的方式方法:“程序”----“管理工具”----“本地安全策略”---“安全设置”----“账户策略”----“密码策略”二.在服务器A上安装证书服务勾选,点击下一步勾选,下一步选择独立,下一步由于我这里只有一台服务器所以就设为根,下一步新建密钥,下一步,剩下的我都选的默认项,然后安装安装完成。
三、在服务器B上安装WEB服务并入域(略)。
这样CA服务器和Web服务器都搭建好了。
四、创建证书申请并提交(在WEB服务器上操作)点击开始------->管理工具------->Internet信息服务管理器点击服务器证书------>创建证书申请通用名称填写我们web服务器的名称或者ip(当web服务器和CA服务器不在一台机器上时),由于我这里web服务器和CA服务器在一起,所以为了识别,我用web服务器的ip (因为此时计算机名已作为证书服务器自身的证书通用名称使用了),其它信息依次填写,并保存该证书申请文件,然后进入到我们存放证书申请文件的地方,我的是在‘库\文档’中,打开我们已生成的证书申请文件,将里面的内容复制备用。
在浏览器中输入http:// CA的 IP /certsrv/ 即可打开CA服务器的证书服务网页,选择第一项,进去点击高级证书申请然后点击第二项,我的是winserver2008是这样的,对于不同的服务器随机应变。
SSL证书生成及配置方法如下:
获取证书:可以通过购买或免费获取证书。
在某些网站上可以免费申请到一些证书,如Let's Encrypt,这些证书可以提供基本的SSL加密功能。
如果需要更高级别的证书,可能需要购买。
安装证书:安装证书的过程通常包括以下几个步骤:
获取证书文件和私钥文件,这两个文件通常由证书颁发机构(CA)提供。
将证书文件上传到服务器上,并确保服务器能够访问到该文件。
在服务器上配置SSL证书,这通常涉及到编辑服务器的配置文件,如Nginx 或Apache的配置文件。
在配置文件中指定SSL证书的位置和私钥的位置,并启用SSL加密。
保存配置文件并重新启动服务器,使配置生效。
验证和测试:在配置SSL证书后,应该进行验证和测试,以确保SSL证书已经正确安装并且能够提供有效的SSL加密。
可以通过使用浏览器或其他工具来测试SSL证书是否有效。
需要注意的是,SSL证书的生成和配置涉及到网络安全和数据隐私等方面的问题,需要谨慎处理。
建议在进行相关操作前,了解相关的安全标准和最佳实践,并寻求专业人士的帮助和建议。
1. 在D盘建立目录:mykeys BKS
2. 启动命令行,并转移到d:/mykeys
a) 创建服务器密钥,其密钥库为d:/mykeys/server.ks,注意keypass
和storepass保持一致,它们分别代表密钥密码和密钥库密码,注意
CN=localhost 中,localhost表示要配置SSL的主机名,不能任意指定
D:/mykeys>keytool -genkey -v -alias serverKey -dname "CN=localhost"
-keyalg RSA -keypass jinbang -keystore server.ks -storepass jinbang
b) 创建客户端密钥,其密钥库为d:/mykeys/client.p12,注意这个密钥
库的后缀名,注意密钥库类型PKCS12
D:/mykeys>keytool -genkey -v -alias clientKey -dname "CN=SomeOne"
-keyalg RSA -keypass jinbang -keystore client.p12 -storepass jinbang
-storetype PKCS12
c) 将客户端密钥导出为证书文件
D:/mykeys>keytool -export -alias clientKey -file clientKey.cer -keystore
client.p12 -storepass jinbang -storetype PKCS12
d) 将上述客户端密钥文件导入服务器证书库,并设置为信任证书;注
意会问你是否信任该证书,回答y 即可
D:/mykeys>keytool -import -v -alias clientKey -file clientKey.cer
-keystore server.ks -storepass jinbang
e) 将客户端密钥导出为证书文件
D:/mykeys>keytool -export -alias serverKey -file serverKey.cer -keystore
client.p12 -storepass jinbang -storetype PKCS12
3. 为了在本机浏览器中进行SSL访问,请:双击d:/mykeys/client.p12 ,
将启动证书向导
a) 第2步:要导入的文件文件名D:/mykeys/client.p12
b) 第3步:为私钥键入密码lyl147 ,勾选:标志此密钥为可导出的
c) 第4步:证书存储,选:将所有的证书放入下列存储区,然后,浏
览-个人
d) 现在,打开IE,查看证书:工具-Internet选项-内容-证书-个人,可
以看到SomeOne 证书已被安装
4. 配置TOMCAT服务器,以支持SSL认证,编辑文
件:%tomcat_home%/conf/server.xml,下面这段配置代码本来是被屏蔽的,现在请取消其屏蔽,并相应增加密钥库的配置,其中clientAuth="true" 用以启动双向认证,否则,只有客户端认证服务器-单向
<Connector port="8443" protocol="HTTP/1.1" SSLEnabled="true"
maxThreads="150" scheme="https" secure="true"
clientAuth="true" sslProtocol="TLS"
keystoreFile="D:/mykeys/server.ks" keystorePass="jinbang"
truststoreFile="D:/mykeys/server.ks " truststorePass=" jinbang" />
5. 启动TOMCAT,然后在IE浏览器中访问:https://localhost:8443/
a) 将弹出一个消息框,这是要客户端认证服务器,查看证书可看到
服务器证书为localhost ,回顾前面的步骤,正是我们创建的那个服
务器证书;这里点是
b) 页面出现,说明客户端被允许访问
6. 现在,再次打开IE,工具-Internet选项-内容-证书-个人,删除那个
SomeOne 证书
a) 现在,再次在IE浏览器中访问:https://localhost:8443/你会发现,
回顾前面的 3 步骤,你会明白为什么要将客户端证书导入IE 浏览
器;
7. 请再次重复3 步骤,之后再尝试访问
OK,至此,我们在本机上SSL双向配置已经成功,那么,换另一台电脑来访问本机服务器如何处理呢?很简单,把d:/mykeys/client.p12 复制到该机器,然后执行3 步骤,将这个证书导入到该机器的IE 浏览器个人证书中,记得密码是:lyl147;当然,在那台电脑上访问时,要将localhost修改为本机主机名或IP地址
-------------------------------------------------------------------
要使你自己的WEB程序应用SSL安全访问,请遵循如下配置
在你应用的web.xml 文件的<web-app></web-app> 中加入如下配置<login-config>
<!-- Authorization setting for SSL -->
<auth-method>CLIENT-CERT</auth-method>
<realm-name>Client Cert Users-only Area</realm-name>
</login-config>
<security-constraint>
<!-- Authorization setting for SSL -->
<web-resource-collection >
<web-resource-name >SSL</web-resource-name>
<url-pattern>/*</url-pattern>
</web-resource-collection>
<user-data-constraint>
<transport-guarantee>CONFIDENTIAL</transport-guarantee> </user-data-constraint>
</security-constraint>
你会发现,即使使用http://....:8080 来访问你的应用程序,它也会重定向为https://....8443 访问,也就是说,你的应用已经强制使用SSL安全访问层OK,现在,充分享受SSL 安全访问服务吧
此外,你还可以在你的程序中验证客户证书,实现客户端证书登录,具体这里不谈了,下次给出完整程序。