大屏显示器说明书
- 格式:pdf
- 大小:101.00 KB
- 文档页数:6

DSC系列显示大屏使用说明书北京首昌衡器有限公司2013.11目录一、概述 (3)二、技术指标及性能 (4)三、接口说明及功能选择 (5)3.1 接口说明 (5)3.2 功能设定 (5)3.3 拨码开关主要功能设定方法 (7)四、串口通信协议 (8)4.1 MODBUS RTU协议介绍 (8)4.2 MODBUS RTU通信协议功能码 (9)4.3寄存器地址列表 (10)4.4 MODBUS 协议应用 (11)4.5 EDI-700系列通信协议 (11)五、称重仪表和大屏幕显示器的配置 (11)5.1 EDI-700仪表: (11)5.2大屏幕显示器在各种状态下运行时的拨码开关位置 (12)一、概述DSC-系列屏幕显示器是专门为各种称重显示仪表设计的配套产品,可广泛应用于冶金、机械、铸造、铁路和港口等行业,能满不同用户的多种需求,是各种称重仪表的理想配套产品。
本系列产品的特点如下:◆本系列屏幕的主电路采用低功耗、性能稳定的CMOS芯片以及特殊的抗干扰电路,性能稳定,可靠性高。
安装采用隔热密封胶条,可防尘,在有噪音、机械振动和热辐射等恶劣环境可以下长期稳定运行。
◆本系列屏幕所提供的四位、五位或六位LED显示全部为高反差、超高亮度数码管,具有耗低、亮度高和使用寿命长等特点。
◆本系列屏幕在选用串口通信时,当15秒内未接收到新的数据,屏幕仅在最后一位显示0,其余位均熄灭,以提醒用户当前数据通信中断。
◆本系列产品具有通用接口、4 ~20mA电流环、标准RS232、标准RS-422/485、4 ~20mA电流输入等多种输入通讯接口,可以满足具有各种通讯接口的称重仪表,同时通信协议兼容有本公司EDI-700系列仪表协议和MODBUS RTU标准协议。
◆本系列产品串行通信波特率和数据格式可设定。
◆本系列产品小数点位臵可通过拨码开关以及软件进行设定。
◆本系列产品4 ~20mA电流输入线性可标定,满量程可通过拨码开关设定。


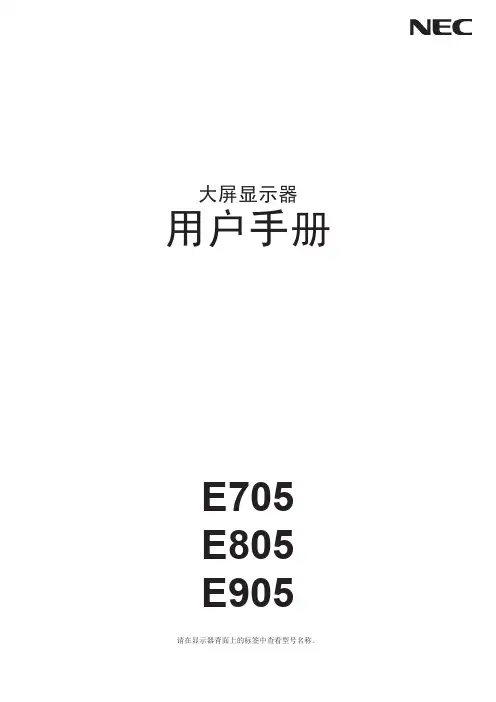
用户指南目 录关于本手册显示器外观和接口介绍安装显示器将显示器连接至计算机等设备,使用麦克风使用五向摇杆按键开关机、设置 OSD 菜单显示器 OSD 菜单选项使用 SoundBar 显示灯效、调节音量常见问题安全信息法律声明关于本手册使用设备前请仔细阅读本手册。
手册中展示的组件可能未包含在设备内,您需要单独购买;手册中描述的功能可能需要与其他组件配合,才能使用;手册中的图形、界面可能和实际有差异,所有图示仅供参考,请以实际产品为准。
显示器外观和接口介绍•不同型号的显示器,配置不同,请以实际为准。
•下文提及的 USB-C 转 USB-C 线缆、USB-C 转 USB-A 线缆均为 ZQE-CAA 型号显示器随附的线缆;若使用非标配线缆,部分功能可能无法使用。
显示器外观和接口介绍安装显示器1打开纸箱包装,根据缓冲泡沫上的箭头指示水平放置纸箱(箭头朝上)。
将整机和缓冲泡沫一起取出,保持水平放置。
从缓冲泡沫中取出底座支架。
ZQE-CBA型号显示器,需要先将底座和支架通过螺丝连接在一起。
2将底座支架上端倾斜插入显示器背部的卡槽,然后向下按压,听到咔哒声表示已安装好。
3将组装好的显示器用双手托起,立在平整的桌面上。
托起过程中,请勿用手按压屏幕,以免屏幕破损。
拆除显示器底座支架若要拆除底座支架,将显示器面板朝下,轻放在原包装中的曲面缓冲泡沫上,向上推动显示器背部的快拆按钮,同时将底座支架下端向上抬起即可。
安装底座支架前请确保显示器背部安装支架处无铁件等物体吸附,否则可能造成电路短路。
安装显示器将显示器连接至计算机等设备,使用麦克风•部分组件或线缆未包含在设备内,请单独购买。
•不同型号显示器标配的线缆不同,请以实际为准。
打开显示器背面底部的接口保护盖,可以看到显示器的接口。
您可以根据您的线缆类型,将显示器连接至计算机等设备。
•在接口下方贴有显示器的铭牌,在铭牌上可以查看设备的 S/N 号等信息。
•连线成功后,建议将线缆整理好,装回显示器接口保护盖,以免灰尘等进入接口。
预防措施
适用于欧盟国家的使用者信息 1 适用于美国的使用者信息 1 安装
1 电源连接 1 维护
1 搬运显示器 1
入门
包装内容 2 显示器安装
认识部件和控制按钮 3 定制您的显示器 3 使用OSD群组 3 热键介绍 功能键操作 4 OSD图标列表
5疑难解答
6
机能规格与特性
接口频率 7
附录
8
FCC达标 2
4
第三层
3.按在OSD 的跳出窗口上的对应的功能图标按键。
第二层
按右边第一个按键
功能时,按左边第二个按键 改变模式,你可以按 和 在4个模式间调整.
离开
图标
功能
详情
现象 检查项目
重要:注意确定显示设定并未超过VESA1920x1080@ 60Hz 。
机能规格与特性。
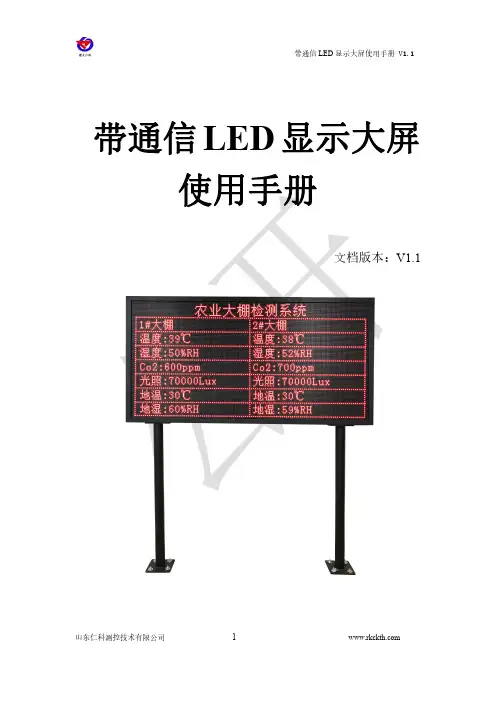
带通信LED显示大屏
使用手册
文档版本:V1.1
带通信显示LED大屏是从云平台获取数据之后并将数据显示在LED大屏上的固定设备。
大屏可轮屏播放32个节点的实时数据,分4屏播放,大屏采用192*96阵列,两根立杆间的距离是1.5m,立杆高1.5m,屏宽2m、高1.04m。
字体可设置大小,可远距离直观看到实时数据。
产品配件:8个M14*120膨胀螺丝
8个M10*16圆头螺丝
1根一米网线
一个三角钥匙
将大屏使用螺丝固定在立杆上。
其他设置等请参考“RS-DCEN-M通信服务器用户手册”
底座安装尺寸:
联系方式
山东仁科测控技术有限公司
营销中心:山东省济南市高新区舜泰广场8号楼东座10楼整层邮编:250101
电话:400-085-5807
传真:(86)*************
网址:
云平台地址:
文档历史
V1.0文档建立。
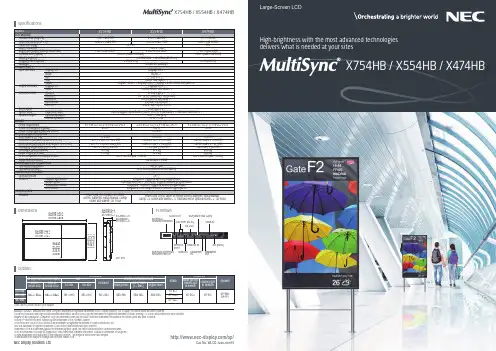
MultiSync, NaViSet, TileMatrix and Frame Comp are trademarks or registered trademarks of NEC Display Solutions, Ltd. in Japan, the United States and other countries.The terms HDMI and HDMI High-Definition Multimedia Interface, and the HDMI Logo are trademarks or registered trademarks of HDMI Licensing LLC in the United States and other countries.DisplayPort and DisplayPort Compliance Logo are trademarks owned by the Video Electronics Standards Association in the United States and other countries.HDBaseT™ and the HDBaseT Alliance logo are trademarks of the HDBaseT Alliance.CRESTRON and CRESTRON ROOMVIEW are trademarks or registered trademarks of Crestron Electronics, Inc.AMX is a trademark or registered trademark of AMX in the United States and other countries.Trademark PJLink is a trademark applied for trademark rights in Japan, the United States and other countries and areas.VESA is a trademark of a nonprofit organization, Video Electronics Standard Association. Android is a trademark of Google Inc.All other trademarks are the property of their respective owners. The images in this brochure are samples.All specifications are subject to change without notice. March 2016Cat. No. WLCD-1603-0011NNEC Display Solutions, Ltd.SpecificationsDimensionsOptionsTerminalsLocal options: please contact your supplier.AUDIO OUT LAN PORT (RJ-45)VGA (Mini D-Sub 15 pin)DVI (DVI-D)SERVICE PORTAUDIO INDisplayPort INDisplayPort OUTEXTERNALSPEAKER TERMINAL INTERNAL/EXTERNAL SPEAKER SWITCHRS-232CHDMI INREMOTE IN X754HB:1694.4X554HB:1253.6X754HB:146.2X554HB:137.7X754HB / X554HB / X474HBHigh-brightness with the most advanced technologies delivers what is needed at your sites/ap/X754HB / X554HB / X474HB23HighlightsThe state-of-the-art connectivity and sensors allow additional creativity in the content displayed and how it is controlled. The unique built-in NFC sensor, in combination with NEC’s new Android app, reduces installation and maintenance times, which is especially useful on larger installations. The Human Sensor is aware of viewer presence based on proximity and can change brightness, volume, and inputs or power the display up or down, resulting in added engagement and considerable energy savings over time.The HB series is designed to be installed in shop windows or in cabinets for outdoor applications, offering high levels of brightness. The display can be seen clearly in bright locations where external light shines in and is thus optimal for digital signage on which information must be displayed accurately.Thanks to the multi-stream function of DisplayPort, multiple displays can be daisychained and still be individually controlled. This also makes a 2 × 2 video wall with native Ultra High Difinition 4K/2K (3,840 × 2,160) possible.Dedicated Colour Calibration Software*As the brightness and colour temperature of the LCD change with time, colours may not match across multiple screens. Our dedicated colour calibration software ensures colour uniformity and fidelity across multiple screens, creating a perfectly matched image in tiled environments.The dual slot technology allows for the integration of Open Pluggable Specification (OPS*) boards and other option slot products without the need to store additional external equipment. This offers the greater flexibilitycustomers require.Video signals and control signals can be daisy chained with one DisplayPort and LAN line respectively, meaning that just two cables manage everything for setup.Monitoring and managing the temperature of each display is crucial to secure reliability and longevity.An industrial-strength, premium-grade panel with additional thermal protection, internal temperature sensors with selfdiagnostics, and fan-based technology allows for 24/7 operation, and protects your display investment.The built-in near field communication (NFC) chip allows data to be read and written via a mobile phone or tablet PC. Users can significantly reduce installation costs as displays can be easily configured and serviced using the NEC NFC Android app. This is available even when the display is switched off and especially useful on larger installations.This new optional human (motion) sensor accessory (KT -RC2) helps to deliver creative digital signage to end users by allowing for dynamic control of brightness, audio and source inputs while saving on operating costs. Auto dimming adjusts the backlight of the LCD automatically depending on the amount of ambient light.Simplify your installations with HDBaseT, which is optimized for video applications and supports uncompressed Full-HD digital video, audio, Ethernet, and various control signals. With only a single cable (up to 100 m) to run, infrastructure and labour costs are reduced, installations are significantly easier, and there is no cable clutter to manage. With uncompressed HD video support, images have never been morestunning. What’s more, control signals are contained in the same cable.This software is an all-in-one remote support solution that runs from a central location and provides monitoring, asset management and control functionality of the majority of NEC display devices and Windows computers. It is ideal for multi-device installations over larger infrastructures.Proof of PlayThis function provides accurate proof that displays are working as established and is helpful when checking on the status of the displaysinstalled at user’s site.No human (motion) detected• Practical exampleHuman (motion) detectedX754HB / X554HB / X474HB* Requires the optional HDBaseT board, SB-07BC* NEC Display Wall Calibrator* OPS is a standard established by Intel Corporation.OPS*Interface Extension• Just one cable for each video and control • Just two cables will manage everything • Up to 100 displays can be daisy chainedOther Useful Features and Functions• Landscape/portrait capable • Scheduler with real-time clock• Intelligent power management system • Power on delay • Screen saver function • Aspect ratio control • Memo function • Carbon footprint metre• Image and on-screen display ip • Picture-in-picture, picture-out-picture • Built in speakers • Point zoom• Control lock function• 6-axis colour adjustments and sRGB standard• Advanced video settings(Noise reduction, adaptive contrast)• Colour temperature adjustment• Programmable gamma setting (3 settings)• DICOM simulation• Plug and pay (DDC/CI, DDC2B)• HDCP (High-bandwidth Digital Content Protection)• Ethernet and RS-232C control and communication• CRESTRON ROOMVIEW™• AMX Discovery HTTP server • PJLink • Self-diagnosis • Status log function • Firmware update over LAN• Metal rear cabinet with VESA Standard (FDMIv1) Mounting Interface • HandlesX754HB / X554HB / X474HB。

VX3258-C-PRO 显示器User Guide型号:VS17483P/N:VX3258-C-PRO感谢您选择ViewSonic作为世界领先显示解决方案提供商,ViewSonic 一直专注在技术发展、创新和简单化方面超过世界的预期。
在ViewSonic,我们相信我们的产品能够对世界产生积极的影响,并且我们深信您选择的View-Sonic 产品会很好地为您服务。
再次感谢选择ViewSonic!目录1.注意事项与警告 (1)2.准备使用 (3)2-1. 包装物品 (4)2-2. 显示器外观 (5)2-3. 硬件安装 (6)2-4. 快速安装 (9)2-5. 电源开启 (11)3.调整屏幕图像 (12)3-1. 设置时序模式 (12)3-1. 使用控制面板 (13)4.OSD菜单介绍 (15)4-1. OSD菜单树 (15)4-2. OSD菜单说明 (21)4-3. 显示器设置管理 (25)5.技术规格 (26)6.故障诊断 (28)7.清洁和维护 (29)如何清洁显示器 (29)8.电磁相容信息 (31)8-1. FCC 符合性声明 (31)8-2. 加拿大工业部声明 (31)8-3. 针对欧盟国家的CE 符合性 (32)8-4. 电子电气产品有害物质限制使用标识要求 (33)8-5. 产品达到使用寿命后废弃产品 (34)9.版权信息 (35)10.服务信息 (36)产品注册 (36)客户支持 (37)有限保修 (40)1.注意事项与警告1.在使用设备之前,仔细阅读这些指导说明。
2.妥善保管这些指导说明。
3.注意所有警告并遵照所有指示。
4.使用显示器时,请保持离屏幕约40-50 公分的距离。
5.在移动时务必小心搬动显示器。
6.切勿拆下后盖。
显示器内有高压零件。
如果您触碰这些零件,可能会受到严重伤害。
7.请勿在靠近水的地方使用本设备。
警告: 为减低火灾或电击的危险,请勿将此产品暴露在雨或潮湿的环境中。
55吋LED显示器目录重要的安全指示3特别通告..................................................................................................3警告&注意事项........................................................................................3清洁&维护...............................................................................................4管理通知.. (4)概述6检查所供附件..........................................................................................6前控制面板..............................................................................................6电池安装..................................................................................................6后面板连接..............................................................................................7遥控器按纽..............................................................................................8使用OSD 菜单........................................................................................9屏幕状态显示 (9)安装10连接宝利通视频会议系统......................................................................10连接DVD..............................................................................................10连接Codec............................................................................................10连接外接式扩音机.................................................................................11连接外部放大扬声器..............................................................................11连接個人电腦........................................................................................11支持的解析度. (13)菜单系统14画面调整................................................................................................14对各种画面控制设置的说明...................................................................14RGB/HDMI 模式下手动微调..................................................................15了解宽萤幕模式.....................................................................................16系统调整................................................................................................16各种系统设置的说明 (16)附加说明18疑难排解................................................................................................18规格.......................................................................................................19组件定时................................................................................................20RJ-45连接..........................................................................................23命令格式及定序.....................................................................................23尺寸图...................................................................................................25配色方案................................................................................................25包装分解图 (26)特别通告某些程序为版权所有,未经授权全部或部分记录可能导致违反美国和加拿大版权法。
大屏幕使用手册北京环宇蓝博科技有限公司欢迎选用LANBO CRT高清晰光学反射式投影电视墙,请在操作本系统前仔细阅读此说明书,并按其操作步骤,规范使用,以便能更好地使用和维护,谢谢您的合作为了方便您的使用,本说明书将力求陈述简单明了,帮助您快速掌握,熟练操作本套系统目录一大屏幕投影单元技术性能二图像处理器三视频矩阵的技术指标四有线解码器的技术指标五大屏幕结构图六系统功能说明七操作说明八注意事项九设备清单十效果图一CRT三枪投影单元技术性能* 东芝公司3个7"高亮度液泠耦合投影管,短焦距大口径复合透镜高亮度CRT 三枪投影机* 投影屏:高性能细节距菲涅耳和双柱面屏* 控制系统:IR遥控控制* 专用CPU芯片三色汇聚控制* S-VIDEO输入DVD色差视频输入* VIDEO输入信号1V(P-P)* 阻抗75欧姆* 兼容PAL/SECAM/NTSC制* 先进的5D画质提高电路* 高清晰画质800线(水平)* 视角水平160度垂直60度* 单元边缝约1mm(拼缝<2mm),投影管寿命3万小时以上* 峰白输出:800流明*色温:多种状态(明亮、标准、柔和)选择*采用铝型材喷哑光黑塑的机体设计,外形美观、结构坚实* 电源电压220V 50/60Hz* 单元耗电量220w* 单元尺寸880X670X1200mm(宽、高、厚)* 工作温度5—35度湿度20%—90%* 单元重量92公斤*在箱体顶部装有散热风扇,与机箱后面的散热孔形成对流,以保证机箱内不会有太高温度,优良的散热系二图像处理器(一) LANBO-1000 (3X3)主要技术指标(二)LANBO10003X3数码处理器的功能NBO1000数码处理器分割视频功能a)将一路视频信号分割成1*1;1*2;2*1;1*3;3*1;1*4;4*1;2*2;2*3;3*2;3*3等任何比例的效果及各种效果的组合.(最大可到8*8)b)动态捕捉图像(即定格效果).2.多屏卡的功能即把LANBO1000数码处理器内部计算机信息送至9屏幕任何位置.3.屏幕叠加功能即把功能1与功能2叠加显示在大屏之上.4.X/Y方向的镜像功能(三)LANBO10003X3处理器示意图(四)各文件说明INITVGA.EXE MONCONF.EXE ASCFONT.24 QBASIC.EXE VWCOMM.EXE COWAY.INI WALL3X3.CFG Tv.exeT.bat 初始化各屏幕定义屏幕位置24点陈字库编辑文件执行文件各屏幕配置文件3X3分割器的功能文件ESC键退出后执行T 可进入分割画面状态T.BAT的内容是:VWCOMM WALL3X3.CFG 1999TV ON NTSC 按“ESC”键退出时显示N制三视频矩阵技术指标四有线电视解码器技术指标五系统连线框图(按屏幕编号顺序连接)六.系统功能说明1. 50组有线电视解码器将现场电视射频信号解调为50路视频信号2. 50路视频信号送给64X16视频矩阵3. 由控制电脑的控制软件控制视频矩阵,选择9路需要观看的视频信号输出给图像处理器4. 控制面板控制图像处理器,显示各种不同的效果(如9个单元全屏显示一个图像信号,9个单元分别滚动显示9个图像信号,其中2X2显示某一信号,其他5个单元分别滚动显示其余信号)七 大屏幕控制软件操作说明(一)虽然大屏幕系统先进复杂,但对于用户而言,只需象操作电脑显示器一样简单,只要开关电源就可以了。
NEC X463UN & X551UN46” & 55” LED-backlit, ultra-narrow, professional-grade LCD displays ideal for video wall applicationsLarge-Screen LCDTransform your video walls with the immaculate high definition of the 46” NEC X463UN and 55” X551UN . Direct LED backlighting attributes toreduced power consumption and improved edge-to-edge brightness uniformity, while a mere 5.5mm (X551UN) separates active screen areas between neighboring displays to ensure a smooth transition from screen-to-screen in video wall matrices. This displayis ideal for digital signage, boardrooms,entrance lobbies and broadcast applications, and can be deployed in video wallapplications up to 10 x 10 in size utilizing integrated TileMatrix ™ technology.•LED direct backlighting source allows even distribution of light across the panel, resulting in improveduniformity from bezel-to-bezel•Professional-grade LCD panel and components meet even the most formidable digital signage industry requirements, allowing for 24/7 run times•1920 x 1080 full HD resolution allows for crisper, more lifelike imaging•Ground-breaking ultra-narrow bezel as low as 5.5mm (screen-to-screen) creates a nearly seamless video wall•TileMatrix technology enables video walls (up to 100 displays in a 10x10 matrix) •Digital loop through includes DVI-D (with HDCP) and DisplayPort•Simple Network Management Protocol standards are met for controlling the display through LAN •Built-in expansion slot allows for seamless integration of NEC-branded option cards as well as Intel’s Open Pluggable Specification (OPS)-certified cards•Optional color calibration solution ensures color uniformity and fidelity across individual and multiple screens, creating a perfectly matched image in tiled environments•Ethernet Control and Communication provides the highest level of remote display management and includes such features as automatic email notification for diagnostic purposes•Carbon footprint meter informs and motivates responsible use of the display by calculating and tracking carbon savings •Diverse input connectors allow for maximum compatibility and flexibility during product implementation •Optional overframe bezel kit simplifies your installation and enhances the aesthetics of your video wall•ENERGY STAR ® 5.1 is proudly offered, which meets strict energy efficiency guidelines set by the U.S. Environmental Protection Agency and the U.S. Department of Energy, helping you save money and reduce greenhouse gas emissionsHighlightsNEC Display Solutions500 Park Boulevard, Suite 1100Itasca, IL 60143866-NEC-MORERapid Response and TileMatrix are trademarks of NEC Display Solutions. All other brand or product names are trademarks or registered trademarks of their respective holders. Productspecifications subject to change. 4/11 ver. 2.©2011 NEC Display Solutions of America, Inc. All rights reserved.NEC Display Solutions 500 Park Boulevard, Suite 1100Itasca, IL 60143866-NEC-MORE Rapid Response and TileMatrix are trademarks of NEC Display Solutions. All other brand or product names are trademarks or registered trademarks of their respective holders. Product specifications subject to change. ver. 06212013©2012 NEC Display Solutions of America, Inc. All rights reserved.33mm5.7mmNEC P462NEC X463UN 37mm5.5mmNEC P552NEC X551UN NEC’s ultra-narrow-bezel displays allow for a screen-to-screen distance between two neighboring displays as thin as 5.5mm, close to 450%improvement compared to its previously revolutionary P Series displays.Image Gap ComparisonThe X463UN and X551UN support Intel’s Open Pluggable Specification (OPS), the first industry-wide standardization in option slots, simplifying installation, use and maintenance of digital signage.RS-232 In/OutSpeaker OutLAN Port IR In/Out 5 BNC In (RGBHV,DVD/HD or Composite Video)HDMI InVGA D-Sub InAudio Mini-Jack In/OutBNC Composite Video In/Out DisplayPort In/OutDVI-D In/Out RCA Audio InS-VideoIn。
前视图前面板控制标签说明1-2快捷键*默认设置为“预设模式选择”和“亮度/对比度选择”。
1快捷键:预设模式(默认)后视图标签说明/用1条形码序列号标签联系 Dell 获取技术支持。
2安全锁槽确保显示器安全。
3Dell Soundbar 安装支架安装选配的 Dell Soundbar。
左侧底视图显示器规格电源管理模式如果用户电脑上安装有符合 DPMS™ 规范的 VESA 显卡或软件,当显示器未使用时,可自动降低其耗电量。
这称为“节能模式”。
如果电脑检测到来自键盘、鼠标或其它输入设备的输入信号,显示器会自动“醒来”。
下表显示了这种自动节电功能的耗电量和信号: ST2320L/ST2321L底视图标签说明1交流电源线接口2DVI 接口3HDMI 接口4VGA 接口5音频输入6音频输出VESA 模式水平同步 垂直同步 视频 电源指示灯 耗电量正常工作时使用中使用中使用中白30 W (最大值) 24 W (标准)停机模式 非使用中非使用中空白橘黄色 低于 1 W 关闭---关闭低于 0.5 W注: 本显示器符合 ENERGY STAR ® 标准。
注: 只有拔下连接显示器的电源线时才能实现 “关机”模式下的零耗电量。
针脚号码已连接信号线的 15 针针侧针脚号码已连接信号线的24 针针侧1TMDS RX2-注注l如果在拆开显示器的包装时发现有白色粉末,请用布将其擦干净。
l移动显示器时请小心,深色显示器可能会比浅色显示器更容易刮花。
l为保持显示器的最佳图像显示质量,请使用动态屏保,并在不使用时关闭显示器。
返回目录回到目录设置显示器Dell™ ST2320L/ST2321L 显示器如果您使用的是 Dell™ 台式机或便携式电脑并且可以连接互联网1. 访问 ,输入您的服务编号并下载适用于您的显卡的最新驱动程序。
2. 安装驱动程序后,再一次将屏幕的分辨率设置为 1920x1080。
回到目录注: 如果您无法将屏幕的分辨率设置为 1920x1080, 请联系 Dell™打听可以设置这个分辨率的显卡。
液晶显示器用户说明书24V5C2安全 (1)标志惯例 (1)电源 (2)安装 (3)清洁 (4)其它 (5)设置 (6)物品清单 (6)安装支架/底座 (7)调整视角 (8)连接显示器 (9)调节显示器 (10)热键 (10)OSD设定 (12)Luminance(明亮度) (13)Color Setup(颜色设置) (14)Picture Boost(窗口增亮) (15)OSD Setup(OSD设置) (16)Game Setting(游戏设置) (17)Extra(其它) (18)Exit(退出) (19)LED指示灯 (20)故障排除 (21)规格 (22)主要规格 (22)预设显示模式 (23)引脚分配 (24)即插即用 (24)版权说明 (24)安全标志惯例以下小节描述此文档中使用的标志惯例。
注释、注意和警告在本指南中,文本块可能带有图标并且以粗体或斜体打印。
这些文本块是注释、注意和警告,如下所示:注释:注意事项指示帮助你更好地使用你的计算机系统的重要信息。
注意:“注意”表示潜在的硬件损坏或数据丢失,并告诉您如何避免出现问题。
警告:“警告”表示存在潜在的人身伤害,并告诉您如何避免伤害的发生。
某些警告可能采用其它格式,也可能不带有图标。
在这种情况下,由相关的管制机构提供专门的警告表示方法。
对于I 类设备,必需使用有保护接地的电源插头和电网连接。
在建筑物中安装时,请确认配电系统应能提供额定电压为120/240V 最大20A 的断路器。
显示器应使用铭牌上标示的电源规格。
如果您不能确定家里电源规格,请咨询供应商或当地电力公司。
显示器配备三项接地插头,一个插头具有第三个(接地)引脚。
这个引脚会只嵌入作为安全装置的接地电源插座。
如果插座不适合三线插头,那么请让电工安装正确的插座,或者使用转接器使得设备安全接地。
请不要使接地插头的安全目的失效。
在雷雨天气或者当长期不用时请拔掉电源插头。
这可以保护显示器不会因为电压剧烈变化而遭到损坏。
MQS3840/0802iLD24-ACC, iLD24-ACV,iLD24-FP Big DisplayWARNING:These products are not designed for use in, and should not be used for, patient-connected applications.It is the policy of OMEGA to comply with all worldwide safety and EMC/EMI regulations that apply. OEMGA is constantly pursuing certification of its products to the European New Approach Directives. OMEGA will add the mark to every appropriate device upon certification.The information contained in this document is believed to be correct, but OMEGA Engineering, Inc. accepts no liability for any errors it contains, and reserves the right to alter specifications without notice.TRADEMARK NOTICE:®,®,, andare Trademarks ofOMEGA ENGINEERING, INC.®SPECIFICATIONTemperature Stability:50 ppm/°CDisplay:4-digit, 7-segment LED, 57.2mm (2.25”)with red, green and amber programmable colors.Alarm:Alarm 1 & 2 programmable,Latch/Unlatch, High, Low, High/Low SERIAL INTERFACE Communication Standard:RS-485, RS-422 or RS-232Transfer speed (Baud rate):300, 600, 1200, 2400, 4800, 9600,19200 bpsData Format:7O1-7 bit, Odd,1stop bit, 7E1- 7 bit,even, 1 stop bit8N1 – 8 bit, No parity, 1 stop bit Multi-Point Address (RS-485):0 to 199Flow Control:No Flow controlScrew terminals for RS-232/485/422interfacePower Supply:100-240 Vac ±10%, 50/60 Hz, 22.5 W Operating Temperature:0 to 40°CStorage Temperature:-20 to 60°C Relative Humidity:0 to 85%Protection:NEMA-4x (IP65)Dimensions:298L x 137W x 73D mm (11.75" x 5.375" x 2.875")Panel Cutout:279.4 L x 116.8 W mm (11.00” L x 4.60” W)Weight:1,360 g (3 lbs)Approvals:per EN50081-1, EN50082-2, EN61010-1DISPLAY ABBREVIATIONSALR1Alarm 1 Status OFF Alarm 1 set Off ON Alarm 1 set On A1Md Alarm 1 Mode A1LO Alarm 1 LowA1HIAlarm 1 HighA1LH Alarm 1 Low/High LO-1Alarm 1 Low-999..Alarm 1 Low Value ..9999HI-1Alarm 1 High -999..Alarm 1 High Value..9999A1CR Display color when Alarm 1 triggered GRN Green Color REd Red Color AMbR Amber Color ALR2Alarm 2 Status OFF Alarm 2 set Off ON Alarm 2 set On A2Md Alarm 2 Mode A2LO Alarm 2 Low A2HI Alarm 2 High A2LH Alarm 2 Low/High LO-2Alarm 2 Low -999..Alarm 2 Low Value..9999HI-2Alarm 2 High -999..Alarm 2 High Value..9999A2CR Display color when Alarm 2 triggered GRN Green Color REd Red Color AMbR Amber Color OUt Alarm Latched/Unlatched selection LAtC Latched UNLA Unlatched NO.CR Display Color in Normal condition GRN Green Color REd Red Color AMbR Amber Color MOdE Data Flow Mode HOSt Host Mode SLAV Slave Mode bAUd Baud Rate 300..Baud Rate Value..19200FORM Data Format 7O17 Bit, Odd,7E17 Bit, Even,1 Stop Bit 1 Stop Bit8N18 Bit,No parity,1 Stop BitCOMM Communication Standard 232RS-232 Standard 485RS-485 Standard AddR Device Address 0000..Address Value..0099INtF Interface Device dRNt DRN with dRNP DRN withTemperature Input Process InputMiscellaneous:PEAk Peak Value VALL Valley Value PROC Process Value RUN Run Mode OVLd Input Overload StOR Stored Message1.In Slave Mode the Big Display will wait forcommands and data from the Serial Bus.2.In Host Mode the Big Display will send dataautomatically and continuously into the Serial Bus.3.When used in RS-485Mode, the device must be accessed with an appropriate Address tched Mode: Alarm remains latched until reset.To reset already latched alarm select any menu items and then press “up” or “down” button.RoHS 2 CompliantMounting Big Display on Bail:e the Big Display template to mark the location of mounting screws on the flat surface.2. Be sure to leave enough room around the bail (as noted on the template drawing) to allow for removal and rotation of the display.3.The display can be rotated for the best viewing angle.Disassembly Instruction:1.Remove all wiring connections from the rear of the instrument, by unscrewing the power and input connectors.2.Remove six screws at the back of the display and back cover.3.Remove the Big Display from the panel.4.To remove the Big Display from the bail, unscrew the two knobs at each end of the mounting brackets.DESCRIPTION:The iLD24 is a 4-digit master/slave display providing remote readout from instruments such as programmable controllers, digital panel meters and other instruments with serial output. Communication interfaces supported are RS-232 or RS-485 standards. Both RS-232or RS-485 are programmable through front panel buttons.The Big Display features a large three color programmable display with the capabitity to change color every time an Alarm is triggered.Refer to the separate Signal Conditioner Manual for your specific Input details.SAFETY:•The instrument is a panel mount device protected in accordance with Class III of IEC 1010.EMC:•Whenever EMC is an issue, always use shielded cables. •Never run signal and power wires in the same conduit.•Use signal wire connections with twisted-pair cables.•Install Ferrite Bead(s) on signal wire close to the instrument if EMC problems persist.Mounting Big Display Through Panel:ing the panel cutout diagram shown above, cut an opening in the panel.2. Remove six screws at the back of Big Display to remove back cover.3.Insert the unit into the opening from the front of the panel, so the gasket seals between the bezel and the front of the panel.4.Align back cover to Big Displayand reinstall screws.。
一.概述
本公司生产的LED 系列大屏幕显示器具有多种输入信号接口,适用于各种具有数字信号输出接口的称重、温度等仪表作外接显示器使用,是工矿企业和交通运输等部门作为远距离监视的合适的智能型数据显示器。
二.主要技术参数 1. 型号的意义
2. 基本参数见表
显示字高
显示位数 外形尺寸 (mm)
功 耗
重 量
5英寸(130mm ) 5 710(L )×195(H )×78(W )≤30VA ≤5Kg 8英寸(205mm ) 4 700(L )×280(H )×110(W )≤20VA ≤8Kg 8英寸(205mm ) 5 850(L )×275(H )×120(W )≤20VA ≤10Kg 12英寸(315mm ) 4 1026(L )×400(H )×120(W )≤40VA ≤13Kg 12英寸(315mm )
5
1260(L )×400(H )×120(W )≤40VA ≤15Kg
▲ 非标产品另行设计
3. 使用工作条件及通讯参数
(1)工作条件
a 、电源电压:V
b 、电源频率:50±1Hz
c 、环境温度:0~40℃
d 、相对湿度:40℃(20~90)%RH
e 、周围无腐蚀性气体或腐蚀液
f 、应远离强电磁场,远离高压动力线及高频设备。
HG-2
(2)通讯参数
a、串行BCD码电流环
通讯电流:10mA
通讯距离:≤100m
b、串行电流环
波特率:300、600、1200 bit任选
通讯电流:20mA
通讯距离:≤200m
c、RS 232 C
波特率:300、600、1200 bit任选
通讯距离:≤10m
d、标准模拟量
输入信号:4-20mA
通讯距离:≤100m
注:1、用户如对波特率另有要求,请在订货时注明,可按非标订货。
2、通讯距离受现场环境的影响,可能缩短或延长。
三.安装方式及尺寸
1. 安装方式:悬挂式
2. 电源、通讯接口插座及保险丝的位置:
出厂时一般都安装在大显示器左侧下(205为右侧下),如有特殊需要也可安装在其它位置。
3. 安装尺寸见图、表
四.接线及使用方法
1. 输入信号插头接线
(1)通讯信号插头为9芯航空插头,孔座引脚编号如图所示
(2)通讯信号连接线引脚见表
引脚号 1
2
3
4
5
6 7
8
9
串行BCD 码
电流环
数控(S) D 8 位控(W) D 4
D 2 D 1 +12V
RS 232C
地
(公共线)
RXD
串行电流环 IN(+) IN(—) 模拟量输入
地
IN(+)
(3)仪表与大显示器的连接示意图
a 、串行BCD 码电流环
b、串行电流环
c、RS 232C
d、标准模拟量
2. 功能选择开关
(1)选择显示器的输入信号形式,以及串行BCD码电流环信号输入时的小数点位置可由大显示器主机板上的DIP开关完成。
DIP开关在主机板上的位置见下图
DIP 开关的使用见下表(DIP 开关 0 = OFF 1= ON / = 任意位置)
(2)选择标准模拟量输入时分辨率、小数点位置及满量程范围可由大显示器主机板上的DIP 开关完成。
DIP 开关在主机板上的位置见下图
1. 分辨率参数选择:(DIP 1)
说明:ON 为“1”,OFF 为“0”,* 为任意。
注:DIP 1:分辨率参数选择开关
DIP 2:小数点位置选择开关 满量程范围选择开关
2. 小数点位置选择:(DIP2)ON为“1”,OFF为“0”,* 为任意。
3. 满量程范围选择:(DIP3)ON为“1”,OFF为“0”
注:如订货时未作说明,出厂设置为20.00t,分辨率为2。
五.成套性
1. 大屏幕显示器1台
2. 产品合格证书1份
3. 使用说明书1份
4. 9芯航空插头1只
5. 2ABXGP5×20保险丝管2只
6. 信号连接线(9m)1根
如对信号连接线长度另有要求,请订货时注明,但最长不能超过技术指标所要求的长度。
内容如有变动,恕不另行通知(10603)。