依维柯欧胜收音机说明书
- 格式:docx
- 大小:4.08 KB
- 文档页数:3
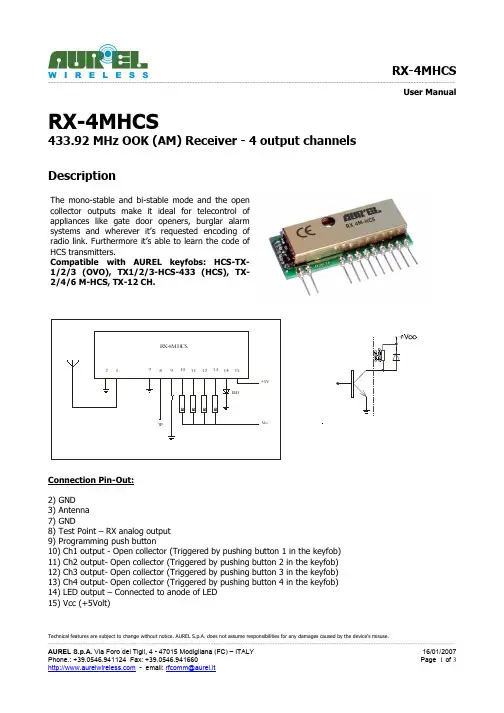
---------------------------------------------------------------------------------------------------------------------------------------------------User Manual RX-4MHCS433.92 MHz OOK (AM) Receiver - 4 output channelsDescription Array The mono-stable and bi-stable mode and the opencollector outputs make it ideal for telecontrol ofappliances like gate door openers,burglar alarmsystems and wherever it’s requested encoding ofradio link. Furthermore it’s able to learn the code ofHCS transmitters.Compatible with AUREL keyfobs:HCS-TX-1/2/3(OVO),TX1/2/3-HCS-433(HCS),TX-2/4/6 M-HCS, TX-12 CH.Connection Pin-Out:2) GND3) Antenna7) GND8) Test Point – RX analog output9) Programming push button10) Ch1 output - Open collector (Triggered by pushing button 1 in the keyfob)11) Ch2 output- Open collector (Triggered by pushing button 2 in the keyfob)12) Ch3 output- Open collector (Triggered by pushing button 3 in the keyfob)13) Ch4 output- Open collector (Triggered by pushing button 4 in the keyfob)14) LED output – Connected to anode of LED15) Vcc (+5Volt)Technical features are subject to change without notice. AUREL S.p.A. does not assume responsibilities for any damages caused by the device’s misuse.------------------------------------------------------------------------------------------------------------------------------------------------------------------------------------------------------------------------------------------------------------------------------------------------------------------------User ManualHow to get startedThe voltage supply to the module (pin 15) shall be 5Vdc. Pin 9 shall be connected to the push button for programming the receiver, pin 14 shall be connected to the anode of LED to control that programming has been carried out (output current is internally limited to around 20 mA by a 180 ohm resistor). External antenna shall be connected, by utilizing for example a piece of wire 17 cm long and a surrounding widespread ground plane.Every output of RX-4MHCS is driven by a transistor in open collector configuration, able to bear max current of 100 mA. In stand-by mode transistor is cut off while when triggered is in saturation region. Output can be programmed to work in mono-stable or bi-stable mode, every one independent from the others.In mono-stable mode output is active for all the time the corresponding push button is pressed in the keyfob, releasing the button output switches off.In bi-stable mode output switches its state every time the corresponding push button is pressed in the keyfob (from active to inactive and vice versa). The two operative modes are independent each other, that means it’s possible to program some outputs as mono-stable and some others as bi-stable.If an inductive load is connected to the output (i.e. a relay) it’s necessary to prevent voltage transients by putting a diode in parallel to the inductive load. LED anode shall be connected towards the output of the module.In order to enable the receiver to activate its outputs it’s necessary to store in the RX-4MHCS the keyfobs codes. To carry out this operation it’s necessary to approach the keyfob to the receiver. By pressing a push button (it doesn’t matter which one) of the keyfob during the auto-learning phase, the receiver RX-4MHCS recognises the button pressed and all other channels automatically.Only the keyfobs with HCS encoder shall be recognised by the receiver RX-4MHCS. Keyfobs not programmed or programmed with manufacturer code different from the one used by AUREL would not be recognised.Based on reasonable demand, Aurel is willing to program the receiver RX-4MHCS with specific manufacturer code indicated by the customer.Ground planeThe circuit must be double layer. Ground plane must surround at the best the welding area of the receiver. For further info please refer to the user manuals of AUREL’s receivers.Ca pa c ità di disa c c oppia mento L inea 50 ohm +5VConnessi oneA nt ennaTechnical features are subject to change without notice. AUREL S.p.A. does not assume responsibilities for any damages caused by the device’s misuse. ------------------------------------------------------------------------------------------------------------------------------------------------------------------------------------------------------------------------------------------------------------------------------------------------------------------------User Manual ProgrammingHow to erase the memoryIn order to reset the RX-4MHCS, press the push button connected to pin 9 and release it when LED starts blinking. Now press again the push button and hold it pressed for around 5 seconds until it switches off again. As you release the push button the LED blinks 5 times indicating that memory has been erased.After carrying out the reset, no HCS encoded keyfob shall be recognised and all outputs shall be set up in mono-stable mode.Auto-learning procedureBy pressing and soon releasing the programming push button the auto-learning procedure is initiated. LED blinks quickly for 10 seconds: for this time long, every time a push button of a keyfob, located near the RX-4MHCS, is pressed, such keyfob would be learnt. Programming of RX-4MHCS is confirmed by LED with steady red light, afterwards it switches off.When programmed all push buttons of the keyfob are learnt and each of them activate the corresponding output. Outputs will be mono-stable.It’s possible to repeat this procedure to allow the receiver RX-4MHCS to learn up to 10 keyfobs.Bi-stable mode programmingIn order to get the output bi-stable, press and release the push button. LED blinks quickly for 10 seconds: for this time long it must be pressed the push button again. LED turns from blinking to steady light. In the next 10 seconds it’s possible to press the button corresponding to the output to make bi-stable, getting the keyfob close to RX-4MHCS. The receiver shows that operations has been successfully carried out by 3 blinks of LED.To turn back to mono-stable mode repeat the above described procedure; in this case LED blinks just twice to indicate the operation was successful.Change of output functionality mode can be executed only after the receiver learns the keyfob code.Technical features are subject to change without notice. AUREL S.p.A. does not assume responsibilities for any damages caused by the device’s misuse.---------------------------------------------------------------------------------------------------------------------------------------------------------------------。
欧胜车内全部按键说明
欧胜车系是一款豪华车型,其内部按键功能丰富多样。
以下是欧胜车内全部按键以及它们的说明:
1.方向盘上的按键:
-方向盘上的左侧有音量加/减按键,通过按键可以调节收音机、音乐播放器等的音量大小。
2.中控台的按键:
-仪表板中央的显示器上有导航按键,可以用于输入目的地、选择路线等导航功能。
-液晶屏下方有空调控制按键,可以调节空调温度、风速等。
-空调旁边是车内温度调节按键,可以调节座椅的加热或制冷功能。
-中央控制台还有音乐控制按键,可以调节收音机或连接的音乐播放器。
-另外还有USB、AUX和蓝牙连接口,方便连接外部设备播放音乐。
3.后排座位的按键:
-后排座位上有独立的空调控制按键,可以调节座位上的空调温度和风速。
-座椅上还有座椅调节按键,可以调节座椅的角度、高低、前后位置等。
4.仪表板上的按键:
-仪表板上有大灯控制按键,可以切换车辆的大灯模式,例如远光灯、近光灯、照明灯等。
-还有雨刷控制按键,用于控制雨刷的启动和速度调节。
5.车门上的按键:
-车门上有车窗控制按键,可以控制车窗的开关和上下滑动。
6.后备箱的按键:
-后备箱上有开启和关闭按钮,可以通过按键打开或关闭车辆的后备箱。
7.座椅上的按键:
-部分座椅有电动调节功能,上面有座椅调节按键,可根据个人需求
调节座椅的位置、角度、高度等。
8.通用按键:
-车内的大部分按键都有通用的调光功能,可以调节按键背光的亮度。
汽车收音demo车收音demo用户手册UM01010101 1.2.00 Date:2023/2/27类别内容关键词汽车收音demo、操作摘要简单介绍汽车收音demo的使用方式©2023 Guangzhou ZLG Technology Corp.,Ltd.修订历史版本日期原因V1.0.00 2008/01/01 创建文档V1.1.00 2019/02/19 修改企业名称V1.1.01 2023/02/27 更新模版目录1. Demo简介 (1)2. Demo资源 (4)2.1汽车收音demo 底板 (4)2.2汽车收音demo 子板 (4)2.2.1SAF775D-EVB子板 (4)2.2.2TEF6638-EVB子板 (5)3. 接口简介 (7)3.1tuner-EVB-demo 底板接口 (7)3.2SAF775D-EVB子板接口 (8)3.3TEF6638-EVB子板接口 (10)4. 开发环境 (12)4.1SAF775D开发环境 (12)4.2TEF6638开发环境 (12)4.3TDF8532开发环境 (12)4.4TDF8546开发环境 (12)4.5TEF7018开发环境 (12)5. 操作详解 (13)5.1SAF775D部分 (13)5.1.1SAF775D启动 (13)5.1.2SAF775D GUI功能介绍 (14)5.1.3Radio部分 (15)5.1.4Audio部分 (18)5.2TEF6638部分 (31)5.2.1HERO GUI主面板 (31)5.2.2HERO GUI-FM (32)5.2.3HERO GUI-AM (37)5.2.4HERO GUI-AUDIO (38)5.3TDF8532部分 (38)5.4TDF8546部分 (42)5.5TEF7018部分 (43)6. 汽车收音damo的应用 (44)6.1手机音乐播放 (44)6.1.1连接线路 (44)6.1.2操作说明 (44)6.2以太网音乐播放 (44)6.2.1线路连接 (44)6.2.2操作说明 (45)6.3收音机播放 (46)6.3.1线路连接 (46)6.3.2操作说明 (46)7. 免责声明 (48)1. Demo简介欢迎您选择立功科技,我们将竭诚为您提供专业的服务。
汽车音响功能操作使用说明一、收音部份:1.PW---------电源开关按下此键为开/关机作用。
2.频率范围:1).FM(调频)87.5-108.0MHz(根据机型而定)2).AM(调幅)531-1629KHz(根据机型而定)3.FM/AM---波段选择每按一下FM/AM钮,波段将在FM1→FM2→FM3→AM1→AM2→FM1之间来回切换。
4.VOL.SEL--音量控制/音效功能选择顺时针旋转VOL钮为依次增加到最大音量停止,逆时针旋转VOL钮为依次减少到最小音量0为止。
每按一下SEL钮,主机将在音量控制→低音控制→高音控制→左右平衡控制→前后音箱控制→音量控制之间循环切换,同时相应显示为VOL→BASS→TRE→BAL→FAD。
5.SEEK<>-收音自动调谐/CD选曲钮按一下“∧”或“∨”钮,将自动向上向下搜索电台,直至搜索到一个电台信号,才停止搜索并播放该电台节目。
6.TUNE------收音手动调谐钮旋转TUNING钮为手动调整电台频率,每次旋转TUNING钮,按步进频率(例AM:9KHZ,FM:100KHZ)向上或向下调整电台频率(手调圆周钮每旋转二格为一步进)。
7.1-6----------频道预存储功能钮/CD状态相应丝印功能钮a.每个波段可存储6个电台。
b.按动FM/AM波段钮选择一个收音波段。
c.按住1#~6#任意一个按钮0.5秒以上,所选定的电台将存储到相应的钮上。
d.收音时按1#~6#任意一钮,即可收听所预置的电台。
8.AS/PS------收音自动存储、预存电台播放(CD防震控制)a.按AS/PS钮≥2秒,将进入自动搜索电台存储状态,当搜索到6个最强电台时自动按顺序存入1-6频道上,并开始播放最后锁定的电台;再次轻按AS/PS主机将依次播放1-6频道存入的电台,且每个电台播放5秒,同时电台频率字符在显示屏内闪动,当碰到所需要收听的电台时按下当前频道将停此在此电台播放。
b.在CD(有防震功能)状态下长按AS/PS大于2秒可消除防震ESP消失,再次长按大于2秒显示ESP恢复防震功能。
欧胜使用手册前言:欢迎您使用欧胜产品!欧胜是一家致力于提供高品质家居产品的公司,我们采用先进的技术和优质的材料,为您带来舒适、方便和美好的生活体验。
本手册将为您详细介绍欧胜产品的使用方法和注意事项,希望能够让您更好地享受我们的产品。
第一章:欧胜产品概述1.1 产品特点:欧胜产品注重设计、质量和实用性,为您提供多样化选择,满足不同需求。
1.2 产品种类:欧胜产品涵盖家具、家居饰品、灯具等多个品类,丰富您的家居生活。
第二章:欧胜产品的使用方法2.1 家具使用方法:根据产品的具体类型和功能,为您详细介绍家具的组装、使用和保养方法。
2.2 家居饰品使用方法:指导您如何搭配和使用家居饰品,使家居更具韵味和个性。
2.3 灯具使用方法:介绍灯具的安装、使用和维护方法,让您享受舒适的照明效果。
第三章:欧胜产品的保养与维护3.1 家具保养:根据家具的不同材质和表面处理,为您提供相应的保养方法,延长产品寿命。
3.2 家居饰品保养:指导您如何清洁和保养家居饰品,保持良好的品质和光泽。
3.3 灯具维护:教您定期清洁、检查和维护灯具,确保安全和良好的照明效果。
第四章:欧胜产品的注意事项4.1 安全使用:提醒您在使用产品时注意安全,避免意外伤害和损坏。
4.2 环保理念:介绍欧胜的环保理念和相关产品,鼓励您共同保护环境。
4.3 售后服务:说明欧胜的售后服务政策和渠道,为您解决使用中遇到的问题。
结语:欧胜产品使用手册为您提供了详尽的产品信息和使用指导,希望能够帮助您更好地了解和使用我们的产品。
如果您在使用过程中有任何问题或建议,欢迎随时联系我们,我们将竭诚为您服务。
感谢您选择欧胜,愿您拥有愉快的购物体验和满意的家居生活!。
TECSUNPL-600高性能全波段数字调谐立体声收音机使用说明东莞市德生通用电器制造有限公司中国制造感谢您购买了 二次变频TECSUN PL-600立体声收音机。
开始使用前,请阅读本说明书。
高性能全波段数字调谐外接天线立体声耳机稳压电源镍氢充电电池附件:使用说明、快速操作指南、保护套、售后服务保证书、合格证 外观与功能指示........................ 1 显示屏显示符号的说明 (3)PL-600快速操作指南 (4)PL-600使用说明一. 开机 (6)二. 收听电台节目 (7)1.选择波段2.搜寻电台3.调整音量及音调4.使用天线 三. 关机…………………………… 10 四. 充电…………………………… 11 五. 存取电台……………………… 12 1.存储电台 2.收听预存电台 六. 自动搜台存储(ATS)………… 14 七. 改变当前存储页面…………… 15 八. 时间设置……………………… 16 1.调整时钟 2.调整定时A 或B 开机时间和定时 开机后的自动关机时间九. 预设定时开机的电台............19 十. 使用定时功能 (20)十一. 使用贪睡功能 (21)十二. 睡眠定时自动关机功能……22 十三. 删除电台……………………23 1. 删除单个电台 2. 删除整页电台十四. 其它选台方式………………25 1. 直接输入地址收听已存电台 2. 浏览预存电台十五. 锁定按键........................26 十六. 使用夜间照明功能 (26)十七. 使用复位键 (27)目录十八. 广播收听技巧 (27)手动搜寻电台 自动搜寻电台 灵敏度选择 调频立体声转换接收校园调频广播输入数字选择短波米波段调幅宽窄带/接收单边带信号(SSB) 提高调频和短波接收能力的 简易方法十九. 系统码设置..................... 30二十. 选择充电电池容量............ 32二十一. 充电注意事项............... 34二十二. 使用电池注意事项......... 34二十三. 广播知识简介............... 35二十四. 常见问题及解决方法...... 39二十五. PL-600主要性能指标 (41)外观与功能指示电源/睡眠开关键 Power / Sleep Button (见第6、10、22、26、27页) 1调频/短波拉杆天线 Antenna (见第9页)5液晶显示屏 LCD Display (见第3页) 69向上调节/自动搜索键 Up / Auto Scan Button(见第7、9、13、14、15、16、17、22、23、25、27、32页)2 时钟设置键 Time Button (见第16、18页) 10 向下调节/自动搜索键 Down / Auto Scan Button(见第7、9、13、14、15、16、17、22、23、25、27、32页)调台快慢切换/锁定键 T uning Mode / Lock Button (见第8、26页) 83定时A 键 Timer A Button (见第17、18、19页) Frequency / Preset Mode Selector(见第13、23、24、25页)11 页面转换键 Page Button (见第15页) 12调频/中波/长波转换及调频/中波自动搜台存储键FM / MW / LW Band Selector & FM / MW ATS Button (见第7、8、9、14页) 15短波及短波米波段键 SW(SW Meter) Band Button (见第7、28页) 16 0...9数字键 Numeric Keypad (见第8、18、24、25、28、31页) 17 充电开关 Charge On / Off Button (见第11页)19 存储电台/系统设置键 Memory / Sys. Set Button (见第12、15、30、31、32页) 20 调频/短波外接天线插孔 FM / SW ANT . Jack (见第29页) 22 灵敏度选择拨钮 ANT . Gain (DX / Normal / Local) (见第28页) 23 确认/ 删除键 Enter / Delete Button (见第23、24页) 1821 手挽带 Hand Carry Belt音调选择拨钮 T one Control (见第9页) 24 耳机插孔 Earphone Jack25单边带拍频旋钮 SSB BFO Knob (见第29页) 2914 调频立体声及调幅宽/窄带键 FM. ST & AM Bandwidth Button (见第28页) 外接电源插孔 DC 6V Jack (见第6、11页) 2627 竖立支架 Vertical Stand 音量调节旋钮 Volume Knob (见第9页) 307照明/贪睡/ 删除数字键 Light / Snooze / Cancel Button (见第8、21、25、26页)28 多功能调节旋钮 T uning Knob(见第8、9、13、14、15、16、17、22、23、26、32页) 4定时B 键 Timer B Button (见第17、19页) 13 单边带键 SSB Button (见第29页)复位键(在底部) Reset Button (见第27页)31显示屏显示符号的说明开机状态下:显示电台频率、错误操作提示PL-600快速操作指南一. 时钟设置1.长按 [键],“小时”时间闪烁,旋转 [钮]调整小时;TIME TUNING 2.调整小时后,马上短按 [键],“分钟”时间闪烁,旋转 TIME [钮]调整分钟;TUNING 3.最后要短按 [键]确认。
Application operation screenAV operation screenPhone menu screenAV operation keyThe AV operation screen appears.12 Displays the source list.Recalls equalizer curves.Refer to Using the equalizer on page 50 Selecting a sourceSource on the AV source selectionTouching an item on the list allows you to narrow down the options and proceed to the next operation.Appears when all characters are not displayed on the display area.If you touch the key, the rest are scrolled for display.Appears when items cannot be displayed on a single page.Drag the slider bar or the list to view any hidden items. Operating the time bar6Displays the characters that are entered.Moves the cursor to the right or left for a number of charac-ters equivalent to the number of touches.Enters the characters in the text box.Deletes the input text to the left of the cursor one letter at a time. Touching and holding the key deletes the letters to the left of the cursor in rapid succession.*6Switches to the preset dial screen.Refer to Using the preset dial lists on page 15 Switches to the phone book list.Refer to Calling a number in the phone book on page 15Recalls the preset channel stored to a key from memory.Stores the current broadcast frequency to a key.iTunes® tagging indicator andiTunes® tagging song status indicatorHOLDPerforms manual tuning.Performs seek tuning or non stop seek tuning.Releasing the key in a few seconds, skips to the nearest station from the current frequency.HOLDSkips files forwardor backward.*2Switches between playback and pause.Audio source screen 2Sets a repeat play range.: Repeats the current disc.: Repeats the current track.Video source screen 1Performs fast reverse orfast forward.Touch again to change play back thespeed.Stops playback.Sets a repeat play range.: Repeats all files.: Repeats the current chapter.: Repeats the current title.*6Resumes playback (Bookmark). This function is available for DVD-Video. You can memorize one point as a Bookmark for a disc (up to five discs).Skips files forwardor backward. Switches between playback and pause.*4Switches the current music information display.Sets a repeat play range.or : Repeats all files.: Repeats the current folder.or : Repeats the current file.Sets a repeat play range.: Repeats the current file.: Repeats the current folder. or: Repeats all files.Touch again to change the playback speed.Performs fast reverse or fast forward.*4Switches between Sets a repeat play range.: Repeats all files.: Repeats the current folder.Plays files in random order.Touch again to change the playback speed.Performs fast reverse or fast forward.*4Switches betweenAudio source screen 1Switches between playback and pause.Skips files forward or backward.Audio source screen 2Sets a repeat play range.: Repeats all in the selected list.: Repeats the current song or video.Video source screenPerforms fast reverse orfast forward.Apple Music Radio screenSwitches between playbackand pause.Skips tracks forward.Displays the pop-up menu forApple Music Radio.Displays the current source.Displays the menu screen.Press the button twice to hide the App control side bar.123 Touch to mute. Touch again to unmute.Sets whether to switch the sound mix function on or off. Left tab:The audio mix function is enabled (mix on) and the App volume is displayed.Right tab:The audio mix function is disabled (mix off).21Touch to mute. Touch again to unmute.21Touch to mute. Touch again to unmute.Skips tracks forward.Switches between playback Gives a “Thumbs Up” to the playing track.Adds information for the track currently playing to bookmarks.*2Skips files forward or backward.Plays files in random order. Playback screen 2Sets a repeat play range.Switches between playbackand pause.Selects a file from the list.Performs manual tuning.Selects a channel directly.*2Skips broadcasting channels.HOLDDisplays the preset channels.Select an item on the list("1" to "6") to switch to the preset channel.Skips files forward or backward.132Continues playing the current scanning song or channel.Skips to the previous/next song during TuneScan™ or to the previous/next channel during category scan.Cancels scan play.Using TuneMix™A High Speed HDMI® Cable (sold separately) is required forconnection.Refer to Using an HDMI input on page 64You can set the screen size for the video image.Refer to Changing the wide screen mode on page 55 CAUTIONFor safety reasons, video images cannot be viewed while yourSwitches between the video inputand the sound input.A Mini-jack AV cable (CD-RM10) (sold separately) is required for connection.Refer to External video component on page 63You can set the screen size for the video image.CAUTIONFor safety reasons, video images cannot be viewed while your vehicle is in motion. To view video images, stop in a safe place and apply the parking brake.Starting procedure (for AVSelects a track.Turns on or off the MIXTRAXoriginal visual display. Switches between playback and Sets to the original BPM (Beats Per Minute).Specifies the playback portion.: Plays back a middle portion.Displays the Parking Assist screen. Displays the Climate screen.Vehicle Information screen Climate screenParking Assist screenDisplaying the setting screen for iDatalinkFunctions and displays vary depending on the connected type of iDatalink adapter and the vehicle model.Display the “System” setting screen.。

調諧至一個無線電台自動調諧1.按主機上的 TUNER 幾次以選擇"AM"或"FM"。
2.按 TUNING MODE ,使顯示螢幕上的"AUTO"指示燈亮起。
3.按 TUNING 開始自動調諧。
找到一個電台後搜尋即自動停止。
調諧至某個無線電台時,顯示幕上的"TUNED "指示燈亮起。
調到一個 FM 無線電台時,"FM STEREO"指示燈亮起。
"TUNED "指示燈熄滅時,無聲音輸出。
FM 無線電台的訊號微弱時:無線電波信號可能較弱,這取決於其構建結構與周圍環境情況。
在此種情況下,請按照下一節"手動調諧"說明的程序,手動選擇所需的電台。
手動調諧1.按主機上的 TUNER 幾次以選擇"AM"或"FM"。
AM/FM 接收詳情2.按 TUNING MODE,使顯示螢幕上的"AUTO"指示燈熄滅。
3.按 TUNING 選擇所需的無線電台。
每按一下按鈕,頻率改變 1 個步長。
按住按鈕時頻率會持續改變,鬆開後停止。
調台時注意顯示幕。
若要返回自動調諧:按主機上的 TUNING MODE。
本機自動調諧至一個無線電台。
這時通常應顯示"AUTO"。
直接調諧頻率用於直接輸入您要收聽的無線電台的頻率。
1.按遙控器上的 TUNER 幾次以選擇"AM"或"FM"。
2.按 D.TUN。
3.使用數字按鈕,在 8 秒內輸入無線電台的頻率。
例如,要輸入 87.5 (FM),請按 8、7、5 或 8、7、5、0。
如果輸入的數字錯誤,請按 D.TUN 並輸入正確值。
預設一個 AM/FM 無線電台可以記錄最多 40 個您最喜歡的 AM/FM 無線電台。
提前記錄無線電台讓您能夠直接調到喜歡的電台。

Table des matières 1Important2SécuritéAvis 2 22Votre Radio Portable3 Introduction3 Contenu de la boîte3 Présentation de la radio portable33Mise en route4 Installation des piles44Écoute de la radio FM/MW5Syntonisation des stations de radio Connexion à un casque 5Réglage du volume555Informations du produit666Résolution des problèmes1FR1ImportantSécurité••••••••••••AvisToutes les modi cations ou altérationsapportées à cet appareil et qui ne sont pasexpressément approuvées par MMD HongKong Holding Limited peuvent annuler ledroit de l'utilisateur à employer le matériel.Par le présent document TP Vision Europe B.V.déclare que ce produit est conforme auxexigences essentielles et aux autresdispositions applicables de la Directive2014/53/EU. Vous pouvez trouver la déclarationde conformité sur /support.Ce produit est conforme auxexigences d'interférence radio de laCommunauté Européenne.Ce produit est conçu et fabriquéavec des matériaux et descomposants de qualité supérieurequi peuvent être recyclés ouréutilisés.Ce symbole signi e que le produit nedoit pas être jeté avec les déchetsménagers courants et doit être livré àune installation de collecte appropriéepour le recyclage. Respectez les règleslocales et ne jetez jamais le produit etles piles rechargeables avec lesdéchets ménagers courants. Une miseau rebut correcte des produits et despiles rechargeables usagés contribue àéviter des conséquences négativespour l'environnement et la santéhumaine.Ce symbole signi e que le produitcontient des piles couvertes par laDirective européenne 2013/56/EU quine peuvent pas être éliminées avec lesdéchets ménagers courants.Renseignez-vous sur le système decollecte séparé local des produitsélectriques, électroniques et des piles.Respectez les règles locales et ne jetezjamais le produit et ses piles avec lesdéchets ménagers courants. Une miseau rebut correcte des produits et despiles usagés contribue à éviter desconséquences négatives pourl'environnement et la santé humaine. Lisez ces instructions.Tenez compte de tous les avertissements.Suivez toutes les instructions.Ne bloquez aucune bouche d'aération. Exécutezl’installation conformément aux instructions dufabricant.Ne l'installez pas à proximité d'une source dechaleur telle que des radiateurs, des bouches dechaleur, des fourneaux ou d'autres appareils (ycompris les ampli cateurs) qui produisent de lachaleur.Con ez toutes les réparations à un technicienquali é. Une révision est nécessaire lorsquel’appareil a été endommagé d'une façonquelconque, que du liquide a été déversé ou lesobjets sont tombés dans l’appareil, quel’appareil a été exposé à la pluie ou à l'humidité,ne fonctionne pas normalement ou est tombé.ATTENTION d'utilisation de la batterie - Pouréviter toute fuite de batterie pouvant entraîner desblessures corporelles, des dommages matériels oudes dommages à la radio portable :Installez correctement les piles en respectant+ et - comme indiqué sur l'appareil.Retirez les piles lorsque l'appareil n'est pasutilisé pendant une longue période.La pile ne doit pas être exposée à une chaleurexcessive telle que la lumière du soleil, le feuou une source similaire.Cette radio portable ne doit pas être exposée àdes gouttes ou à des éclaboussures.Ne placez aucune source de danger sur la radioportable (par exemple, des objets remplis deliquide, des bougies allumées).2FR2 Votre RadioPortableFélicitations pour votre achat et bienvenue chez Philips ! Pour pro ter complètement del'assistance o erte par Philips, enregistrez votre produit sur /support. IntroductionAvec cette radio portable, vous pouvez•écouter la radio FM/MWContenu de la boîteVéri ez et identi ez le contenu de votre emballage :••••Présentation de la radio portable - améliore la réception FM.- allume/éteint l'appareil.- ajuste le niveau du son.- en mode FM/MW, règle une station avecprécision.- sélectionne la bande de fréquences : FM ou MW.- Prise casque 3,5 mm.Antenne télescopique1Compartiment des piles6TUNING234Sélecteur de bande5Unité principaleGuide de démarrage rapideBrochure de sécuritéGarantie3FR3 Mise en route Suivez toujours les instructions de ce chapitre selon leur séquence.Installation des pilesInsérez 2 piles AAA (non fournies) en respectant leur polarité correcte (+/-) comme indiqué.FR45FR 4 Écoute de la radioFM/MWSyntonisation des stations de radioRéglage du volumeConnexion à un casque Réglez le son avec la commande .Vous pouvez connecter un casque à la prise casque.-> Les haut-parleurs seront alors désactivés.4 Pour éteindre la radio, tournez la commandesur OFF .1 Tournez la commande pourallumer l'appareil.2 Réglez le sélecteur de bande sur FM ou MW .3 Sélectionnez votre station à l'aide de lacommande TUNING .5 Informationsdu produitInformations généralesPuissance Son Bandes de tuner MW 530 - 1700 kHz Tuner/Réception/TransmissionSortie Audio/Vidéo Casque (3,5 mm)Connectivité(Unité principale)88 g6 Résolution desproblèmes Pour maintenir la validité de la garantie, n'essayez jamais de réparer l’appareil vous-même.Si vous rencontrez des problèmes lors de l'utilisation de cet appareil, véri ez les points suivants avant de demander une intervention. Si le problème persiste, rendez-vous sur la page Web de Philips (/support). Lorsque vous contactez Philips, assurez-vous d'avoir l'appareil à proximité et de disposer du numéro de modèle et du numéro de série.Absence de son / pas d’alimentation - Volume non réglé- Casque connecté à l'appareil - Piles épuisées / mal insérées • Réglez le VOLUME.• Insérez correctement les piles (neuves).• Débranchez le casque.Mauvaise réception radio - Signal radio faible • Pour FM, étendez, inclinez et tournez l'antenne télescopique pour une meilleure réception. Réduisez sa longueur si le signal est trop fort.• Pour MW, l'appareil utilise une antenne intégrée. Dirigez cette antenne pour une meilleure réception en tournant l'appareil. • Lors de l'insertion de nouvelles piles, n'essayez pas de mélanger les piles usagées et neuves.• Retirez les piles si l'appareil ne va pas être utilisé pendant un certain temps. Les piles contiennent des substances chimiques, elles doivent donc être éliminées correctement.FM 88 - 108 MHz6FR2021 © MMD Hong Kong Holding Limited. Tous droits réservés. Les caractéristiques sont sujettes à modi cation sans préavis.Philips et l'emblème du bouclier Philips sont des marques commerciales déposées de Koninklijke Philips N.V. et sont utilisés sous licence. Ce produit a été fabriqué par MMD Hong Kong Holding Limited ou l'une de ses liales et est vendu sous sa responsabilité, et MMD Hong Kong Holding Limited est le garant de ce produit.TAR1506_00_UM_V1.0。
Yaesu VX-3R 中文说明书快捷按键使用:【TXPO 】键: 1.调整发射功率 2.按键一秒进入设置模式。
.【DIAL 拨】盘选择需要调整的项目,设置完成后可以按PTT 键来存储这个新的设置并回到普通操作状态。
注意:不要忘记把DIAL 拨盘拉出来。
要调整多个参数,(如设置86 项: TN FRQ)可以按[TXPO] 键来进行其他项目调整设置。
【VOL 】键:按住VOL 键并调整DIAL 拨盘可对音量大小进行调节【RADIO 】键:1. 调频收音机功能切换1.在使用外接立体声耳机时按住一秒可选择使用立体声耳机作为接收天线【HM/RV 】键:长按一秒紧急呼叫模式,机器将自动在430.000 频率发送呼救信息,蓝色高亮度指示灯同时闪烁。
总复位操作:在电源关闭的状态下,按住[MODE]和[V/M]键不放,按电源键打开电源,之后按[F W]键即可复位。
简要设置项目设置项目1 [ANT AM] (AM 天线设置)功能: 为收听AM 广播选择合适的天线。
可用参数选项: BAREXT/BARANT默认值: BAREXT内置的磁棒天线和橡胶天线两个都使用:BAREXT只使用内置磁棒天线:BARANT磁棒天线具有方向性,请旋转VX-3R 机身以获得较好的接收效果。
. 设置项目2 [ANT FM] (FM 天线设置)功能: 为收听FM 广播选择合适的天线。
可用参数选项: EXTANT/EARPHO默认值: EXTANT: 使用橡胶天线:EXTANT: 使用耳机线做天线(EAR 插口为3R 专门为收听立体声广播设置的耳机接口),当接收弱信号是,会有噪音。
:EARPHO注:也可在RADIO 模式下,按RADIO 键一秒中对天线进行切换设置项目84[SUB-RX]功能:你在收听广播时频率上有信号时会自动切换至监听频率。
可选参数:TX1S、TX2S….10S(切换1--10秒选择卜HOLD (永久切换)和OFF (关闭自动切换)默认值:OFF设置项目3 [ANT.ATT]*功能: 收信机衰减有效/无效。
CD7416UB-ORCD RADIO / USB MP3 / WMA / Bluetooth® 12V OWNER’S MANUALContentsSafety Information ......................................... 2Contents ........................................................ 2Panel Controls ............................................... 3Operate Guide .............................................. 4Sound Setting ............................................... 5System Setting Item List ................................ 6USB MP3/WMA Overview ............................. 7Bluetooth Operations ..................................... 8Electrical Connections ................................. 10Troubleshooting ........................................... 11Specifications .............................................. 12FCC . (13)Safety InformationPrecautions• U se only in a 12-volt DC negative-ground electrical system. • D isconnect the vehicle's negative battery terminal while mounting and connecting the unit.• W hen replacing the fuse, be sure to use one with an identical amperage rating. U sing a fuse with a higher amperage rating may cause serious damage to the unit.• D O NOT attempt to disassemble the unit. Laser beams from the optical pickup are dangerous to the eyes.• M ake sure that pins or other foreign objects do not get inside the unit, they may cause malfunctions, or create safety hazards such as electrical shock or laser beam exposure.• I f you have parked the car for a long time in hot or cold weather, wait until the temperature in the car becomes normal before operating the unit.• K eep the volume at a level you can hear outside warning sounds (horns sirens, etc.).CD Notes• P laying a defective or dusty CD can cause dropouts in sound.• H old CDs as illustrated.• D o not touch the unlabeled side.• D o not attach any seal, label or data protec-tion sheet to either side of a disc.• D o not expose a CD to direct sunlight or excessive heat.• W ipe a dirty CD from the center outward with a cleaning cloth.• N ever use solvents such as benzine or alcohol.• T his unit cannot play 3-inch (8 cm) CDs.NEVER insert a 3-inch CD contained in the adapter or an irregularly shaped CD. The unit may not be able to eject it, resulting in a malfunction. • D isc can not have foreign body, the damage caused by the disc with foreign body do not belong to the warranty scope.Before Operation• D o not raise the volume level too much, as this will block outside sounds, making driving dangerous. Stop the car before performing any complicated operation.CAUTION• D O NOT open covers and do not repair you r se lf. C on su lt th e d e ale r o r an experienced technician for help.* I n addition to ordinary CDs, this unit can playback CD - R or CD - RW, MP3.Note: The system just support the Englishand number display. Not all kinds letters are compatible with the unit.1. - Disc eject2. - Rotate to adjust volume.- Radio: Mute- CD/MP3: Pause- Hold it to power off3. - Band select4. - 1-6 preset- Automatically search and save station5. - Channel 1/Play/Stop/Top6. - Channel 2/SCN7. - Channel 3/RPT8. - Channel 4/RDM9. - Channel 5/FOLDER-10. - Channel 6/FOLDER+11. - D isplay paly time and clock in the CDstate.- t he LCD will display the ID3 T AG informationrecycle: file name/folder name/ID3 T AG/system time in the MP3 state.- D isplay PTY info and system time in theRadio state.12. - Menu select13. - USB connector14. - Seek+/Select the next track15. - Seek-/Select the previous track16. - Disc slot17. - S CR buttonRadioDisc(when disc is in)USB(when USB inserted)AUX IN18. - Reset hole19. - P ress to select VOL/BAS/TRE/BAL/LOUD/FAD/ AF/TA/PTY, rotate VOL knob to adjust - RADIO: Rotate to adjust radio tune- C D /MP3: Rotate to select the previous/next track20. 1-6 preset:Press to tune in a preset station.Hold for more than 2 seconds to store adesired station.21. - MicrophoneOperate GuideDisc Load / EjectEject: Press to eject the disc.Band ModePress the button to change bands:FM1 FM2 FM3 AM1 AM2 LWSRCPress the [SRC] button to switch between and select available sources, the mode as follows: TUNER->CD/MP3/USB->AUX.Auto Memory Store(Radio mode)Press the [PS/AST] button to scan the presetstations 1-6 for 10 seconds each.Hold the [PS/AST] button more than 2 seconds, the strongest available stations will be automatically saved in the memory ofpreset button 1-6 .Seek ModeEQ Loud ModePress the [TUNE] Knob and rotate to se-lect sound effect EQ OFF POP ROCKCLASSICJAZZCUSTOMP r e s s t h e [T U N E ] b u t t o n a n d p r e s s/ BAS/TRE, rotate theClock Settingif RDS clock (CT) doesn’t work, you can adjust manually the Clock time.Long press the [DISP] button to set the time.Select [CLOCK] with the search buttons./Press [TUNE] knob and rotate it to adjust the hours.Press [TUNE] knob and rotate it to adjust theminutes.Press the [TUNE] knob to exit the clock setting.System Settingto select: TA TA RETUN AF REGC TD X /L O S T /M O N O C L O C K 12/24H BEEP SWRC SET LOGIC AREA SET, and rotate the [TUNE] to setting.BEEP setting: The beep tone feature allows the selection of an audible beep tone to be heard each time the menu is accessed.SWRC setting: Rotate the [TUNE] knob to select ON or OFF.DX/LO setting: Rotate the [TUNE] knob to se-lect DX or LO.CT setting: Rotate the [TUNE] knob to select ON or OFF.REG setting: Rotate the [TUNE] knob to select ON or OFF.AF setting: Rotate the [TUNE] knob to select ON or OFF.TA RETUN setting: Rotate the [TUNE] knob to select RETUNE S or L. Setting for “L”, Auto search the TA time space for 180 sec,Setting for “S”, auto search the TA time space for 45 sec.TA setting: Rotate [TUNE] knob to select ON or OFF.AREA SEL setting: Rotate the [TUNE] knob to select USA, EUROPE, NORTH AFRICA, ASIA, JAPAN.LOGIC ON/OFF: Logic ON to limit the use of the set to one hour when the car ignition is switched off. Logic OFF to prevent the set from turning on when the car ignition is switched off.SCROLL setting(CD SRC): Rotate the [TUNE] knob to select ON or OFF.MIC SEL setting(Bluetooth SRC): Rotate the [TUNE] knob to choose Microphone EXTERNAL or INTERNAL.AUTO CON(Bluetooth SRC): To link incoming calls automatically.Operate Guide Sound SettingMP3 Track SearchCD/MP3 mode:Press the [MENU] button to select “TRACK SCH” mode, and press the [TUNE] knob to en-ter searching mode. Then rotate and press the [TUNE] knob to select a track number which you want, then press the [TUNE] knob to con-firm.RDS(PTY SEEK)Only the radio region is Europe and on the FM the PTY can be seached. Press the [MENU] button to PTY function, rotate the [TUNE] knob to display the program types, and press [TUNE] to select the desired.Note:If radio region isn’t Europe, RDS won’t display.Press the [TUNE] knob to enter sound effectsetting mode. First press shows current EQ.Rotate the [TUNE] knob to changes BEATEQ in this order:EQ OFF -> POP -> ROCK -> CLASSIC ->JAZZ -> CUSTOM/BAS-G / TRE-G: (-7)- (+7)[TUNE] knob to select a value.BALANCE: LEFT 1-7->CENTER->RIGHT1-7FADER: FRONT 1-7->CENTER->REAR 1-7LOUD: ON/OFFSystem Setting Item ListUSB MP3/WMA OverviewNote on MP3• M P3 is short for MPEG Audio Layer 3 and refers to an audio compression technology standard.• T his product allows playback of MP3 files on CD-ROM, CD-R or CD-RW discs.• T he unit can read MP3 files written in the format compliant with ISO 9660.H owever it does not support the MP3 datawritten by the method of packet write.• T he unit can not read an MP3 file that hasa file extension other than ".mp3".• I f you play a non-MP3 file that has the “.mp3" extension, you may hear some noise.• I n this manual, we refer to what are called "MP3 file" and "folder " in PC terminology as "track" and "Album," respectively.• M aximum number of directory level is 8, including the root directory. Maximum number of files and folders per disc is 256.• T he unit may not play tracks in the order of Track numbers.• T he unit plays only the audio tracks if a disc contains both audio tracks and MP3 files.• W hen playing a disc of 8kbps or VBR*, theelapsed playing time in the display windowwill not be correct and also the intro playmay not function properly. *VBR: VariableBit RateNote on creating your own CD-Rs orCD-RWs containing MP3 files• T o e n j o y h i g h q u a l i t y s o u n d,w erecommend converting to MP3 files witha sampling frequency of 44.1 kHz and afixed bit rate of 128 kbps.• D O NOT store more than 256 MP3 filesper disc.• F or ISO 9660 -compliant format, themaximum allowable depth of nestedfolders is 8, including the root directory(folder).• W hen CD-R disc is used, playback ispossible only for discs which have beenfinalized.• M ake sure that when MP3 CD-R or CD-RW is burned that it is formatted as a datadisc and NOT as an audio disc.• Y ou should not write non-MP3 files orunneeded folders along with MP3 files onthe disc otherwise it takes a long time untilthe unit starts to play MP3 files.• W ith some CD-R or CD-RW media, datamay not be properly written depending ontheir manufacturing quality.I n this case, data may not be reproducedcorrectly. High quality CD-R or CD-RW disc isrecommended.• U p to 16 characters are displayed for thename of an Album or a Track. ID3 TAGversion 1.x is required.•N ote that the unit may not play Track inthe order that you wrote them to the disc.USB NotesUSB functions (flash memory type) MP3 musicplay.(1) USB flash memory 2 in 1 support(2) FAT 12/FAT 16/FAT 32 format supported.(3)F ile name:64byte/dir name:64byte/tagname: 30 byte.(4) Tag (id3 tag ver 2.0)- title/artist/album: 32 byte support.(5) U SB 1.1 support, USB 2.0 support (For 2.0,speed performance is as USB 1.1)(6) N ot all USB devices are compatible withthe unit.(7) U SB connector is support maximum workpower with 500 mA.The Bluetooth allows you to utilize your car’s built-in audio system for wireless mobile phone or music handsfree communication. Some Bluetooth mobile phones have the audio features, and some portable audio players support Bluetooth feature. This system can play audio data stored in a Bluetooth audio device. The car stereo with Bluetooth will be able to retrieve phonebook contacts, received call, dialed call, missed call, incoming calls, outgoing call and listen to music.Notes:• D o not leave the microphone of Bluetooth handsfree in the places with wind passing such as air outlet of the air conditioner, etc. This may cause a malfunction.• I f leave it in the places subjected to direct sun, high temperature can cause distortion, discoloration which may result in a malfunction.• T his system will not operate or may operate improperly with some Bluetooth audio players.• C annot guarantee the compatibility of all mobile phones together with unit.• A udio playback will be set to the same volume level as set during telephone call. This might cause problems, if extreme volume level is set during telephone call.Handsfree OperationsPairing1. T urn on Bluetooth function of your mobile phone.2. E nter mobile phone’s Bluetooth setup menu.3. S earch for new Bluetooth devices.4. S elect Bluetooth devices from the pairing list on the mobile phone.5. Enter“1234” as the password (The password default setting is “ 1234 ”).6. A fter pairing successfully, BT and HPF icons will light up.A2D P i c o n w i l l l i g h t u p a f t e r A2D P connected.Making a callOperation from Bluetooth menuPress the [SRC] button to switch the source to “BT MUSIC”. When display "A2DP" press the [MENU / ] button to switch to “DIAL NUM”.• Dial Number1. P ress the [TUNE] knob on the front panel to confirm to dial number.2. R otate the [TUNE] knob to select a number, press the knob to confirm, and continue to input the next digit. Repeat above until all numbers inputted.3. P ress the [BAND / ] button to dial.4. P ress the [MENU / ]button to terminate call.• Dialled/Missed/ ReceivedYou can search any Dialled/Missed/Received.1. R o t a t e t h e[T U N E]k n o b t o s e l e c t “DIALLED”, “MISSED”, “RECEIVED”.Bluetooth Operations2.P ress the [TUNE] knob to enter the selectedcall history.3. R otate the [TUNE] knob to scroll the contacts.4. W hen the contact name or mobile phone No.is displayed, press the [BAND / ] button tocall the mobile phone No. of that contact.* P ress the [MENU/ ] button to end the call.• Call from PhonebookUser can search the contact name in thephonebook and make call.1.R otate the [TUNE] knob to select “USERPBK”.2.P ress the[TUNE] knob to enter the selectedphonebook.3. R otate the [TUNE] knob to scroll the contacts.4. T he phone number and the name to scrolldisplay.When the contact name is displayed,press the [BAND / ] knob to call the mobilephone No. of that contact.*P ress the[MENU / ] button to end thecall.Note:• S ome mobile phones may not be able totransfer data of Phonebook.• Transfer CallYou can switch handsfree call and mobile phonecall. Press the [BAND / ] button during call.• Answering a callYou can answer an incoming call by pressing the [BAND / ] button.*P ress the[MENU / ] button to reject an incoming call.Audio Streaming OperationsWhat is audio streaming?Audio streaming is a technique for transferring audio data such that it can be processed as a steady and continuous stream. Users can stream music from their external audio player to their car stereo wirelessly and listen to the tracks through the car’s speakers. Please consult your nearest dealer for more information on the product of wireless audio streaming transmitter offered.mobile phone while audio streaming as this may cause noise or sound choppy on the song playback.Audio streaming may or may not resume a f t e r t e l e p h o n e i n t e r r u p t a s t h i s i s dependent on mobile phone.System will always return to Radio mode if audio streaming is disconnected.Note:Be sure to read the chapter “Pairing” before proceeding.Play / Pause a track1. P ush the [ 1 ] button to pause audio playback.2. T o resume audio playback, push the [ 1 ] button again.Selecting a trackTrack-up P ressthe button to move to the beginning P ress the button to move to the beginning Note:audio depends on the duration of playback.During music streaming playback, “A2DP and HFP ” will be shown on the display. When A2DP device is disconnected, “DISCONN ” will be shown on the display Some Bluetooth audio players may not have play / pause synchronized with this unit. Please make sure both device and main unit are in the same play / pause status in BT MUSIC mode.Bluetooth OperationsElectrical ConnectionsWiring DiagramTroubleshootingIf you suspect something is wrong, immediately switch power off. Do not use the unit in abnormal condition, for example without sound, or with smoke or foul smell, can cause fire or electric shock. Immediately stop using it and call the store where you purchased it. Never try to repair the unit yourself because it is dangerous to do so.SpecificationsGeneralPower supply: 12 V DC negative ground Maximum power output: 41 W x 4 channels (4 ) Suitable speaker impedance: 4ESP: 10 s (CD-DA)/40 s (MP3) Dimensions(WxDxH): 178x161x50 mm Weight: 1.33 kgNote: For different bit-rate MP3, ESP time are different;40 seconds only for the bit-rate MP3 file of the 128Kbps FM Stereo RadioFrequency range: 87.5-108.0 MHz Usable sensitivity: < 14 dBμFrequency response: 50 Hz - 10 KHzStereo separation: ≥ 22 dB (1 KHz)Image response ratio: ≥ 40 dBIF response ratio: ≥ 60 dBSignal/noise ratio: ≥ 50 dBAM(MW) RadioFrequency range: 522-1620 KHzUsable sensitivity(S/N=20dB): < 35 dBμDisc PlayerSystem: Disc digital audio system Frequency response: 20 Hz - 20 KHzSignal/noise ratio: > 72 dB (dBA)Total harmonic distortion: Less than 1% (1 KHz) Channel separation: > 55 dB Note: Specifications and the design are subject to change without notice due to improvements in technology.NORTHAFRICAJAPAN531- 1602KHz153 - 252KHzFCC STATEMENT1. This device complies with Part 15 of the FCC Rules. Operation is subject to the following two conditions:(1) This device may not cause harmful interference.(2) This device must accept any interference received, including interference that may cause undesired operation.2. Changes or modifications not expressly approved by the party responsible for compliance could void the user's authority to operate the equipment.NOTE: This equipment has been tested and found to comply with the limits for a Class B digital device, pursuant to Part 15 of the FCC Rules. These limits are designed to provide reasonable protection against harmful interference in a residential installation.This equipment generates uses and can radiate radio frequency energy and, if not installed and used in accordance with the instructions, may cause harmful interference to radio communications. However, there is no guarantee that interference will not occur in a particular installation. If this equipment does cause harmful interference to radio or television reception, which can be determined by turning the equipment off and on, the user is encouraged to try to correct the interference by one or more of the following measures: Reorient or relocate the receiving antenna. Increase the separation between the equipment and receiver.Connect the equipment into an outlet on a circuit different from that to which the receiver is connected.Consult the dealer or an experienced radio/ TV technician for help.FCC Radiation Exposure StatementThis equipment complies with FCC radiation exposure limits set forth for an uncontrolled environment. This equipment should be installed and operated with minimum distance 20cm between the radiator & your bodyFCCContinental Trading GmbH。
依维柯使用指南[日期:2009年04月09日] 来源:依维柯论坛提供一、新车的检查及走合(一)、新车的检查新车启用前,首先应认真阅读该车使用说明书,熟悉本车型各总成的结构特点,了解驾驶室内各操纵机构的操作方法,仪表板上各仪表之功能和使用方法。
另外还应注意做好以下几点检查工作:1.检查车身各总成的连接及紧固情况,尤其是传动、转向、制动、车轮等部位是否有松动、异响、渗漏等现象。
2.检查冷却液液面、发动机润滑油油面、变速器油及制动液等高度是否符合要求。
3.检查蓄电池电压是否正常。
4.检查各轮胎充气压力是否符合规定。
5.起动发动机,检查发动机、离合器、变速器、发电机、转向系和制动系工作情况和性能是否正常。
6.检查各种电气设备、灯光、喇叭和仪表的工作情况。
7.检查随车工具和随车文件是否齐全。
(二)、新车的走合依维柯各型车的新车走合期为1500公里。
在走合期内行车,应不使发动机满负荷运转。
走合期结束后,应做好以下工作:1.彻底更换发动机机油。
2.检查底盘各传动机构是否有泄漏。
3.检查管路及接口部分是否有泄漏。
4.检查各活动部分的间隙是否正常。
二、发动机的正确使用(一)、发动机的起动1.起动前应把变速杆移至空档,并拉上手制动器2.将钥匙插入点火开关并向右转至位置1(MAR)。
此时若发动机水温正常,则预热系统不起作用,但有预热指示灯显示发动机电路及各信号装置电路已接通,预热指示灯亮,约2秒后即可将钥匙转到位置2(AVV),并在发动机起动后立即松开钥匙。
注意:钥匙在位置2处的停留时间不得超过30秒。
如超过30秒,发动机尚未起动,则需松开点火钥匙间隔1分钟后再重复预热操作,进行重新起动。
若起动时发动机水温低于2±2℃时,点火钥匙在位置1时,会自动接通预热系统,预热指示灯会连续亮30-40秒,直到指示灯熄灭,表示预热完成,此时方可将点火钥匙转至位置2,进行发动机起动。
注意:在起动期间预热指示灯连续亮,发动机起动后指示灯熄灭。
欧胜使用手册欧胜是一款功能强大的办公软件,能够帮助用户高效地处理文档、表格、演示文稿等办公任务。
本手册将介绍欧胜的基本功能、操作方法和常见问题的解决方案,帮助用户更好地掌握和使用欧胜软件。
第一部分:欧胜软件概述欧胜是一款办公软件套装,包括文档处理、表格处理、幻灯片演示等多种功能模块。
欧胜的界面简洁清晰,功能丰富实用,能够满足用户在日常办公中的各种需求。
第二部分:欧胜使用方法1. 文档处理- 新建文档:点击菜单栏上的“文件”-“新建”,选择文档类型,即可创建新的文档。
- 编辑文档:在文档中直接输入文字,也可以通过插入图片、表格、图表等丰富文档内容。
- 保存文档:点击菜单栏上的“文件”-“保存”或“另存为”,选择保存位置和格式,即可保存文档。
2. 表格处理- 新建表格:点击菜单栏上的“文件”-“新建”,选择表格类型,即可创建新的表格。
- 编辑表格:在表格中输入数据,也可以对表格进行格式调整、边框设置等操作。
- 公式计算:欧胜表格支持各种数学公式计算,用户可以输入公式进行计算,并查看计算结果。
3. 幻灯片演示- 新建幻灯片:点击菜单栏上的“文件”-“新建”,选择幻灯片类型,即可创建新的幻灯片。
- 编辑幻灯片:在幻灯片中插入文字、图片、图表等元素,设置幻灯片切换效果和动画效果。
- 播放幻灯片:完成幻灯片制作后,用户可以点击“播放”按钮进行幻灯片放映。
第三部分:常见问题解决1. 如何设置页面大小和页面边距?在欧胜文档中,点击菜单栏上的“页面布局”-“页面设置”,即可调整页面大小和页面边距。
2. 如何进行表格复制粘贴?在欧胜表格中,选中需要复制的单元格或区域,点击右键选择“复制”,然后在目标位置点击右键选择“粘贴”。
3. 如何为幻灯片添加过渡效果?在欧胜幻灯片编辑模式中,点击“幻灯片”-“过渡效果”,选择需要的过渡效果和时间,即可为幻灯片添加过渡效果。
通过本手册的介绍,相信用户已经对欧胜软件有了更深入的了解,并能够更加熟练地使用欧胜进行文档、表格和幻灯片制作。
PhilipsOriginal radio20 W Output PowerTAVS700Iconic vibesAuthentic 1950s style meets modern performance in this mains-powered Bluetoothradio. The wooden cabinet, copper dials and dimmable display make this the perfectcenterpiece in any room. A digital radio tuner delivers clear reception.Iconic looks. Modern performance.•Vintage wooden cabinet. Period 1950s details•Clear, detailed sound. 2x3" full-range speakers•Bass-reflex port. Full, powerful low tones•Large, clear digital clock display. DimmableTuned for today•DAB+ and FM digital radio with presets•Twin dual-layered control knobs•20 W output power•Copper-toned mesh grille lets the sound flowPlay it again•AC-in. Mains-powered•Up to 10 m wireless range•Dimensions: 335x146x183 mm•Weight 2.55 kgIssue date 2022-05-16Version: 11.0.212 NC: 8670 001 61696EAN: 48 95229 10129 6© 2022 Koninklijke Philips N.V.All Rights reserved.Specifications are subject to change without notice. Trademarks are the property of Koninklijke Philips N.V. or their respective Specifications Original radio Bluetooth® 20 W Output PowerHighlights Original radio This Bluetooth radio pays homage to the iconic Philips Philetta 254 tabletop radio. The vintage wooden cabinet oozes charm. The 1950s detailing on the twin control knobs and speaker grille takes you back to the era when jazz and rock and roll ruled the airwaves.Sharp digits. Night and day.The large, clear digital clock display is dimmable, so it's easy to find the perfect level for your room. When the sun goes down, press the menu knob to access and change the intensity of the illumination.Tuned for today This retro radio features a digital FM tuner for radio—and a Bluetooth connection for streaming from your mobile device. The digital radio tuner delivers crystal-clear reception. You can set up to 20 FM presets and 20 DAB presets for your favourite stations.Crisp sound and punchy bass Two 3" full-range speakers deliver clear sound. A bass-reflex port fills in the low tones, giving you rounded, powerful bass response. The copper-toned mesh grille lets the sound flow.Easy pairing. Easy listening.A short press of the power button gets this radio ready to pair. The wireless range is 10 m: perfect if your device is in another room. Two retro-styled knobs with dual layers offer control of volume, source, DAB+/FM stations, and more.Accessories •Included accessories: Quick install guide, AC power cord (VDE & UK)Loudspeakers •Built-in speakers: 2Sound •Volume Control: rotary •Sound system: stereo •Output power (RMS): 20WCompatibility •other Bluetooth-enabled device Connectivity •Bluetooth profiles: A2DP, AVRCP, HFP •Bluetooth version: 5•USB charging: Yes, 5V, 2A •Bluetooth range: Line of sight, 10M or 30FT Tuner/Reception/Transmission •Auto digital tuning•Tuner Bands: FM Stereo •DAB: info display, menu, smart scan •Tuner bands: DAB (Band III)•No. of preset stations: 20 (DAB), 20 (FM)•DAB frequency range: 174.9 - 239.2 MHz •FM frequency range: 87.5 - 108 MHz •Tuner Display:PLL Convenience •Clock/Version:Digital •Clock: sleep timer Clock •Time format: 12H, 24H Dimensions •Product weight: 2.55 kg •Product dimensions (WxDxH): 33.5 x 14.6 x 18.3 cm •Weight incl. Packaging: 2.75 kg •Packaging dimensions (WxDxH): 40.8 x 18.6 x 23.4 cm。
Playing the Radio94The ignition switch must be in ACCESSORY (I)or ON (II).Turn the system on by pushing the PWR/VOL knob or the AM or FM button.Adjust the volume by turning the same knob.The band and frequency that the radio was last tuned to is displayed.To change bands,press the AM or FM button.On the FM band,ST will be displayed if the station is broad-casting in stereo.Stereoreproduction on AM is not available.You can use these five methods to find radio stations on a selected band:the preset buttons,and .plays a station you want to listen to,press the SCAN button again.Each preset button can store one frequency on AM,and two frequencies on FM.Select the desired band,AM or FM.FM1and FM2let you store two frequencies with each preset button.Use the TUNE,SEEK,or SCAN function to tune the radio to a desired station.Pick a preset button,and hold it until you hear a beep.Repeat steps 1to 3to store a total of six stations on AM and twelve stations on FM.The preset frequencies will be lost if your vehicle’s battery goes dead,is disconnected,or the radio fuse is removed.2.3.4.1.CONTINUEDTo Play the RadioTo Select a StationTUNE,SEEK,SCAN,AUTO SELECT Preset Playing the Radio95If you aretraveling far from home and can no longer receive your preset stations,you can use the Auto Select feature to find stations in the local area.Press the A.SEL Button.‘‘A.SEL’’flashes in the display,and the system goes into scan mode for several seconds.It stores the frequencies of six AM,and twelve FM stations in the preset buttons.You will see a ‘‘0’’displayed after pressing a preset button if Auto Select cannot find a strong station for every preset button.If you do not like the stations Auto Select has stored,you can store other frequencies on the preset e the TUNE,SEEK,or SCAN functions to find stations,then store them in the preset buttons as described.press theA.SEL button.This restores the presets you originally set.Press the MODE knob repeatedly to display the Bass (BAS),Treble(TRE),Balance (BAL),Fader (FAD),and Sub-Woofer (SUB-W)settings.Each mode is shown in the display as it changes.Turn the MODE knob to adjust the setting to your liking.When the level reaches the center,you will see ‘‘C’’in the display.The system will automatically return the display to the selected audio mode about five seconds after you stop adjusting a mode.These two modes adjust the strength of the sound coming from each speaker.BAL adjusts the side-to-side strength,while FAD adjusts the front-to-back strength.Use the TRE/BAS/SUB-W modes to adjust the tone to your liking.To turn off Auto Select,If equippedAUTO SELECT Adjusting the SoundBalance/Fader Treble/Bass/Sub-Woofer Playing the Radio96Your Honda’s radio can receive the complete AM and FM bands.Those bands cover these frequen-cies:AM band:530to 1,710kilohertz FM band:87.7to 107.9megahertzRadio stations on the AM band are assigned frequencies at least ten kilohertz apart (530,540,550).Stations on the FM band are assigned frequencies at least 0.2megahertz apart (87.9,88.1,88.3).Stations must use these exactfrequencies.It is fairly common for stations to round-off the frequency in their advertising,so your radio could display a frequency of 100.9even though the announcer may identify the station as ‘‘FM101.’’How well your Honda’s radio receives stations is dependent on many factors,such as the distance from the station’s transmitter,nearby large objects,and atmos-pheric conditions.A radio station’s signal gets weaker as you get farther away from itstransmitter.If you are listening to an AM station,you will notice the sound volume becoming weaker,and the station drifting in and out.If you are listening to an FM station,you will see the stereo indicator flickering off and on as the signal weakens.Eventually,the stereo indicator will go off and the sound will fadecompletely as you get out of range of the station’s signal.Driving very near the transmitter of a station that is broadcasting on a frequency close to the frequency of the station you are listening to can also affect your radio’s reception.You may temporarily hear bothstations,or hear only the station you are close to.CONTINUEDRadio FrequenciesRadio ReceptionRadio Reception97Radio signals,especially on the FM band,are deflected by large objects such as buildings and hills.Your radio then receives both the direct signal from the station’s transmitter, and the deflected signal.This causes the sound to distort or flutter.This is a main cause of poor radio reception in city driving.As required by the FCC:Changes or modifications not expressly approved by the party responsible for compliance could void the user’s authority to operate the equipment.Radio Reception98Playing a CD99With the ignition in the ACCESSORY(I)or ON(II)position, insert a CD into the CD slot.The drive will pull the CD in the rest of the way and begin to play it.You operate the CD player with the same controls used for the radio.The number of the track playing is shown in the display.The system will continuously play a CD until you change modes.Each time you press and release,the player skips forward to the beginning of the next track. Press and release to skip backward to the beginning of the previous track.To move rapidly press and hold the or.You will see CUE or REW in the display.To continuously replay is playing,either with the PWR/VOL knob or by turning off the ignition, the CD will stay in the drive.When you turn the system back on,the CD will begin playing where it left off.A CD changer is available for your vehicle.It holds up to six CDs.You operate the CD changer with the same controls used for the in-dash CD player.Load the desired CDs in the magazine,and load the magazine in the changer according to the instructions that came with the unit. To select the CD changer,press the CD button.The CD and track numbers will be displayed.To select a different CD,use the preset5 (DISC)or preset6(DISC) button.If you select an empty slot in the magazine,the changer will,after finding that slot empty,try to load the CD in the next slot.To Play a CDTo Change Tracks(SKIP) REPEAT Operating the Optional CD ChangerPlaying a CD100。
依维柯欧胜收音机说明书
一、产品介绍
依维柯欧胜收音机是一款高品质的汽车配件,专为依维柯欧胜车型设计。
它采用先进的技术和精湛的工艺制造而成,具有稳定的性能和出色的音质效果。
欧胜收音机能够提供多种收音方式,让您在驾驶的同时享受多样化的音乐和资讯服务。
二、主要功能
1. 收音功能:欧胜收音机具有AM和FM两种收音模式,可接收各类广播电台,提供丰富多样的音乐和新闻节目。
2. 频道搜索:收音机配备了频道搜索功能,可快速扫描并自动储存可接收的频道,方便用户切换收听。
3. 手动调谐:收音机还支持手动调谐功能,用户可以根据需要精确调整频率,以便收听到更清晰的广播信号。
4. 预设频道:用户可以将常听的电台频道预设到收音机的快捷键上,方便快速切换。
5. 睡眠定时:欧胜收音机还具有睡眠定时功能,可以在设定的时间后自动关闭,为用户提供更好的睡眠环境。
6. 外接设备:收音机支持外接MP3、手机等音频设备,可以通过线缆或无线连接,实现音乐播放和通话功能。
三、使用方法
1. 打开收音机电源,通过控制面板或遥控器开关即可。
2. 选择收音模式,根据需要选择AM或FM模式。
3. 使用频道搜索功能,按下搜索按钮,收音机将自动搜索可接收的频道并储存。
4. 如需手动调谐,可使用调谐按钮进行微调,直到找到理想的频道。
5. 如果有常听的电台,可以将其预设到收音机的快捷键上,以便快速切换。
6. 如果需要外接设备,可使用相应的线缆或无线连接方式进行连接。
7. 如需使用睡眠定时功能,可在设置菜单中进行设定,收音机将在设定的时间后自动关闭。
四、注意事项
1. 请在安全驾驶的前提下使用收音机,避免因频繁操作影响驾驶安全。
2. 使用收音机时,请确保车辆电源正常,以免因电源不足影响正常使用。
3. 避免将收音机长时间暴露在高温、潮湿或阳光直射的环境中,以免损坏设备。
4. 如遇到收音机无法正常使用的情况,请及时联系专业维修人员进行维修。
5. 请勿私自拆卸或修改收音机内部结构,以免造成设备损坏或人身安全问题。
五、维护保养
1. 定期清洁收音机外壳,可使用柔软的布擦拭,并避免使用腐蚀性强的清洁剂。
2. 如发现收音机插孔有异物,请及时清理,以免造成连接不稳定或短路的问题。
3. 如遇到收音机无法正常使用或音质变差的情况,请检查天线是否连接良好。
4. 如长时间不使用收音机,请关闭电源以节省能源并延长设备寿命。
六、总结
依维柯欧胜收音机作为一款实用的汽车配件,为车主提供了丰富多样的音乐和资讯服务。
它具备多种功能,如收音、频道搜索、手动调谐、预设频道、外接设备和睡眠定时等,让用户能够根据自己的需求自由选择和享受。
在使用过程中,我们需要注意安全驾驶、设备保养和维护,并遵循使用方法和注意事项,以保证收音机的正常使用和延长其使用寿命。
欧胜收音机将为您的驾驶旅程增添更多乐趣和便利。