UG后处理变量
- 格式:doc
- 大小:147.00 KB
- 文档页数:9
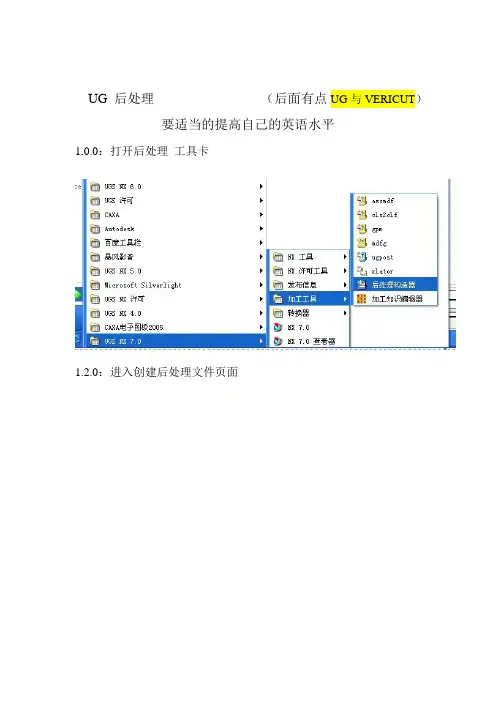
UG 后处理(后面有点UG与VERICUT)要适当的提高自己的英语水平1.0.0:打开后处理工具卡1.2.0:进入创建后处理文件页面1.2.1 创建一个新的后处理文件这里输入文件名(英文)此区域Inches 英制单位Millimeters 公制设定此区域轴选项3-轴4-轴或5轴这里只讲解3轴通用设定此区域为机床类型设定Generic 通用的Library 浏览自带机床User’s 用户自定义此区域描述你的后处理单只能输入英文选择完自己需要的格式后处理单击OK 进入下一步这一选项进行修改你的程序头程序尾中间换刀程序衔接道具号道具属性显示的添加进行讲解此选项为程序头选项此选项为增加程序条命令点击它可以拖入程序条就像这样这里的垃圾桶通样你不想要的此条可以删除下面讲解通用的编程设置下面图片是默认的设置此选项为N码关闭此选项为N码开启一般都是把这条此选项需要更改改成你需要的G40 G49 G80 G90既可单击这条词条就可修改进入下一画面把不需要的拖入垃圾桶通过此选项里的代码你可以找到你想要的改好后点击OK既可安全起见最好加入个Z轴回零命令拉入一个词条框添加一个新的词条框如果你想把词条框放在哪个词条框的周围只要看好词条对应放置位置变白既可松掉鼠标下面进入新词条选项里点击这里可以加入你要的词条而我们需要的是 G00 G91 G28 Z0 命令可以用文本形式输入就是这里选择第二个选项“TEXT”文本点击 Add word 拉入这个区域同样变白放置输入你要的文本G00 G91 G28 ZO 点击OK 既可程序头设定完成就是这个效果看下图如果需要加入O号下面编辑你的换刀过程点击中文意思就是操作开始步骤在这里你可以加入你需要的道具信息 N号的开关 M8 M9的开关设置 G43H00等设置下面先讲解 N号的加入加入N号我们只需要拉两个 N号开关词条就可以选择这一选项拉到上面是N号开然后拉入在下面既可下面加入刀具信息找到这个选项操作员消息拉入 N号关后面输入命令MOM_output_literal “( 刀具名称:$mom_tool_name )”MOM_output_literal “( 刀具直径:$mom_tool_diameter )”MOM_output_literal “( 刀具R角半径:$mom_tool_corner_radius )”想要哪个信息就输入哪行如果要两个以上就飞边拉入词条输入这项编辑完毕单击蓝色的区域机床控制 Machine Control 进入一下界面我们只要在G43后加上M8既可完成此项设定然后点击进程动作设定我们只需要修改中间的那个 G02 G03的进入下一页面该为Vector-Arc Start to Center 修改后OK 推出不改出程序带R的带圆的程序就是乱做一团。

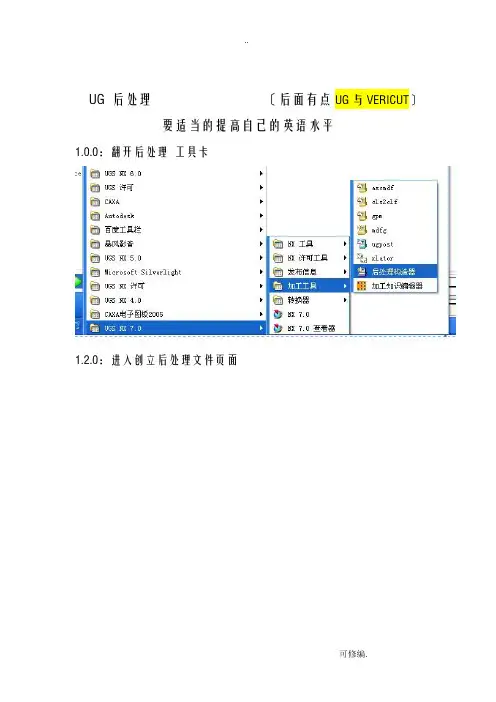
UG 后处理〔后面有点UG与VERICUT〕要适当的提高自己的英语水平1.0.0:翻开后处理工具卡1.2.0:进入创立后处理文件页面1.2.1 创立一个新的后处理文件这里输入文件名〔英文〕此区域Inches 英制单位Millimeters 公制设定此区域轴选项3-轴4-轴或5轴这里只讲解3轴通用设定此区域为机床类型设定Generic 通用的Library 浏览自带机床User’s 用户自定义此区域描述你的后处理单只能输入英文选择完自己需要的格式后处理单击OK 进入下一步这一选项可以显示你选择机床类型4轴3轴或你自定义的机床这一区域是你的输出是否记录选项此区域左边为机床行程数据右边为机床原点数据此区域左边为机床精度小数右边为机床快速进给G00速度其他选项默认就可以了这一选项进展修改你的程序头程序尾中间换刀程序衔接道具号道具属性显示的添加进展讲解此选项为程序头选项点击它可以拖入程序条就像这样这里的垃圾桶通样你不想要的此条可以删除下面讲解通用的编程设置下面图片是默认的设置此选项为N码关闭此选项为N码开启一般都是把这条此选项需要更改改成你需要的G40 G49 G80 G90既可单击这条词条就可修改进入下一画面把不需要的拖入垃圾桶通过此选项里的代码改好后点击OK既可平安起见最好参加个Z轴回零命令拉入一个词条框添加一个新的词条框如果你想把词条框放在哪个词条框的周围只要看好词条对应放置位置变白既可松掉鼠标下面进入新词条选项里点击这里可以参加你要的词条而我们需要的是G00 G91 G28 Z0 命令可以用文本形式输入就是这里选择第二个选项“TEXT〞文本点击Add word 拉入这个区域同样变白放置输入你要的文本G00 G91 G28 ZO 点击OK 既可程序头设定完成就是这个效果看下列图如果需要参加O号下面编辑你的换刀过程点击中文意思就是操作开场步骤在这里你可以参加你需要的道具信息N号的开关M8 M9的开关设置G43H00等设置下面先讲解N号的参加参加N号我们只需要拉两个N号开关词条就可以选择这一选项拉到上面是N号开然后拉入在下面既可下面参加刀具信息找到这个选项操作员消息拉入N号关后面输入命令MOM_output_literal “( 刀具名称:$mom_tool_name )〞MOM_output_literal “( 刀具直径:$mom_tool_diameter )〞MOM_output_literal “( 刀具R角半径:$mom_tool_corner_radius )〞想要哪个信息就输入哪行如果要两个以上就飞边拉入词条输入这项编辑完毕单击蓝色的区域机床控制Machine Control 进入一下界面我们只要在G43后加上M8既可完成此项设定然后点击进程动作设定我们只需要修改中间的那个G02 G03的进入下一页面修改这里把Vector-Arc Center to Start 该为Vector-Arc Start to Center修改后OK 推出不改出程序带R的带圆的程序就是乱做一团。

②1启动后处理构造器③④①2如图设置,选用fanuc_6M 控制器①②③④①3保存,取名:3zhou_fanuc②③②4(不让G40单独占一行)删除G40代码①③④⑤②5(不让G40与G02同一行)删除G41代码①③④⑤②6(设置G00同样可以输出G41/G40)添加G41代码①③④⑤②7(设置G41之后必然有D01)添加custom command代码①③④⑤⑥7(设置G41之后必然有D01)输入代码MOM_force Once D⑦插入⑧设置名称⑨输入代码7(设置G41之后必然有D01)(补充说明)下面的做法是不正确的D会提前出现8(设置线性运动分辨率)(即坐标数据精度)(设置为0.001,精度不要设置高了)②9(设置圆弧最小值)①③④⑤最小值最小圆弧长度太小会出问题,见后面补充说明设置0.01比较合适10(设置钻孔循环G98退刀)选择G9810(设置钻孔循环G98退刀)添加G9811(设置G84格式)允许定制11(设置G84格式)添加G95 M29指令11(设置G84格式)添加定制G95指令11(设置G84格式)添加定制M29指令11(设置G84格式)(设置G84之后输出G94的标识)(钻孔之后不输出G94攻丝之后才输出G94)11(设置G84格式)钻孔之后不输出G94攻丝之后才输出G9411(设置G84格式)(单独定义一个攻丝F指令)删除原来的F11(设置G84格式)添加自定义F如下图11(设置G84格式)新建格式设置如下11(设置G84格式)(设置螺距F大于5小于0.001报警)编程F超出区间会报警如下图这个报警不便于检查我们继续优化11(设置G84格式)(设置超出值弹出报警窗口)值设大11(设置G84格式)(设置超出值弹出报警窗口)在G84之后加入如下语句就会报警如右图作业:设置T=0 S=0 报警提示:在代码上面右键选择编辑,可以查看代码的变量名称11(设置G84格式)(添加一个Q代码)设置如右图11(设置G84格式)设置代码输出顺序交换一下输出顺序完成G84设置②12(去除切削进给F后面的点)如F200.改成F200①③④⑤13(删除G02后面的K代码)G18/G19平面需要时可以单独做一个后处理14(线性运动 S M03 单独占行)提行即可15(程序无G00同样输出G43)加入G43 H01指令16(快速运动 S M03 单独占行)提行即可17(G43这行输出M08)18(S之后出现G04暂停)在线性运动和快速运动的S之后添加G04 K 地址不同系统暂停指令不同自己根据系统要求设置代码18(S之后出现G04暂停)(每个工序刷新一次G04)这样可以实现,但是同一把刀每个工序都在S之后输出暂停浪费时间我们需要换刀时才暂停所以要改一下,见后页18(S之后出现G04暂停)接上页把刷新放到换刀之前就可以了19(添加刀具信息和换刀暂停T0报警)在自动换刀T M6后面添加一个自定义命令如下图看不清楚代码到后处理视频页面可以下载后处理然后打开TCL文件,搜索T=0即可20(S0、F250报警)在每个地方都添加右边代码(有些工序是没有某些动作的,所以全部添加保证生效)20(S0、F250报警)钻孔需要在这里面添加,否则无效21(设置G54-G59)添加一个新块21(设置G54-G59)添加G-MCS Fixture offset21(设置G54-G59)右键更改为用户定义21(设置G54-G59)53改成G54默认输出G54MCS中的装夹偏置设置1=G55 2=G56...22(程序头输出%+NC名)输出零件名称23(在程序头输出Zmax)定制命令-导入-行程检查导入23(在程序头输出Zmax)在before_motion中输入check命令23(在程序头输出Zmax)在尾部添加如下代码注意因为要重写文件,所以后处理NC文件不能指定为中文路径,否则会报警注意:代码看不清楚到后处理页面下载打开.TCL文件搜索rewrite即可把ZMAX输出到程序头会大大减慢后处理速度做过一个比较:2250K的文件(2.19M)不加turbo输出到前面80秒加turbo输出到前面要55秒钟不加turbo输出在后面30秒加turbo输出在后面7秒钟24(提高后处理速度)导入turbo高速处理指令24(提高后处理速度)把turbo高速处理指令加入程序头即可注意:加入turbo的影响加入turbo高速处理指令后,设置的自定义事件:与线性运动,圆弧运动,快速运动相关的都无效了例如F=250报警就无效了(钻孔,换刀有效里面的还有效)制作完成!后面有补充内容。

UG后处理变量global mom_seqnumglobal mom_part_nameglobal mom_lognameglobal mom_dateglobal mom_spindle_speedglobal mom_output_file_basenameMOM_set_seq_offset mom_seqnum 100# MOM_output_literal "(######## TASK : $mom_part_name ############)" # MOM_output_literal "(# Created By : $mom_logname)"# MOM_output_literal "(# Creation Date: $mom_date)"# MOM_output_literal "(############################################)" # MOM_suppress always NMOM_output_literal "G28 G91 Z0.0"MOM_output_literal "M30"MOM_output_literal "%"MOM_output_literal "(Date: $mom_date)"# MOM_suppress off NMOM_output_literal "(name: $mom_output_file_basename.nc )"MOM_output_literal "($mom_part_name)"# MOM_output_literal "O$mom_output_file_basename"# MOM_set_seq_onglobal max_z min_zset zmax [string trimright [format %.4f $max_z] 0]set zmin [string trimright [format %.4f $min_z] 0]MOM_output_literal "(MAXZ = $zmax , MINZ = $zmin)"global mom_machine_timeMOM_output_literal "(Total Machine Time:[format "%.2f" $mom_machine_time min])"Tool_Name:$mom_tool_name Tool_No:$mom_tool_number $mom_operation_typeglobal max_z min_zset zmax [string trimright [format %.4f $max_z] 0]set zmin [string trimright [format %.4f $min_z] 0]MOM_output_literal "(MAXZ = $zmax , MINZ = $zmin)"global mom_machine_timeMOM_output_literal "(Total Machine Time:[format "%.2f" $mom_machine_time minglobal toolnumglobal toolinfoglobal mom_group_nameglobal mom_tool_nameglobal mom_tool_diameterglobal mom_tool_corner1_radiusglobal mom_stepover_percentglobal mom_stock_partglobal mom_stock_floorglobal mom_cut_level_max_depthglobal mom_cut_level_min_depthglobal max_zglobal min_zglobal max_xglobal min_xglobal max_yglobal min_yglobal mom_operation_nameglobal mom_machine_timeglobal mom_tool_flute_lengthglobal mom_dateglobal mom_part_nameglobal mom_lognameglobal mom_cutting_timeglobal pre_tool_nameglobal pre_machine_timeglobal pre_timeglobal mom_spindle_rpmglobal mom_feed_cut_valueglobal alex_depthglobal alex_stepoverglobal tolglobal mom_tool_number mom_next_tool_numberglobal mom_coolant_status mom_coolant_modeglobal mom_spindle_rpmglobal mom_warning_infoglobal anchor_flagglobal coolant_flagglobal first_toolglobal mom_tool_nameglobal mom_tool_diameterglobal mom_tool_length_adjust_registerglobal mom_tool_corner1_radius global mom_tool_flute_lengthglobal mom_work_coordinate_number global msys mom_stock_partglobal mom_stock_floorglobal mom_inside_outside_tolerances global mom_global_cut_depthglobal mom_stepover_distance global mom_global_cut_depthglobal mom_stepover_distance global mom_stepover_scallopglobal mom_stepover_variable_passes global mom_stepover_percentglobal mom_stepover_typeglobal mom_depth_of_cut_type global mom_cut_level_max_depth global mom_depth_per_cut后处理加速度详解1.找到后处理TCL文件用写字板打开2.找到proc PB_start_of_program此处加入:PB_CMD_init_turbo 3.找到proc PB_CMD_kin_before_motion并且在其上面加入如下:距上一命令空两行#============================================================= proc PB_CMD_init_turbo { } {#============================================================= ## This custom command may only be used with Post Builder 3.2.1 # or later and NX2 or later.## Place this custom command with the "Start of Program" marker. ### This custom command will activate the turbo process mode for# the 3-axis mill posts. The execution time will be about 5 to# 10 times faster than the normal process.## Special Blocks are included in any 3-axis mill post created# by Post Builder v3.2.1 and on.## The blocks being output are formatted similar to that of the# Fanuc type of controllers.## The following turbo blocks will appear in the Block section# of N/C Data Definitions in Post Builder:## linear_move_turbo# circular_move_turbo# rapid_move_turbo# sequence_number_turbo## In Post Builder, you may modify the Word parameters from# the N/C Data Defitions dialog to configure the output of that# word used within the turbo blocks. You may also modify the Format # parameters. You may not, however, edit the expression in the# words, remove or add words in any turbo block.## All rapid motion is output in a single move. Any custom# commands in the linear move, circular move, rapid move and# mom_before_motion event markers will be ignored.#global mom_kin_machine_typeif {$mom_kin_machine_type == "3_axis_mill"} {uplevel #0 {set mom_kin_is_turbo_output "TRUE"MOM_reload_kinematics}}}距下一命令空两行空两行空两行修改圆弧最大半径在后处理器里面:后处理变批处理其实想让你的后处理摇身一变,成为批处理,也不是什么难事,我有个方法,大家可以试试,不过记得回贴,不然我会鄙视你有。

UG后处理输出宏变量1. 什么是UG后处理?UG后处理是指在使用UG软件进行工程仿真分析后,对仿真结果进行处理和分析的过程。
UG(Unigraphics)是一种三维CAD软件,它提供了一系列功能强大的后处理工具,可以对仿真结果进行可视化、统计和分析,帮助工程师更好地理解和评估产品的性能。
2. 为什么需要输出宏变量?在UG后处理过程中,宏变量是一种非常有用的工具。
宏变量可以用来存储和管理各种数值和数据,包括几何参数、边界条件、材料特性等。
通过输出宏变量,我们可以将计算结果和分析数据导出到外部文件,方便后续的处理和使用。
输出宏变量可以帮助我们快速提取关键信息,进行更深入的分析和优化。
3. 如何在UG中输出宏变量?UG提供了多种方式来输出宏变量。
下面将介绍几种常用的方法:3.1 使用Post Output宏UG中的Post Output宏是一种用于输出宏变量的脚本工具。
通过编写Post Output 宏,我们可以指定要输出的宏变量和输出的格式。
在UG的后处理过程中,我们可以通过调用Post Output宏来执行输出操作。
具体步骤如下:1.打开UG软件,并加载需要进行后处理的模型。
2.进入后处理环境,在菜单栏中选择”Post Processing” -> “Macro” ->“Post Output”。
3.在弹出的对话框中,选择要输出的宏变量和输出的文件路径。
4.点击”OK”按钮,UG会自动执行Post Output宏,并将宏变量输出到指定的文件中。
3.2 使用Journal文件UG中的Journal文件是一种记录用户操作的脚本文件。
我们可以通过编写Journal 文件来实现自动化的后处理操作,包括输出宏变量。
具体步骤如下:1.打开UG软件,并加载需要进行后处理的模型。
2.在菜单栏中选择”Tools” -> “Journal”,打开Journal编辑器。
3.在Journal编辑器中,编写输出宏变量的脚本代码,包括定义宏变量、执行后处理操作和输出宏变量到文件等。
![UG_后处理技巧说明[1]](https://uimg.taocdn.com/72fe36b0f01dc281e43af00c.webp)
U G_后处理技巧说明[1](总16页)--本页仅作为文档封面,使用时请直接删除即可----内页可以根据需求调整合适字体及大小--UG 后处理(后面有点UG与VERICUT)要适当的提高自己的英语水平:打开后处理工具卡:进入创建后处理文件页面创建一个新的后处理文件这里输入文件名(英文)此区域 Inches 英制单位 Millimeters 公制设定此区域轴选项 3-轴 4-轴或5轴这里只讲解 3轴通用设定此区域为机床类型设定 Generic 通用的 Library 浏览自带机床 User’s 用户自定义此区域描述你的后处理单只能输入英文选择完自己需要的格式后处理单击OK 进入下一步这一选项可以显示你选择机床类型 4轴 3轴或你自定义的机床这一区域是你的输出是否记录选项此区域左边为机床行程数据右边为机床原点数据此区域左边为机床精度小数右边为机床快速进给G00速度其他选项默认就可以了这一选项进行修改你的程序头程序尾中间换刀程序衔接道具号道具属性显示的添加进行讲解此选项为程序头选项点击它可以拖入程序条就像这样这里的垃圾桶通样你不想要的此条可以删除下面讲解通用的编程设置下面图片是默认的设置此选项为N码关闭此选项为N码开启一般都是把这条此选项需要更改改成你需要的 G40 G49 G80 G90既可单击这条词条就可修改进入下一画面把不需要的拖入垃圾桶通过此选项里的代码你可以找到你想要的改好后点击OK既可安全起见最好加入个Z轴回零命令拉入一个词条框添加一个新的词条框如果你想把词条框放在哪个词条框的周围只要看好词条对应放置位置变白既可松掉鼠标下面进入新词条选项里点击这里可以加入你要的词条而我们需要的是 G00 G91 G28 Z0 命令可以用文本形式输入就是这里选择第二个选项“TEXT”文本点击 Add word 拉入这个区域同样变白放置输入你要的文本G00 G91 G28 ZO 点击OK 既可程序头设定完成就是这个效果看下图如果需要加入O号下面编辑你的换刀过程点击中文意思就是操作开始步骤在这里你可以加入你需要的道具信息 N号的开关 M8 M9的开关设置 G43H00等设置下面先讲解 N号的加入加入N号我们只需要拉两个 N号开关词条就可以选择这一选项拉到上面是N号开然后拉入在下面既可下面加入刀具信息找到这个选项操作员消息拉入 N号关后面输入命令MOM_output_literal “( 刀具名称:$mom_tool_name )”MOM_output_literal “( 刀具直径:$mom_tool_diameter )”MOM_output_literal “( 刀具R角半径:$mom_tool_corner_radius )”想要哪个信息就输入哪行如果要两个以上就飞边拉入词条输入这项编辑完毕单击蓝色的区域机床控制 Machine Control 进入一下界面我们只要在G43后加上M8既可完成此项设定然后点击进程动作设定我们只需要修改中间的那个 G02 G03的进入下一页面修改这里把Vector-Arc Center to Start 该为Vector-Arc Start to Center修改后OK 推出不改出程序带R的带圆的程序就是乱做一团。

U G后处理变量UG后处理变量global mom_seqnumglobal mom_part_nameglobal mom_lognameglobal mom_dateglobal mom_spindle_speedglobal mom_output_file_basenameMOM_set_seq_offset mom_seqnum 100# MOM_output_literal "(######## TASK : $mom_part_name ############)" # MOM_output_literal "(# Created By : $mom_logname)"# MOM_output_literal "(# Creation Date: $mom_date)"# MOM_output_literal"(############################################)"# MOM_suppress always NMOM_output_literal "G28 G91 Z0.0"MOM_output_literal "M30"MOM_output_literal "%"MOM_output_literal "(Date: $mom_date)"# MOM_suppress off NMOM_output_literal "(name: $mom_output_file_basename.nc )"MOM_output_literal "($mom_part_name)"# MOM_output_literal "O$mom_output_file_basename"# MOM_set_seq_onglobal max_z min_zset zmax [string trimright [format %.4f $max_z] 0]set zmin [string trimright [format %.4f $min_z] 0]MOM_output_literal "(MAXZ = $zmax , MINZ = $zmin)"global mom_machine_timeMOM_output_literal "(Total Machine Time:[format "%.2f" $mom_machine_time min])"Tool_Name:$mom_tool_name Tool_No:$mom_tool_number $mom_operation_type global max_z min_zset zmax [string trimright [format %.4f $max_z] 0]set zmin [string trimright [format %.4f $min_z] 0]MOM_output_literal "(MAXZ = $zmax , MINZ = $zmin)"global mom_machine_timeMOM_output_literal "(Total Machine Time:[format "%.2f" $mom_machine_time minglobal toolnumglobal toolinfoglobal mom_group_nameglobal mom_tool_nameglobal mom_tool_diameterglobal mom_tool_corner1_radiusglobal mom_stepover_percentglobal mom_stock_partglobal mom_stock_floorglobal mom_cut_level_max_depthglobal mom_cut_level_min_depthglobal max_zglobal min_zglobal max_xglobal min_xglobal max_yglobal min_yglobal mom_operation_nameglobal mom_machine_timeglobal mom_tool_flute_lengthglobal mom_dateglobal mom_part_nameglobal mom_lognameglobal mom_cutting_timeglobal pre_tool_nameglobal pre_machine_timeglobal pre_timeglobal mom_spindle_rpmglobal mom_feed_cut_valueglobal alex_depthglobal alex_stepoverglobal tolglobal mom_tool_number mom_next_tool_number global mom_coolant_status mom_coolant_mode global mom_spindle_rpmglobal mom_warning_infoglobal anchor_flagglobal coolant_flagglobal first_toolglobal mom_tool_nameglobal mom_tool_diameterglobal mom_tool_length_adjust_register global mom_tool_corner1_radiusglobal mom_tool_flute_lengthglobal mom_work_coordinate_numberglobal msys mom_stock_partglobal mom_stock_floorglobal mom_inside_outside_tolerances global mom_global_cut_depth global mom_stepover_distanceglobal mom_global_cut_depth global mom_stepover_distanceglobal mom_stepover_scallopglobal mom_stepover_variable_passesglobal mom_stepover_percentglobal mom_stepover_typeglobal mom_depth_of_cut_typeglobal mom_cut_level_max_depthglobal mom_depth_per_cut后处理加速度详解1.找到后处理TCL文件用写字板打开2.找到proc PB_start_of_program此处加入:PB_CMD_init_turbo3.找到proc PB_CMD_kin_before_motion并且在其上面加入如下:距上一命令空两行#============================================================= proc PB_CMD_init_turbo { } {#=============================================================# This custom command may only be used with Post Builder 3.2.1# or later and NX2 or later.## Place this custom command with the "Start of Program" marker.### This custom command will activate the turbo process mode for# the 3-axis mill posts. The execution time will be about 5 to# 10 times faster than the normal process.## Special Blocks are included in any 3-axis mill post created# by Post Builder v3.2.1 and on.## The blocks being output are formatted similar to that of the# Fanuc type of controllers.## The following turbo blocks will appear in the Block section# of N/C Data Definitions in Post Builder:## linear_move_turbo# circular_move_turbo# rapid_move_turbo# sequence_number_turbo## In Post Builder, you may modify the Word parameters from# the N/C Data Defitions dialog to configure the output of that# word used within the turbo blocks. You may also modify the Format # parameters. You may not, however, edit the expression in the# words, remove or add words in any turbo block.## All rapid motion is output in a single move. Any custom# commands in the linear move, circular move, rapid move and# mom_before_motion event markers will be ignored.#global mom_kin_machine_typeif {$mom_kin_machine_type == "3_axis_mill"} {uplevel #0 {set mom_kin_is_turbo_output "TRUE"MOM_reload_kinematics}}距下一命令空两行空两行空两行修改圆弧最大半径在后处理器里面:后处理变批处理其实想让你的后处理摇身一变,成为批处理,也不是什么难事,我有个方法,大家可以试试,不过记得回贴,不然我会鄙视你有。

UG 后处理(后面有点UG与VERICUT)要适当的提高自己的英语水平1.0.0:打开后处理工具卡1.2.0:进入创建后处理文件页面1.2.1 创建一个新的后处理文件这里输入文件名(英文)此区域Inches 英制单位Millimeters 公制设定此区域轴选项3-轴4-轴或5轴这里只讲解3轴通用设定此区域为机床类型设定Generic 通用的Library 浏览自带机床User’s 用户自定义此区域描述你的后处理单只能输入英文选择完自己需要的格式后处理单击OK 进入下一步这一选项可以显示你选择机床类型4轴3轴或你自定义的机床这一区域是你的输出是否记录选项此区域左边为机床行程数据右边为机床原点数据此区域左边为机床精度小数右边为机床快速进给G00速度其他选项默认就可以了这一选项进行修改你的程序头程序尾中间换刀程序衔接道具号道具属性显示的添加进行讲解此选项为程序头选项此选项为增加程序条命令点击它可以拖入程序条就像这样这里的垃圾桶通样你不想要的此条可以删除下面讲解通用的编程设置下面图片是默认的设置此选项为N码关闭此选项为N码开启一般都是把这条此选项需要更改改成你需要的G40 G49 G80 G90既可单击这条词条就可修改进入下一画面把不需要的拖入垃圾桶通过此选项里的代码你可以找到你想要的改好后点击OK既可安全起见最好加入个Z轴回零命令拉入一个词条框添加一个新的词条框如果你想把词条框放在哪个词条框的周围只要看好词条对应放置位置变白既可松掉鼠标下面进入新词条选项里点击这里可以加入你要的词条而我们需要的是 G00 G91 G28 Z0 命令可以用文本形式输入就是这里选择第二个选项“TEXT”文本点击 Add word 拉入这个区域同样变白放置输入你要的文本G00 G91 G28 ZO 点击OK 既可程序头设定完成就是这个效果看下图如果需要加入O号下面编辑你的换刀过程点击中文意思就是操作开始步骤在这里你可以加入你需要的道具信息 N号的开关 M8 M9的开关设置 G43H00等设置下面先讲解 N号的加入加入N号我们只需要拉两个 N号开关词条就可以选择这一选项拉到上面是N号开然后拉入在下面既可下面加入刀具信息找到这个选项操作员消息拉入 N号关后面输入命令MOM_output_literal “( 刀具名称:$mom_tool_name )”MOM_output_literal “( 刀具直径:$mom_tool_diameter )”MOM_output_literal “( 刀具R角半径:$mom_tool_corner_radius )”想要哪个信息就输入哪行如果要两个以上就飞边拉入词条输入这项编辑完毕单击蓝色的区域机床控制 Machine Control 进入一下界面我们只要在G43后加上M8既可完成此项设定然后点击进程动作设定我们只需要修改中间的那个 G02 G03的进入下一页面该为Vector-Arc Start to Center 修改后OK 推出不改出程序带R的带圆的程序就是乱做一团。

ug后处理global用法UG(Unigraphics NX)是一款功能强大的CAD/CAM/CAE软件,其后处理功能可以用于将CNC机床的G代码输出。
在UG后处理中,`GLOBAL`语句用于定义全局变量,这些变量可以在整个后处理文件中使用。
下面是一些常用的`GLOBAL`用法:1. 定义全局变量:```ugGLOBAL 100 = 10;```这将定义一个名为`100`的全局变量,并将其值设置为10。
2. 设置初始值:可以使用`IF`语句为全局变量设置初始值:```ugIF 100 = 0 THEN 100 = 10;如果全局变量`100`的值为0,则将其设置为10。
3. 引用全局变量:在G代码中,可以使用全局变量来控制程序的某些行为。
例如:```ugIF 100 > 5 THEN G0 X100;```如果全局变量`100`的值大于5,则快速定位到X轴坐标为`100`的位置。
4. 更新全局变量:在G代码中,可以使用``符号来更新全局变量的值。
例如:```ug100 = 20;```这将更新全局变量`100`的值为20。
5. 条件语句:可以使用条件语句来根据全局变量的值执行不同的操作。
例如:```ugIF 100 > 15 THEN G0 X100; ELSE G1 X100; ENDIF;```如果全局变量`100`的值大于15,则快速定位到X轴坐标为`100`的位置;否则,线性定位到X轴坐标为`100`的位置。
这只是`GLOBAL`语句的一些基本用法,具体用法还取决于您的加工需求和后处理配置。
如果您需要更深入的了解或具体的用法示例,建议参考UG的官方文档或相关教程。
![UG_后处理技巧说明[1]](https://uimg.taocdn.com/b016a713b9d528ea81c779f1.webp)
UG 后处理(后面有点UG与VERICUT)要适当的提高自己的英语水平1.0.0:打开后处理工具卡1.2.0:进入创建后处理文件页面1.2.1 创建一个新的后处理文件这里输入文件名(英文)这一区域是你的输出是否记录选项此区域左边为机床行程数据右边为机床原点数据此区域左边为机床精度小数右边为机床快速进给G00速度其他选项默认就可以了然后进入下一页面点击这里这一选项进行修改你的程序头程序尾中间换刀程序衔接道具号道具属性显示的添加进行讲解此选项为程序头选项此选项为增加程序条命令点击它可以拖入程序条就像这样这里的垃圾桶通样你不想要的此条可以删除下面讲解通用的编程设置下面图片是默认的设置此选项为N码关闭此选项为N码开启一般都是把这条此选项需要更改改成你需要的G40 G49 G80 G90既可单击这条词条就可修改进入下一画面把不需要的拖入垃圾桶通过此选项里的代码你可以找到你想要的改好后点击OK既可安全起见最好加入个Z轴回零命令拉入一个词条框添加一个新的词条框如果你想把词条框放在哪个词条框的周围只要看好词条对应放置位置变白既可松掉鼠标下面进入新词条选项里点击这里可以加入你要的词条而我们需要的是G00 G91 G28 Z0 命令可以用文本形式输入就是这里选择第二个选项“TEXT”文本点击Add word 拉入这个区域同样变白放置输入你要的文本G00 G91 G28 ZO 点击OK 既可程序头设定完成就是这个效果看下图如果需要加入O号下面编辑你的换刀过程点击中文意思就是操作开始步骤在这里你可以加入你需要的道具信息N号的开关M8 M9的开关设置G43H00等设置下面先讲解N号的加入加入N号我们只需要拉两个N号开关词条就可以选择这一选项拉到上面是N号开然后拉入在下面既可下面加入刀具信息找到这个选项操作员消息拉入N号关后面输入命令MOM_output_literal “( 刀具名称:$mom_tool_name )”MOM_output_literal “( 刀具直径:$mom_tool_diameter )”MOM_output_literal “( 刀具R角半径:$mom_tool_corner_radius )”想要哪个信息就输入哪行如果要两个以上就飞边拉入词条输入这项编辑完毕单击蓝色的区域机床控制Machine Control 进入一下界面我们只要在G43后加上M8既可完成此项设定然后点击进程动作设定我们只需要修改中间的那个G02 G03的进入下一页面修改这里把Vector-Arc Center to Start 该为Vector-Arc Start to Center 修改后OK 推出不改出程序带R的带圆的程序就是乱做一团。
UG常用环境变量设置方法总结,绝对干货!1,UG菜单界面语言系统环境变量UGII_LANG=simpl_chinese 简体中文菜单界面UGII_LANG=english 英文菜单界面UGII_LANG=french 法语菜单界面UGII_LANG=german 德语菜单界面UGII_LANG=japanese 日文菜单界面UGII_LANG=italian 意大利语菜单界面UGII_LANG=russian 俄语菜单界面UGII_LANG=korean 韩文菜单界面2,NC后处理程序指定存放目录环境变量在UG加工中,如果要控制我们后处理时NC文件放置位置不用每次选择文件夹,可以如下设置UGII_CAM_POST_OUTPUT_DIR=E:\NC(你要后处理NC文件保存的路径)3,UG后处理时指定调用后处理器文件位置的环境变量这个文件不能删除,删除后就会导致UG后处理出错。
UGII_CAM_POST_DIR= D:\333DUO\postprocessor\(你后处理器文件的路径)4,设置图纸文字字体环境变量UGII_CHARACTER_FONT_DIR=D:\333DUO\ugfonts(文字字体的路径)5,UG自动调用外挂的环境变量UGII_GROUP_DIR或UGII_SITE_DIR或UGII_VENDOR_DIR或UGII_GROUP_DIR= D:\TOOL这些个变量名加变量值是告诉UG,这个路径下有个外挂,UG启动的时候,就会自动把这些目录下的外挂程序挂上去了。
也就是说,UG的外挂就这样被装上去了。
6,UG背景图片设置环境变量是不是已经厌倦了UG默认的背景图片,这个也是可以更改的,UGII_BACKGROUND_PICTURE=D:\333DUO\yjh.jpg7,UG高版本变换+移动对象命令还原为4.0的变换命令的环境变量UG4.0变换这个命令,到了8.0等高版本后,分解成了两个命令,即变换+移动对象,如果想回到4.0时代的变换命令,这样设置就OK 了。
Unigraphics作为一种优秀CAD/CAM软件已被广泛应用于汽车、航空等领域,基础应用方面的文章也比较多,但对于加工后处理(postprocessing)这方面的文章却不多,本人结合自己的工作和在实际中遇到的几个问题,谈一下对后处理的认识以及应该注意的几个问题,尽量减少在实际应用中因后处理的不当所带来的损失(比如撞刀、过切等)。
我们利用UG加工模块产生刀轨,首要目的是为了加工工件,但我们不能直接将这种未修改过的刀轨文件传送给机床进行切削工件,因为机床的类型很多,每种类型的机床都有其独特的硬件性能和要求,比如它可以有垂直或是水平的主轴,可以几轴联动等。
此外,每种机床又受其控制器(controller)的控制,控制器接受刀轨文件并指挥刀具的运动或其它的行为(比如冷却液的开关),但控制器也无法接受这种未经格式化过的到轨文件,因此,刀轨文件必须被修改成适合于不同机床/控制器的特定参数,这种修改就是所谓的后处理。
后处理最基本的两个要素就是刀轨数据(Tool Path Data)和后处理器(A Postprocessor),如下图示:UG的后处理有两种方法:一种是利用MOM(Manufacturing Output Manager),一种是利用GPM(Graphics Postprocessor Module)。
MOM的工作过程如下:由上图我们知道,MOM后处理是将UG的刀轨作为输入,它需要两个文件,一个是Event Handler,扩展名为.tcl,包含一系列指令用来处理不同的事件类型;另一个是Definition File,扩展名为.def,包含一系列机床、刀具的静态信息。
这两个文件可以利用UG自带的工具POSTBUILD来生成。
当这两个文件生成后,我们要将它加入template_post.dat(..\\UGS180\MACH\resource\postprocessor)文件里才能使用,其格式如下:fanuc,${UGII_CAM_POST_DIR}fanuc.tcl,${UGII_CAM_POST _DIR}fanuc.defGPM的工作过程如下:由上图我们知道,GPM后处理是将刀轨源文件(the cutter location source file)作为输入,它需要一个MDF(machine datafile)即机床数据文件。
UG后处理变量global mom_seqnumglobal mom_part_nameglobal mom_lognameglobal mom_dateglobal mom_spindle_speedglobal mom_output_file_basenameMOM_set_seq_offset mom_seqnum 100# MOM_output_literal "(######## TASK : $mom_part_name ############)" # MOM_output_literal "(# Created By : $mom_logname)"# MOM_output_literal "(# Creation Date: $mom_date)"# MOM_output_literal "(############################################)" # MOM_suppress always NMOM_output_literal "G28 G91 Z0.0"MOM_output_literal "M30"MOM_output_literal "%"MOM_output_literal "(Date: $mom_date)"# MOM_suppress off NMOM_output_literal "(name: $mom_output_file_basename.nc )"MOM_output_literal "($mom_part_name)"# MOM_output_literal "O$mom_output_file_basename"# MOM_set_seq_onglobal max_z min_zset zmax [string trimright [format %.4f $max_z] 0]set zmin [string trimright [format %.4f $min_z] 0]MOM_output_literal "(MAXZ = $zmax , MINZ = $zmin)"global mom_machine_timeMOM_output_literal "(Total Machine Time:[format "%.2f" $mom_machine_time min])"Tool_Name:$mom_tool_name Tool_No:$mom_tool_number $mom_operation_typeglobal max_z min_zset zmax [string trimright [format %.4f $max_z] 0]set zmin [string trimright [format %.4f $min_z] 0]MOM_output_literal "(MAXZ = $zmax , MINZ = $zmin)"global mom_machine_timeMOM_output_literal "(Total Machine Time:[format "%.2f" $mom_machine_time minglobal toolnumglobal toolinfoglobal mom_group_nameglobal mom_tool_nameglobal mom_tool_diameterglobal mom_tool_corner1_radiusglobal mom_stepover_percentglobal mom_stock_partglobal mom_stock_floorglobal mom_cut_level_max_depthglobal mom_cut_level_min_depthglobal max_zglobal min_zglobal max_xglobal min_xglobal max_yglobal min_yglobal mom_operation_nameglobal mom_machine_timeglobal mom_tool_flute_lengthglobal mom_dateglobal mom_part_nameglobal mom_lognameglobal mom_cutting_timeglobal pre_tool_nameglobal pre_machine_timeglobal pre_timeglobal mom_spindle_rpmglobal mom_feed_cut_valueglobal alex_depthglobal alex_stepoverglobal tolglobal mom_tool_number mom_next_tool_numberglobal mom_coolant_status mom_coolant_modeglobal mom_spindle_rpmglobal mom_warning_infoglobal anchor_flagglobal coolant_flagglobal first_toolglobal mom_tool_nameglobal mom_tool_diameterglobal mom_tool_length_adjust_registerglobal mom_tool_corner1_radius global mom_tool_flute_lengthglobal mom_work_coordinate_number global msys mom_stock_partglobal mom_stock_floorglobal mom_inside_outside_tolerances global mom_global_cut_depthglobal mom_stepover_distance global mom_global_cut_depthglobal mom_stepover_distance global mom_stepover_scallopglobal mom_stepover_variable_passes global mom_stepover_percentglobal mom_stepover_typeglobal mom_depth_of_cut_type global mom_cut_level_max_depth global mom_depth_per_cut后处理加速度详解1.找到后处理TCL文件用写字板打开2.找到proc PB_start_of_program此处加入:PB_CMD_init_turbo 3.找到proc PB_CMD_kin_before_motion并且在其上面加入如下:距上一命令空两行#============================================================= proc PB_CMD_init_turbo { } {#============================================================= ## This custom command may only be used with Post Builder 3.2.1 # or later and NX2 or later.## Place this custom command with the "Start of Program" marker. ### This custom command will activate the turbo process mode for# the 3-axis mill posts. The execution time will be about 5 to# 10 times faster than the normal process.## Special Blocks are included in any 3-axis mill post created# by Post Builder v3.2.1 and on.## The blocks being output are formatted similar to that of the# Fanuc type of controllers.## The following turbo blocks will appear in the Block section# of N/C Data Definitions in Post Builder:## linear_move_turbo# circular_move_turbo# rapid_move_turbo# sequence_number_turbo## In Post Builder, you may modify the Word parameters from# the N/C Data Defitions dialog to configure the output of that# word used within the turbo blocks. You may also modify the Format # parameters. You may not, however, edit the expression in the# words, remove or add words in any turbo block.## All rapid motion is output in a single move. Any custom# commands in the linear move, circular move, rapid move and# mom_before_motion event markers will be ignored.#global mom_kin_machine_typeif {$mom_kin_machine_type == "3_axis_mill"} {uplevel #0 {set mom_kin_is_turbo_output "TRUE"MOM_reload_kinematics}}}距下一命令空两行空两行空两行修改圆弧最大半径在后处理器里面:后处理变批处理其实想让你的后处理摇身一变,成为批处理,也不是什么难事,我有个方法,大家可以试试,不过记得回贴,不然我会鄙视你有。
UG环境变量汇总,超级全面!1:UG语言界面系统环境变量,特别是安装忘记选择中文,以下帮你有帮助:UGII_LANG= simpl_chinese 简体中文菜单界面UGII_LANG=english 英文菜单界面UGII_LANG=french 法语菜单界面UGII_LANG=german 德语菜单界面UGII_LANG=japanese 日文菜单界面UGII_LANG=italian 意大利语菜单界面UGII_LANG=russian 俄语菜单界面UGII_LANG=korean 韩文菜单界面2:在UG加工中,如果要控制我们后处理时NC文件放置位置不用每次选择文件夹,可以如下设置UGII_CAM_POST_OUTPUT_DIR=D:\NC(你要后处理NC文件的路径)3:指定后处理文件,这个文件不能删除,删除后处理就会出错了UGII_CAM_POST_DIR= D:\QHKJ\postprocessor\(你后处理文件的路径)4 :设置图纸文字字体环境变量UGII_CHARACTER_FONT_DIR=D:\QHKJ\ugfonts(文字字体的路径)5:外挂中环境变量名的意思设置本帖隐藏的内容UGII_GROUP_DIR或UGII_SITE_DIR或UGII_VENDOR_DIR或UGII_GROUP_DIR= D:\QHKJ这个变量是告诉UG,这个路径下有个外挂,启动的时候,UG就会自动挂上去了如果你还有其他外挂必须用到这个变量,也没有关系,咱换一个就是了,总有一个可能适合你这个外挂的6 :以前用习惯UG4.0的人现在用了高版本还怀念UG4.0的转换,也可以通过环境变量达到两个版本同时用的感觉哦UGII_ENABLE_TRANSFORM_LEGACY_OPTIONS=17: WIN7系统下安装UG7.0 7.5 8.0拖工具条卡死解决办法UGII_BACKGROUND_URL=NONE 8:设置启动档放置位置UGII_ROOT_DIR= D:\Program Files\UGS\NX7.5\UGII9:设置UG安装路径UGII_BASE_DIR= D:\Program Files\UGS\NX7.5\UGII。
UG后处理比较常用的后处理变量设置变换为4.0版本界面UGII_ENABLE_TRANSFORM_LEGACY_OPTIONS值为1输出加工部件名称$mom_output_file_basename.NC输出程序处理时间$mom_date刀具信息刀具号刀具直径刀具半径加工余量等变量global mom_tool_diameterglobal mom_tool_corner1_radiusglobal mom_tool_nameglobal mom_tool_typeglobal mom_stock_floorglobal mom_stock_part sideMOM_output_literal "( $mom_tool_name D=[format "%.2f" $mom_tool_diameter] R=[format "%.2f" $mom_tool_corner1_radius] XY= [format "%.2f" $mom_stock_part side]mm )"支持T刀的刀具信息global mom_tool_diameterglobal mom_tool_corner1_radiusglobal mom_tool_lower_corner_radiusglobal mom_tool_lengthglobal mom_tool_nameglobal mom_tool_typeglobal mom_tool_shank_diameterglobal mom_tool_flute_lengthglobal mom_stock_floorglobal mom_stock_part sideif {$mom_tool_type =="Milling Tool-T Cutter"} {MOM_output_literal "(Tool Nane=$mom_tool_name XY= [format "%.2f" $mom_stock_part side]mm)"MOM_output_literal "(D=[format "%.2f" $mom_tool_diameter] ND=[format "%.2f" $mom_tool_shank_diameter] R=[format "%.2f" $mom_tool_lower_corner_radius] FL=[format "%.2f" $mom_tool_flute_length] L=[format "%.2f" $mom_tool_length])"} else {MOM_output_literal "(Tool Nane=$mom_tool_name XY= [format "%.2f" $mom_stock_part side]mm)"MOM_output_literal "(D=[format "%.2f" $mom_tool_diameter] R=[format "%.2f" $mom_tool_corner1_radius] FL=[format "%.2f" $mom_tool_flute_length] L=[format "%.2f" $mom_tool_length])"}刀具信息1:$mom_operation_name Tool_Name:$mom_tool_name Tool_No:$mom_tool_number刀补(刀具半径补偿)D值每次输出MOM_force once D坐标系输出G54$mom_fixture_offset_value + 54G84功牙输出Q$mom_cycle_cam 复制前面的 Q_cutcom$mom_cycle_delay$mom_cycle_retract_to输出M29变量$mom_sys_coolant_code(TAP)输出G95变量的S$mom_spindle_speed程序结尾输出加工时间global mom_machine_timeMOM_output_literal "( TIME:[format "%.2f" $mom_machine_time] )"读取单个操作名称变量$mom_operation_name$mom_PROGRAM_nameG95$mom_sys_feed_rate_mode_code(MMPR)G76 Q$mom_cycle_orient后处理输出路径变量UGII_CAM_POST_OUTPUT_DIRD:\NC。
UG后处理变量global mom_seqnumglobal mom_part_nameglobal mom_lognameglobal mom_dateglobal mom_spindle_speedglobal mom_output_file_basenameMOM_set_seq_offset mom_seqnum 100# MOM_output_literal "(######## TASK : $mom_part_name ############)" # MOM_output_literal "(# Created By : $mom_logname)"# MOM_output_literal "(# Creation Date: $mom_date)"# MOM_output_literal "(############################################)" # MOM_suppress always NMOM_output_literal "G28 G91 Z0.0"MOM_output_literal "M30"MOM_output_literal "%"MOM_output_literal "(Date: $mom_date)"# MOM_suppress off NMOM_output_literal "(name: $mom_output_file_basename.nc )"MOM_output_literal "($mom_part_name)"# MOM_output_literal "O$mom_output_file_basename"# MOM_set_seq_onglobal max_z min_zset zmax [string trimright [format %.4f $max_z] 0]set zmin [string trimright [format %.4f $min_z] 0]MOM_output_literal "(MAXZ = $zmax , MINZ = $zmin)"global mom_machine_timeMOM_output_literal "(Total Machine Time:[format "%.2f" $mom_machine_time min])"Tool_Name:$mom_tool_name Tool_No:$mom_tool_number $mom_operation_typeglobal max_z min_zset zmax [string trimright [format %.4f $max_z] 0]set zmin [string trimright [format %.4f $min_z] 0]MOM_output_literal "(MAXZ = $zmax , MINZ = $zmin)"global mom_machine_timeMOM_output_literal "(Total Machine Time:[format "%.2f" $mom_machine_time minglobal toolnumglobal toolinfoglobal mom_group_nameglobal mom_tool_nameglobal mom_tool_diameterglobal mom_tool_corner1_radiusglobal mom_stepover_percentglobal mom_stock_partglobal mom_stock_floorglobal mom_cut_level_max_depthglobal mom_cut_level_min_depthglobal max_zglobal min_zglobal max_xglobal min_xglobal max_yglobal min_yglobal mom_operation_nameglobal mom_machine_timeglobal mom_tool_flute_lengthglobal mom_dateglobal mom_part_nameglobal mom_lognameglobal mom_cutting_timeglobal pre_tool_nameglobal pre_machine_timeglobal pre_timeglobal mom_spindle_rpmglobal mom_feed_cut_valueglobal alex_depthglobal alex_stepoverglobal tolglobal mom_tool_number mom_next_tool_number global mom_coolant_status mom_coolant_mode global mom_spindle_rpmglobal mom_warning_infoglobal anchor_flagglobal coolant_flagglobal first_toolglobal mom_tool_nameglobal mom_tool_diameterglobal mom_tool_length_adjust_registerglobal mom_tool_corner1_radiusglobal mom_tool_flute_lengthglobal mom_work_coordinate_numberglobal msys mom_stock_partglobal mom_stock_floorglobal mom_inside_outside_tolerancesglobal mom_global_cut_depth global mom_stepover_distanceglobal mom_global_cut_depth global mom_stepover_distanceglobal mom_stepover_scallopglobal mom_stepover_variable_passesglobal mom_stepover_percentglobal mom_stepover_typeglobal mom_depth_of_cut_typeglobal mom_cut_level_max_depthglobal mom_depth_per_cut后处理加速度详解1.找到后处理TCL文件用写字板打开2.找到proc PB_start_of_program此处加入:PB_CMD_init_turbo 3.找到proc PB_CMD_kin_before_motion并且在其上面加入如下:距上一命令空两行#============================================================= proc PB_CMD_init_turbo { } {#============================================================= ## This custom command may only be used with Post Builder 3.2.1 # or later and NX2 or later.## Place this custom command with the "Start of Program" marker. ## This custom command will activate the turbo process mode for# the 3-axis mill posts. The execution time will be about 5 to# 10 times faster than the normal process.## Special Blocks are included in any 3-axis mill post created# by Post Builder v3.2.1 and on.## The blocks being output are formatted similar to that of the# Fanuc type of controllers.## The following turbo blocks will appear in the Block section# of N/C Data Definitions in Post Builder:## linear_move_turbo# circular_move_turbo# rapid_move_turbo# sequence_number_turbo## In Post Builder, you may modify the Word parameters from# the N/C Data Defitions dialog to configure the output of that# word used within the turbo blocks. You may also modify the Format # parameters. You may not, however, edit the expression in the# words, remove or add words in any turbo block.## All rapid motion is output in a single move. Any custom# commands in the linear move, circular move, rapid move and# mom_before_motion event markers will be ignored.#global mom_kin_machine_typeif {$mom_kin_machine_type == "3_axis_mill"} {uplevel #0 {set mom_kin_is_turbo_output "TRUE"MOM_reload_kinematics}}}距下一命令空两行空两行空两行修改圆弧最大半径在后处理器里面:后处理变批处理其实想让你的后处理摇身一变,成为批处理,也不是什么难事,我有个方法,大家可以试试,不过记得回贴,不然我会鄙视你有。
UG后处理变量global mom_seqnumglobal mom_part_nameglobal mom_lognameglobal mom_dateglobal mom_spindle_speedglobal mom_output_file_basenameMOM_set_seq_offset mom_seqnum 100# MOM_output_literal "(######## TASK : $mom_part_name ############)" # MOM_output_literal "(# Created By : $mom_logname)"# MOM_output_literal "(# Creation Date: $mom_date)"# MOM_output_literal "(############################################)" # MOM_suppress always NMOM_output_literal "G28 G91 Z0.0"MOM_output_literal "M30"MOM_output_literal "%"MOM_output_literal "(Date: $mom_date)"# MOM_suppress off NMOM_output_literal "(name: $mom_output_file_basename.nc )"MOM_output_literal "($mom_part_name)"# MOM_output_literal "O$mom_output_file_basename"# MOM_set_seq_onglobal max_z min_zset zmax [string trimright [format %.4f $max_z] 0]set zmin [string trimright [format %.4f $min_z] 0]MOM_output_literal "(MAXZ = $zmax , MINZ = $zmin)"global mom_machine_timeMOM_output_literal "(Total Machine Time:[format "%.2f" $mom_machine_time min])"Tool_Name:$mom_tool_name Tool_No:$mom_tool_number $mom_operation_typeglobal max_z min_zset zmax [string trimright [format %.4f $max_z] 0]set zmin [string trimright [format %.4f $min_z] 0]MOM_output_literal "(MAXZ = $zmax , MINZ = $zmin)"global mom_machine_timeMOM_output_literal "(Total Machine Time:[format "%.2f" $mom_machine_time minglobal toolnumglobal toolinfoglobal mom_group_nameglobal mom_tool_nameglobal mom_tool_diameterglobal mom_tool_corner1_radiusglobal mom_stepover_percentglobal mom_stock_partglobal mom_stock_floorglobal mom_cut_level_max_depthglobal mom_cut_level_min_depthglobal max_zglobal min_zglobal max_xglobal min_xglobal max_yglobal min_yglobal mom_operation_nameglobal mom_machine_timeglobal mom_tool_flute_lengthglobal mom_dateglobal mom_part_nameglobal mom_lognameglobal mom_cutting_timeglobal pre_tool_nameglobal pre_machine_timeglobal pre_timeglobal mom_spindle_rpmglobal mom_feed_cut_valueglobal alex_depthglobal alex_stepoverglobal tolglobal mom_tool_number mom_next_tool_number global mom_coolant_status mom_coolant_mode global mom_spindle_rpmglobal mom_warning_infoglobal anchor_flagglobal coolant_flagglobal first_toolglobal mom_tool_nameglobal mom_tool_diameterglobal mom_tool_length_adjust_registerglobal mom_tool_corner1_radiusglobal mom_tool_flute_lengthglobal mom_work_coordinate_numberglobal msys mom_stock_partglobal mom_stock_floorglobal mom_inside_outside_tolerancesglobal mom_global_cut_depth global mom_stepover_distanceglobal mom_global_cut_depth global mom_stepover_distanceglobal mom_stepover_scallopglobal mom_stepover_variable_passesglobal mom_stepover_percentglobal mom_stepover_typeglobal mom_depth_of_cut_typeglobal mom_cut_level_max_depthglobal mom_depth_per_cut后处理加速度详解1.找到后处理TCL文件用写字板打开2.找到proc PB_start_of_program此处加入:PB_CMD_init_turbo 3.找到proc PB_CMD_kin_before_motion并且在其上面加入如下:距上一命令空两行#============================================================= proc PB_CMD_init_turbo { } {#============================================================= ## This custom command may only be used with Post Builder 3.2.1 # or later and NX2 or later.## Place this custom command with the "Start of Program" marker. ## This custom command will activate the turbo process mode for# the 3-axis mill posts. The execution time will be about 5 to# 10 times faster than the normal process.## Special Blocks are included in any 3-axis mill post created# by Post Builder v3.2.1 and on.## The blocks being output are formatted similar to that of the# Fanuc type of controllers.## The following turbo blocks will appear in the Block section# of N/C Data Definitions in Post Builder:## linear_move_turbo# circular_move_turbo# rapid_move_turbo# sequence_number_turbo## In Post Builder, you may modify the Word parameters from# the N/C Data Defitions dialog to configure the output of that# word used within the turbo blocks. You may also modify the Format # parameters. You may not, however, edit the expression in the# words, remove or add words in any turbo block.## All rapid motion is output in a single move. Any custom# commands in the linear move, circular move, rapid move and# mom_before_motion event markers will be ignored.#global mom_kin_machine_typeif {$mom_kin_machine_type == "3_axis_mill"} {uplevel #0 {set mom_kin_is_turbo_output "TRUE"MOM_reload_kinematics}}}距下一命令空两行空两行空两行修改圆弧最大半径在后处理器里面:后处理变批处理其实想让你的后处理摇身一变,成为批处理,也不是什么难事,我有个方法,大家可以试试,不过记得回贴,不然我会鄙视你有。