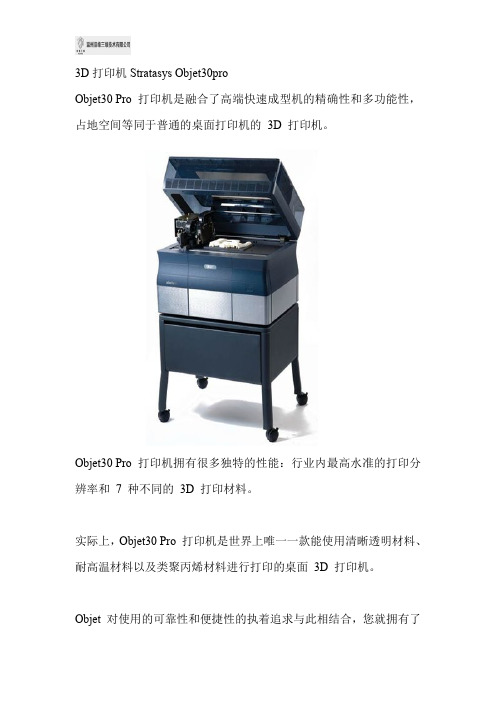
Stratasys推出3D打印机Objet30 OrthoDesk
- 格式:doc
- 大小:95.00 KB
- 文档页数:3
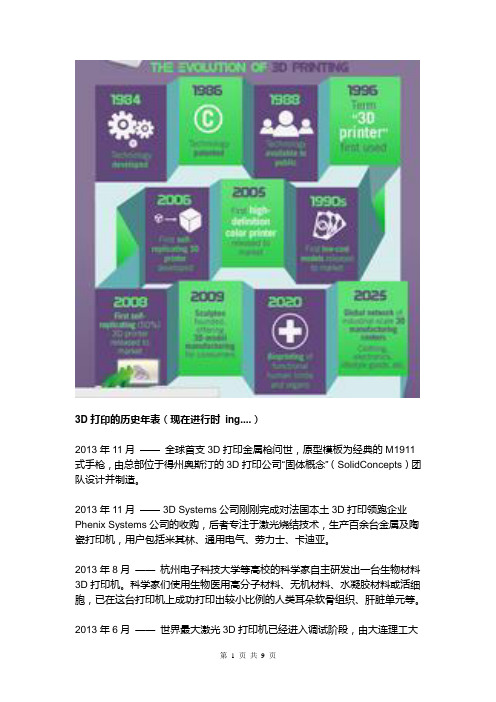
3D打印的历史年表(现在进行时ing....)2013年11月——全球首支3D打印金属枪问世,原型模板为经典的M1911式手枪,由总部位于得州奥斯汀的3D打印公司“固体概念”(SolidConcepts)团队设计并制造。
2013年11月—— 3D Systems公司刚刚完成对法国本土3D打印领跑企业Phenix Systems公司的收购,后者专注于激光烧结技术,生产百余台金属及陶瓷打印机,用户包括米其林、通用电气、劳力士、卡迪亚。
2013年8月——杭州电子科技大学等高校的科学家自主研发出一台生物材料3D打印机。
科学家们使用生物医用高分子材料、无机材料、水凝胶材料或活细胞,已在这台打印机上成功打印出较小比例的人类耳朵软骨组织、肝脏单元等。
2013年6月——世界最大激光3D打印机已经进入调试阶段,由大连理工大学参与研发的,最大加工尺寸达1.8米。
其采用"轮廓线扫描"的独特技术路线,可以制作大型的工业样件和结构复杂的铸造模具。
这种基于"轮廓失效"的激光三维打印方法已获得两项国家发明专利。
2013年6月—— Stratasys和桌面型3D打印领导者MakerBot合并,此次合并使Stratasys业务从工业3D打印机扩展到家用3D打印机。
2013年6月—— MadSolid创立,一个专门研发3D打印材料的公司,位于奥克兰。
MadeSolid的化学家和工程师不断的研究FormLab的Form1打印机支持的树脂材料,除此之外还设计了其他打印机的材料配方,如B9 Creator 和Muve3D。
2013年3月——美国波士顿创业公司WobbleWorks日前发起了一个项目,为号称全球第一款3D打印笔的“3Doodler”(3D涂鸦手)募资。
2013年3月——著名运动品牌耐克公司就设计出了一款3D打印的足球鞋。
这双3D打印的耐克鞋名为Vapor Laser Talon Boot(蒸汽激光爪),整个鞋底都是采用3D打印技术制造。
电脑报/2012年/8月/20日/第A02版头条3D Systems和Stratasys,在3D打印领域,两个不得不提的名字,它们争斗了近30年,它们的故事演绎着一个行业的发展轨迹。
3D打印双雄争斗记本报记者王星3D Systems和Stratasys这两家成立于上世纪80年代末的公司,分别根据自己的3D打印技术专利推出了商业化的3D打印机,并通过不断创新和吸收新技术引领着3D打印的发展。
20多年来,两家公司在3D打印市场上持续上演双雄争霸,直至今天也未分胜负。
发明家间的技术PK3D Systems的创始人查尔斯・胡尔(Charles W.Hull)称得上是一位发明家,现年73岁的他已经获得了60多项专利,其中最著名的当数为3D打印技术普及铺平道路的立体平板印刷(stereolithography)。
1982年,在紫外线设备生产商UVP担任副总裁的胡尔试图将光学技术应用于快速成型领域。
他尝试将一种可被紫外光固化的液态感光树脂放在一个大容器中,并在容器里放置一个可上下移动的升降平台,用来承载打印出的物体。
升降平台最初与液体上表面平行,容器上方的紫外激光器射出的紫外线照射到液体表面指定的位置,将液体固化,即完成一层物体的打印;随后升降平台向下移动一层的高度——通常是0.05-0.15毫米,随后紫外激光器用同样的方法打印另一层物体;随着升降平台的不断下移,一层一层的物体被打印出来,并最终“累积”成三维物体;从液体中将物体取出,并去除掉将其固定在升降平台上的支持物,便可以得到和电脑中的CAD模型相同的真实物体。
胡尔的方法对于当时的快速成型工艺是一个巨大的突破。
一方面,它加快了制造物品的速度;另一方面,打印物品的体积也得到了提升,有的机器能打印出高达2米的物体。
1986年3月,胡尔为这项技术申请了专利,随后他从UVP离开,成立了3D Systems公司,将该技术商业化。
为了让机器能够更加精确地将CAD模型打印成实物,胡尔又研发了著名的STL 文件格式。

Manual of FDM 3D PrinterZHUHAI CTC ELECTRONIC CO, LTD Company Links:CONTENTS1. CONTENTS………………………………………………………..Description Matters…………………………………………………Manual Introduction………………………………………………Precautions ………………………………………………………Safety Precautions……………………………………………………Contact us……………………………………………………Accessories List………………………………………………….2. Product Description………………………………………………………………Product Categories………………………………………………………Appearance………………………………………………………….Product Specifications………………………………………………………….Technical parameters……………………………………………………Environmental Specifications……………………………………………………3.Instructions……………………………………………………………….Prepare for printing……………………………………………..Computer preparations………………………………………………….Replicatorg installment………………………………..Software Functions……………………………………………..Makerware installment (compatible with this software)……………Software Function………………………………………………LCD screen function keys and the Key Functions comment…………………………….4.Take the model…………………………………………………………………5.Maintenance……………………………………………………………………Clean the printhead………………………………………………………Tighten belts…………………………………………………………Screw axis and Maintenance…………………………………………………6.Troubleshooting………………………………………………………………7.Warranty statements and license agreement………………………………………………8.Operations Guide………………………………………………………………Let’s go1.Instructions mattersManual IntroductionThis User's Guide includes product description, operating instructions, print a test model, consisting of maintenance and troubleshooting, and several other parts. Please read it carefully, and use the3D printer based on the contents of the specification.PrecautionsThis product is due to the different regions from each customer, and the voltage of each region are different, so please make sure how much voltage before you use the printer in your area (generally 110v and 230v)This product required the customer's printer maintenance after using a period of time, it can extend the life of the printer with regular proper maintenance.Safety PrecautionsOur company do not recommend using other brands of supplies, in order to get the 3D best printing results, please use our special supplies. If use other supplies caused by maintenance and repair, its not included in our company's warranty.When the printer is printing or just finished printing , please do not touch the rest of the model, the head of printer and the platform or the internal body due to the high temperature .Contact UsIf you need to contact the after-sale 3D printers service, you can add my company’s group number "102304634" directly SD card user guide : about 3D printers use and troubleshooting information, available on the instruction included, you also can add my company's 3D printing community (group no. "102304634") for online technical support.You can add my company's sina weibo, it always update my company's new technology and software upgrades, add sina weibo have access to random rewards and prizes "a tablets "go into the sina weibo search CTC 3D printing in the future "concern" and “reprinted”can get more opportunity and higher rewarded .Accessories Listnumber the name of material quantity unit1 3D printer 1 table2 power line 1 root3 USB cable 1 root4 toolkit 1 cover5 SD卡 1 piece6 printing supplies 1 volume7 hanging material column 2 slipProduct CategoryProduct Categories3D printing is based on the west fuse deposition manufacturing process (FDM) rapid prototyping device that connected to the computer via an SD card online or print spooling, only an ordinary computer can be completed via USB cable to print, as long as you there have STL 3D file format you can complete a variety of print job complex three-dimensional solid model. This device is easy to use, even if you have never used 3D printer, but you can easily print all kinds of 3D models through 3D printer.Appearance(three Generation)(one Generation)(two Generation)Product SpecificationsThe total volume of printer:320*467*381mmPackage Size:565*430*535mmWeight (with packaging):15KGConstruction size:225*145*150mmInput voltage : 220VPower Requirement:210VConstruct platform temperature: about110(adequate heating in winter,appropriate cooling in summer)Nozzle extrusion flow rate is about 24cc / hrSupported operating systems:Windows XP Windows7/8(32位/64位)Software:ReplicatorG 或西通汉化版(Software is compatible with MakerWare)Print materials:ABS ,PLAMaterial properties: 3D printing special ABS and PLA(only produced in our company)Layer precision:0.1mm-0.5mm Positioning Precision:XY axis 0.011mm Filament Diameter:Z axis 0.0025mm Nozzle diameter:0.4mmMovement shaft speed:30mm/s_100mm/sRecommended nozzle movement speed: 35-40 mm/sInput file types:stl , gcodeRecommended environmentOperation environment :Installed in a well-ventilated, dust-free area. Temperature: 15 ° C to 35 ° C. Humidity: 20-80% (non-condensing)Storage environment : Temperature: 0 ° C to 40 ° C . Humidity: 10-80% (non-condensing). The existence of non-corrosive gases and cleaning applications.3.InstructionsPrepare for printing(1) Check whether the appearance of 3D printers outside the box bumps scratches and other defects.Check the box edges and corners are squeezed or without deformation or rupture of the place.(2)Open the box, after subtracting out the printer nozzle fixed tie, (tied in the front left side of the Z-axis X-axis Y-axis.Use Water-nose pliers to cut straps fixed printhead.(3)open the print head surface foam (Note: Try not to use face of the knife in order to avoid the above print head cable was hung before to hung up now)take the print head is mounted on the X-axis bracket, mounting orientation shown in rather the two screws.(图一)(图二)(4)Taking out the tube hanging material feeding tube installed in the hole at the back of the printer, and put the printing supplies into the feeding tube hanging, then pull out the printing supplies, printing supplies section of the circle into the print head party hole (Note use the left print head is inserted left and use the right print head is inserted on the right)(5) Check Limit switches cable of the printer loose or fall off the surface.(Z-axis ) (Y-axis ) (X-axis )(6)Check whether the voltage can reach the printer of voltage required (110 v or 220v, where the power supply is determined on the printer)(7)Taking out the SD card to read inside of the printer driver and installing the driver.(8)Turn on the printer and manipulate to control panel , make Z axis up to the top of the printer, check the printer nozzle parts and print platform’s distance can meets the criteria (best distance test method: Put a sheet of A4 paper in the printing surface of the platform and control panel make it go to the top of the Z-axis, and then pull the A4 paper, printing paper can be pulled out, but with a little bit of strength, but the paper will not be scratched,) Note: The blue paper of print platform surface can not be teared. Otherwise it will affect the print quality(9)You need to be ready for STL file format, after the software has been installed in the printer top can open the file, adjust the parameters, you can start printing3.1 Preparations for computer3.1.1 Installing Replicatorg drive software(1)Taking out SD card to read inside of the printer driver, looking for 3dsetup folder(2)Open 3dsetup file folders and looking for software(3)Right-click the file to open the software into the software installation manager(4)Click Replicatorg software installation (you can choose to install English, Chinese also can choose )(5)Click Replicatorg software automatically installs the icon will appear and then click the Next button.(6)Click Next will appear one icon, click on the Install button、(7)Click the Install button will pop up a window, need to wait for moments(8)After Click the Install button in the process the computer will pop up dialog box, please click Next(9)After clicking Next the computer will appear fifth consecutive prompt, click "Install this driver software."(10)Click Five times"Install this driver software" button to complete the installation , at the same time the computer will pop up dialog box to view the program was successful (query methods: View pop-up dialog box Driver Name, all check mark indicates that the software is installed successfully, if X number or ! number will be deemed not to have been successfully installed), after checking please click "Finish."(11) Click Finish emperor of the page "Next" button to begin the lights, the left the mouse click "Next" button, the computer Replicatorg print software installation completed.3.2.2 Software Functions(1) Charging the machine, link USB, open replicator, (first double nozzle to choose The Replicator Dual machine, choose the first single nozzle The Replicator Single)(2) Next is to select the correct serial port (Please note the serial number of the machine is often not com1)(3) Click online.(4)Then select the file you want to printThen there will be a pattern file:(5)Open the Control PanelSet the nozzle temperature: Target Tempriture box set a carriage.Different machines due to differences in temperature conductivity, temperature difference is relatively large, its better to start from 215 degrees , try to use the wire. The temperature rises rapidly to reach 190 degrees, indicating a larger margin heating. If relatively slow, indicating a small heating. If the Szymborska appear, there may bot be enough temperature. If there are bubbles silk sound, temperature high. From low to high, according to the actual situation to set a suitable temperature. If you click on the reverse, the extrusion head motor reversal,l running out of the material is sent back . Cut flat new material, take them into the hole , click stop, then click forward, the motor is transferred out of the head, insert a little tight, the material is bite into the nozzle, until spinning. Please note, it will arrive at a predetermined value will continue to wait for the temperature down when he reaches the bottom surface of the print.How to start printing:The map is moved to the appropriate location, click the following buttonChoose:Please note that the above options, click Generate Gcode to be Gcode. After generating gcode, this time move the print head to the center position,Can modify Feedrate (mm / s) to 20, Tralvel Feedrate 20 can make more accurate printing. How to calibrate (normal calibration is not necessary):Through the control panel take the head to the platform。

3D打印发展史3D打印突然大热, 令我们以为它是横空出世的新技术。
其实, 任何新奇技术都不是一蹴而就的。
3D打印从正式出现到现在较为广泛的应用, 已经有将近30年的历史了。
所以习惯上把它称作“上上个世纪的思想, 上个世纪的技术, 这个世纪的市场”。
3D打印技术的核心制造思想最早起源于19世纪末的美国, 到20世纪80年代后期3D打印技术发展成熟并被广泛应用。
1892年, 美国登记了一项采用层合方法制作三维地图模型的专利技术。
1860年, 法国人Franois Willème申请到了多照相机实体雕塑(Photosculpture)的专利。
1979年, 日本东京大学生产技术研究所的中川威雄教授发明了叠层模型造型法。
1980年, 日本人小玉秀男又提出了光造型法。
虽然日本人研究出3D打印的一些方法, 但是此后20多年的时间里, 把这些科学方法转化为实际用途的都是美国人。
最早从事商业性3D打印制造技术的是美国发明家查尔斯·赫尔。
1986 年, 查尔斯离开了原来为之工作的紫外光产品公司, 成立一家名为“3D系统”的公司, 开始专注发展3D 打印技术。
这是世界上第一家生产3D 打印设备的公司, 而它所采用的技术当时被称为“立体光刻”, 是基于液态光敏树脂的光聚合原理工作的。
1988 年, 查尔斯生产出世界上首台以立体光刻技术为基础的3D 打印机SLA-250, 体型非常庞大。
1988年, 美国人斯科特·克朗普发明了一种新的3D打印技术——熔融沉积成型。
该工艺适合于产品的概念建模及形状和功能测试, 不适合制造大型零件。
1989年, 美国人德卡德发明了选择性激光烧结技术, 这种技术的特点是选材范围广泛, 比如尼龙、腊、ABS、金属和陶瓷粉末等都可以作为原材料。
1992年, 美国人赫利塞思发明层片叠加制造技术。
在1995年之前, 还没有3D打印这个名称, 那时比较为研究领域所接受的名称是“快速成型”。

PolyJet 系统和材料精确 强大 快速 高效2敢想 敢印PolyJet ™3D 打印机使设计师、工程师、教育工作者和医疗保健专业人员能够跳脱传统建模方法的局限来发挥创造力和解决问题。
PolyJet 技术的强大优势在于,能够使可固化的液态光敏聚合物生成非常精细的层,从而获得光滑的表面、复杂的细节和鲜艳的色彩。
Stratasys ® PolyJet 技术有助于以几乎任何色彩和透明度、不透明度、刚性与弹性的任意组合来呈现创意,模拟各种需要的材料和表面处理效果。
PolyJet 技术的多功能性源于广泛可用的材料属性和一系列 3D 打印机,可适应不同的预算和应用场景。
无论是在什么行业,PolyJet 技术都能提供快速、准确地磨炼想法的强大能力。
• 帮助设计师节省 50% 的时间。
产品设计师和开发人员可以在单次操作中创建具有全彩色元素、标签和真实纹理的逼真原型和模型,从而能够在进行全面生产之前获得焦点小组的反馈。
• 全彩色柔性材料可制作用于医师培训和术前准备的逼真解剖模型,从而降低手术室成本并改善患者疗效。
• 教育工作者可以助力学生在短短数日而非数周内完成设计、测试和探索。
• 牙科实验室可通过在单次打印操作中创建多种模型和试戴来提高生产效率,从而大幅提升生产能力并推动增长。
选择简单适用于任何应用PolyJet 3D 打印机的尺寸可以满足多种不同的功能和产能需求。
这些打印机分为两类:一次喷射单一材料(基本树脂)的单材料打印机,以及能够同时喷射多种基本材料的多材料打印机。
Agilus30 白色几何球体Vivid 蓝色灯打印单一材料单材料打印机为经济实惠的台式型号,具有 PolyJet 技术的精细分辨率和高表面光洁度。
根据具体型号,这些打印机可采用一种或多种基本材料,支持用户选择刚性或柔性特性。
所有单材料打印机均采用 SUP705™ 支撑材料,可通过 WaterJet 去除。
一些型号还兼容 SUP706B ™ 可溶性支撑材料,无需动手操作即可轻松去除支撑材料。
Stratasys桌面机分享FDM3D打印机的基础硬件知识目前国内做3D打印机(FDM)的到处都是,在淘宝上买3D打印机的时候各式各样的五花八门,让人看得不禁眼花缭乱。
但这些打印机所应用的原理,技术手段基本上是大同小异,大部分是国外的仿制品,改改外形、微调结构而已。
作为消费者和使用者的我们来说,需要做的就是了解各种各样的打印机,搞懂3D打印机的基本结构,知道不同打印机的优点、缺点,这样才可以作出最好的选择。
下面飞哥给大家简单总结了一些FDM型桌面打印机的基础硬件知识,希望能帮到大家。
3d打印机的基本组成结构:1)机体框架:机体框架是各款打印机之间差异最大的地方,但总的来说有一个原则是不会违背的,就是结构的刚性!各款打印机主要是采用三角形、矩形来作为机体结构的基本形状。
因为打印机工作的时候,x轴、y轴是在不断的运动的,所以为了保证打印机的精度,喷头运动时的动量对机体的影响越小越好!解决方法就是减轻喷头质量和提高机体刚性。
2)机械轴:机械轴就是XYZ轴运动的部件,主要有3种类型:直角坐标型:XYZ轴成互为直角样子的,X和Y轴通常是由同步带连接步进电机来定位的,Z轴则是由丝杆控制的。
三角爪型:其数学原理是跟直角坐标型一样,用笛卡尔坐标系原理的。
只是将X和Y 轴通过三角函数来映射到三个爪的位置上。
舵机转动型:舵机转动行型的X和Y轴坐标所运用的数学原理则是采用极坐标系了。
跟笛卡尔坐标系不同,所以在控制程序上有完全不同的代码。
从理论上来说不论是笛卡尔坐标系还是极坐标系,所表示空间中的一点都是一样的,也就是说,这些打印机的打印精度是一致的。
不存在说用极坐标系的效果就不如笛卡尔坐标系的(不要被商家忽悠哦)。
3)控制电路:控制电路的基本结构是由单片机、步进电机驱动、控制喷嘴热床的场效应管还有各种外出接口构成的。
单片机现在有两大种类:1)用arduinoMEGA开源硬件作为基础部件,具体参数可以看这里。
在单片机外面外加一个集成步进电机驱动、场效应管等外围电路的电路版。
Stratasys推出3D打印机Objet30 OrthoDesk
Stratasys公司(纳斯达克股票代码:SSYS),一个领先的3D打印机制造商,其近日宣布推出了首款桌面3D打印机Objet30 OrthoDesk,专门用于较小的正畸实验室和诊所。
数字口腔正畸有很多的业务优势,比如缩短交货时间,提高生产能力,并且不用再存储笨重的模型。
Objet30 OrthoDesk 3D打印机的出现,模型可以以3D模型数字化存储。
Objet30 OrthoDesk 3D打印机的托盘尺寸(X×Y×Z)为300×200×100毫米(11.81 x 7.87 X 3.94英寸),并配备了专门的牙科印刷材料密封盒。
产品规格:
托盘尺寸:300×200×100毫米(11.81 x 7.87 X 3.94英寸)
层厚度(Z轴):水平层28微米(0.0011英寸)
建设分辨率:X轴:600 DPI,Y轴:600 DPI,Z轴:900 DPI
密封材料盒:4X1公斤(2.2磅)墨盒
电源要求: 100-120V~; 50-60Hz; 7A | 200-240V~; 50-60Hz; 3.5A
机器外形尺寸:82.5×62×59厘米(WxDxH)((32.28 x 24.4 x 23.22英寸)机器重量:93公斤(205磅)
转载请注明:3D打印-3D族 » Stratasys推出3D打印机Objet30 OrthoDesk /2013/03/13/271。