绿联蓝牙音频发射接收器说明书CM108
- 格式:pdf
- 大小:5.53 MB
- 文档页数:2
蓝牙适配器操作手册尊敬的用户,感谢您选购绿联产品。
为了能更进一步了解产品,使用前请参照本文档安装驱动,并了解本产品功能应用。
祝您体验愉快!一、驱动安装本产品支持WindowsXP、Vista/Win7/8/10等系统,不支持苹果Mac OS系统。
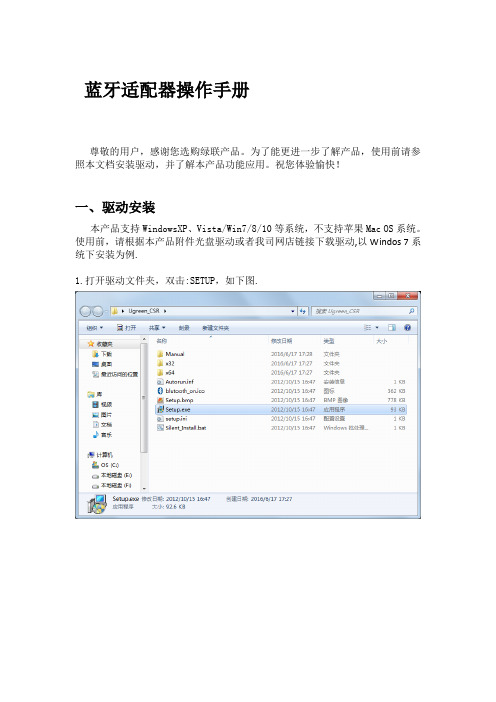
使用前,请根据本产品附件光盘驱动或者我司网店链接下载驱动,以Windos 7系统下安装为例.1.打开驱动文件夹,双击:SETUP,如下图.2.进入安装后,桌面将会出现一个CSR设计的界面图标,如下图:此时,系统已经开始读取驱动文件,请耐心等候!3.接下来,将进入选择语言的界面,请根据自身需要选择,如下图:备注:本驱动支持全球30个国家语言4.点击确定后系统将进入安装,请等待!如下图:5.请点击“下一步”,如下图:6.选择“我接受该许可证协议中的条款”,然后点击“下一步”,如下图:7.请点击“下一步”. 如下图:备注:安装到此步,可点击“更改”选择驱动安装位置.8.选择“搜寻打开”,点击“下一步”.如下图:9.请点击“安装”, 如下图.10.系统进入安装状态,请稍等!如下图:11.安装完成后,提示图下图,请点击“完成”12. 安装完成后,在“我的电脑”或“计算机”界面中会生成快捷图标“我的Bluetooth”,如下图:安装好驱动后,请手动选择重启电脑。
13.电脑完全启动后,插入蓝牙适配器,电脑右下角会有提示,如图:恭喜您驱动已经安装成功。
备注:如果插入本成品后,电脑还是没有如上图提示,请确认是否重启了电脑,或者请根据以上步骤重新安装一遍驱动,谢谢!二、使用说明驱动安装完成后,如果您的电脑有内置蓝牙,请打开设备管理器,设置内置蓝牙为“禁用”,请参考图示:1.本产品连接设备后的几种常用操作方式:连接蓝牙耳机听音乐:请参考图片上的步骤操作:为方便于操作,请直接将鼠标移动到桌面右下角蓝牙图标处,点右键选择“添加Bluetooth设备”后,可以再根据您的需要分项选择将要查找的设备:这时候桌面会出现一个蓝牙进入搜索状态的界面,被搜索的的设备将在这显示,如图:您可以直接点左键双击要连接的蓝牙设备,可以直接进入配对状态,系统会自动与设备配对,并连接上,如图:显示设备连接成功了,您可以打开音乐播放器,试一下蓝牙耳机是否有声音,如果还没有声音,就需要您设置一下电脑的声音输出了。

TP-100 All IN ONE使用說明書音譜利專業音響www .yplaudio .com .tw TEL : 04-2473-7735台中市南屯路二段351號唱盤 / 擴大機 / 藍芽接收 / 喇叭親愛的用戶:感謝您購買本公司YPL AUDIO TP-100器音箱),確保使用機器的安全,我們建議閣下您在打開包裝後,請仔細閱讀使用說明書,並留意下列事項,再進行操作。
All IN ONE ( 唱盤擴大機藍芽接收注意: 請勿移除外殼或打開產品讓內部零件外露。
機箱內部沒有任何可供用戶自行維修的零件。
若您的產品出現問題,請接洽YPL AUDIO公司或是當地經銷商尋求服務,在問題尚未解決之前,請勿繼續使用本產品。
未按照說明書指示控制、修改、操作產品,可能會導致輻射外洩的危險。
未經YPL AUDIO認可變更或修改本機,使用者將喪失保固權力。
附件:開箱時,請詳細檢查並確認箱內包含下列附件:1. 音箱 x 22. 喇叭線 x 23. 唱盤主機 x 14. 壓克力蓋子x 15. 中心(小)轉盤軸 x 16. 鋁鑄(大)轉盤 x 17. 45RPM轉接環 x 18. 平衡錘 x 1產品規格9. 防滑錘 x 110. 唱針(附AT3600L Mm)x 111. 驅動皮帶. 2A皮帶鉤 x 112. 絨布墊 x 113 .紙質校準工具 x 114. D C15V 2400mA電源適配器 x 115. 使用說明書 x 1 TP-100 唱盤、擴大機、藍芽接收器(一體機)電源供應功率 : AC交流電源適配器,DC直流輸出15V 2400mA 消耗功率 : 36W輸出功率 : 30Wx2 RMS轉盤速度 : 33 1/3, 45RPM1.0%信噪比 : 72dB下壓力範圍 : 0~6.0g有效音臂長度 :8.6"(218.5mm)轉盤尺寸(WxHxD) : 418 x 123 x 346mm重量 : 5.8 kgTP-100 音箱承受功率 : 30 W (4Ω) 10 W (8Ω)音箱尺寸 : 162 x 248 x 158mm重量 : 4 kgs唱頭類型 : AT-3600L MM(VM)頻率響應 : 20Hz - 20KHz聲道平衡 : < 2.5dB聲道分離 : > 18dB輸出電壓 : 2.5mV負載電阻 : 47KΩ放大器連接 : MM-輸入重量 : 5 g1.2.3. 4.重要安全指示1. 請詳讀本說明書2 .請妥善保存本說明書3. 請注意所有警語4. 請遵照本說明書內所有指示5. 不要在接近水的地方使用此機器6. 僅用乾布擦拭清潔機器7. 請勿擋住通風口,請遵照廠商指示安裝機器。

Micro Hi-Fi System MC108CImportant notes for users inthe U.K.Mains plugThis apparatus is fitted with an approved 13Amp plug. T o change a fuse in this type ofplug proceed as follows:1Remove fuse cover and fuse.2Fix new fuse which should be a BS1362 3Amp, A.S.T.A. or BSI approved type.3Refit the fuse cover.If the fitted plug is not suitable for yoursocket outlets, it should be cut off and anappropriate plug fitted in its place.If the mains plug contains a fuse, this shouldhave a value of 3 Amp.If a plug without afuse is used,the fuse at the distribution boardshould not be greater than 3 Amp.Note:The severed plug must be disposed of toavoid a possible shock hazard should it beinserted into a 13 Amp socket elsewhere.How to connect a plugThe wires in the mains lead are colouredwith the following code: blue = neutral (N),brown = live (L).¶As these colours may not correspond withthe colour markings identifying the terminalsin your plug, proceed as follows:–Connect the blue wire to the terminalmarked N or coloured black.–Connect the brown wire to the terminalmarked L or coloured red.–Do not connect either wire to the earthterminal in the plug,marked E (or e) orcoloured green (or green and yellow).Before replacing the plug cover,make certainthat the cord grip is clamped over the sheathof the lead - not simply over the two wires.Copyright in the U.K.Recording and playback of material mayrequire consent. See Copyright Act 1956 andThe Performer’s Protection Acts 1958 to1972.CAUTIONUse of controls or adjustments orperformance of procedures otherthan herein may result in hazardousradiation exposure or other unsafeoperation.ContentsGeneral InformationEnvironmental information (5)Supplied accessories (5)Safety information (5)PreparationRear connections.............................................6–7Before using the remote control (7)Replacing battery (lithium CR2032)into the remote control (7)ControlsControls on the system and remotecontrol (8)Basic FunctionsSwitching the system on (9)Power-saving automatic standby (9)Adjusting volume and sound (9)CD OperationPlaying a disc (10)Selecting a different track (10)Finding a passage within a track (10)Different play modes: Shuffle and Repeat (11)Programming track numbers (11)Erasing the programme (11)Radio ReceptionT uning to radio stations (12)Maintenance (12)Clock/TimerSetting the clock (13)Setting the timer (13)Activating and deactivating TIMER (13)Activating and deactivating SLEEP (14)Specifications (14)Troubleshooting (15)l iGeneral InformationThis product complies with the radiointerference requirements of the European Community.Supplied accessories– 2 speaker boxes–remote control with battery –AM loop antennaEnvironmental InformationAll unnecessary packaging has been omitted. We have tried to make the packaging easy toseparate into three materials: cardboard (box),polystyrene foam (buffer) and polyethylene (bags,protective foam sheet).Y our system consists of materials which can be recycled and reused if disassembled by a specialized company. Please observe the local regulations regarding the disposal of packaging materials, exhausted batteries and old equipment.Disposal of your old product Y our product is designed and manufactured with high quality materials and components,which can be recycled and reused.When this crossed-out wheeled bin symbol is attached to a product it means the product is covered by the European Directive 2002/96/EC Please inform yourself about the local separate collection system for electrical and electronic products.Please act according to your local rules and do not dispose of your old products with yournormal household waste. The correct disposal of your old product will help prevent potential negative consequences for the environment and human health.Safety Information●Before operating the system, check that theoperating voltage indicated on the typeplate (or the voltage indication beside the voltage selector) of your system is identical with the voltage of your local power supply. If not, please consult your dealer.●Place the system on a flat, hard and stablesurface.●Place the system in a location with adequateventilation to prevent internal heat build-up in your system. Allow at least 10 cm (4 inches)clearance from the rear and the top of the unit and 5 cm (2 inches) from each side.●The ventilation should not be impeded bycovering the ventilation openings with items,such as newspapers, table-cloths, curtains, etc.●Do not expose the system, batteries or discs toexcessive moisture, rain, sand or heat sources caused by heating equipment or direct sunlight.●No naked flame sources, such as lighted candles,should be placed on the apparatus.●No objects filled with liquids, such as vases, shallbe placed on the apparatus.●If the system is brought directly from a cold to awarm location, or is placed in a very damp room,moisture may condense on the lens of the disc unit inside the system. Should this occur, the CD player would not operate normally. Leave the power on for about one hour with no disc in the system until normal playback is possible.●The mechanical parts of the set contain self-lubricating bearings and must not be oiled or lubricated.●When the system is switched to Standbymode, it is still consuming some power.T o disconnect the system from thepower supply completely, remove the AC power plug from the wall socket.PreparationsRear connectionsThe type plate is located at the rear of the system.For users in the U.K.: please follow the instructions on page 2.A Power–Before connecting the AC power cord to the wall outlet, ensure that all other connections have been made.WARNING!–For optimal performance, use only the original power cable.–Never make or change any connections with the power switched on.B Antennas Connection AM (MW) antenna1Unfold the loop antenna and if necessary, use screws (not supplied)to fix it to a flat, hard and stable place:2ANTENNA as shown above.3Adjust the antenna for optimal reception●Position the antenna as far as possible from a TV,VCR or other radiation source.l iPreparationsC Speakers ConnectionFront SpeakersConnect the speaker wires to the SPEAKERS terminals, right speaker to "RIGHT " and left speaker to "LEFT ", coloured (marked) wire to ●wire into the terminal as shown.Notes:–For optimal sound performance, use the supplied speakers.–Do not connect more than one speaker to any one pair of +/- speaker terminals.–Do not connect speakers with an impedance Before using the remote control1Pull out the plastic protective sheet.2Select the source you wish to control by pressing one of the source select keys on the remote control (for example CD, TUNER).Replacing battery (lithiumCR2032) into the remote control 1Pull out the knob A slightly to the left.2Pull out the battery compartment B .3Replace a new battery and fully insert thebattery compartment back to the original CAUTION!Batteries contain chemical substances, so they should be disposed off properly.Controls (illustrations on page 3)Controls on the system andremote control1BAND–for T uner (on the set only) selects waveband.2SOURCE (CD/ TUNER/ AUX)–switches on the system.–selects the respective sound source for CD/ FM/MW/ AUX.3POWER / y–switches the system to standby/on.4PROG/CLOCKfor CD.................programs tracks and reviews theprogram.for clock..............sets the clock function.5OPEN•CLOSE–opens/closes the CD door.6VOLUME – / +–adjusts volume level.7TUNING 0–tunes to radio stations.8iR SENSOR–infrared sensor for remote control.9n–connect headphones.0ÉÅfor CD.................starts or pauses CD playback.!¡1 / 2™–skips to the beginning of a current track/previous/ next track.–fast searches back and forward within a track/CD.@STOP 9–stops CD playback or erase a CD program.#AUX IN–connects to external audio source.$REPEAT–repeats a track/CD program/ entire CD.%SHUFF (SHUFFLE)–plays CD tracks in random order.^SLEEP–activates/deactivates or selects the sleeper time.&TIMER–activates/deactivates or sets the timer function..*DBB–(Dynamic Bass Boost) enhances the bass.$MUTE–switches playback sound off and on.Notes for remote control:–First select the source you wish to controlby pressing one of the source select keys onthe remote control (for example CD ,TUNER).–Then select the desired function (forexampleÉ,í,ë).E n g l i s hIMPORTANT:Before you operate the system, complete the preparation procedures.Switching the system on●Press POWER (y on the remote control).➜The system will switch to the last selected source.●Press SOURCE (CD , TUNER or AUX onthe remote control).➜The system will switch to the selected source.T o switch the system to standby mode ●Press POWER (y on the remote control).➜The volume level (up to maximum volume level of 20), interactive sound settings, last selected source will be retained in the player's memory.Power-saving automatic standbyThe power-saving feature automatically switches to standby 15 minutes after a CD playback has ended and no control is operated.➜Playback will continue without sound and the display shows MUTE .●T o start sound playback you can:–press MUTE again;–adjust the volume controls;–change source.CD Operation5T o pause playback press 2;. Press 2; again toresume play.➜The display freezes and the current tracknumber flashes when playback is paused.6T o stop disc playback,press 9.Note: CD play will also stop when;– the CD door is opened.– the disc has reached the end.– you select another source: AUX,TUNER.– you select standby.Selecting a different track●Press ¡1 or 2™ once or repeatedly until thedesired track number appears in the display.●If you have selected a track number shortly afterloading a disc, or in the PAUSE position, you willneed to press 2; to start playback.Finding a passage within a track1Press and hold down ¡1 or 2™ .➜The disc is played at high speed and lowvolume.2When you find the passage you want,release¡1 or 2™ .➜Normal playback continues.IMPORTANT:The lens of the CD player should never be¶123Insert a disc with the printed side facing up andpress down on OPEN•CLOSE to close theCD door.➜is displayed as the CD player scansthe contents of a disc.The total number oftracks and time are also shown.4Press 2; to start playback.➜Current track number followed by elapsedplaying time of the track are displayed during discplayback.l iCD OperationDifferent play modes: SHUFFLE and REPEATY ou can select and change the various playmodes before or during playback.REPEAT............plays the current trackcontinuouslyREPEAT ALL...repeats the entire disc/programmeSHUFFLE.........tracks of the entire disc areplayed in random order1T o select your play mode,press SHUFF or REPEAT on the remote control before orduring playback until the display shows thedesired function.2Press 2; to start playback if in the STOP position.➜If you have selected SHUFFLE, playback starts automatically.3T o return to normal playback,press SHUFF or REPEAT on the remote control until thevarious SHUFFLE/ REPEAT modes are no longer displayed.●Y ou can also press STOP9 to cancel your playmode..Programming track numbersProgramme in the STOP position to select and store your disc tracks in the desired sequence. If you like,store any track more than once. Up to20 tracks can be stored in the memory.1Press ¡1 or 2™ to select your desired track number.2Press PROG.➜Display shows:the selected track number.PROG flashes and appears briefly.3Repeat steps 1-2 to select and store all desired tracks.➜ is displayed if you attempt toprogramme more than 20 tracks.4T o start playback of your disc programme,press 2;.Notes:–If you wish,you can add further tracks to yourcurrent program.Make sure you are in the STOPposition, and that you have not exceeded 20tracks.–Display shows if there is no trackselected.Erasing the programmeY ou can erase the programme by:●pressing 9 once in the STOP mode;●pressing 9 twice during playback;●opening the CD compartment;●Select another sound source➜PROG disappears from the display.T uning to radio stations 1Select TUNER source.➜is displayed.2Press BAND (TUNER on the remotecontrol ) once or more to select your waveband.Cleaning the Cabinet●Use a soft cloth slightly moistened with a milddetergent solution. Do not use a solutioncontaining alcohol, spirits, ammonia or abrasives.Cleaning Discs●When a disc becomes dirty,clean it with a cleaning cloth.Wipe the disc from the centre out.●Do not use solvents such asbenzene, thinner, commerciallyavailable cleaners, or antistatic spray intended for analogue records.MaintenanceCleaning the disc lens●After prolonged use, dirt or dust mayaccumulate at the disc lens. T o ensure good playback quality, clean the disc lens with Philips CD Lens Cleaner or any commercially available cleaner. Follow the instructions supplied with cleaner.E n g l i sClock/TimerSetting the timer●The system can be used as an alarm clock. CDor TUNER can be set to switch on at a preset time. The clock time needs to be set first before the timer can be used.●If no button is pressed within 90 seconds duringtimer setup, the system will exit timer setting mode automatically.1In any mode, press TIMER (on the remote control) for more than 2 seconds.2Press ¡1 / 2™ (or CD / TUNER on the remote control) to select sound source.3Press TIMER to confirm your desired source.➜ The clock digits for the hours flash.4Press ¡1 / 2™ to set the hours.5Press TIMER again.➜The clock digits for the minutes flash.6Press ¡1 / 2™ to set the minutes.7Press TIMER to confirm the time.➜The timer is now set and actiated.Notes:- If source CD is selected and no disc is in the CD tray or the disc has an error, TUNER will be selected automatically.- The volume level will be increased from min. to 20within 2 minutes after alarm wake up.Activating and deactivating TIMER●In standby or during playback, pressTIMER once.➜ if activated, and disappears if deactivated.Setting the clock 1In Standby mode, press PROG/CLOCK button.➜The clock digits for the hours flash.2Press ¡1 / 2™ to set the hours.3Press PROG/CLOCK again.➜The clock digits for the minutes flash.4Press ¡1 / 2™ to set the minutes.5Press PROG/CLOCK to confirm the time.Note:– If the clock has not been set, --:-- will be displayed.Clock/TimerSpecificationsAMPLIFIEROutput power..........................................2 x 2 W RMS.................................................................4 W + 4 W MPOSignal-to-noise ratio..........................≥ 62 dBA (IEC)Frequency response.........60 – 16000 Hz, ± 3 dBImpedance loudspeakers.........................................8 ΩImpedance headphones.................32 Ω – 1000 ΩCD PLAYERFrequency range..................................20 – 20000 HzSignal-to-noise ratio............................................75 dBATUNERFM wave range...................................87.5 – 108 MHzMW wave range................................531 – 1602 kHzSensitivity at 75 Ω– mono,26 dB signal-to-noise ratio............2.8 µV– stereo,46 dB signal-to-noise ratio........61.4 µVSelectivity.................................................................≥ 28 dBT otal harmonic distortion.....................................≤ 5%Frequency response.....63 – 12500 Hz (± 3 dB)Signal-to-noise-ratio..........................................≥ 50 dBSPEAKERSBass reflex systemDimensions (w x h x d).150 x 150 x 200 (mm)GENERAL INFORMATIONAC Power.....................................220 – 230 V / 50 HzDimensions (w x h x d)..150 x 150 x 220 (mm)Weight (with/without speakers).................................................................................................approx.4.9 / 2.3 kgStandby power consumption..........................< 3 WSubject to modificationl iTroubleshooting WARNINGUnder no circumstances should you try to repair the system yourself, as this will invalidate the warranty. Do not open the system as there is a risk of electric shock.If a fault occurs, first check the points listed below before taking the system for repair. If you are unable to remedy a problem by following these hints, consult your dealer or service centre. Problem SolutionCD OPERATION“no cd” is displayed.–Insert a disc.–Check if the disc is inserted upside down.–Wait until the moisture condensation at the lenshas cleared.–Replace or clean the disc,see “Maintenance”.–Use a finalised CD-RW or CD-R.RADIO RECEPTIONRadio reception is poor.–If the signal is too weak,adjust the antenna orconnect an external antenna for better reception.–Increase the distance between the Micro HiFiSystem and your TV or VCR.GENERALThe system does not react when buttons–Remove and reconnect the AC power plug and are pressed.switch on the system again.Sound cannot be heard or is of poor–Adjust the volume.quality.–Disconnect the headphones.–Check that the speakers are connected correctly.–Check if the stripped speaker wire is clamped. The left and right sound outputs are–Check the speaker connections and location. reversed.The remote control does not function–Select the source (CD or TUNER,for example) properly.before pressing the function button (É,í,ë).–Reduce the distance between the remote controland the system.–Insert the batteries with their polarities(+/– signs) aligned as indicated.–Replace the batteries.–Point the remote control directly towardIR sensor on the front of the system.The timer is not working.–Set the clock correctly.–Press TIMER to switch on the timer.–If a recording is in progress, stop the recording. The Clock/Timer setting is erased.–Power has been interrupted or the power cordhas been disconnected.Reset the clock/timer.MC108Meet Philips at the Internet 。


书明说用使机音收ENJob Site RadioInstruction manual1 23325476498105简体中文(原厂指导手册)符号下列所示为用于设备的符号。
请确保在使用前理解各个符号的含义。
重要安全指导警告:在使用电动工具时,应始终遵守包括如下内容在内的基本安全注意事项,以降低火灾、触电或人身伤害的风险:1.使用前仔细阅读本指导手册和充电器指导手册。
2.仅用干布清洁。
3.请勿安装在任何热源附近,如散热器、热调节器、炉子或其他产生热量的设备(包括放大器)。
4.仅使用制造商规定的配件/附件。
5.雷暴或长期不使用时,请拔下本设备的插头。
6.电池驱动的收音机(带一体的电池或独立的电池组)必须只能用指定的电池充电器充电。
适用于一种类型电池的充电器如果用于其他电池可能会引起火灾危险。
7.使用电池驱动的收音机时仅使用指定的电池组。
使用任何其他电池可能会引起火灾危险。
8.当电池组未用时,请将其保存在远离金属物品之处。
如回形针、硬币、钥匙、钉子、螺丝或其他小金属物体等。
这些物体可能会将电池的两个端子连在一起。
短接电池端子可能会引起爆炸或火灾。
9.避免身体与接地的表面接触,如水管、散热器、电炉和电冰箱等。
如果您的身体接地了,会增加电击的危险。
10.如果使用不当可能从电池渗出液体。
避免接触此类流动物体。
如果意外接触到电池漏液,请用水冲洗。
如果上述液体侵入眼睛必须即刻就医。
从电池流出的液体会刺激或灼伤皮肤。
请保留此说明书。
电池套管特别安全规则1.使用电池套管前,请阅读 (1) 电池充电器、(2) 电池和 (3) 使用电池之产品上的所有指导说明和警戒标记。
2.请勿拆开电池套管。
3.如果操作时间变得过短,立即停止操作。
其可能导致过热、造成灼伤,甚至爆炸的危险。
4.如果电解液进入您的双眼,用清水冲洗,并立即就医。
其可能导致您的视力下降。
5.请勿短接电池套管。
(1)请勿使用任何导电材料接触端子。
(2)避免在装有其它金属物体的容器内存放电池套管,例如钉子、硬币等。
PhilipsBluetooth ® Hi-Fi adapterBluetooth ® music receiverFor smartphone, tablet NFCBluetooth ® aptX and AACAEA2500Play music wirelessly from smartphone to Hi-FiBluetooth-enabledPhilips Bluetooth ® Hi-Fi Adapter turns your Hi-Fi or PC speaker system into a wireless sound system. Simply connect the adapter, and you're ready to play music from your smartphone, tablet and other Bluetooth-enabled devices to your Hi-Fi.Wireless music streaming via Bluetooth ® technology •Works with any smartphone or tablet with Bluetooth ®•Connects wirelessly via Bluetooth ® technology•Stream your local music library via Bluetooth ® technology •Stream music apps from your smartphone or tablet to Hi-Fi•One-Touch with NFC-enabled smartphones for Bluetooth pairing •High fidelity Bluetooth ® (aptX ® and AAC) music streaming Turns your Hi-Fi into a wireless sound system •Connects to almost any Hi-Fi or PC speaker system •Uses RCA or 3.5mm jack to connect adapter •Enjoy better sound than from your smartphone Simplicity in use•Plug-and-play for easy use •Smooth and compact designHighlightsNFC technologyPair Bluetooth ® devices easily with one-touch NFC (Near Field Communications) technology. Just tap the NFC enabledsmartphone or tablet on the NFC area of a speaker to turn the speaker on, startBluetooth ® pairing, and begin streaming music.High fidelity Bluetooth®With advanced technology, sound streamed via Bluetooth ® is brought to the next level. Standard Bluetooth ® audio uses SBC codec that is built for basic audio transmission, leaving listeners sometimes disappointed and dissatisfied. The Hi-Fi adapter, however, is armed with high fidelity (aptX ® and AAC) Bluetooth ® wireless technology – giving you rich, powerful and crystal clear sound.Compatible with both latest Android™ and Apple iOS smartphones, tablets and other devices, Philips now delivers the audio quality you have come to expect. Wireless music never sounded this good.RCA or 3.5mm jackStandard analogue RCA or 3.5mm jack (cable included).Enjoy better soundYou love music, and have a huge library on your smartphone and tablet. But the built-in speakers just don't sound right. With the Bluetooth ® Hi-Fi adapter you can listen to all your favorite music in better sound.Plug-and-playThe Bluetooth ® Hi-Fi adapter connects readily to your favorite Hi-Fi. Just plug it in the RCA or 3.5mm jacks, and you are ready to play music from your smartphone or tablet on your Hi-Fi.Bluetooth ®connectivityThe Bluetooth ® Hi-Fi adapter uses Bluetooth ® to connect to your smartphone or tablet.Compact designThe Bluetooth ® Hi-Fi adapter features a compact and streamlined design, looking perfect on your favorite Hi-Fi.Links to smartphone or tabletBluetooth ® Hi-Fi Adapter works withBluetooth ®-enabled phones and tablets. Just turn on Bluetooth ®, connect to the Hi-Fi adapter and play music from your smartphone/tablet on your Hi-Fi.Stream music libraryYou store your music on smartphone and tablet. With Bluetooth ® Hi-Fi Adapter, you can stream all your music from your music library to your Hi-Fi system.Stream online music appsEvery music lover has his favorite music service or online radio apps on his mobile devices. Now you can play them directly on your Hi-Fi system.Works with most Hi-Fi systemsYou can connect the Bluetooth ® Hi-Fi adapter to almost any Hi-Fi or PC speaker system usingstandard analogue RCA or 3.5mm jack.Issue date 2020-07-08 Version: 3.0.312 NC: 8670 001 07218 EAN: 87 12581 69879 9© 2020 Koninklijke Philips N.V.All Rights reserved.Specifications are subject to change without notice. Trademarks are the property of Koninklijke Philips N.V. or their respective owners.SpecificationsConnectivity•NFC technology•Bluetooth version: 2.1+EDR •Bluetooth profiles: A2DP, AVRCP •Bluetooth: support aptX & AAC streaming •Bluetooth range: Up to 10m•Audio out (3.5mm)•RCA Aux outAccessories•AC Adapter •Cables: RCA to 3.5mm cables •Quick start guideDimensions•Product dimensions (W x H x D): 74 x 22 x 74 mm•Product weight: 0.04 kgPower•Power supply: 100-240 V ~, 50/60 Hz。
蓝牙GPS接收器说明书(优选)word资料BTGP38-Plus 蓝牙GPS接收器说明书Ver3.11.视图A.外观及功能Power button:电源开关Bluetooth Status Led:蓝牙状态指示灯GPS Status Led:GPS 状态指示灯Power Jack:电源充电孔Charge Led:电源充电状态指示灯B.包装附件蓝牙GPS接收器电池说明书交流充电器车用充电器在开始使用前,请确认包装盒内的物品如上图清单,如有缺失请立即和您最近的销售商联系。
2.概述BTGP38-Plus整合了最新的蓝牙技术、内置天线的高灵敏度的GPS接收器,其基于SiRF 三代低功耗芯片组,高灵敏度,在山谷,茂密的树林等恶劣的环境中性能优势更为明显。
其外观经典大方、小巧精美,它可以通过蓝牙通信在您的智能手机、PDA、手提电脑等具有蓝牙设备上通过蓝牙通信,配合相关的软件进行定位、导航等应用。
A.充电孔使用注意事项交流充电器或车用充电器通过该电孔供给电能给蓝GPS可充电电池,要注意充电器充电电压为直流5V@500mA。
充电孔中心电极为正极。
B.LED状态指示LED 状态描述绿色LED 常亮GPS未定位闪烁GPS已经定位蓝色LED 快闪没有建立蓝牙连接慢闪蓝牙已经连接红色LED 常亮充电时指示正在充电不亮充电时指示充电完成C.技术指示一般指标接收频率L1, 1575.42 MHzC/A 码 1.023MHz通道数20精确度水平精确度10米2D RMS (SA OFF)时间1微秒同步到卫星原子钟速度0.1米/秒坐标系统数据WGC-84定位时间热启动1秒暖启动38秒冷启动42秒重新获取0.1秒GPS协议GPS输出数据NEMA 0183草案协议,支持数据命令格式GGA (1sec) ,GSA(1sec), GSV(5sec), RMC(1sec),VTG(1sec )GLL(1sec)GPS数据传输速率9600bps,无校验位,8位数据位,1位停止位动态条件加速度限制小于4G高度限制不大于18000米速度限制不大于515米/秒电源电源供给内置750mAh锂电,性能优越充电电路工作时长电池充足电,GPS定位良好,蓝牙连接状态下,可连续工作15小时工作电流50mA主机特征主机尺寸72.5(L)*40.4(W)*26(H)主机重量70g环境条件工作温度-20°~60°C储存温度-30°~ 80°C蓝牙指标蓝牙规范Ver2.0+EDR发射功率Class2(4dBm最大)接收灵敏度-80 dBm通信范围10米3. 产品操作a.电池按装取下电池盖板,按标示的正负方向插入电池,再装回电池盖板。
MANUAL DE INSTRUCCIONESTORRE DE SONIDO CON BLUETOOTHModelo: PD-100BTAntes de comenzar a operar por favor lea atentamente este manualESTIMADO CLIENTE:Le damos las gracias por adquirir este producto de la marca ELCO. La calidad y facilidad de uso son nuestras principales prioridades. Para que usted pueda disfrutar enteramente de este producto, lo hemos fabricado con estándares, materiales y componentes de alta calidad.Nota:Este manual del usuario ha sido impreso previo al desarrollo del producto. Cuando sea necesario variar las especificaciones del producto con la finalidad de mejorar su funcionalidad, se dará priori-dad a las propias especificaciones del producto. En dichos casos, el manual de instrucciones podría no coincidir plenamente con todas las funciones del producto comprado. Por lo tanto, el producto comprado y su empaquetado, así como los nombres e ilustraciones, podría diferir de los del ma-nual.ELCO no se responsabiliza de los daños consiguientes.CARACTERÍSTICAS1.Torre de sonido estéreo con 80W.patible con archivos en formato MP3.patible con reproductores mp3/mp4 mediante el uso del cable de audio.4.Alimentación: 220~240V, 50/60HZ.5.Panel táctil para los botones.6.Mando a distancia con funciones.7.Función Bluetooth.8.Altavoz: 3” 4OHMS, 15Wx2; 5.25” 8OHMS, 50Wx1.9.Potencia: 80W.10.Puerto USB (compatible con archivos MP3).11.Ranura para tarjetas SD/MMC (compatible con archivos mp3).12.Entrada auxiliar.13.Radio FM incorporada.14.Pantalla LED en color azul.DEBE SABER QUE:1.Mientras utiliza esta torre de sonido, pulsando el botón “INPUT”, podrá cambiar de USB a modotarjeta, Radio FM, Bluetooth, AUX.También si pulsa el botón “Mode” en el mando a distancia podrá cambiar de USB a modo tarje-ta, Radio FM, Bluetooth, AUX.2 . Si enciende la torre de sonido pulsando el botón ON/OFF, el nivel del volumen queda configura-do por defecto, pero si la torre de sonido se enciende a través del mando a distancia, el nivel del volumen empezará desde el mismo punto que se quedo por última vez.3.Botones de funciones principalesPulse este botón para seleccionar el modo deseado entre Bluetooth-USB-SD-AUX-Radio FM;Pulse este botón una vez para saltar a la pista anterior.Pulse este botón una vez para comenzar la reproducción ó pausar la reproducción(play/pause)Pulse este botón una vez para saltar a la siguiente pista.Pulse este botón una vez para bajar el nivel del volumen.Pulse este botón una vez para aumentar el nivel del volumen.FUNCIONAMIENTO1.Pulse varias veces el botón “INPUT” hasta seleccionar la opción USB / SD que aparecerá en pan-talla. Inserte un pendrive en el puerto USB o una tarjeta SD en su correspondiente ranura, au-tomáticamente comenzará la reproducción del los archivos en formato MP3.2.Modo Shift: Si inserta una tarjeta SD en su correspondiente ranura mientras esta en reproduc-ción música desde el Puerto USB, el equipo automáticamente empezará a reproducir las cancio-nes desde la tarjeta de memoria SD.3.Control del volumen: Durante la reproducción de la música, pulse los botones “VOL-“ y “VOL+”para bajar / subir el nivel del volumen a su gusto.4.Selección de canciones: Durante la reproducción de la música, pulse una vez los botones ópara saltar a la canción anterior / siguiente. Mantenga pulsado los botonesó para avanzar o rebobinar rapidamente.Para saltar 10 canciones de golpe, pulse el botón PROG.Pulse el botón para comenzar con la reproducción de la música, vuelva a pulsar el botón para hacer una pausa durante la reproducción.5.Pulse varias veces el botón “INPUT”hasta seleccionar la opción “AUX” que aparecerá en pantalla.Conecte un cable de 3.5mm a un reproductor MP3, Smartphone, tablet y pulse play para co-menzar con la reproducción.6.Pulse varias veces el botón “INPUT” hasta seleccionar la opción “FM”o una frecu encia de radio.Pulse el botón para hacer una búsqueda de emisoras, posteriormente pulse los botones ó para seleccionar una emisora de radio entre las programadas.Mantén pulsado los botones ó para buscar una emisora de radio manualmente.7.CONEXIÓN BLUETOOTHEste equipo se puede conectar a la mayoría de los dispositivos móviles con Bluetooth por vía Bluetooth. Puede reproducir el audio guardado en los móviles a través de la función Bluetooth.La distancia entre el equipo y el dispositivo móvil con Bluetooth es de 10 metros aproximada-mente.Pulse varias veces el botón “INPUT”hasta seleccionar la opción “BLUE”,ahora haga una bús-queda de dispositivos Bluetooth hasta encontrar “ELCO PD-100BT”, una vez encontrado vincula ambos dispositivos, una vez la conexión Bluetooth se haya realizado con éxito escuchará un Beep de confirmación.VISTA DEL MANDO A DISTANCIA1. Botón de encendido2. Aumentar nivel del volumen3. Play o Pause, (Botón de búsqueda de emisoras para FM)4. Canción anterior (Búsqueda de emisoras de FM hacia atrás)5. Siguiente canción (Búsqueda de emisoras de FM hacia adelante)6. Reducir el nivel del Volumen.7. Mode ( Para cambiar entre las opciones de Radio FM, Bluetooth, USB, etc. )ACCESORIOSCable de audio AUX x1Mando a distancia x1Manual de instrucciones x1VISTA DE LA TORRE DE SONIDOl. INPUT: Selector de funciones USB-SD/MMC-RADIO FM-BLUETOOTH-AUX.2. Canción anterior / mantenga pulsado este botón para rebobinar rápidamente.3. Botón de Play/Pause.4. Siguiente canción / mantenga pulsado este botón para avanzar rápidamente.5. VOL- (Botón para reducir el nivel del volumen).6. VOL + (Botón para aumentar el nivel del volumen).7. Pantalla LED8.Ranura para tarjetas SD/MMC9.Lector Puerto USB10. Entrada Aux11. Ajuste de Bass12.Alimentación: 220V-240V13.Botón de encendido / apagado (ON/OFF)RESOLUCIÓN DE PROBLEMASMaterial: Plástico y Madera.Versión Bluetooth: 2.1Potencia: 80WMedidas: 17x18x106.3cmAltavoces: 3” 40OHMS, 15Wx2; 5.25” 80OHMS, 50Wx1AC: 220~240V, 50Hz/60HzPuerto USB y ranura para tarjetas SD/MMC para reproducir archivos MP3Salida Aux de 3.5mmRadio FMFrecuencia de respuesta: 30HZ – 20KHZNota:Debido a continuas mejoras del producto, el equipo está sujeto a cualquier cambio sin previo avisoFinal de la vida útilEste símbolo indica que el producto eléctrico o la batería en cuestión no deberán ser eliminados junto con los desechos del hogar en el ámbito de la UE. Para garantizar un tratamiento adecua-do del producto y su batería, por favor, deposítelos según las leyes locales vigentes requeridaspara la eliminación de equipos eléctricos o baterías. Al hacerlo, ayudará a conservar los recur-sos naturales y mejorar los estándares de protección medioambiental en el tratamiento y elimi-nación de residuos eléctricos (Directiva de Residuos de Aparatos Eléctricos y Electrónicos)CERTIFICADO DE GARANTIACertificamos que el aparato indicado en la presente Tarjeta de Garantía ha sido fabricado bajo un estricto control de calidad y que tiene una Garantía total de 24 MESES a partir de la fecha de compra.Durante los 24 MESES del periodo de GARANTÍA, el presente certificado da derecho a la reparación, mano de obra y piezas de toda avería producida por defecto de fabricación, quedando excluidas las averías producidas por:Defectos de instalación, golpes, uso incorrecto, rotura de piezas y causas externas al propio equipo.Derechos del consumidor:El vendedor responderáante el consumidor de cualquier falta de conformidad que exista en el momento de la entrega del equipo. Se reconoce al con-sumidor el derecho de la reparación del equipo, a su sustitución si fuere necesario.El presente certificado de garantía solo tendrávalidez si va acompañado de la correspondiente factura o ticket de compra.PROCO-DIS, S.L. C/. Rufino González, 6 28037 – Madrid Telf: 91 304 47 47。