东芝TOSHIBAB-EV4T用户手册(使用说明书)
- 格式:pdf
- 大小:1.45 MB
- 文档页数:47
★在使用本产品之前请务必认真阅读本资料中的"操作及安全方面的注意事项"。
★本资料中所记载的技术信息仅用于说明产品代表性的动作、应用,而并非是使用时本公司及第三方的工业所有权及其他权利的保证或实施权的许诺。
★记载内容可能在不事先通知的情况下进行更改,使用时请向东芝电子管器件株式会社咨询。
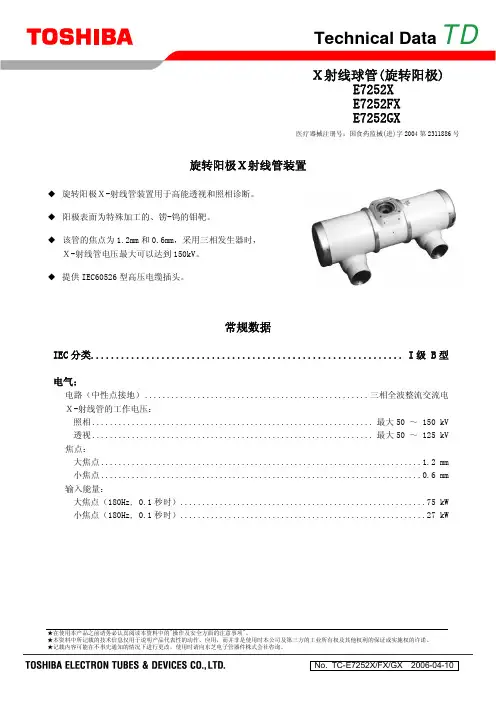
Technical Data TD旋转阳极X射线管装置◆ 旋转阳极X-射线管装置用于高能透视和照相诊断。
◆ 阳极表面为特殊加工的、铹-钨的钼靶。
◆ 该管的焦点为1.2mm 和0.6mm,采用三相发生器时,X-射线管电压最大可以达到150kV。
◆ 提供IEC60526型高压电缆插头。
常规数据IEC 分类..............................................................I 级 B 型电气:电路(中性点接地)...................................................三相全波整流交流电 X-射线管的工作电压:照相................................................................最大50 ~ 150 kV透视................................................................最大50 ~ 125 kV 焦点:大焦点.........................................................................1.2 mm 小焦点.........................................................................0.6 mm 输入能量:大焦点(180Hz, 0.1秒时)........................................................75 kW 小焦点(180Hz, 0.1秒时)........................................................27 kWX射线球管(旋转阳极)E7252X E7252FX E7252GX医疗器械注册号:国食药监械(进)字2004第2311886号E7252X, E7252FX, E7252GX发动机额定值:XS-AL状态 起动 运行电源 (Hz) 180 2)60 180 2)60输入功率 (W) 1100 910 83 83电压 (V) 220 130 60 40电流 (A) 5.7 7.8 1.6 2.3最小增速 1)(s) 1.2 0.8 - -电容器 (μF) 6 44 6 44最小制动时间 2)(s) 3 / 90 V (DC)定子阻抗公共端-主线圈之间的电阻值..................................................... 9.4 Ω 公共端-辅助线圈之间的电阻值...................................................28.3 ΩXS-R状态 起动 运行电源 (Hz) 180 3)50/60 180 3)50/60输入功率 (W) 2300 1450 300 80电压 (V) 460 240 130 58电流 (A) 5.4 6.5 2.0 1.5最小增速1)(s) 1.0 0.6 - -电容器 (μF) 3 24 3 24最小制动时间 2)(s) 1.5 / 90 V (DC) 3)定子阻抗公共端-主线圈之间的电阻值.................................................... 27.5 Ω 公共端-辅助线圈之间的电阻值...................................................58.0 Ω注: 1)从每分钟3000min-1(3600 min-1)的普通转速到每分钟10800转的高转速,提速时间 为所载提速时间(从0到高速)的2/3,其内容已在马达规格中载明。

E n g l i s hDISHWASHERINSTRUCTION MANUALModel:DW-10F1CIS(W)-UA DW-10F1CIS(S)-UARead these instructions carefully before using your DISHWASHER, and keep it carefully.SAFETY INSTRUCIONSAll instructions described should be carefully read and followed.These instructions are precautions to prevent the risks of serious injury or death of the user, and any damages to property.(*1) Serious injury - injury which requires hospitalization, lengthy treatment, or blindness, hot and cold skin burn, electric shock, broken bones or poisoning.(*2) Injury - injury, skin burn or electric shock which does not require hospitalization or lengthy treatment.(*3) Property loss - extended loss of houses, furniture, domestic animals or pets.02E n g l i s h03040506Handle the package of the dishwasher with extreme care.All packages are recyclables.Plastic parts are marked with abbreviation of international standard;TreatmentsPE Polyethylene, e.g., tableted package material Polystyrene, e.g., packing material Polymethyl, e.g., plastic clip Polymer, e.g., control panel Polypropylene, e.g., inner wallPS POM ABS PPE n g l i s hSuch warning sign is used to prevent dangers to you and others.Please follow it strictly.After reading, please store it properly for use just in case.07Start upCleaning and care Filter cleaning Spray arms cleaning Care and maintenanceRecognize the dishwasher Dishwasher features Control panel Use the dishwasher Water softenerAdding salt to the softener Adding rinse aid to the dispenser 10111301020304Rinse aid and detergent 1617182627281914Please carefully read the instruction manual before using the dishwasher,and this is helpful for the use and maintenance of the product.ContentsProgram Setting Washing program 08Changing the program mid-cycle Put additional dishes in End of washing programBasket used tipsInstall dishwasher bowl basket 2021Adding rinse aid to the dispenser 24141515TroubleshootingBefore connecting customer service center Error code Installation Product dimension Power connection 052930323435Specification06Water connection Connection of drain hoses303109Recognize the dishwasherDishwasher featuresImportant:Before using the dishwasher for the first time, read following instructions to ensure the best results.Salt containerFilterLower spray armDispenserCutlery basket Lower basketUpper basket Upper spray arm Cutlery rackCup rackControl panelE n g l i s hFollowing table shows best cleaning procedures and amount of dishwashing powder required according to the dirty level of the dishes, as well as the Washing programDishwashing powder (g)Highest Water Temperature65℃Time (min)Power (K wh)Water (L)ProgramAUTO1503/221 piece 0.9-1.39.5~1362℃2050.749GLASS60℃1340.811265℃90251 piece1.1511.5RAPID55℃300.71020HYGIENE70℃170 1.2715.5Program SettingE n g l i s h3/221 piece 3/221 piece 3/221 pieceStart upChanging the program mid-cycle1. The plug shall be firstly plugged into the socket. Power supply shall be of 220-240V AC 50Hz type, with socket of 10 A 220-240V AC.2. Make sure that the water supply is turned on to full pressure.3. Close the door, press "ON/OFF" button turn on the dishwasher.4. Press the button of desired program, the corresponding indicator will light up.5. Then, pass”Start/Pause”button to start.A wash cycle can only be changed if it has been running for a short time otherwise, the detergent may have already been released and the dishwasher may have already drained the wash water. If this is the case, the dishwasher needs to be reset and the detergent dispenser must be refilled. To reset the dishwasher, follow the instructions below:1. Press the Start/Pause button to pause the washing.2. Press the Program button for more than 3 seconds, the dishwasher will enter standby mode.3. Press the Program button to select the desired program.4. Press the Start/Pause button, the dishwasher will run after 10 seconds.3 secondsPut dishes inadditional Additional dishes can be placed in at any time before dishwasher program start. If you want to reload dishes in the process of washing, please follow instructions below:1. Press “Start/Pause” button to pause washing program;2. Wait for 5 seconds to open the door;3. Put the additional dishes in;4. Close the door;5. Press “Start/Pause” button and after 10 seconds, the dishwasher will start again.End of washing programAfter the program finishes, the machine show "End" after the buzzer beeps for 8 seconds. Turn off the machinePress ON/OFF button to turn off the dishwasher.Hot dishes are more likely to be damaged. The dishes shall be cool for about 15 minutes and then taken out from the dishwasher.Open the door carefullyClear the dishwasherIt is normal that the dishwasher still remains wet inside.E n g l i s hThe dishwasher is designed to allow for adjustment in the amount of salt consumed based on the hardness of the water used. This is intended to optimise and customise the level of salt consumption.Please follow the steps below for adjustment in salt consumption.0 - 56 - 1112 - 1718 - 2223 - 3435 - 55German dH Salt consumption(gram/cycle)0 - 910 - 2021 - 3031 - 4041 - 6061 - 980 - 67 - 1415 - 2122 - 2829 - 4243 - 690 - 0.941.0 - 2.02.1 - 3.03.1 - 4.04.1 - 6.06.1 - 9.80912203060FrenchfH Mmol/l Water softener level British Clarke WATER HARDNESSH1H2H3H4H5H6dH=1.25Clarke=1.78fH=0.178mmol/l°°°1The water softener must be set manually, using the water hardness dial.The water softener is designed to remove minerals and salts from the water, which would have a detrimental or adverse effect on the operation of the appliance. The more minerals there are, the harder your water is.The softener should be adjusted according to the hardness of the water in your area. Your local Water Authority can advise you on the hardness of the water in your area.1. Close the door and s witch on the appliance .2. Press the Start/Pause button for more than 5 seconds ,when the salt indicator flashes means entering the water softener settings.set model within 60 seconds after the appliance was switched on .3. Press the Start/Pause button to select the proper set according to your local environment, the sets will change in the following sequence: H1->H2->H3->H4->H5->H6.4. Without any operation in five seconds, the machine will exit from set mode, the machine is into standby status.Use the dishwasherWater softenerAdjusting salt consumptionThe manufactory setting: H3Contact your local water board for information on the hardness of your water supply.1. Remove the lower basket and unscrew the reservoir cap.2. Place the end of the funnel (supplied) into the hole and pour in about 1.5kg of dishwasher salt.3. Fill the salt container to its maximum limit with water, It is normal for a small amount of water to come out of the salt container.4. After filling the container, screw back the cap tightly.5. The salt warning light will stop being after the salt container has been filled with salt.6. Immediately after filling the salt into the salt container, a washing program should be started (We suggest to use a short program). Otherwise the filter system, pump or other important parts of the machine may be damaged by salty water. This is out of warranty.Please follow the steps below for adding dishwasher salt:Adding salt to the softenerE n g l i s hFunction of the rinse aid and detergentThe rinse aid is released during the final rinse to prevent water from forming droplets on your dishes, which can leave spots and streaks. It also improves drying by allowing water to roll off the dishes. Your dishwasher is designed to use liquid rinse aids.When to refill the rinse aidThe regularity of the dispenser needing to be refilled depends on how often dishes are washed and the rinse aid setting used.The Low Rinse Aid indicator ( ) will appear in the display when more rinse aid is needed.Do not overfill the rinse aid dispenser.Function of detergentThe chemical ingredients that compose the detergent are necessary to remove, crush and dispense all dirt out of the dishwasher. Most of the commercial quality detergents are suitable for this purpose.To achieve a better drying performance with limited rinse aid, the dishwasher is designed to adjust the consumption by user. Follow the below steps.1. .Close the door and s witch on the appliance 2. Within 60 seconds after step 1, press the Start/Pause button more than 5 seconds, and then press the Delay button to enter the set model, the rinse aid indication blinks as 1 Hz frequency.3. Press the Start/Pause button to select the proper set according to your using habits , the sets will change in the following sequence: D1->D2->D3->D4->D5->D1. The higher the number, the more rinse aid the dishwasher uses.4. Without operation in 5 seconds or press the Power button to exit the set model, the set success.Adjusting the rinse aid reservoirAdding rinse aid to the dispenserE n g l i s h1. Open the cap by sliding the release catch.2. Open the cap by pressing down the release catch.For better cleaning result, especially if you have very dirt items, pour a small amount of detergent onto the door. The additional detergent will activate during the pre-wash phase.Adding detergent to the dispenser20Dishes and knives should not be placed in other utensils, and they can’t overlaid each other.Do not place glass close to each other to avoid damage.For long knives, placing upright is very dangerous.Precautions before and after the bowl basket is placedInstall dishwasher bowl basketSuggestionUse the dishwashing machine rationallyPurchase dishes suitable for dishwasher.Use a suitable mild dishwashing powder. If necessary, consult the manufacturer for more information.For special appliances, try to select a washing program that with a lower temperature.Do not take out the glass dishes immediately after the program ends to prevent damage.Limited use:Not for:Wooden, ivory, porcelain or pearl shank tool Non heat-resistant plastic products Cohesive knives or dishes Tin or copper vessels Crystal glass Rusty steel products Wooden utensils Synthetic fiber productsStale non heat-resistant cutters with glue adhesive partAfter several cleanings, some glassware will become dullColor of smooth dishes may fade out if often washedSilver or aluminum products tend to change color during cleaning(For the best use of dishwasher, follow the instructions below. For different models, the characteristics and appearance of the basket will be different) Clear larger food residues.Soften the residue of burnt food left on the pan. It is not necessary to rinse dishes with water first. Place the dishes in the dishwasher as follows:Cups, glasses, pots and so on are placed face down.For curved or concave and convex vessels, place them diagonally so that the water flows out. All utensils should be placed safely and must not be overturned.All utensils should be placed that the arms can rotate freely during washing.The open of hollow tablewares (such as cups, glasses, pots, etc.) should face downward so that water does not easily remain in the container or grooves.Long or sharp knives (eg. meat cleavers) should be placed horizontally in the basket.Do not use the dishwasher overloaded so that you can get better cleaning performance.E l i 21Loading the lower basketUse the upper rack for small or delicate items such as small plates,cups, saucers, glasses, and dishwasher-safe plastic items.Place items so that the open end faces down for cleaning and drying. Do not stack items on top of each other.The lower rack is recommended for dinner plates, soup bowls, dishes, pots, pans, lids, and grill trays. Plates should be positioned vertically and facing the center of the rack.Make sure that large items do not interfere with the rotation of the spray arms, and do not prevent the detergent dispenser from opening.2289810711977The cutlery rack is best suited for washing flatware and most cooking or serving utensils. The separators on the cutlery racks help keep flatware separated to avoid damage and improve cleaning.E n g l i s h231111111111444874444444Adjusting the upper basketThe height of the upper basket can be easily adjusted to accommodate taller dishes in either the upper or lower basket. We recommend adjust the height of the upper basket before loading dishes.To adjust the height of the upper rack, follow these steps:each side until the basket locks into place in the upper position. It is not necessary to lift the adjuster handle.release the basket and lower it to the lower position.Basket used tips24Folding back the cup shelvesTo make room for taller items in the upper basket, raise the cup rack upwards. You can then lean the tall glasses against it. You can also remove it when it is not required for use.raise upwardsfold backwardsFolding back the rack shelvesThe spikes of the lower basket are used for holding plates and a platter. They can be lowered to make more room for large items.E n g l i s h25Cleaning and careThe filtering system in the base of the wash cabinet retains coarse debris from the washing cycle. The collected coarse debris may cause the filters to clog. Check the condition of the filters regularly and clean them if necessary under running water.Follow the steps below to clean the filters in the wash cabinet.Filter cleaningLift the filter upwards and out of the dishwasher.The coarse filter can be detached from the main filter by gently squeezing thetabs at the top and pulling it away.For a more thorough clean, use a softcleaning brush.filter insert, and rotate clockwise tothe close arrow.26the jets. Replace them after rinsing them thoroughly.It is necessary to clean the spray arms regularly for hard water chemicals will clog the spray arm jets and bearings.To clean the spray arms, follow the instructions below:rotate the spray arm counterclockwise to remove it.Spray arms cleaningE n g l i s h27Care and maintenanceThe door and the door sealClean the door seals regularly with a soft damp cloth to remove food deposits.When the dishwasher is being loaded, food and drink residues may drip onto the sides of the dishwasher door. These surfaces are outside the wash cabinet and are not accessed by water from the spray arms. Any deposits should be wiped off before the door is closed. The control panelControl panel can be wiped with a slightly wet cloth. After cleaning, make sure it iscompletely dry.Do not use Sharp tools, Scratch sponge, or Rough detergent anywhere in the machine.28Height (H)Width (W)Depth (D1)Depth (D2)845mm 448mm600mm (with the door closed)1175mm (with the door opened 90°)InstallationProduct dimensionE n g l i s h29Power connectionPower requirementsPlease check the label of rated value of power supply system for knowing rated voltage and connect the machine to appropriate power supply. 10A fuse is required and time-delay fuse or circuit breaker is recommended. Only separate circuit is suitable for this machine. Machine connectionMake sure that supplied voltage and frequency correspond to those on rating plate. Plug can only be connected to a properly grounded socket. If the socket that the machine must be connected to is not suitable for the plug, replace the socket, and do not use a power adapter that may cause overheating and burning.Water connectionConnect the cold water supply hose to a threaded 3/4(inch) connector and make sure that it is fastened tightly in place.If the water pipes are new or have not been used for an extended period of time, let the water run to make sure that the water is clear. This precaution is needed to avoid the risk of the water inlet to be blocked and damage the appliance.Please securely fix the drain hose in either position A or position BInsert the drain hose into a drain pipe with a minimum diameter of 4 cm, or let it run into the sink, making sure to avoid bending or crimping it. The height of drain pipe must be less than 1000mm. The free end of the hose must not be immersed in water to avoid the back flow of it.Extension hoseWater outletHow to drain excess water from hosesSyphon connectionIf the sink is 1000 higher from the floor, the excess water in hoses cannot be drained directly into the sink. It will be necessary to drain excess water from hoses into a bowl or suitable container that is held outside and lower than the sink.Connect the water drain hose. The drain hose must be correctly fitted to avoid water leaks. Ensure that the water drain hose is not kinked or squashed.The waste connection must be at a height less than 100 cm (maximum) from the bottom of the dish. The water drain hose should be fixed .If you need a drain hose extension, make sure to use a similar drain hose.It must be no longer than 4 meters; otherwise the cleaning effect of the dishwasher could be reduced.Connection of drain hosesE n g l i s hTroubleshootingBefore connecting customer service center Please check the chart below before connecting customer service centerE n g l i s hError codeWhen failure occurs, error code will appear to remind you:SpecificationE n g l i s h。
东芝电梯现在最常见的几个型号分别是:CV150;CV160;CV180;CV190;CV300;CV320;CV330;CV330A。
其中:CV150;CV160;CV180;CV190为有齿轮曳引机。
CV300;CV320;CV330;CV330A为无齿轮永磁同步曳引机。
CV300为无机房,分为A、B、C三个型号。
东芝电梯的OBM操作方式:CV150;CV160;CV300;CV320:1、故障调阅:(还没有通俗易懂的话形容)2、故障清除:MODE按两下显示“0.0.”跳动按中间键到“0.E.”按STB键显示“E.1”按STB一下显示“0.E.”然后按STB接着显示“E.1”按中间键加到“E.2”按STB键显示“0.E.”按STB键显示“E.1”NUM键加到“E.3”按STB键显示“0.E.”MODE键就可以看到显示“CL”证明故障清除。
3、井道自学习方法:先将正常转换成检修。
MODE按两下显示“0.0.”跳动按中间键到“1.0”按STB键显示“E.2”按STB键一下显示“1.0”,在按中间键按到“0.E.”,按STB键显示“E.1”,在按中间键按到“E.C”按STB。
然后把检修转换成正常。
电梯向下,进行井道自学习。
CV180;CV190;CV330;CV330A:1、故障调阅:MODE键(也就是第一个键子)按两下显示“0.0.” 此时显示的数字为闪烁的)。
按中间键NUM按到“0.8” 此时8在闪烁)然后按STB确定键(也就是最后一个)一直按确定键什么时候显示“X.X.”两点都出现不在闪烁那个就是故障代码2、故障清除:MODE按两下显示“0.0.”跳动按中间键到“0.E.”按STB键显示“E.1”动按STB一下显示“0.E.”然后按STB接着显示“E.1”按中间键加到“E.2”按STB键显示“0.E.”按STB键显示“E.1”NUM键加到“E.3”按STB键显示“0.E.”MODE键就可以看到显示“CL”证明故障清除。
东芝热转印打印机B-SA4TM 系列E NERGY S TAR 是美国注册商标此产品配备有一台无线通讯装置,TEC-RFID-US1 (B-SA704-RFID-U1-US)TEC-RFID-EU1 (B-SA704-RFID-U1-EU)在使用此产品之前,请务必仔细阅读有关如何使用无线通讯装置的附带的预防措施。
使用无线通讯装置的预防措施RFID包 TEC-RFID-US1 (B-SA704-RFID-U1-US)TEC-RFID-EU1 (B-SA704-RFID-U1-EU)所有适用的国家和地区此产品是一种无线通讯装置,仅限于在以下国家和地区内使用此产品。
如果将此产品用于除此之外的其它国家或地区,则根据这些国家或地区的法律,您将可能受到处罚。
TEC-RFID-US1 (B-SA704-RFID-U1-US)TEC-RFID-EU1 (B-SA704-RFID-U1-EU): 奥地利、比利时、塞浦路斯、捷克共和国、丹麦、爱沙尼亚、芬兰、法国、匈牙利、德国、希腊、爱尔兰、意大利、拉脱维亚、立陶宛、卢森堡、马耳他、荷兰、波兰、葡萄牙、斯洛伐克、斯洛文尼亚、西班牙、瑞典、英国、挪威、列支敦士登、冰岛、瑞士安全性切勿将此产品用于禁止使用的区域,例如医院内。
如果您不了解存在哪些禁止使用的区域,请咨询医疗机构。
否则,医疗设备将受到影响,并造成严重事故。
此产品可能影响到某些植入心脏起搏器和其它医疗植入设备的正常使用。
使用心脏起搏器的病人应该意识到,在心脏起搏器周围使用此产品将可能导致起搏器设备故障。
如果您出于某种原因而怀疑存在信号干扰,请立刻关闭此产品,并联系您的东芝泰格销售代理商。
切勿擅自拆卸、变更或修理此产品。
这样做可能会造成损伤。
同时,变更设备也是违反有关无线电设备法律法规的。
需要修理时,请联系您的东芝泰格销售代理商。
适用于美国此设备符合FCC法规的第15部分。
使用此设备时必须满足以下两个条件:(1) 此设备不会引起有害干扰;2 此设备必须接受任何接收到的干扰,包括可能引起意外操作的干扰。

Safety.book Page 1 Friday, March 24, 2017 4:35 PMђ㣓⭫㝇 ⭞⭞ 䈭䰻䈱Safety.book Page 2 Friday, March 24, 2017 4:35 PMSafety.book Page 3 Friday, March 24, 2017 4:35 PM3目录简介 (5)安全使用电脑、组件和附件 (6)电源 (6)通信 (12)主机 (14)系统/外设 (20)如何更舒适地使用电脑 (25)良好的工作姿势 (25)使用外接键盘、鼠标或显示器操作电脑 (26)打字方式 (27)休息及变换工作任务 (27)移动过程中使用电脑的提示 (27)搬运电脑 (27)寻求额外的帮助 (28)检查清单 (28)您购买的电脑系统可能会带有包含最先进的数据存储技术的可刻录和/或可擦写光盘驱动器及相关软件。
同其它新技术一样,您必须先阅读并遵循随附的或以电子方式提供的相关用户指南和/ 或手册中所有的设置及使用指引。
如果不这样做,该产品可能不能正常运行并且您可能会丢失数据或遭受其它损害。
东芝、其附属公司及供应商并不保证本产品的所有运转都不受干扰或无错误。
您同意对由于使用本产品而引起的任何商业、利润、程序、数据或可移动存储媒体的损害或损失,即使已经被告知此可能性,东芝、其附属公司及供应商不应承担任何责任。
为求准确,出版时东芝公司已反复验证提供的信息,但是该信息有可能加以改动,恕不另行通知。
该使用指南或其它的任何书面材料及信息中的描述仅仅是一般性的指导,而不是向您承诺的任何保证。
对任何直接或间接地由于使用指南条款中技术或印刷的错误或遗漏引起的损害,东芝公司不承担任何责任。
在任何情况下,不管是基于民事侵权或与此相关的合同还是其他方面的理由,由于使用指南、其他信息或使用引起的任何意外的、因果的、特殊的或典型的损害,东芝公司不承担任何责任。
Safety.book Page 4 Friday, March 24, 2017 4:35 PM4商标Wi-Fi是Wi-Fi Alliance的注册商标。

Instruction ManualCautionDo not disassemble, repair or modify. Do not immerse the appliance in water.Do not attempt to use the metal articles, e.g. a pin or a wire, into the hole.Do not use when the power supply cord or the power plug is broken, or the power plug is loose.Do not directly touch the steam with your hand or face.When disconnecting, hold the power plug and pull it out without touching the power supply cord.Pull the power plug from the AC outlet when not in use.Do not place the appliance on the hot, soft, or unstable surface.Do not use the appliance near re or water source.Do not use any other inner pot except the provided one.Holding the power plug while retracting the power supply cord.Do not use the appliance in the place which is about 10 cm near the wall, on the paper, clothes, a carpet, or a plastic bag, etc. and the place exposed to direct sunlight.Wipe away the drops of water and the foreign matter after use.Do not cover the steam vent with the cloth or place anything while operating.Do not use the metal spatula, metal-scrubbing brush, nylon-scrubbing brush, and cleanser with the inner pot.Do not use the appliance near the ammable place or an electromagnetic wave adjuster.This appliance is not intended for use by young children or in rmed persons unless they have been adequately supervised by a responsible person to ensure they can use the appliance safely.Do not allow the children to use, keep it out of reach from them.If the power plug or its polar is dusty, wipe it away with the dry cloth.Fully t the power plug into the socket.Do not open the lid while cooking.Do not break/scratch, bend, pull, twist, the power supply cord.Do not place the appliance near the heating source.Do not put the heavy objects, pinch, or modify the power supply cord.Do not connect the power supply cord while your hand is wet.Do not add ingredients, seasonings and water that exceed the water level scale of the inner pot.(Otherwise, the cooker may boil over or you may get burned.)Right after use or while using, do not touch the hot part (e.g. the inner part of the outer lid, a heating plate, a steam vent, or the inner pot)Do not use the appliance near the wall or the furniture.Do not touch the hook button while moving the appliance.Do not move the appliance while cooking.Do not warm rice with the spatula inside inner pot.Do not cooking if the inner pot is not inside the appliance.Unplug the power cord before cleaning the appliance.Do not warm rice over 30 hours. It is greater than standard of warming time, the indicator ashing.This appliance is not intended for use by persons (includingchildren) with reduced physical, sensory or mental capabilities, or lack of experience and knowledge, unless they have been given supervision or instruction concerning use of the appliance by a person responsible for their safety. Children should be supervised to ensure that they do not play with the appliance.This appliance is intended to be used in household and similar applications such as:- sta kitchen areas in shops, o ces and other working environments;- farm houses;- by clients in hotels, motels and other residential type environment;- bed and breakfast type environment.If the power supply cord is damaged, it must bereplaced by the manufacturer, its service agent or similarly quali ed persons in order to avoid a hazard.The boiling water may over ow from adjusting the amount of water exceed maximum water level scale for cooking.A warning of potential injury from misuse.A warning to avoid spillage on the connector.The heating element surface is subject to residual heat after use.The appliance inlet must be dried before the appliance is used again.Insert the power plug (main body side) into the plug insertion hole on the rear side of the main body.Do not expose the power plug or other electrical components to hot steam.Be especially careful when placing and using the appliance on the kitchen counter, to avoid steam attached to the plug and cause electric shock or re.Safety cautionPower plug(main body side)Insert the power plug into the hole completely.Do not add the following items.(Otherwise, the cooker may boil over or you may get burned.)• Beans, noodles, baking soda, roux such as curry, stew, etc., alarge amount of oil, and milk or other foods that are likely to get frothy that easily bubble.• Green leaves, plastic wrap, aluminum foil, cooking sheet, scum removing sheets and other items that easily oat.Indicates the forbidden operation.Indicates the information which should be followed strictly. Safety WarningForbidden Do not disassemble, repair, x, or modify the product (unless indicated in the operation manual). Do not pull or insert the electric plug and the magnetic plug with wet hands.Do not touch the product, cable, or electric plug with wet hands.Do not operate the product if the cable or electric plug is damage, or the electric plug is inserted improperly.Do not modify or repair the cable and electric plug or use other cables which are not included with the product (except the ground wire).Do not bend, break, twist, or pull the cable while the product is operating.Do not place the product or other objects on the cable or pinch the electric plug or the cable.Do not place the electric plug or cable in the place with high temperature, ooded water, and high humidity or touch it with sharp-edge object.Do not connect the product to the power source which is not speci ed in the operation manual. Do not expose the product to water.Do not use the adaptor plug in order to t in the power outlet.Do not use the power outlet together with other electric appliances.Safety CautionInsert the electric plug into the power outlet as far as the base of the electric plug. T o unplug, holdthe body of the electric plug and pull it o .Wipe dust or moisture at the electric plug’s pins thoroughly before inserting it into the power outlet.Pull the electric plug out of the power outlet when the product is not in use.Pull the electric plug out of the power outlet before maintaining or cleaning the product. Caution for Safety InstallationDo not bring any ammable object, hazardous object, chemicals, or ammable gas near or in theproduct.Do not install the product near the naked ame, wet area, or hot and high humidity area.Do not install the product in the high electromagnetic area.Do not install the product in the area within a child’s reach.Do not install the product on the slant or insecure oor.Connect the ground wire at the speci ed position on the product.Caution for Safety OperationRead the operation manual carefully and thoroughly before using the product.Always inspect that the product is in a good operating condition before using by following therecommendation in the instruction manual.Remove all packing materials.Do not allow children to use the product alone.Do not place any object on the product or cover the product while in use (unless indicated in theoperation manual).Do not touch any hot or cold parts of the product.Do not use “Max” water level scale for cook rice.It may cause burn injury.Important Document on Safety PrecautionInner Lid (detachable)Inner Lid PackingScoop Holder HookOuter LidHandleHeating Plate Warning LabelPlug insertion hole Steam Vent Temperature Sensor Operation PanelHook ButtonInner PotMain Body AccessoriesMeasuring Cup (Approx. 180 ml.) Scoop holder Insert it in the hook on the cooker’s side.Scoop Food SteamerPower cordPower plug[main body side]CordPower plug[power supply side]Control PanelRice Cooker - Cooking TimeDisplay Panel Cancel Button Mixed Rice Button Timer Button Cooking Button Water Level Scale Type 1.0 L Type 1.8 LAmount of Rice (Cup)Cooking Time (Minutes)Amount of Rice (Cup)Cooking Time(Minutes)White Rice COOK White Rice 1-5.538-512-1042-54White Rice (Rapid Cook)COOK(Press twice)White Rice 1-5.532-452-1034-52Mixed Rice MIXED RICE Mixed Rice 1-5.562-732-1065-79Glutinous Rice COOK Glutinous Rice 1-337-462-639-49Congee CONGEE Congee 0.5-158-680.5-1.559-72(MODEL : RC-10NMF, RC-18NMF, RC-10NMFI, RC-18NMFI, RC-10NMFE, RC-18NMFE, RC-10NMFEIS,RC-18NMFEIS)Hr. Button Function IndicatorFunction IndicatorCongee ButtonMenu ButtonMin. ButtonCook / Keep Warm ButtonHow to install Earth lead wire (Model RC-10NMF, RC-18NMF, RC-10NMFE, RC-18NMFE, RC-10MM, RC-18MM, RC-10MME, RC-18MME)1. Remove Screw. Spring washer and Flat washer on Earth connecting plate.Earth connecting plateScrewScrewSpring washerFlat washer2. S et Earth lead wire on Earth connecting plate then put Flat washer and Spring washer respectively on Earth lead wireEarth connecting plateScrew Earth lead wireRemarkIf want to start steaming function new one, push COOK button for COOK or RAPID COOK function again.Be careful the water level inside pan cooking before steaming process again.Steam StandHow to pour waterRice CookerWater level Minimum Maximum RC-10250 ml.(approximately 1.5 cup of Measuring cup).900 ml.(approximately 5 cup of Measuring cup).RC-18350 ml.(approximately 2 cup of Measuring cup).1000 ml.(approximately 6 cup of Measuring cup).How to useCan use function COOK or RAPID cook for steaming.Pan CookingSteam StandWaterSteam Stand1Measure the rice with the measuring cup provided.•2 Quickly rinse the rice until the water becomes clear.1 water and rinse the rice, then pour out the waterimmediately.2 Scrub and rinse the rice repeatedly with water untilthe water becomes reasonably clear.3 Fill in or pour out water according to the water level scale of the cooking means you want.•out w• Fill in or pour out water according to the cookingmeans and the cups of the rice. And adjust theamount of water according to the type of the riceand your personal taste.4 Place the inner pot inside the body and close the outer lid.• Please wipe away the water drops and dirton the outer of the inner pot, the temperaturesensor, the cooking heating plate and theinner lid.• In order to make the inner pot close contactthe cooking heating plate, please turn theinner pot twice or three times in the directionsas shown by the arrows.• Make sure that the steam vent works properly.5 Fit the power plug into the socket.•plug into the socket.6 Make sure that the time on the display window was set precisely with the present time.IncorrectCorrect P r e pa r a t i on♦ The rice can be rinsed in the inner pot.♦ Example: Cooking 3 cups of rice.Preparation121 Hold down the Hrs button for more than 1 second.2 Press the Hrs button to adjust the Hour readings and press the Min button to adjust the Minute readings.• For Min button, if the button is held down and not released the setting pace will be 10 minutes.3 Press the CANCEL button.Clock adjustment is complete and the time counts.Example: To adjust the current time to 8:31 a.m.Pr o ce du re NOTE • The lithium battery installed inside the cooker will last for 4-5 years at the room temperature with the power plug connected. With the lithium battery, the current time can still display and the set time is still stored in the means that the battery expired.Even if the current time and the set time disappear, the cooker can cook rice as usual.Never drop the lithium battery into water or charge, disassemble or heat it.• The clock cannot be set during COOK, WARM and TIMER mode.• The clock cannot be set if the power plugs (at the power supply side and the body side) are not fully inserted.•• Time display is 24 Hrs.• In the operation of the Hrs button, at 0:00 the sound “beep luo luo” will be heard and at 12:00 the sound “beep luo luo” will be heard twice. In the operation of the Min button, the sound “beep luo luo” will be heard at 00 minute and the long “beepee” sound will be heard at 10, 20, 30, 40 and 50 minutes.How to adjust the clock3122Press the COOK button once.• For rapid cook, please press thisbutton twice.• In rapid cook, the rapid Indicator will light up.cooking• In rapid cook, the rapid Indicator will ash.• In rapid cook, the time will show 8 minutes ahead.SteamingWarmingThe COOK indicator lights up.The COOK indicator is ashing.After “Beep” sounds for 5 times The KEEP WARM indicator will light up.Current time The time (in minutes)remains for cooking.The time that has elapsed forwarming. ( : hour)How to cook (White Rice, Mixed Rice, Quick Cook and Congee)C o okingDo n eNOTEŶ For rapid cook only.• Rapid cook refers to the cooking method that rst shortens the cooking time. Generally, the rice cooked by this method tastes rmer and has a little water on its surface.• Use this method when the amount of rice is less than 4 cups for Type 1.0L and 6 cups for Type 1.8L.Pr o ce d u r e1Select (Fermentation) press button 2 Set time cooking by press button 3 Start (Cooking) press button Example : Ferment cookingP r o c e d u re •Select cooking menu by MENU button.• • During press button MENU, screen displays menu ( ) running change will occur.Co okingDo ne(Sample time setting 60 minutes)• If the Min button is held down and notreleased the time setting will be added10 minutes.• The COOK indicator light up.• The remaining time for cooking show59 minutes.How to cook (Fermentation, Baking/Soup, Boiling Egg and Warming Soup)Screen displays cookingPress button to warmingK e epwa rmfuncti o nHow to keep warmCooked rice will run into warming automatically.• The keep warm and reheat indicator will light up.• Screen displays running time.( : hour)Press button to cancel keep warm function.•Stop warmingS to pNOTE • During warming or reheat function press hour button, screen will display present time.• Do not warm and leave scoop in pot. Because it causes smell or color changeable.•30 hours.• Use warming menu for rice which is less than half of pot. If rice is over, heat is not unsuitable.• Rice is extremely hard, pouring water for 1-2 teaspoon can solve this problem. Rice will be soft.• Do not heat cold rice because heat is not unsuitable.Start warmingAfter the rst fermentation is completed open the lid and swollen the dough about 2 minutes.Take out the dough, round it again and put inthe inner pot with a few vegetable oil.Push the MENU button to select Fermentation cooking (The second fermentation) set the cooking time 30 minutes and push COOK button.After the second fermentation is completed open the lid and ferment condition testing by nger test.After the dough is mixed put Butter Cake our mixed about 200 ml in the inner pot with a few vegetablePush the MENU button to select Baking/Soup set the cooking time 40 minutes and push COOK button.When baking nished, take Butter Cake out witha ladle.When boiling nished, take egg out immediately with a ladle and remove the husk politely. Put it in the cup and pour with mixed sauce.NRNL10000000013 REV.0Part names and Functions (Model RC-10NMFI, RC-18NMFI, RC-10NMFIAU, RC-18NMFIAU, RC-10NMFEIS, RC-18NMFEIS)Outer LidInner LidInner Lid PackingHandleScoop Holder HookHeating PlateWarning LabelTemperature SensorSteam Vent Control PanelPlug insertion holeHook ButtonInner PotRegarding the Power cord.If the supply cord is damaged, it must be replaced by a special cord or assembly available from the manufacturer or its service agent.Power cordPower plug[main body side]CordPower plug[power supply side]。
东芝复印机部分维修调整代码及其使用方法1、更换载体同时按05, 打开电源开关, 面板显示AJ, 键入调整模式N按复印键显示当前值,进行(自动)调整,键入修改值,按插入键将修改值存入内存,按3+4 复印--0 TD传感器自动调整--键入0,按复印键鼓和显影器工作大约2分钟面板显示数开始自动改变短时间后显示数停止改变。
显示值=24(2.4±0.5v)[否则用无级变倍键更改到24(2.4±0.5v)],按插入键存入内存,按09退出退出自诊断05 模式: 键入"09"东芝复印机维修代码大全(仅供参考)同时按0和1键打开电源面板指示灯全部点亮,按清除/停止键解除同时按0和2键打开电源机器进入老化方式,显示AG,同时按09键解除同时按0 3或04键打开电源机器进入输入/输出检查方式,显示CH,输入不同的代码可以启动不同的部件,例如03-33暴光灯检查同时按0和6键打开电源强制启动《定影器不加热》同时按0和7键打开电源自动进稿器老化方式,显示AG,按09退出按03/04键同时打开电源,进入输入/输出检查状态显示CH,退出同时按09键1主电机ON 11 OFF2供纸辊离合器ON 12 OFF3定位辊离合器ON 13 OFF6调色剂电机ON 16 OFF7冷却风扇ON 17 OFF10 总计数器按P键20扫描电机按P键移动50% 再按P键200%21 镜头电机按P键移动50%在按P键200%22 反光镜电机按P键移动50%再按P键200%31转印输出按P键ON再按P键OFF32 分离输出按P键ON再按P键OFF33嚗光灯输出按P键ON再按P键OFF34 预转印偏压按P键ON再按P键OFF40 上纸盒电机按P键ON再按P键OFF41 上纸盒供纸离合器按P键ON再按P键OFF43 下纸盒电机按P键ON再按P键OFF44 下纸盒供纸离合器按P键ON再按P键OFF以上是检测代码,一般只使用03/04 05 08,老化方式机器空运转。
首 页 关于公司 条码产品 自主开发 应用方案 下载中心条码产品 条码扫描器美国intermec 美国Symbol 意大利Datalogic 台湾Gyoung美国HHP(honeywell) 日本Opticon 美国Microscan 美国Metrologic 台湾IMC 美国PSC 新大陆nls 日本东研tohken 条码打印机 美国Intermec 日本Toshiba-Tec 美国斑马Zebra 日本佐藤Sato 日本Ring 美国Datamax台湾Godex台湾TSC日本西铁城Citizen日本新盛shinsei 德国CAB美国科立得Cognitive 数据采集终端 美国intermec日本Toshiba条码打印机 > Toshiba B-SX4T系列条码打印机高速 :□ 32位RISC 中央处理器(SH-3 88 MHz),8/16MB DRAM存储 型的程序和数据。
易用 :□ 打印头、滚筒、送纸机制、传感器得到大幅改进,拥有全新的的清理和调整变得非常容易。
□ 随机附带的光盘包含各种语言的用户手册,技术手册(程序软件(试用版)和Windows驱动器,便于使用。
高品质:□ 东芝独特的悬压式打印头— B-SX4T(203dpi)&B-SX4T(306dpi 使用东芝全新的双马达控制技术,打印效果将变得十分理想。
的作业。
同时,东芝打印头延长了打印头的使用寿命(100km) 高可靠性:□ B-SX4T&B-SX5T连着重载钢质外壳和丰富的内部机制,使它能都处在竞争优势。
高兼容性: □ 软件和配件兼容东芝泰格以前生产的机器—— TEC 品牌的 增强的功能:Internet, Email, FTP, XML 和 BCI 增强的功能提供许多优点□ 远程打印□ 由于采用了标准化的XML数据交换模式,大大降低了软件集成东芝Toshiba B-SX4T 系列条码打印机具有创新性和可靠性闻名于世。
工业风扇简易操作指南1 安全注意事项1.1 安全标记的说明:危险:错误使用时,可能导致火灾、人身伤害甚至死亡。
注意:错误使用时,可能会导致人身中等程度的伤害或轻伤,以及发生设备损坏。
1.2 用途本系列变频器用于控制三相电动机的变速运行,1.3 到货检验若发现变频器受损或缺少零部件则不可安装,否则可能发生事故。
1.4 接线必须由合格的电气工程人员进行接线工作,否则有触电或损坏变频器的危险。
1.5 接线1.6 运行方可通电,不要采用接通或断开供电电源的方式来起、停变频器,否则可能引起变频器损坏。
1.7 维护、检查在通电状态,请勿触摸变频器的端子,否则有触电的危险。
大规模集成电路,请勿用手触摸,以防静电损坏线路板。
2 产品外形和安装尺寸(单位:mm )图2-1 产品外形和安装尺寸示意图、W ,否则将造成变频器损坏。
绝对禁止在变频器的输出端连接电容或相位超前的3 主回路端子配置图3-1 单相端子接线图图3-2 三相端子接线图4 基本功能参数简表:“○”运行中参数可更改;“×”运行中参数不可更改;“*”实际检测值或固定参数,不可更改;“-”厂家设定,用户不可R 、R 、输入“T ”空接7产品保修卡9保修协议1、保修期为十八个月,保修期内按照使用手册正常使用情况下,产品发生故障或损坏,我公司负责免费维修。
2、保修期起始时间为产品出厂日期,机器编码是判断保修期的唯一依据。
3、保修期内,因以下原因导致损坏,将收取一定的维修费用:⏹因错误使用、擅自修理或改造而导致的产品损坏。
⏹由于火灾、水灾、地震、雷电、电压异常、其它天灾及二次灾害等造成的产品损坏。
⏹购买后由于人为摔落及运输导致的产品损坏。
⏹因产品以外的障碍(如外部设备因素)而导致的产品故障及损坏。
⏹由于气体腐蚀、盐蚀、金属粉尘等超出使用手册要求的恶劣环境应用而导致的产品故障及损坏。
4、产品发生故障或损坏时,请您正确的填写《产品保修卡》中的各项内容。
5、服务费按实际费用计算,如另有合同,以合同优先的原则处理。
词汇表本词汇表中的术语覆盖本手册所讨论的内容。
其中包括术语的别名供您参考。
缩写AACS:高级内容访问系统AC:交流电ACPI:高级配置与电源接口AMT:Intel 主动管理技术ASCII:美国信息交换标准代码BIOS:基本输入/输出系统bps:比特/ 秒CD:压缩盘CD-ROM:只读存储光盘CD-RW:可重写光盘CMOS:互补金属氧化物半导体CPU:中央处理器CRT:阴极射线管DC:直流电DDC:显示数据通道DDR:双倍数据速率DIMM:双列直插内存模块DVD:多功能数码光盘DVD-R:可刻录多功能数码光盘DVD-RAM:多功能数码光盘—随机存取存储器DVD-R (Dual Layer):双层可刻录多功能数码光盘DVD-ROM:多功能数码光盘—只读存储器DVD-RW:多功能数码光盘—可重写DVD+R(Double Layer):双层可刻录多功能数码光盘FDD:软驱FIR:快速红外GB:千兆字节HDD:硬驱HDCP:高带宽数码内容保护HDMI:高清晰多媒体接口HDMI-CEC:高清晰多媒体接口消费电子控制IDE:电子集成驱动器IEEE:电气电子工程师协会IMSM:Intel 矩阵存储管理器I/O:输入/ 输出IRQ:中断请求KB:千字节LAN:局域网LCD:液晶显示器LED:发光二极管MB:兆字节MMC:多媒体卡OCR:光学字符识别(阅读器)PC:个人电脑PCI:外围组件互连RAM:随机访问存储器RGB:红、绿和蓝ROM:只读存储器RTC:实时时钟S/P DIF:索尼和飞利浦数字接口格式SDRAM:同步动态随机存储器SLI:可扩充连接接口SO-DIMM:小型双重内嵌式内存模块SSD:固态盘TFT:薄膜晶体管USB:通用串行总线UXGA:超扩展图形阵列VGA:视频图象阵列WAN:广域网WSXGA:宽屏超级扩展图形阵列WSXGA+:宽屏超级扩展图形阵列+WUXGA:宽屏极速扩展图形阵列WXGA:宽屏扩展图形阵列WXGA+:宽屏扩展图形阵列+XGA:扩展图形阵列Aadaptor (适配器):一种在两个装置之间提供兼容连接的装置。
WARNINGWARNING: This indicates an important item which incorrect operation may lead to injury or death.Never attempt to touch laundry in the spin basket until the motion of the basketstops completely.Use particular caution when children are present.Never operate washing machine by young children and infirm person.This washing machine is not intended for use by persons (including children) with reduced physical, sensory or mentalcapabilities, or lack of experience and knowledge unless they have been adequately supervised by a responsibleperson to ensure that they can use the washing machine safety.Children should be supervised to ensure that they do not play with the washing machine.Never allow children to look into the basket or play around the washing machine.Do not place the stand or box near the washing machine.Children may fall into the basket and get injured or drowned.Never disassemble or modify the machine.It may cause fire or electrical shock or malfunctions that lead to injuries.Consult the store you bought the machine.Use proper power source indicated in the rating label of the machine.It may cause fire or electrical shock.Failure to use a proper power source may result in the electrical outlet becoming excessively hot, leading to fire.Unplug the power cord from the electrical outlet before attempting to cleaning or maintenance thewashing machine.Do not insert or pull the power plug with wet hands.It may cause electrical shock or malfunctions that lead to injuries.Never use damaged electrical cords or plugs or loose socket.It may cause electrical shock or malfunctions that lead to injuries or fire.Do not damage the power cord.Do not attempt to damage, cut, or modify the power cord, or subject it to excessive bending, pulling, twisting, or binding. Also, do not yank the metal portion, place heavy objects on the power cord, or pinch the power cord. Doing so may damage the power cord, resulting in fireor electrical shock.If the power cord is damaged, it must be replaced by the manufacturer or its service agent or a simillarly qualifiedperson in order to avoid a hazard.Do not install in a bathroom or in exposed area to the rain.Do not allow water to come into direct contact with the various parts of the outer body.Doing so may result in electrical shock or short circuit.Do not place flammable materials in the basket.Do not put any kerosene, gasoline, benzene, thinners, alcohol, other flammable materials, or the laundry soaked with such materialsin the basket.It can cause explosion or fire.Wipe away off the dust or grime which attached to surface on pin of the plug.The dust or grime may cause fire.Do not place a fire source such as a candle or cigarette near the washing machine.It may cause fire.Make sure that water drains properly.Using the washing machine with faulty drainage may cause water to back up within the machine, leading to electrical shock or fire.DO NOT TOUCH OUT OF CHILD DO NOT MODIFYELECTRICSHOCK UNPLUG POWERDO NOTDISASSEMBLE AND REPAIR DO NOT WET HAND DO NOT USE WET PLACE DO NOT SPLASH WATERAVOID INFLAMMABLE AVOID INFLAMMABLEREMOVE DUST INSTALLCAREFULLY x x x x x x x x x x x x x x x x x ELECTRIC SHOCKDoing so may result in electrical shock or short circuit.Laundry in the basket may bacame wrapped around the hand, even when the basket is only moving slowly.x Do not install the washing machine in highly humid place.xPlease stop operating the washing machine immediately and contact to service dealer for repairs.is opened.During the spin extracting, if the spin basket does not stop rotation completely within 15 seconds after the lid Softener/Detergent case CAUTION: This indicates an important item which incorrect operation may lead to injury or damages to the product.Do not pull the power cord when unplug the appliance.Hold the plug body to unplug.It may cause electrical shock or malfunctions that lead to injuries.Do not connect to the hot water supply.Do not use water with temperatures over 50°C.Water that is too hot may cause malfunctions and deformation of the machine, which may result in electrical shock.Do not climb or place heavy objects on the washing machine.Doing so may result in injury due to bending or breakage.Pull out the plug if you do not plan to use the machine for a long time.Failure to do so may result in electrical shock or shorts due to deterioration of the insulation.Do not place the hands or other objects under the washing machine while in operation.Moving parts may cause injury.Before use, make sure the faucet is open, and the connection with water inlet hose is not loose orleakage water.Looseness of hose nut, hose connections, water inlet valve or other areas may cause water leakage or other damage.The bottom ventilation of washing machine must not be obstructed by carpet when the washingmachine is installed on a carpet floor.x x x x x x x x DANGER HAND WATER LEAKAGE INSTALLCAREFULLY UNPLUG POWER CAUTIONDO NOT PULL DO NOT USE DO NOT WASH DO NOT CLIMB STOP x x It will cause abnormal vibration and damage while in spin extracting.Do not wash or spin extraction the mats, waterproof suites such as raincoats, fishing suite (jackets and pants)ski suite, sleeping bags etc.OPERATEDCassette Filter12Plugthe lid will be locked auto -matically Flowing water starts while This section describes the procedure of the “REGULAR” course with “CONDENSED BUBBLE”. Fully automatic washing machine will operated to the following.Put the laundry in the basket and start the machine. The sensor will weigh clothes and begin flowing water.The pulsator begins torevolve 6 seconds afterstartup under none-watersituation, and clothes areweighed.1Detergent amount is displayed. Put in dertergent to "D etergent / Bleach dispenser" , and softener to softener case.Close the lid.Reference value of detergent2amount.3When a chemical fiber, blending fiber or spreadsheet is washed, the water level may be a little bit low.Adjust the water level by button.•After the start of operation I f the lid is openedan error code will be displayed.L How to remove Hold the upper side of the cassette filter, and push down and pull it at the same time.Clean the lint trap at the end of operation.Cassette filterWhen it is difficult to remove the filter case due to lint attached, wet it with water to soften the lint.L How to set inHold the filter case with its top side up. Put the lower side of the filter case in the filter stand, and then push it until a“click” sound is heard.Filter slot Cassette filter Filter slotCassette filterFilter cover Filter coverFilter case Filter coverFilter caseFilter valveConcavity Filter coverConvexityw Insert the groove of the filter valve to the click at thecenter of the filter cover.ClickGrooveL How to remove Turn over the filter, and then slide the filter case in the arrow direction of the following figure (q ) to remove it (w ).Clean inside the filter cover and the filter case.Filter case L When the filter valve inside the filter cover is loosenedIf the filter valve is loosened, lint may not be collected.q Set the filter valve to the filter case while aligning itsconcavity and convexity to those of the filter case.CASSETTE FILTERL How to set inq Set the filter case to the filter cover as follows.w Press down the filter cover case until a “click” sound is heard.。
东芝条码打印机B-EV4T系列北京鑫泰维科技发展有限公司www.bjtw.com.cn特别要警告的内容在符号中左边的符号表示一般的提醒注意禁止接入任何与规定交流电压不符的电源禁止禁止禁止禁止拔掉电源插头拔掉电源插头如果对此设备作不恰当的与提示相违背的操作,预防措施注意禁止拆卸机箱与地线相连目录页码1. 产品概述...................................................................................................................................1-1 1.1 介绍..................................................................................................................................1-1 1.2 特点..................................................................................................................................1-1 1.3 拆箱..................................................................................................................................1-1 1.4 附件..................................................................................................................................1-1 1.5 外观..................................................................................................................................1-3尺寸..............................................................................................................................1-31.5.1前视图..........................................................................................................................1-31.5.2后视图...........................................................................................................................1-31.5.3内部结构.......................................................................................................................1-41.5.4按钮和指示灯................................................................................................................1-51.5.52. 打印机安装.................................................................................................................................2-1 2.1 注意事项...........................................................................................................................2-1 2.2 操作之前的程序................................................................................................................2-2 2.3 开启/关闭打印机...............................................................................................................2-2开启打印机....................................................................................................................2-22.3.1关闭打印机....................................................................................................................2-32.3.22.4 打印机上的电缆连接.........................................................................................................2-4 2.5 连接电流适配器和电源线..................................................................................................2-5 2.6 打开/关闭顶盖...................................................................................................................2-6 2.7 加载打印介质....................................................................................................................2-7 2.8 加载碳带.........................................................................................................................2-14 2.9 介质探测器校准,自动打印测试和倾印模式等功能.........................................................2-17介质探测器校准..........................................................................................................2-172.9.1自动打印测试和倾印模式..........................................................................................2-182.9.2如何使用SD 卡................................................................................................................2-202.103. 维护 ..........................................................................................................................................3-1 3.1 清洁..................................................................................................................................3-1打印头...........................................................................................................................3-13.1.1滚筒/探测器...................................................................................................................3-23.1.2机盖..............................................................................................................................3-23.1.3介质箱...........................................................................................................................3-23.1.4剥离感应器/剥离滚轴(选项)......................................................................................3-33.1.53.2 介质和碳带的保存/使用.....................................................................................................3-34. 故障检修....................................................................................................................................4-14.1 故障检修指南....................................................................................................................4-1 4.2 状态提示灯........................................................................................................................4-2 4.3 去除堵塞的打印介质.........................................................................................................4-3 附录1 规格.....................................................................................................................................A1-1 A1.1 打印机............................................................................................................................A1-1 选购件............................................................................................................................A1-3 A1.2A1.3打印介质........................................................................................................................A1-3 打印介质的类型........................................................................................................A1-3 A1.3.1穿透式探测器的探测区域..........................................................................................A1-4 A1.3.2反射式探测器的探测区域..........................................................................................A1-5 A1.3.3有效打印区域............................................................................................................A1-5 A1.3.4碳带...............................................................................................................................A1-6 A1.4附录2 接口.....................................................................................................................................A2-1 术语表1. 产品概要1.1 介绍1.2 特点1.3 拆箱1.4 附件感谢您选择东芝B-EV4D 系列条码打印机。