京华DVR-898录音笔说明书
- 格式:pps
- 大小:2.28 MB
- 文档页数:6

总览Structure:1、开关2、摄像头3、麦克风4、批示灯5、复位孔6、USB7、笔头1, button 2, camera, 3 microphone 4, indicator light5, reset 6, USB 7, pen head产品简介:1.世界上最小旳微型DVR,隐藏在钢笔里面!带有录像录声音旳微型DVR,是世界上第一台钢笔型带录像录声音旳微型DVR2.高敏捷度旳麦克风,在15平方米之内都可清晰旳把声音录下来;高清晰旳摄像效果,为公安部门、法庭取证等提供有力旳证据。
Brief Introduction:1. Hidden inside a pen, it is the world's smallest micro-DVR as well as the world's first pen-based video recorder with voice.2. It features with high sensitivity of the microphone: within 15 square meters, the clear voice can be recorded. With high-definition camera, it is helpful to provide strong evidence for the public security departments and court.3.精美旳外观,流畅旳圆珠笔书写功能,可替代旳原则笔芯,耐用环保。
4.合用于任何带USB接口旳计算机及其他电子设备。
5.USB2.0原则接口,无需驱动器,无需外接电源。
6.支持WINDOWS98/98SE/ME//XP/MAS OS/ LINUX并自动辨认操作系统,安装相应旳驱动程序,无需手动安装(WINDOWS98除外)。
7.录象格式为CIF 旳352*288旳AVI格式8.数据读写速度快:900K/700K字节/秒(与主机速度有关)3. Exquisite looking, smooth ball-point pen to write. The replacable cartridge isdurable and environment-friendly.4. Apply to any computer with USB and other electronic equipment.5. USB2.0 standard interface. No need drive or external power supply.6. Support WINDOWS 98/98SE/ME//XP/MAS OS / LINUX operating systems. Itmay automatic identify the system to install the driver. (Excpet WINDOWS 98 ).7. 352 x288 CIF file in A VI format8. High reading & writing speed: 900 K/700K bytes / sec (depends on theconnected computer)Applications:A. Police to take recordB. Lawyer to take evidenceC. Reporter to record in the interviewD. stealth monitorWarning: It is forbidden to use for illegal purpose.录像笔应用场合:A.公安执法过程记录B.律师取证C.记者特殊场合采访D.隐形监控录像注:严禁用于(偷拍等)非法目旳。

快捷操作指南1、开关机①开机:将电源开关由“关”位置往上推动到“开”位置。
②关机:将电源开关由“开”位置往下推动到“关”位置。
2、录像/录音:①开始录像:在待机状态下,将红色的录像/录音开关由“停止”的位置往上推动到“录像/录音”位置时开始录像。
②开始录音:将红色的录像/录音开关由“停止”的位置往上推动到“录像/录音”位置时开始录音。
(注:录音/录像在菜单功能选项里选择)③保存录像/录音:在录像或录音的过程中,将红色的录像/录音开关由“录像/录音”的位置往下推动到“停止”位置时停止并保存录像或录音文件。
3、播放文件: 在待机状态下,选择相应录像或录音文件,按“”键进行播放。
深圳市京华数码科技有限公司简介深圳市京华数码科技有限公司成立于2000年2月,是深圳市京华电子股份有限公司投资兴办的一家从事高新技术产品研究、开发和进行生产经营的高科技企业。
秉系京华公司“重质量、守信誉、讲实干、多贡献”的企业精神,凭藉京华电子股份有限公司强大的资金、管理、技术、销售渠道等多种支持,京华数码科技有限公司紧跟国际先进技术,专业从事高科技产品,主要开发系列包括:数码录音笔、GPS、MP3、MP4数码播放机、笔记本电脑、MID平板电脑。
公司现有一批现代化的高素质管理人员,并拥有一支多年从事计算机、通讯等领域高科技产品研发的高素质技术队伍,从设计、开发到生产、品质出货等,都有严格的控制。
对产品质量一丝不苟。
技术负责人具有国际先进技术水准,具备不断创新发展现有产品技术的能力。
确保公司的产品具有与世界同步的高技术水准及先进性。
公司现在开发生产的:数码录音笔、GPS、MP3、MP4数码播放机、笔记本电脑、MID平板电脑与国外同类产品相比,以其技术成熟、质量稳定且具有成本优势。
具有相当大的市场,发展潜力巨大,与国外产品竞争完全有优势。
公司生产基地位于深圳市平湖良安田京华工业园,占地15万平方米,拥有20万平方米的生产厂房。
拥有3000多名训练有素的员工及强有力的管理队伍,完善的品质管理,已通过ISO9001和ISO14001认证。

数码录音笔说明书DVR-116功能特点z一键录音z三种录音模式LP为长时间录音:ACT格式SP为优质声控录音:WAV格式HP为高保真录音:MP3格式z录音监听、助听功能z USB端口即插即用,无须USB连接线 z电话录音与外接麦克风录音功能z录音自动分段z录音时间设置功能z MP3播放功能z低电提示功能z内置扬声器播放z U盘功能z A-B复读功能z内置锂电注意事项●长时间不使用机器时,将电源开关拨至OFF位置。
●使用过程中,电量显示不足时,请及时充电。
●使用前请详细阅读说明书,注意防潮防高温,勿靠近火源。
●避免摔落或强烈碰撞本机,请勿过分用力按压液晶显示屏,否则可能导致液晶屏损坏或显示异常。
●本机出现故障,请与本公司或经销商联系,切勿自行拆卸更换内部零件。
●请经常对录音文件进行备份,因维修或其它原因造成信息丢失,本公司概不负责。
●未经他人允许的录音行为所引起的纠纷,与本产品无关,本公司概不负责。
●本公司保留改进产品的权利,规格及设计如有变动,恕不另行通知。
目录外观图及各部分名称 ┄┄┄┄┄┄┄┄┄┄┄┄┄┄ 1功能操作 ┄┄┄┄┄┄┄┄┄┄┄┄┄┄┄┄┄┄┄ 2开机/关机 ┄┄┄┄┄┄┄┄┄┄┄┄┄┄┄┄┄┄┄ 2录音/停止 ┄┄┄┄┄┄┄┄┄┄┄┄┄┄┄┄┄--- 3录音播放 ┄┄┄┄┄┄┄┄┄┄┄┄┄┄┄┄┄┄┄ 6录音时间设置 ┄┄┄┄┄┄┄┄┄┄┄┄┄┄┄┄┄ 7MP3音乐 ┄┄┄┄┄┄┄┄┄┄┄┄┄┄┄┄┄┄┄- 8A-B复读 ┄┄┄┄┄┄┄┄┄┄┄┄┄┄┄┄┄┄┄- 9删除文件 ┄┄┄┄┄┄┄┄┄┄┄┄┄┄┄┄┄┄┄ 10USB电脑连接 ┄┄┄┄┄┄┄┄┄┄┄┄┄┄┄┄┄- 10充电 ┄┄┄┄┄┄┄┄┄┄┄┄┄┄┄┄┄┄┄┄┄ 11安装应用程序 ┄┄┄┄┄┄┄┄┄┄┄┄┄┄┄┄┄ 12 ACT格式转换┄┄┄┄┄┄┄┄┄┄┄┄┄┄┄┄┄┄12疑难解答 ┄┄┄┄┄┄┄┄┄┄┄┄┄┄┄┄┄┄┄14规格参数 ┄┄┄┄┄┄┄┄┄┄┄┄┄┄┄┄┄┄┄ 15外观图及各部分名称(1)播放/开关机/暂停键()(2)菜单键/删除键(M )(3)快退键() (4)快进键() (5)录音键(REC) (6)音量加键(+)(7)音量减键(-) (8)电源开关 (ON/OFF)(9)耳机孔() (10)信号输入孔()(11)显示屏 (12)USB(13)指示灯 (14)内置麦克风功能操作开机/关机●开机:在断电状态下将ON/OFF电源开关键拨至“ON”位置,等待约3秒显示屏点亮,录音笔开机。

摄像笔使用说明书◆外观简介◆操作说明1.开机/关机:长按“摄像/播放”键约3秒,红灯长亮摄像笔开机进入待机状态。
再次长按“摄像/播放”键红灯熄灭摄像笔关机。
2.摄像/拍照/录音:将“模式”键拔至下档,开机后即进入摄像/拍照/录音模式待机状态。
A.摄像:在摄像/拍照/录音模式待机状态下短按“摄像/播放”键,开始摄像此时蓝灯闪烁;再次短按“摄像/播放”键则停止并保存摄像文件,此时蓝灯熄灭红灯恢复长亮。
B.拍照:在摄像/拍照/录音模式待机状态下短按“拍照”键,开始拍照此时蓝灯闪一下,并自动保存照片文件,按一次拍一张。
C.录音:在摄像/拍照/录音模式待机状态下短按“录音”键,约3秒钟后开始录音此时蓝灯闪烁,再次短按“录音”键则停止并保存录音文件,此时蓝灯熄灭红灯恢复长亮。
注意:请在有充足光线的环境下,确保摄像头没有被遮挡,保持摄像笔机身的水平与稳定,并与被摄景物保持50cm以上的距离,以得到方向正确、色彩自然、图像清晰、画面稳定的影像,为了保证录音效果,请勿遮挡住麦克风部位。
在摄像或录音时,不要操作其它无关的按键。
若存储的空间不足时则会自动保存文件并退出到待机状态。
为了保证拍摄文件的大小和安全,系统将每隔90分钟自动保存一次文件,并继续摄像。
3.播放录音、音乐:将“模式”键拔至上档,开机后即进入播放模式待机状态,短按“摄像/播放”键开始播放录音、音乐文件,此时蓝灯闪烁,再次短按“摄像/播放”键为暂停,此时蓝灯长亮。
长按则退出播放模式返回到待机模式,此时蓝灯熄灭红灯恢复长亮。
在播放录音/音乐时,短按“拍照”键为音量加,长按为上一曲,短按“录音”键为音量减,长按为下一曲。
4.连接电脑:将USB线一端连接在摄像笔USB端口,另一端插入电脑USB端口,机器随即进入USB模式,此时,计算机中将会出现可移动磁盘标识,录像文件保存目录为:*:\ VIDEO 中,拍照文件保存目录为:*:\ IMAGE中,录音文件保存目录为:*:\ AUDIO\RECORD中,音乐文件保存目录为:*:\ AUDIO中,需要断开连接时,请用鼠标左键点击右下角任务栏里面的可移动磁盘图标,再点击安全删除,然后即可拔出摄像笔。
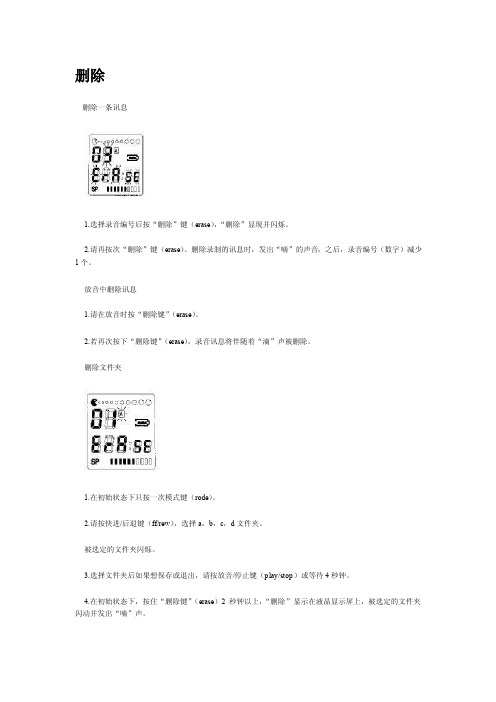
删除删除一条讯息1.选择录音编号后按“删除”键(erase),“删除”显现并闪烁。
2.请再按次“删除”键(erase)。
删除录制的讯息时,发出“嘀”的声音,之后,录音编号(数字)减少1个。
放音中删除讯息1.请在放音时按“删除键”(erase)。
2.若再次按下“删除键”(erase),录音讯息将伴随着“滴”声被删除。
删除文件夹1.在初始状态下只按一次模式键(rode)。
2.请按快进/后退键(ff/rew),选择a,b,c,d文件夹。
被选定的文件夹闪烁。
3.选择文件夹后如果想保存或退出,请按放音/停止键(play/stop)或等待4秒钟。
4.在初始状态下,按住“删除键”(erase)2秒钟以上,“删除”显示在液晶显示屏上,被选定的文件夹闪动并发出“嘀”声。
5.请再次按下“删除键”(erase),这样一来,所选定的文件夹中的所有讯息将伴随着“嘀”声被删除。
全部删除1.请在初始状态下按住“删除键”(erase)2秒钟以上。
按快进/后退键(ff/rew)选择全部文件夹。
这样一来,a,b,c,d(704s:ab)所有文件夹闪烁。
1.文件选择顺序如下2.a-b-c—d-all (a,b,c和d)—a—b-c—d-all—a-b—3.a—b—a11(a,b):704s2.请再次按下“删除键”(erase),这样,所有录音讯息将伴随着“滴”声被删除。
录音时如掌握以下内容,将更加便利选择文件夹1.请按模式键,则当前文件夹闪烁。
2.按下快进/后退键,可以选择a,d,c,d文件夹。
被选定的文件夹闪烁。
3.选择文件夹后,如果想保存或退出,只需等待4秒钟或按放音/停止键简便录音1.请按录音/暂停键(rec/pause)2秒以上。
在放音(play)过程中也可以按下录音键(rec)进行录音。
确认可录音时间如果在录音过程中按下录音键(rec),将显示剩余可录音时间。
模式键(mode)说明如果按下模式键,会显示如下状态。
在录音过程中增加录音编号若在录音过程中按下快进健(ff),则录音编号会自当前编号起增加一个。
数码录音笔使用说明书■功能特点●一键录音,一键播放功能●声控录音●两种录音模式- 1 -页SP为高保真录音模式LP为长时间录音模式●靓丽背光,流线型外观设计。
●支持多种音频格式播放如:MP3、WMA、WAV等音乐格式。
●电话录音与外接麦克风功能●内置扬声器播放●免驱动U盘功能无需管理程序,可直接通过“我的电脑”中“可移动磁盘”进行文件操作,在WIN2000及以上系统中无需安装驱动程序。
■外型及按键显示屏1.菜单(MODE)2.显示屏(SCREEN)3. 选段(LAST)4.选段(NEXT)5.音量+(VOL+)6.音量-(VOL-)7.删除(DEL)8.录音(REC)9.电池(BATTERY)10开机/播放(PLAY)B接口(USB)- 2 -页12.耳机插孔(EAR)13.信号输入(SINGAL IN)14.锁定键(HOLD)15.喇叭(LOUDSPEAKER)■技术规格外形尺寸105mm*29mm*16mm重量32g显示屏段码液晶屏、LED背光连接电脑USB 2.0支持系统Windouw98/SE/ME/2K/XP,/Vista电源二节AAA(7号)碱性电池用耳机时播放时间10小时以上录音采样率8KHz录音格式WAV - 32K bpsACT - 8K bps录音时间128MB SP:8小时 LP:32小时256MB SP:17小时 LP:70小时512MB SP:36小时 LP:140小时1GB SP:71小时 LP:280小时2GB SP:142小时 LP:570小时MP3 WMAWAV 耳机最大输出(L)10mW+(R)10mW MP3比特率8K bps – 320K bps WMA、WAV比特率5K bps – 384K bps 频率响应20Hz至20KHz- 3 -页信噪比80dB音乐格式MP3、WMA、WAV内存128MB----2GB■注意事项:1.长时间进行录音或听音乐,电量显示不足时,请及时更换电池。
摄像笔使用说明书◆外观简介◆操作说明1.开机/关机:长按“摄像/播放”键约3秒,红灯长亮摄像笔开机进入待机状态。
再次长按“摄像/播放”键红灯熄灭摄像笔关机。
2.摄像/拍照/录音:开机后即进入待机状态。
A.摄像:在待机状态下将“模式”键拔至下档,短按“摄像/播放”键开始摄像,此时蓝灯闪烁;再次短按“摄像/播放”键则停止并保存摄像文件,此时蓝灯熄灭红灯恢复长亮。
移动侦测摄像:在待机状态下将“模式”键拔至上档,短按“摄像/播放”键开始摄像,此时蓝灯闪烁;再次短按“摄像/播放”键停止并保存摄像文件,此时蓝灯熄灭红灯恢复长亮。
摄像过程中若没有检测到物体移动,本机为了节省存储空间10秒后会自动降为每秒一帧的速度摄像,当有物体移动时会自动继续摄像。
B.拍照:在待机状态下将“模式”键拔至下档,短按“拍照”键开始拍照,此时蓝灯闪一下,并自动保存照片文件,按一次拍一张。
三连拍:在待机状态下将“模式”键拔至上档,短按“拍照”键开始拍照,此时蓝灯闪三下,并自动保存照片文件,按一次拍三张。
C.录音:在待机状态下将“模式”键拔至下档,短按“录音”键开始录音,此时蓝灯长亮,再次短按“录音”键则停止并保存录音文件,此时蓝灯熄灭红灯恢复长亮。
声控录音:在待机状态下将“模式”键拔至上档,短按“录音”键开始录音,此时蓝灯长亮,再次短按“录音”键则停止并保存录音文件,此时蓝灯熄灭红灯恢复长亮。
录音过程中若没有检测到声音或者声音过小,本机3秒后会自动暂停录音,当检测到声音后会自动继续录音。
注意:请在有充足光线的环境下,确保摄像头没有被遮挡并且没有被光线直射,保持摄像笔机身稳定,并与被摄景物保持1米以上的距离,以得到方向正确、色彩自然、图像清晰、画面稳定的影像,为了保证录音效果,请勿遮挡住麦克风部位。
在摄像或录音时,不要操作其它无关的按键。
若存储空间不足时红灯蓝灯同时快速闪烁并自动保存文件并退出到待机状态。
为了保证文件的大小和安全,摄像文件每30分钟自动保存一次后并继续摄像,录音文件每60分钟自动保存一次后并继续录音。
可编辑修改精选全文完整版高清口香糖使用说明书一、总览1.录像停止键2.电源指示灯 3、待机指示灯 4、拍照录音指示灯5、录像录音转换键6、T卡插槽7、USB8、摄像头 9、麦克风 10、开关键本产品是当今首款采用内置存储器的先进摄像器。
用于数码有声视频拍摄,使用十分方便,是现代科技与传统文具的完美结合。
产品操作简便,小巧精致,美观实用,便于携带,是商务、教育、安防、媒体、司法、旅游、医疗、生活等领域必备的实用工具,受到广大用户的青睐。
二、1:操作说明1.开始暂停键:电源开关拨到“ON”处,录音键拨到VIDEO,蓝红灯亮(大概1秒钟左右)蓝灯亮,按开始键黄灯闪烁进入拍照模式,长按5秒蓝灯闪烁进入录像模式。
2.电源指示灯:连接电脑和充电灯亮;充电满后,红灯不亮。
3.待机指示灯:在录像模式,短按按钮,蓝灯不闪烁,蓝灯一直亮停止当前的录像,并保存录像内容,,机器进入待机状态。
4.录音指示灯:电源开关拨到“ON”处,录音键拨到RECORD,黄灯闪烁直接进入录音。
5.电源开关:电源开关拨到“ON”处,准备工作。
电源开关拨到“OFF”处关机,关机时插USB支持保存资料和网络视频6.T F插槽:支持128M-8G的TF卡。
:7.USB:连接电脑,充电,网络视频8.摄像头:录像启动摄像头。
9. 麦克风:录像的声音和录音10.录像键和录音键1:电源开关拨到“ON”处,录音键拨到RECORD,直接录音。
2:电源开关拨到“OFF”处,录音键拨到RECORD处,连接电脑,启动网络视频。
a. 正在录像时,如果此时电量不足,机器会先保存录像内容,然后自动关机,此时需要给机器充电。
b. 每次摄像时,每一次开始摄像和停止摄像的循环操作,系统将生成一个新的视频文件。
c. 文件存盘需要一定的时间,请勿在指示灯闪烁过程中进行其他操作,如:按按钮、连接计算机等;这样将会导致刚刚录制的视频文件无法顺利保存,可能导致生成文件不完整、丢失、死机等情况。
Quick Start Instruction1. Turn On/OffTurn on: turn the power switch from OFF position to ON position.Turn off: turn the power switch from ON position to OFF position.2. Start/Stop Recording [Save] recording①Start Recording: when the recording is on, push the red color record switch up from Stop position to Record position and start the recording.② Stop Recording: during recording, push the read record switch from record position down to stop position to stop the recording and automatically save the record.3. Play① Play recording: push the recorder/music switch to recorder position to enter recorder mode. Push >|| play key to start playing the current recording file.②: Play music: push recorder/music switch to Music position to enter Music mode.Push >|| play key to start playing the current music file.I. CautionsIf you intend not to use this product for long time, put the power switch to OFF position.Do not use this product in extremely hot, cold, dusty or moisture environment.Do not drop down this product.The product is not water proof, do not splash or dip in water.The battery life may vary as the operation condition, manufacturer, and production time. Please recharge under the following conditions:When the battery icon shows empty, or when the recorder is automatically turned off at low battery.In case the push key is not responding.Or there abnormal during the regular operation.Special Notice: Mind your operation and back up your data. In case of data loss, our company is not responsible.Our company reserves the right to improve this product, Specifications are subject to change and improvement without notice. The image and text in this manual is for reference only, the actual operation result prevail.II. Feature FunctionsProfessional on recording dynamic noise reduction.PCM linear recording function.Patented one key recording technology.(ZL:200820093021.2)Pressed Aluminum case, CD pattern face plate.OLED display.Fashioned Hidden type push key designBuild-in dual microphone, hi-fi stereo voice recording.Recording monitor setting function.Automatic save at low battery when recording.Recording time setting function. Time stampTimed recording, voice controlled recording, radio recording, telephone recording functions.FM radio, FM radio recording (support campus radio)Build in high quality loud speakerBuild in high capacity battery.Support MPLS, WMA, WAV etc music format, support Synchronized Lyrics display.III. Instruction to the Case1-显示屏2-耳机插孔3- line-in输入插口4-内置左麦克风5-内置右麦克风6-音乐/录音笔模式切换键7-电源开关键8- >|播放/暂停键9-"V"音量键10-上一曲/快退/音量减小11- 下一曲/快进/音量增加12- "M"菜单键13-一键录音键14-外响喇叭15-USB接口1. OLED display2. Earphone jack3. Line-in Jack4. build-in left microphone5. Build-in right microphone6. DVR/Music7. Switch button8. Play/Pause9. Volume Key10. Previous/REW/VOL-11. Next/FF/Vol+12. M Menu13. one button record14. Loud-speaker15. USB interfaceIV. Instruction to the display21. time length of the current recording file,2. file sequent number,3. current recording time,4. file name,5. remaining recording time,6. recording format,7. creation date and time,8. battery quantity symbol, 9 play mode, 10. play time, 11. file sequent number, 12. repetition mode, 13. voice controlled recording symbolV. Operation instruction1. Basic operation1.1 PowerThe product use build in lithium battery for power supply.When the battery icon shows ===, please recharge promptly.Recharge method (no adapter included):Connect this unit with the computer with a USB cable.(the computer should be booted up) Please use a recharger that complies with #C safety standard to recharge this unit. Suggested model is DNS-CH68. Using fault adapter may damage this unit.When connect in this method, the unit is in recharging state.Battery indicator symbol loop from empty to full, indicating this unit is in recharging state.In normal operation, the recharging time is 3 to 4 hours.Note: during recharging, keep the power switch at ON position.1.2 Turn On/ Off1) when the power switch is at OFF position, then this unit is disconnected from power and can not be turned on.2) When the power switch is pushed from Off position to On position, the unit is automatically turned on, display shows “Welcom…”“JWD”, “DVR”, and enter main menu, the operation mode option interface.Then the On/Off status of this unit is controlled by >|| play key, in the following method:Turn Off: when this unit is turned on, long press >|| key until Byebye appears in the display, and this unit is turned off.Turn On: when the unit is turned, long press >|| key to turn on, “JWD”, “DVR” appears in the display in sequence, the unit enters the operation mode last time before this unit is turned off. Note: during pause or stop status, if the unit has automatic turn off time setting in save energy model in the turn off setting, then if there is operating during the automatic turn off time, the system will automatically turn off.1.3 Operation Status and “One Key Recording” key1.3.1 Operation StatusThis unit has recorder and music player 2 operation status. Switch recorder/music key can change the option.Under music status, there are 4 operation mode: music mode, FM mode, campus music mode, and system setting mode.1.3.2 “One Key Recording” Key1) When the unit is on, turn “One Key Recording” key from “Stop” position to “Record” position, this unit enters Recording status.If this unit is not at stop status, then it stops the current work first and then automatically start recording; If this unit is already at stop status, the recording automatically starts instantly.The recording operation then after, please refer to the instruction in the “Recorder Stator” chapter.2) Under non recording status, turn the “Recorder/Music” key, the op eration status will alter between Recorder and Music Player.3) Under non recording status, when the “Recorder/Music” key is at Music position, this unit operates at music player status.Long pressing “Menu” key to enter music mode selection menu, there are Music Mode, FM mode, Campus Radio and System Setting options.Press > or < key to select, and press M menu key to enter selected mode.Note: during the operation, if screen displays “Please wait…”, hold on till the unit finish the processing to continue other function operating.2. Recorder2.1 Method to EnterTurn “Recorder/Music” key to Recorder position, entering Recorder Mode. Turn “One Key Recording” key to Record position, entering recorder mode, recording starts.Then this unit is under recording status. If this unit is not at stop status, then it stops the current work first and then automatically start recording; if this unit is already at stop status, the recording automatically starts instantly.2.2.1 Start RecordingUnder standby status, turn “One Key Recording” key from “Stop” position to “Record” position, enter recording status and start to record, “Recording” text displays in the screen and flashes.2.2.2 Pause RecordingUnder recording status, short press >|| (play/pause) key to pause the recording, under pause status, the screen displays “Recording Pause” text and the current recording timeflashes.Under Pause status, short press >|| (Play/Pause) key to resume recording.2.2.3 Save RecordingTurn “One Key Recording” key from “Record” position to “Stop” position to save the recording.When the recording is saved, the unit automatically shift to operation mode that allows playing of the current recording file.Note: In case the “Recorder/Music” key is at “Music” position, the unit will automatically shiftto Music status.Note: 1) if the screen display “Disk Full!” it means there is not enough space in the disk. Please delete some file to release disk space.2) This unit support saving 200 recording file in each folder, if the screen displays “Folder Full”, it means there are already 200 recording entry under this folder. Please delete some file before starting recording.2.2.4 Play Music ……………Page 18 missing…………..Select “delete all” option, press “Menu” key to enter Delete Current Track interface.Screen displays YES and NO option menu, press > or < key to select, when YES is selected, press “M” menu key will delete all tracks under current folder.If NO is selected, press “M” menu key will abandon deleting current track, and return to pause or stop status.2.3 Professional on recording dynamic noise reduction settingThe environment is a key factor to good quality recording.The unit adopts our company’s creative professional recording technology: dynamic on recording noise reduction technology.In noisy environment (i.e. subway, crowded shopping center, etc.) this unit can also achieve good quality recording.Under Stop status in recorder mode, press “M” menu key to enter setting page.Press > or < key to select Dynamic Noise Reduction option, then press “M” menu key to enter, select “Normal” or “Noise Reduction”, “Noise Reduction” option is for recording in noise environment (in subway, on street or in shopping center, etc), to effectively filter and reduce background noise.Special Note: this technology adopts dynamic noise reduction. The working principle is to sample under microcomputer control to sample according to sound filed, and identify human voice from noise by comparison, then process with microcomputer, remove noise and keep the human voice, thus realize noise reduction.Because during the comparison, there is slight distortion and background noise, it is specially reminded, if recording under quiet environment, please select “Normal” mode to achieve the best recording quality.Note: Dynamic Noise Reduction only works under Stereo Recording mode. It does not apply to Standard Recording and Long Time Recording modes.2.4 PCM Linear RecordingUnder Stop status in recorder mode, press “M” menu key to ente r setting page. Press > or < key to select Record Type option, and press “M” menu key to enter.Then, Short press < or > key to select PCM Recording format, then short press “M” menu key to enter and exit.PCM linear recording adopt complete non compact method to record voice. Because it does not compact source sound, it avoided the loss in recording process, to be authentic to original sound, thus can achieve equal to CD quality sound. It is best for music recording and other uses.Note: during PCM linear recording, when recording time reaches 60 minutes, it is automatically saved in section and continue recording.2.5 Turn ON/OFF Voice Controlled RecordingUnder Stop status in recorder mode, press “M” menu key to enter setting page. Press > or <key to selec t Vice Controlled Record setting, press “M” menu key to enter. Default is “Voice Control Off” mode.Press < or > key to select “Voice Control On” or “Voice Control Off”, then press “M” menu key to enter.When selected “Voice Control On”, if the unit detects no sound, it automatically pause the recording, when detected sound, it resumes the current recording. Note: 1) when Voice Controlled Recording is on, the screen display Voice Controlled Recording sign VOR, otherwise this sign does not display.2) Under dynamic noise reduction recording mode, voice controlled recording is not available.3) Under stereo recording mode, voice controlled recording is not available.4) Under telepone recording mode, voice controlled recording is not available.2.6 Recording monitor function settingUnder Stop status in recorder mode, press “M” menu key to enter setting page.Press > or < key to select “Monitor setting”Press < or > key to select “Monitor On” or “Monitor Off”, then press “M” menu key to enter .Note: when monitor function is on, the recording can be monitored by earphone during the process.2.7 Recording Type SelectionUnder Stop status in recorder mode, press “M” menu key to enter setting page.Press > or < key to select Recording Type option, then press M menu key to enter. Then again press > or < key to select recording type, then press M menu key to enter.3) Recording Type ExplainationThe unit provides following recording types: PCM recording, stereo recording, standard recording, and long time recording.The Recording type, file format, saved location, default file name are listed in following table.Recording type File format RecordingqualitySave location Default nameStereo MP3 HighqualityRoot/DVR/ST REC***.MP3PCM WAV HighqualityRoot/DVR/PC REC***.WAVStandard WAV GoodqualityRoot/DVR/SP REC***.WAVLong time REC FinequalityRoot/DVR/LP REC***.RECtelephone MP3 HighqualityRoot/DVR/ST REC***.MP3FM MP3 HighqualityRoot/DVR/ST REC***.MP3Radio MP3 HighqualityRoot/DVR/ST REC***.MP3Dynamic noise reduction MP3 HighqualityRoot/DVR/ST REC***.MP3Note: 1. default recording format is stereo recording format.(Recommended recording format)2. When saving the recording, if there is not corresponding folder exists, this unit will automatically generate the folder needed.2.8 Audio file selectionUnder Stop status in recorder mode, press “M” menu key to enter settingpage.Press > or < key to select Audio File Selection option, then press M menu key to enter. Then again press > or < key to select the fold that include the audio file to play, then press M menu key to enter.2.9 System Time SettingUnder recording file Stop status, press “M” menu key to enter setting page.Press > or < key to select System Time option, press, “M” menu key to enter, pr ess > or < key again to select option Current Time, Timed Recording, Recording Length, etc. then press, “M” menu key to enter setting.2.9.1 Current Time (enter this interface to view the time display)To facilitate the recording, before using this unit, it is necessary to set the current time, the setting method is:1. Manual setting:Short press “M” menu key to enter current time page.Then, short press “V” volume key to start with Year setting, (Year flashes) , thenshort press > or < key to increase or reduce the figure; then short press “V” volumekey, to set the Month, Day and Hour, Minutes.When it is done, short press “M” menu key to enter and exit setting.2. Setting on computer (short cut)Connect this unit with computer through USB cable, find the removable disk on thecomputer, and open the disk, locate the attached documents in the disk: “settingrecording equipment time tool” folder, open this folder, double click “set recordingequipment time tool.exe” file, a confirming dialogue box pop up,reads “Recordingdevice time successfully set”. click “Yes” then the unit time is synchronized to thecomputer current time.Note: 1. after setting the current time, this unit can save and maintain its time, if theunit is out of battery for long time, its time may goes wrong, in that case, rechargethe unit and reset the time.2. when connecting the unit with USB, make sure the unit power is at ON position, ifthe power is OFF, then after setting the system time with the tool, while disconnectfrom the USB, the system time setting is lost.3. if the computer is connect with several USB devices, then the unit’s system timesetting will fail.Therefore, this unit must be the only USB device connected to thecomputer.2.9.2 Timed RecordingSetting a future time, when the time is due, the recording automatically starts.Short press “M” menu key to enter Timed Recording page.The time adjustment method is the same as above, set Year, Month, Day, Hour and Minutes one by one. After finishing the setting, short pr ess “M” menu key to enter andexit.Note: during the timed recording process, if needing to save the recording, short press “V” volume key will do.2.9.3 Set Recording TimeShort press “M” menu key to enter recording time length setting interface: (default lengthis 1 minute)The time adjust method is same as above , When it is done, short press “M” menu key to enter and exit setting.2.10 Telephone Recording2.10.1 connect this unit with telephone.Connect the telephone external extension wire and telephone wire to the telephone recording adapter, connect the telephone recording wire to recording adapter and the Line-in Jack of this unit, as the diagram shows:Note: when the recording is done, the file save location is as indicated in the recording type explanation.2.10.2 Basic Telephone Recording OperationPlease read the “Build in microphone recording” manual.2.11 Radio Pickup2.11.1 Radio pickup function instructionThis function requires specially attached adapter, please contact local sales agency for information.2.11.2 Enter and Exit Radio pickup1 Method to EnterUnder Stop status in recorder mode, press “M” menu key to enter setting page. Press > or < key to select Radio Pickup option, and press “M” menu key to enter.2) Method to ExitUnder the radio pickup status, long press “M” menu key to return to Audio Stop status. 2.11.3 Radio Pickup RecordingUnder radio pick up status, connect the earphone, then short press “M” menu key, this unit enters Radio Pick Up Recording status: short press “V” volume key to stop the recording and save, the saving location is Root/RECORDS/ST, file format is MP3, default name is RWX…..MP3.2.12 Transfer the Recording to External UtilitiesConnect the audio wire to this unit’s Phone jack and the external utility’s Input jack, then press the ▲ key of this unit and the Record key of the external utility (to avoid recording failure, please test the external utility’s recording function first)Note: during the recording, if the unit suddenly lose power due to bumping or other reason, the recording file will lose, please mind your operation.2.13 Convert REC format file to WAV format fileThe REC format file recorded in this unit can not play on the computer directly, but canbe converted to WAV with the tool in the attached CD after installing the tool in a computer.(1) Run the installed recording convert tool program, click to open.(2) locate the REC file to convert.(3) Click “Convert” button, select a path and the file name after conversion and save, then the conversion starts.Note: In addition to converting REC file to WAV file, this tool can also play WAV andMP3 file.3. Music Mode3.1 Method to EnterUnder non recording status, turn “Recorder/Music” key to change from “Recorder” position to “Music” position, entering music mode.Note: Under this mode only music files saved at Root folder play.3.1.1 PlayUnder Stop or Pause status, press >|| key to start playing current track; press the same key again, shift to pause status, at pause, the play time flashes.3.1.2 Previous/Next, Forward/BackwardShort press < key, select previous song, short press > key, select next song; under playing status, long press < key is backward, long press > key is forward.3.1.3 Volume changeUnder stop or play status, short press “V” volume key, enter volume regulationmode.Then short press > key to increase volume, press < key to reduce volume.3.14 Loop ModeUnder play mode, short press “M" menu key to enter play menu, then short press > or < key to select Single Loop, Play List, Loop List, etc multiple Loop mode, press “M” menu key to enter the selection.3.1.5 Output Equalizer Mode SelectionUnder play mode, short press “M" menu key to enter play menu, then short press > or < key to select Equalizer option, press “M” menu key again to enter. Short press > o r < key to select Natural, Rock, Pop, Classic, Soft, Jazz, Bass, etc. press “M” menu key to enter the selection.3.1.6 Repeater Mode1) Set RepeaterUnder play status, press “M” menu key to enter play menu, then short press > or < key to select repeater Mo de option, press again the “M” menu key to enter, return to the play status interface, in this case, the A of the sign A-B flashes, short press > key, the B of the sign A-B flashes, this set the start point of the repetition; short press > key again, the screen display A-B, neither A or B flashes, this set the end point of the repetition; when the repetition sign A-B set, repetition from A point to B potion starts, when the repetition reaches set times. Sign A-B flashes, to stand by for reset new starting point, and resume normal play, in case no need to use repetition any long, exit the repetition mode in the following method:2) Exit(1) short press >|| key, cancel the AB repetition already set and pause the play.(2) short press “M” menu key, cancel the AB repetition, and resume normal play status.3.1.7 Repetition TimesUnder play status, short press “M” menu key to enter play menu, then short press < or > key to select Repetition Time option, then press “M” key to enter, short press > or < key to adjust, the times is set within the range from 1 to 10.After finishing the setting, press “M” menu key to enter.3.18 Repetition IntervalUnder play status, short press “M” menu key to enter play menu, then short press < or > key to select Repetition Interval op tion, then press “M” key to enter, short press > or < key to adjust, the interval is set within the range from 1 to -10. After finishing the setting, press “M” menu key to enter.3.1.9 Delete MusicRefer to 2.2.5 for the method to delete file.Note: this unit can play MP3 (MPEG1 layer 3, MPEG2 layer 3, MPEG2.5 layer 3) and WMA file.3.1.10 Lyric Synchronous DisplayThis unit support ….Lrc lyric file to realize synchronous display with the music play.1) How to use lyric file?Keep the lyric file name be the same as the song file name.2) How to know if the current has a lyric or not ?If the current song has a matching lyric, then the music mode icon at the upper right corner shows a lyric sign, like , if there is not matching lyric, then on sign appears, like .3) How to display lyric ?If a match lyric is available, long press the “M” menu key during the play to enter lyric interface, lyric will then display on the screen.To exit, short press “M” menu key to return to music list mode.4. FM modeUnder non recorder status, turn “Recorder/Music” key from “Recorder” to ”Music” position. Long press “M” menu key to enter operation mode selection interface, then press > or < key to select FM mode.Plug the earphone and then press “M” menu key to enter this mode.4.1 Manual SearchUnder FM mode, short press > or < key to change the frequency, long press > or < key to continuously change frequency in one direction, press >|| key to stop at current frequency.4.2 Auto SearchUnder FM mode, press “M” menu key, short press > or < key to select Auto Search option, press “M” menu key to enter; in the main interface, the ↓ icon start to search from the start point to HF end, all picked up channel are automatically sorted and listed; During to auto search, press >|| key to exit.Note: the Channel list is automatically sorted according to frequency form low to high frequency sequence.4.3 Save the channelUnder FM mode, press “M” menu key, short press > or < key to select Save Channel option, short press “M” menu key to enter, this display on the screen is as follows:This means 97.5MHZ channel is saved, its sequence number is [01].After saving this channel, under FM mode, continue to short press > or < key to change the FM frequency, the [01] number disappear, but this [01] channel is still saved in the unit, to save another channel the sequent number is [02], and so forth.This unit can save maximum 20 channels.Under FM mode, when the channel number is more than 1, press >|| key will change channel in ascending sequence.4.4 Radio Recording4.4.1 Start RecordingUnder FM mode, in the main interface, short press “M” menu ke y, short press > or < key to select Radio Recording option.Then short press “M” menu key, this unit will automatically start recording.4.4.2 Save RecordingDuring the radio recording process, short press “V” volume key to save.And return to corresponding mode’s interface.The Radio Recording file’s saving location isROOT/RECORD/ST, file format is MP3, with default name “RFM….MP3”.4.5 Delete ChannelUnder FM mode’s main interface, press “M” menu key, short > or < key to select Delete Channel option, short press “M” menu key to enter, the current channel is deleted.If there is channel after this channel, then after this deletion, all the following channel’s sequence number automatically minus one and move forward. i.e. if there are 4 channel with number [01],[02],[03],[04], delete channel [02], then channel [03] and [04] automatically move forward, and the number of the remaining channel changes to [01],[02],[03].4.6 Delete AllUnder FM mode’s main interface, press “M” menu key, short > or < key to select D elete All option, short press “M” menu key to enter, All saved channel are deleted.5. Campus RadioUnder non recording status, turn “Recorder/Music” key to change from “Recorder” position to “Music” position.Long press “M” menu key to enter operation mode selection interface, then short press < or > key to select Campus Radio mode, Plug earphone and then press “M” menu key to enter this mode.5.1 Manual SearchUnder Campus Radio mode, short press > or < key to change the frequency, long press > or < key to continuously change frequency in one direction, press >|| key to stop at current frequency.5.2 Auto SearchUnder Campus Radio main interface, press “M” menu key, short press > or < key to select Auto Search option, press “M” menu key to enter; in the main interface, the ↓ icon start to search from the start point to HF end, all picked up channel are automatically sorted and listed; During to auto search, press >|| key to exit.Note: the Channel list is automatically sorted according to frequency form low to high frequency sequence.5.3 Save the channelUnder Campus Radio mode, press “M” menu key, short press > or < key to select Save Channel option, short press “M” menu key to enter, this display on the screen is as follows:This means 76.5.5MHZ channel is saved, its sequence number is [01].After saving this channel, under Campus Radio mode, continue to short press > or < key to change the FM frequency, the [01] number disappear, but this [01] channel is still saved in the unit, to save another channel the sequent number is [02], and so forth.This unit can save maximum 20 channels.Under Campus Radio mode, when the channel number is more than 1, press >|| key will change channel in ascending sequence.5.4 Radio Recording5.4.1 Start RecordingUnder Camp us Radio mode, in the main interface, short press “M” menu key, short press > or < key to select Radio Recording option. Press “M” menu key the recording automatically starts.5.4.2 Save RecordingDuring the radio recording process, short press “V” volume key to save, and return to the corresponding mode’s interface.The Radio Recording file’s saving location is ROOT/RECORD/ST, file format is MP3, with default name “RFM….MP3”.5.5 Delete ChannelUnder Campus Radio mode, in the main interface, short press “M” menu key, short press > or < key to select Delete Channel option.Short press “M” menu key to enter, then the current channel is deleted.If there is channel after this channel, then after this deletion, all the following channel’s sequence number automatic ally minus one and move forward. i.e. if there are 4 channel with number [01],[02],[03],[04], delete channel [02], then channel [03] and [04] automatically move forward, and the number of the remaining channel changes to [01],[02],[03].5.6 Delete AllUnde r Campus Radio mode’s main interface, press “M” menu key, short > or < key to select Delete All option, short press “M” menu key to enter, All saved channel are deleted.6. System Setting。