DSource零件库安装说明
- 格式:doc
- 大小:156.00 KB
- 文档页数:4

实用CAD零件库的管理与使用技巧在使用CAD软件进行设计和绘图过程中,经常需要使用各种标准零件,如螺栓、螺母、齿轮等。
为了提高工作效率,合理管理和使用CAD零件库是非常重要的。
本文将为您介绍实用的CAD零件库的管理与使用技巧,帮助您更好地进行CAD设计。
1. 创建零件库文件夹首先,为零件库创建一个独立的文件夹,用于存储并组织各种标准零件文件。
在这个文件夹中,你可以根据自己的需要创建多个子文件夹,例如“螺栓”,“螺母”,“齿轮”等,便于分类管理。
2. 文件命名规范为了方便快速查找和识别零件,建议使用统一的文件命名规范。
可以采用以下方法进行命名:a) 使用简洁明了的名称,例如“M8螺栓”,“M10螺母”等。
b) 在名称末尾加上一些关键信息,如材料、标准等,例如“M8螺栓_304不锈钢”,“M10螺母_GB1234标准”等。
3. 维护零件库定期检查和维护零件库是保持其有效性和完整性的关键。
删除或更新失效、重复或过时的零件,保持库中只包含最新的和有效的标准零件。
4. 增加自定义零件除了标准零件,您可能还需要添加一些自定义的零件到库中,这些零件可能会在日常设计中频繁使用。
在添加自定义零件时,同样需要注意文件命名的统一规范,并将其放入适当的文件夹中。
5. 使用CAD软件的内置库功能大多数CAD软件都提供了内置的零件库功能,可以直接从库中导入所需的零件。
在使用过程中,可以充分利用这些内置库,减少手动绘制的工作量,提高效率。
6. 创建自定义库如果CAD软件没有提供内置的库功能,或者内置库中缺少特定类型的零件,您可以尝试创建自定义库。
通过将常用的零件以特定格式保存在文件中,可以方便地导入到CAD软件中,实现快速绘制。
7. 分享和获取零件库在CAD设计的过程中,我们可能会遇到某些零件的缺失或不熟悉,这时可以通过网络或其他途径获取他人分享的零件库。
同时,在您积累了一定的零件库后,也可以与他人进行分享,以促进共享和学习。

3DSource零件库( 在线版) SolidWorks客户端用户手册杭州新迪数字工程系统有限公司3月目录1 软件概述1.1 简介1.2 运行环境1.3 运行界面2 使用方法2.1 加载插件2.2 零件库目录管理2.3 【零件目录树】标签页2.3.1 添加零件2.3.2 编辑零件2.3.3 打开零件2.3.4 搜索零件2.4 【搜索】标签页1 软件概述1.1 简介3DSource零件库( 在线版) 是由杭州新迪数字工程系统有限公司开发的三维产品零件库软件, 可直接嵌入到各种3D设计软件中。
3DSource零件库( 在线版) 可支持: SolidWorks、 Inventor、Pro/E、 UG、 CATIA等多种设计平台, 并实现了与各CAD软件平台间的无缝集成。
3DSource零件库( 在线版) 当前收录了: 中国国家标准件库( GB) 、机械行业标准件库( JB) 和汽车行业标准件库( QC) 。
汇集了通用标准件、轴承、电机、管路附件等各类约种零件, 将近100万配置的三维CAD模型。
在以后的版本中, 我们将添加更多的标准件、常见件以及供应商产品库。
本产品的主要特点:•内置于各类CAD软件。
界面友好, 调用方便。
可直接经过拖拽的方式调用标准件;•系统采用C/S架构。
库文件统一存储在服务器, 有效节约客户端资源。
多客户端同时调用零件。
主要功能:•零件目录树: 显示各类标准件件, 用户可经过直接拖拽( 或插入) 的方式将三维模型添加到您的当前设计中。
•搜索。
用户可经过搜索方便地查找三维产品目录中的零件, 并可经过拖拽的方式调用。
1.2 运行环境•操作系统: Windows XP、 Vista, 简体中文环境;•CAD软件版本: 支持SolidWorks / / / ;•硬件要求: 内存不少于512M;1.3 运行界面以下截图是3DSource零件库( 在线版) 运行于SolidWorks 时的客户端软件界面。

1、0层上是不可以用来画图的,那0层是用来做什么的呢?是用来定义块的。
定义块时,先将所有图元均设置为0层(有特殊时除外),然后再定义块,这样,在插入块时,插入时是哪个层,块就是那个层了。
2、Purge这个命令可以清除掉图中所有的没有用到的设置、图块等信息,建议大家多多使用,我是几乎每次存盘前都要Purge一下的。
3、快捷键的定义是保存在acad.pgp文件中,2004版后(也可能是02版后,记不清了)改变了放置的目录,大家自己在windows里面搜索一下就知道了。
快捷键是可以根据每个人的喜好,自由定义的。
但,我认为自由不等于随便,也应该有一些原则。
一、不产生歧义,尽量不要采用完全不相干的字母。
比如说,copy这个命令,就不要用v这个字母来定义快捷键。
这样容易造成误解、遗忘。
就算自己背熟了,别人一到你的机器上来,就绝对晕倒了。
二、根据各个命令的出现频率来定义快捷键,定义时,依次采用“1个字母--1个字母重复两遍--两个相邻或相近字母--其他”的原则。
举个最简单的例子,copy和circle。
在cad的默认设置中,copy是co/cp,circle 是c。
这样的安排绝对不合理。
一般说来,copy使用的频率比circle要高得多,所以,首先应该是将c定义为copy的快捷键。
然后,对于circle,可以采用cc(第一和第四个字母),也可采用ce(首尾两个字母),这两个都被占用了或者不习惯,再采用ci。
对于常用命令,我的建议是一定要采用快捷键,使用快捷键比用鼠标点取图标,或在菜单上选择命令要快上非常多的时间。
一定要养成左手键盘,右手鼠标的习惯。
什么算是常用命令呢?我建议平均每天出现5次以上的命令,都应该归结于常用命令。
大家根据这样的原则来定义好快捷键后,经过1~2天的练习,一定能够提高不少的效率。
4、绘制-明细表在Excel中制作表格,并按AutoCAD字体要求填充表格内容;将制作好的表格复制到剪贴板;进入AutoCAD界面,选择“edit”(编辑)菜单中的“Paste special”(选择性粘贴),在出现的对话框中选择作为“AutoCAD Entities”(AutoCAD图元),点击“确定”按扭,表格即转化成AutoCAD实体;用“explode”(炸开)命令将此AutoCAD实体分解,按需要编辑表格内容或表格图线。

林清安标准零件库安装一、安装前的准备。
在进行林清安标准零件库安装之前,首先需要进行一些准备工作,以确保安装顺利进行。
首先,需要确认计算机系统的兼容性,确保系统能够支持标准零件库的正常运行。
其次,需要准备好安装所需的软件及相关驱动程序,以及确保计算机网络连接正常。
另外,还需对安装环境进行检查,确保环境整洁、安全,以及符合标准零件库的运行要求。
二、安装步骤。
1. 下载安装程序。
首先,需要从官方网站或指定渠道下载林清安标准零件库的安装程序,确保获取的安装程序是最新版本,并且来源可靠。
下载完成后,进行安全扫描,确保安装程序没有病毒或恶意软件。
2. 运行安装程序。
双击安装程序,按照提示进行安装,选择安装路径和相关设置。
在安装过程中,需要注意选择合适的语言版本和组件,确保安装的内容符合实际需求。
3. 完成安装。
安装程序会自动进行相关文件的复制和注册,待安装完成后,系统会提示安装成功。
此时,可以进行相关设置和配置,以确保标准零件库能够正常运行。
三、安装后的操作。
安装完成后,需要进行一些操作,以确保标准零件库的正常使用。
首先,需要进行相关的更新和注册,确保标准零件库的数据是最新的。
其次,需要对标准零件库进行相关设置,以符合实际需求。
另外,还需要对相关的权限和许可进行管理,确保标准零件库的安全运行。
四、常见问题解决。
在安装过程中,可能会遇到一些常见问题,如安装失败、程序无法运行等。
针对这些问题,可以参考官方的帮助文档或在线支持,进行相关的排查和解决。
另外,也可以通过查阅相关的技术论坛和社区,寻求其他用户的帮助和经验分享。
五、总结。
林清安标准零件库的安装并不复杂,只要按照上述步骤进行操作,一般情况下都能够顺利完成。
在安装过程中,需要注意选择合适的安装环境和进行相关的准备工作,以确保安装的顺利进行。
另外,在安装完成后,也需要进行相关的操作和设置,以确保标准零件库能够正常使用。
如遇到问题,也不必过于担心,可以通过官方渠道或其他用户的帮助进行解决。

标准零件库的详细安装方法1 把你下到的的GBLib解压到你的各种Pro/ENGINNER库文件所在的目录以各种Pro/ENGINNER库文件所在的目录E:\ProLibs下为例,则解到E:\ProLibs 目录E:\ProLibs|_GBLib (GBLib Directory) |_ProLibs.MNU (总库的MNU文件,你可以改总库的目录名为其它,则此MNU主文件名要改为相同的)|_pbc.exe Catlog文件生成器 |_GB库使用方法.TXT 你现在看的文件就是它!如果你各种Pro/ENGINNER库文件所在的目录不在E:\ProLibs,则改名ProLibs.MNU成相应的*.MNU,改变了GBLib目录名的话,则要编辑E:\ProLibs\ProLibs.MNU相应改变。
2 设定CONFIG.PRO:pro_library_dir E:\ProLibs\pro_catalog_dir E:\ProLibs\save_objects changed!上面保证能正确找库和catalog文件的位置,并设定不改不往库中存新版本3 我们不用search path那种原始的过时的方法来保证Pro/E装配或其它情形下用过的库中的文件后,下次PROE打开这些装配时它还能正确找到和检索出库中的文件(想想就要ft,一个一个目录去写serach path,要我的命啊!),我们用Catalog文件:现在来建cataglog文件:设定系统环境变量(同设LANG=Chinese_CN方法一样)PRO_LIBRARY_DIR=e:\ProLibsDOS CMD行set pro看一下PRO_LIBRARY_DIR变量有没有,没有看到的话重启动或手工加啊:c:\>set PRO_LIBRARY_DIR=e:\ProLibs 再运行E:\ProLibs\pbc.exe就会生成E:\ProLibs\prolibs.ctg.1这个catlog文件。
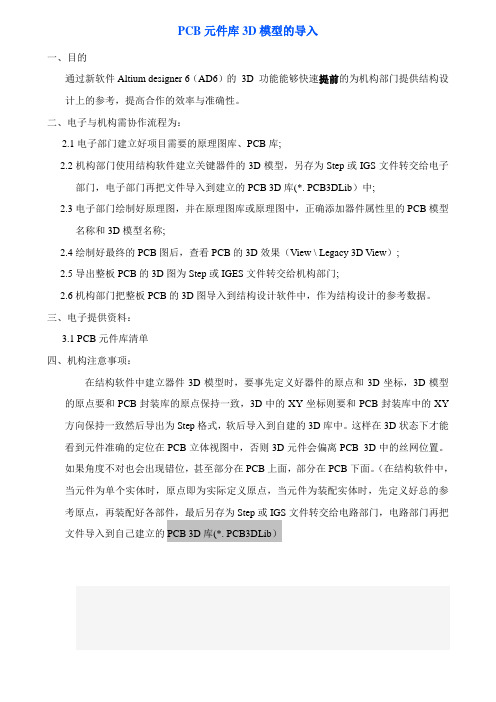
PCB元件库3D模型的导入一、目的通过新软件Altium designer 6(AD6)的3D 功能能够快速提前的为机构部门提供结构设计上的参考,提高合作的效率与准确性。
二、电子与机构需协作流程为:2.1电子部门建立好项目需要的原理图库、PCB库;2.2机构部门使用结构软件建立关键器件的3D模型,另存为Step或IGS文件转交给电子部门,电子部门再把文件导入到建立的PCB 3D库(*. PCB3DLib)中;2.3电子部门绘制好原理图,并在原理图库或原理图中,正确添加器件属性里的PCB模型名称和3D模型名称;2.4绘制好最终的PCB图后,查看PCB的3D效果(View \ Legacy 3D View);2.5导出整板PCB的3D图为Step或IGES文件转交给机构部门;2.6机构部门把整板PCB的3D图导入到结构设计软件中,作为结构设计的参考数据。
三、电子提供资料:3.1 PCB元件库清单四、机构注意事项:在结构软件中建立器件3D模型时,要事先定义好器件的原点和3D坐标,3D模型的原点要和PCB封装库的原点保持一致,3D中的XY坐标则要和PCB封装库中的XY 方向保持一致然后导出为Step格式,软后导入到自建的3D库中。
这样在3D状态下才能看到元件准确的定位在PCB立体视图中,否则3D元件会偏离PCB 3D中的丝网位置。
如果角度不对也会出现错位,甚至部分在PCB上面,部分在PCB下面。
(在结构软件中,当元件为单个实体时,原点即为实际定义原点,当元件为装配实体时,先定义好总的参考原点,再装配好各部件,最后另存为Step或IGS文件转交给电路部门,电路部门再把文件导入到自己建立的PCB 3D库(*. PCB3DLib)电子与机构需协作流程为:1.电子部门建立好项目需要的原理图库、PCB库.2.机构部门使用结构软件建立关键器件的3D模型,另存为Step文件转交给电子部门,电子部门再把文件导入到建立的PCB 封装库中.3.电子部门在原理图库中,正确添加器件属性里的PCB封装名称;并最终生成集成库(*.intlib).4.电子部门在设计中使用集成库(*.intlib)中的元器件.绘制好最终的PCB图后,查看PCB的3D效果(View \ switch to 3D).5.导出整板PCB的3D图为Step文件转交给机构部门.6.机构部门把整板PCB的3D图导入到结构设计软件中,作为结构设计的参考数据。
D-Cube-Edit_系统安装手册D3-Edit HD系统安装手册2006年7月目录目录 (2)前言 (4)第一部分拆箱核对配件 (4)1.4U机箱前面板主要功能介绍 (4)2.后面板接口图 (5)第二部分开机检测 (6)第三部分 D3-Edit HD软件安装说明 (8) 一.软件安装前的准备工作 (8)二.安装数据库 (8)三.全新安装D3-Edit HD软件 (9)第1步 (9)第2步 (10)第3步 (10)第4步 (11)第5步 (11)第6步 (12)第7步 (12)第8步 (12)第9步 (13)第10步 (13)第11步 (14)第12步 (14)第13步 (16)第14步 (16)第15步 (17)四.D3-Edit HD软件升级安装说明 (18)第1步:升级板卡驱动 (18)第2步:卸载老版本软件 (18)第3步:安装新版本软件 (18)第4步:手动升级数据库 (18)五.首次启动D3-Edit HD软件 (19)第1步:配置系统参数 (19)第2步:启动软件 (20)第2步:选择编辑格式 (20)附录1:D3-Edit HD数据库脚本说明(SQL) (21)第一节数据库脚本升级通用操作方法 (21)第1步 (21)第2步 (22)第3步 (22)第4步 (22)第5步 (23)第6步 (23)第二节数据库表格更新通用操作方法 (24)第三节全新创建完整数据库操作方法 (29)第四节软件版本对应数据库脚本升级列表 (31)附录2:X.MIO板卡安装说明 (32)1 新驱动安装说明 (32)2 驱动升级说明 (35)附录3:插件设置说明 (36)附录4:Geforce 7800双屏设置说明 (37)前言本手册作为D3-Edit HD高标清非线性编辑系统的组成部分,所有整机出货产品均配备此系统安装手册。
本手册指导您如何正确连接系统外围设备及配件,并提供了正确安装和卸载D3-Edit HD软件的方法。
solidedge标准件库安装完全攻略第13章标准件库概述Solid Edge提供⼀整套功能强⼤的标准件管理系统,如图13-1所⽰,是设计者进⾏标准化设计必不可少的实⽤⼯具,它包括各种标准(例如:ANSI、ISO、DIN、GB、JIS、UNI、GOST、ASME等)的紧固件及型材库(Machine Library)和管路库(Piping Library)。
图13-1 标准件库Solid Edge标准件库允许设计者快速并且有效地定义、存储、选择和定位通⽤的零件(例如:紧固件、轴承、管接头、钢结构成员),⽽且能够快捷、精确地完成模型装配。
有了标准件库,公司可以建⽴和共享⾃⼰的设计标准;使⽤Solid Edge提供的标准件库,⽤户只需直接调⽤相关的标准件即可,不必考虑冗余的建模任务,从⽽使设计⼈员能够集中注意⼒在创新的设计上。
每套软件内都有⼀个标准件向导。
利⽤该向导,设计⼈员按照要求把符合公司标准的⼀系列零件放置在标准件库内。
安装标准件库软件提供了⼀整套标准件库,使得⽤户能够提⾼设计效率;通过将⾃定义的系列零件添加到零件库中,可以将效率提⾼更多。
13.2.1 安装标准件服务器1、插⼊Solid Edge安装程序光盘,单击光盘中的“”⽂件,程序安装界⾯中单击“其它Solid Edge产品”按钮,如图13-2所⽰,。
图13-2 程序安装界⾯2、安装标准件服务器:如图13-3所⽰,单击“Standard Parts”和“标准件服务器”。
图13-3 安装标准件库“标准件服务器”包括两个内容:标准件管理程序和少量的标准件。
使得即使没有购买标准件的⽤户,也能够学习和使⽤标准件库。
3、设置安装⽬录:程序默认的安装路径是“C:\Solid Edge Standard Parts\”,⽤户也可以单击“更改”按钮,⾃定义新的路径,如图13-4所⽰。
但是路径所在的硬盘最好有很⼤的空间,推荐⾄少有4G的硬盘空间,因为后⾯正式安装“机械标准件库”时,需要较⼤的空间(如果是完全安装所有的设计标准库,约占⽤2.7G硬盘)。
Developer Studio Installation Guide Version 11.2October 2015Developer Studio Installation GuideProduct version: 11.2Release date: 10-22-15Copyright © 2003, 2016, Oracle and/or its affiliates. All rights reserved.This software and related documentation are provided under a license agreement containing restrictions on use and disclosure and are protected by intellectual property laws. Except as expressly permitted in your license agreement or allowed by law, you may not use, copy, reproduce, translate, broadcast, modify, license, transmit, distribute, exhibit, perform, publish, or display any part, in any form, or by any means. Reverse engineering, disassembly, or decompilation of this software, unless required by law for interoperability, is prohibited.The information contained herein is subject to change without notice and is not warranted to be error-free. If you find any errors, please report them to us in writing.If this is software or related documentation that is delivered to the U.S. Government or anyone licensing it on behalf of the U.S. Government, the following notice is applicable:U.S. GOVERNMENT END USERS: Oracle programs, including any operating system, integrated software, any programs installed on the hardware, and/or documentation, delivered to U.S. Government end users are "commercial computer software" pursuant to the applicable Federal Acquisition Regulation and agency-specific supplemental regulations. As such, use, duplication, disclosure, modification, and adaptation of the programs, including any operating system, integrated software, any programs installed on the hardware, and/or documentation, shall be subject to license terms and license restrictions applicable to the programs. No other rights are granted to the U.S. Government.This software or hardware is developed for general use in a variety of information management applications. It is not developed or intended for use in any inherently dangerous applications, including applications that may create a risk of personal injury. If you use this software or hardware in dangerous applications, then you shall be responsible to take all appropriate fail-safe, backup, redundancy, and other measures to ensure its safe use. Oracle Corporation and its affiliates disclaim any liability for any damages caused by use of this software or hardware in dangerous applications.Oracle and Java are registered trademarks of Oracle and/or its affiliates. Other names may be trademarks of their respective owners.Intel and Intel Xeon are trademarks or registered trademarks of Intel Corporation. All SPARC trademarks are used under license and are trademarks or registered trademarks of SPARC International, Inc. AMD, Opteron, the AMD logo, and the AMD Opteron logo are trademarks or registered trademarks of Advanced Micro Devices. UNIX is a registered trademark of The Open Group.This software or hardware and documentation may provide access to or information about content, products, and services from third parties. Oracle Corporation and its affiliates are not responsible for and expressly disclaim all warranties of any kind with respect to third-party content, products, and services unless otherwise set forth in an applicable agreement between you and Oracle. Oracle Corporation andits affiliates will not be responsible for any loss, costs, or damages incurred due to your access to or use of third-party content, products, or services, except as set forth in an applicable agreement between you and Oracle.Documentation AccessibilityFor information about Oracle's commitment to accessibility, visit the Oracle Accessibility Program website at /pls/ topic/lookup?ctx=acc&id=docacc.Access to Oracle SupportOracle customers that have purchased support have access to electronic support through My Oracle Support. For information, visit http:// /pls/topic/lookup?ctx=acc&id=info or visit /pls/topic/lookup?ctx=acc&id=trs if you are hearing impaired.Table of ContentsPreface (v)About this guide (v)Who should use this guide (v)Conventions used in this guide (vi)Contacting Oracle Support (vi)1. Installation for Endeca Developer Studio (1)Before you install (1)About Developer Studio (1)System requirements (2)Required reading (2)Installing Endeca Developer Studio (3)Installation steps (3)Silent installation steps for Windows (3)2. Changing the Developer Studio configuration (5)Pipeline paths in an Endeca Application Controller environment (5)About temporal properties (5)Configuring Developer Studio for the use of Duration and Time property types (6)3. Uninstalling Developer Studio (9)Steps to uninstall Developer Studio on Windows (9)Developer Studio Installation Guide iiiiv Developer Studio Installation GuidePrefaceOracle Commerce Guided Search is the most effective way for your customers to dynamically explore yourstorefront and find relevant and desired items quickly. An industry-leading faceted search and GuidedNavigation solution, Guided Search enables businesses to influence customers in each step of their searchexperience. At the core of Guided Search is the MDEX Engine™, a hybrid search-analytical database specificallydesigned for high-performance exploration and discovery. The Oracle Commerce Content Acquisition Systemprovides a set of extensible mechanisms to bring both structured data and unstructured content into the MDEXEngine from a variety of source systems. The Oracle Commerce Assembler dynamically assembles content fromany resource and seamlessly combines it into results that can be rendered for display.Oracle Commerce Experience Manager enables non-technical users to create, manage, and deliver targeted,relevant content to customers. With Experience Manager, you can combine unlimited variations of virtualproduct and customer data into personalized assortments of relevant products, promotions, and other contentand display it to buyers in response to any search or facet refinement. Out-of-the-box templates and experiencecartridges are provided for the most common use cases; technical teams can also use a software developer's kitto create custom cartridges.About this guideThis guide contains installation instructions for setting up Developer Studio on Windows.This guide assumes that you have read the Oracle Endeca Commerce Getting Started Guide. This guide coversinstallation of Endeca Developer Studio; for information about installing other Endeca components, refer to theappropriate Installation Guide. Endeca Developer Studio is a Windows-only application.Who should use this guideThis guide is intended for developers who are building applications using Oracle Endeca Guided Search, as wellas for system administrators managing Endeca applications.Preface vConventions used in this guideThis guide uses the following typographical conventions:Code examples, inline references to code elements, file names, and user input are set in monospace font. In thecase of long lines of code, or when inline monospace text occurs at the end of a line, the following symbol isused to show that the content continues on to the next line: ¬When copying and pasting such examples, ensure that any occurrences of the symbol and the correspondingline break are deleted and any remaining space is closed up.Contacting Oracle SupportOracle Support provides registered users with answers to implementation questions, product and solution help,and important news and updates about Guided Search software.You can contact Oracle Support through the My Oracle Support site at https://.vi Preface1Installation for Endeca Developer StudioThis section contains instructions for installing Developer Studio.Related links•Before you install (page 1)•Installing Endeca Developer Studio (page 3)Before you installThis section provides an overview of Endeca Developer Studio, system requirements, and other information youneed to know before installing.About Developer StudioDeveloper Studio is a Windows application that you use to define all aspects of your instance configurationincluding pipeline components, Endeca properties and dimensions, precedence rules, dynamic business rules,and user profiles.With Developer Studio, you can define:•Pipeline components for tasks such as loading, standardizing, joining, mapping, and exporting data.•Endeca properties and property attributes such as sort and rollup.•Dimensions and dimension values, including dimension hierarchy.•Precedence rules among dimensions that provide better control over your implementation's navigation flow.•Search configurations, including which properties and dimensions are available for search.•Dynamic business rules that allow you to promote certain records on your Web site using data-drivenbusiness logic. Dynamic business rules are used to implement merchandising and content spotlighting.1 Installation for Endeca Developer Studio1•User profiles that tailor the content returned to an end-user based upon pre-configured rules.Developer Studio uses a project file, with an .esp extension, that contains pointers to the XML files that supportan instance configuration.System requirementsDeveloper Studio is only available for Windows and has the following hardware requirements:Minimum hardware requirements:•x86 or x64 compatible processor, minimum 1.8 Ghz•At least 1 GB of RAM, depending on the size of the application data set•80 GB hard driveRecommended hardware requirements:•x86 or x64 3.0+ Ghz processor; Oracle recommends Intel Xeon, AMD Opteron, or Intel Dual Core Pentium (x86only) processors• 2 GB of RAM or more, depending on the size of the application data set•One 80 GB hard drive per CPU, minimum 10,000 RPM spindle speed•Gigabit ethernetThe Endeca Developer Studio software installs to approximately 50 MB. Because multiple versions of DeveloperStudio can be stored, a large hard drive is recommended.Required readingBefore installing, Oracle recommends that you read the following documents for important information aboutthe release.Getting Started GuideThe Oracle Commerce Guided Search Getting Started Guide gives an overview of Oracle Commerce Guided Searchcomponents and includes information about configuration scenarios. After installing all the components in yourOracle Commerce Guided Search deployment, read this guide for information on verifying your installation. Youcan download the Oracle Commerce Guided Search Getting Started Guide from the Oracle Technology Network. Release NotesRefer to the release notes for information about known issues for this release. You can download the OracleCommerce Guided Search and Experience Manager Release Notes from the Oracle Technology Network. Migration GuideRefer to the Oracle Commerce Platform Services Migration Guide for information about migrating yourimplementation from a previous version of Oracle Commerce Guided Search software.2 1 Installation for Endeca Developer StudioInstalling Endeca Developer StudioThis section describes the installation procedure.Installation stepsDeveloper Studio is available on the Oracle Software Delivery Cloud.To install Developer Studio:1.In your local environment, locate the Developer Studio installer that you downloaded from the OracleSoftware Delivery Cloud.2.Extract the Endeca Developer Studio package to a local directory.3.Double-click the installer file: OCdevstudio<version>-<OS>_<BUILD>.exe4.Click Next to begin the installation wizard.5.On the Copyright and legal screen, click Next.6.In the License Agreement screen, select I accept the terms in the license agreement, then click Next.7.In the Destination Folder screen, either accept the default location or click Change and browse to thedirectory where you want to install the Endeca software. Oracle recommends that you accept the defaultlocation (C:\Endeca\DeveloperStudio). When you have finished, click Next.NoteIf you do not use the default location, and you are installing more than one Endeca product on thesame machine, ensure that you install each product to a separate location.8.In the Ready to Install the Program screen, click Install.9.When the installation is complete, click Finish.Silent installation steps for WindowsThe silent installer is useful if you want to add the installation of Developer Studio to your own install script, orpush out the installation on multiple machines.The silent installer is not interactive and is available for Windows only.To launch the silent installer:1.Open a command prompt and navigate to the directory where you downloaded the installer.2.Issue the following command:dstd_version_arch-OS.exe /s /v" /qn INSTALLDIR=\"C:\Endeca\DeveloperStudio\""You can replace C:\Endeca\DeveloperStudio\with the location to which you want to install.1 Installation for Endeca Developer Studio34 1 Installation for Endeca Developer Studio2Changing the Developer Studio configurationThis section describes tasks for configuring Developer Studio. For complete information on the pipelinedevelopment and instance configuration tasks that you can perform in Developer Studio, see the EndecaDeveloper Studio Help.Related links•Pipeline paths in an Endeca Application Controller environment (page 5)•About temporal properties (page 5)Pipeline paths in an Endeca Application Controller environmentWhen using a Pipeline.epx file in an environment controlled by the Endeca Application Controller, pipelinepaths for incoming data are treated as follows:•Relative paths in the pipeline are resolved in relation to the directory path you entered in the IncomingDirectory field for hosts, components and scripts on the EAC Administration page in Oracle EndecaWorkbench.•Absolute paths are not changed and are used exactly as specified.About temporal propertiesTime and date properties are defined like other property types in Endeca Developer Studio.The Property editor provides three temporal property types:•DateTime values represent a time of day on a given date2 Changing the Developer Studio configuration5•Duration values represent a length of time•Time values represent a time of dayThe DateTime property type is available by default in Developer Studio. The Duration and Time property typesare not supported in the default version of Developer Studio.Configuring Developer Studio for the use of Duration and Time property types Developer Studio is configured through the EStudio.ini file, located in the conf directory of the DeveloperStudio installation.Settings in this file are read at startup. The EStudio.ini file accepts two configuration options, latitude andclassicForge, each of which may be set to 0 (zero) or 1.To Configure Developer Studio for Duration and Time properties:1.Navigate to Developer Studio's conf directory.For example:C:\Endeca\DeveloperStudio\<version>\conf2.Open EStudio.ini in a text editor.Edit the file so that it contains the following settings:3.4.Copy the entire contents of the directory template\Basic Pipeline to the directory template\_Latitude\Basic Pipeline, overwriting existing files.5.Open the Project.esp file in the template\_Latitude\Basic Pipeline directory in a text editor. Just, which is located near the end of the file, add the following line:above the line </STUDIO_PROJECT>6.Save and close the file.7.Create a Latitude directory in the help directory of Developer Studio.A sample path for this directory might be:8.Copy the contents of the help\basic directory to the new Latitude directory.unch Developer Studio and open your project file.6 2 Changing the Developer Studio configuration10.In the Project Explorer, double-click on Properties.11.Create a new property or edit an existing property.In the Type drop-down list, the Duration and Time property types are now available.NoteOnce you have added properties with a Duration or Time type, the project cannot be opened by aDeveloper Studio instance with the default configuration.2 Changing the Developer Studio configuration78 2 Changing the Developer Studio configuration3Uninstalling Developer StudioThis section contains the procedures for uninstalling the Developer Studio package.Related links•Steps to uninstall Developer Studio on Windows (page 9)Steps to uninstall Developer Studio on WindowsFollow these steps to uninstall Developer Studio from your Windows machine.Before you begin the uninstall process, back up files that you want to retain from the Developer Studio directory.To uninstall Developer Studio from your Windows machine:1.From the Windows Control Panel, select Add or Remove Programs.2.Select Endeca Developer Studio from the list of installed software.3.Click Remove and follow the prompts.3 Uninstalling Developer Studio910 3 Uninstalling Developer Studio。
目录
一、3DSource零件库安装步骤 .................................................... - 1 -
二、Win7系统下3DSource零件库不能正常使用...................................... - 2 -
三、提示“308 下载库索引错误”................................................. - 3 -
四、二次安装3DSource零件库后,零件库不能正常使用.............................. - 3 -
一、3DSource零件库安装步骤:
1、运行3DSource零件库安装程序;
2、在线版用户在“安装类型”里请勾选“在线使用”;
4、点“确定”完成安装。
二、Win7系统下3DSource零件库不能正常使用
找到CAD软件的主程序单击“右键—属性—兼容性”,把“以管理员身份运行”打钩,重新启动CAD软件即可正常使用(以solidworks为例)。
三、提示“308 下载库索引错误”
网络问题,请联系贵公司网管。
四、二次安装3DSource零件库后,零件库不能正常使用
请将第一次零件库安装目录下的安装目录及文件全部清除干净,再进行第二次安装。
(注:素材和资料部分来自网络,供参考。
请预览后才下载,期待你的好评与关注!)。