台式眼压计产品介绍
- 格式:pptx
- 大小:1.46 MB
- 文档页数:21
眼压测量与眼压计的介绍眼压是诊断与治疗青光眼的一个必不可少的手段。
眼压测量方法有眼压计法、直接检测法(液体压力计)及指压法。
目前临床上常用的眼压计有Goldmann压平眼压计、Perkins手持眼压计、Tono-Pen眼压计、Proview眼压监测计与非接触式眼压计等。
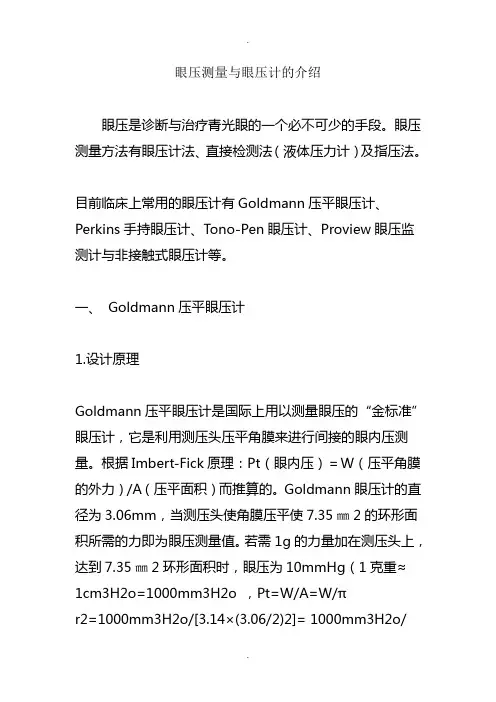
一、Goldmann压平眼压计1.设计原理Goldmann压平眼压计是国际上用以测量眼压的“金标准”眼压计,它是利用测压头压平角膜来进行间接的眼内压测量。
根据Imbert-Fick原理:Pt(眼内压)=W(压平角膜的外力)/A(压平面积)而推算的。
Goldmann眼压计的直径为3.06mm,当测压头使角膜压平使7.35㎜2的环形面积所需的力即为眼压测量值。
若需1g的力量加在测压头上,达到7.35㎜2环形面积时,眼压为10mmHg(1克重≈1cm3H2o=1000mm3H2o ,Pt=W/A=W/πr2=1000mm3H2o/[3.14×(3.06/2)2]= 1000mm3H2o/7.35mm2=135.98mmH2o=135.98/13.6(mmHg)=10m mHg),依此类推。
2.Goldmann压平眼压计的结构(1)测压头:为一表面平滑的透明塑料柱,前端可直接接触角膜,作压平角膜用,压平面直径为3.06mm。
后端固定于测压杠杆末端的金属环内。
测压头内有两个基底相反的三棱镜,故能使与角膜接触处的环形物象移位成为两个半圆环形。
另在测压头前端侧面上有径线刻度,供测量高度散光时,作轴向定位用。
(2)测压装置:为一能前后移动的杠杆,其移动度受内部安装的弹簧控制,弹簧的张弛力可被一测压螺旋调整。
在测压螺旋表面有以克重量为单位的重力刻度,表示弹簧的张力(克重量),范围由0至8g(即相当于0至80mmHg)。
Goldmann 眼压计有“悬吊式”(T900型)与“座式”(R900型)两型。
操作时只需捻转测压螺旋,在裂隙灯显微镜观察下,当角膜压平面达3.06mm直径时,所需压力即眼压值。

U S ER’S A N D M AI N TEN AN CE M A N U A L ENGLISHINSTRUCTION MANUAL 12TONOMETERIcare® TA01iINSTRUCTION MANUAL TA01i-001 EN-3.0The information in this document is subject to change without prior notice. In a conflict situation the English version prevails.0044This device complies with:Medical Device Directive 93/42/EEC Canadian Medical Device RegulationsCopyright © 2015 Icare Finland Oy Made in FinlandIcare Finland Oy/Tiolat OyÄyritie 22, FI-01510 Vantaa, FinlandTel. +358 9 8775 1150, Fax +358 9 728 6670 , *********************TABLE OF CONTENTSIndications for use ...................................................................................................................................................................................................................... 3 Introduction ............................................................................................................................................................................................................................... 3 Safety instructions ...................................................................................................................................................................................................................... 3 Parts of the tonometer ............................................................................................................................................................................................................... 4 Turning the tonometer on and loading the probe ...................................................................................................................................................................... 4 Load the probe in the following way: ................................................................................................................................................................................... 4 Measurement ............................................................................................................................................................................................................................. 4 Display after measurements ...................................................................................................................................................................................................... 5 Other functions .......................................................................................................................................................................................................................... 5 Accessing old measurement value ........................................................................................................................................................................................ 5 Turning the tonometer OFF .................................................................................................................................................................................................. 5 Error messages ..................................................................................................................................................................................................................... 5 Diagram of tonometer functions ................................................................................................................................................................................................ 6 Technical information ................................................................................................................................................................................................................ 6 Performance data....................................................................................................................................................................................................................... 7 Accessories ................................................................................................................................................................................................................................. 7 Maintenance .............................................................................................................................................................................................................................. 7 Replacing the probe base...................................................................................................................................................................................................... 8 Cleaning the probe base ....................................................................................................................................................................................................... 8 Cleaning the tonometer ........................................................................................................................................................................................................ 8 Replacing the batteries ......................................................................................................................................................................................................... 8 Returning the Icare tonometer for servicing /repair ............................................................................................................................................................. 9 Periodic Safety Checks .......................................................................................................................................................................................................... 9 Patents and copyrights ............................................................................................................................................................................................................... 9 Symbols ...................................................................................................................................................................................................................................... 9 Electromagnetic declaration (9)INDICATIONS FOR USEThe Icare tonometer TA01i is intended to be used for the measurement of intraocular pressure in the human eye.INTRODUCTIONThe Icare tonometer is used in the diagnosis, follow up and screening of glaucoma. It is based on a new, patented, induction-based rebound method, which allows intraocular pressure (IOP) to be measured accurately, rapidly and without an anesthetic.Since single-use probes are used for measurement, there is no risk of microbiological contamination. No part of the tonometer or probes are made with natural rubber latex. Intraocular pressure changes due to the effects of the pulse, breathing, eye movements and body position. Because measurements are taken using a handheld device in fractions of a second, several measurements are needed to obtain an accurate reading and there fore the software is pre-programmed for six measurements.SAFETY INSTRUCTIONSWARNINGThe tonometer must not come into contact with the patient’s eyes, except for the probes, which may do so for a fraction of a second during measurement. Do not bring the tonometer into contact with the eye or push it into the eye (the tip of the probe should be 4-8mm, or 1/6 – 1/3 inch, from the eye).WARNINGThe tonometer should only be opened by qualified service personnel. It contains no userserviceable parts, apart from the batteries and a probe base. The Icare tonometerrequires no routine servicing or calibration other than changing the batteries at least every 12 months or changing or cleaning the probe base. If servicing is necessary, contact qualified service personnel or your local Icare representative.WARNINGNever spray, pour or spill liquid onto the Icare tonometer, its accessories, connectors, switches or openings in the chassis. Dry any liquid on the surface of the tonometer immediately.WARNINGUse of any accessories and cables other than those specif ied in the manufacturer’s documentation, with the exception of cables sold by the manufacturer as replacement parts for internal components, may result in increased emissions or decreased immunity of the Icare TA01i tonometer.WARNINGUse of any accessory or cable with the Icare TA01i tonometer other than those specified may result in increased emissions or decreased immunity of the Icare TA01i tonometer.CAUTIONRead this manual carefully, since it contains important information on using and servicing the tonometer.Retain this manual for future use.When you have opened the package, check for any external damage or faults, particularly for damage to the case. If you suspect that there is something wrong with the tonometer, contact the manufacturer or distributor.Use the tonometer only for measuring intraocular pressure. Any other use is improper and the manufacturer cannot be held liable for any damage arising from improper use, or for the consequences thereof.Never open the casing of the tonometer, except for the battery compartment or to change the probe base.This manual contains instructions for replacing batteries and changing the probe base.Never use the tonometer in wet or damp conditions.The probe base, battery compartment cover, screws, collar and probes are so small that a child could swallow them. Keep the tonometer out of the reach of children.Do not use the device near inflammable substances, including inflammable anesthetic agents.Prior to each measurement, check that a new disposable probe from an intact package is being used.Be sure that the probe contains the small plastic round tip in front.Certain microbiological agents (e.g. bacteria) can be transmitted from the forehead support.To avoid this, the forehead support should be cleaned regularly with a disinfectant, e.g. an alcohol solution.The tonometer conforms to EMC requirements (IEC 60101-1-2: 2001), but interference may occur in it if used near (<1m) a device (such as a cellular phone) causing high-intensity elect romagnetic emissions. Although the tonometer’s own electromagnetic emissions are well below the levels permitted by the relevant standards, they may cause interference in other, nearby devices, e.g. sensitive sensors.If the device is not to be used for a long time, we recommend that you remove its AA batteries, since they may leak. Removing the batteries will not affect the subsequent functioning of the tonometer.Be sure to dispose of the single-use probes properly (e.g. in a container for disposable needles), because they may contain micro-organisms from the patient.Batteries, packaging materials and probe bases must be disposed of according to local regulations.To obtain firm support for the patient’sforehead, in order to obtain an accuratemeasurement at the right distance, you can adjust the forehead support by turning the forehead supportadjusting wheel.Open the probe tube by removing the cap and insert the probe into probe base as shown in the image. After the probe has been inserted, be careful not to point it down before activating the tonometer in order to prevent the probe from falling out. Activate by pressing the easurement button once and the tonometer will be ready for measurement when 00 appears on the display. After activating the probe is magnetized and will not fall out. CAUTIONFederal law (U.S.) restricts this device to sale by or on the order of a physician.PARTS OF THE TONOMETERTURNING THE TONOMETER ON AND LOADING THE PROBEPlace the wrist strap into the wrist strap attachment. Place the wrist strap around your wrist and secure it. The wrist strap protects the tonometer from dropping onto the floor accidentally. Insert batteries into the tonometer (page 9).Press the measurement button to turn the tonometer ON. The tonometer display will display all of the LCD segments (see the figure beside). Check that all of the segments are functional in the four-digit, sevensegment LCD display.Following a brief pause, the displa y will show “LoAd,” reminding the user to load the single use probe into the tonometer prior to measurement.Load the probe in the following way:MEASUREMENTSince local anesthetic may lower the tonometer reading, we recommend that you refrain from using an anesthetic when performing measurements.Ask the patient to relax and look straight ahead at a specific point. Bring the tonometer near the patient’s eye. The central groove should be in a horizontal position, and the distance from the eye to the front part of the collar shouldbe the length of the collar. In other words, the distance from the tip of the probe to the patient’s cornea (see picture) should be 4-8 mm (1/6-1/3 inch). 1. Forehead support2. Forehead support adjusting wheel3. Display4. Collar5. Selector button6. Measurement button7. Probe base8. Central grooveIf necessary, adjust the distance by turning the forehead support adjusting wheel. Press the measurement button lightly to perform the measurement, taking care not to shake the tonometer. The tip of the probe should make contact with the central cornea. Six measurements are made consecutively. After each successful measurement, you will hear a short beep. Once the six measurements have been performed, the IOP will be shown on the display after the ‘P’.If there is an erroneous measurement, the tonometer will beep twice and display an error message. Press the measurement button to clear the error message. If several erroneous measurements appear, see error messages (page 10).To obtain the most accurate reading, six measurements are required, but the result is also displayed after the first measurement, which can usually be considered valid. The measurement values displayed are average values for all previous measurements (1.-5.). Single measurement values are not shown. Should there be variation between the measurements, ‘P’ will flash on the display after the sixth measurement.Following the performance of the entire measurement, a new measurement series can be begun by pressing the measurement button. The tonometer will then be ready for the next measurement series (00 will show on the display, see page 8).If the user doubts the validity of the measurement (for example, if the probe made contact with the eyelid, or missed the central cornea etc.), we recommend that he/she make a new measurement. In addition, when encountering unusual values (for example over 22mmHg or below 8 mmHg) we recommend the performance of a new measurement to verify the result.*Badouin C, Gastaud P. Influence of topical anesthesia on tonometeric values of intraocular pressure. Ophthalmologica 1994;208:309-313 DISPLAY AFTER MEASUREMENTSBefore After the second measurement After the sixth measurement00 2.13 P 13After the sixth measurement, the letter P appears on the display, followed by the IOP (Intraocular pressure) reading.If the P is blinking, it means that the standard deviation of the measurements is greater than normal.P_ (line down) The standard deviation of the different measurements has a slightly greater value than normally, but the effect on the result is unlikely to be relevant.P-(line in the middle) The standard deviation of the different measurements is clearly greater than normal, but the effect on the result is probably irrelevant. A new measurement is recommended if the IOP is over 19 mmHg.P–(line up) The standard deviation of the different measurements is great and a new measurement is recommended.OTHER FUNCTIONSAccessing old measurement valueFrom the starting position, press the right or left selector buttonuntil ‘Old’ appears on the display. Then press the measurementbutton. You can now ‘scroll’ through the old values by pressingthe selector buttons (right=older, left=more recent, from 0-9).To exit the old values search, press the measurement button.The display will now show the word ‘Old’. Press either selector button to access other functions (00=measurement, End=turning OFF).Turning the tonometer OFFPress either selector butto n until the display shows ‘End‘. Pressthe measurement button for two seconds - the display will show‘byE’ and the tonometer will switch off. The used probe will bepartially ejected. Use the used package to remove it from thetonometer. Ensure that you dispose of the probe properly.Error messagesTo clear error messages, press the measurement button, after which the measurement can be repeated. The following messages may appear:DIAGRAM OF TONOMETER FUNCTIONSTECHNICAL INFORMATIONType: TA01i.The device conforms to CE regulations.Dimensions: 13 – 32 mm (W) * 45 – 80 mm (H) * 230 mm (L).Weight: 155 g (without batteries), 250 g (4 x AA batteries).Power supply: 4 x AA non-rechargeable batteries (e.g. alkaline).Measurement range: 7-50 mmHg, display range: 0-99 mmHg (IOP estimation beyond the measuring range). Accuracy (95 % tolerance interval relative to manometry): ±1.2 mmHg (≤20 mmHg) and ±2.2 mmHg (>20 mmHg). Repeatability (coefficient of variation): <8 %.Accuracy of display: 1.Display unit: Millimeter mercury (mmHg).The serial number is on the back of the battery compartment cover.There are no electrical connections from the tonometer to the patient.The device has B-type electric shock protection.Operation environment:Temperature: +10 °C to +35 °CRelative humidity: 30 % to 90 %Atmospheric pressure: 800 hPa-1,060 hPaStorage environment:Temperature: -10 °C to +55 °CRelative humidity: 10 % to 95 %Atmospheric pressure: 700 hPa-1,060 hPaTransport environment:Temperature: -40 °C to +70 °CRelative humidity: 10 % to 95 %Atmospheric pressure: 500 hPa-1,060 hPaMode of operation: continuous.PERFORMANCE DATAThe performance data is obtained from a clinical study, performed according to American National Standard ANSI Z80.10-2003 and International Standard ISO 8612.2 for tonometers. The study was performed ain the Department of Ophthalmology, Helsinki University Central Hospital. In the study, 158patients were measured. The mean paired difference and standard deviation (Goldmann-Icare) were -0.4 mmHg and 3.4 mmHg. A scattergram and Bland-Altman plot of the results is shown below.ACCESSORIESMAINTENANCEFollow local regulations and recycling instructions regarding the disposal or recycling of the Icare tonometerand accessories.WARNINGThe tonometer should only be opened by qualified service personnel. It contains no userserviceable parts, apart from the batteries and a probe base. The Icare tonometerrequires no routine servicing or calibration other than changing the batteries at least every 12 months or changing or cleaning the probe base. If servicing is necessary, contact qualified service personnel or your local Icare representative.Battery compartment coverReplacing the probe baseReplace the probe base every twelve months. Clean or replace the probe base if the error messages E01 or E03 are displayed.Instructions for replacing the probe base: • Turn off the tonometer.• Unscrew the probe base collar and put it in a safe place.• Remove the probe base by tilting the tonometer downwards and use your fingers to pull the probe base out of the tonometer.• Insert a new probe base into the tonometer. • Screw the collar in, to lock the probe base.Cleaning the probe baseYou can reuse the probe base after careful cleaning. Clean the probe base every six months. Clean or replace the probe base if the error messages E01 or E03 are displayed.Instructions for cleaning the probe base:• Fill the probe base cleaning container or other clean container with 100% isopropyl alcohol. • Turn the power off.• Unscrew the probe base collar.• Invert the probe base over the container, drop in the probe base into the container and l et soak for 5-30 minutes. • Remove the probe base from alcohol.• Dry the probe base by blowing clean canned or compressed air into the hole in the probe base. This will additionally remove possible residual dirt. • Insert the probe base into the tonometer. • Screw the collar in, to lock the probe base.Cleaning the tonometerWARNINGNever spray, pour or spill liquid onto the Icare tonometer, its accessories, connectors, switches or openings in the chassis. Dry any liquid on the surface of the tonometer immediately.Icare TA 01’s surfaces have been tested and found chemically resistan t to the following liquids: • 100 % 2-propanol • Mild soap solution • 95% Pursept solutionCleaning instructions for surfaces: • Turn the power off.• Dampen a soft cloth with one of the liquids mentioned above. • Lightly wipe the surfaces of the t onometer with the soft cloth. • Dry the surfaces with a dry soft cloth.Replacing the batteriesUnscrew the battery compartment locking screw with a screwdriver or a small coin.Remove the battery compartment cover. Remove the old batteries.Insert a new set of batteries (four AA batteries). Do not use rechargeable batteries, since they may not function properly (the inner resistance of some rechargeable batteries is too high). Insert the batteries in accordance with the diagrams inside the battery compartment, with the +terminals pointing downwards on the display side of the tonometer (the rear side), and the -terminals pointing downwards on the measurement side (the front side).Replace the battery compartment cover and secure it by screwing it in lightly using the coin or screwdriver. Take care not to use excessive force when screwing the cover into place.Returning the Icare tonometer for servicing /repairContact Icare Finland’s Technical Services Department (see ) or your local Icare representative for shipping instructions. Unless otherwise instructed by Icare Finland, there is no need to ship accessories along with the tonometer. Use a suitable carton with the appropriate packaging material to protect the device during shipment. Return the device using any shipping method that includes proof of delivery.Periodic Safety ChecksWe recommend that the following checks be performed every 24 months.Equipment inspection for mechanical and functional damage.Inspection of safety labels for legibility.Applicable in Germany only: Messtechnische Kontrolle nach MPG (Medizinproduktegesetz) alle 24 Monate.PATENTS AND COPYRIGHTSUS Patent No 6,093,147 and patents pending. The Icare tonometer is also protected by the applicable copyright laws.SYMBOLSELECTROMAGNETIC DECLARATIONWARNINGUse of any accessories and cables other than those specified in the manufacturer’s documentation, with the exception of cable s sold by the manufacturer as replacement parts for internal components, may result in increased emissions or decreased immunity of the Icare TA01i tonometer.WARNINGUse of any accessory or cable with the Icare TA01i tonometer other than those specified may result in increased emissions or decreased immunity of the Icare TA01i tonometer.Attention See instructionsSerial numberSingle use onlyB-type deviceLot numberManufacturing dateSterilized using radiationKeep dryStorage environmentTransport environmentManufacturerTA01i is class B equipment and needs special precautions regarding EMC and needs to be installed and put into service according to EMC information provided in user and maintenance manual.Compliance level Electromagnetic environment-GuidancePortable and mobile RF communications equipment should be usedno closer to any part of the IcareTA01i, including cables, than therecommended separation distance calculated from the equationapplicable to the frequency of the transmitter.Recommended separation distanced = 1 2 √Pd = 1.2 √P 80 MHz to 800 MHzd = 2.3 √P 800 MHz to 2 5 GHzwhere P is the maximum output power rating of the transmitter inwatts (W) according to the transmitter manufacturer and d is therecommended separation distance in metres (m).Field strengths from fixed RF transmitters, as determined by anelectromagnetic site survey should be less than the compliance levelin each frequency range.Interference may occur in the vicinity of equipment marked with thefollowing symbol:11。
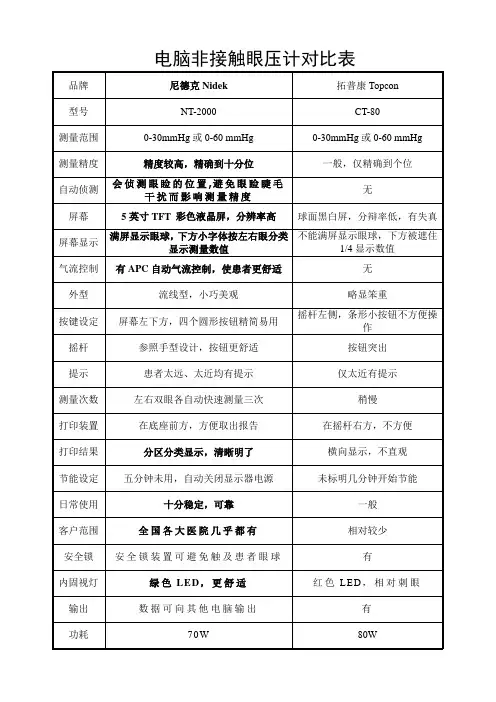
电脑非接触眼压计对比表产品介绍:1. NIDEK NT-2000利用自动对焦功能进行检测,即使是初次使用也可以轻松掌握操作。
2. NT-2000具有独特的软气流设计:NT-2000在第一次读数后将会自动启动APC功能,根据眼压情况调整喷气量的大小,从而在保证测量准确的同时尽可能让患者感觉更舒适。
3. NT-2000的安全锁装置可避免触及患者眼球。
4. 在检测前,NT-2000会侦测眼睑的位置,避免眼睑睫毛干扰而影响测量精度。
NIDEK眼压计进入中国市场已有十年,目前全国各大医院几乎都有NIDEK眼压计在使用中。
NIDEK眼压计稳定的性能已得到广大医务人员的认可。
功能参数:测量范围:1-60毫米贡柱(1毫米贡柱间隔)APC40.APC60工作距离;11毫米(喷头到角膜顶点)对位模式:一个对位光点和对焦显示内固视灯:绿色LED操纵柑工作范围:前/后36毫米左/右86毫米上/下28毫米对位模式:(对位)(对焦)(喷气)测量范围:1-60毫米贡柱(1毫米贡柱间隔)APC40.APC60工作距离;11毫米(喷头到角膜顶点)对位模式:一个对位光点和对焦显示内固视灯:绿色LED操纵柑工作范围:前/后36毫米左/右86毫米上/下28毫米对位模式:(对位)(对焦)(喷气)(自动) 自动手动自动(手动) 手动手动自动测量范围:1-60毫米贡柱(1毫米贡柱间隔)APC40.APC60工作距离;11毫米(喷头到角膜顶点)对位模式:一个对位光点和对焦显示内固视灯:绿色LED操纵柑工作范围:前/后36毫米左/右86毫米上/下28毫米对位模式: (对位)(对焦)(喷气)(自动) 自动手动自动(手动) 手动手动自动适用范围:测量范围:1-60毫米贡柱(1毫米贡柱间隔)眼科最基本视功能检查项目之一.适用于眼外伤,青光眼,眼底病,白内障,验光,以及原因不明性眼压升高.零配件:标准配件:保险丝打印纸颌托纸颌托纸固定针电源线防尘罩脉冲探测器顶盖。
眼压测量与眼压计的使用眼压是指眼球内眼房的液体对于眼球壁的压力。
眼压的正常范围为10-21毫米汞柱(mmHg),超过或低于这个范围都可能是眼部疾病的标志。
因此,眼压测量是一种常见的眼科检查方法,以检查眼压是否正常。
眼压计是一种用于测量眼压的专用仪器。
它的主要组成部分包括眼压计主机、显微镜和计量器。
下面将详细介绍眼压测量的步骤和眼压计的使用:1.准备工作:使用眼压计之前,需要进行一些准备工作。
首先,确保测量环境安静、明亮。
然后,确认仪器的电源已接通,然后等待其预热。
最后,预备好测量所需的消毒用品和眼压计笔尖。
2.患者准备:确保患者没有佩戴隐形眼镜,并进行眼部的简单清洁和消毒。
3.测量步骤:患者坐在测量椅上,保持眼睛的水平。
医生或技术人员戴上手套,并使用消毒液清洁手指。
然后,将消毒液放在眼压计笔尖上,在患者的眼上方放置显微镜。
医生使用另一只手的食指和中指,在患者下眼睑上施加轻微的压力使其下垂。
4.测量过程:医生使用眼压计笔尖轻轻触碰患者眼球的角膜中央。
然后医生通过显微镜观察角膜的形状和变化,并将结果读取到眼压计上的计量器上。
通常需要进行两次测量,以确保准确性。
5. 测量结果:眼压计的计量器会显示出测量结果,以毫米汞柱(mmHg)为单位。
正常的眼压范围是10-21mmHg,超过或低于这个范围可能表明患者存在眼部疾病。
1.统一标准:为了保证测量结果的准确性和可比性,需要遵循统一的测量标准。
医生或技术人员应接受专业培训,熟悉使用眼压计的方法和技巧。
2.注意清洁:眼压计使用之前需要进行清洁和消毒,以防止交叉感染。
同时,医生或技术人员需要注意手部清洁和消毒,避免引入细菌。
3.遵守操作规程:医生或技术人员在使用眼压计时需要遵守操作规程,确保测量过程的安全和有效。
比如,要保持手稳定,避免眼球受伤。
4.注意卫生习惯:医生或技术人员应注意个人卫生习惯,如佩戴手套、洗手等,以降低交叉感染的风险。
5.客观测试:为了得到准确的眼压测量结果,需要消除因素干扰。
眼压计市场分析报告1.引言1.1 概述概述:眼压计是一种用于测量人眼内部压力的仪器,是眼科医生诊断和治疗青光眼的重要工具。
眼压计市场在近年来得到了迅速发展,随着人们对眼健康的关注度不断提升,对眼压计的需求也日益增加。
本报告将对眼压计市场进行深入分析,包括市场现状、发展趋势和竞争分析,旨在为行业相关企业和投资者提供全面的市场情报,并对市场未来的发展做出展望和建议。
1.2 文章结构文章结构:本报告共分为引言、正文和结论三个部分。
引言部分主要包括概述、文章结构、目的和总结等内容,用以引导读者对本报告的内容和结构有一个整体的把握。
正文部分将分为眼压计市场现状、眼压计市场发展趋势以及眼压计市场竞争分析三个小节,分析市场的现状和发展趋势,同时对市场的竞争情况进行深入剖析。
结论部分将对市场分析报告进行总结,并展望市场的发展前景,同时提出相关建议和展望。
整个报告将全面、系统地分析眼压计市场,为相关行业和企业提供可靠的参考和分析。
json"1.3 目的": {"content": "本报告的目的是对眼压计市场进行深入分析,了解市场现状、发展趋势和竞争情况。
通过对市场数据和趋势的分析,为相关企业、投资者和决策者提供有效的市场信息和参考,帮助他们制定正确的市场战略、投资决策和业务规划。
同时,通过对市场前景的展望,提供相关建议和展望,为市场未来发展提供指导和推动。
"}1.4 总结:在本篇市场分析报告中,我们对眼压计市场进行了深入分析,从现状、发展趋势到竞争分析,全面展现了眼压计市场的整体情况。
通过对市场现状的分析,我们发现眼压计市场正处于快速增长的阶段,需求持续增加,市场规模不断扩大。
同时,我们也分析了眼压计市场未来的发展趋势,包括技术创新、产品升级和市场需求的变化。
在竞争分析部分,我们对市场主要竞争对手进行了分析,并提出了一些市场策略和建议。
综合以上分析,我们认为眼压计市场有着广阔的发展前景,但也面临着激烈的市场竞争。
简述眼压计的工作原理一、引言眼压计是一种用于测量眼压的仪器,通常用于诊断青光眼等眼部疾病。
本文将详细介绍眼压计的工作原理。
二、眼压计的分类根据测量原理和使用场景,眼压计可以分为以下几种:1.接触式眼压计:需要接触到角膜表面进行测量;2.非接触式眼压计:无需接触角膜表面即可进行测量;3.便携式眼压计:体积小、重量轻,适合在户外或临床移动使用;4.台式眼压计:体积大、重量重,适合在医院或诊所等固定场所使用。
三、接触式眼压计的工作原理1.装置接触式眼压计由一个金属柄和一个圆锥形塑料头组成。
塑料头上覆盖着一个小球,该小球与角膜表面相接触。
2.测量原理当小球与角膜表面相接触时,会产生一个力。
这个力会传递到金属柄上,并通过一个弹簧传递到一个指针上。
指针的位置会随着力的大小而改变,因此可以测量出眼压。
3.注意事项接触式眼压计需要直接接触到角膜表面,因此需要消毒,并且需要由专业人员进行操作。
四、非接触式眼压计的工作原理1.装置非接触式眼压计通常由一个光源和一个探测器组成。
在使用时,光源会发射一束光线,探测器会检测这束光线经过角膜后的弯曲程度。
2.测量原理当光线经过角膜时,会受到折射和反射的影响,从而产生弯曲。
探测器会检测这种弯曲,并通过一个算法计算出眼压。
3.注意事项非接触式眼压计无需直接接触到角膜表面,因此不需要消毒,并且操作简单、方便。
五、便携式眼压计的工作原理1.装置便携式眼压计通常由一个小型电子仪器和一个小型气泵组成。
电子仪器用于控制气泵输出气体的流量和压力。
2.测量原理当气泵输出气体时,气体会通过一个小孔进入角膜表面下方的前房。
当压力达到一定值时,前房会变形,从而改变眼内压力。
电子仪器会测量这种压力变化,并通过一个算法计算出眼压。
3.注意事项便携式眼压计需要经常更换气泵中的电池,并且需要进行校准以保证测量精度。
六、台式眼压计的工作原理1.装置台式眼压计通常由一个大型仪器和一个附带支架的测量头组成。
测量头上覆盖着一个小球,该小球与角膜表面相接触。
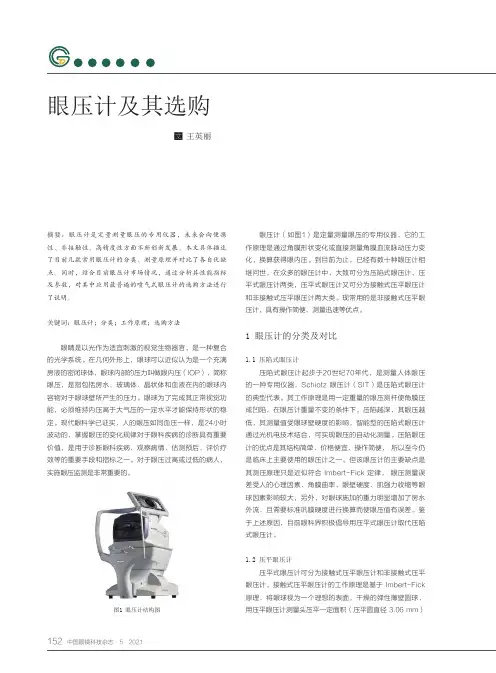
眼压计及其选购王英丽摘要:眼压计是定量测量眼压的专用仪器,未来会向便携性、非接触性、高精度性方面不断创新发展。
本文具体描述了目前几款常用眼压计的分类、测量原理并对比了各自优缺点。
同时,结合目前眼压计市场情况,通过分析其性能指标及参数,对其中应用最普遍的喷气式眼压计的选购方法进行了说明。
关键词:眼压计;分类;工作原理;选购方法眼睛是以光作为适宜刺激的视觉生物器官,是一种复合的光学系统。
在几何外形上,眼球可以近似认为是一个充满房液的密闭球体,眼球内部的压力叫做眼内压(IOP),简称眼压,是指包括房水、玻璃体、晶状体和血液在内的眼球内容物对于眼球壁所产生的压力。
眼球为了完成其正常视觉功能,必须维持内压高于大气压的一定水平才能保持形状的稳定。
现代眼科学已证实,人的眼压如同血压一样,是24小时波动的,掌握眼压的变化规律对于眼科疾病的诊断具有重要价值,是用于诊断眼科疾病、观察病情、估测预后、评价疗效等的重要手段和指标之一。
对于眼压过高或过低的病人,实施眼压监测是非常重要的。
图1 眼压计结构图眼压计(如图1)是定量测量眼压的专用仪器,它的工作原理是通过角膜形状变化或直接测量角膜血流脉动压力变化,换算获得眼内压。
到目前为止,已经有数十种眼压计相继问世,在众多的眼压计中,大致可分为压陷式眼压计、压平式眼压计两类,压平式眼压计又可分为接触式压平眼压计和非接触式压平眼压计两大类。
现常用的是非接触式压平眼压计,具有操作简便、测量迅速等优点。
1 眼压计的分类及对比1.1 压陷式眼压计压陷式眼压计起步于20世纪70年代,是测量人体眼压的一种专用仪器,Schiotz 眼压计(SIT)是压陷式眼压计的典型代表。
其工作原理是用一定重量的眼压测杆使角膜压成凹陷,在眼压计重量不变的条件下,压陷越深,其眼压越低,其测量值受眼球壁硬度的影响,智能型的压陷式眼压计通过光机电技术结合,可实现眼压的自动化测量。
压陷眼压计的优点是其结构简单、价格便宜、操作简便, 所以至今仍是临床上主要使用的眼压计之一。
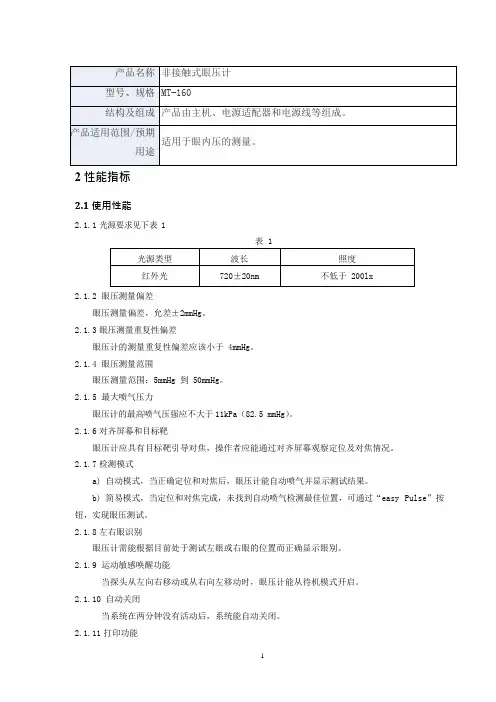
2性能指标2.1使用性能2.1.1光源要求见下表 1表 12.1.2眼压测量偏差眼压测量偏差,允差±2mmHg。
2.1.3眼压测量重复性偏差眼压计的测量重复性偏差应该小于 4mmHg。
2.1.4眼压测量范围眼压测量范围:5mmHg 到 50mmHg。
2.1.5最大喷气压力眼压计的最高喷气压强应不大于11kPa(82.5 mmHg)。
2.1.6对齐屏幕和目标靶眼压计应具有目标靶引导对焦,操作者应能通过对齐屏幕观察定位及对焦情况。
2.1.7检测模式a)自动模式,当正确定位和对焦后,眼压计能自动喷气并显示测试结果。
b)简易模式,当定位和对焦完成,未找到自动喷气检测最佳位置,可通过“easy Pulse”按钮,实现眼压测试。
2.1.8左右眼识别眼压计需能根据目前处于测试左眼或右眼的位置而正确显示眼别。
2.1.9运动敏感唤醒功能当探头从左向右移动或从右向左移动时,眼压计能从待机模式开启。
2.1.10自动关闭当系统在两分钟没有活动后,系统能自动关闭。
2.1.11打印功能眼压计内置打印机,并实现检测结果的打印功能。
2.1.12下巴托a)眼压计的下巴托能进行垂直升降,不应有停顿和突跳现象。
b)下巴托升降范围不小于72mm。
2.1.13移动台a)移动台能进行任意的平移和停止,不应有停顿和突跳现象。
b)移动台左右调节范围不小于(0~78)mm,前后调节范围不小于(0~56)mm。
c)移动台具有运动锁功能。
锁止状态下探头无法随意移动,以保证静止状态和关机状态下探头滑动。
2.1.14探头a)探头能进行垂直升降,不应有停顿和突跳现象。
b)探头升降范围不小于30mm。
2.1.15工作距离工作距离 15mm,允差±10%。
2.1.16软件功能a)软件应具有自动判断对焦情况,并控制喷气功能;b)软件应能够对喷气测试采集数据并计算眼压值;c)软件应具有控制仪器自检程序;d)软件应具有清除历史数据和自动喷气演示功能;2.2外观和结构2.2.1外观应美观大方,色泽均匀;结构合理。
非接触式眼压计的使用说明书非接触式眼压计使用说明书一、产品概述非接触式眼压计是一款用于测量眼压的医疗设备,相比传统的接触式眼压计,它具有操作简便、无痛无创、准确度高等优点。
非接触式眼压计适用于医院、眼科诊所、药房等医疗机构,也可在家庭中使用。
二、产品特点1.非接触式测量,无需触碰眼睛,避免了交叉感染的风险。
2.使用方便,一键式测量,适合各种人群进行自测。
3.快速测量,只需几秒钟即可完成测量。
4.高度准确,具有精准、可靠的测量数据。
三、产品使用方法1.打开设备电源,待屏幕出现欢迎界面后,即可开始测量。
2.使用前请先清洁眼部,去除眼部化妆品、油脂等物质。
3.将测试者按照正确的位置坐好,使其放松身体,抬头注视前方。
4.将设备对准眼睛,使红外线对准瞳孔中央,按下测试按键,进行测量。
5.测量完成后,设备会自动显示测试结果。
四、注意事项1.使用时请注意保持设备清洁,防止使用过程中的污染。
2.使用过程中请勿摇晃设备,以免影响测量结果。
3.请勿将设备放置在高温、潮湿等环境中。
4.请勿将设备放置在易碎物品、锐利器具等物品附近。
5.请勿将设备投掷或撞击,以免损坏设备。
6.请勿自行更换设备上的电池,如需更换,请联系售后人员。
五、维护保养1.使用完毕后,请及时清洁设备,尤其是测试部位,以免污垢影响测量精度。
2.请勿使用化学药品或锐利物品清洗设备,以免损坏设备。
3.长时间不使用设备时,请取出电池,以免电池老化影响设备性能。
4.请勿将设备存放在过于潮湿或过于干燥的环境中。
六、售后服务如有任何产品质量问题,请及时联系售后人员,我们将在收到您的反馈后,为您提供优质的售后服务。
电脑眼压仪的使用方法和流程简介电脑眼压仪是用于测量眼球的压力的一种仪器。
它可以帮助眼科医生进行眼压的检测,从而诊断眼部疾病。
本文将介绍电脑眼压仪的使用方法和流程,以帮助使用者正确操作和获取准确的眼压数据。
使用方法以下是使用电脑眼压仪的步骤:1.准备工作–打开电脑眼压仪,确保仪器处于正常状态。
–准备好一次性的眼罩和清洁纸巾。
2.患者准备–让患者坐在测量椅上,确保舒适和稳定。
–提醒患者在测量过程中保持眼睛稳定和不要眨眼。
3.遮盖眼睛–将眼罩轻轻地放在患者的眼睛上,确保完全覆盖住眼部。
–用手指轻轻按压眼罩,确保贴合眼部并排除空气。
4.开始测量–确保电脑眼压仪的探头对准眼罩上的指示线。
–按下开始按钮,仪器将自动进行测量,测量过程中患者要保持眼睛稳定。
–等待仪器完成测量并显示眼压数据。
5.结束测量–仪器完成测量后,解除眼罩并让患者缓慢睁开眼睛。
–记录测量结果,包括眼压数据和测量时间。
流程概述以下是使用电脑眼压仪的流程概述:1.准备工作:打开仪器并准备好眼罩和清洁纸巾。
2.让患者坐在测量椅上并保持稳定和舒适。
3.遮盖眼睛:轻轻地将眼罩放在眼睛上,并确保贴合和无空气。
4.开始测量:按下开始按钮,仪器将自动进行测量。
5.等待测量结果:在测量过程中,患者要保持眼睛稳定。
6.结束测量:仪器完成测量后,解除眼罩并记录测量结果。
注意事项在使用电脑眼压仪时,请注意以下事项:•确保仪器处于正常工作状态,如有异常请及时联系维修人员。
•确保患者的眼部没有受伤或感染,否则不宜进行测量。
•仪器和眼罩应保持清洁,以避免交叉感染。
•在测量过程中,患者要保持眼睛稳定和不要眨眼。
•记录测量结果时,注意准确记录眼压数据和测量时间。
总结电脑眼压仪是一种用于测量眼压的仪器,能够帮助眼科医生进行眼部疾病的诊断。
正确使用电脑眼压仪可以得到准确的测量结果。
本文介绍了电脑眼压仪的使用方法和流程,以及使用时需要注意的事项。
希望本文能帮助读者正确操作电脑眼压仪,并获取准确的眼压数据。
眼压计使用说明眼压计是一种常用的医疗仪器,用于测量患者眼压的工具。
它通常由医生或医疗专业人员使用,可以帮助判断和监测许多眼部疾病,如青光眼。
本文将详细介绍如何正确使用眼压计,以确保准确的测量结果。
一、准备工作1. 确认设备完好:在使用眼压计之前,首先确认设备的完好性。
检查设备是否存在损坏、老化或缺陷,并且确保所有部件都完整无缺。
2. 保持卫生:使用眼压计之前,务必洗净双手并戴上一次性手套,以避免交叉感染。
二、使用步骤1. 让患者保持舒适:在测量眼压之前,告诉患者他们需要保持头部正直和舒适的姿势。
可以提供一个支撑患者下颌的枕头,以确保他们的头部保持固定。
2. 眼部准备:使用一块干净的纱布或棉球轻轻擦拭患者眼睛周围的任何分泌物或眼妆。
3. 应用麻醉药水:使用一种安全的眼部麻醉药水,滴入患者的眼睛中。
这可以减轻患者的不适感,同时也有助于确保准确的测量结果。
4. 准备测量仪器:打开眼压计,确保其处于准备状态。
根据设备的使用说明书,校准仪器以便获得准确的测量结果。
5. 将眼压计放置在眼睛上方:将眼压计轻轻置于被测眼睛上方,确保其与患者的角膜保持平行。
牢牢抓住仪器的手柄以确保稳定。
6. 启动测量:按下眼压计的测量按钮,仪器会发送一股轻微的气流冲击到患者的眼睛表面。
这些气流将通过计算测量结果来推测眼内的压力。
7. 记录结果:根据眼压计的显示结果,记录测量结果。
这些结果对于评估和监测患者的眼部健康非常重要。
三、清洁和维护1. 每次使用后清洁:每次使用完眼压计后,用清洁剂轻轻擦拭其表面,确保除去可能污染仪器的任何污垢或残留物。
2. 定期校准:根据设备的使用说明书,定期校准眼压计以确保准确的测量结果。
3. 储存注意事项:在不使用眼压计时,将其存放在干燥、清洁且避光的位置,以防止污染或损坏。
总结:使用眼压计测量眼压是一项重要的医疗程序,可帮助诊断和监测眼部疾病。
在使用眼压计之前,请确保设备完好无损,保持卫生,为患者提供舒适和准备工作。