
WINDOWS2000驱动安装
- 格式:doc
- 大小:257.50 KB
- 文档页数:8
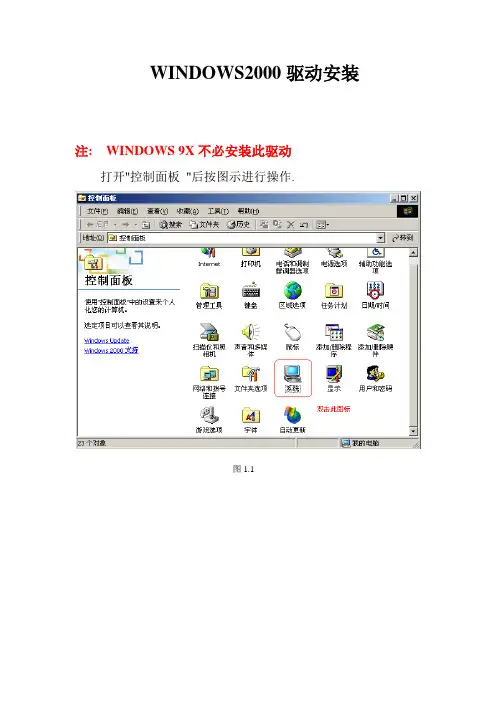

WINDOWS2000驱动安装注:WINDOWS9X不必安装此驱动打开“控制面板”后按图示进行操作.图1」图1.2图13Standard101/102-KeyorMicrosoftNaturalPS/2Keyboard属'Standard101/102-K«yorMicrosoftNaturalFS/2Keyboard驱动程序提供商:Microsoft驱动程序日期:2003-6-Z0驱动程序版本:5.0,2195.6717数字筌名程序:MicrosoftWindows2000Fublisher要查阅有关为该设备加载的驱动程序文件的详细信息,造单击“驱动程序详细信息”。
要卸载该设备的驱动程序文件」诘单击“卸载”。
要更新该设备的驱动程序文件,语单击“更新驱动程序”。
执行此项/、驱动程序详细信息矿卸载QT)I更新驱动程序区).・・确定I取消I图1.4升颌设备哭动程序向导欢迎使用升级设备驱动程序向导此向导帮助您为硬件设备升级驱动程序口要继侯,诸单击“下一步执行“下一步”;、图1.5升级设备驱动程序向导安装硬件设备驱动程序设备驱动程序是可使硬件设备与糜作系统工作的软件程序.该向导将为下列硬件设备更新驱动程序:Standard101/102-KeyorMicrosoftNaturalPS/2KeyboardIIiTi|将设备驱动程序更新到新的版本有可能增进这个设备的性能或增加功能。
您期望向导做什么?r搜索适于我的设备的驱动程序能荐)⑤”G费示m知设备驱动程序的史版;从中选掾脖定驱动程序⑥:T)•・•••••••••••••••・•・・・••・・••••••••••・•・・・•••・•・•••・・•・••••••・•・■•・・・・・■••••••••・•・■•・•••••••••••••・•・・・••・・•・••••••・•・■••••••••••・•・■•・•・•••♦•・・・••••・)选择此项并执行〃下一步<上一步也)於一步3),取消|图1.6图1.7图1.8出现上图(图1.8)后点击”浏览”项,指定驱动所在的文件夹的路径,驱动放在我们提供的“driver”文件夹里. 查找文件|a driver 三|Q .甘心力找到驱动所在的文件夹选择此项并“打开” W:Ikbdriver.inf(1):|安装信息[*.一£)查找范围(1):便件更新向导选择要为此硬件安装的设备骗动程方型号安3杜要<上一步也)|下一步值)>1取消I图1.10硬件更新向导选择要为此要件安装的设备斐动程存请选定硬件的厂商和型号J然后单击“下一步”。

oki彩色打印机驱动安装说明(OKI color printer driverinstallation instructions)readme.txt= = = = = = = = = = = = = = = = = = = = = = = = = = = = = = = = = = = = = = = = = = = = = = = = = = = = = = = = = = = = = = = = = = =oki c810dn软件cd - rome版本 1.00copyright (c) 2008 oki data corporation= = = = = = = = = = = = = = = = = = = = = = = = = = = = = = = = = = = = = = = = = = = = = = = = = = = = = = = = = = = = = = = = = = =目录1. 关于本cd - rome2. cd rom的构成3. windows环境3.1 在windows 2000上安装3.1.1 使用安装程序3.1.2 通过添加打印机向导安装3.1.3 即插即用安装3.1.3.1 通过usb接口连接3.2 在windows xp / server 2003上安装3.2.1 使用安装程序3.2.2 通过安装打印机安装3.2.3 即插即用安装3.2.3.1 通过usb接口连接3.3 在windows vista / server 2008上安装3.3.1 使用安装程序3.3.2 即插即用安装3.3.2.1 通过usb接口连接4. macintosh环境4.1 在macintosh上安装※关于商标= = = = = = = = = = = = = = = = = = = = = = = = = = = = =1. 关于本cd - rome= = = = = = = = = = = = = = = = = = = = = = = = = = = = =本cd - rom包含oki c810dn专用的软件.打印机驱动程序为windows 2000 / xp / server 2003 / vista / server 2008、macintosh、mac osx专用.有关相应机型的详细信息, 请参阅打印机软件的用户手册及各目录中的 "gas" 或 "readme".= = = = = = = = = = = = = = = = = = = = = = = = = = = = =2. cd rom的构成= = = = = = = = = = = = = = = = = = = = = = = = = = = = =本cd - rom的构成如下.windowsdrivers windows专用打印机驱动程序.utilities 包括颜色和网络设定等各种实用程序.misc 包括adobe reader等.cdinst 供安装程序使用的目标文件.i'm 供安装程序使用的目标文件.(注意)- 以下各种软件均是使用 "安装程序 (cd 根目录的startup.exe) 安装.nic setup utilityoki lpr utilitynetwork extensioncolor swatch utilitycolor correct utilityoki setup utilitymacintoshdriver 包括macintosh专用打印机描述文件、mac os x专用打印机描述文件.utility 包括adobe reader及网络设定专用的各种实用程序. other language包括英文版专用打印机驱动程序.= = = = = = = = = = = = = = = = = = = = = = = = = = = = =3. windows环境= = = = = = = = = = = = = = = = = = = = = = = = = = = = =---------------------------------3.1 在windows 2000上安装---------------------------------(注意) 需要administrator权限.- 在本文中cd - rom驱动器名以d: 为例.- 通过 "软件cd rome" 安装时, 请原封不动使用该文件夹名.- 将 "软件cd rome" 复制到硬盘等进行安装时, 请将 "d: \" 替换为复制有打印机驱动程序的文件夹的路径.- 当即插即用程序不能搜索出该新硬件时,请参阅 "3.1.1 使用安装程序".-----------------------------------------3.1.1 使用安装程序-----------------------------------------(1) insert "software CD-ROM"".(2) select "run" from the "start" menu, and "open" columnType "D:\Setup" and click "OK"".(3) read the software license agreement carefully and click the accept button.(4) click Install driver.(5) choose to use it as a local printer or as a network printer,Click the "next" button.(6) install according to the prompt of the screen.For more information, please refer to the user manual (installation section).(7) when used as a network printer, the printer icon added will be displayed in the "printers and faxes" folder after installation. When connected to the USB interface and used as a local printer, it will automatically install the driver after it is connected to the computer. Finished installationAfter it is finished, it will be displayed in the printers and faxes folder.-----------------------------------------3.1.2 installs by adding a printer wizard-----------------------------------------(1) insert "software CD-ROM"".(2) from the "start" menu, select "Settings" - "printers and faxes", double-click "add printers"".(3) click "Add Printer Wizard", and then click next".(4) select "local printer" and click "next"".(5) select "use the following port", select port, click "next"".(6) click "use disk"".(7) when the "disk install" screen prompt appears in the "vendor file replication source",Type "D:\Drivers\CHS\WinXP2k\Hiper-C""Click ok".(8) select the name of the printer you want to install, and clicknext".(9) confirm the name of the printer and choose "yes" in "whether you want to set the printer as the default printer", and click "next"".(10) select "do not share this printer", and click "next"".(11) when showing "want to print the test page?"" Choose "no" and click "next"".(12) Click finish".(13) when you show "no digital signature" is found, click "yes"". Start copying files.(14) after installation, the printer icon added will be displayed in the "printers and faxes" folder.---------------------------------------------3.1.3 plug and play installation---------------------------------------------------------------------------------------------Connection of 3.1.3.1USB port------------------------------------------------(1) make sure that the printer and the computer's power are closed.(2) connect the USB cable.(3) open the printer power supply.(4) start Windows.Reboot if Windows is already started. If it is connected to the new USB corresponding printer,Windows will automatically install USB printing support.(5) when you display the search for the new hardware wizard, click next".When you show "no digital signature" is found, click Yes, and go to step (11).(6) choose "search for drivers for my device" (recommended), click "next"".(7) select the specified path, and click next".(8) insert "software CD-ROM"". At the source of the manufacturer file replication,Type "D:\Drivers\CHS\WinXP2k\Hiper-C""Click ok".(9) after confirming the driver of the device, click next".(10) if the "no signature" dialog box pops up, then click "yes"". Start copying files.(11) in the "new hardware has been searched" dialog box,Click finish".(12) make sure that the printer icon has been added.-------------------------------------------3.2 install on Windows XP/Server 2003-------------------------------------------(notice) you must have Administrator permissions.In this paper, the CD-ROM driver name, D:, is taken as an example.Install through the software CD-ROM, please use the folder name directly.If you copy the software CD-ROM to the hard disk and so on, when you install it, please send it"D:\" replaces the path to the folder where the printer driver is copied.When the plug and play device cannot search for new hardware,Please refer to "3.2.1 use installer"".-----------------------------------------3.2.1 using installer-----------------------------------------(notice)In the case of connecting to the USB interface, if you install the installer, start the printer andWhen WindowsXP/Server 2003, the screen displays "search for new hardware"".Plug and play must be used when installing on WindowsXP/Server 2003 for the first time.(1) insert "software CD-ROM"".(2) select "run" from the "start" menu, and then "open" columnType "D:\Startup" and click "OK"".(3) read the software license agreement carefully and click the accept button.(4) click Install driver.(5) install according to the prompt of the screen.For more information, please refer to the user manual (installation section).(6) after installation, the printer icon added will be displayed in the "printers and faxes" folder.,3.2.2 is installed by adding printers,(1) insert "software CD-ROM"".(2) open the "control panel" from the "start" menu and double-click "printers and faxes"".Click "Install Printer"".(3) the screen prompts "Add Printer Wizard", and click "next"".(4) select the local printer that connects to this computer, and click next".(5) select "use the following ports", select the port, and click "next"".(6) click "use disk"".(7) when the "disk installation" is displayed, at the "vendor file replication source",(in the case of 32bit OS)Type "D:\Drivers\CHS\WinXP2k\Hiper-C""(64bit OS)Type "D:\Drivers\CHS\WinXP64\Hiper-C""Click ok".(8) select the folder to install, and click next".(9) confirm the name of the printer and choose "yes" in "whether you want to set the printer as the default printer", and click "next"".(10) select "do not share this printer", and click "next"".(11) when showing "want to print the test page?"" Choose "no" and click "next"".(12) Click finish".(13) when you display "installing from hardware", click "continue"". Start copying files.(14) after installation, the printer icon added is displayed in the "printers and faxes" folder.---------------------------------------------3.2.3 plug and play installation---------------------------------------------------------------------------------------------Connection of 3.2.3.1USB port------------------------------------------------(1) make sure that the printer and the computer's power are closed.(2) connect the USB cable.(3) open the printer power supply.(4) start Windows.Reboot if Windows is already started.If it is connected to the new USB corresponding printer, Windows will automatically install USB printing support.(5) after the screen display "start searching for new hardware wizard", if the pop-up "to search software, want to connectWindows Update" dialog box?,Please choose "no, no connection", and then choose "the next step"".Please select "browse or install from specific path" (detail), and click "next"".Sometimes need to display a dialog box with a 1-2 minutes.If the screen does not display the above content, go to "3.2.2" using the installer".(6) insert printer software CD-ROM".(7) choose the most appropriate driver to search from the following path".(8) do not choose "search disk" (floppy disk, CD-ROM, etc.)".Select "include the following path",(in the case of 32bit OS)Type "D:\Drivers\CHS\WinXP2k\Hiper-C""(in the case of 64bit OS)Type "D:\Drivers\CHS\WinXP64\Hiper-C""Click next".(9) when you display the tooltip for installing hardware, click continue".(10) when displaying "insert disk", go to step (12).Start copying files.(11) make sure that the new hardware has been searched, and click finish".Go to step (15).Employed(12) insert the "software CD-ROM" when the screen shows "insert disk"",Click ok".(13) at the source of the manufacturer's document replication,(in the case of 32bit OS)Type "D:\Drivers\CHS\WinXP2k\Hiper-C""(in the case of 64bit OS)Type "D:\Drivers\CHS\WinXP64\Hiper-C""Click next". Start copying files.(14) make sure that the new hardware has been searched, and click finish".Employed(15) select "start" - "control panel", click "printers" and other hardware",Confirm the printer icon has been added.-----------------------------------------3.3 install on Windows Vista/Server 2008-----------------------------------------(notice) you must have Administrator permissions.In this paper, the CD-ROM driver name, D:, is taken as an example.Install through the software CD-ROM, please use the folder name directly.If you copy the software CD-ROM to the hard disk and so on, when you install it, replace the D:\Copy the path to the folder with printer driver.When the plug and play program is unable to search for the newhardware, please refer to "3.3.1 using the installer"".-----------------------------------------3.3.1 using installer-----------------------------------------(1) insert "software CD-ROM"".(2) from the "start" menu, select "D:\Startup" in "run"",Click "startup" on "open"".(3) read the software license agreement carefully and click accept".(4) click "install driver"".(5) install according to the prompt of the screen.For more information, please refer to the user manual (installation section).(6) after installation, the printer icon added will be displayed in the "printers and faxes" folder.---------------------------------------------3.3.2 plug and play installation---------------------------------------------------------------------------------------------3.3.2.1设施上通过USB端口连接------------------------------------------------(1)确认打印机和电脑的电源均为关闭状态。

如何在DOS下安装Windows 2000前提∶你的硬盘是FAT32或者FAT文件系统,DOS不能识别NTFS文件系统。
XP安装程序可识别NTFS文件系统。
一、准备工作:1.Windows98(或Me)启动盘一张。
内含smartdrv.exe(磁盘高速缓存) (硬盘分区格式化命令)。
2.准备好Windows Server 2000简体中文版安装文件。
推荐将安装文件解压缩(或复制)到硬盘如 F:\Win2000s (这时Win2000s文件夹里包含如下文件夹∶BOOTDISK、I386、CLIENTS、PRINTERS、SETUPTXT、SUPPORT、VALUEADD和8个文件,在DOS下安装,存放安装文件的文件夹的名称不能是中文,要用英文或数字,并且长度最好不超过8个英文字母或数字),将安装文件复制到硬盘,这样安装速度会快一点,同时避免在安装过程中有提示xxx文件不能复制的问题,亦使到以后运行Windows Server 2000过程(或安装驱动程序)如有系统文件丢失时,系统能自动从该文件夹提取文件修复系统。
推荐将smartdrv.exe和复制到F盘根目录F:\ 这样便于操作。
3.可能的情况下,在运行安装程序前用磁盘扫描程序扫描所有硬盘检查硬盘错误并进行修复,否则安装程序运行时如检查到有硬盘错误即会很麻烦。
以上所提到的文件均有超链接,点击文件时均可下载。
如果是压缩文件请解压缩。
4.用纸张记录安装文件的产品密匙(安装序列号)。
5.如果你正在使用Windows 2000系统,请用驱动程序备份工具(如:驱动精灵 2004 V1.9 Beta.exe)将Windows 2000下的所有驱动程序备份到硬盘上(如∶F:\Drive)。
6.如果你想在安装过程中格式化C盘或D盘(建议安装过程中格式化C盘),请备份C盘或D盘有用的数据。
7. 系统要求-----中央处理器 (CPU)133-MHz 奔腾或更高的。
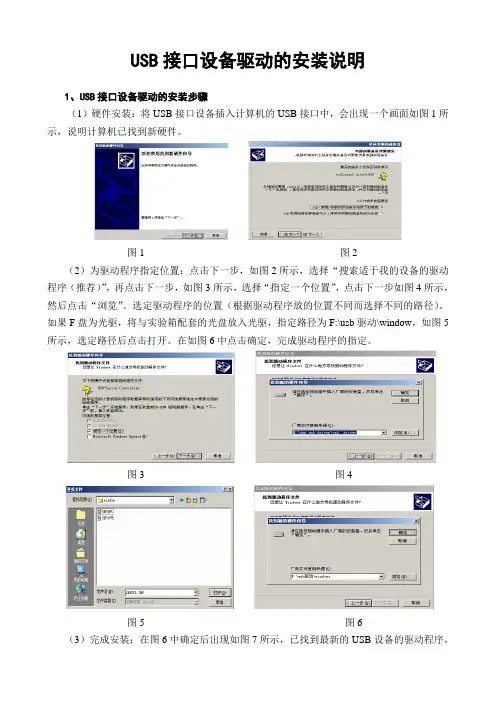
USB接口设备驱动的安装说明1、USB接口设备驱动的安装步骤(1)硬件安装:将USB接口设备插入计算机的USB接口中,会出现一个画面如图1所示,说明计算机已找到新硬件。
图1 图2(2)为驱动程序指定位置:点击下一步,如图2所示,选择“搜索适于我的设备的驱动程序(推荐)”,再点击下一步,如图3所示,选择“指定一个位置”,点击下一步如图4所示,然后点击“浏览”。
选定驱动程序的位置(根据驱动程序放的位置不同而选择不同的路径)。
如果F盘为光驱,将与实验箱配套的光盘放入光驱,指定路径为F:\usb驱动\window,如图5所示,选定路径后点击打开。
在如图6中点击确定,完成驱动程序的指定。
图3 图4图5 图6(3)完成安装;在图6中确定后出现如图7所示,已找到最新的USB设备的驱动程序,开始安装驱动程序所需的信息和文件,点击下一步出现如图8所示,点击完成后,则USB设备驱动程序已全部安装完成。
2、查看USB设备的信息选择“我的电脑”点击右键,选择“属性”就出现系统特性,对话框显示如图9所示。
图7 图8选择“硬件”选项卡,选择“设备管理器”,选择“查看”→“依类型排序设备”。
再双击“端口(com 和LPT)”如图10所示,可以看到(prolific usb-to-serial bridge(com3)桥控制器)。
注意!这个com3在通信过程中要与usb接口设备的上位机软件中通信口设置一样,否则会出问题。
图9 图103、注意!(1)不要直接在驱动程序文件夹中,点击setup来直接安装USB设备的驱动程序。
(2)这个过程是在win2000系统中的安装过程,在win98和winxp中,步骤一样,可能有些不同的图片。