jsp图片上传(commons-fileupload组件)
- 格式:doc
- 大小:3.70 KB
- 文档页数:3
Java使⽤Commons-FileUpload组件实现⽂件上传最佳⽅案学习的⽬标使⽤commons-fileupload实现⽂件上传使⽤commons-fileupload封装⽂件上传⼯具类什么是commons-fileupload?The CommonsFileUploadpackage makes it easy to add robust, high-performance, file upload capability to your servlets and web applications.FileUpload parses HTTP requests which conform toRFC 1867, "Form-based File Upload in HTML". That is, if an HTTP request is submitted using the POST method, and with a content type of "multipart/form-data", then FileUpload can parse that request, and make the results available in a manner easily used by the caller.FileUpload包可以很容易地添加强⼤的,⾼性能,⽂件上传到你的Servlet的Web应⽤程序的能⼒。
FileUpload解析HTTP请求符合RFC 1867年,“在HTML的⽂件上传。
就是说,如果⼀个HTTP请求是使⽤POST⽅法提交,并与⼀个内容类型“multipart/form-data”,然后FileUpload可以解析这个请求,并把结果提供⼀个容易使⽤的调⽤⽅式。
为什么要使⽤commons-fileupload在使⽤传统的Servlet上传的时候我们可以使⽤req.getInputStream()来获取⽂件上传的流,我们在获取到这个流之后需要⼿动的针对这个流进⾏特殊处理进⾏去流中不必要的开始和结束内容,才能真正的获取到流的内容,本章节并不对原始Servlet的上传进⾏探究,我们另开章节针对原始Servelt上传进⾏探究。
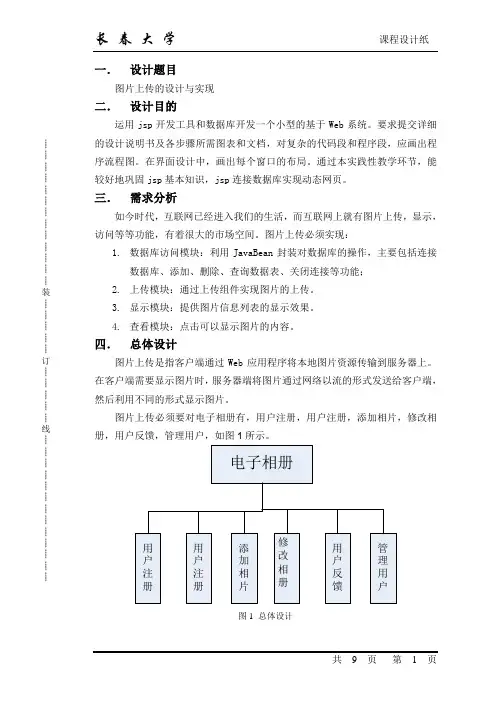
┊┊┊┊┊┊┊┊┊┊┊┊┊装┊┊┊┊┊订┊┊┊┊┊线┊┊┊┊┊┊┊┊┊┊┊┊┊图片上传的设计与实现二.设计目的运用jsp开发工具和数据库开发一个小型的基于Web系统。
要求提交详细的设计说明书及各步骤所需图表和文档,对复杂的代码段和程序段,应画出程序流程图。
在界面设计中,画出每个窗口的布局。
通过本实践性教学环节,能较好地巩固jsp基本知识,jsp连接数据库实现动态网页。
三.需求分析如今时代,互联网已经进入我们的生活,而互联网上就有图片上传,显示,访问等等功能,有着很大的市场空间。
图片上传必须实现:1.数据库访问模块:利用JavaBean封装对数据库的操作,主要包括连接数据库、添加、删除、查询数据表、关闭连接等功能;2.上传模块:通过上传组件实现图片的上传。
3.显示模块:提供图片信息列表的显示效果。
4.查看模块:点击可以显示图片的内容。
四.总体设计图片上传是指客户端通过Web应用程序将本地图片资源传输到服务器上。
在客户端需要显示图片时,服务器端将图片通过网络以流的形式发送给客户端,然后利用不同的形式显示图片。
图片上传必须要对电子相册有,用户注册,用户注册,添加相片,修改相册,用户反馈,管理用户,如图1所示。
图1 总体设计┊┊┊┊┊┊┊┊┊┊┊┊┊装┊┊┊┊┊订┊┊┊┊┊线┊┊┊┊┊┊┊┊┊┊┊┊┊1.文件上传组件介绍文件上传组件是一些开源组织发布的针对实现文件上传功能的一组class 文件。
jspSmartUpload和Apache的common-fileupload是两个比较流行的文件上传组件。
这两个组件都可以在JSP中实现文件上传。
本节使用Apache的common-fileupload组件实现图片上传。
2.HTML中文件上传组件介绍HTML中<input type="file"/>元素可以创建文件上传组件。
该控件带有一个文本框和浏览按钮。
使用该组件时要注意以下几点。
使用commons-fileupload处理HTTP文件上传
刘冬
【期刊名称】《开放系统世界》
【年(卷),期】2003(000)006
【摘要】Commom是Apache开放源代码组织中的一个Java子项目,该项目主要涉及一些开发中常用的模块。
例如文件上传、命令行处理、数据库连接池、XML配置文件处理等。
这些项目集合了来自世界各地软件工程师的心血,其性能、稳定性等方面都经受得住实际应用的考验。
有效地利用这些项目将会给开发带来显而易见的效果。
Fileupload就是其中用来处理HTTP文件上传的子项目。
本文主
要介绍如何使用Fileupload来处理浏览器提交到服务器的文件信息。
【总页数】3页(P99-101)
【作者】刘冬
【作者单位】无
【正文语种】中文
【中图分类】TP391.1
【相关文献】
1.基于HTTP文件上传进度显示组件的设计及实现 [J], 段旭光;李岚;董立岩;臧雪
柏
2.SolarWinds Orion NPM中使用HTTPS [J], 何今成;杜致远
3.基于HTTP协议和数据库的文件上传方法 [J], 黄景文
4.让Gmail始终使用https连接 [J], 王勇
5.如何设置证书来使用IIS 7 HTTPS? [J],
因版权原因,仅展示原文概要,查看原文内容请购买。

关于Commons-fileupload的上传组件Apache的上传组件其它已经被封装到Struts那中去了,我在网上找到了一些文章介绍它是如何上传文件的,自己跟了一下源码也写了一个上传的实例,仅供参考!一、JSP页面如下:Html代码1<form method="POST" action="UploadServlet"2 ENCTYPE="multipart/form-data">3<table>4<tr><td><input type="text" name="subject" /></td></tr> 5<tr><td><input type="text" name="subject" /></td></tr> 6<tr><td><input type="file" name="file1" /></td></tr>7<tr><td><input type="file" name="file2" /></td></tr>8<tr><td><input type="file" name="file3" /></td></tr>9<tr><td><input type="submit" value="上传"/></td></tr> 10</table>11</form>12<br/>13<a href="DownLoadServlet">下载</a>二、上传的Servlet如下:Java代码14/**15 * Apache组件上传16 *17 * @author mingxue.zhang@18 * @date 2010-10-3019 */20public class UploadServlet extends HttpServlet {2122private static final long serialVersionUID = 5827821285414610443L;2324public void doGet(HttpServletRequest request, HttpServletResponse response)25throws ServletException, IOException {26this.doPost(request, response);27 }2829public void doPost(HttpServletRequest request, HttpServletResponse response)30throws ServletException, IOException {31 // 上传文件目录32 String uploadDir =this.getServletContext().getRealPath("/uploadDir");33 DiskFileItemFactory factory = new DiskFileItemFactory();34 // 设置内存区块大小4KB35 factory.setSizeThreshold(4 * 1024);36 // 设置暂存容器,当上传文件大于设置的内存块大小时,用暂存容器做中转37 factory.setRepository(newFile(this.getServletContext().getRealPath(38 "/temp")));39 ServletFileUpload fileUpload = new ServletFileUpload(factory);40 fileUpload.setSizeMax(1024 * 1024 * 100);41 fileUpload.setFileSizeMax(1024 * 1024 * 10);42 List<FileItem> fileItemList = null;4344try {45 fileItemList = fileUpload.parseRequest(request);46 } catch (FileUploadException e) {47 e.printStackTrace();48 }49 Iterator<FileItem> fileItemIterator = fileItemList.iterator();50 FileItem fileItem = null;51while (fileItemIterator.hasNext()) {52 fileItem = fileItemIterator.next();53 // 普通文件框上传54if (fileItem.isFormField()) {55 String filedName = fileItem.getFieldName();56 String filedValue = fileItem.getString("GBK");// 编码格式57 System.out.println(filedName);// 文件框名称58 System.out.println(filedValue);// 文件的值59 } else {60 String filedName = fileItem.getFieldName();// 文件上传框的名称61 // 获取文件上传的文件名62 String OriginalFileName =takeOutFileName(fileItem.getName());63 System.out.println("原始文件名:"+OriginalFileName);64if (!"".equals(OriginalFileName)) {65 // 根据上传的文件名重新命名66 String newFileName =getNewFileName(OriginalFileName);67 System.out.println("重新名:"+newFileName);68 File writeToFile = new File(uploadDir + File.separator69 + newFileName);70try {71 fileItem.write(writeToFile);72 } catch (Exception e) {73 e.printStackTrace();74 }75 }76 }77 }78 }7980private String takeOutFileName(String filePath) {81 String fileName = filePath;82if (null != filePath && !"".equals(filePath)) {83int port = stIndexOf("\\" + 1);84if(port != -1){85 fileName = filePath.substring(port);86 }87 }88return fileName;89 }9091private String getNewFileName(String originalFileName) {92 StringBuffer newFileName = new StringBuffer();93if (null != originalFileName && !"".equals(originalFileName)) { 94int port = stIndexOf(".");95 String type = "";96 String fileName = "";97if (port != -1) {98 type = originalFileName.substring(port + 1);99 fileName = originalFileName.substring(0, port);100 } else {101 fileName = originalFileName;102 }103 StringBuffer suffix = new StringBuffer("_");104 suffix.append(Calendar.getInstance().getTimeInMillis()); 105 suffix.append("_");106 suffix.append(new Random().nextInt(100));107 newFileName.append(fileName);108 newFileName.append(suffix);109 newFileName.append(".");110 newFileName.append(type);111 }112return newFileName.toString();113 }114115}三、下载的Servlet如下:Java代码116/**117 * Apache组件下载118 *119 * @author mingxue.zhang@120 * @date 2010-10-30121 */122public class DownLoadServlet extends HttpServlet {123124public void doGet(HttpServletRequest request, HttpServletResponseresponse)125throws ServletException, IOException {126this.doPost(request, response);127 }128129public void doPost(HttpServletRequest request, HttpServletResponse response)130throws ServletException, IOException {131 String filePath ="D:\\Tomcat\\apache-tomcat-6.0.26\\webapps\\ApacheUpload\\uploadDir\\";132 String fileName = "2010年10月安排2_1288447490125_56.txt";133 String Originalname = "2010年10月安排2.txt";134 response.setContentType("application/octet-stream");135 String isoFileName = new String(Originalname.getBytes("GB2312"), 136 "ISO8859-1");137 response.setHeader("Content-Disposition", "attachment; filename="138 + isoFileName);139 ServletOutputStream out = response.getOutputStream();140 BufferedOutputStream bufferOut = new BufferedOutputStream(out);141 FileInputStream inputStream = new FileInputStream(newFile(filePath,142 fileName));143 BufferedInputStream bufferInput = newBufferedInputStream(inputStream);144byte[] buffer = new byte[5 * 1024];145int length = 0;146while ((length = bufferInput.read(buffer)) != -1) {147 bufferOut.write(buffer, 0, length);148 }149 bufferInput.close();150 inputStream.close();151 bufferOut.close();152 out.close();153 }154155}Servlet配置如下:Xml代码156<servlet>157<servlet-name>UploadServlet</servlet-name>158<servlet-class>com.mengya.servlet.UploadServlet</servlet-class> 159</servlet>160<servlet>161<servlet-name>DownLoadServlet</servlet-name>162<servlet-class>com.mengya.servlet.DownLoadServlet</servlet-class>163</servlet>164165<servlet-mapping>166<servlet-name>UploadServlet</servlet-name>167<url-pattern>/UploadServlet</url-pattern>168</servlet-mapping>169<servlet-mapping>170<servlet-name>DownLoadServlet</servlet-name>171<url-pattern>/DownLoadServlet</url-pattern>172</servlet-mapping>。
文件上传和下载
javaweb文件上传简单介绍
文件的上传和下载在企业级应用中很常见,javaee通常使用commons-fileupload.jar配合commons-io.jar实现文件的上传下载。
具体实现过程如下
准备相应的jar包,并且导入。
写带有文件表单的上传文件的jsp页面,以及处理的后台servlet。
文件的下载
下载就是向客户端响应字节数据!
原来我们响应的都是HTML字符数据!
把一个文件编程字节数组:使用response.getOutputStream()
文件下载操作,最重要的步骤:两个头一个流
第一个头:Content-type:你传递给客户端的文件是什么MIME类型,例如:image/pjpeg
第二个头;Content-Disosition:它的默认值是inline,表示在浏览器窗口中打开!attachment;filename=xxx
流:要下载的文件数据
Attachment翻译为附件
下载的具体编码。

很多初学jsp的同志都在实现文件上传到服务器或者从服务器上下载文件到本地计算机这方面不是很了解,今天在这里我会帮助大家慢慢的实现这一功能。
准备工作:1.到网上下载两个包第一个叫做commons-fileupload-1.2.1.jar第二个叫做commons-io-1.3.2.jar2. 建一个项目用来实现文件上传和下载我创建的Web项目名为fileUpload,截图如下3.我们把从网上下载下来的包copy到WebRoot目录下Web-INF下的子目录lib目录里然后打开Referenced Libraries,你会看见两个包已经存在于里面了。
下面我们开始实现文件上传1. 首先我们创建一个名为uploadFile.jsp的页面,如下图:点击浏览,可以出现以下画面源代码如下:<%@page language="java"import="java.util.*"pageEncoding="UTF-8"%> <%String path = request.getContextPath();String basePath = request.getScheme()+"://"+request.getServerName()+ ":" +request.getServerPort()+path+"/";%><!DOCTYPE HTML PUBLIC"-//W3C//DTD HTML 4.01 Transitional//EN"><html><head><base href="<%=basePath%>"><title>实现文件上传到服务器</title><meta http-equiv="pragma"content="no-cache"><meta http-equiv="cache-control"content="no-cache"><meta http-equiv="expires"content="0"><meta http-equiv="keywords"content="keyword1,keyword2,keyword3"> <meta http-equiv="description"content="This is my page"><!--<link rel="stylesheet" type="text/css" href="styles.css">--></head><body><form action="doFileUpload.jsp"method="post"enctype="multipart/form-data">文件:<input type="file"name="chooseFile"/></br>姓名:<input type="text"name="userName"/></br><input type="submit"value="提交"></form></body></html>注意:form表单里的enctype=”multipart/form-data”这一属性一定要写,这是用来标明此表单的类型是文件类型的。
Commons-fileupload工具的API与开发实例解析(一)文件上传组件的应用与编写在许多Web站点应用中都需要为用户提供通过浏览器上传文档资料的功能,例如,上传邮件附件、个人相片、共享资料等。
对文件上传功能,在浏览器端提供了较好的支持,只要将FORM表单的enctype属性设置为“multipart/form-data”即可;但在Web服务器端如何获取浏览器上传的文件,需要进行复杂的编程处理。
为了简化和帮助Web开发人员接收浏览器上传的文件,一些公司和组织专门开发了文件上传组件。
本章将详细介绍如何使用Apache文件上传组件,以及分析该组件源程序的设计思路和实现方法。
1.1 准备实验环境按下面的步骤为本章的例子程序建立运行环境:(1)在Tomcat 5.5.12的<tomcat的安装目录>\webapps目录中创建一个名为fileupload的子目录,并在fileupload目录中创建一个名为test.html的网页文件,在该文件中写上“这是test.html页面的原始内容!”这几个字符。
(2)在<tomcat的安装目录>\webapps\fileupload目录中创建一个名为WEB-INF 的子目录,在WEB-INF目录中创建一个名为classes的子目录和一个web.xml文件,web.xml文件内容如下:<web-app></web-app>(3)要使用Apache文件上传组件,首先需要安装Apache文件上传组件包。
在<tomcat的安装目录>\webapps\fileupload\WEB-INF目录中创建一个名为lib的子目录,然后从网址/commons/fileupload下载到Apache组件的二进制发行包,在本书的附带带光盘中也提供了该组件的二进制发行包,文件名为commons-fileupload-1.0.zip。
«博客园首页如何在Jsp上传图片作者:夏夏知来源:博客园发布时间:2012-03-28 11:43 阅读:246 次原文链接[收藏] 1. 新建一个Dynamic Web Project:2. 键入工程名UploadImage:3. 选择Dynamic web module version :2.54. 点击“Finish”5. 新建两个jsp文件:ImageUpload.jsp和ImageUploadHandler.jsp6. 新建一个类,专门用来处理图片上传新建一个包mytest:在包下新建一个类FileUpload:代码内容:package mytest;import java.awt.image.BufferedImage;import java.io.*;import java.awt.Image;import com.sun.image.codec.jpeg.JPEGCodec;import com.sun.image.codec.jpeg.JPEGImageEncoder; public class FileUpload{public static void uploadImage(String imgFolderPath,String srcFileName,String dstFileName) throws IOException{//判断文件夹image是否存在,若不存在则创建File folder = new File(imgFolderPath);System.out.println("function'uploadFileTest2'-imgFolderPath'"+imgFolderPath);if(!folder.exists()){folder.mkdir();System.out.println("maked a folder!");}File _file = new File(srcFileName); //读入文件Image src = javax.imageio.ImageIO.read(_file); //构造Image对象int wideth=src.getWidth(null); //得到源图宽int height=src.getHeight(null); //得到源图长BufferedImage tag = newBufferedImage(wideth,height,BufferedImage.TYPE_INT_RGB); tag.getGraphics().drawImage(src,0,0,wideth,height,null); FileOutputStream out=new FileOutputStream(dstFileName); //输出到文件流JPEGImageEncoder encoder = JPEGCodec.createJPEGEncoder(out); encoder.encode(tag); //JPEG编码out.close();System.out.println("function 'uploadFileTest2'-status:A Image File Saved!");}}发现报错:找到代码的库Libraries:打开rt.jar所在文件夹:复制这个文件:右键粘贴到WEB_INF\lib下:效果:没再报错。

目录1.2Apache Commons-FileUpload文件上传组件技术及应用实例 (2)1.2.1Apache Commons-FileUpload组件相关技术概述 (2)1.2.2下载Commons-FileUpload组件系统库 (3)1.2.3应用Commons-FileUpload组件实现文件上传功能 (5)1.2.4利用FileUpload组件具体实现文件上传的功能实现代码示例 (7)1.2.5测试本示例的应用效果 (14)1.11.2Apache Commons-FileUpload文件上传组件技术及应用实例1.2.1Apache Commons-FileUpload组件相关技术概述1、Web应用系统中的文件上传在许多Web站点应用中都需要为用户提供通过浏览器上传文档资料的功能,例如,上传邮件附件、个人相片、共享资料等。
文件上传和下载同样也是Web应用系统中的通用功能实现的要求,但如何能够简化对这个功能的实现和避免开发人员重复地编程同样功能的实现程序?在浏览器端提供了较好的支持,只要将FORM表单的enctype属性设置为“multipart/form-data”即可。
但在Web服务器端如何获取浏览器上传的文件,需要进行复杂的编程处理。
为了简化和帮助Web开发人员接收浏览器上传的文件,一些公司和组织专门开发了文件上传组件。
为此,在Commons组件集中也提供有一个Commons-FileUpload组件,帮助Web开发人员实现文件上传的功能。
作者在本节中继续通过银行账户信息管理系统中的文件上传功能的具体实现的示例,为读者介绍如何正确地应用Commons-FileUpload组件,并介绍两种不同的应用方式——标准的Web技术实现和基于Struts2框架下的文件上传功能的实现。
2、Commons-FileUpload文件上传功能组件(1)Commons-FileUpload组件主要实现文件上传功能Commons-FileUpload组件主要实现处理HTTP请求方式下的文件上传功能,并遵守RFC1867标准,它自动地分析上传表单中的各种请求参数,最终向服务器端的程序提供上传后的服务器端文件的数据。
Commons FileUpload组件使用方法2010年03月18日 16:04本文以Commons FileUpload组件为例说明怎样为JSP应用添加文件上传功能.当然也有其它组件能实现此功能,本文只是为了说明Commons FileUpload组件的用法.准备工作:1,下载Commons FileUpload组件包,具体可以在网上找,开源的,免费下载.2,下载Commons IO包,上面的组件必须依赖它才能实现功能.该包也在上面的网页上有提供.注意:如果你是使用Tomcat直接开发应用程序,则把上面下载的两个.ZIP文件解压后,将解压后的commons-io-1.4-sources.jar和commons-fileupload-1.2.1.jar两个.jar文件放到tomcat的webapps\你的webapp\WEB-INF\lib\下,目录不存在的话请自己创建.如果你是直接使用MyEclipse进行开发应用,刚把上面的两个.jar文件放到自己创建的用户库里面,在用到这个库时再导入到应用程序中.步骤:1.创建一个Servlet----Upload.java文件,用于实现上传文件import java.io.*;import java.util.*;import javax.servlet.*;import javax.servlet.http.*;import mons.fileupload.*;public class Upload extends HttpServlet {private String uploadPath = "d:\\upload\\"; // 上传文件的目录private String tempPath = "d:\\upload\\tmp\\"; // 临时文件目录在doPost()方法中,当servlet收到浏览器发出的Post请求后,实现文件上传。
jsp用户上传头像、上传图片、邮件上传附件代码jsp教程用户上传头像、上传图片、邮件上传附件代码2. 页面表单的实现文件上传表单和普通表单有两个区别1) 需要文件上传字段<input type=”file” />2) form 表单的 enctype 属性需要指定为 multipart/form-data3. 服务器端解析request在 Servlet 中通过 request.getInputStream 获得表单上传数据,会发现数据是分段发送的由于自己写程序解析有难度,我们可以使用Apache 开发的开源组件Commons-fileupload需要导入 jar 包Commons-fileupload 和Commons-io4 . UploadServlet 中处理文件上传程序// 1. 创建工厂类DiskFileItemFactory factory = new DiskFileItemFactory();// 2. 创建FileUpload对象ServletFileUpload upload = new ServletFileUpload(factory);// 3. 判断是否是上传表单boolean b = upload.isMultipartContent(request);if(!b) {// 不是文件上传request.setAttribute("message", "对不起,不是文件上传表单!");request.getRequestDispatcher("/message.jsp").forward(requ est, response);return;}// 是文件上传表单// 4. 解析request,获得FileItem项List<FileItem> fileitems = upload.parseRequest(request); // 5. 遍历集合for(FileItem item : fileitems) {// 判断是不是普通字段if(item.isFormField()) {String name = item.getFieldName();String value = item.getString();// 手工的转换了value = new String(value.getBytes("iso-8859-1"),"utf-8"); System.out.println(name + "=" + value);} else {// 文件上传字段// 获得文件名String filename = item.getName();System.out.println(filename);filename = filename.substring(stIndexOf("")+1);System.out.println(filename);// 创建文件ServletContext context = getServletContext();String dir = context.getRealPath("WEN-INF/upload");File file = new File(dir, filename);file.createNewFile();// 获得流,读取数据写入文件InputStream in = item.getInputStream(); FileOutputStream fos = new FileOutputStream(file);int len;byte[] buffer = new byte[1024];while((len=in.read(buffer))>0)fos.write(buffer,0,len);fos.close();in.close();item.delete(); // 删除临时文件}二、文件上传处理细节1. 中文乱码问题1) 文件名中文乱码问题,解决办法:告诉文件上传组件以什么编码方式来解码文件名ServletUpload.setCharacterEncoding(“utf-8”);request. setCharacterEncoding(“utf-8”);2) 普通字段中文乱码问题fileitem.getString(“utf-8”);2. 临时文件对于大文件不能缓存在内存,需要缓存到硬盘,为了方便管理,我们需要设置临时文件存放目录// 设置临时文件的存放位置factory.setRepository(new File("d:/temp"));文件上传完毕需要删除临时文件,否则会导致服务器存在两份上传文件// 注意,需要先将流进行关闭,否则会导致临时文件无法删除out.close();in.close();// 删除临时文件fileitem.delete();3. 文件存放目录1) 目录需要隐藏,禁止外界直接访问2) 文件名需要保证不重复3) 文件应该分目录存放三、上传进度条1. 实现进度监听需要实现对文件上传进度的监听,需要给FileUpload 对象添加ProgressListener在upload方法中对与进度相关的数据进行处理upload.setProgressListener(new ProgressListener() {long num = 0;public void update(long bytesRead, long contentLength, int items) {long progress = bytesRead*100/contentLength;if(progress==num)return;num = progress;System.out.println("上传进度:" + progress + "%");// request.getSession().setAttribute("progress", progress);}});2. 在 jsp 页面显示进度实验:1) 使用 iframe 发送请求,请求一个Servlet, 在Servlet 中返回响应,发送自增的num此时会发现 iframe 会不停第想Servlet发送请求2) 点击文件上传按钮后,iframe立刻停止刷新,直至上传完毕页面跳转至新页面3)为了观察实验结果,将form 的target 指定为iframe,UploadServlet回送上传完毕的结果4) 出现上述问题的原因,浏览器不支持多线程同时访问服务器只能同时发送一个请求,这样的访问方式为同步访问5) 要在文件上传的同时在iframe中实现进度访问,就需要ie浏览器与服务器进行异步交互此时就需要 XMLHttpRequest 对象在网页特效中可以直接使用XMLHttpRequest 对象与服务器进行异步通信获得XmlHttpRequest 对象的方式有两种ie7以上版本var xhr = null;if(window.XMLHttpRequest)xhr = new XMLHttpRequest();ie7以下版本if(window.ActiveXObject)xhr = new ActiveXObject(“Microsoft.XMLHTTP”);获得对象后需要调用open方法输入请求地址注意请求方式,地址的输入,并且需要设置为true 指定异步访问该地址xhr.open(“get”,”/upload/servlet/UploadServlet”, false)// 调用send 方法发送请求,post方式需要发送消息体,get方式则不用直接传入null值xhr.send(null);// 访问 responseT ext 属性获得 Servlet 回送的数据document.write(xhr.responseText);四、 api方法1. DiskFileItemFactory 对象设置缓冲区大小,字节为单位,默认为10K,一般不用修改factory.setSizeThreshold(1000);设置临时文件存放目录factory.setRepository(file);2. ServletFileUpload 对象判断是否为文件上传表单boolean b = upload.isMultipartContent(request);解析request对象List<FileItem> list = upload.parseRequest(request);设置上传文件的最大值setFileSizeMax(long fileSizeMax)设置上传文件总量的最大值setSizeMax(long sizeMax)设置编码格式setHeaderEncoding(ng.String encoding)注册进度监听器setProgressListener(ProgressListener pListener)3. FileItem 对象获得表单字段的属性名item.getFieldName();获得普通字段的值item.getString(charsetName)获得文件上传字段的文件名item.getName()获得文件上传的流item.getInputStream()文件上传时需要注意的问题:1.如何设置上传文件最大值,并实现超出最大值时给用户一个友好提示upload.setFileSizeMax(1024*10); //设置最大值实现超出最大值时给用户一个友好提示:在程序中捕获FileUploadBase.FileSizeLimitExceededException只要程序抛出这个异常,代表用户上传的文件超出最大值2.上传过程中的乱码问题2.1 普通输入项的乱码item.getString("码表 ")2.2 上传文件名的乱码ServletFileUpload.setHeaderEncoding("码表")3.上传文件的安全性问题为防止用户直接上传文件,危害服务器安全,程序应禁止用户直接访问上传文件(即把上传文件保存在用户无法直接访问的目录)4.防止文件覆盖(UUID)5.文件打散存储(一个目录下面不能存超出1000个文件)用hash算法生成目录保存6.设置监听器,监听文件上传进度upload.setProgressListener(newProgressListener(){public void update(long arg0, longarg1, int arg2) {System.out.println("当前已上传" +arg0 + ",当前处理的文件总大小" + arg1);}});7.临时文件的删除问题处理完每一个文件上传后,一定要记得调用Fileitem.delete方法,删除临时文件8.限定上传文件类型判断上传文件后缀名。
java web中commons FileUpload文件上传一、文件上传1.创建项目,导入jar包将commons-fileupload.jar粘贴到项目下的lib文件夹下。
2.编写上传的jsp页面3.Upload.jsp源代码如下:<%@page language="java"contentType="text/html; charset=utf-8"pageEncoding="utf-8"%><!DOCTYPE html><html><head><meta charset="utf-8"><title>文件上传</title></head><body><form action="/fileUploadDown/Uploadservlet"method="post"enctype="multipart/form-data">请选择文件:<input type="file"name="myfile"/><input type="submit"value="上传"></form></body></html>4.编写处理上传请求的servletimport java.io.File;import java.io.FileOutputStream;import java.io.IOException;import java.io.InputStream;import java.util.List;import javax.servlet.ServletException;import javax.servlet.annotation.WebServlet;import javax.servlet.http.HttpServlet;import javax.servlet.http.HttpServletRequest;import javax.servlet.http.HttpServletResponse;import mons.fileupload.FileItem;import mons.fileupload.FileItemFactory;import mons.fileupload.FileUploadException; import mons.fileupload.disk.DiskFileItemFactory; import mons.fileupload.servlet.ServletFileUpload; import org.apache.tomcat.util.buf.StringUtils;import org.apache.tomcat.util.http.fileupload.FileUtils;@WebServlet("/Uploadservlet")public class Uploadservlet extends HttpServlet {private static final long serialVersionUID = 1L;protected void doGet(HttpServletRequest request, HttpServletResponse response)throws ServletException, IOException {this.doPost(request, response);}protected void doPost(HttpServletRequest request, HttpServletResponse response)throws ServletException, IOException {FileItemFactory factory = new DiskFileItemFactory();request.setCharacterEncoding("utf-8");ServletFileUpload fileupload = new ServletFileUpload(factory);fileupload.setFileSizeMax(1024 * 1024 * 10);// 限制单个文件上传大小为10MBfileupload.setSizeMax(1024 * 1024 * 20);// 限制多文件上传大小为20MBtry {// 解析请求,将表单中的每一个input标签解析成一个FileItemList<FileItem> fileList= fileupload.parseRequest(request);for (FileItem fileItem : fileList) {if (fileItem.isFormField()) {// 是否为普通表单元素String filedName = fileItem.getFieldName();// 获得字段名称String value = fileItem.getString();// 获得字段的值System.out.println(filedName + ":" + value);} else {String fileName = fileItem.getName();// 获得原始路径的文件名fileName =fileName.substring(stIndexOf("\\") + 1);// 获得文件名InputStream is = fileItem.getInputStream();String parentDir =this.getServletContext().getRealPath("/WEB-INF/upload/");String filePath = parentDir + fileName;// 文件保存的路径File file = new File(filePath);if (!file.getParentFile().exists()) { // 父目录不存在file.getParentFile().mkdirs(); // mkdirs():创建文件夹,如果上级目录没有的话,也一并创建出来。
⽂件上传-CommonsFileUpload介绍⼀、概述FileUpload能够以多种不同的⽅式使⽤,具体取决于应⽤程序的要求。
在最简单的情况下,调⽤单个⽅法来解析servlet请求,然后处理解析出来的Item 集合。
此外也可以⾃定义FileUpload已完全控制各个Item的存储⽅式,⽐如设置缓存⽬录、直接将接收到的Item以流的形式写⼊数据库等。
FileUpload依赖于Commons IO,因此类路径下要有Commons IO的jar包。
当然采⽤Maven依赖的⽅式不⽤担⼼,maven会⾃动下载Commons IO包。
⼆、FIleUpload使⽤上传⽂件,注意⼏个问题:① form表单内,要添加空间<input type="file" name="myfile">② form表单的内容格式要定义成multipart/form-data格式:<form action="admin/good_add" method="post" enctype="multipart/form-data">③需要类库:1 commons-io.jar ,2 commons-fileupload-1.3.1.jar接下来我们看下他的⽤法。
1)DiskFileItemFactory factory = new DiskFileItemFactory();FileItemFactory可以设置内容:● setRepository(File dir);//设置临时⽂件存储位置。
● setSizeThreshold(long bytes);//设置请求⼤⼩阈值,当请求⼤于该值时,接收到的数据是缓存在磁盘中的,否则直接缓存到内存中。
● setFileCleaningTracker(FileCleaningTracker pTracker);//设置临时⽂件清理跟踪器2)创建核⼼类-⽂件解析对象ServletFileUpload upload = new ServletFileUpload(DiskFileItemFactory factory);ServletFileUpload可以设置内容:● setSizeMax(long bytes);//设置整个请求的最⼤值,⼤于该值时,不允许传送。
一.在JSP环境中利用Commons-fileupload组件实现文件上传1.页面upload.jsp清单如下:Java代码1.<%@ page language="java" import="java.util.*" pageEncoding="UTF-8"%>2.3.<!DOCTYPE HTML PUBLIC "-//W3C//DTD HTML4.01 Transitional//EN">4.<html>5. <head>6. <title>The FileUpload Demo</title>7. </head>8.9. <body>10. <form action="UploadFile" method="post" enctype="multipart/form-data">11. <p><input type="text" name="fileinfo" value="">文件介绍</p>12. <p><input type="file" name="myfile" value="阅读文件"></p>13. <p><input type="submit" value="上传"></p>14. </form>15. </body>16.</html>注意:在上传表单中,既有一般文本域也有文件上传域2.FileUplaodServlet.java清单如下:Java代码1.package org.chris.fileupload;2.3.import java.io.File;4.import java.io.IOException;5.import java.util.Iterator;6.import java.util.List;7.8.import javax.servlet.ServletException;9.import javax.servlet.http.*;10.11.import org.apachemons.fileupload.FileItem;12.import org.apachemons.fileupload.FileItemFactory;13.import org.apachemons.fileupload.disk.DiskFileItemFactory;14.import org.apachemons.fileupload.servlet.ServletFileUpload;15.16.public class FileUplaodServlet extends HttpServlet {17.18. protected void doGet(HttpServletRequest request, HttpServletResponse response) throws ServletException, IOException {19. doPost(request, response);20. }21.22. protected void doPost(HttpServletRequest request, HttpServletResponse response) throws ServletException, IOException {23.24. request.setCharacterEncoding("UTF-8");25.26. //文件的上传部份27. boolean isMultipart = ServletFileUpload.isMultipartContent(request);28.29. if(isMultipart)30. {31. try {32. FileItemFactory factory = new DiskFileItemFactory();33. ServletFileUpload fileload = new ServletFileUpload(factory);34.35.// 设置最大文件尺寸,那个地址是4MB36. fileload.setSizeMax(4194304);37. List<FileItem> files = fileload.parseRequest(request);38. Iterator<FileItem> iterator = files.iterator();39. while(iterator.hasNext())40. {41. FileItem item = iterator.next();42. if(item.isFormField())43. {44. String name = item.getFieldName();45. String value = item.getString();46. System.out.println("表单域名为: " + name + "值为: " + value);47. }else48. {49. //取得取得文件名,此文件名包括途径50. String filename = item.getName();51. if(filename != null)52. {53. File file = new File(filename);54. //若是此文件存在55. if(file.exists()){56. File filetoserver = new File("d:\\upload\\",file.getName());57. item.write(filetoserver);58. System.out.println("文件 " + filetoserver.getName() + " 上传成功!!");59. }60. }61. }62. }63. } catch (Exception e) {64. System.out.println(e.getStackTrace());65. }66. }67. }68.}3.web.xml清单如下:Java代码1.<?xml version="1.0" encoding="UTF-8"?>2.<web-app version="2.4"3. xmlns="java.sun/xml/ns/j2ee"4. xmlns:xsi="/2001/XMLSchema-instance"5. xsi:schemaLocation="java.sun/xml/ns/j2ee6. java.sun/xml/ns/j2ee/web-app_2_4.xsd">7.8. <servlet>9. <servlet-name>UploadFileServlet</servlet-name>10. <servlet-class>11. org.chris.fileupload.FileUplaodServlet12. </servlet-class>13. </servlet>14.15. <servlet-mapping>16. <servlet-name>UploadFileServlet</servlet-name>17. <url-pattern>/UploadFile</url-pattern>18. </servlet-mapping>19.20. <welcome-file-list>21. <welcome-file>/Index.jsp</welcome-file>22. </welcome-file-list>23.24.</web-app>二.在strut1.2中实现1.上传页面file.jsp 清单如下:Java代码1.<%@ page language="java" pageEncoding="ISO-8859-1"%>2.<%@ taglib uri="/struts/tags-bean" prefix="bean"%>3.<%@ taglib uri="/struts/tags-html" prefix="html"%>4.5.<html>6. <head>7. <title>JSP for FileForm form</title>8. </head>9. <body>10. <html:form action="/file" enctype="multipart/form-data">11. <html:file property="file1"></html:file>12. <html:submit/><html:cancel/>13. </html:form>14. </body>15.</html>2.FileAtion.java的清单如下:Java代码1./*2. * Generated by MyEclipse Struts3. * Template path: templates/java/JavaClass.vtl4. */5.package action;6.7.import java.io.*;8.9.import javax.servlet.http.HttpServletRequest;10.import javax.servlet.http.HttpServletResponse;11.import org.apache.struts.action.Action;12.import org.apache.struts.action.ActionForm;13.import org.apache.struts.action.ActionForward;14.import org.apache.struts.action.ActionMapping;15.import org.apache.struts.upload.FormFile;16.17.import form.FileForm;18.19./**20. * @author Chris21. * Creation date: 6-27-202022. *23. * XDoclet definition:24. * @struts.action path="/file" name="fileForm" input="/file.jsp"25. */26.public class FileAction extends Action {27. /*28. * Generated Methods29. */30.31. /**32. * Method execute33. * @param mapping34. * @param form35. * @param request36. * @param response37. * @return ActionForward38. */39. public ActionForward execute(ActionMapping mapping, ActionForm form,40. HttpServletRequest request, HttpServletResponse response) {41. FileForm fileForm = (FileForm) form;42. FormFile file1=fileForm.getFile1();43. if(file1!=null){44. //上传途径45. String dir=request.getSession(true).getServletContext().getRealPath("/upload");46. OutputStream fos=null;47. try {48. fos=new FileOutputStream(dir+"/"+file1.getFileName());49. fos.write(file1.getFileData(),0,file1.getFileSize());50. fos.flush();51. } catch (Exception e) {52. // TODO Auto-generated catch block53. e.printStackTrace();54. }finally{55. try{56. fos.close();57. }catch(Exception e){}58. }59. }60. //页面跳转61. return mapping.findForward("success");62. }63.}3.FileForm.java的清单如下:Java代码1.package form;2.3.import javax.servlet.http.HttpServletRequest;4.import org.apache.struts.action.ActionErrors;5.import org.apache.struts.action.ActionForm;6.import org.apache.struts.action.ActionMapping;7.import org.apache.struts.upload.FormFile;8.9./**10. * @author Chris11. * Creation date: 6-27-202012. *13. * XDoclet definition:14. * @struts.form name="fileForm"15. */16.public class FileForm extends ActionForm {17. /*18. * Generated Methods19. */20. private FormFile file1;21. /**22. * Method validate23. * @param mapping24. * @param request25. * @return ActionErrors26. */27. public ActionErrors validate(ActionMapping mapping,28. HttpServletRequest request) {29. // TODO Auto-generated method stub30. return null;31. }32.33. /**34. * Method reset35. * @param mapping36. * @param request37. */38. public void reset(ActionMapping mapping, HttpServletRequest request) {39. // TODO Auto-generated method stub40. }41.42. public FormFile getFile1() {43. return file1;44. }45.46. public void setFile1(FormFile file1) {47. this.file1 = file1;48. }49.}4.struts-config.xml的清单如下:Java代码1.<?xml version="1.0" encoding="UTF-8"?>2.<!DOCTYPE struts-config PUBLIC "-//Apache Software Foundation//DTD Struts Configuration 1.2//EN" "/d tds/struts-config_1_2.dtd">3.4.<struts-config>5. <data-sources />6. <form-beans >7. <form-bean name="fileForm" type="form.FileForm" />8.9. </form-beans>10.11. <global-exceptions />12. <global-forwards />13. <action-mappings >14. <action15. attribute="fileForm"16. input="/file.jsp"17. name="fileForm"18. path="/file"19. type="action.FileAction"20. validate="false">21. <forward name="success" path="/file.jsp"></forward>22. </action>23.24. </action-mappings>25.26. <message-resources parameter="ApplicationResources" />27.</struts-config>5.web.xml代码清单如下:Java代码1.<?xml version="1.0" encoding="UTF-8"?>2.<web-app xmlns="java.sun/xml/ns/j2ee" xmlns:xsi="w/2001/XMLSchema-instance" version="2.4" xsi:schemaLocatio n="java.sun/xml/ns/j2ee java.sun/xml/ns/j2ee/web-app_2_4.xsd">3. <servlet>4. <servlet-name>action</servlet-name>5. <servlet-class>org.apache.struts.action.ActionServlet</servlet-class>6. <init-param>7. <param-name>config</param-name>8. <param-value>/WEB-INF/struts-config.xml</param-value>9. </init-param>10. <init-param>11. <param-name>debug</param-name>12. <param-value>3</param-value>13. </init-param>14. <init-param>15. <param-name>detail</param-name>16. <param-value>3</param-value>17. </init-param>18. <load-on-startup>0</load-on-startup>19. </servlet>20. <servlet-mapping>21. <servlet-name>action</servlet-name>22. <url-pattern>*.do</url-pattern>23. </servlet-mapping>24.</web-app>三.在struts2中实现(以图片上传为例)1.FileUpload.jsp代码清单如下:Java代码1.<%@ page language="java" import="java.util.*" pageEncoding="utf-8"%>2.<%@ taglib prefix="s" uri="/struts-tags" %>3.<html>4. <head>5. <title>The FileUplaodDemo In Struts2</title>6. </head>7.8. <body>9. <s:form action="fileUpload.action" method="POST" enctype="multipart/form-data">10. <s:file name="myFile" label="MyFile" ></s:file>11. <s:textfield name="caption" label="Caption"></s:textfield>12. <s:submit label="提交"></s:submit>13. </s:form>14. </body>15.</html>2.ShowUpload.jsp的功能清单如下:Java代码1.<%@ page language="java" import="java.util.*" pageEncoding="utf-8"%>2.<%@ taglib prefix="s" uri="/struts-tags" %>3.<html>4. <head>5. <title>ShowUpload</title>6. </head>7.8. <body>9. <div style ="padding: 3px; border: solid 1px #cccccc; text-align: center" >10. <img src ='UploadImages/<s:property value ="imageFileName"/> '/>11. <br />12. <s:property value ="caption"/>13. </div >14. </body>15.</html>3.FileUploadAction.java的代码清单如下:Java代码1.package com.chris;2.3.import java.io.*;4.import java.util.Date;5.6.import org.apache.struts2.ServletActionContext;7.8.9.import com.opensymphony.xwork2.ActionSupport;10.11.public class FileUploadAction extends ActionSupport{12.13. private static final long serialVersionUID = 572146812454l;14. private static final int BUFFER_SIZE = 16 * 1024 ;15.16. //注意,文件上传时<s:file/>同时与myFile,myFileContentType,myFileFileName绑定17. //因此同时要提供myFileContentType,myFileFileName的set方式18.19. private File myFile; //上传文件20. private String contentType;//上传文件类型21. private String fileName; //上传文件名22. private String imageFileName;23. private String caption;//文件说明,与页面属性绑定24.25. public void setMyFileContentType(String contentType) {26. System.out.println("contentType : " + contentType);27. this .contentType = contentType;28. }29.30. public void setMyFileFileName(String fileName) {31. System.out.println("FileName : " + fileName);32. this .fileName = fileName;33. }34.35. public void setMyFile(File myFile) {36. this .myFile = myFile;37. }38.39. public String getImageFileName() {40. return imageFileName;41. }42.43. public String getCaption() {44. return caption;45. }46.47. public void setCaption(String caption) {48. this .caption = caption;49. }50.51. private static void copy(File src, File dst) {52. try {53. InputStream in = null ;54. OutputStream out = null ;55. try {56. in = new BufferedInputStream( new FileInputStream(src), BUFFER_SIZE);57. out = new BufferedOutputStream( new FileOutputStream(dst), BUFFER_SIZE);58. byte [] buffer = new byte [BUFFER_SIZE];59. while (in.read(buffer) > 0 ) {60. out.write(buffer);61. }62. } finally {63. if ( null != in) {64. in.close();65. }66. if ( null != out) {67. out.close();68. }69. }70. } catch (Exception e) {71. e.printStackTrace();72. }73. }74.75. private static String getExtention(String fileName) {76. int pos = stIndexOf(".");77. return fileName.substring(pos);78. }79.80.@Override81. public String execute() {82. imageFileName = new Date().getTime() + getExtention(fileName);83. File imageFile = new File(ServletActionContext.getServletContext().getRealPath("/UploadImages" ) + "/" + imageFileN ame);84. copy(myFile, imageFile);85. return SUCCESS;86. }87.}注:现在仅为方便实现Action因此继承ActionSupport,并Overrider execute()方式在struts2中任何一个POJO都能够作为Action4.struts.xml清单如下:Java代码1.<?xml version="1.0" encoding="UTF-8" ?>2.<!DOCTYPE struts PUBLIC3. "-//Apache Software Foundation//DTD Struts Configuration2.0//EN"4. "/dtds/struts-2.0.dtd">5.<struts>6. <package name="example" namespace="/" extends="struts-default">7. <action name="fileUpload" class="com.chris.FileUploadAction">8. <interceptor-ref name="fileUploadStack"/>9. <result>/ShowUpload.jsp</result>10. </action>11. </package>12.</struts>5.web.xml清单如下:Java代码1.<?xml version="1.0" encoding="UTF-8"?>2.<web-app version="2.4"3. xmlns="java.sun/xml/ns/j2ee"4. xmlns:xsi="/2001/XMLSchema-instance"5. xsi:schemaLocation="java.sun/xml/ns/j2ee6. java.sun/xml/ns/j2ee/web-app_2_4.xsd">7. <filter >8. <filter-name > struts-cleanup </filter-name >9. <filter-class >10. org.apache.struts2.dispatcher.ActionContextCleanUp11. </filter-class >12. </filter >13. <filter-mapping >14. <filter-name > struts-cleanup </filter-name >15. <url-pattern > /* </url-pattern >16. </filter-mapping >17.18. <filter>19. <filter-name>struts2</filter-name>20. <filter-class>org.apache.struts2.dispatcher.FilterDispatcher</filter-class>21. </filter>22. <filter-mapping>23. <filter-name>struts2</filter-name>24. <url-pattern>/*</url-pattern>25. </filter-mapping>26. <welcome-file-list>27. <welcome-file>Index.jsp</welcome-file>28. </welcome-file-list>29.30.</web-app>。
在用java开发企业器系统的使用,特别是涉及到与办公相关的软件开发的时候,文件的上传是客户经常要提到的要求.因此有一套很好文件上传的解决办法也能方便大家在这一块的开发.首先申明,该文章是为了自己记录一备以后开发需要的时候,不用手忙脚乱哈哈........现在在国内用的非常多的一般是两种方法解决来解决文件上传.cos.jar + uploadbean.jar + filemover.jar这个是用的非常普遍的,原因是因为他操作方便,是我们不必再去关注,那些文件的输入和输出流,使我们从底层的流中解脱出来.uploadfile,uploadbean,multipartformdatarequest<%@ page contenttype="text/html;charset=gb2312" %><head><title>fbysss uploadbean 示例</title><!--meta http-equiv="content-type" content="text/html; charset=iso-8859-1"--><!--meta http-equiv="content-type" content="text/html; charset=gb2312"--></head><form name="form1" method="post" action="sssupload.jsp" enctype="multipart/form-data"><input name="title" type= "text" value="中文字"><td class="bodystyle">附件</td><td class="bodystyle"> <input name="attach" type="file" id="attach" size="50" > </td><input name="ok" type= "submit" value="提交"></form>2.读取表单页面sssgetdata.jsp<!--//==================================================== ======================//文件:uploadbean上传实例//功能:解决中文乱码,完成文件上传,并提供上传改名解决方案//作者:fbysss//msn:jameslastchina@//==================================================== ======================--><%@ page contenttype="text/html;charset=gbk" %><%@ page language="java" import="com.jspsmart.upload.*"%><%@ page import="java.text.simpledateformat"%><%@ page import="java.io.file"%><%@ page import="java.util.*"%><%@ page import="javazoom.upload.*"%><%@ page import="uploadutilities.filemover"%><head><meta http-equiv="content-type" content="text/html; charset=gb2312"></head><%request.setcharacterencoding("gbk");//设置编码格式,就不用一个个转码了。
1.开发环境:
1)eclipse3.2+tomcat5.5;
2)创建dynamic web project;
3)下载:
Commons FileUpload 可以在/commons/fileupload/下载
附加的Commons IO 可以在/commons/io/下载
将commons-fileupload-1.2.1.jar commons-io-1.4.jar拷贝到WebContent\WEB-INF\\lib 目录;
2.前台:
<;form method=";post"; enctype=";multipart/form-data"; action=";upload.jsp"; target=";_blank";>;
<;%-- 类型enctype用multipart/form-data,这样可以把文件中的数据作为流式数据上传,不管是什么文件类型,均可上传--%>;
<;table>;
<;tr>;<;td>;作品:<;input type=";file"; name=";upfile"; size=";50";>;<;/td>;<;/tr>;
<;tr>;<;td>;作者:<;input type=";text"; name=";author"; size=";22";>;
标题:<;input type=";text"; name=";title"; size=";22";>;
<;input type=";submit"; name=";submit"; value=";上传";>;<;/td>;<;/tr>;
<;tr>;<;td>;备注:上传的jpg图片(显示扩展名为.jpg)大小不能超过4M!<;/td>;<;/tr>; <;/table>;
<;/form>;
3.后台:
1)引用:
<;%@ page import=";mons.fileupload.servlet.ServletFileUpload";%>; <;%@ page import=";mons.fileupload.disk.DiskFileItemFactory";%>; <;%@ page import=";mons.fileupload.*";%>;
2)代码:
String id=null;//上传记录id
String destinationfileName=null;//目标文件名
String author=null;
String title=null;
int flag=0;//上传标志
String uploadPath =request.getSession().getServletContext().getRealPath(";/";)+";upload/";;//图片上传路径
String tempPath = request.getSession().getServletContext().getRealPath(";/";)+";upload/temp/";;//图片临时上传路径
String
imagePath=request.getScheme()+";://";+request.getServerName()+";:";+request.getS erverPort()+request.getContextPath()+";/";; // 图片网络相对路径
if(!new File(uploadPath).isDirectory()) new File(uploadPath).mkdirs();// 文件夹不存在就自动创建:
if(!new File(tempPath).isDirectory())new File(tempPath).mkdirs();
try {
DiskFileUpload fu = new DiskFileUpload();
fu.setSizeMax(4194304);// 设置最大文件尺寸,这里是4MB
fu.setSizeThreshold(4096);// 设置缓冲区大小,这里是4kb
fu.setRepositoryPath(tempPath);// 设置临时目录:
List fileItems = fu.parseRequest(request);// 得到所有的文件:
Iterator i = fileItems.iterator();
while(i.hasNext()) {// 依次处理表单中每个域
FileItem file = (FileItem)i.next();// 获得用户上传时文件名
if (file.isFormField()){ //获得文本域表单数据
if(";author";.equals(file.getFieldName()))
author=codeToString(file.getString());
if(";title";.equals(file.getFieldName())) title=codeToString(file.getString()); continue;//非file域不处理
}
String sourcefileName = file.getName();
if( sourcefileName.endsWith(";.jpg";)){//生成上传后的文件名
Random rd = new Random();
Calendar time = Calendar.getInstance();
id=String.valueOf(time.get(Calendar.YEAR))
+ String.valueOf(time.get(Calendar.MONTH)+1)
+ String.valueOf(time.get(Calendar.DAY_OF_MONTH))
+ String.valueOf(time.get(Calendar.HOUR_OF_DAY))
+ String.valueOf(time.get(Calendar.MINUTE))
+ String.valueOf(time.get(Calendar.SECOND))
+ String.valueOf(rd.nextInt(100));
destinationfileName=id+";.jpg";;
File fTmp=new File(uploadPath+destinationfileName);
file.write(fTmp);
//out.print(";<;img src=";+imagePath+";upload/";+destinationfileName+";>;";); flag=1;//上传成功标志1
}else{out.print(";上传失败,只能上传jpg文件!";); }
}
//out.print(";<;script>;location.href=\";demo.jsp\";;<;/script>;";);
}catch (IOException e) {out.print(";上传失败!";);}
out.flush();
out.close();
4.主要解决点:
1)问题:form设置enctype=";multipart/form-data";,request.getParameters函数无法获取表单域值;
2)解决方案:
if (file.isFormField()){ //获得文本域表单数据
if(";author";.equals(file.getFieldName()))
author=codeToString(file.getString());
if(";title";.equals(file.getFieldName())) title=codeToString(file.getString()); continue;//非file域不处理
}。