思科 IP 电话 8811
- 格式:pdf
- 大小:573.21 KB
- 文档页数:7

思科IP话机用户使用手册IP话机常用功能使用方法注:如果在屏幕中找不到下文提到按钮,请按翻页1,拨打电话1)摘机输入号码2)在免提状态下,直接按输入号码。
此时扬声器打开,如果不需要扬声器,可直接摘机3)在免提状态下,直接按,听到拨号音后输入号码2,接听电话1)在未摘机情况下,摘机接听2)已摘机情况下,在屏幕左下角按接听3,电话保留在通话过程中按保留,就可以将这路电话保留。
此时,对方处于听音乐状态。
如要取消保留,继续按即可。
4,转接电话在通话状态中按,>输入目标电话号码>再按,目标电话将响铃。
5,呼叫前转(又叫“呼叫转移”)在未摘机状态下,按>听到“嘟嘟”两声提示音>输入目标号码(前转至座机或者手机,请按照拨打该号码的方式输入,如市话加拨0),然后稍等一会,系统会自动跳回原来的待机屏幕,并显示前转号码。
6,取消前转在待机状态下,按。
7, 创建电话会议1)Ad-hoc方式。
在通话过程中,如果此时你想让某人加入讨论,按,然后输入与会者号码,再按下。
2) 如果你已经在两个通话中(一路电话被保留,另一路正常),你也可以按,然后再利用方向选择键,往上或者下选择另一路通话,并且再按,即可建立三方会议。
3) Meet-me 方式。
会议主持人,先按,输入18后,再拨自己分行站点号及分机号,然后通知其他要参加会议的人直接拨打这个10位号码,其他人不用按8,查看电话记录按, 就可以选择查看未接呼叫,已接通话, 已拨呼叫9,查看语音留言按语音按钮,然后按照提示输入密码,就可以收听语音留言。
在电话使用过程中如有问题,请致电话机按键介绍编号图标功能描述1预设按钮 根据配置设计不同,该按钮有不同的功能,如话路选择(一个话机有多个号码的情况),快速拨号等按钮会根据当前通话状态改变颜色 并保持,表示正在进行的通话并闪烁,表示挂起的通话并保持,表示拒绝呼叫开启或者该线路已加入组等并保持,表示远端线路忙并闪烁,表示该线路有呼叫进入并保持,表示远端线路忙。
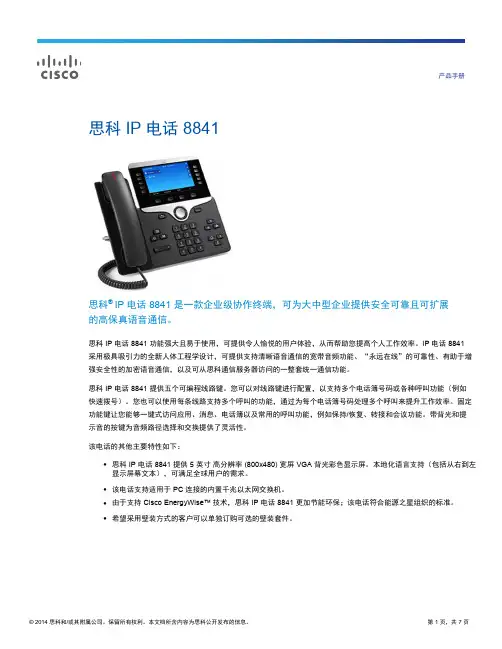
产品手册思科 IP 电话 8841思科®IP 电话 8841 是一款企业级协作终端,可为大中型企业提供安全可靠且可扩展的高保真语音通信。
思科 IP 电话 8841 功能强大且易于使用,可提供令人愉悦的用户体验,从而帮助您提高个人工作效率。
IP 电话 8841采用极具吸引力的全新人体工程学设计,可提供支持清晰语音通信的宽带音频功能、“永远在线”的可靠性、有助于增强安全性的加密语音通信,以及可从思科通信服务器访问的一整套统一通信功能。
思科 IP 电话 8841 提供五个可编程线路键。
您可以对线路键进行配置,以支持多个电话簿号码或各种呼叫功能(例如快速拨号)。
您也可以使用每条线路支持多个呼叫的功能,通过为每个电话簿号码处理多个呼叫来提升工作效率。
固定功能键让您能够一键式访问应用、消息、电话簿以及常用的呼叫功能,例如保持/恢复、转接和会议功能。
带背光和提示音的按键为音频路径选择和交换提供了灵活性。
该电话的其他主要特性如下:●思科 IP 电话 8841 提供 5 英寸高分辨率 (800x480) 宽屏 VGA 背光彩色显示屏。
本地化语言支持(包括从右到左显示屏幕文本),可满足全球用户的需求。
●该电话支持适用于 PC 连接的内置千兆以太网交换机。
●由于支持 Cisco EnergyWise™技术,思科 IP 电话 8841 更加节能环保;该电话符合能源之星组织的标准。
●希望采用壁装方式的客户可以单独订购可选的壁装套件。
特性和优势表 1 列出了思科 IP 电话 8811 系列的特性和优势。
表 1. 特性和优势特性优势● 10.0 及更高版本(通过 Fast Track)Cisco UnifiedCommunications ManagerExpress (Unified CME)Cisco Business Edition ● 8.6.26000 (BE 6000) ● 9.1.2● 10.0 及更高版本思科托管协作● 8.6.2解决方案 (HCS) ● 9.1.2● 10.0 及更高版本许可思科 IP 电话 8841 必须具有增强型用户连接许可证 (UCL),才能连接到思科统一通信管理器。

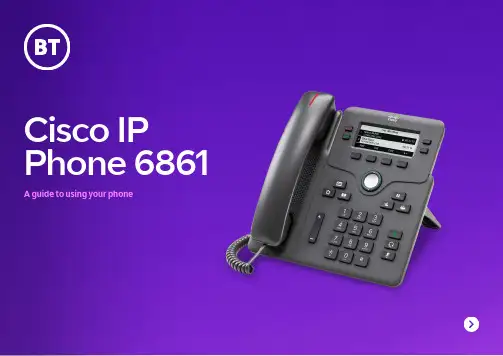
Cisco IP Phone 6861 A guide to using your phoneWhat’s in the box 3 Set up your phone 4 Get to know your phone 5 How to handle calls 6 How to manage your contacts 8 Your problems solved 9 Make sure you can successfullycall emergency services 10Cisco IP Phone 6861 including a handset with a separatecoiled cable – to connect into the handset and then into the phonePlug adaptor – to connect the phone to the powerEthernet cable – optional if you wish to connect your phone directly to the internetQuick start guideStep one:Check your broadband is workingIf your broadband’s up and running the light on your Hub will glow blue Step two:Set up your phone and turn it on Plug the handset into the p ort on the base of the phone and turn it on. When you see network failure appear on screen, don’t worry – it means you’re ready to connect to the wi-fi.Step three:Choose to connect via ethernet cable or wi-fiPlug the ethernet cable provided into the port of the base of the phone and the other end into an ethernet port on the Hub. The phone will then connect to your Hub and automatically connect to the voice service.If you’re connecting to your Hub using wi-fi, press the settings button a nd using the central navigation button , press down and select 4. Select network configuration, then, wi-fi configuration. There you have the choice to either type in your wi-fi password or use the WPS button on your Hub.To type in your wi-fi password:• Select wi-fi profile and if your Hub is not listed, click scan and it willappear• Select your Hub and click down to highlight passphrase – usingthe number keys, type your wi-fipassword (which is on the back ofyour Hub) and click connectThe phone will now connect to your wi-fi.OrTo use the WPS button on your Hub:• Select wi-fi type and it will change to WPS. Then click setYou’ll then see a push button configuration; enter that and press select• Follow the message that appears –click the WPS button on your Hub,then click continue on your phone. This will link the phone to your Hub.After 30-60 seconds the phone will automatically connect to the voice service. Your phone number will appear on screen and there’ll be a green light on the top left button, showing you’re connected.Set up your phone by following these simple stepsTo start using your phone, you should:1. Check your broadband is working2. Set up your phone and turn it on3. Choose if you are connecting viaethernet cable or via wi-fiGet to know your phoneHere’s what the buttons mean:1. Incoming call or voicemail indicator2. Line and feature buttons3. Softkeys4. Navigation5. Hold, transfer and conference6. Speakerphone, headset and mute7. Voice mail, applications and directory8. Volume1874 56Line and feature buttonsYou can use the line and feature buttons to view calls, access and use features.Buttons light up to indicate the phone’s status:Green: line is idleRed (steady): line is activeor in useRed (flashing): line is on holdor there’s an inbound callAmber (steady): line isunregistered (it can’t be used) ororororHow to handle callsThere are a few ways to call peopleJust dial the number and pick up the handsetor click the speakerphone button.To call a contact in your directory1. Press the directory button2. Select personal address book3. Choose the contact you want andpress callTo call a number from your redial list1. Press the redial softkey on the screen2. Choose the number you want andpress callTo call a number from your call history1. Press the settings button2. Select recents3. Select type of call – e.g. all calls4. Choose the number you want andpress callTo call using a headset1. Plug a headset into the headset porton the base of the phone2. Enter a number using the key pad, or contacts3. Press headsetAnswer a callTo answer a call – just lift the handset, or pressthe red flashing line, or push the speakerphonebutton1. Press the mute button2. Press it again to unmuteHold a call1. Press the hold button o r the buttonby hold on the screen2. To resume press it button again or thebutton by pressing resume on the screenTo transfer a call to anotherperson1. From a call that’s not on hold,press transfer 2. E nter the number of the personyou are transferring to 3. Press transfer againTo add a third person to the call1. From an active call pressconference2. E nter the phone number of theperson you want to add and press call 3. P ress conference a all three people to speakChange the volume on the call or of the ringer1. U se the volume key to adjust thevolume during a call 2. To adjust the ringer volume usethe same key when the phone is not in use or when it is ringingsoftkey. If using speakerphone you can press the and if using a headset headsetandbuttonHow to manage your contactsThere are a few ways to add contacts to your phone directory.To add a number from your redial list or your recent call list to your personal address book:1. Press the option softkey2. Select add contact3. D elete the number fromthe name section using the delete arrow 4. Add the name you want usingthe number keys 5. P ress the button by save– and then the name will appear in you recent call list. The name and number will also be saved to your personal address list, which can be accessed by pushing the directory buttonTo add directly into thedirectory, where you can search, edit and delete contacts:1. Press the directorybutton 2. Press the softkey under thecircles 3. S elect add and enter yourcontacts details and press save The personal address book is local to your phone; by selecting this you can see all the contacts saved on it. You can call them from here, as well as edit and add entries. By selecting the options button you can search the contact list, delete and manage entries.Your problems solvedCan I check if my phone is connected?Yes. If the light on the top left button is greenyour phone is connected. If it’s amber then it isdisconnected. First check if your broadband isconnected – the Hub’s light would be blue. Anyother colour indicates an issue and should beinvestigated. If it’s blue then check if the phoneis connected to the wi-fi.How do I check if my wi-fi is connected?Press the settings button , then select wi-ficonfiguration, then wi-fi status. This will confirmif the wi-fi is connected and the signal strength.If the wi-fi is disconnected please follow the steps atthe start of the user guide to reconnect the phoneto your Hub via wi-fi.My broadband is connected and wi-fi seemsok, but I’m still having issues. What do I do?Turn the wi-fi off and back on again using themenu, this could recover the connection. Pressthe settings button , select networkconfiguration, then wi-fi configuration andwi-fi on. Change to off and press set. This willdisconnect the wi-fi. After the phone returnsto the main menu, follow same steps andchange back to wi-fi on and set. The phonewill automatically re-connect to the wi-fi andconfirm the configuration.I can make calls but people can’t call me.What’s gone wrong?Check if your handset is set to do not disturb.Pressing clr DND will remove it.My phone still isn’t workingDon’t worry. We should be able to help.Call us on ***********.Make sure you can successfully call emergency servicesKeep your address updatedYour Cloud Voice number’s registered to a specific address. When you make a 999 or 112 call from your phone number, that’s the address emergency services will see.We don’t update your address automatically. So please tell us if you start using Cloud Voice in a different location. You might not be able to make 999 or 112 calls when you internet network is down or during a power cut, or if you’reusing Cloud Voice from an app.。
思科SLM224G2-CN带有2个Combo SFP 的24-端口10/100 + 2-端口10/100/1000千兆位高级智能交换机——适用于您成长中的企业,具备简单网管功能的经济有效而又安全的交换机成长中的企业需要一个能够不断满足企业自身变化需求的并且成本低廉的网络解决方案。
Cisco SLM224G2智能交换机能够以一个经济有效的价格为您的企业网络基础架构带来全新水平的智能性和安全性。
它提供24个10/100M以太网(铜缆)端口,并且带有2个10/100/1000M自适应的铜缆接口或可选光纤(SFP)接口为接入用户提供从网络边缘到网络核心的千兆上行链路。
对于任何规模的企业,网络安全性始终被置于较高的优先级别而加以考虑,企业经常担心非授权的用户对网络或业务关键数据进行访问。
这款SLM224G2交换机能够通过802.1x端口认证技术和MAC地址过滤技术使企业的网络变得更加安全,802.1x在交换机端口转发数据之前要求接入用户进行自身的身份验证。
企业用户越来越意识到VoIP语音呼叫的优越性并且正在迅速地把其语音业务迁移到基于IP的平台上来,这就需要其本地网络能够同时有效地支持语音和数据的应用程序。
SLM224G2交换机广泛而丰富的QoS特性为诸如语音、视频等实时应用程序提供了理想的解决方案。
通过四个优先级队列的划分,配合加权轮叫调度(WRR)或严格优先级调度(SP)算法,网络管理员能够快速地把语音/视频等实时数据流和其他数据流加以区分,使实时应用能够获得优先处理。
通过配置各种服务等级(Class of Service,CoS)参数,如:端口、第2层优先级(802.1p)、第3层优先级(TOS或DSCP)等,特殊的用户或应用程序也能够获得较其他用户或程序更高的优先级别。
智能的广播、组播及未知单播风暴控制功能能够把这几类风暴对正常数据流的影响减至最低。
IGMP嗅探功能限制极占带宽的视频数据流,使其仅仅转发至发起视频请求的用户而非滥发至所有用户。

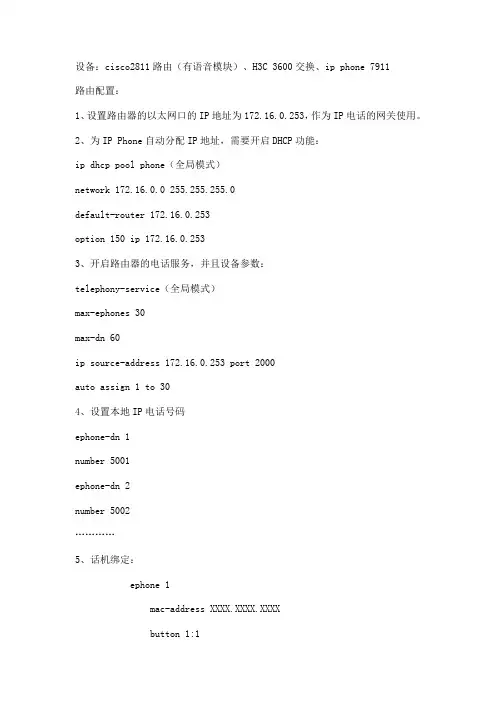
设备:cisco2811路由(有语音模块)、H3C 3600交换、ip phone 7911路由配置:1、设置路由器的以太网口的IP地址为172.16.0.253,作为IP电话的网关使用。
2、为IP Phone自动分配IP地址,需要开启DHCP功能:ip dhcp pool phone(全局模式)network 172.16.0.0 255.255.255.0default-router 172.16.0.253option 150 ip 172.16.0.2533、开启路由器的电话服务,并且设备参数:telephony-service(全局模式)max-ephones 30max-dn 60ip source-address 172.16.0.253 port 2000auto assign 1 to 304、设置本地IP电话号码ephone-dn 1number 5001ephone-dn 2number 5002…………5、话机绑定:ephone 1mac-address XXXX.XXXX.XXXXbutton 1:1type 7910ephone 2mac-address XXXX.XXXX.XXXXbutton 1:2type 7910 注:2811里面的选项没有7911,故选择7910 …………注:button <physical button> <separator> <ephone-dn>常用的separator如下配置好之后,拔掉电话电源,重新连接上去即可。
参考文档:PT 5.3实现ip phone4_融合通信综合实验二_局域网内部的VOIP实现.doc。
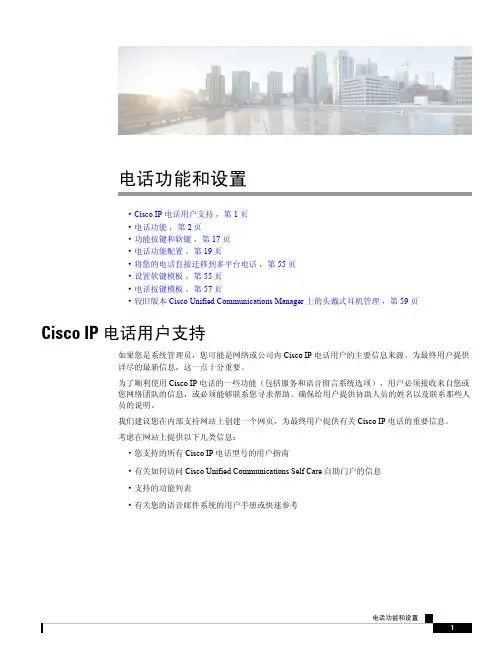
电话功能和设置•Cisco IP电话用户支持,第1页•电话功能,第2页•功能按键和软键,第17页•电话功能配置,第19页•将您的电话直接迁移到多平台电话,第55页•设置软键模板,第55页•电话按键模板,第57页•较旧版本Cisco Unified Communications Manager上的头戴式耳机管理,第59页Cisco IP电话用户支持如果您是系统管理员,您可能是网络或公司内Cisco IP电话用户的主要信息来源。
为最终用户提供详尽的最新信息,这一点十分重要。
为了顺利使用Cisco IP电话的一些功能(包括服务和语音留言系统选项),用户必须接收来自您或您网络团队的信息,或必须能够联系您寻求帮助。
确保给用户提供协助人员的姓名以及联系那些人员的说明。
我们建议您在内部支持网站上创建一个网页,为最终用户提供有关Cisco IP电话的重要信息。
考虑在网站上提供以下几类信息:•您支持的所有Cisco IP电话型号的用户指南•有关如何访问Cisco Unified Communications Self Care自助门户的信息•支持的功能列表•有关您的语音邮件系统的用户手册或快速参考电话功能将Cisco IP电话添加到Cisco Unified Communications Manager中后,就可以向电话添加功能。
下表列出了支持的电话功能,其中许多功能都可以使用Cisco Unified Communications Manager Administration配置。
如需了解如何使用电话上的大多数功能,请参阅Cisco7800系列IP电话用户指南。
参阅功能按键和软键,第17页获取可配置为预设按键、专用软键和功能按键的功能列表。
向电话线路键添加功能时,会受到可用线路键数量的限制。
您添加的功能不能超过电话上的线路键数。
Cisco Unified Communications Manager Administration还提供多个服务参数,您可以使用这些参数配置各种电话功能。
Cisco Unified Communications Self Care 门户网站用户指南 10.5(1) 版Unified Communications Self Care门户网站2Unified Communications Self Care设置2电话4附加设置12Revised: January 22, 2015, OL-32117-01Unified Communications Self Care 门户网站本文档说明如何使用Unified Communications Self-Care门户网站配置Cisco Unified IP电话和Jabber应用程序的用户设置。
使用Unified Communications Self Care门户网站可以配置各项设置,例如快速拨号号码、联系人列表、电话服务和语音信箱通知。
本文档包含以下各节:Unified Communications Self Care 设置本用户指南说明Unified Communications Self-Care Portal中所有可用的配置设置。
本指南假定您的电话支持所有可用的设置,并且网络管理员已配置Unified Communications Self-Care Portal显示所有用户设置。
请注意,当您在Unified Communications Self-Care Portal中设置电话时,本指南中出现的某些设置可能不会显示,原因如下:•电话功能 如果某项功能不适用于您的特定电话型号,则当您在Unified Communications Self-Care Portal中设置电话时,该功能不会出现。
例如,如果您的电话不支持“免打扰”,则该功能不会显示为可用的设置。
•企业参数 网络管理员可以在Cisco Unified Communications Manager中设置企业参数,以限制用户可以在Unified Communications Self-Care Portal中配置的设置。
思科IP话机用户使用手册IP话机常用功能使用方法注:如果在屏幕中找不到下文提到按钮,请按翻页1,拨打电话1)摘机输入号码2)在免提状态下,直接按输入号码。
此时扬声器打开,如果不需要扬声器,可直接摘机3)在免提状态下,直接按,听到拨号音后输入号码2,接听电话1)在未摘机情况下,摘机接听2)已摘机情况下,在屏幕左下角按接听3,电话保留在通话过程中按保留,就可以将这路电话保留。
此时,对方处于听音乐状态。
如要取消保留,继续按即可。
4,转接电话在通话状态中按,>输入目标电话号码>再按,目标电话将响铃。
5,呼叫前转(又叫“呼叫转移”)在未摘机状态下,按>听到“嘟嘟”两声提示音>输入目标号码(前转至座机或者手机,请按照拨打该号码的方式输入,如市话加拨0),然后稍等一会,系统会自动跳回原来的待机屏幕,并显示前转号码。
6,取消前转在待机状态下,按。
7, 创建电话会议1)Ad-hoc方式。
在通话过程中,如果此时你想让某人加入讨论,按,然后输入与会者号码,再按下。
2)如果你已经在两个通话中(一路电话被保留,另一路正常),你也可以按,然后再利用方向选择键,往上或者下选择另一路通话,并且再按,即可建立三方会议。
3)Meet-me方式。
会议主持人,先按,输入18后,再拨自己分行站点号及分机号,然后通知其他要参加会议的人直接拨打这个10位号码,其他人不用按8,查看电话记录按, 就可以选择查看未接呼叫,已接通话, 已拨呼叫9,查看语音留言按语音按钮,然后按照提示输入密码,就可以收听语音留言。
在电话使用过程中如有问题,请致电话机按键介绍编号图标功能描述1预设按钮根据配置设计不同,该按钮有不同的功能,如话路选择(一个话机有多个号码的情况),快速拨号等按钮会根据当前通话状态改变颜色 并保持,表示正在进行的通话编号图标功能描述并闪烁,表示挂起的通话并保持,表示拒绝呼叫开启或者该线路已加入组等并保持,表示远端线路忙并闪烁,表示该线路有呼叫进入并保持,表示远端线路忙2屏幕显示电话功能3支架按钮按下可调整话机放置角度4语音留言按下后自动转到语音留言服务5目录按钮打开或关闭通信录目录,通过通信录来查询通话记录或者定制的通讯录并拨号6帮助按钮显示帮助目录7设定按钮打开设定目录,通过设定目录可以更改网络,屏幕,铃声等设定8服务按钮打开服务目录9音量调节用以调节听筒及扬声器(免提\铃声)的音量10免提按钮激活免提,当免提激活时该按键点亮11静音按钮使话筒静音,当静音时该按键点亮12耳机按钮激活头戴式耳机,使用听筒时该按键点亮13方向按钮方向键用以在菜单中卷动屏幕,在不同栏中移动选择.14键盘用以输入电话号码,用户名等信息,字母键的使用同手机键盘15软按键对应屏幕最下方的软按键选项16听筒灯条提示有呼叫进入或者有新语音留言话机电缆连接1直流变压器端口(DC48V)6听筒端口2 交流电源7头戴式耳机端口3 AC 电源线8支架按钮4网络端口(10/100 SW)9辅助端口(AUX)5接入端口(10/100 PC)屏幕上软键定义说明。
cisco怎么还原ip设置思科路由器是世界闻名的通讯设备之一了,有不少用户不知道cisco怎么还原ip电话设置?店铺为大家分享了具体操作方法,供大家参考!cisco还原电话设置参考以下步骤:思科IP电话恢复出厂设置、思科IP电话7911恢复出厂设置官关恢复方法:This phone must be on a DHCP-enabled network before you can perform these steps.Step 1 Unplug the power cable from the phone and then plug it back in.The phone begins its power up cycle.Step 2 While the phone is powering up, and before the Applications Menu button flashes on and off, press and hold #.Continue to hold # until the message LED on the handset flashes on and off in sequence in red.Step 3 Release # and press 123456789*0#.You can press a key twice in a row, but if you press the keys out of sequence, the factory reset will not take place.After you press these keys, the message LED on the handset flashes faster in red and the phone goes through the factory reset process.Do not power down the phone until it completes the factory reset process and the main screen appears.-------------------------------中文解释:思科IP电话连接到网络中,并可以自动获取IP地址!1、一直按住#号,电话连接POE交换机。
Cisco IP 电话 8811、8841、8851 和 8861 用户指南(用于 Cisco Unified Communications Manager 10.5)首次发布日期: 2014年09月05日上次修改日期: 2014年09月09日Americas HeadquartersCisco Systems, Inc.170 West Tasman DriveSan Jose, CA 95134-1706USATel: 408 526-4000800 553-NETS (6387)Fax: 408 527-0883本手册中有关产品的规格和信息如有更改,恕不另行通知。
本手册中的所有陈述、信息和建议被认为是准确的,但我们不提供任何形式的明示或暗示担保。
用户必须自行负责对任何产品的应用。
软件许可证和产品的有限保修单在产品随附的信息包中皆有说明,并作为参考文件列入此处。
如果您找不到软件许可证或有限保修单,请联系CISCO销售代表获取一份。
以下信息涉及A类设备的FCC遵从性:经测试,本设备符合FCC规则第15部分对A类数字设备的限制规定。
这些限制旨在提供合理的保护,防止设备在商业环境中运行时产生有害干扰。
本设备可以产生、利用并发射无线射频能量。
如果不按说明中的要求安装和使用本设备,有可能对无线电通信产生有害干扰。
在居民区运行此设备可能会造成有害干扰,在这种情况下,用户需要自费消除干扰。
以下信息涉及B类设备的FCC遵从性:经测试,本设备符合FCC规则第15部分对B类数字设备的限制规定。
设置这些限制的目的是在设备安装于居所时,提供合理保护以避免干扰。
本设备可以产生、利用并发射无线射频能量。
如果不按说明中的要求安装和使用本设备,有可能对无线电通信产生有害干扰。
不过,我们不能保证在任何安装中都不会产生干扰。
如果本设备确实对无线电或电视接收造成干扰(可以通过打开和关闭设备来确定),建议用户采取以下一种或多种措施来消除干扰:•重新调整接收天线的方向或位置。
Cisco IP Phone硬件•Cisco IP Phone硬件概述,第1页•Cisco IP Phone7811,第2页•Cisco IP Phone7821,第3页•Cisco IP Phone7841,第4页•Cisco IP Phone7861,第5页•按键和硬件,第6页•术语差异,第9页Cisco IP Phone硬件概述Cisco IP Phone提供基于Internet协议(IP)网络的语音通信。
Cisco IP Phone的功能与数字业务电话十分相似,并允许您拨打和接收电话呼叫以及访问各种功能,例如静音、保留、转接、快速拨号和呼叫前转等。
此外,由于电话连接到您的数据网络,它还提供增强的IP电话功能,例如访问网络信息和服务以及可定制的功能和服务。
Cisco IP Phone7841支持千兆位以太网连接。
向电话线路键添加功能时,会受到可用线路键数量的限制。
您添加的功能不能超过电话上的线路键数。
表1:Cisco IP Phone7800系列和支持的线路键支持的线路键电话Cisco IP Phone78112Cisco IP Phone7821Cisco IP Phone78414Cisco IP Phone786116与其他网路设备类似,Cisco IP Phone 也必须进行配置和管理。
这些电话可编码G.711a-law 、G.711mu-law 、G.722、G.722.2/AMR-WB 、G.729a 、G.729ab 以及iLBC 编解码器;并解码G.711a-law 、G.711mu-law 、G.722、G.722.2/AMR-WB 、G.729a 、G.729ab 以及iLBC编解码器。
如果在Cisco IP Phone 附近使用蜂窝电话、移动电话、GSM 电话或双向无线电,则可能会产生干扰。
有关详细信息,请参阅干扰设备的制造商文档。
Cisco IP Phone 提供传统电话功能,例如呼叫前转和转移、重新拨号、快速拨号、电话会议以及语音留言系统访问。
思科IP电话更新网络设置
思科IP电话在使用过程中会出现更换机构使用的情况,由于新的IP电话会自动配置网络设置,但已经配置好的IP电话如果更换了机构使用,它的网络设置不会自动更改,需要手动清除原先设置,然后电话才会自动配置新的网络设置,下面介绍一下如何手动清除当前电话网络设置。
1、IP电话主界面如图,其中右上角显示该话机号码,如图;
2、首先按菜单键,弹出菜单界面,然后按键选择SETTINGS,再按“Select”按钮,如图;
3、弹出设置界面,然后按键选择“Network Configuration”,再按“Select”按钮,如图;
4、弹出网络设置界面,可以查看该电话的网络设置,注意右上角的锁定标记,此时是无法进行网络设置的更改的,在当前的界面在话机键盘上输入“**#”即可解锁,如图;
5、解锁后右上角标记为,选择按钮多了一个“more”,按下“more”按钮,如图;
6、接着按下“Erase”按钮,就会清除目前电话的网络设置,然后电话会自动从网络中获取新的设置,电话号码不变,如图;
7、最后更新设置完毕后重新回到网络设置界面,再依次按下“**#”按键即可重新锁定电话,防止别人随意更改设置。
cisco ip电话怎么设置思科路由器是世界闻名的通讯设备之一了,有不少用户不知道cisco ip电话的设置方法?店铺为大家分享了具体操作方法,供大家参考!cisco client记忆默认用户名和密码连接设置参考以下命令:总公司路由:ip dhcp pool voicenetwork 192.168.6.12 255.255.255.252default-router 192.168.6.14option 150 ip 192.168.6.14telephony-servicemax-ephones 35max-dn 35ip source-address 192.168.6.14 port 2000!ephone-dn 1number 1001!!ephone 1device-security-mode nonemac-address 000C.CF64.2801type 7960button 1:1!交换机:interface FastEthernet0/3switchport access vlan 10switchport mode accessswitchport port-securityswitchport port-security maximum 70switchport port-security mac-address stickyswitchport port-security mac-address sticky 0050.0F16.B1EB(PC端MAC)spanning-tree portfastspanning-tree bpduguard enable!interface FastEthernet0/4switchport access vlan 10switchport mode trunkswitchport voice vlan 70switchport port-securityswitchport port-security maximum 70switchport port-security mac-address stickyswitchport port-security mac-address sticky 0003.E482.96CA switchport port-security mac-address sticky 000C.CF64.2801 店铺分享了cisco ip电话设置的方法,希望大家喜欢。
产品手册思科 IP 电话 8811
思科®IP 电话 8811 是一款具成本效益的企业级协作终端,可为大中型企业提供安全
可靠且可扩展的高保真语音通信。
思科 IP 电话 8811 功能强大且易于使用,可提供令人愉悦的用户体验,从而帮助您提高个人工作效率。
IP 电话 8811
采用极具吸引力的全新人体工程学设计,可提供支持清晰语音通信的宽带音频功能、“永远在线”的可靠性、有助于增强安全性的加密语音通信,以及可从思科通信服务器访问的一整套统一通信功能。
思科 IP 电话 8811 支持五个可编程线路键。
您可以对线路键进行配置,以支持多个电话簿号码或各种呼叫功能(例如
快速拨号)。
您也可以使用每条线路支持多个呼叫的功能,通过为每个电话簿号码处理多个呼叫来提升工作效率。
固定功能键让您能够一键式访问应用、消息、电话簿以及常用的呼叫功能,例如保持/恢复、转接和会议功能。
带背光和提示音
的按键为音频路径选择和交换提供了灵活性。
该电话的其他主要特性如下:
●思科 IP 电话 8811 提供 5 英寸高分辨率 (800 x 480) 宽屏背光灰阶显示屏。
本地化语言支持(包括从右到左显示
屏幕文本),可满足全球用户的需求。
●该电话支持适用于 PC 连接的内置千兆以太网交换机。
●由于支持 Cisco EnergyWise™技术,思科 IP 电话 8811 更加节能环保-该电话符合能源之星组织的标准。
●希望采用壁装方式的客户可以单独订购可选的壁装套件。
特性和优势
表 1 列出了思科 IP 电话 8811 系列的特性和优势。
表 1. 思科 IP 电话 8811 的特性和优势
特性优势
● 10.0 及更高版本(通过 Fast Track)
Cisco Unified Communications
Manager Express
(Unified CME)
Cisco Business Edition 6000 ● 8.6.2
(BE 6000) ● 9.1.2
● 10.0 及更高版本
思科托管协作● 8.6.2
解决方案 (HCS) ● 9.1.2
● 10.0 及更高版本
许可
思科 IP 电话 8811 必须具有增强型用户连接许可证 (UCL),才能连接到思科统一通信管理器。
产品规格
表 2 列出了思科 IP 电话 8811 的特性和规格。
表 2. 特性和规格
特性规格
●对讲系统
●立即转移
●恶意呼叫方 ID
●消息等待指示器 (MWI)
●Meet-Me 会议
●移动性
●呼叫保持音乐 (MoH)
●静音
●网络配置文件(自动)
●联网和离线独特铃音
●个人目录
●代接
●发送前预拨
●隐私声明
●专线自动振铃 (PLAR)
●重新拨号
●每条线路的铃声
●服务统一资源定位符 (URL)
●共享线路
●随机监听和录音
●快速拨号
●时间和日期显示
●转接
●统一资源标识符 (URI) 拨号
●可视语音邮件
●语音邮件
●耳语指导
电子叉簧●可通过连接至辅助端口的第三方耳机以电子方式控制叉簧。
服务质量 (QoS) 选项●该电话支持思科发现协议和 802.1Q/p 标准,可以配置 801.1Q VLAN 信头,其中包含管理员 VLAN ID
配置的 VLAN ID 覆盖。
网络功能●适用于信令的会话发起协议 (SIP)
●会话描述协议 (SDP)
●IPv4 和IPv6
●用户数据报协议 (UDP)(仅用于实时传输协议 [RTP] 流)
●动态主机配置协议 (DHCP) 客户端或静态配置
●无端地址解析协议 (GARP)
●域名系统 (DNS)
●简单文件传输协议 (TFTP)
●安全超文本传输协议 (HTTPS)
●VLAN
●实时传输协议 (RTP)
●实时控制协议 (RTCP)
●思科对等分发协议 (PPDP)
●思科发现协议
●LLDP(包括 LLDP-MED)
●交换机速度自动协商
安全功能●安全启动
●安全凭证存储
●设备验证
●配置文件身份验证和加密
●图像身份验证
●随机位生成
●硬件加密加速
●思科证书颁发机构代理功能 (CAPF)
●制造商安装的证书 (MIC)
特性规格
●本地重要证书 (LSC)
●以太网 802.1x supplicant 选项:可扩展鉴权协议-通过安全隧道的灵活身份验证 (EAP-FAST) 和扩展认证
协议-传输层安全 (EAP-TLS)
●使用 TLS 的信令身份验证和加密
●使用 SRTP 的媒体身份验证和加密
●客户端和服务器的 HTTPS
●安全外壳 (SSH) 协议服务器
●基于安全套接字层 (SSL) 的 VPN 客户端
物理尺寸(高 x 宽 x 深)●9.02 x 10.13 x 1.57 英寸(229.1 x 257.34 x 40 毫米)
(不含脚架)
重量(含听筒)●2.58 磅(1.17 千克)
电话外壳组成●聚碳酸酯氰乙烯丁二烯苯乙烯 (ABS) 网纹塑料;外观 A 类
工作温度●32 至 104°F(0 至 40°C)
非工作温度冲击●14 至 140°F(-10 至60°C)
湿度●工作:10 至 90%,非冷凝
●非工作:10 至 95%,非冷凝
语言支持●阿拉伯语(阿拉伯区)
●保加利亚语(保加利亚)
●加泰罗尼亚语(西班牙)
●中文(中国大陆)
●中文(中国香港)
●中文(台湾地区)
●克罗地亚语(克罗地亚)
●捷克语(捷克共和国)
●丹麦语(丹麦)
●荷兰语(荷兰)
●英文(英国)
●爱沙尼亚语(爱沙尼亚)
●法语(法国)
●芬兰语(芬兰)
●德语(德国)
●希腊语(希腊)
●希伯来语(以色列)
●匈牙利语(匈牙利)
●意大利语(意大利)
●日语(日本)
●拉脱维亚语(拉脱维亚)
●立陶宛语(立陶宛)
●韩语(韩国)
●挪威语(挪威)
●波兰语(波兰)
●葡萄牙语(葡萄牙)
●葡萄牙语(巴西)
●罗马尼亚语(罗马尼亚)
●俄语(俄罗斯)
●西班牙语(哥伦比亚)
●西班牙语(西班牙)
●斯洛伐克语(斯洛伐克)
●瑞典语(瑞典)
●塞尔维亚语(塞尔维亚共和国)
●塞尔维亚语(黑山共和国)
●斯洛文尼亚语(斯洛文尼亚)
●泰国语(泰国)
●土耳其语(土耳其)
产品规格
表 3 列出了该款电话及其配件的订购信息。
表 3. 订购信息
产品编号说明
CP-8811-K9= ●思科 IP 电话 8811
CP-DX-HS= ●思科 IP 电话 7800、8800 和DX600 系列的听筒备件
CP-DX-CORD= ●思科 IP 电话 8800 和DX600 系列的听筒线备件
CP-8800-WMK= ●思科 IP 电话 8800 系列的壁装套件备件
CP-8800-FS= ●思科 IP 电话 8800 系列的脚架备件
CP-8800-B-BEZEL= ●思科 IP 电话 8800 系列的黑色顶盖备件
CP-8800-S-BEZEL= ●思科 IP 电话 8800 系列的银色顶盖备件
CP-PWR-CUBE-4 ●思科外接电源 4
CP-PWR-CORD-AP= ●电源线(亚太地区)
CP-PWR-CORD-AR= ●电源线(阿根廷)
CP-PWR-CORD-AU= ●电源线(澳大利亚)
CP-PWR-CORD-BZ= ●电源线(巴西)
CP-PWR-CORD-CE= ●电源线(欧洲)
CP-PWR-CORD-CN= ●电源线(中国)
CP-PWR-CORD-JP= ●电源线(日本)
CP-PWR-CORD-NA= ●电源线(北美)
CP-PWR-CORD-SW= ●电源线(瑞士)
CP-PWR-CORD-UK= ●电源线(英国)
保修
思科 IP 电话 8811 系列享受思科标准的 1 年更换保修。
思科统一通信服务
思科和我们的认证合作伙伴可帮助您设置一个安全、可靠的思科统一通信解决方案,满足您的严格部署计划,并增强您的业务优势。
思科的服务组合基于成熟的方法,用于统一固定和移动网络上的语音、视频、数据和移动应用。
我们独特的生命周期服务方式定义了解决方案生命周期每个阶段的具体需求。
定制的规划和设计服务帮您创建一个满足您业务需求的解决方案。
屡获殊荣的技术支持能够帮您提高运营效率。
远程管理服务简化了日常运作。
优化服务让您能够在业务需求变化时修改和完善网络解决方案。
更多信息
有关思科 IP 电话 8800 系列的其他详细信息,请访问 /go/ipphones/8800。
美国印刷C78-731637-00 06/30。