热压机使用说明
- 格式:ppt
- 大小:10.14 MB
- 文档页数:18
热压机操作说明一、操作说明前言热压机是一种常见的工业设备,用于对材料进行高温和高压处理。
正确的操作热压机可以保证设备的安全性和工作效率。
本文将详细介绍热压机的操作步骤和注意事项。
二、热压机操作步骤1. 安全检查在使用热压机之前,必须进行全面的安全检查。
确保设备完好无损,电源与水源连接正常,并确保紧急停止按钮可靠工作。
2. 材料准备根据工作需求选择合适的材料,并进行必要的加工和处理。
确保材料的尺寸与工作台面匹配,并清理材料表面的杂质和污垢。
3. 加热准备按照热压机的规格和要求,设置适当的温度和加热时间。
通常使用的方法是在控制面板上操作电子温度控制器,确保温度的准确性和稳定性。
4. 压力调整根据工作需要,使用压力表来调整热压机的工作压力。
确保压力在安全范围内,并确保压力的均匀分布。
5. 材料放置将材料放置在热压机的工作台面上,并确保材料与模具紧密接触。
根据需要,可以在材料上放置一定的压力块来提高压力的均匀性。
6. 热压关闭热压机的安全门,并启动设备。
根据设备的特点,选择合适的模具操作模式。
在热压过程中,保持设备的稳定运行,并注意温度和压力的变化。
7. 冷却热压完成后,逐渐降低设备的温度和压力。
可以使用冷却水或其他冷却设备来加速冷却过程。
8. 材料处理热压完成后,将材料从热压机中取出,并按照需求进行后续处理。
对于一些特殊材料,可能需要进行降温处理或其他特殊工艺。
三、热压机操作注意事项1. 安全操作在操作热压机时,必须戴上适当的个人防护装备,如手套和护目镜。
不得将手部或其他身体部位放置在运动部件附近,以免造成伤害。
2. 清洁和维护经常清洁和维护热压机设备,确保其正常工作。
定期检查电气线路和液压系统,并随时保持机器的清洁和整洁。
3. 操作规范严格按照操作规范进行操作,不得随意调整参数或更改工作流程。
必要时,可以请专业人员进行操作或维修。
4. 温度控制在加热过程中,始终保持对温度的监控,并根据需要进行及时调整。
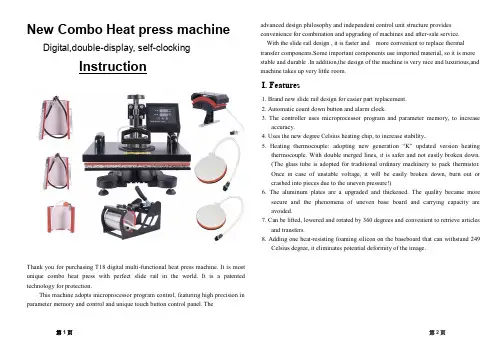
New Combo Heat press machine Digital,double-display,self-clockingInstructionThank you for purchasing T18 digital multi-functional heat press machine. It is most unique combo heat press with perfect slide rail in the world. It is a patented technology for protection.This machine adopts microprocessor program control, featuring high precision in parameter memory and control and unique touch button control panel. The advanced design philosophy and independent control unit structure provides convenience for combination and upgrading of machines and after-sale service.With the slide rail design , it is faster and more convenient to replace thermal transfer components.Some important components use imported material, so it is more stable and durable .In addition,the design of the machine is very nice and luxurious,and machine takes up very little room.I. Features1. Brand new slide rail design for easier part replacement.2. Automatic count down button and alarm clock.3. The controller uses microprocessor program and parameter memory, to increaseaccuracy.4. Uses the new degree Celsius heating chip, to increase stability..5. Heating thermocouple: adopting new generation “K” updated version heatingthermocouple. With double merged lines, it is safer and not easily broken down.(The glass tube is adopted for traditional ordinary machinery to pack thermistor.Once in case of unstable voltage, it will be easily broken down, burn out or crashed into pieces due to the uneven pressure!)6. The aluminum plates are a upgraded and thickened. The quality became moresecure and the phenomena of uneven base board and carrying capacity are avoided.7. Can be lifted, lowered and rotated by 360 degrees and convenient to retrieve articlesand transfers.8. Adding one heat-resisting foaming silicon on the baseboard that can withstand 249Celsius degree, it eliminates potential deformity of the image.II.Technical parameters·Voltage:220V / 110V Frequency:50HZ / 60 HZ·Power:1000W·Main Heating plate size:290*380mm / 800W·Packing Size:520mm x 500mm x 480mm·8 inch plate heating mat:Diameter 11~12CM (Ф122/200W, Ф155/260W)·10 inch plate heating mat:Diameter 15CM (Ф122/200W, Ф155/260W)·Mug heating pad: 11oz, heating band dimension: 105X235(unfolded)/350W·Cap pad :print on the edge of cap printing area: 14*8.5 CM·Weight:24Kg·T ime Range:0-999 sec.·Temperature range:0-200℃ /0-399FTemperature rise time: About 5-15 mins·Real-time display of temperature state: Automatic alarm.Other expanded functions: 10oz min mug pad,12oz cone mug pad,17oz cone mug pad,7.1 long mug pad,8 inch plate pad ,10 inch plate pad .III.Operation guide1.Introduction of control panel and buttons OUT: Heating Indicator LightWORK: Countdown Time Indicator lightSET: Function setting key: Reducing Key / M anual timing S tart & clear key: Increase Key(H1): LED Temperature Display screen(H2): LED Time Display screen2. Guide of setting parameterI. Working temperature setting (temperature of heating & press object)Press the “SET” Key first time, the H1 LDE screen will show “SP”, it indicates the current temperature. Temperature can be adjusted by pressing ▼or ▲. Note: before setting temperature pleasure check your controller setting for C or F degree reading.(For Example 330 F Degree)3. Time setting (time of heating & press object)Press the “SET” Key 2nd time, the H1 LDE window will show “” it indicates the setting time. Timer can be adjusted by pressing ▼or ▲.IV. Secondary Manual setting. (Regarding Second Menu (Non-professionals, please do not use this menu; When necessary please use it very carefully!)1. How to change Fahrenheit degree or Celsius degree reading?Press SET Key at the same time for 5 Sec. TheH1 LED window will show “C-F”, Press ▼or ▲Key, to select Fahrenheit degree OR Celsius degree reading. Press SET 5 Sec. again to save setting.V. The process for Printing customized giftsStep 1. Print the designed photo on the sublimation paper or color inkjet paper in sublimation ink ,While printing ,choose mirror image .When theink is dry on the paper, transfer the image to your item .Step 2. Turn power switch on; Press SET first time to set the desired temperature, the LED will show SP, indicating that you can select by press ▼or ▲Step 3. To set the heating time, press SET second time, LED light will show , then press ▼or ▲key to adjust heating time.The temperature rising time within 5-15 minutes;Step 4, Adjust the right pressure (turn the pressure adjust regulator for adjust the pressure);After the temperature reach the desire setting, Place the picture-wrapped mug in to the machine, close the handle.THE TIMER WILL START WORKING AFTER PRESSING ▼Step 5. The machine will start the timer.Step 6. When the timer shows “0”, the machine will alert you by making a buzzer sound. That indicates your transfer is finished. R elease the handle and take out the printed object; Press ▼ Key to cancel the alarm prompt, and then retrieve the object and finish DIY gift printing.Get rid of the picture paper after the printed objects to be taken out from the machine.VI. Replacement of accessoriesThe counterdie of the heat press equipment is slide rail design. It is only necessary to plug it out and replace accessories easily and conveniently.1. Parts replacement instruction2. Adjustable MatUneven work surface, adjust the height and direction of the mat will be OK 1. Adjust the height of the mat roughly, in order to achieve the basic flat 2. Adjust the direction of the mat finely, in order to achieve the completely flat.3. Installation for each heating accessories:A. Flat press (for t shirt): Plug out other heating pad, and put this flat into the slidingrails and fix it.B. Plate press parts installation: Maintain the bottom flat-panel, and push the plate part into the hole and fixed with a screwdriver.C. Mug press parts installation: Put foaming rubber pad fixed in mug shelves(push the long screws into the both side holes of the steel mug shelves directly, without disassembly of the screws).D. Cap Press Parts installation: Push one part along the slide rails, and push theother part into the hole and fixed with a screwdriver.3. Adjust pressureStep 1, Loosen the screw with a screwdriver.Step 2, Hold the handle and gently pull it forward, and then remove the partsAdjust the right pressure before printing or after replace different accessories. Turn the pressure regulator to adjust appropriate pressure,then turn the back side to lock the screw cap .Different Combo heat press accessories For your choiceName Flat Press Mug press pad Cap press Platepress4 in 1One piece29*38cmOne piece 1set8’ or 10‘5 in 1One piece29*38cmOne piece1set8’ & 10’6 in 1One piece29*38cmTwo pieces1set8’ & 10’7 in 1One piece29*38cm3 PCS (different sizes)1set8’ & 10’8 in 1One piece29*38cm4 PCS (different sizes)1set8’ & 10’Mug & Cap Heat press accessoriesTurn the pressure regulator toadjust appropriate pressurePlease lock the screw cap afteradjusting the pressure well .VI. Kindly prompts:To print and make individualized DIY products, it is also necessary for you to prepare the following equipment and materials.1. Ink jet printer/ six colors printer (For example: Epson R-330 / R270 / R290 / T50)2. CISS (Continuous ink supply system)Different models of Ink jet Printer will need different CISS.3. Sublimation ink / Heat transfer ink;4. High-temperature resistant tape;5. Sublimation paper / Heat transfer paper (for Ceramic and fabric)6. Paper cutter7. Press mug / cup and plate: Normal mug and plate will can not use for press, Only sublimation mug and plate can be use.VII. WARRANTY SERVICE REGULATIONSAll machines comes with a one year warranty from the date of purchase. Please contact us or the dealers if you encounter quality problems..In accepting the warranty service, please provide all of information as follow: (You can send us those information, through the scans or express way. Address:Repair date:Repair fault:Repair reason:Fault handing:Customer name & address:Email:Products Model:Purchase date:VIII.ATTENTION1.Be sure to connect safe and correct ground wire !2.Be cautious when operating the heat press. Parts will be hot and may cause serious burn. Keep surrounding clear of the machine.3.The steel of mug frame is sharp, handle with care..4.Object may still be hot after the transfer.5.Please keep children and senior citizens away from the machine .。
热压机操作指令概述本操作指令旨在提供热压机的正确操作方法,以确保操作人员的安全和设备的正常运行。
请严格按照以下步骤进行操作。
操作步骤1. 确保热压机处于正常工作状态,周围环境清洁无障碍物。
2. 检查热压机的电源和供电线路,确保连接牢固稳定。
3. 打开热压机的主电源开关,待设备自检完成后,确认其工作状态正常。
4. 使用压力计检查热压机的工作压力,并确保其处于合理范围内。
5. 将待加工的材料放置在热压机的工作平台上,并根据需要进行定位和固定。
6. 调整热压机的温度和压力控制参数,根据加工要求进行设定。
7. 按下启动按钮,使热压机开始工作。
注意观察设备的运行状况和操作过程中是否存在异常情况。
8. 在加工过程中,定期检查热压机的温度和压力参数,确保其稳定在设定值范围内。
9. 加工完成后,先关闭热压机的加热系统,待温度降至安全范围后,再关闭主电源开关。
10. 清理和维护热压机,包括清除加工残留物和润滑移动部件。
注意事项- 在操作热压机前,请确保自己已经熟悉热压机的使用说明书,并具备相关的安全知识和技能。
- 在操作过程中,应注意避免突发事件的发生,如材料熔化、火灾等,及时采取必要的应急措施。
- 操作人员需佩戴符合要求的安全防护装备,如防护眼镜、安全手套等。
- 任何时候都不要强行操作损坏或工作不正常的热压机,应及时报修或寻求专业人员的帮助。
以上即为热压机的操作指令,请严格遵守。
在操作之前务必确认所有安全措施已经采取并符合规定要求。
祝您操作顺利!。
Heat Press Instructionke k S ee u t e k S e e u t e e e u t e k S e e u t e k S e S e e u t e k S e e u t e k S e e u t k S e e u t e k S e e u t e k S e e u t e k e k S e e u t e k S e e u t e k S e e u t e k u t e k S e e u t e k S e e u t e k S e e u t e k e e u t e k S e e u t e k S e e u t e k S e e u t e k S e e u t e k S e e u t e k S e e u t e k S e e u t e S e e u t e k S e e u t e k S e e u t e k S e e u S e e u t e k S e e u t e k S e e u t e k S e e e e u t e k S e e u t e k S e e u t e k S t e k S e e u t e k S e e u t e k S e e u t e k S e e u t e u t e k S e e u k S e eIntroductionThanks for purchasing Seeutek heat press machine. This machine adopts microprocessor program control, featuring high precision in parameter memory and control, comes with digital dual display control box, more steady and accurate. It can bake and fabricate colorful logos, portraits & photos as well as scenery patterns, etc. It is applicable for baking cup, baking tray, baking hat, heat transfer clothing T-shirt, mouse pad, pillow and metal ornaments, etc. It also can be used as the individualized article, integrating artistic appreciation and utility.A : Heating Plate G : Mug Press 2"-2.75" diameter(6OZ)B : Mug Press Machine H : Mug Press 11oz latte mug(cone)C : Mug Press 3"-3.5" diameter(11OZ) I : Mug Press 12oz latte mug(cone)D : Hat/Cap press:5.5"x 3"(14*8cm)E : Plate Press #1 5" max diameter(12.5cm)F : Plate Press #2 6" max diameter(15.5cm)NOTE: Heat Press Machine 5 in 1 Package Include:1 x Heat Press Machine(telfon-coated)1 x Hat press 5.5"x 3"(14*8cm); 1 x Mug Press(3"-3.5" diameter,11OZ); 1 x Plate Press #1 5"1 x Plate Press #2 6";1 x User Manual(T-shirts, cups and hats are NOT included.)NOTE: Heat Press Machine 8 in 1 Package Include:1 x Heat Press Machine(telfon-coated)1 x Hat press 5.5"x 3"(14*8cm); 1 x Plate Press #1 5"; 1 x Plate Press #2 6";1 x Mug Press(3"-3.5" diameter,11OZ);1 x Mug Press(2"-2.75" diameter,6OZ)1 x Mug Press 11oz latte mug(cone)1 x Mug Press 12oz latte mug(cone)1 x User Manual(T-shirts, cups and hats are NOT included.)Features:1. Revolutionary sliding rails make components replacement easier.2. Auto timer & alarming clock.3. Digital dual displays are controlled with microprocessor, which brings higher accuracy.4. Stable power offers intensive protection for circuit board.5. The new-generation thermocouple is safer and sturdy.6. Thickened aluminum board brings even capacity. Superior quality and construction areguaranteed.7. 360°swivel design for easy transport.8. Place a heat-resistant silicone rubber foam mat on the base, and the base can withstand up to752°F without deformationControl Box Introduction: OUT: Heating; WORK: Countdown; SET : Function setting ▲: Increase ; ▼: Decrease&(count down by manual ) Firstline Led : temperature; Secondline Led : countdownHow to set the control box?1.Temperature setting:Press “SET”key, upper display frame shows “SP”; lower display frame shows temperature values, press ▲ or ▼ to increase or decrease temperature.2.Time setting:Double press “SET”, upper display frame show ”S ”, lower display frame shows time, press ▲ or ▼ to increase or decrease time3.Centigrade / Fahrenheit conversion:Press “SET”3 times, upper display frame show “C -F”, lower display frame shows temperature units, press ▲ or ▼ to increase or decrease to convert between centigrade and Fahrenheit4.Start the countdown:In the interface shown in the picture, press ▼ to start the countdown.ke k S ee u t e k S e e u t e e e u t e k S e e u t e k S e S e e u t e k S e e u t e k S e e u t k S e e u t e k S e e u t e k S e e u t e k e k S e e u t e k S e e u t e k S e e u t e k u t e k S e e u t e k S e e u t e k S e e u t e k e e u t e k S e e u t e k S e e u t e k S e e u t e k S e e u t e k S e e u t e k S e e u t e k S e e u t e S e e u t e k S e e u t e k S e e u t e k S e e u S e e u t e k S e e u t e k S e e u t e k S e e e e u t e k S e e u t e k S e e u t e k S t e k S e e u t e k S e e u t e k S e e u t e k S e e u t e u t e k S e e u k S e eHeat Press Machine Users’ Guide Thank you for purchasing our product, we appreciate your business. It is a multi-purpose heatpress machine with which you can apply it on T-shirts, caps, china or mugs. However, it does require different attachment to make it compatible with different tasks.1. Attachment for T-shirtsThe machine is defaulted to T-shirt mode. The default temperature is 356°F while the timer is set to 30 seconds.2. Ceramic plate installationRemove screws on the heating plate, install the plate press via switch the two screws on the backside of plate press.ke k S ee u t e k S e e u t e e e u t e k S e e u t e k S e S e e u t e k S e e u t e k S e e u t k S e e u t e k S e e u t e k S e e u t e k e k S e e u t e k S e e u t e k S e e u t e k u t e k S e e u t e k S e e u t e k S e e u t e k e e u t e k S e e u t e k S e e u t e k S e e u t e k S e e u t e k S e e u t e k S e e u t e k S e e u t e S e e u t e k S e e u t e k S e e u t e k S e e u S e e u t e k S e e u t e k S e e u t e k S e e e e u t e k S e e u t e k S e e u t e k S t e k S e e u t e k S e e u t e k S e e u t e k S e e u t e u t e k S e e u k S e e3. Attachment for caps/hats installationThe whole attachment easily slides in/out, after taking out the previous attachment, insert the attachment for caps/hat and slide it in, fix it with screws.4. Attachment for cups and cylindrical objects installationThis attachment do not need to install and just need to plug in the control box, then it will work. If you want to replace the cup, loose the clamp and replace the cup.ke k S ee u t e k S e e u t e e e u t e k S e e u t e k S e S e e u t e k S e e u t e k S e e u t k S e e u t e k S e e u t e k S e e u t e k e k S e e u t e k S e e u t e k S e e u t e k u t e k S e e u t e k S e e u t e k S e e u t e k e e u t e k S e e u t e k S e e u t e k S e e u t e k S e e u t e k S e e u t e k S e e u t e k S e e u t e S e e u t e k S e e u t e k S e e u t e k S e e u S e e u t e k S e e u t e k S e e u t e k S e e e e u t e k S e e u t e k S e e u t e k S t e k S e e u t e k S e e u t e k S e e u t e k S e e u t e u t e k S e e u k S e eNote:1. Different heating press material, time and temperature will be different.2. Please try a sample to test the right temp and time before large quantity of printing.3. Clothing require temp about 180°C/356℉, Fabric clothing use with sublimation paper:30-50 sec,100% cotton clothing use with transfer paper: 15-20sec.Kindly prompts: To print and make individualized DIY products, it is also necessary for you to prepare the following equipments and materials.1. Ink jet printer/ six colors printer (For example: Epson R-230 / R270 / R290 / T50)2. CISS (Continuous ink supply system)Different models of Ink jet Printer will need different CISS. 3. Sublimation ink / Heat transfer ink; 4. High-temperature resistant tape;5. Sublimation paper / Heat transfer paper (for Ceramic and fabric)6. Paper cutter7. Press mug / cup and plate: Normal mug and plate will can not use for press, Only sublimation mug and plate can be use. ke k S ee u t e k S e e u t e e e u t e k S e e u t e k S e S e e u t e k S e e u t e k S e e u t k S e e u t e k S e e u t e k S e e u t e k e k S e e u t e k S e e u t e k S e e u t e k u t e k S e e u t e k S e e u t e k S e e u t e k e e u t e k S e e u t e k S e e u t e k S e e u t e k S e e u t e k S e e u t e k S e e u t e k S e e u t e S e e u t e k S e e u t e k S e e u t e k S e e u S e e u t e k S e e u t e k S e e u t e k S e e e e u t e k S e e u t e k S e e u t e k S t e k S e e u t e k S e e u t e k S e e u t e k S e e u t e u t e k S e e u k S e e。
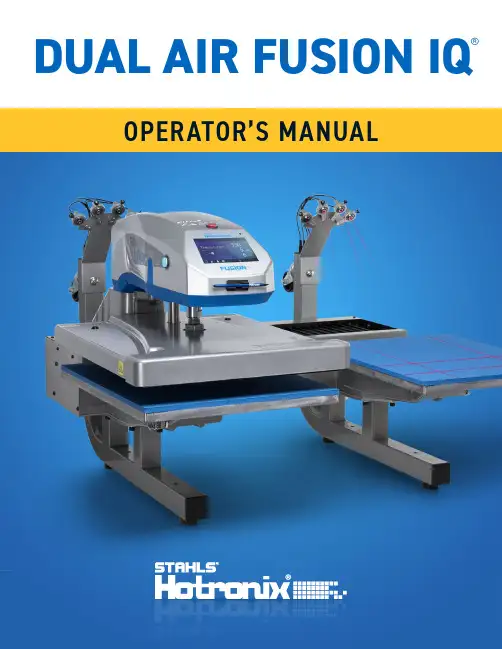
DUAL AIR FUSION IQ®OPERATOR’S MANUALHOTRONIX®DUAL AIR FUSION IQ®When using your heat press, basic precautions should alwaysbe followed, including the following:1. Read all instructions.2. Use heat press only for its intended use.3. To reduce the risk of electric shock, do not immerse the heat press in water or other liquids.4. Never pull cord to disconnect from outlet, instead grasp plug and pull to disconnect.5. Do not allow cord to touch hot surfaces, allow heat press to cool completely before storing.6. Do not operate heat press with a damaged cord or if the equipment has been dropped or damaged.To reduce the risk of electric shock, do not disassemble or attempt to repair the heat press. Take it toa qualified service person for examination and repair. Incorrect assembly or repair could increase therisk of fire, electric shock, or injury to persons when the equipment is used. Power supply cord mustbe disconnected before cleaning or servicing press.7. This appliance is not intended for use by persons (including children) with reduced physical, sensory ormental capabilities, or lack of experience and knowledge, unless they have been given supervision orinstruction concerning use of the appliance by a person responsible for their safety.8. Close supervision is necessary for any heat press being used by or near children. Do not leaveequipment unattended while connected.9. To avoid burns, do not touch hot metal parts or the heated platen during use.10. To reduce the likelihood of circuit overload, do not operate other high voltage equipment on the same circuit.11. If an extension cord is necessary, then a 20-amperage rated cord should be used. Cords rated for lessamperage may overheat. Care should be taken to arrange the cord so that it cannot be pulled or tripped over.12. Keep hands clear of the upper heat press platen during lock down as the pressure may cause injury.13. Heat press should be placed on a sturdy, suitable stand at least 24"L x 36"W x 28"H with 30” height.14. Work area must be kept clean, tidy, and free of obstructions.ImportantThe Hotronix® Dual Air Fusion IQ® is equipped with a Quick Release Button located on top of the control housing. When pressed, this button activates a quick release of the heat platen when in the print position and automatically returns the platen tothe UP position. Once activated, the button can be reset by pushing it in. The press will return to Normal Operating Mode. Light on = Normal Operating ModeLight off = Quick Release ModeIn the event of a loss in air pressure while the heat platen is in the down or print mode, disconnect the powersupply (or flip power switch to the OFF position) and remove opposite lower platen. Then push the top of theDual Air Fusion IQ® to the open position.After air pressure has been restored, turn the heat press back on and press the yellow Shop Air Pressure iconon your screen. You may then replace the lower platen and resume printing.Safety InstructionsMachine View Operating InstructionsConnecting the SystemStart Up/Shut DownHome ScreenPrepare to PrintTouch Screen GuideSetup MenuPassword SetupPreset SetupDate & Time SetupDisplay SetupAuto On & Off SetupSystem SetupCalibrationUpdating SoftwareLaser Alignment Setup Connecting to the IQ® PortalElectrical SchematicReplacement Parts ListContact 245-7 55678-13 88910101011121213 14 15 16-19 20HOTRONIX®DUAL AIRFUSION IQ®BellowTouch ScreenStylus PenPrint ButtonLower Platen ALower Platen BUpper PlatenBase Alignment LasersLeverSERVICE HOTLINE: 800.727.8520 45Insert power cord into IEC inlet located on the side of press (1.1). Connect the power cord into a properly grounded electrical outlet with a sufficient amperage rating.Voltage240 volt 3500 watt presses require a full 15-amp grounded circuit 240 volt 1800 watt presses require a full 10-amp grounded circuitExtension CordsIf used, extension cords should be as short as possible and not less than 12 gauge. Heavy duty cords are recommended.CircuitsCircuits that have inadequate amperage, or have other high demand equipment or appliances (especially more than one heat press) plugged in, should not be used.Note: If supply cord is damaged, it must be replaced by the manufacturer, its service agent, or a similarly qualified person to avoid hazard. Use SJT type rated 300 V cord for replacement.Connecting the SystemTo start up your heat press:Flip the power switch ON (2.1). A splash screen displaying the Hotronix ® logo and current software version is shown for several seconds.To turn your heat press off, flip the power switch OFF.To place your heat press into Standby Mode, touch and release the Power icon on the Home Screen (3.2). In Standby Mode,the heater turns off while the Touch Screen remains on, displaying anorange background as a warning if the platen is still hot (above 100°F / 38°C).NOTE: Standby Mode must be used for the Auto On feature to function (10.1). The Auto On feature will not work if the power switch (2.1) is in the OFF position.To start up your heat press while in Standby Mode, touch and release the Home icon on the Standby Screen.Start Up/Shut Down1.11.22.1SERVICE HOTLINE: 800.727.85206HOTRONIX®DUAL AIR FUSION IQ®Displays the selected preset. Touch andsettings.NOTE:name will display targeted application settings. Screen pressure, and time.Status bar provides helpful information regarding heat press.Displays multiple heat application preset step. Touch the empty circled numbers to switch between preset steps.Touch and edit your favorite presets.Lock the screen operators from changing settings.control operator access level and track press usage by operator in the IQ ® Portal.Displays the current application temperature and time. To view pressure, touch 0 and target pressure is displayed. Manual pressure adjustment required.Home Screenrepresents the active platen; top is A, bottom is B.Touch to toggle tack mode.7Entering Application SettingsBefore you begin heat applying, verify the appropriate application settings are entered for both lower platens. Application settings for lower platen A and platen B are stored separately.To enter application settings for lower platen A, the upper platen must be in the A position. If it is in the B position, depress the foot pedal (4.2) while the Auto Shuttle function is enabled (3.2) to shuttle to A position.Select a preset material application (7.1) for the A position or manually enter temperature, pressure and time based on transfer material instructions.Shuttle the upper platen to the B position using the foot pedal (4.2).Select a preset material application (7.1) for the B position or manually enter temperature, pressure and time based on transfer material instructions. For best results, temperature settings for A and B positions should match.Basic PrintingPosition the garment and design.Shuttle the upper platen over the garment and design using the foot pedal.Press both Print Buttons located on the side of the press.The upper platen will lower into PRESS position. The timer will automatically begin to count down.When the Print Cycle is complete, the top platen will return to the UP position.CAUTION: When Auto Shuttle mode is enabled (Arrow icon), the upper platen will automatically shuttle to the opposite platen.If a second application is desired, repeat previous steps.Shuttle and Tack ModesTouch the Shuttle icon (3.2) to cycle through three shuttle modes:• Auto: shuttle automatically after each Print Cycle or when the foot pedal is pressed • Foot pedal: shuttle only when the foot pedal is pressed• O ff: air-operated shuttling is disabled and the controller housing must be shuttled by hand.The Print Cycle will not begin unless the upper platen is in either the A or B position.NOTE: Auto Shuttle can be disabled for individual preset stages (7.6) for a heated post-cure effect.Touch the Tack Mode icon (3.2) to toggle ON/OFF. Tack mode is useful for experimenting, fine-tuning print recipes or very brief application times.• Tack Mode On: press and hold both Print Buttons to start Print Cycle. Print Cycle completes when buttons are released• T ack Mode OFF: press and hold both Print Buttons to start Print Cycle. Print Cycle completes when countdown timer reaches 0. Pressing the print buttons a second time during the print cycle will interrupt it.Prepare to Print4.14.2SERVICE HOTLINE: 800.727.85208HOTRONIX®DUAL AIR FUSION IQ®Touch the Settings icon on the Home Screen (5.1) to configure your heat press.Managers can access all setup options, while Users can access a limited set (5.2).• Managers default password: MTouch the User icon on the Home Screen (6.1) or Setup Menu (6.2) to select, add, and edit Users.Touch and edit Managers and Users to configure access to settings (6.3, 6.4). Heat press reports on the IQ ® Portal can be filtered by User to track individual operator performance.Touch the arrow keys on the taskbar to scroll through a long list of Users (6.5).Setup MenuPassword Setup (Manager Level Only)5.15.26.16.26.36.46.59 Touch the Columns icon (7.1) to select from a list of saved presets (7.2).Touch the arrow keys on the taskbar to scroll through a long list of presets (7.3).Touch a preset to select a material. The preset selection is applied to the active platen.Touch the Pencil icon (7.4) to enter edit mode, then touch preset name to edit settings. Touch Enter to save changes.Touch the Plus icon to create a new preset (7.5).Name your preset and enter desired temperature, time, and pressure. When creating a new preset, the current Home Screen application settings are selected automatically (7.6).Touch the empty circled numbers to set multiple preset stages for pretreatment or multi-step applications (7.7).Auto Shuttle can be disabled on individual preset stages for a heated post-cure useful in some applications, including Direct-To-Garment printing. This setting will override Shuttle settings on the Home Screen (3.2).Preset Setup7.17.27.37.67.57.77.4SERVICE HOTLINE: 800.727.852010HOTRONIX®DUAL AIR FUSION IQ®Touch the Settings icon on the Home Screen.• Touch Date & Time, information displays on right of screen (8.1).• T ouch up/down arrows to select time zone.• T ouch Auto to automatically synchronize the heat press clock. The heat press must be connected to a WIFI network with access to the Internet.• T ouch Daylight Saving to enable daylight saving mode.Date & Time SetupTouch the Settings icon on the Home Screen.• Touch Display, information displays on right of screen (9.1). • T ouch Temperature to switch between F° or C°, then touch Check Mark icon on taskbar to save.Display SetupTouch the Settings icon on the Home Screen.• Touch Auto On/Off, information displays on right of screen (10.1).• T ouch Enable, then On Hour/Minute and Off Hour/Minute, selecting Enter between each setting. Once entered, touch Check Mark icon on taskbar to save.NOTE:Standby Mode must be used for the Auto On feature to function (3.2). The Auto On feature will not work if the power switch (2.1) is in the OFF position.Auto On & Off Setup8.19.110.111 Touch the Settings icon on the Home Screen.• Select System, information displays on right of screen (11.1).• T ouch Power Save and select time, then touch Check Mark icon on taskbar to save.• W hen enabled, your heat press will enter Standby Mode if it is not used for the specified number of hours.System Setup (Manager Level Only)11.1SERVICE HOTLINE: 800.727.852012HOTRONIX®DUAL AIR FUSION IQ®Touch the Settings icon on the Home Screen.• W hen a software update is available, an exclamation point appears after the version number in the Setup Menu.• T ouch Firmware, information displays on right of screen. An available online update displays a cloud icon (13.1).• T ouch Update File on right of screen, then touch Check Mark icon on taskbar to start download. A downloaded update displays a memory card icon.• T ouch Downloaded Update File on right of screen, then touch Check Mark icon on taskbar to start installation.NOTE: If a power failure occurs during installation, the heat press will attempt to install the previous software version.Updating SoftwareAll Fusion IQ ® heat presses have a temperature calibration function (12.1).• T urn on heat press and heat to 350°F/177°C.• P lace temperature strip on center of platen and press for 5 seconds, or measure center of heater with contact thermocouple (not infrared) thermometer.• T ouch the Settings icon on the Home Screen.• T ouch Calibration, information displays on right of screen.• T ouch Temperature and adjust Temperature Calibration to match Target Temperature.Your heat press comes pre-calibrated from the factory. Calibration is only required after sensor or controller replacement. Incorrect calibration can result in poor print results or damage to your heat press which is not covered by warranty.Calibration (Manager Level Only)12.113.1 13Touch the Settings icon on the Home Screen.• Touch Laser Setup, information displays on right of screen (14.1).• T ouch empty circled numbers 1-4 to toggle lasers ON or OFF on A and B platensLaser Alignment Setup14.1SERVICE HOTLINE: 800.727.852014HOTRONIX®DUAL AIR FUSION IQ®Create Your Account•U sing a phone or computer, visit to create an account (15.1).• E nter your name, email, and password.• Click on the confirmation link in the email you receive.• Y our account has been created.Register a Heat Press• C lick on Manage Heat Presses, then New Heat Press.• S elect heat press type, enter serial number, and enter a name for the heat press (optional).• C lick on Create Heat Press and enter the verification code given.• O n the heat press Setup Menu, touch WIFI and connect to your WIFI router or mobile hotspot (15.2).• O n the heat press Setup Menu, touch the Cloud icon and enter the verification code displayed in the IQ ® Portal (15.3).• Y our heat press has been registered.Create & Assign Users• C lick on Manage Operators, then New User.• E nter a name and select a privilege level. Managers can access all heat press settings while Users have limited access.• Click on New User, then Assign Machines in the sidebar. • Select a machine and click Assign.• On the heat press Setup Menu, touch the Cloud icon, then Manual Sync (15.4).• Reporting will show impressions made by the Users.15.115.215.315.415TRIACWhite 14gaRed 20gaBlack 14gaON/OFF SwitchIEC InletL NWhite 14ga Black 14ga Ground to FrameWhite 14gaBlack 14ga Circuit BreakerCircuit BreakerGround to Frame230/240V VersionRTD ProbeHigh Temperature Wire 14gaHigh Temperature Wire 14ga Proximity Switch 2Print SwitchPrint SwitchQuick ReleaseSwitchS w i n g V a l v eP r i n t V a l v eElectro-PneumaticRegulatorProximity Switch 1A Platen LasersB Platen Lasers3500W Heater - 230/240V - 50/60Hz F o o t P e d a lHOTRONIX®DUAL AIR FUSION IQ®1Air Fusion Control Housing1-21971 2Button, White, Print Switch1-23192 3Button, Red, Quick Release1-22701 4Fusion IQ Power Board —1 5Fusion IQ Power Bracket1-24731 6Screw, Sheet Metal #6 x 1/2"3-1011-2356 7Fusion IQ Latch1-24742 8Spring, 1/4" x 1", 1.7lbs/in —2 9Fusion IQ Controller1-24631 10Fusion Overlay NextGen1-2198-11 11Cap, Plastic Black 1/2"1-19712 12Touchscreen Stylus Holder1-23861 13Touchscreen Stylus1-23851 14Power Switch Cover Plate1-24221 15Screw, Machine #6-32 x 1/2"3-1011-197 16Nut, #6-32 Hex with Lockwasher2-1006-506 17Chevron Cover Plate1-24231 18Screw, Machine #8-32 x 3/4"3-1011-1554 19Air Fusion Upper Casting3-13411 20Bushing, Flange 1in1-22821 21Dual Fusion Bearing Spacer, 3/16"1-23966 22Dual Fusion Bearing Spacer, 1/41-23972 23Spanner Nut 2in-182-1006-951 24TRIAC1-10591 25Air Cylinder 6in1-22641 26Washer, 1in Nord-Lock2-1006-941 27Nut, Hex 1"-122-1006-961 28Dual Fusion Heater Spacer —1 29Screw, Button Socket Head 5/16"-18 x 1-1/8" —6 30Air Fitting, Elbow 1/4" NPT x 1/4" Tube4-1015-125 31Screw, Machine #10-24 x 1/2"3-1011-2174 32Washer, Plastic Finishing1-10634 33Air Fusion Heater Cover1-22631 34Insulation 16 x 201-10201 35C-Clip1-22861 36Guide Tube, XRF & XRF21-22901 38Screw, Socket Head 3/8"-16 x 1"3-1011-431 39Screw, Socket Head 5/16"-18 x 3/4"3-1011-1001 40Screw, SS Phillips #8-32 X 1/4"3-1011-871 42Thermostat Disc1-20761 43Screw, SS Sheet Metal #4 X 1/4"3-1011-982 44Temperature Probe1-1272-11 45Heat Platen 16 x 20 3500W Milled (No Ears)2-1002-3-HW1 46Screw, Socket Head Cap Low Profile 1/4-20 X 3/4"3-1011-2454 47Pneumatic Package, Dual Air Fusion1-2269-1150Screw, Sheet Metal Hex #8 x 1/2"1-24214 51Screw, M4x0.7 x 8 Pan Phillips1-24175 52Print Valve1-22991 53Air Fitting, Straight Hex 1/4" NPT 1/4" Tube1-24273 54Air Fitting, Muffler, 1/8" NPT1-24182 55Speed Control Muffler1-23391 56Air Fitting, Check Valve, 1/4" Push-to-Connect1-24191 57Screw, Pan Phillips M3x05 x 6mm —2 58Swing Valve1-22981 59Air Fitting, Elbow Restrictor #10-32 UNC 5/32" Tube1-24282 60Air Fitting, Elbow #10-32 UNF 5/32" Tube1-23504 61Electro-Pneumatic Regulator1-22931 62Air Fitting, Tee, 1/4" Push-to-Connect1-24201 63Pneumatic Regulator, Mini1-22971 64Air Fitting, Elbow #10-32 UNF 1/4" Tube1-24301 65Grommet, 5/16" ID 1/2" OD1-24291 75Dual Fusion Alignment Arm1-23941 76Press Mount Casting1-23471 77Dual Air Fusion Main Spindle2-1670-11 79Press Mount Cover1-23931 80Alignment Arm Spacer1-23981 81Press Mount Keeper Bar1-23951 82Washer, 5/16" Flat SAE Zinc2-1006-6310 83Screw, Socket Head 1/4"-20 x 3/4"3-1011-2439 84Screw, 5/16"-18 x 1-1/8" Socket Head Cap —10 85Screw, 5/16"-18 x 5/8" Flat Socket Head Cap —6 86Screw, 3/8"-16 x 1-1/4" Socket Head Cap3-1011-213IN1 87Screw, Machine #8-32 x 1/4"3-1011-1018 88Platen, 16x202-10292 89Silicone Pad 16 x 20 Blue1-21362 90Adapter Plate3-13362 91Quick Release Pin1-22152 92Washer, Flat 1/4" SAE2-1006-2514 93Washer, Split Lock 1/4"2-1006-4414 94Screw, Socket Head Cap 1/4"-20 x 1"3-1011-1918 95Dual Laser Alignment Bracket1-23482 102Laser Diode1-2348-18 105Laser Assembly Dual1-23452 111Caster, Threaded Stem —4 112Rubber Foot Kit 1-23454 113End Cap, Dual Fusion Leg Kit 1-23452 115Plastic Square End Cap, 2in1-23492 116Washer Split Lock 3/8"2-1006-4318 117Screw, Socket Head Cap 3/8"-16 x 1"3-1011-4318 118Screw, Set #8-32 x 3/8" —8SERVICE HOTLINE: 800.727.8520 1617HOTRONIX®DUAL AIRFUSION IQ®121Dual Fusion Regulator Mount —1 122Air Filter & Regulator1-12151 123Curtain Bellows1-23352 125Carriage Plate Keeper1-23422 126Back Cover (Part of Tin Assembly)Kit 1-23401 127Front Cover (Part of Tin Assembly)Kit 1-23401 128End Stop Plate N/A2 129Proximity Magnet1-12192 130Dual Fusion Base Casting4-11761 131Rail and Block Rear, XRF21-2336-11 132Rail and Block Front, XRF21-2336-21 133Base Plate —1 134Right Base Cover (Part of Tin Assembly)Kit 1-23401 135Air Fitting, 1/4" ARO Male Coupling 1/4" NPT1-17881 136Air Cylinder Rodless1-23381 138Quick Release Clamp, Fusion1-2332-12 142Machine Screw M3 x 8 Long JIS Standard —2 143Silicone Damper1-24242 145Cable Carrier1-23371 147Left Base Cover (Part of Tin Assembly)Kit 1-23401 148Base Access Plate (Part of Tin Assembly)Kit 1-23401 149Foot Pedal Socket (Part of Foot Pedal Assembly)Kit 1-23051 150Air Fitting, Elbow Bulkhead 1/4" Tube —1 152Screw, Machine #8-32 x 1/2"3-1011-1596 153Screw, Button Head Socket 1/4"-20 x 1/2"3-1011-24612 154Screw, Machine #6-32 x 1/4"3-1011-2512 155Nut, Hex #8-32 w/ Tooth Washer2-1006-528 156Screw, Machine #4-40 x 3/8"3-1011-229 157Screw, Machine #8-32 x 3/8" Black Oxide3-1011-1274 158Screw, Socket Head 1/4"-20 x 1-3/4"3-1011-1946 159Screw, Socket Head M4 x 20mm1-242638 160Power Inlet and Filter, 20A1-24901 161Power Switch1-20871 162Circuit Breaker 20A (STX XF XRF)1-13312 163Dual Fusion Carriage Plate1-23441 164Block, XRF2 (not sold separately) —4 167Drive Angle1-23412 168Screw, Flat Head Phillips 1/4"-20 x 1/2" —4 169Hard Stop1-23432 170Dual Fusion Magnet Bracket1-24252 171Screw, Machine #4-40 x 1/4"3-1011-154 172Proximity Switch1-12112 173Nut, #4-40 with Tooth Washer2-1006-514 174Screw, Socket Head M5 x 15mm3-1011-26316 174Foot Pedal Assembly Kit 1-23051 178Power Cord C19 250V1-23531SERVICE HOTLINE: 800.727.8520 1819This document includes multiple trademarks and describes equipment covered by many patents that are owned by GroupeSTAHL and/or its subsidiaries. GroupeSTAHL enforces its rights to protect these intellectual properties. ©2022REV. 1122STAHLS’ Hotronix ®Technical Support Customer Service****************************Replacement Parts Web。

热压机使用说明书1. 简介1.1 概述本章节将对热压机进行简要的概述,包括其作用、特点和适用范围。
1.2 结构组成在此部分详细描述了热压机的结构组成,包括主体框架、加温系统、液压系统等。
2. 安全操作指南此章节列出了在使用过程中需要注意的安全事项,并提供相应建议以确保用户及设备安全。
3. 准备工作这一部分解释了在开始正式操作之前所需完成的准备工作。
例如:检查电源接线是否正确连接;确认所有控制开关处于关闭状态等。
4.启动与停止描述如何正确地启动和停止该设备。
从打开电源到调整相关参数并实际运行起来再到最后完美结束这个流程都会被详尽阐明。
5.程序设置解释如何通过界面或其他方式输入必要信息(时间/温度)进而为不同材料选择合适处理方案,同时也给予具体例子帮助理解6.故障排除可能发生问题并针对每一个问题提供有效方法去修复它们7.维护保养详述如何对热压机进行日常的维护和保养工作,包括清洁、润滑等。
8. 技术参数在此部分列出了该设备的主要技术指标,例如最大温度范围、加压力量以及尺寸规格等。
9. 其他注意事项此章节提供一些其他需要特别关注或遵循的说明。
比如:禁止在潮湿环境下使用;请勿随意更改电路连接方式等。
10. 附件本文档所涉及到的相关文件和资料将会被整理成一个附件列表,并给予相应编号方便查阅与。
法律名词及注释:1)合同 - 双方达成共识并签署后具有法律效力且受国家监管约束之协议。
2)责任限制条款 - 对于因产品质量问题而导致损失时,明确生产商/销售商承担赔偿责任程度之条款.3) 安全操作指南- 设备运行过程中需遵守并执行以确保人身安全与设备完好无损.。
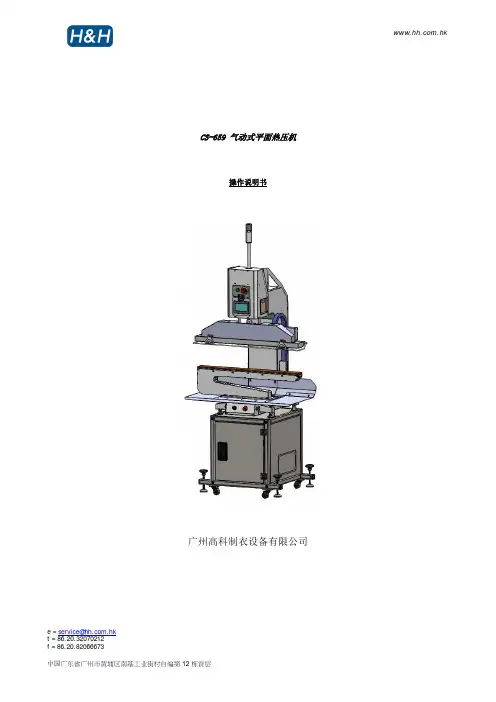
e = **************.hk t = 86.20.32070212f = 86.20.82066673CS-659 气动式平面热压机操作说明书广州高科制衣设备有限公司目录安全守则铭牌产品简介产品规格主要特性机器部件名称前视图安装准备操控方法触屏式控制主页加热控制加热时间段设置程序版本语言选择主管控制模式选择警报处理温度监控压力监控信号反馈监控温度校正统计测试模式习惯选项趋势图手动控制台加压压力调较目录 (续)使用模具时的防护措施清洁与维护清洁发热板日常维护每月维护故障排除附表A 气路图附表B 线路图> 安全守则请遵守以下安全守则,以便能在一个安全的工作环境下提高工作效率,防止伤害事故发生。
若能严格遵守本手册指引,本设备可以维持多年的优越使用性能。
小心触电紧急停止按钮注意!与压辘保持距离> 安全守则(续)危险!与压板保持距离,小心压手警告!旋转时小心压手及碰撞其它物件危险!小心触电危险!高温,请勿触碰> 铭牌感谢使用广州高科制衣设备有限公司出产的CS-659气动式平面热压机。
为了能够正确操作本设备,避免机器损坏和人员伤害,请仔细阅读本手册并保留以作日常参考之用。
型号 : CS-659电压 : 220 V, 单相频率 : 50/60 Hz功率 : 2400 W压缩空气 : >0.4 Mpa加热温度范围 : 30~260O C热加压时间范围 : 1~999秒热压尺寸 : 900 毫米(长) x 80毫米(宽)下工作平台尺寸 : 900 毫米(长) x 70毫米(宽)总体积尺寸 : 970 毫米(长) x 660毫米(宽) x 2050毫米(高) 总重量 : 205 kg注 :由于持续改良,规格会因应更改,对此不会再另行通知。
●控制系统 – 触屏式便于操作界面.●安全防护 – 主工作区周围设置有安全杆,安全框架被碰及时,机器会立即停止。
必须两个启动开关一起按下(相差不超过0.5秒),否则继续不会工作。
布标热压机操作规程标题:布标热压机操作规程引言概述:布标热压机是一种常用于标签、徽标等产品的热压设备,操作规程的严谨性对于保证产品质量和生产效率至关重要。
本文将详细介绍布标热压机的操作规程,匡助操作人员正确操作设备,提高生产效率。
一、设备准备1.1 确保设备处于稳定状态,无异常响声或者异味。
1.2 检查电源线、气源线等连接是否坚固。
1.3 检查热压机的温度控制器是否正常,设定温度是否符合产品要求。
二、操作流程2.1 打开热压机电源开关,待设备预热至设定温度。
2.2 将待热压的标签或者徽标放置在热压机的压模上。
2.3 关闭热压机盖子,启动热压机进行热压。
三、注意事项3.1 操作人员在操作过程中应穿戴好防护用具,避免烫伤。
3.2 避免在热压机运行时触碰设备的挪移部件。
3.3 在操作过程中注意设备周围环境的整洁,避免杂物进入热压机内部。
四、故障处理4.1 若发现热压机温度异常升高或者降低,应即将住手操作并检查故障原因。
4.2 若热压机浮现异常声响或者异味,应即将住手操作并联系维修人员进行检修。
4.3 若热压机无法正常启动或者关闭,应即将切断电源并进行检查处理。
五、设备保养5.1 定期清洁热压机的压模和周围区域,保持设备清洁。
5.2 定期检查热压机的电源线、气源线等连接部份,确保无松动。
5.3 定期对热压机进行润滑保养,延长设备使用寿命。
结论:遵循布标热压机操作规程,能够确保设备正常运行,提高生产效率,同时也能保证产品质量和操作人员的安全。
操作人员在日常工作中应严格按照规程操作,做好设备维护保养工作,以确保设备的稳定运行和长期使用。

e = **************.hk t = 86.20.32070212f = 86.20.82066673CS-684气动式平面热压机操作说明书广州高科制衣设备有限公司目录> 安全守则 (2)> 铭牌 (4)> 产品简介 (5)> 产品规格 (6)> 机械部件名称 (7)>控制台 (8)> 通电前准备 (9)> 操作模式 (9)> 机器操作 (10)> 机器设定 (11)>>控制器面板 (11)>>控制器面板标准显示 (11)>> 温度设定调校 (12)>> 加压时间调校 (12)>> 加压压力调校 (12)> 故障排除 (13)> 安全守则请遵守以下安全守则,以便能在一个安全的工作环境下提高工作效率,防止伤害事故发生。
若能严格遵守本手册指引,使用多年后,本设备仍然性能良好。
小心触电紧急停止按钮危险!与压板保持距离,小心压手> 安全守则(续)危险!小心触电危险!高温,请勿触碰> 铭牌感谢使用广州高科制衣设备有限公司出产的CS-684气动式平面热压机。
本手册所描述之气动式平面热压机是迄今为止市场上最先进的机型。
CS-684为专业用户而设,以全数码化平台为基础,融合众多简易操作特性。
使用前,用户需具备基本热压操作知识及技术。
为了能够正确操作本设备,避免机器损坏和人员伤害,请仔细阅读本手册并保留以作日常参考之用。
型号 : CS-684电压 : AC 220V 单相频率 : 50/60HZ功率 : 400 瓦压缩空气 : >0.4 兆帕加压温度 : 室温~26O摄氏度加压时间 : 1~999 秒热压板面积 : 110毫米 x 110毫米工作台面积 : φ100毫米外型尺寸 : 300毫米(长) x 470毫米(宽) x 480毫米(高) 总重量 : 20 千克注 :由于持续改良,规格会因应更改,对此不会再另行通知。
三层热压机的安全操作规程三层热压机是一种用于加工木材、板材、胶合板等材料的机械设备,具有高压力、高温度的特点,如果操作不当,可能会造成人身安全事故。
因此,为了确保操作人员的安全,下面是关于三层热压机的安全操作规程:一、准备操作前的安全措施1. 检查热压机的工作台和紧固装置是否牢固,是否有损坏或松动的部分。
2. 检查热压机的电源线是否破损,电气元件是否正常工作。
3. 检查热压机的压力表,温度表等仪表是否正常工作。
4. 确保工作区域干净整洁,没有杂物和垃圾。
二、操作过程中的安全措施1. 在操作前必须穿戴安全工具,如防护眼镜、防护手套、耳塞等。
2. 操作人员必须熟悉热压机的使用说明书和操作方法,遵循厂家的规定操作。
3. 操作人员必须站在热压机的一侧操作,不得随意接近热压机的运动部位。
4. 在操作热压机时,必须注意工件的尺寸和形状是否适合热压机的工作规格。
5. 在操作过程中,不得在工件上堆积其他杂物,保持工件的清洁和整齐。
6. 在操作热压机时,必须保持手部干燥,以防滑动造成意外伤害。
7. 在操作热压机时,不得用手直接触摸或靠近热板,以防烫伤。
必要时可以使用隔热手套。
8. 关注热压机的温度和压力变化,如发现异常应立即停机检查。
9. 操作人员不得擅自离开热压机,需要离岗时必须先停机并切断电源。
10. 操作结束后,必须切断热压机的电源,清理工作区域,并将热压机恢复到安全状态。
三、应急处理措施1. 在操作过程中,如发现热压机有异常声音、烟雾或火灾等情况,应立即停机切断电源,并报告维修部门处理。
2. 在操作过程中,如发生人身伤害事故,应立即停机切断电源,并进行紧急救治,同时报告相关部门。
四、维护和保养措施1. 每次使用热压机后,应进行清洁工作,包括清除压力板上的残渣,清洁掉油污等。
2. 定期对热压机进行维护保养,包括润滑系统的维护和更换磨损零件。
3. 定期对热压机的电气系统进行检查,保证电气元件的正常运行。
4. 定期校准热压机的压力表、温度表等仪表,保证其准确度。
热压机保温冷却系统使用说明书热压机保温冷却系统使用说明书1. 系统概述:热压机保温冷却系统是用于控制热压机温度的关键设备。
它通过调节冷却水的流量和温度来维持热压机的温度稳定。
本说明书旨在帮助操作人员正确使用和维护该系统。
2. 系统组成:热压机保温冷却系统由以下主要部件组成:- 冷却水源:通常是一台水冷却机或冷却塔。
- 冷却水管道:将冷却水从冷却水源输送到热压机。
- 冷却水泵:用于增加冷却水的流动压力。
- 温度传感器:用于监测热压机的温度。
- 控制系统:根据温度传感器的反馈信号来控制冷却水的流量和温度。
3. 系统操作步骤:以下是使用热压机保温冷却系统的基本操作步骤:- 打开冷却水源,并确保冷却水质量和温度符合要求。
- 打开冷却水泵,并调整冷却水的流量和压力,使其达到热压机温度的要求。
- 在热压机上安装温度传感器,并将其连接到控制系统。
- 打开控制系统,并设置所需的热压机温度。
- 控制系统将根据温度传感器的反馈信号自动控制冷却水的流量和温度,以维持热压机的温度稳定。
4. 系统维护:为了确保热压机保温冷却系统的正常运行,需要进行定期维护:- 定期清洗冷却水管道和冷却水源,以防止堵塞和水质问题。
- 检查冷却水泵的工作状态,确保其正常运转。
- 定期检查温度传感器的准确性和工作状态,必要时进行校准或更换。
- 定期检查控制系统的工作状态,确保其正常运行。
- 如果发现任何问题或异常,应及时通知维修人员进行处理。
请在使用热压机保温冷却系统前仔细阅读和理解本说明书,并按照操作步骤进行操作。
如有疑问,请咨询相关技术人员。
使用不当可能会导致设备损坏或人员受伤,因此请务必遵守相关安全操作规程。
热压机使用说明书使用说明书一、产品介绍热压机是一种常见的机械设备,用于将热塑性塑料、热固性塑料以及木材、纤维板、合成材料等通过高温和压力进行热压成型。
本文档旨在为用户提供热压机的详细使用指南,以确保用户能够正确、安全地操作该设备。
二、安装与调试1.设备安装:根据设备的尺寸和安装要求,选择适当的安装位置,确保周围有足够的工作空间和通风条件。
将设备稳固地安装在坚实的地面上,避免震动和噪音。
2.电源接入:将设备插头插入正确的电源插座,并确保电压与设备要求相符。
3.温度调节:根据所需的热压温度,调节设备上的温度控制器或设定器。
注意不要将温度设定过高,以免损坏设备或引发安全事故。
4.压力调节:根据所需的热压压力,调节设备上的压力调节阀。
确保压力调节阀工作正常,以免造成工件变形或设备损坏。
三、操作步骤1.准备工作:将待加工的材料切割成所需的形状和尺寸,并清洁表面上的杂质和灰尘。
检查设备的工作状态和各项安全装置是否完好。
2.开机操作:将设备的电源开关置于ON位置,待设备预热达到设定温度后,开始工作。
3.加载材料:将准备好的材料放置在热压机的工作台上,并根据实际情况调整材料的位置和摆放方式。
4.设定参数:根据加工要求,设定热压温度、热压时间和热压压力。
确保设定值与实际需求一致,避免产生产品质量问题。
5.开始热压:按下启动按钮,设备开始进行热压过程。
在热压过程中,注意观察设备运行状态,确保设备工作平稳、安全。
6.热压完成:热压时间到达设定值后,设备会自动停止工作。
此时,打开热压机的顶盖,取出热压成型的产品。
四、维护与保养1.定期保养:按照设备说明书中的维护周期进行定期保养,包括清洁设备表面、检查电路连接和控制系统、添加润滑剂等。
2.检查安全装置:定期检查热压机的各项安全装置是否正常工作,如过载保护装置、温度保护装置、压力保护装置等。
3.注意安全操作:在使用热压机时,务必戴好防护手套和防护眼镜,避免发生意外伤害。
禁止在运行时伸手或放入身体部位。
光桓热压机安全操作规程光桓热压机是一种常用的设备,用于将材料或产品通过加热和压力进行塑性变形或粘合。
在使用热压机时,安全操作是至关重要的,可以有效预防事故的发生,保证工作人员的安全。
下面是光桓热压机的安全操作规程,供参考:一、工作人员的安全要求:1. 所有操作热压机的人员必须接受过相关的培训,了解热压机的工作原理和操作流程。
2. 必须穿戴适当的劳动防护用品,如安全帽、劳动服、护目镜、耐高温手套等。
3. 身体健康且无酒后现象的人员方可操作热压机。
4. 操作者应对设备进行日常检查,确保设备处于正常工作状态。
二、热压机的安全操作流程:1. 开始操作前,操作者需要仔细检查热压机的各个部件是否完好,如压力表、温度计、防护罩等。
2. 在操作过程中,操作者需保持清醒的头脑,不能受到其他事物的干扰。
3. 在操作热压机前,需要先将压力调节器调整到设定好的工作压力范围内。
4. 操作者需要对热压机的热传导油进行加热,加热时间和温度需符合设备规定的要求。
5. 将待加工的材料或产品放在热压机的工作台上,并根据需要进行定位和固定。
6. 按照设备要求调节热压机的温度和压力,并确保在整个加工过程中保持稳定。
7. 在加工过程中,操作者禁止将手或其他物体放入热压机内部,以免发生意外。
8. 加工完成后,需要将热压机的温度和压力调节到最低状态,待设备冷却后方可清理和维护。
三、热压机的风险防控措施:1. 设备放置位置应平稳,设备的电源应与其他设备隔离,并配备过载保护装置。
2. 操作者在操作热压机时,应保持工作区域整洁,以免发生滑倒和摔伤事故。
3. 长时间操作热压机时,注意保持室内空气流通,防止中暑或缺氧。
4. 定期进行设备维护保养,包括清理设备表面和内部的灰尘和油污,并对设备的液压系统、电气系统等进行全面检查。
5. 尽量避免将热压机超过其额定负荷使用,以防设备过载,造成设备损坏或事故。
6. 对于热压机的使用和维护,需按照设备说明书进行操作,不准私自更改设备的参数和部件。
安装说明安装时空压机尽量远离热压机,以免工作时产生震动影响图像清晰度。
室内尽量保持洁净,尽量保持无灰尘。
尽量使用1024X768分辨率或者1280X1024分辨率显示器。
摄像机下方有摄像机参数调节按键,可选择分辨率,调节亮度,调出十字参考线等功能。
使用热压机前请调整放屏平台的高低和平衡度,调整垫压模具的位置和平衡度,以适应您的产品。
刀头下方垫压模具的平衡度直接影响到产品的修复成功率,请尽量调平。
调节时可借助感压纸或者热敏传真纸调节,还可借助一张纸下压后拽动纸张,感觉出刀头左右的平衡度,进行调整。
压力表旁边设有三档热压开关,分别是1上:自动压开关,按设定的时间压过后自动弹起2中间:悬停,刀头停止在最上方不动,不下压3下:手动热压开关,此档位让刀头一直下压,直到拨回中间。
压力表盘读数最大为1Mpa,一般预压时用0.1Mpa左右本压时用0.2至0.25Mpa.压力表盘上方为压力大小调钮。
一般本压温度设定为200度左右,时间设定为20秒左右。
若刀头下压速度调慢应适当加大下压时间。
若工作时经常出现本压后排线向一边偏移,请调整刀头下方模具平衡度。
若PCB板端本压后粘不上,自动浮起,或者拉力值不够,请加厚热压垫布并稍微加大压力。
若发现下LED灯照射的位置不对,没有对准排线请调整。
LED灯光直接影响图像亮度和清晰度。
上射灯也可以外接普通12V电源,或者15V电源。
电压越高上射灯亮度越亮。
图像亮度越亮。
根据图像的清晰度选择使用上射灯或下LED灯。
修COG时必须使用下LED灯。
修屏更换TAB步骤1去除TAB清洗TAB 清洗玻璃用细口热风枪边吹边撕TAB 注意控制好温度,一般200度左右比较合适。
注意不要吹坏屏膜。
撕掉后玻璃上均匀涂上少量去除液,用棉棒轻轻擦拭,去掉玻璃上残存的ACF胶。
如果有些胶很难擦掉也可用薄竹板轻轻刮除。
最后再用丙酮或酒精清洗玻璃再用无尘布沾一些丙酮或酒精擦拭一遍玻璃(注意玻璃和TAB正反两面都要清洗干净)之后可贴ACF.排线清洗时注意要顺着导电引线擦拭,以免导电引线活动造成导电引线之间接触造成短路。
热压机使用说明书概述本文档旨在为用户提供热压机的准确和详细的使用说明。
请在使用热压机前仔细阅读本文档,并按照文档中的步骤操作,以确保正常使用和维护热压机。
1. 简介1.1 热压机是一种将高温和高压应用于材料的机械设备。
它通常用于制作纤维增强复合材料、热塑性塑料和其他热处理工艺。
1.2 热压机的主要特点包括:高温控制、精确的压力控制、稳定的加热和冷却过程以及易于操作的界面。
2. 安全提示在操作热压机之前,请务必遵守以下安全提示:2.1 在使用热压机时,请确保穿戴适当的个人防护装备,如手套、安全眼镜和防护服。
2.2 请确保热压机的电源线连接正确,并且接地良好。
2.3 请勿在热压机周围堆放易燃物品或液体。
2.4 禁止将手指、衣物或其他物体插入热压机的运动部件。
2.5 在使用热压机时,请确保工作环境通风良好,以防止有害气体的积聚。
3. 热压机的使用步骤以下是热压机的基本使用步骤:3.1 准备工作:3.1.1 清洁工作区域,并确保工作台面干净整洁。
3.1.2 验证热压机的电源连接,并确保开关处于关闭状态。
3.1.3 检查热压机的加热元件和压力传感器是否正常。
3.2 加载材料:3.2.1 根据所需的工件形状和尺寸,选择合适的压模。
3.2.2 将待加工材料置于压模中,并确保其在压模内部均匀分布。
3.3 设置参数:3.3.1 打开热压机的电源开关。
3.3.2 设置所需的加热温度和保温时间。
3.3.3 设置所需的压力值。
3.4 进行热压:3.4.1 按下启动按钮,热压机开始加热和施加压力。
在此过程中,请确保保持安全距离,以防止受伤。
3.4.2 在设定的保温时间内,保持热压机的温度和压力稳定。
3.5.3 完成热压后,停止热压机并将加工件从压模中取出。
4. 热压机的维护为确保热压机的长期性能和可靠性,请定期进行以下维护步骤:4.1 清洁热压机的工作台面和外壳,以确保工作环境的清洁和卫生。
4.2 定期检查热压机的加热元件和压力传感器,确保其正常工作。
万锐三层热压机按键说明
一、技术参数:
1.万x三层热压板规格: 1370X 2700X 40mm (长X宽X高)
2.万x三层热压板层间有效空间: 90mm
3.万x三层热压机层数: 12 层
4.万x三层热压板数量: 13 块
5.总压力: 600T
6.压机自重: 15T
7.电机功率:低压快速7. 5KW,高压快速7. 5KW
二、使用方法:
按上升→压机自动上升并加压至设定工作压力→至设定时间卸压→自动下降→至设定高度停。
压机在上升时,按急停按钮,压机停止工作。
按上升,压机自动上升至设定高度后自停。
压机上升过程中按急停按钮压机立即停止工作。
三、注意事项:
1.压机在加压时,压力超过设定工作压力而不能自停,工作人员
2.应立即终止加压(按下降停止或急停)。
3.压机在加压时如漏油,应停止加压。
4.压机油路溢流阀禁止非专业人员调整。
5.电器电路部分非专业人员勿动。
6.接通蒸气后,应打开排水阀门将热压板内水放尽。
布标热压机操作规程标题:布标热压机操作规程引言概述:布标热压机是一种常用于制作标志、标牌等产品的设备,正确操作布标热压机对于产品质量和生产效率至关重要。
本文将详细介绍布标热压机的操作规程,帮助操作人员正确、安全地操作设备。
一、准备工作1.1 确保布标热压机处于稳定状态,地面平整,设备周围无杂物。
1.2 检查布标热压机的电源线是否接地良好,电源开关是否处于关闭状态。
1.3 检查布标热压机的压力调节器、温度控制器和安全阀是否正常。
二、操作步骤2.1 打开电源开关,调节压力调节器和温度控制器至所需数值。
2.2 将需要加工的标志或标牌放置在热压机的工作台上,并调整位置。
2.3 关闭热压机的安全阀,开始加工操作。
三、热压加工3.1 当温度和压力达到设定数值后,将热压头缓慢向下压合,直至完全接触到工件表面。
3.2 保持压合一定时间,根据工件的材质和厚度进行调整。
3.3 当加工完成后,松开压力,将热压头缓慢抬起,取出加工好的产品。
四、安全注意事项4.1 操作人员在操作过程中应穿戴好劳保用品,避免发生意外伤害。
4.2 加工过程中应注意观察压力和温度的变化,及时调整设定数值。
4.3 操作完成后,及时关闭电源开关,清理工作台和设备周围的杂物。
五、设备维护5.1 定期清洁布标热压机的工作台和热压头,避免灰尘和污垢影响加工质量。
5.2 定期检查热压机的电源线和电器设备,确保安全可靠。
5.3 如发现设备有异常情况或故障,应及时通知维修人员进行处理,切勿私自维修。
结语:正确操作布标热压机不仅可以提高产品质量,还能确保操作人员的安全。
遵守操作规程,定期维护设备,是保证布标热压机长期稳定运行的关键。
希望本文的介绍能帮助操作人员更好地掌握布标热压机的操作技巧,提高工作效率和产品质量。