HANNA牌PH计使用说明书
- 格式:pdf
- 大小:1.57 MB
- 文档页数:4
pH计的使用方法(步骤)pH计使用前的准备工作1.使用pH计之前先用三蒸水清洗电极,注意玻璃电极不要碰碎。
2.准备在平台pH计的旁边放至调节用的NaOH液和HCL液。
3.在冰箱中拿出定pH液(pH=7.0),放与平台上。
4.打开pH计,调定pH值,按︿﹀键选择pH和CAL选项,选择其中的CAL项,调节插入到pH液(pH=7.0)中,按《》键选择数据值到7.0处,出现小八叉即可。
5.将玻璃电极插入到待测的溶液中,再放入另一电极,适当的搅动液面(注意:不要碰碎玻璃电极)。
6.pH计的电子单元使用必须注意电路的保护,在不进行pH值测量时,要将pH 计的输入短路,以避免pH计的损坏。
7.pH计的玻璃电极插座必须保持干净、清洁和干燥,不能接触盐雾和酸雾等有害气体,同时严禁玻璃电极插座上沾有任何的水溶液,以避免pH计高输入阻抗。
8.未到你需要的pH值时要小心的加如NaOH液和HCL液,(据调节范围不同可以选择不同浓度的调节液,浓度小时可以快加,浓度大时要加慢)。
9.加液时小心不要超过所需的定容量。
pH计使用步骤1.后盖打开,装入电池一块。
2.装上复合玻璃电极注意:(1)复合电极下端是易碎玻璃泡,使用和存放时千万要注意,防止与其它物品相碰。
(2)复合电极内有KCl饱和溶液作为传导介质,如干涸结果测定不准必须随时观察有无液体,发现剩余很少量时到化验室灌注。
(3)复合电极仪器接口决不允许有污染,包括有水珠。
(4)复合电极连线不能强制性拉动,防止线路接头断裂。
3.打开电源开关后,再打到pH测量档。
4.用温度计测量pH6.86标准液的温度,然后将pH计温度补偿旋钮调到所测的温度值下。
5.将复合电极用去离子水冲洗干净,并用滤纸擦干。
6.将pH6.86标准溶液2~5mL倒入已用水洗净并擦干的塑料烧杯中,洗涤烧杯和复合电极后倒掉,再加入20mLpH6.86标准溶液于塑料烧杯中,将复合电极插入于溶液中,用仪器定位旋钮,调至读数6.86,直到稳定。

PH计操作规程标题:PH计操作规程引言概述:PH计是一种用于测量溶液酸碱度的仪器,广泛应用于实验室、工业生产等领域。
正确使用PH计对于保证实验结果的准确性和生产过程的稳定性至关重要。
本文将详细介绍PH计的操作规程,包括校准、测量、维护等方面。
正文内容:1. 校准1.1 清洁PH电极:使用纯水清洗PH电极,确保表面干净。
1.2 校准标准液:选择适当的标准液,通常是pH 4.01、pH 7.00和pH 10.01。
将PH电极依次浸入标准液中,等待数分钟,确保读数稳定。
1.3 调节校准:根据标准液的读数,调节校准旋钮,使读数与标准液的pH值一致。
2. 测量2.1 准备样品:将待测溶液倒入干净的容器中,确保容器干燥且无杂质。
2.2 放置PH电极:将PH电极浸入溶液中,确保电极与溶液充分接触。
2.3 稳定读数:等待数分钟,直到PH计读数稳定,记录读数。
2.4 清洁PH电极:测量完成后,用纯水清洗PH电极,并将其放置在保护盖中,避免损坏。
3. 维护3.1 定期校准:根据使用频率,定期进行校准,以确保准确性。
3.2 保护PH电极:在使用过程中,避免电极受到物理冲击,同时注意避免PH电极与强酸、强碱等物质接触。
3.3 存放条件:将PH电极存放在干燥、避光、通风的环境中,避免高温和湿度。
总结:在使用PH计进行酸碱度测量时,正确的操作规程至关重要。
校准是保证准确性的基础,测量时要注意样品准备和电极放置的细节。
此外,定期维护和保养PH计也是确保长期稳定性的关键。
通过遵循操作规程,我们能够获得准确可靠的测量结果,提高实验和生产的效率与质量。
请注意,本文仅提供了PH计的操作规程概述,具体操作步骤可能因仪器型号和实际情况而有所不同。
在实际操作中,请务必参考仪器的使用说明书并严格按照要求进行操作。
1 开机、关机1.1 按电源键打开PH计,测试完毕按电源键关机.2 仪器的校正2.1 PH计的校正(两点校正法)2.1.1 开机后按“M”键使仪器转换到PH档位.2.1.2 按“CAL”键,此时屏幕上显示“Ct1”2.1.3 把PH探头插入PH=7.00的标准溶液中,按“RUN”键进入自动校正程序.2.1.4 当屏幕上显示“Ct2”时,说明第一点校正完毕.(如果按M键退出,即为单点校正)2.1.5把电极冲洗干净,擦干后放入PH=4.01(如果需测溶液显酸性)或PH=10.01(如果需测溶液显碱性)的标准液中.2.1.6 按“RUN”键,待稳定后显示“-59.4mu/PH”(-59.4mu/PH是一个举例值.一般在这个数值左右.可能高.可能低)2.1.7按“RUN”键,此时显示“PH2mv”,2.1.8 按“M”键校正完毕.2.1.9如果校正失败,则需要重复以上步骤..2.2 电导率仪的校正2.2.1按“M”键转换到电导档位,当屏幕显示“0us/cm”时.2.2.2 按“CAL”键,此时屏幕显示“CELL”.2.2.3 按“RUN”键屏幕显示“CAL”.2.2.4把电导探头放入0.01mol/lKCL标准溶液中,2.2.5 按“RUN”键等到稳定后(即AR停止闪动),屏幕上显示标准液的电导率值,如果显示值与标准值不符,则需重复以上步骤.2.2.6 校正完毕,按M键开始测量.3 测量方法3.1 PH值的测量3.1.1把校正好的PH电极用DI水清洗擦干后放入被测样品中.3.1.2 按“AR”键和“RUN”键,直至“AR”停止闪动时读数.3.1.3 记录该样品的PH值.3.1.4测量完毕后必须用DI水清洗并擦干探头放入饱和的氯化钾溶液中.3.2 电导率的测量3.2.1把校正好的用来测电导的探头用DI水清洗擦干后放入被测样品中.3.2.2 记录屏幕上所显示的数值为该溶液的电导率.3.2.3测量完毕后必须用DI水清洗探头.4 注意事项4.1 测PH值的电极不使用时浸入饱和的氯化钾溶液中.4.2 测电导率的电极不使用时保存在空气中.4.3 使用探头时,要轻拿轻放,不可当搅拌器使用.。
PH计安装使用说明PH计是一种用来测量溶液酸碱度的仪器。
它可以用于多种应用,包括水质监测、实验室分析等。
在安装和使用PH计之前,需要了解一些基本概念和操作步骤。
本文将给出PH计的安装和使用说明。
一、PH计的安装1.确保准备好以下物品:PH计、电极、PH4和PH7标准缓冲液、去离子水、电源、连接线等。
2.将PH计放置在平稳的工作台上,并连接电源线。
3.选用合适的电极,并插入PH计的电极插孔。
4.使用去离子水清洗电极,并将其浸泡在PH7标准缓冲液中。
待电极稳定后,将其插入PH计的插孔中。
5.打开PH计电源开关,并等待一段时间,直到仪器表面显示出稳定的PH值。
二、PH计的校准1.使用去离子水清洗电极,然后插入PH7标准缓冲液中。
等待电极稳定后,记录下显示的PH值。
2.更换PH4标准缓冲液,重复上述步骤,记录下显示的PH值。
3.使用PH计自带的校准程序,将PH计的读数与标准缓冲液的PH值进行校准。
4.校准完成后,将电极插入PH7标准缓冲液中,确认读数是否接近于7三、PH计的使用1.将待测溶液倒入一个干净的玻璃容器中。
2.使用去离子水清洗电极,并将其插入溶液中,确保电极与溶液充分接触。
3.静待电极稳定后,记录下PH计的读数。
4.如果需要多次测量,每次测量之前都应当将电极清洁干净,并用PH7标准缓冲液校准。
5.测量完成后,关闭PH计电源开关,并将电极插入PH4或PH7标准缓冲液中,以保护其电极。
6.定期检查PH计的电极是否需要更换,避免误差的累积影响测量结果。
四、PH计的维护1.清洗电极:使用去离子水清洗电极可以去除附着在电极表面的污物和离子,保证测量的准确性。
2.保持电极湿润:长时间不使用时,应将电极插入PH4或PH7标准缓冲液中,避免电极干燥导致性能下降。
3.定期校准:每隔一段时间,使用标准缓冲液对PH计进行校准,以保证测量的准确性。
4.避免强烈碱性或酸性溶液:PH计的电极对强酸强碱的抗性有限,因此应尽可能避免测量过程中接触这样的溶液。
PH计使用说明1、开机注意:开机前,需检查电源是否接妥,应保证仪器良好接地。
电极的连接须可靠,防止腐蚀性气体侵袭。
仪器插入电源后,按电源开关开机。
仪器首先显示“PHS-3C”字样,稍等,会显示上次标定后的斜率以及E0值,然后进入测量状态,显示当前的电位值或者PH值。
其中显示屏上方为当前的电位值或者PH值,下方为设定的温度值。
在测量状态下,按“mV/pH键可以切换显示电极位以及PH值;按“温度”键设置当前的温度值;按“定位”或“斜率”键标定电极斜率。
2、功能设置●设置温度用温度计测出被测溶液的温度,然后按“温度△”或“温度▽”键,调节显示值,使温度显示为被测溶液的温度,按“确认”键,即完成当前温度的设置,按“PH/mV”键放弃设置,返回测量状态。
●pH电极的准备(1)将pH复合电极下端的电极电极保护瓶拔下,并且拉下电极上端的橡皮套使其露出上端小孔。
(2)用蒸馏水清洗电极。
3、pH电极的标定仪器使用前首先要标定,一般情况下仪器在连续使用时,每天都要标定一次。
本仪器具有自动识别标准缓冲溶液的能力,可识别4.00PH,6.86PH,9.18PH三种标液,因此对于标准缓冲溶液4.00PH,6.86PH,9.18PH,用户按“定位”键或者“斜率”键后不必再调节数据,直接按“确定”键即可完成标定。
用“定位”进行一点标定,用“斜率”进行二点标定。
对于其他的非常规律标准缓冲溶液,仪器也允许用户标定使用。
如果用户需要标定,则只须在标定状态下调节显示的PH数据至该温度下的标准溶液的PH值,然后按“确定”键即可。
●一点标定:一点标定即一点定位法,使用一种标准缓冲溶液定位EO,斜率设为默认的100.0%,这种方法比较简单,用于要求不太精确的情况下测量。
注意:进行一点标定即定位操作后,仪器会自动删除上一次的标定数据,一点标定后,斜率默认设置为100.0%。
1)在仪器的测量状态下,把用蒸馏水清洗过的电极插入某种标准缓冲溶液中(如PH=6.86PH 的标准缓冲溶液中)2)用温度计测出被测溶液的温度值,按前面设置温度的方法设置温度值3)稍后,待读书稳定,按“定位”键,仪器会提示用户是否进行标定,显示“STD YES”字样如果用户需要标定,则按“确定”键,仪器自动进入一点标定状态,否则按任意键退出标定,仪器返回测量状态。
PH计操作规程一、引言PH计是一种常用的分析仪器,用于测量溶液的酸碱度。
本操作规程旨在指导操作人员正确使用PH计,确保测试结果的准确性和可靠性。
二、仪器准备1. 检查PH计的外观是否完好,如有损坏或者松动的部件应及时修复或者更换。
2. 检查PH电极是否干净,无沉积物或者污渍。
如有污染,应用去离子水清洗。
3. 准备标准缓冲液,用于校准PH计。
标准缓冲液的选择应根据待测溶液的酸碱度范围进行。
三、校准PH计1. 打开PH计电源,确保仪器正常启动。
2. 将PH电极浸入第一个标准缓冲液中,等待PH计稳定。
3. 按下校准键,根据仪器的操作指南进行校准。
通常需要输入标准缓冲液的PH值。
4. 校准完成后,将PH电极清洗干净,并用纸巾轻轻擦拭干燥。
四、测量样品1. 准备待测样品,并保证样品处于室温下。
如果需要,可以通过加热或者冷却来调整样品温度。
2. 将PH电极浸入样品中,确保电极彻底浸没,并避免电极与容器壁接触。
3. 等待PH计稳定,并记录测量结果。
如果样品中有气泡,应轻轻摇动电极以去除气泡。
4. 测量完成后,将PH电极从样品中取出,用去离子水清洗干净,并用纸巾轻轻擦拭干燥。
五、数据处理1. 将测量结果记录在数据表中,包括样品的标识、测量时间和测量值。
2. 如有需要,可以进行数据分析和计算,例如计算平均值、标准偏差等。
3. 根据实际需求,可以将数据以图表形式展示,以便更直观地分析和理解结果。
六、仪器维护1. 每次使用后,应及时清洗PH电极,并用保护盖或者盖子保护电极。
2. 定期检查PH电极的状态,如发现损坏或者老化,应及时更换。
3. 根据仪器的要求,定期进行仪器的校准和维护,以确保仪器的准确性和稳定性。
七、安全注意事项1. 在操作过程中,避免将PH计和PH电极暴露在强酸、强碱或者有毒溶液中。
2. 注意避免PH电极与金属物质接触,以免影响测量结果。
3. 遵守实验室的安全规定,佩戴适当的个人防护装备,如实验手套和眼镜。
PH计使用操作和注意事项PH计是一种常用的实验仪器,用于测量溶液的酸碱度。
有许多不同类型的PH计可供选择,但它们的基本操作步骤和注意事项大致相同。
本文将介绍PH计的使用操作和一些注意事项,以帮助读者正确操作该仪器。
PH计的使用操作步骤如下:第一步:准备工作准备工作包括检查PH计的电极是否处于良好的工作状态,并确保电极干净。
如果电极有污垢或残留物,应使用适当的清洁剂进行清洗。
此外,为了准确测量溶液的酸碱度,还应准备一系列标准缓冲溶液,在操作前进行电极校准。
第二步:校准PH计校准PH计是非常重要的,它可以确保测量结果的准确性和可靠性。
PH计通常配有两个校准点,即4.01和7.00的缓冲溶液。
校准步骤如下:1.将PH计放在第一个缓冲溶液中,通常是PH4.01的溶液中。
2.等待一段时间,直到PH计读数稳定后,按下校准按钮进行校准。
3.将PH计移至第二个缓冲溶液中,通常为PH7.00的溶液中。
4.等待一段时间,直到PH计读数稳定后,按下校准按钮进行校准。
5.校准完毕后,将PH计从校准溶液中取出并用干净的纸巾将其擦干。
第三步:测量样品校准完PH计后,可以开始测量待测样品的酸碱度。
测量步骤如下:1.打开PH计并将电极插入样品中。
2.等待一段时间,直到PH计读数稳定后,记录下PH值。
3.轻轻摇晃电极以确保样品与电极完全接触,以获得更准确的测量结果。
4.重复上述步骤,直到获得稳定的测量结果。
第四步:保养和存储保养和存储是确保PH计长期使用性能的重要环节。
建议在使用完毕后将PH计彻底清洗干净,以防止溶液残留对仪器产生不利影响。
此外,应定期检查PH计的电极状况,并根据需要进行校准和更换。
另外,应将PH计存放在干燥、避光和不受温度变化影响的地方。
除了以上操作步骤外,还有一些使用PH计需要注意的事项:1.避免PH计暴露在极端的温度下,因为高温和低温可能会损坏仪器的电极和其他部件。
2.在每次测量前,应将PH计进行校准,以确保测量结果的准确性。
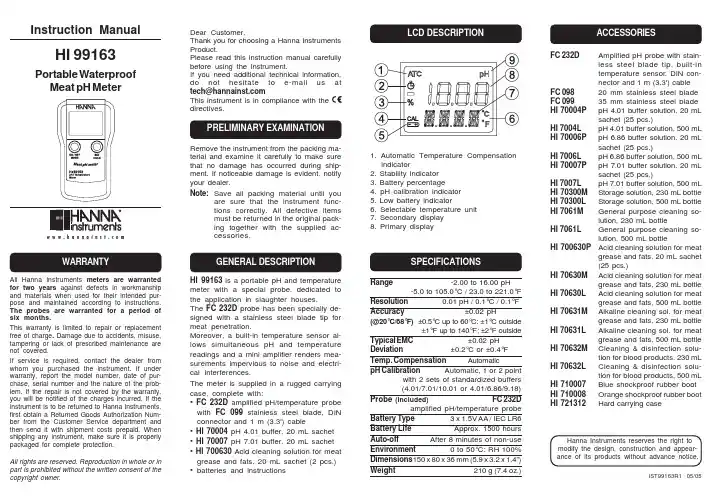
Instruction ManualHI 99163Portable Waterproof Meat pH Meterw w w .h a n n a i n s t .c o mDear Customer,Thank you for choosing a Hanna Instruments Product.Please read this instruction manual carefully before using the instrument.If you need additional technical information,do not hesitate to e-mail us at tech@directives.All Hanna Instruments meters are warranted for two years against defects in workmanship and materials when used for their intended pur-pose and maintained according to instructions.The probes are warranted for a period of six months.This warranty is limited to repair or replacement free of charge . Damage due to accidents, misuse,tampering or lack of prescribed maintenance are not covered.If service is required, contact the dealer from whom you purchased the instrument. If under warranty, report the model number, date of pur-chase, serial number and the nature of the prob-lem. If the repair is not covered by the warranty,you will be notified of the charges incurred. If the instrument is to be returned to Hanna Instruments,first obtain a Returned Goods Authorization Num-ber from the Customer Service department and then send it with shipment costs prepaid. When shipping any instrument, make sure it is properly packaged for complete protection.All rights are reserved. Reproduction in whole or inpart is prohibited without the written consent of the copyright owner.WARRANTYPRELIMINARY EXAMINATIONRemove the instrument from the packing ma-terial and examine it carefully to make surethat no damage has occurred during ship-ment. If noticeable damage is evident, notify your dealer.Note:Save all packing material until youare sure that the instrument func-tions correctly. All defective items must be returned in the original pack-ing together with the supplied ac-cessories.HI 99163 is a portable pH and temperature meter with a special probe, dedicated to the application in slaughter houses.The FC 232D probe has been specially de-signed with a stainless steel blade tip for meat penetration.Moreover, a built-in temperature sensor al-lows simultaneous pH and temperature readings and a mini amplifier renders mea-surements impervious to noise and electri-cal interferences.The meter is supplied in a rugged carrying case, complete with:• FC 232D amplified pH/temperature probe with FC 099 stainless steel blade, DIN connector and 1 m (3.3') cable• HI 70004 pH 4.01 buffer, 20 mL sachet • HI 70007 pH 7.01 buffer, 20 mL sachet • HI 700630 Acid cleaning solution for meat grease and fats, 20 mL sachet (2 pcs.)• batteries and instructionsGENERAL DESCRIPTIONSPECIFICATIONSRange-2.00 to 16.00 pH-5.0 to 105.0°C / 23.0 to 221.0°FResolution 0.01 pH / 0.1°C / 0.1°F Accuracy ±0.02 pH(@20°C/68°F)±0.5°C up to 60°C; ±1°C outside±1°F up to 140°F; ±2°F outsideTypical EMC ±0.02 pH Deviation ±0.2°C or ±0.4°F Temp. Compensation Automatic pH Calibration Automatic, 1 or 2 pointwith 2 sets of standardized buffers (4.01/7.01/10.01 or 4.01/6.86/9.18)Probe (included)FC 232Damplified pH/temperature probeBattery Type 3 x 1.5V AA / IEC LR6Battery Life Approx. 1500 hours Auto-off After 8 minutes of non-use Environment 0 to 50°C; RH 100%Dimensions 150 x 80 x 36 mm (5.9 x 3.2 x 1.4”)Weight 210 g (7.4 oz.)FC 232DAmplified pH probe with stain-less steel blade tip, built-in temperature sensor, DIN con-nector and 1 m (3.3') cableFC 09820 mm stainless steel blade FC 09935 mm stainless steel blade HI 70004P pH 4.01 buffer solution, 20 mLsachet (25 pcs.)HI 7004L pH 4.01 buffer solution, 500 mL HI 70006P pH 6.86 buffer solution, 20 mLsachet (25 pcs.)HI 7006L pH 6.86 buffer solution, 500 mL HI 70007P pH 7.01 buffer solution, 20 mLsachet (25 pcs.)HI 7007L pH 7.01 buffer solution, 500 mL HI 70300M Storage solution, 230 mL bottle HI 70300L Storage solution, 500 mL bottle HI 7061M General purpose cleaning so-lution, 230 mL bottle HI 7061L General purpose cleaning so-lution, 500 mL bottleHI 700630P Acid cleaning solution for meatgrease and fats, 20 mL sachet (25 pcs.)HI 70630M Acid cleaning solution for meatgrease and fats, 230 mL bottleHI 70630L Acid cleaning solution for meatgrease and fats, 500 mL bottleHI 70631M Alkaline cleaning sol. for meatgrease and fats, 230 mL bottleHI 70631L Alkaline cleaning sol. for meatgrease and fats, 500 mL bottleHI 70632M Cleaning & disinfection solu-tion for blood products, 230 mLHI 70632L Cleaning & disinfection solu-tion for blood products, 500 mL HI 710007Blue shockproof rubber boot HI 710008Orange shockproof rubber boot HI 721312Hard carrying caseACCESSORIESLCD DESCRIPTION1. Automatic Temperature Compensation indicator2. Stability indicator3. Battery percentage4. pH calibration indicator5. Low battery indicator6. Selectable temperature unit7. Secondary display8. Primary displayIST99163R1 05/05Hanna Instruments reserves the right to modify the design, construction and appear-ance of its products without advance notice.To connect the probeWith the meter turned off, connect the FC 232D probe to the DIN socket on the top of the meter by aligning the pins and pushing in the plug. Tighten the nut to ensure a good connection. Remove the protective cap from the probe before taking any measurements.To turn the meter ON and check the battery statusPress the ON/OFF/MODE button until the display lights up. At start-up, all the LCD segments are displayed for 1 second, then the percent indica-tion of the remaining battery life is shown for an-other second (E.g. % 100 BATT). The meter then enters the normal measuring mode.Note : If the display needs to be checked, keep the ON button pressed while turning the meter on.The meter will display all segments as long as the button is pressed.To freeze the displayWhile in measurement mode, press the SET/HOLD button, HOLD appears on the secondary display and the reading will be frozen on the LCD (E.g. pH 5.73 HOLD). Press any button to return to normal mode.To turn the meter OFFWhile in normal measurement mode, press the ON/OFF/MODE button. OFF will appear on the secondary display. Release the button.Note : The meter is provided with an acoustic sig-nal feature, which can be disabled using the switch located in the battery compartment.Note : When the meter detects the absence of a temperature probe at its input, the Automatic T emperature Compensation is turned off, and the meter uses a default value of 25°C (77°F)for the temperature measurement and com-pensation. In this condition, the secondary LCD shows 25.0°C (77.0°F) blinking. When a probe is connected, the meter automatically returns to the A TC mode, the ATC tag is turned on, and the temperature is shown on the secondary display.OPERATIONAL GUIDEMETER SETUPpH MEASUREMENT & CALIBRATIONBATTERY REPLACEMENTSetup mode allows the selection of the tempera-ture unit and of the pH buffer set.T o enter the Setup mode, press and hold the ON/OFF/MODE button until CAL on the secondary display is replaced by TEMP and the current tem-perature unit (E.g. TEMP °C). Then:•for °C/°F selection , use the SET/HOLD button.After the temperature unit has been selected,press ON/OFF/MODE to enter the buffer set selection mode; press ON/OFF/MODE twice to return to the normal measuring mode.•to change the calibration buffer set , after set-ting the temperature unit, the meter will show the current buffer set: “pH 7.01 BUFF” (for 4.01/7.01/10.01) or “pH 6.86 BUFF” (for 4.01/6.86/9.18). Change the set with the SET/HOLD but-ton, then press ON/OFF/MODE to return to nor-mal mode.Note : T o clean the meter, do not use aggressive detergents. It is recommended to use water.•Make sure the meter has been calibrated be-fore use.•If the probe is dry, soak it in HI 70300 storage solution for one hour to reactivate it.•Insert the tip of the probe into the sample to be tested and wait until the symbol on the top left of the LCD is turned off.•The LCD shows the pH value (automatically compensated for temperature) on the primary LCD, while the secondary LCD shows the tem-perature of the solution.•After each measurement, it is recommended to perform a complete cleaning of the probe:use the suitable Cleaning solutions (see "Ac-cessories" section) and clean the probe tip thoroughly to eliminate dirtiness and avoid cross-contamination.•When not in use, switch the meter OFF and clean the probe with the specific Cleaning so-lutions (see "Accessories" section) before stor-ing it.pH calibrationFor better accuracy, frequent calibration of the instrument is recommended. In addition, the instrument must be recalibrated whenever:a)The pH electrode is replaced.b)After testing aggressive chemicals.c)Where high accuracy is required.d)At least once a month.•From normal mode, press and hold the ON/OFF/MODE button until OFF on the secondary display is replaced by CAL. Release the but-ton.•The LCD enters the calibration mode, display-ing “pH 7.01 USE” (or “pH 6.86 USE” if the NIST buffer set was selected). After 1 second the meter activates the automatic buffer recog-nition feature. If a valid buffer is detected, then its value is shown on the primary display, and REC appears on the secondary LCD. If no valid buffer is detected, the meter keeps the USE indication active for 12 seconds, and then re-places it with WRNG , indicating that the sample being measured is not a valid buffer.•For a single-point calibration with buffers pH 4.01, 9.18 or 10.01, the meter automatically accepts the calibration when the reading is stable; the meter will show on the primary dis-play the accepted buffer, with the message “OK 1” on the secondary display, and an audible signal is produced. After 1 second the meter automatically returns to the normal measur-ing mode.If a single-point calibration with buffers pH 7.01or 6.86 is desired, then after the calibration point has been accepted the ON/OFF/MODE button must be pressed in order to return to the nor-mal measuring mode. After the button is pressed, the meter shows "7.01" (or "6.86") -"OK 1", and an audible signal is produced. Af-ter 1 second, the meter automatically returns to the normal measuring mode.Note : It is always recommended to carry out a two-point calibration for better accuracy.•For a two-point calibration , place the probe in pH 7.01 (or pH 6.86) buffer. After the calibration point has been accepted, the “pH 4.01 USE”message appears. The message is held for 12 seconds, unless a valid buffer is recog-nized. If no valid buffer is recognized, then the WRNG message is shown. If a valid buffer (pH 4.01, pH 10.01 or pH 9.18) is detected, then the meter completes the calibration procedure.When the buffer is accepted, the LCD shows the accepted value with the “OK 2” message on the secondary display. The meter then re-turns to the normal measuring mode.Note : When the calibration procedure is com-pleted, the CAL tag is turned on.To quit calibration and to reset to the de-fault values•After entering the calibration mode and before the first point is accepted, it is possible to quit the procedure and return to the last calibration data by pressing the ON/OFF/MODE button.The secondary LCD displays ESC for 1 sec-ond and the meter returns to normal mode.•T o reset to the default values and clear a previ-ous calibration, press the SET/HOLD button after entering the calibration mode and before the first point is accepted.The meter displays the remaining battery per-centage when turned on. When the level is below 5%, the symbol on the bottom left of the LCD blinks to indicate a low battery condition. If the battery level is low enough to cause erroneous readings, the Battery Error Prevention System (BEPS) turns the meter off.Unscrew the 4 screws located on the back of the meter and carefully replace the 3 AA batteries lo-cated in the battery compartment, while paying attention to their polarity . Reattach the back mak-ing sure that the gasket is in place and tighten the 4 screws to ensure a watertight seal.The secondary LCD displays CLR for 1 sec-ond, the meter resets to the default calibration and the “CAL” tag on the LCD disappears.。
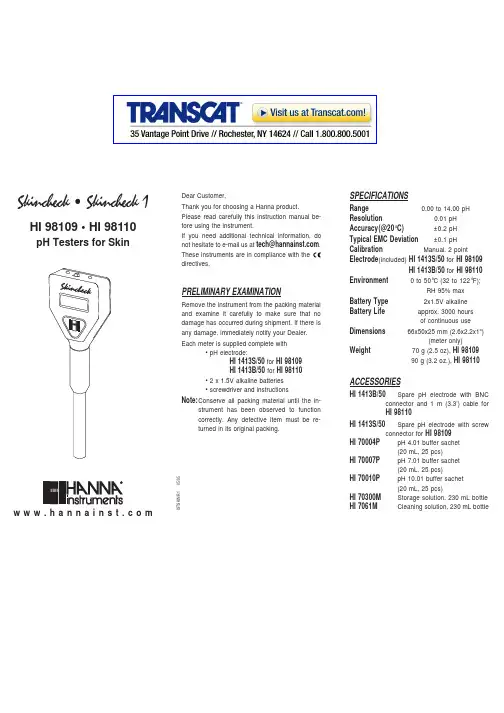
Skincheck • Skincheck 1HI 98109 • HI 98110pH Testers for SkinDear Customer,Thank you for choosing a Hanna product.Please read carefully this instruction manual be-fore using the instrument.If you need additional technical information, do not hesitate to e-mail us at ******************.These instruments are in compliance with the directives.PRELIMINARY EXAMINATIONRemove the instrument from the packing material and examine it carefully to make sure that no damage has occurred during shipment. If there is any damage, immediately notify your Dealer.Each meter is supplied complete with• pH electrode:HI 1413S/50 for HI 98109HI 1413B/50 for HI 98110• 2 x 1.5V alkaline batteries • screwdriver and instructions Note:Conserve all packing material until the in-strument has been observed to function correctly. Any defective item must be re-turned in its original packing.SPECIFICATIONSRange 0.00 to 14.00 pH Resolution 0.01 pH Accuracy (@20°C)±0.2 pH Typical EMC Deviation ±0.1 pH Calibration Manual, 2 point Electrode (included)HI 1413S/50 for HI 98109HI 1413B/50 for HI 98110Environment 0 to 50°C (32 to 122°F);RH 95% maxBattery Type 2x1.5V alkaline Battery Life approx. 3000 hoursof continuous useDimensions 66x50x25 mm (2.6x2.2x1")(meter only)Weight 70 g (2.5 oz), HI 9810990 g (3.2 oz.), HI 98110ACCESSORIESHI 1413B/50Spare pH electrode with BNCconnector and 1 m (3.3’) cable for HI 98110HI 1413S/50Spare pH electrode with screw connector for HI 98109HI 70004P pH 4.01 buffer sachet (20 mL, 25 pcs)HI 70007PpH 7.01 buffer sachet (20 mL, 25 pcs)HI 70010P pH 10.01 buffer sachet (20 mL, 25 pcs)HI 70300M Storage solution, 230 mL bottle HI 7061MCleaning solution, 230 mL bottlew w w .h a n n a i n s t .c omI S T S K I N R 1 05/05INITIAL PREPARATIONThe pH electrode is shipped dry. Before using the meter, remove the protective cap and condition the electrode by soaking the tip (bottom 4 cm/1½") in pH 7.01 buffer solution for a couple of hours. Then follow the calibration procedure.OPERATION•Do not be alarmed if white crystals appear around the cap. This is normal with pH electrodes and they dissolve when rinsed with water.•Connect the supplied electrode to the meter.•Turn the tester on by sliding the switch on the top.•Remove the protective cap and place the tip of the flat electrode on the surface to be measured (skin or scalp).•For best results, wet the surface with distilled wa-ter or a neutral disinfectant.•After use, rinse the electrode with water and store it with a few drops of HI 70300 storage solution in the protective cap.DO NOT USE DISTILLED OR DEIONIZED WATER FOR STORAGE PURPOSES.•Always replace the protective cap after use.CALIBRATION•For best results, calibrate frequently.•Dip the tip of the electrode (4 cm/1½") in pH 7.01 buffer solution at room temperature. Allow the reading to stabilize.•Use a small screwdriver to adjust the pH7 trimmer until the display reads "pH 7.01".•Rinse the electrode with water and dip it in pH 4.01 (or pH 10.01) buffer solution. Allow the reading to stabi-lize.•With a small screwdriver adjust the pH4/10 trimmer until the display reads "pH 4.01" (or "pH 10.01").•Calibration is now complete.ALWAYS CALIBRATE USING FRESH BUFFER SO-LUTIONS.WARRANTYThese meters are guaranteed for one year against defects in work-manship and materials when used for its intended purpose and maintained according to instructions. Electrodes are guaranteed for a period of six months . This warranty is limited to repair or replace-ment free of charge. Damages due to accident, misuse, tampering or lack of prescribed maintenance are not covered. If service is required,contact the dealer from whom you purchased the instrument. If under warranty, report the model number, date of purchase, serial number and the nature of the failure. If the repair is not covered by the warranty, you will be notified of the charges incurred. If the instrument is to be returned to Hanna Instruments, first obtain a Returned Goods Authorization Number from the Customer Service department and then send it with shipment costs prepaid. When shipping any instru-ment, make sure it is properly packaged for complete protection.Recommendations for UsersBefore using this product, make sure that it is entirely suitable for the environment in which it is used. Operation of this instrument in residential areas could cause interference to radio and TV equipment. The glass bulb at the end of the pH electrode is sensitive to electrostatic discharges. Avoid touching this glass bulb at all times. Any variation introduced by the user to the supplied equipment may degrade the instrument's EMC performance. To avoid electrical shocks, do not use this instrument when voltage at the measurement surface exceeds 24Vac or 60 Vdc. To avoid damage or burns, do not perform any measurement inmicrowave ovens.BATTERY REPLACEMENTReplace the batteries when the display fades or the meter cannot be switched on.Remove the battery cover on the back of the meter. Insert 2 new 1.5V batteries, while paying at-tention to their polarity.Batteries should only be replaced in a safe area using the battery type specified in this instructionmanual.。
可编辑修改精选全文完整版目录1、仪器简介2、概貌3、仪器的使用3.1标定3.2测量pH值4、仪器的维护与保养5、错误诊断6、标准缓冲液的配制及其保存7、电极型号1、仪器简介PB-21酸度计是由赛多利斯公司出品的电化学分析仪器,仪器集pH、mV、温度测量于一体,作为实验室常规测量设备被广泛应用。
该型pH计具有以下特点:●自动温度补偿●最多3点校准存储●全自动显示电极斜率及使用状态●自动识别3组16种缓冲液●校准只需按一个键,简单方便●稳定符号,表示读数已达稳定●同步显示pH、温度和缓冲液●直接以mV或pH方式读取测量值●配送三合一电极PB-21酸度计技术参数如下:PH测量范围-1.99至+19.99可读性0.01准确度±0.005mV测量范围±1800.00mV可读性0.1mV准确度±0.3mV(005%,if<-400mV/>+400mV)温度测量范围-5.0℃至105.0℃可读性0.1℃准确度±0.2℃校准点最多三种缓冲液自动识别缓冲液16种缓冲液2;4;7;10;121;3;6;8;10;131.68;4.01;6.86;9.1812.46自动温度补偿(ATC)电极斜率自动修正范围90%至105%使用玻璃膜电极使用环境要求温度10℃~33℃,湿度不大于85%RH的实验室要求3、仪器的使用3.1 pH计标定pH计每周标定一次,由专人负责完成。
如遇到下列情况之一,仪器则需要重新标定:a)溶液温度与定标温度有较大的差异时.b)电极在空气中暴露过久,如半小时以上时.c)定位或斜率调节器被误动;d)测量过酸(pH<2=或过碱(pH>12)的溶液后;e)换过电极后;f)当所测溶液的pH值不在两点定标时所选溶液的中间,且距pH7又较远时具体操作步骤如下:a)按“Mode”按键把测量选择调到PH测定界面,按“Enter”键即可。
b)按“Setup”按键1次,屏幕显示“Clear”,表示清除以前的所有的校正数据,通过“Enter”键确认清除过去的数据。
ph计使用方法和注意事项摘要:一、PH计简介二、PH计使用方法1.准备工作2.测量步骤3.数据读取与记录三、PH计注意事项1.操作注意事项2.维护与保养3.校准与检测正文:PH计是一种测量溶液酸碱度的仪器,广泛应用于化工、环保、食品等行业。
掌握PH计的使用方法和注意事项,对于确保测量结果的准确性和设备的使用寿命至关重要。
本文将详细介绍PH计的使用方法和注意事项。
一、PH计简介PH计是一种电子测量仪器,通过电极传感器检测溶液中的氢离子浓度,从而得出溶液的酸碱度。
PH计有多种类型,如便携式、台式、在线式等,用户应根据实际需求选择合适的设备。
二、PH计使用方法1.准备工作在使用PH计之前,首先要确保仪器处于完好状态,检查电极、传感器等部件是否正常。
同时,准备好待测溶液,确保溶液干净、无杂质。
2.测量步骤将PH计电极浸入待测溶液中,注意不要碰触容器壁或其他物体。
等待仪器显示稳定的数值,此时光标会停止波动。
此时,可读取PH值并进行记录。
3.数据读取与记录PH计上的显示屏会显示溶液的PH值,可以将该值记录下来。
如有需要,还可以使用数据线将PH计与计算机连接,将测量数据导入电脑,方便进行进一步分析和处理。
三、PH计注意事项1.操作注意事项- 使用PH计时,应避免振动和强烈冲击,以免影响测量精度。
- 待测溶液的温度应在测量范围内,以保证测量结果的准确性。
- 不要让PH计电极暴露在高温、高湿或腐蚀性环境中,以免损坏设备。
2.维护与保养- 定期检查PH计的电极、传感器等部件,如有损坏,及时更换。
- 测量完成后,将电极清洗干净,避免残留物影响下一次测量。
- 长时间不使用PH计时,请将电极取出,存放在干燥、通风的地方。
3.校准与检测- 使用PH计前,应进行校准,以确保测量结果的准确性。
- 定期对PH计进行检测,检查其测量精度是否符合要求。
掌握以上PH计使用方法和注意事项,可以帮助用户更好地使用PH计,确保测量结果的准确性和设备的使用寿命。
Instruction ManualHI 99131Portable Waterproof pH Meter for Plating BathsDear Customer,Thank you for choosing a Hanna Instruments product.Please read this instruction manual care-fully before using the instrument. If you need additional technical information, do not hesi-tate to e-mail us at ******************All Hanna Instruments meters are warranted for two years against defects in workmanship and materials when used for their intended pur-pose and maintained according to instructions.The probes are warranted for a period of six months.This warranty is limited to repair or replacement free of charge . Damages due to accident, mis-use, tampering or lack of prescribed maintenance are not covered.If service is required, contact the dealer from whom you purchased the instrument. If under warranty, report the model number, date of pur-chase, serial number and the nature of the prob-lem. If the repair is not covered by the warranty,you will be notified of the charges incurred. If the instrument is to be returned to Hanna Instru-ments, first obtain a Returned Goods Authoriza-tion Number from the Customer Service depart-ment and then send it with shipment costs pre-paid. When shipping any instrument, make sure it is properly packaged for complete protection.All rights are reserved. Reproduction in whole or in part is prohibited without the written consent of the copyright owner.WARRANTYRemove the instrument from the packing material and examine it carefully to make sure that no damage has occurred during shipment. If noticeable damage is evident,notify your dealer.Note:Save all packing material until youare sure that the instrument func-tions correctly. All defective items must be returned in the original packing together with the supplied accessories.HI 99131 is a portable, microprocessor-based pH and temperature meter with a special probe.The HI 62911 pH electrode has been spe-cially designed and fully shielded for appli-cations in plating baths. The titanium elec-trode body acts like a Faraday cage, and allows stable readings even in samples where strong electrical fields are involved.Moreover, a built-in temperature sensor al-lows simultaneous pH and temperature readings and a mini amplifier renders mea-surements impervious to noise and elec-trical interferences.Each meter is supplied complete with:• HI 62911 pH/temperature probe• calibration & cleaning solution sachets • 3x1.5V AA alkaline batteries • instruction manual • rugged carrying caseRange -2.00 to 16.00 pH-5.0 to 105.0°C / 23.0 to 221.0°FResolution0.01 pH 0.1°C / 0.1°FAccuracy (@20°C)±0.02 pH±0.5°C up to 60°C; ±1°C outside ±1°F up to 140°F; ±2°F outside Typical EMC ±0.02 pH Deviation±0.2°C or ±0.4°FTemperature AutomaticCompensationpH Calibration Automatic, 1 or 2 pointwith 2 sets of memorized buffers (pH 4.01/7.01/10.01 or 4.01/6.86/9.18)Probe (included)HI 62911amplified pH probe with built-intemperature sensor and titanium cageworking as matching pin Battery Type 3 x 1.5V AA / IEC LR6Battery Life Approx. 1500 hoursAuto-off After 8 minutes of non-use Environment0 to 50°C (32 to 122°F);RH max 100%Dimensions 150x80x36 mm (5.9x3.1x1.4”)Weight210 g (7.4 oz.)To clean the meter, it is recommended to use water.HI 62911Amplified pH electrode with built-in temperature sensor,DIN connector & titanium cage working as matching pin HI 7004L pH 4.01 buffer solution, 500 mL HI 7006L pH 6.86 buffer solution, 500 mL HI 7007L pH 7.01 buffer solution, 500 mL HI 7009L pH 9.18 buffer solution, 500 mL HI 7010L pH 10.01 solution, 500 mL HI 70300L Storage solution, 500 mL HI 7061L Cleaning solution, 500 mL HI 710007Blue shockproof rubber boot HI 710008Orange shockproof rubber boot HI 721312Rugged carrying case HI 76405Electrode holderACCESSORIES1. Automatic Temperature Compensation indicator2. Stability indicator3. Battery percentage4. pH calibration indicator5. Low battery indicator6. Selectable temperature unit7. Secondary display8. Primary display9. Measuring unit for primary displayIST99131R3 07/05w w w .h a n n a i n s t .c o mHanna Instruments reserves the right to modify the design, construction and appear-ance of its products without advance notice.To connect the probeWith the meter turned off, connect the HI 62911 probe to the DIN socket on the top of the meter by aligning the pins and pushing in the plug. Tighten the nut to ensure a good connection. Remove the protective cap from the probe before taking any measurements.To turn the meter ON and check the bat-tery statusPress the ON/OFF/MODE button until the dis-play lights up. At start-up, all the LCD segments are displayed for 1 second, then the percent in-dication of the remaining battery life is shown for another second (E.g. % 100 BATT). The meter then enters the normal measuring mode. Note: If the display needs to be checked, keep the ON button pressed while turning the meter on. The meter will display all segments as long as the button is pressed.To freeze the displayWhile in measurement mode, press the SET/ HOLD button, HOLD appears on the secondary display and the reading will be frozen on the LCD (E.g. pH 5.73 HOLD). Press any button to return to normal mode.To turn the meter OFFWhile in normal measurement mode, press the ON/OFF/MODE button. OFF will appear on the secondary display. Release the button. Note: The meter is provided with an acoustic signal feature which can be disabled using the switch located in the battery compartment. Note: When the meter detects the absence of a temperature probe at its input, the Automatic T emperature Compensation is turned off, and the meter uses a default value of 25°C (77°F) for the temperature measurement and com-pensation. In this condition, the secondary LCD shows 25.0°C (77.0°F) blinking. When a probe is connected, the meter automatically returns to the ATC mode, the ATC tag is turned on, and the temperature is shown on the sec-ondary display.•Make sure the meter has been calibrated be-fore use.•If the probe is dry, soak it in HI 70300 storagesolution for one hour to reactivate it.•Place the tip of the probe into the sample to betested.•Stir briefly and wait until the symbol on thetop left of the LCD is turned off.•The LCD shows the pH value (automaticallycompensated for temperature) on the primaryLCD, while the secondary LCD shows the tem-perature of the solution.•If measurements are taken in differentsamples successively, rinse the probe tip thor-oughly to eliminate cross-contamination. Aftercleaning, rinse the probe tip with some of thesample to be measured.pH calibrationFor better accuracy, frequent calibration of theinstrument is recommended. In addition, theinstrument must be recalibrated whenever:a)The pH electrode is replaced.b)After testing aggressive chemicals.c)Where high accuracy is required.d)At least once a month.•From normal mode, press and hold the ON/OFF/MODE button until OFF on the secondarydisplay is replaced by CAL. Release the but-ton.•The LCD enters the calibration mode, display-ing “pH 7.01 USE” (or “pH 6.86 USE” if theNIST buffer set was selected). After 1 secondthe meter activates the automatic buffer rec-ognition feature. If a valid buffer is detected,then its value is shown on the primary display,and REC appears on the secondary LCD. Ifno valid buffer is detected, the meter keepsthe USE indication active for 12 seconds, andthen replaces it with WRNG, indicating that thesample being measured is not a valid buffer.•For a single-point calibration with buffers pH4.01, 9.18 or 10.01, the meter automaticallyaccepts the calibration when the reading isstable; the meter will show on the primary dis-play the accepted buffer, with the message“OK 1” on the secondary display, and an au-dible signal is produced.After 1 second the meter automatically returnsto the normal measuring mode.If a single-point calibration with buffers pH 7.01or 6.86 is desired, then after the calibrationpoint has been accepted the ON/OFF/MODEbutton must be pressed in order to return tothe normal measuring mode. After the buttonis pressed, the meter shows "7.01" (or "6.86")- "OK 1", and an audible signal is produced.After 1 second, the meter automatically returnsto the normal measuring mode.Note: It is always recommended to carry out atwo-point calibration for better accuracy.•For a two-point calibration, place the probe inpH 7.01 (or pH 6.86) buffer. After the calibrationpoint has been accepted, the “pH 4.01 USE”message appears. The message is held for12 seconds, unless a valid buffer is recog-nized. If no valid buffer is recognized, then theWRNG message is shown. If a valid buffer(pH 4.01, pH 10.01 or pH 9.18) is detected,then the meter completes the calibration pro-cedure. When the buffer is accepted, the LCDshows the accepted value with the “OK 2”message on the secondary display. The meterthen returns to the normal measuring mode.Note: When the calibration procedure is com-pleted, the CAL tag is turned on.To quit calibration and to reset to the de-fault values•After entering the calibration mode and beforethe first point is accepted, it is possible to quitthe procedure and return to the last calibrationdata by pressing the ON/OFF/MODE button.The secondary LCD displays ESC for 1 sec-ond and the meter returns to normal mode.•T o reset to the default values and clear a pre-vious calibration, press the SET/HOLD buttonafter entering the calibration mode and beforethe first point is accepted.The secondary LCD displays CLR for 1 sec-ond, the meter resets to the default calibrationand the “CAL” tag on the LCD disappears.The meter displays the remaining batterypercentage when turned on. When the levelis below 5%, the symbol on the bottomleft of the LCD blinks to indicate a low batterycondition. If the battery level is low enough tocause erroneous readings, the Battery ErrorPrevention System (BEPS) turns the meteroff.Unscrew the 4 screws located on the backof the meter and carefully replace the 3 AAbatteries located in the battery compartment,while paying attention to their polarity. Reat-tach the back making sure that the gasket isin place and tighten the 4 screws to ensurea watertight seal.Setup mode allows the selection of the tempera-ture unit and of the pH buffer set.T o enter the Setup mode, press and hold theON/OFF/MODE button until CAL on the second-ary display is replaced by TEMP and the currenttemperature unit (E.g. TEMP °C). Then:•for °C/°F selection, use the SET/HOLD button.After the temperature unit has been selected,press ON/OFF/MODE to enter the buffer setselection mode; press ON/OFF/MODE twiceto return to the normal measuring mode.•to change the calibration buffer set, after set-ting the temperature unit, the meter will showthe current buffer set: “pH 7.01 BUFF” (for 4.01/7.01/10.01) or “pH 6.86 BUFF” (for 4.01/6.86/9.18). Change the set with the SET/HOLD but-ton, then press ON/OFF/MODE to return to nor-mal mode.。
PH 计操作使用说明书感谢您选购本公司笔式PH 计.在使用前请详细阅读使用说明书,并妥善保存它。
功能简介1、按键自动关机PH 计在20 分钟内无任何按键操作时,PH 计将自动关机。
2、数据保持功能在正常的测量模式下,有一个小数点在不停的闪烁。
当按下“HOLD”键时,显示屏保持当前数值且小数点停止闪烁;再次按下“HOLD”键时PH 计恢复到正常测量模式,小数点开始闪烁。
3、自动温度补偿(A TC)和℃/℉转换在显示屏上“CAL”的左下方有一个“A TC”符号显示,表示PH 计处于自动温度补偿状态。
℃/℉转换:PH 计默认温度单位为“℃”。
如果需要把温度单位转换为“℉”时,可在PH 计关机后,同时按住“CAL”和“ON/OFF”键,直到显示屏上只显示“℃或者℉”时,再按“HOLD”进行选择,选择完成后按下“CAL”键,显示屏上会显示“SA”符号 1 秒后自动返回正常测量模式,说明设置成功。
4、仪器标定:此PH 计为3 点标定,三个标定点为:4.0,7.0 和10.0打开PH 计电源,将PH 电极放入到PH7.0 的缓冲液中,轻轻搅拌缓冲液,待PH 计显示数据稳定后,按“CAL”键进入标定模式。
当显示屏上显示“CAL”1S 后,“CAL”符号和缓冲液所测的数值会同时显示在显示屏上。
如果缓冲液的测的数值在6.5-7.5 之间,PH 计默认此缓冲液的PH值为7.0,此时显示屏会显示7.0,如果你确认缓冲液是7.0,请等待5-10秒钟,显示屏会显示“SA”符号。
表示PH计正在保存标定结果,之后显示“END”,7.0 标定结束。
如果你使用的缓冲液不是7.0,按“HOLD”键选择正确数值。
例如你使用的是PH=6.86 的缓冲液,请用下列方法进行标定。
将PH电极放入到6.86的缓冲液中,轻轻搅拌缓冲液,待PH计显示数据稳定后,按“CAL”键进入标定模式。
当显示屏上显示“CAL”1 秒后,“CAL”符号和缓冲液所测的数值会同时显示在显示屏上。
2PRELIMINARY EXAMINATION.....................................................3GENERAL DESCRIPTION............................................................3FUNCTIONAL DESCRIPTION HI 9023C & HI 9023CN ..................5SPECIFICATIONS HI 9023C & HI 9023CN .................................6FUNCTIONAL DESCRIPTION HI 9024C & HI 9025C.....................7SPECIFICATIONS HI 9024C & HI 9025C....................................8FUNCTIONAL DESCRIPTION HI 9110..........................................9FUNCTIONAL DESCRIPTION HI 9210 & HI 9210N....................10SPECIFICATIONS HI 9110, HI 9210 & 9210N .........................11OPERATIONAL GUIDE .............................................................12pH CALIBRATION...................................................................16pH VALUES AT VARIOUS TEMPERATURES ................................24TROUBLESHOOTING GUIDE.....................................................25ELECTRODE CONDITIONING AND MAINTENANCE.........................26TAKING REDOX MEASUREMENTS (HI 9023C & HI 9025C only).29BATTERY REPLACEMENT & AUTO-OFF......................................30ACCESSORIES .. (31)ELECTRODE APPLICATION REFERENCE GUIDE .............................37WARRANTY ..........................................................................38CE DECLARATION OF CONFORMITY .. (39)Dear Customer,Thank you for choosing a Hanna Product. Please read this instruction manual carefully before using the instrument. It will provide you with the necessary information for a correct use of theinstrument, as well as a precise idea of its versatility. If you require further technical information, do not hesitate to e-mail us at tech@.TABLE OF CONTENTS3These waterproof Hanna instruments are heavy-duty pH meters designed to provide laboratory results and accuracy under harsh industrial conditions.HI 9023C, pH/mV/°C meter utilizes an advanced customized micro-processor. The meter has three memorized buffer values (4.01, 7.01and 10.01) and automatic buffer recognition to avoid errors during calibration. There are no trimmers, making calibration an easy process, even for non-technical personnel. Temperature effects are automatically compensated for, or can be manually adjusted. With HI 9023C 23C you can also measure ORP (Oxidation Reduction Poten-tial) or Ion Specific. Millivolt measurements automatically switch from 0.1 to 1 mV resolution when the reading reaches 400mV.HI 9023C is supplied with HI 1230B combination double-junction gel pH electrode, HI 7669/2W temperature probe, pH 4.01 and 7.01 (20mL each) buffer solutions, sample vessel, 1.5V AA size batteries (4each) and a rugged carrying case.HI 9023CN, pH/mV/°C meter utilizes an advanced customized microprocessor. The meter has three memorized buffer values (4.01,7.01 and 10.01) and automatic buffer recognition to avoid errors during calibration. Temperature effects are automatically compen-sated for.HI 9023CN is supplied with HI 1217D 4-in-1 amplified, gel pH/ C electrode, pH 4.01 and 7.01 (20 mL each) buffer solutions, sample vessel, 1.5V AA size batteries (4 each) and a rugged carrying case.HI 9024C and HI 9025C are pH/°C meters with a built-in micropro-cessor. A large dual-level LCD displays the pH and temperature simultaneously. The display has graphic symbols to make the calibra-tion procedure easy to follow. The meters have 5 memorized bufferRemove the instrument from the packing material and examine it carefully to make sure that no damage has occurred during shipping.If there is any noticeable damage, notify your Dealer immediately.Note:Save all packing materials until you are sure that the instru-ment functions correctly. Any damaged or defective item must be returned in its original packing materials together with the supplied accessories.4values (4.01, 6.86, 7.01, 9.18 and 10.01), buffer recognition to avoid errors during calibration and automatic temperature compensa-tion. You can use HI 9025C with ORP (Oxidation Reduction Potential)or Ion Specific Electrodes. Millivolt measurements automatically switch from 0.1 to 1 mV resolution when the reading reaches 400 mV. To insure trouble-free operation, the meter's circuitry comes with built-in protection against electromagnetic interference.HI 9024C and HI 9025C are supplied with HI 1230B combination double-junction, gel pH electrode, HI 7669/2W temperature probe,pH 4.01 and 7.01 (20 mL each) buffer solutions, sample vessel, 1.5V AA size batteries (4 each) and a rugged carrying case.HI 9110 pH meter has simple manual temperature compensation and calibration which make this meter easy to use in laboratory and field. The calibration trimmers are sealed behind a protective cover so that they cannot be accidentally moved or readjusted by unauthorized persons.HI 9110 is supplied with FC 100B combination double-junction,refillable pH electrode, calibration screwdriver, 1.5V AA size batteries (4 each) and a soft carrying case.HI 9210 pH meter has simple manual temperature compensation and calibration with only two buttons, making it simple to use for even non-technical personnel. The calibration trimmers are sealed behind a protective cover so that they cannot be accidentally moved or readjusted by unauthorized persons.HI 9210 is supplied with HI 1230B combination double-junction, gel pH electrode, calibration screwdriver and 1.5V AA size batteries (4each).HI 9210N pH/°C meter measures both pH and temperature. It has only two buttons, making it simple to use for even non-technical personnel. The calibration trimmers are sealed behind a protective cover so that they cannot be accidentally moved or readjusted by unauthorized persons.HI 9210N is supplied with HI 1217D 4-in-1, gel, amplified pH/ C electrode, calibration screwdriver and 1.5V AA size batteries (4 each).51)Electrode connector (BNC for HI 9023C and DIN for HI 9023CN)2)Temperature probe socket (HI 9023C only)3)Liquid Crystal Display4)CAL key to enter or exit calibration mode 5)CFM key to confirm calibration 6)Ï°C and Ð C C keys for manual temperature setting (HI 9023C only)7)ON/OFF key to turn the instrument on or off 8)RANGE key to select pH, C or mV9)Low battery indicator (additional decimal point)10)Mode indicator6HI 9023CHI 9023CNRange0.00 to 14.00 pH±399.9 mV (ISE); ±1999 mV (ORP)0.0 to 100.0 C 0.0 to 70.0 CResolution 0.01 pH0.1 mV (ISE); 1 mV (ORP)0.1 CAccuracy ±0.01 pH (@20°C/68°F)±0.2 mV (ISE); ±1 mV (ORP)±0.4 C ±0.5 CTypical EMC ±0.02 pH Deviation ±0.2 mV; ±1 mV±0.2 C ±0.5 CCalibration Automatic with 3 memorized standardbuffers (4.01, 7.01, 10.01)Temperature Automatic or manual Automatic Compensation 0 to 100 C (32-212 F)0 to 70 C (32-158 F)Electrode HI1230B plastic body,HI1217D plastic body,combination pH, BNC 4-in-1 gel pH/ C, DIN 1 m cable (included ) 1 m cable (included )Temperature Probe HI 7669/2W (incl.)not necessary Input Impedance 1012 Ohm Battery Type & Life 4x1.5V, AA size (alkaline batteries)approx. 400 hours of continuous use auto-shut off after 10 minutes of non-useEnvironment 0 to 50 C (32 to 122 F); 100% RH Dimensions 196x80x60 mm (7.7x3.1x2.4") (meter)340x230x80 mm (13.8x9x3.1") (kit)Weight 425 g (15 oz.) (meter)1.3 Kg (3.0 lb.) (kit)71)BNC electrode connector 2)Temperature probe socket 3)Liquid Cristal Display4)RANGE key to select pH or mV (HI 9025C only)5)ON/OFF key to turn the meter on or off 6)CAL key to enter or exit calibration mode 7)CFM key to confirm calibration 8)Ï°C and Ð C C keys for manual temperature setting, or selecting pH buffer value9)MEM key to store pH value in memory10)MR key to recall the stored value from memory 11)User-friendly graphic symbols 12)Primary display 13)Secondary display8SPECIFICATIONS HI 9024C & HI 9025CHI 9024CHI 9025CRange0.00 to 14.00 pH; 0.0 to 100.0 C —0.0/±399.9 mV (ISE)—±400/±1999 mV (ORP)Resolution 0.01 pH; 0.1 C—0.1 mV (ISE)— 1 mV (ORP)Accuracy ±0.01 pH; ±0.5 C (@20°C/68°F)—±0.2 mV (ISE)Typical EMC ±0.01 pH; ±0.1 C Deviation —±0.3 mV (ISE)Calibration Automatic with 5 memorized standardbuffers (4.01, 6.86, 7.01, 9.18, 10.01)Offset Calibration ±1 pH Slope Calibration From 70 to 108%Temperature Automatic or manual from 0 to 100 C Compensation (32 to 212 F)Electrode HI 1230B pH electrode (included )Temperature Probe HI 7669/2W (included )Input Impedance 1012 Ohm Battery Type & Life 4x1.5V, AA size (alkaline batteries)approx. 400 hours of continuous use auto-shut off after 10 minutes of non-useEnvironment 0 to 50 C (32 to 122 F); 100% RH Dimensions meter: 196x80x60 mm (7.7x3.1x2.4")kit: 340x230x80 mm (13.8x9x3.1")Weight meter: 425 g (15 oz.)kit: 1.3 Kg (3.0 lb.)91)Battery cover2)BNC electrode connector 3)Offset calibration trimmer 4)Slope calibration trimmer 5)Temperature setting trimmer 6)Mode indicator 7)Liquid Crystal Display8)ON/OFF key to turn the meter on or off9)pH/°C SET key to select pH measurement or for manual temperature setting101)Battery cover2)Electrode connector (BNC for HI 9210 and DIN for HI 9210N)3)Offset calibration trimmer 4)Slope calibration trimmer5)Temperature setting trimmer (HI 9210) or Temperature Calibration (HI 9210N)6)Mode indicator 7)Liquid Crystal Display8)ON/OFF key to turn the meter on or off9)RANGE key to visualize the temperature (HI 9210N) or for manual temperature setting (HI 9210)11HI 9110HI 9210HI 9210NRangepH 0.00 to 14.00 pH °C—0.0 to 70.0 CResolution pH 0.01 pH°C —0.1 CAccuracy pH ±0.02 pH (@20°C/68°F)°C —±0.5 C Typical EMC pH ±0.05 pH ±0.02 pH Deviation °C—±0.5 C Calibration Manual 2 points through trimmers Offset Calibration ±1 pH Slope Calibration From 85 to 105% of nominal value Temperature Manual 0 to 100 C Auto 0 to 70 C Compensation (32 to 212 F)(32 to 158 F)Electrode FC 100B HI 1230B HI 1217DpH (incl.)pH (incl.)pH/ C (incl.)Input Impedance 1012 Ohm Battery Type 4x1.5 volt, AA size (alkaline batteries);Life 2000 hours of continuous use Environment 0 to 50 C (32 to 122 F); 100% RH Dimensions 196 x 80 x 60 mm (7.7 x 3.1 x 2.4") Weight 320 g (11.3 oz.)12INITIAL PREPARATIONEach meter is supplied complete with batteries.Remove the back cover, unwrap the batteries and install them while paying attention to polarity.HI 9023C, HI 9024C, HI 9025C:temperature probe to the BNC and temperature sockets on the top of the instrument. The temperature probe can be used independently to take temperature measurements, or it can be used in conjunction with the pH electrode to utilize the meter's ATC capability. If the probe is disconnected, temperature can also be set manually with the UP and DOWN keys. Toswitch the instrument on, press and hold theON/OFF key for a fraction of a second. The meter has a built-in protection against electro-magnetic interference and the delayed response of the keys assures that the commands are not mistaken for stray signals.HI 9110 and HI 9210:Connect the pH electrode to the BNC connector on the top of the instrument and press the ON/OFF key.HI 9210N and HI 9023CN:Connect the pH/ C electrode to the DIN connector on the top of the instrument and press the ON/OFF key.13pH MEASUREMENTSTo take a pH measurement remove the elec-trode protective cap and simply submerge the tip (4cm/1½") of the electrode and the tem-perature probe (wherever applicable) into the sample to be tested.Turn the instrument ON and if necessary, press RANGE until the display changes to the pH mode.Allow for the electrode to adjust to the solution and stabilize.In order to take more accurate pH measurements, make sure that the instrument is calibrated (see page 16).It is recommended that the electrode is always kept wet and rinsed thoroughly with the sample to be measured before use.The pH reading is directly affected by temperature. In order for the meter to measure the pH accurately, temperature must be taken in consideration. If the sample temperature is quite different from the temperature at which the pH electrode was kept, allow a few minutes for a perfect thermal equilibrium between them.HI 9023C, HI 9024C and HI 9025C:To use the meter's Automatic Temperature Compensation feature,submerge the temperature probe into the sample as close to the electrode as possible and wait for a couple of minutes. If you know the temperature of the sample to be tested you can manually compensate for it.If manual temperature compensation is desired the temperature probe must be disconnected from the instrument .The display will show the default temperature of 25 C or the last recorded temperature read-ing with the "C" indicator blinking.The temperature can now be adjusted with theUP and DOWN keys.14HI 9023C, HI 9023CN and HI 9210NTo use the meter's Automatic Temperature Compensation feature,simply submerge the pH/ C electrode into the sample and wait for a couple of minutes. The pH electrode also houses the temperature sensor which will measure and adjust for the temperature effect automatically.HI 9110, HI 9210:To use the meter’s Manual Temperature Compensation feature:Press the pH/ C key of HI 9110 or the RANGE key of HI 9210 to select the manual temperature mode.Remove the protective cap on top of the meter to access the trimmers. Measure the temperature of the buffer with a Checktemp or an accurate thermometer.Using the calibration screwdriver, turn the temperature trimmer (#5 pages 9-10) to display the measured temperature value.Press the pH/ C key of HI 9110 or the RANGE key of HI 9210 to return to the pH measurement mode.When finished, switch the instrument off and rinse the electrode with clean water. Pour a few drops of HI 70300 storage solution,or in its absence, pH 7 or pH 4 buffers in the protective cap andreplace it before storing away the electrode.15ORP MEASUREMENTS (HI 9023C AND HI 9025C)To enter the "mV" mode (ORP or ISE), turn the instrument ON and press the RANGE key until the display changes to mV.To measure the mV of a solution simply submerge the ORP or ISE electrode tip (4cm/1½") into the sample to be tested. Allow a few minutes for the readings to stabilize. See also "Taking REDOX Measurements" section at page 29.TEMPERATURE MEASUREMENTS (HI 9023C,HI 9023CN, HI 9024C, HI 9025C AND HI 9210N):Taking a temperature measurement is very easy. Turn the instrument ON and press the RANGE key to enter temperature mode.For HI 9023C , HI 9024C and HI 9025C , dip the liquid/general purpose temperature probe HI 7669/2W into the sample. For HI 9023CN and HI 9210N , simply dip the pH/ C electrode which contains the temperature sensor. Then allow a couple of minutes for the reading to stabilize.Note:You can also calibrate the offset point of the HI 9210N tem-perature sensor, if needed. For this purpose, immerse the pH/C electrode in a solution at a known temperature. Then turn the #5 trimmer (see page 10) until the temperature dis-played on the LCD is that of the solution.16It is recommended to calibrate the instrument frequently, especially if high accuracy is required.The instrument should be recalibrated for pH:a)Whenever the pH electrode or temperature probe is replaced.b)At least once a month.c)After testing aggressive chemicals.d)Whenever the batteries have been replaced.e)If greater accuracy is required.PREPARATIONPour small quantities of pH 7.01 and pH 4.01 solution into two clean beakers.For accurate calibration use two beakers for each buffer solution, the first one for rinsing the electrode and the second one for calibration.This way contamination of buffer is minimized.To obtain accurate readings, use pH 7.01 and pH 4.01 buffers if you are going to measure acidic samples, or pH 7.01 and pH 10.01 for alkaline measurements.PROCEDURE FOR HI 9023C AND HI 9023CN:•Make sure that the meter is in the pH mode.•Remove the protective cap from the elec-trode, rinse it with some pH 7.01 solution,then immerse the pH electrode and tem-perature probe (HI 9023C HI 9023C HI 9023C) or the pH/C electrode (HI 9023CN HI 9023CN HI 9023CN) into pH 7.01 buffer solution and stir gently and wait for the reading to stabilize.17Note:The electrode should be submergedapproximately 4 cm (1½") into the solution. With the temperature probelocated as close to it as possible (HIHI 9023C 9023C).•Press the CAL key. The temperature compensated pH value will blink on the display. For example, if the temperature is 25 C the reading will be pH 7.01. If the temperature is 20 C the readingwill be 7.03. The pH/temperature con-version chart is on page 24.Note:If "E4" flashes, the buffer solution iswrong or the probe is defective (see page 25 for trouble-shooting).•Wait for the "pH" symbol to stop flashing and press the CFMkey. The symbol "E5" will flash to indicate that the electrode is still in the pH 7.01 buffer.•Rinse the pH electrode (and the tem-perature probe) with distilled water first and with the pH 4.01 (or 10.01) buffer after.•Dip the electrode (and the temperatureprobe) into the pH 4.01 (or 10.01) buffer solution. Stir gently and wait for the reading to stabilize.•The "E5" symbol should disappear and the temperature com-pensated value will blink on the display.For example, if you are using pH 4.01 as the buffer, the reading will be 4.01 at 25 C.•When the "pH" symbol stops flashing,press CFM to confirm the calibration.The instrument is now calibrated and will remain calibrated even18when it is turned off.Note: The meter will lose the calibration ifthe batteries are removed.HI 9023C only:To calibrate with manual temperature com-pensation , follow this procedure:•Disconnect the temperature probe and switch the instrument ON.•Press RANGE to select the temperature mode.•Place the pH electrode into the 7.01 buffer stir gently and wait for the LCD to stabilize.•Record the buffer temperature by using a Checktemp C or anC).•Press the UP and DOWN to adjust the temperature accordingly.•Press RANGE to display pH and then press the CAL key. The•Wait for the "pH" symbol to stop flash-ing.•Press CFM. The "E5" symbol will flash to indicate that the electrode is still in the 7.01 solution.19•Rinse the electrode with clean or distilled water first and then with pH 4.01 (or 10.01) buffer. Dip the electrode into the pH4.01 (or 10.01) solution and stir gently.•Wait for the "pH" symbol to stop flashing. Press CFM to confirm the calibration.PROCEDURE FOR HI 9024C AND HI 9025C:In order to calibrate HI 9024C and HI 9025C , there is a choice of 5 memorized buffers: 4.01, 6.86, 7.01, 9.18 and 10.01 pH.•Make sure that the meter is in the pH mode.•Remove the protective cap and rinse the electrode with some of the buffer calibration solution that you are going to use first.ONE-POINT CALIBRATION:It is always recommended to perform a two-point calibration for optimum accuracy. In case of necessity, it is possible to carry out only a one-point calibration with the instruments. The offset buffers, that is the Standard 7.01 or the NIST 6.86 are the most appropriate for this purpose even though both meters can be calibrated with any of the 5 memorized calibration solutions.•Immerse the pH electrode into a pHbuffer solution (e.g. pH 6.86) and stir gently.Note: The electrode should be submerged approximately 4 cmas close to it as possible.20•Once the electrode is submerged in the buffer solution, the LCD will notify the user if the reading is not stable by an intermittent "NOT READY". Only when the reading is stable, will it change to a blinking "READY" and "CON".•Press the CFM key to confirm the calibra-tion. If the reading is not close to theselected buffer, "WRONG 1" and "WRONGclose to the selected buffer, the meter stores the reading (and adjusts the offset point). The buffer value is then displayed on the primary LCD and the secondaryLCD will display another buffer value (e.g."4.01").•Press the CAL key and the calibration pro-cess is ended with only the offset of the meter calibrated. For best accuracy how-ever, do not press CAL and proceed with a two-point calibration.TWO-POINT CALIBRATIONAfter calibrating at 6.86 or 7.01 pH (see above), for the second buffer use pH 4.01 if you are going to measure acidic samples,and pH 9.18 or pH 10.01 if you are measuring alkaline solutions.•Proceed as described in “One-point cali-bration above but do not end the calibration by pressing CAL.•After the first calibration point is con-firmed, immerse the pH electrode into the second buffer solution (pH 4.01,9.18 or 10.01) and stir gently.Note: The electrode should be submergedapproximately 4 cm (1½") into the solution with the temperature probe located as close to it as possible.•secondary display by pressing the Ïor Ð C C key.21Note: The electrode should be submergedapproximately 4 cm (1½") into the solution with the temperature probe located as close to it as possible.•Select the second buffer value on the secondary display bypressing the Ï°C or ÐC key.•When the “READY” and “CON” symbols blink on the display,the reading is stable and the calibration can be confirmed.•Press the CFM key. If the reading is not close to the selected buffer solution, “WRONG 2” and “WRONG ” will blink alternatively. If the reading is close to the selected buffer, the slope and the offset are calibrated. The values will be stored in memory and the meter will return to the operating mode.Note:The meter will automatically skip the buffer that was usedfor the first calibration to avoid erroneous calibration. At least 1 full pH unit is required between the two buffers used for the offset and slope calibration. As a result, once calibrated at either pH 6.86 or 7.01, the microprocessor will automatically ignore the other one for the second point calibration. It will do likewise for pH 9.18 and 10.01Note:During calibration, the secondary LCD displays the selectedbuffer value. With HI 9025C, press the RANGE key to display the buffer temperature during calibration.PROCEDURE FOR HI 9110, HI 9210 & HI 9210N:Manual Temperature CompensationNote:The pH/ C electrode of HI 9210N incorporates a tempera-compensation. Consequently, the following 5 paragraphs are irrelevant to HI 9210N and you can just proceed withpH calibration below.22•Press pH/ C SET key for HI 9110 or the RANGE key for HI 9210 to select the manual temperature setting. The "C"symbol will be displayed to indicate the temperature setting mode.•Remove the protective cap on the top of the meter to have access to the calibration trimmers.•an accurate thermometer (e.g.20C).•Using the screwdriver, turn the temperature trimmer (# 5pages 9-10) to display the recorded temperature value.•Press the pH/ C SET key for HI 9110or the RANGE key for HI 9210 to read pH.pH CalibrationAll three meters provide for manual pH cali-bration. As a result, you can perform one or two point calibration at a buffer of your choice. The instructions below explain a typical calibration procedure at pH 7 and then 4 or 10.•Remove the protective cap from the elec-trode, rinse it with some pH 7.01 solution, then dip in pH 7.01 buffer. Stir briefly and wait for one minute for the reading to stabilize.Note:23(1½") into the solution. For HI 9110 andHI 9210, place the thermometer close to the pH electrode.•Adjust the OFFSET trimmer (#3 pages 9-10) until the LCD shows the pH value atthe buffer temperature (see page 24 for pH values at various temperatures). With HI 9210N , press RANGE to read the buffer temperature.•Rinse first with clean or distilled water and then with a small amount of the next buffer (2nd calibration point). Dip the electrode into pH 4.01 (or 10.01) buffer, stir gently and wait until the display has stabilized.•Adjust the SLOPE trimmer (#4 pages 9-10) until the LCD displays the pH value at the second buffer temperature (see page 24).•pH calibration is now complete. Once the calibration process is complete, replace the trimmer cover and tighten it to ensure a proper seal against water and humidity ingress.24Temperature has an effect on pH. The calibration buffer solutions are affected by temperature changes to a lesser degree than normal solutions.For manual temperature calibration (standard with HI 9110 and HI 9210 or optional with HI 9023C , HI 9024C and HI 9025C )please refer to the following chart.For instance, if the buffer temperature is 25 C, the display should show pH 4.01, 7.01 or 10.01 at pH 4, 7 or 10 buffers, respectively.At 20 C, the display should show pH 4.00, 7.03 or 10.06. The meter reading at 50 C will then be 4.06, 6.98 or 9.82.p TEMP pH VALUES °C °F4.01 6.867.019.1810.0151015202530354045505560657032415059687786951041131221311401491584.014.004.004.004.004.014.024.034.044.054.064.074.094.114.126.986.956.926.906.886.866.856.846.846.836.836.846.846.856.857.137.107.077.047.037.017.006.996.986.986.986.986.986.996.999.469.399.339.279.229.189.149.109.079.049.018.998.978.958.9310.3210.2410.1810.1210.0610.019.969.929.889.859.829.799.779.769.752526ELECTRODE CONDITIONING& MAINTENANCEPREPARATIONRemove the protective cap.DO NOT BE ALARMED IF ANY SALT DEPOSITS ARE PRESENT. This is normal with electrodes and they will disappear when rinsed with water.During transport tiny bubbles of air may form inside the glass bulb affecting proper functioning of the electrode. These bubbles can be removed by "shaking down" the electrode as you would do with a glass thermometer.If the bulb and/or junction is dry, soak the electrode in HI 70300 or HI 80300 Storage Solution for at least one hour.* Not present in gel electrodes.27For refillable electrodes:If the filling solution (electrolyte) is more than 2½ cm (1") below the fill hole, add HI 7082 or HI 8082 3.5M KCl Electrolyte Solution for double junction or HI 7071 or HI 8071 3.5M KCl+AgCl Electrolyte Solution for single junction electrodes.For a faster response, unscrew the fill hole screw during measure-ments.For AmpHel ®electrodes:If the electrode does not respond to pH changes, the battery is run down and the electrode should be replaced.MEASUREMENTRinse the electrode tip with distilled water. Immerse the tip (bottom 4cm /1½") in the sample and stir gently for a few seconds.For a faster response and to avoid cross contamination of the samples,rinse the electrode tip with a few drops of the solution to be tested,before taking measurements.STORAGETo minimize clogging and assure a quick response time, the glass bulb and the junction should be kept moist and not allowed to dry out.Replace the solution in the protective cap with a few drops of HI 70300or HI 80300 Storage Solution or, in its absence, Filling Solution (HI 7071 or HI 8071 for single junction or HI 7082 or HI 8082 for double junction electrodes). Follow the Preparation Procedure above before taking measurements.Note:NEVER STORE THE ELECTRODE IN DISTILLED OR DEIONIZED WA-TER.PERIODIC MAINTENANCEInspect the electrode and the cable. The cable used for connection to the meter must be intact and there must be no points of broken insulation on the cable or cracks on the electrode stem or bulb.Connectors must be perfectly clean and dry. If any scratches or cracks are present, replace the electrode. Rinse off any salt deposits with water.For refillable electrodes:Refill the reference chamber with fresh electrolyte (HI 7071 or HI 8071for single junction or HI 7082 or HI 8082 for double junction elec-trodes). Allow the electrode to stand upright for 1 hour.Follow the Storage Procedure above.AmpHel ® is a registered Trademark of "Hanna Instruments"28CLEANING PROCEDUREGeneralSoak in Hanna HI 7061 or HI 8061 General Clean-ing Solution for approximately ½ hour.Removal of films, dirt or deposits on the membrane/junction:- Protein Soak in Hanna HI 7073 or HI 8073 Protein Clean-ing Solution for 15 minutes.- Inorganic Soak in Hanna HI 7074 or HI 8074 Inorganic Clean-ing Solution for 15 minutes.- Oil/grease Rinse with Hanna HI 7077 or HI 8077 Oil and FatCleaning Solution.IMPORTANT: After performing any of the cleaning procedures rinse the electrode thoroughly with distilled water, refill the refer-ence chamber with fresh electrolyte (not necessary for gel-filled electrodes) and soak the electrode in HI 70300 or HI 80300Storage Solution for at least 1 hour before taking measurements.TROUBLESHOOTINGEvaluate your electrode performance based on the following.•Noise (Readings fluctuate up and down) could be due to:– Clogged/Dirty Junction: Refer to the Cleaning Procedure above.– Loss of shielding due to low electrolyte level (in refillable electrodes only): refill with fresh HI 7071 or HI 8071 for single junction or HI 7082 or HI 8082 for double junction electrodes.•Dry Membrane/Junction: Soak in HI 70300 or HI 80300Storage Solution for at least 1 hour.•Drifting: Soak the electrode tip in warm (approx. 50-60C)Hanna HI 7082 or HI 8082 Solutions for one hour and rinse the tip with distilled water. Refill with fresh HI 7071 or HI 8071 for single junction electrodes and HI 7082 or HI 8082for double junction electrodes (refillable electrodes only).•Low Slope: Refer to the cleaning procedure above.•No Slope: Check the electrode for cracks in glass stem or bulb and replace the electrode.•Slow Response/Excessive Drift: Soak the tip in HI 7061 or HI 8061 Solutions for 30 minutes, rinse thoroughly in distilled water and then follow the Cleaning Procedure above.。
PH计使用步骤
1.插上电源,按下开机键
2.取下电极保护套,双蒸水冲洗电极,纸巾擦干
3.仪器的校正:
A.按校准键,显示cal1,将电极插入PH=7.0校准液,片刻后显示“√”,按读数,双蒸水冲洗电极,擦干;
B.若待测溶液为酸性,按校准键,显示cal2,将电极插入PH=4.00校准液,片刻后显示“√”,按读数;
若待测溶液为碱性,按校准键,显示cal2,将电极插入PH=9.18校准液,片刻后显示“√”,按读数;
校准完毕。
4.测试待测液:
A.双蒸水冲洗电极,纸巾擦干
B.将电极浸入被测溶液中,片刻后待显示屏上出现“√”,按读数键,读取PH值
C.测量完毕后,双蒸水冲洗电极,纸巾擦干,将电极放入充有保护液的电极套中
5.长按开机键关闭机器,拔出插头。
PS:电极保护液,PH=4.0、PH=9.18、PH=7.00和PH=6.98的校准液存放在大实验室透明双开门4度冰箱,右边最下面一层橙色架子上。