SSH无密码认证(密钥)配置
- 格式:docx
- 大小:17.90 KB
- 文档页数:2

Linux配置SSH免密登录“ssh-keygen”的基本⽤法⽬录1 什么是SSH2 配置SSH免密登录2.1 安装必需的软件2.2 ssh-keygen创建公钥-私钥对2.3 ssh-copy-id把A的公钥发送给B2.4 在A服务器上免密登录B服务器3 扩展说明3.2 ⽂件权限3.3 ⽂件的编辑和查看1 什么是SSH引⽤百度百科的说明:SSH 为 Secure Shell的缩写,由 IETF 的⽹络⼩组(Network Working Group)所制定;它是建⽴在应⽤层基础上的安全协议。
SSH 是⽬前较可靠,专为远程登录会话和其他⽹络服务提供安全性的协议。
利⽤ SSH 协议可以有效防⽌远程管理过程中的信息泄露问题。
SSH最初是UNIX系统上的⼀个程序,后来⼜迅速扩展到其他操作平台。
为了在不同平台/⽹络主机之间的通信安全, 很多时候我们都要通过ssh进⾏认证. ssh认证⽅式主要有2种:①基于⼝令的安全认证: 每次登录的时候都要输⼊⽤户名和密码, 由于要在⽹络上传输密码, 可能存在中间⼈攻击的风险;②基于密钥的安全认证: 配置完成后就可以实现免密登录, 这种⽅式更加安全 —— 不需要在⽹络上传递⼝令, 只需要传输⼀次公钥. 常见的git的ssh⽅式就是通过公钥进⾏认证的.2 配置SSH免密登录说明: 这⾥演⽰所⽤的服务器操作系统是Cent OS 7. 我们的⽬标是:A服务器(172.16.22.131) 能免密登录 B服务器 (172.16.22.132).注意: ssh连接是单向的, A能免密登录B, 并不能同时实现B能免密登录A.2.1 安装必需的软件在操作之前, 先确保所需要的软件已经正常安装.这⾥我们需要安装ssh-keygen和ssh-copy-id, 安装⽅式如下:# 安装ssh-keygen, 需要确保服务器可以联⽹. 博主这⾥已经安装完成, 所以没有做任何事.[root@localhost ~]# yum install -y ssh-keygenLoaded plugins: fastestmirror, langpacksbase | 3.6 kB 00:00:00epel | 3.6 kB 00:00:00extras | 2.9 kB 00:00:00updates | 2.9 kB 00:00:00Loading mirror speeds from cached hostfileNo package ssh-keygen available.Error: Nothing to do# 安装ssh-copy-id[root@localhost ~]# yum install -y ssh-copy-idLoaded plugins: fastestmirror, langpacksLoading mirror speeds from cached hostfileNo package ssh-copy-id available.Error: Nothing to do2.2 ssh-keygen创建公钥-私钥对(1) 在指定⽬录下⽣成rsa密钥, 并指定注释为“shoufeng”, 实现⽰例:[root@localhost ~]# ssh-keygen -t rsa -f ~/.ssh/id_rsa -C "shoufeng"# ~密钥类型 ~密钥⽂件路径及名称 ~ 备注信息Generating public/private rsa key pair.Enter passphrase (empty for no passphrase): # 输⼊密码, 若不输⼊则直接回车Enter same passphrase again: # 再次确认密码, 若不输⼊则直接回车Your identification has been saved in /root/.ssh/id_rsa.Your public key has been saved in /root/.ssh/id_rsa.pub.The key fingerprint is:9a:e3:94:b9:69:c8:e9:68:4b:dc:fa:43:25:7f:53:f1 shoufengThe key's randomart image is:+--[ RSA 2048]----+| || . || o || . . . E || + S. || . .. .=o || oo.oB. . || ..o=o.+ || .++oo+ |+-----------------+注意: 密钥的⽂件名称必须是id_xxx, 这⾥的xxx就是-t参数指定的密钥类型. ⽐如密钥类型是rsa, 那么密钥⽂件名就必须是id_rsa.(2) ssh-keygen常⽤参数说明:-t: 密钥类型, 可以选择 dsa | ecdsa | ed25519 | rsa;-f: 密钥⽬录位置, 默认为当前⽤户home路径下的.ssh隐藏⽬录, 也就是~/.ssh/, 同时默认密钥⽂件名以id_rsa开头. 如果是root⽤户, 则在/root/.ssh/id_rsa, 若为其他⽤户, 则在/home/username/.ssh/id_rsa; -C: 指定此密钥的备注信息, 需要配置多个免密登录时, 建议携带;-N: 指定此密钥对的密码, 如果指定此参数, 则命令执⾏过程中就不会出现交互确认密码的信息了.举例说明: 同时指定⽬录位置、密码、注释信息, 就不需要输⼊回车键即可完成创建:ssh-keygen -t rsa -f ~/.ssh/id_rsa -N shoufeng -C shoufeng(3) 前往~/.ssh/⽬录下查看⽣成的⽂件:# ⽣成的⽂件以test_rsa开头, test_rsa是私钥, test_rsa.pub是公钥:[root@localhost .ssh]# lstest_rsa test_rsa.pub# 通过cat命令查看公钥⽂件:[root@localhost .ssh]# cat id_rsa.pubssh-rsa AAAAB3NzaC1yc2EAAAADAQABAAABAQC2JpLMqgeg9jB9ZztOCw0WMS8hdVpFxthqG1vOQTOji/cp0+8RUZl3P6NtzqfHbs0iTcY0ypIJGgx4eXyipfLvilV2bSxRINCVV73VnydVYl5gLHsrgOx+372Wovlanq7Mxq06qAONjuRD0c64xqdJFKb1Ov# 可以看到最后有⼀个注释内容shoufeng2.3 ssh-copy-id把A的公钥发送给B默认⽤法是: ssh-copy-id root@172.16.22.132, ssh-copy-id命令连接远程服务器时的默认端⼝是22, 当然可以指定⽂件、远程主机的IP、⽤户和端⼝:# 指定要拷贝的本地⽂件、远程主机的IP+⽤户名+端⼝号:[root@localhost .ssh]# ssh-copy-id -i ~/.ssh/id_rsa.pub -p 22 root@172.16.22.132/usr/bin/ssh-copy-id: INFO: attempting to log in with the new key(s), to filter out any that are already installed/usr/bin/ssh-copy-id: INFO: 1 key(s) remain to be installed -- if you are prompted now it is to install the new keysroot@172.16.22.132's password: # 输⼊密码后, 将拷贝公钥Number of key(s) added: 1Now try logging into the machine, with: "ssh -p '22' 'root@172.16.22.132'"and check to make sure that only the key(s) you wanted were added.2.4 在A服务器上免密登录B服务器[root@localhost .ssh]# ssh root@172.16.22.132Last login: Fri Jun 14 08:46:04 2019 from 192.168.34.16 # 登录成功3 扩展说明3.1 其他⽅式发送公钥⽂件上述2.3步骤是通过ssh-copy-id⼯具发送公钥⽂件的, 当然我们也可以通过其他⽅式实现:(1) 将A的公钥⽂件发给B:通过scp命令将A服务器的公钥⽂件发送到B服务器的⽤户⽬录下, 因为还没有配置成功免密登录, 所以期间需要输⼊B服务器对应⽤户的密码:[root@localhost .ssh]# scp id_rsa.pub root@172.16.22.132:/root/.sshroot@172.16.22.132's password:id_rsa.pub 100% 390 0.4KB/s 00:00(2) 在B上创建authorized_keys⽂件:[root@localhost .ssh]# cd /root/.ssh/[root@localhost .ssh]# lsid_rsa.pub# 通过A服务器的公钥⽣成"authorized_keys"⽂件:[root@localhost .ssh]# cat id_rsa.pub >> authorized_keys[root@localhost .ssh]# cat authorized_keysssh-rsa AAAAB3NzaC1yc2EAAAADAQABAAABAQC2JpLMqgeg9jB9ZztOCw0WMS8hdVpFxthqG1vOQTOji/cp0+8RUZl3P6NtzqfHbs0iTcY0ypIJGgx4eXyipfLvilV2bSxRINCVV73VnydVYl5gLHsrgOx+372Wovlanq7Mxq06qAONjuRD0c64xqdJFKb1OvS/nyKaOr9注意: 上述重定向时使⽤>>进⾏追加, 不要⽤>, 那会清空原有内容.3.2 ⽂件权限为了让私钥⽂件和公钥⽂件能够在认证中起作⽤, 需要确保权限的正确性:①对于.ssh⽬录以及其内部的公钥、私钥⽂件, 当前⽤户⾄少要有执⾏权限, 其他⽤户最多只能有执⾏权限.②不要图省事设置成777权限: 太⼤的权限不安全, ⽽且数字签名也不⽀持这种权限策略.③对普通⽤户, 建议设置成600权限: chmod 600 authorized_keys id_rsa id_rsa.pub;④对root⽤户, 建议设置成644权限: chmod 644 authorized_keys id_rsa id_rsa.pub.3.3 ⽂件的编辑和查看在Liunx环境下, 如果要查看、复制私钥、公钥, 以及authorized_keys等⽂件, 不要使⽤vim等编辑器打开, 因为它会产⽣不必要的回车;应该通过cat、more、less等查看命令把内容打印到终端上, 再作查看、复制等操作.总结以上所述是⼩编给⼤家介绍的Linux 配置SSH免密登录 “ssh-keygen”的基本⽤法 ,希望对⼤家有所帮助,如果⼤家有任何疑问请给我留⾔,⼩编会及时回复⼤家的。

设置ssh⽆密码登录linux服务器的⽅法每次登录测试服务器,ssh登录总是需要输⼊密码。
登录的少还⾏,登录的多了,多⼀⾏命令都是多余的。
rsa认证登录⽅式制作密钥对在客户端(本地机器)终端下输⼊以下命令ssh-keygen -t [rsa|dsa]rsa和dsa代表不同的算法例如:ssh-keygen -t rsa⼀直回车就对了(不⽤设置密码)将会⽣成密钥⽂件和私钥⽂件 id_rsa,id_rsa.pub(如果⽤dsa则⽣成id_dsa,id_dsa.pub)⽣成位置在/root/.ssh/⽂件夹下(我⽤的是root⽤户所以在root下,⽣成过程会有提⽰⽂件位置).ssh 是隐藏⽂件夹使⽤ ls -a查看将公钥放到服务器指定位置⽅法⼀、直接复制1、将公钥复制到服务器的root⽤户下的.ssh⽂件夹(⽤哪个⽤户登录就复制到哪个⽤户下的.ssh⽂件夹下)scp /root/.ssh/id_rsa.pub root@172.16.0.164:/root/.ssh/2、安装公钥登录到服务器cd /root/.ssh/cat id_rsa.pub >> authorized_keys⽅法⼆、使⽤ssh-copy-id命令复制(推荐)⼀个命令直接就ok了ssh-copy-id root@172.16.0.164验证不⽤输⼊密码则成功,否则失败ssh root@172.16.0.164注意事项上⾯操作测试过是没有问题的linux的版本和使⽤的⽤户不同会有差别的。
如果出现问题可以考虑以下两点1、id_rsa.pub和authorized_keys的⽂件权限问题chmod 600 authorized_keyschmod 700 ~/.ssh2、ssh的配置⽂件vim /etc/ssh/sshd_config#启⽤ RSA 认证,默认为yesRSAAuthentication yes启⽤公钥认证,默认为yesPubkeyAuthentication yes#root⽤户ssh登录PermitRootLogin yes(这些配置我都是没有修改的,我的是redhat7.2)⾃定义写个简单shell脚本在常⽤⽂件夹下创建个⽂件touch 164.sh编辑⽂件⽂件内容 ssh root@172.16.0.164vim 164.sh#添加内容ssh root@172.16.0.164保存退出:wq增加⽤户的执⾏权限chmod u+x 164.sh搞定结合tab键使⽤更爽哟./164.shexpect命令免密登录⽅式可能你觉得需要操作服务器系统不好,当然也可以只在本地操作。
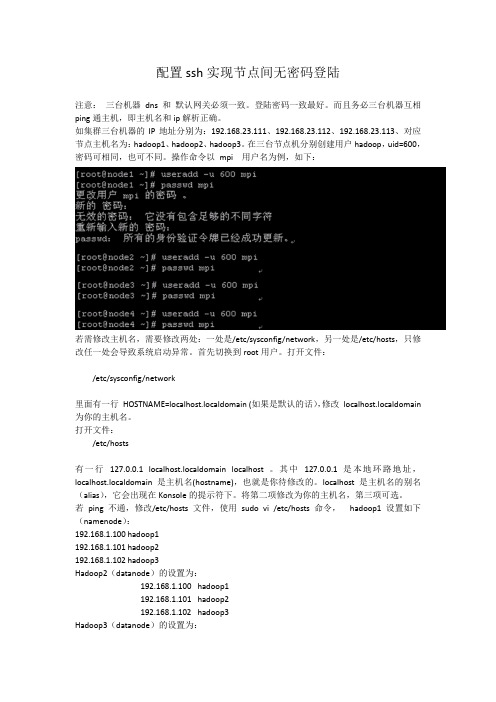
配置ssh实现节点间无密码登陆注意:三台机器dns 和默认网关必须一致。
登陆密码一致最好。
而且务必三台机器互相ping通主机,即主机名和ip解析正确。
如集群三台机器的IP地址分别为:192.168.23.111、192.168.23.112、192.168.23.113、对应节点主机名为:hadoop1、hadoop2、hadoop3。
在三台节点机分别创建用户hadoop,uid=600,密码可相同,也可不同。
操作命令以mpi 用户名为例,如下:若需修改主机名,需要修改两处:一处是/etc/sysconfig/network,另一处是/etc/hosts,只修改任一处会导致系统启动异常。
首先切换到root用户。
打开文件:/etc/sysconfig/network里面有一行HOSTNAME=localhost.localdomain (如果是默认的话),修改localhost.localdomain 为你的主机名。
打开文件:/etc/hosts有一行127.0.0.1 localhost.localdomain localhost 。
其中127.0.0.1 是本地环路地址,localhost.localdomain 是主机名(hostname),也就是你待修改的。
localhost 是主机名的别名(alias),它会出现在Konsole的提示符下。
将第二项修改为你的主机名,第三项可选。
若ping不通,修改/etc/hosts文件,使用sudo vi /etc/hosts命令,hadoop1设置如下(namenode):192.168.1.100 hadoop1192.168.1.101 hadoop2192.168.1.102 hadoop3Hadoop2(datanode)的设置为:192.168.1.100 hadoop1192.168.1.101 hadoop2192.168.1.102 hadoop3Hadoop3(datanode)的设置为:192.168.1.100 hadoop1192.168.1.101 hadoop2192.168.1.102 hadoop3本集群将namenode和jobtracker 设置成一台机器即hadoop1。

SSH三步解决免密登录
SSH 三步解决免密登录
•1.客户端生成公私钥
•2.上传公钥到服务器
•3.测试免密登录
1.客户端生成公私钥
本地客户端生成公私钥:(一路回车默认即可)
ssh-keygen
上面这个命令会在用户目录.ssh文件夹下创建公私钥
cd ~/.ssh
ls
下创建两个密钥:
1.id_rsa (私钥)
2.id_rsa.pub (公钥)
2.上传公钥到服务器
这里测试用的服务器地址为:192.168.235.22
用户为:root
ssh-copy-id-i~/.ssh/**********************.235.22上面这条命令是写到服务器上的ssh目录下去了
cd ~/.ssh
vim authorized_keys
可以看到客户端写入到服务器的 id_rsa.pub (公钥)内容。
3.测试免密登录
客户端通过ssh连接远程服务器,就可以免密登录了。
***************.235.22。


ssh免密登录配置(配置后还需要密码输⼊密码问题解决)背景需要搭建jenkins,⽤来⾃动部署服务到⽬标服务器,所以需要在jenkins所在机器配置免密登录⽬标服务器环境阿⾥云服务器:服务器A(jenkins所在服务器),服务器B(部署⽬标服务器)步骤⼀服务器A部分1 登录A,2 ⽣成秘钥1)⾸先查看.ssh下是否已经有id_rsa和id_rsa.pub⽂件,以免被覆盖2)⽣成秘钥ssh-keygen -t rsa -C "xxx@jenkins"3)将在.ssh⽂件夹下⽣成2个⽂件 id_rsa, id_rsa.pub,重命名为 id_rsa_jenkins,id_rsa_jenkins.pub 以免以后冲突3 配置config 在~/.ssh 下创建config⽂件Host pre1HostName xx.xx.xx.xxHost pre2HostName xx.xx.xx.xxHost *User 登录⽬标机器的⽤户Port 登录⽬标机器的端⼝IdentityFile ~/.ssh/id_rsa_jenkins 私钥所在路径 由于⽤户,端⼝号,秘钥,都是通⽤的,所以以通配符来配置,只有服务器地址不同,每个⽬标服务器单独配置4 拷贝id_rsa_jenkins.pub 内的内容⼆服务器B部分1 使⽤要免密登录的账户登录服务器B2 在~/.ssh⽂件夹下查看是否有 authorized_keys 没有则创建3 将id_rsa_jenkins.pub的内容,追加到authorized_keys后⾯4 查看 /ect/ssh/sshd_config 需要有如下配置RSAAuthentication yesPubkeyAuthentication yesAuthorizedKeysFile %h/.ssh/authorized_keys5 切换到root⽤户重启 sshd : service sshd restart结果在服务器A ssh pre1结果还让输⼊密码,⼀定是我哪⾥配置的不对,查找问题解决问题开两个窗⼝,分别登录服务器A和B服务器B:1 登录root⽤户2 停⽌ssh service ssh stop3 debug运⾏ssh /usr/sbin/sshd -d服务器A:尝试ssh : ssh -v pre1 查看详情服务器A⽇志:OpenSSH_7.6p1 Ubuntu-4ubuntu0.4, OpenSSL 1.0.2n 7 Dec 2017debug1: Reading configuration data /var/lib/jenkins/.ssh/configdebug1: /var/lib/jenkins/.ssh/config line 5: Applying options for pre1debug1: /var/lib/jenkins/.ssh/config line 8: Applying options for *debug1: Reading configuration data /etc/ssh/ssh_configdebug1: /etc/ssh/ssh_config line 19: Applying options for *debug1: Connecting to **.**.**.** [**.**.**.**] port ****.debug1: Connection established.debug1: identity file /var/lib/jenkins/.ssh/id_rsa_jenkins type0debug1: key_load_public: No such file or directorydebug1: identity file /var/lib/jenkins/.ssh/id_rsa_jenkins-cert type -1debug1: Local version string SSH-2.0-OpenSSH_7.6p1 Ubuntu-4ubuntu0.4debug1: Remote protocol version 2.0, remote software version OpenSSH_7.2p2 Ubuntu-4ubuntu2.4debug1: match: OpenSSH_7.2p2 Ubuntu-4ubuntu2.4 pat OpenSSH* compat 0x04000000debug1: Authenticating to **.**.**.**:**** as 'username'debug1: SSH2_MSG_KEXINIT sentdebug1: SSH2_MSG_KEXINIT receiveddebug1: kex: algorithm: curve25519-sha256@debug1: kex: host key algorithm: ecdsa-sha2-nistp256debug1: kex: server->client cipher: chacha20-poly1305@ MAC: <implicit> compression: nonedebug1: kex: client->server cipher: chacha20-poly1305@ MAC: <implicit> compression: nonedebug1: expecting SSH2_MSG_KEX_ECDH_REPLYdebug1: Server host key: ecdsa-sha2-nistp256 SHA256:+/jjmuxy3eZ61XEguY2327fz7OfrhIks1edgLK3AnWYdebug1: Host '[**.**.**.**]:****' is known and matches the ECDSA host key.debug1: Found key in /var/lib/jenkins/.ssh/known_hosts:4debug1: rekey after 134217728 blocksdebug1: SSH2_MSG_NEWKEYS sentdebug1: expecting SSH2_MSG_NEWKEYSdebug1: SSH2_MSG_NEWKEYS receiveddebug1: rekey after 134217728 blocksdebug1: SSH2_MSG_EXT_INFO receiveddebug1: kex_input_ext_info: server-sig-algs=<rsa-sha2-256,rsa-sha2-512>debug1: SSH2_MSG_SERVICE_ACCEPT receiveddebug1: Authentications that can continue: publickey,passworddebug1: Next authentication method: publickeydebug1: Offering public key: RSA SHA256:XS0Qkck+0F5M0iJdLn3/owfK9QGxPSQxRoYcCGcb9zQ /var/lib/jenkins/.ssh/id_rsa_jenkinsdebug1: Authentications that can continue: publickey,passworddebug1: Next authentication method: password发现在登录过程中,尝试证书认证,但是没有认证通过,改为密码登录,于是查看服务器B⽇志,看看因为什么导致证书认证错误服务器B⽇志debug1: sshd version OpenSSH_7.2, OpenSSL 1.0.2g 1 Mar 2016debug1: private host key #0: ssh-rsa SHA256:FdwiwpgHBW6MTxKJSkVYbtYS/H/kYr+o6JAoFjzOrY8debug1: private host key #1: ssh-dss SHA256:thpjst+JHWAjnRyEDtOjWeVNO7JFl5K2FETPSLU5hcgdebug1: private host key #2: ecdsa-sha2-nistp256 SHA256:+/jjmuxy3eZ61XEguY2327fz7OfrhIks1edgLK3AnWYdebug1: private host key #3: ssh-ed25519 SHA256:9X0yrjSoRLi/AM/oyozk3Sgd+G0JoDyJbIZFv1rt1Rgdebug1: rexec_argv[0]='/usr/sbin/sshd'debug1: rexec_argv[1]='-d'debug1: Set /proc/self/oom_score_adj from 0 to -1000debug1: Bind to port **** on 0.0.0.0.Server listening on 0.0.0.0 port ****.debug1: Server will not fork when running in debugging mode.debug1: rexec start in4 out 4 newsock 4 pipe -1 sock 7debug1: inetd sockets after dupping: 3, 3Connection from **.**.**.** port **** on **.**.**.** port ****debug1: Client protocol version 2.0; client software version OpenSSH_7.6p1 Ubuntu-4ubuntu0.4debug1: match: OpenSSH_7.6p1 Ubuntu-4ubuntu0.4 pat OpenSSH* compat 0x04000000debug1: Enabling compatibility mode for protocol 2.0debug1: Local version string SSH-2.0-OpenSSH_7.2p2 Ubuntu-4ubuntu2.4debug1: permanently_set_uid: 109/65534 [preauth]debug1: list_hostkey_types: ssh-rsa,rsa-sha2-512,rsa-sha2-256,ecdsa-sha2-nistp256,ssh-ed25519 [preauth]debug1: SSH2_MSG_KEXINIT sent [preauth]debug1: SSH2_MSG_KEXINIT received [preauth]debug1: kex: algorithm: curve25519-sha256@ [preauth]debug1: kex: host key algorithm: ecdsa-sha2-nistp256 [preauth]debug1: kex: client->server cipher: chacha20-poly1305@ MAC: <implicit> compression: none [preauth]debug1: kex: server->client cipher: chacha20-poly1305@ MAC: <implicit> compression: none [preauth]debug1: expecting SSH2_MSG_KEX_ECDH_INIT [preauth]debug1: rekey after 134217728 blocks [preauth]debug1: SSH2_MSG_NEWKEYS sent [preauth]debug1: expecting SSH2_MSG_NEWKEYS [preauth]debug1: rekey after 134217728 blocks [preauth]debug1: SSH2_MSG_NEWKEYS received [preauth]debug1: KEX done [preauth]debug1: userauth-request for user username service ssh-connection method none [preauth]debug1: attempt 0 failures 0 [preauth]debug1: PAM: initializing for"username"debug1: PAM: setting PAM_RHOST to "**.**.**.**"debug1: PAM: setting PAM_TTY to "ssh"debug1: userauth-request for user username service ssh-connection method publickey [preauth]debug1: attempt 1 failures 0 [preauth]debug1: userauth_pubkey: test whether pkalg/pkblob are acceptable for RSA SHA256:XS0Qkck+0F5M0iJdLn3/owfK9QGxPSQxRoYcCGcb9zQ [preauth] debug1: temporarily_use_uid: 1000/1000 (e=0/0)debug1: trying public key file /home/username/.ssh/authorized_keysdebug1: fd 4 clearing O_NONBLOCKAuthentication refused: bad ownership or modes for directory /home/usernamedebug1: restore_uid: 0/0Failed publickey for username from **.**.**.** port **** ssh2: RSA SHA256:XS0Qkck+0F5M0iJdLn3/owfK9QGxPSQxRoYcCGcb9zQConnection closed by **.**.**.** port **** [preauth]debug1: do_cleanup [preauth]debug1: monitor_read_log: child log fd closeddebug1: do_cleanupdebug1: PAM: cleanupdebug1: Killing privsep child 17849debug1: audit_event: unhandled event 12核⼼部分, /home/username ⽤户⽂件夹权限不对,修改为700 :chmod 700 /home/username再来⼀遍⼜出现了Authentication refused: bad ownership or modes for directory /home/username/.ssh改为700再来⼀遍链接成功最后提醒,解决完了千万别忘记将服务器B的ssh再启动起来最后提醒,解决完了千万别忘记将服务器B的ssh再启动起来最后提醒,解决完了千万别忘记将服务器B的ssh再启动起来。
章节一:密钥认证配置一、生成密钥对1、用SecurtCRT创建密钥对1)2)3)可不输入密码,否则登陆时需每次输入密码4)生成密钥对,选择存放路径2、用linux或unix创建密钥对1)ssh-keygen –t rsa二、服务器配置1、新建用户1)useradd -md /home/longtongbin longtb2、新建.ssh目录,更改所有者和权限1)cd /home/longtb2)mkdir .ssh3)chown longtb:users .ssh3、新建authorized_keys文件,复制.pub文件内容添加至该文件末,更改所有者和权限1)cd .ssh2)vi authorized_keys3)chown longtb:users authorized_keys #注:一般600或644,读写权限很重要!三、客户端连接配置1、SecurtCRT新建ssh连接1)可取消password认证2)选择publicKey,属性3)选择Use session public key setting,key的位置仅对当前用户有效;避免与全局key冲突,当然如果所有认证都共用一个key对,可选择Use globle public key setting4)点OK后即可连接用刚创建的key对ssh连接管理服务器了。
2、Linux或unix服务器建立ssh连接1)ssh user@serverip #若以当前用户连接,可直接ssh serverip章节2:配置sft(设定chroot)前提:完成访问用户的密钥认证配置目标:1.longtb用户可以sftp连接服务器但锁定其连接目录,禁止ssh登录2.访问的目录可以不是用户家路径,可为任意路径要点:1、用户默认shell禁止登陆需设置用户shell为:/usr/sbin/nologin2、Sftp访问目录要求1)不能是链接目录文件2)访问的根目录属主需是root3)访问根目录及对应的其上级实际目录属主为root4)访问根目录及对应的其上级实际目录属组可不变3、Ssh配置文件配置1)启用internal –sftp2)匹配用户,并指定chroot路径4、Ssh服务重启重启sshd服务以使得对sshd的配置文件所做配置生效配置示例1:访问目录:/home/longtb一、更改用户shell,禁止用户登录1、root登录2、chsh -s /usr/sbin/nologin longtb二、更改sftp访问根目录及对应的其上级实际目录属主为root,属组可不变1、root登录2、chown root:longtb /home/longtb #根目录3、chown root:longtb /home #根目录对应的上级目录三、修改sshd配置文件1、root用户登录2、vi /etc/ssh/sshd_config3、#Subsystem sftp /usr/libexec/sftp-serverSubsystem sftp internal-sftp4、Match User longtbChrootDirectory /home/longtbX11Forwarding noAllowTcpForwarding noForceCommand internal-sftp5、/etc/rc.d/sshd restart配置示例2:访问目录:/logs/out/dana/jsreport一、更改用户shell,禁止用户登录1、root登录2、chsh -s /usr/sbin/nologin longtb二、更改sftp访问根目录及对应的其上级实际目录属主为root,属组可不变1、root登录2、chown root:wheel /logs/out/dana/jsreport #根目录3、chown root: wheel /logs/out/dana #根目录对应的上级目录4、chown root: wheel /logs/out #根目录对应的上级目录5、chown root: wheel /logs #根目录对应的上级目录三、修改sshd配置文件1、root用户登录2、vi /etc/ssh/sshd_config3、#Subsystem sftp /usr/libexec/sftp-serverSubsystem sftp internal-sftp #若之前已做配置,此处不做变动4、Match User longtbChrootDirectory /logs/out/dana/jsreportX11Forwarding noAllowTcpForwarding noForceCommand internal-sftp5、/etc/rc.d/sshd restart说明:1.以上sftp配置基于FreeBSD系统,linux系统的sftp配置基本类似2.区别主要在:1)创建系统用户和组时的操作命令不同Linux是:groupadd longtbuseradd -g longtb -d /home/longtb longtb2)Sshd重启命令不同。
服务器间通过ssh使用密钥对实现无密码登录solaris,redhat,linux受flutter的启发,把bigadmin上的文档完善并简化一下,非常简单。
E文原址:/bigadmin/content/submitted/ssh_setting.html 关键词:ssh 密钥无密码登录信任关系以下做法在solaris 10 u5,redhat as 5.0上测试通过。
2008.07.24更新.【概述】如果你(A机)想无密码ssh登录别的机器(B机),只需要完成3个步骤:1.A机生成密钥对2.把公钥传给B机3.B机对A机的公钥授权哥们,看帖要推荐啊,点这里hosta和hostb都必须同步完成以下操作,以hosta为例提示:如果没有.ssh目录可用ssh命令远程登录一下任意机器再退出即可,或者手工创建一个:mkdir .ssh;chmod 755 .ssh注意,如果按下列步骤完成后,ssh依然需要输入密码,那么请设置.ssh目录权限为755,authorized_keys*的权限为600================================================ ================1、创建密钥对,两台都做[root@hosta /]# who am iroot pts/1 2008-04-30 12:08 (172.16.10.220)[root@hosta /]# cd ~/.ssh ----------------------没有这个目录的话,你随便ssh登录一下其他机器,就有了[root@hosta .ssh]# ssh-keygen -t dsaGenerating public/private dsa key pair.Enter file in which to save the key (/root/.ssh/id_dsa):Enter passphrase (empty for no passphrase):Enter same passphrase again:Your identification has been saved in /root/.ssh/id_dsa. -------私钥名一定要叫id_dsaYour public key has been saved in /root/.ssh/id_dsa.pub.The key fingerprint is:0a:13:25:19:a2:59:2c:b1:49:e6:62:90:57:07:e5:f7 root@hostapassphrase(密钥保护) 保留为空,否则使用ssh时将要求输入passphrase(密钥保护)2、发布公钥和获取公钥[root@hosta .ssh]# scp id_dsa.pub hostb:/root/.ssh/hosta.key.pubroot@hostb's password:id_dsa.pub 100% 600 0.6KB/s 00:00[root@hosta .ssh]# scp hostb:/root/.ssh/id_dsa.pub /root/.ssh/hostb.key.pubroot@hostb's password:id_dsa.pub 100% 600 0.6KB/s 00:003、对公钥授权两台都做[root@hostb .ssh]# cat hosta.key.pub >>authorized_keys2-----对A机公钥授权,A机用私钥来登录B机[root@hostb .ssh]# cat id_dsa.pub >>authorized_keys2-----可选项,本机登录本机,可不配置如果是ssh v1版本,比如solaris 9,就使用authorized_keys文件4、使用密钥对登录[root@hosta .ssh]# ssh hostbLast login: Sun Apr 27 00:04:49 2008 from 172.16.10.220已经不用输入密码:" />:" />lol[root@hostb ~]# exitlogoutConnection to hostb closed.5、查看日志[root@hosta .ssh]# more /var/log/secureApr 27 10:26:47 hosta sshd[9309]: Accepted password for root from 172.16.10.220 port 2395 ssh2Apr 27 10:26:47 hosta sshd[9309]: pam_unix(sshd:session): session opened for user root by (uid=0)Apr 27 10:41:51 hosta sshd[12195]: Accepted password for root from 172.16.10.220 port 2408 ssh2Apr 27 10:41:51 hosta sshd[12195]: pam_unix(sshd:session): session opened for user rootby (uid=0)Apr 27 12:42:15 hosta sshd[3331]: pam_unix(sshd:session): session closed for user rootApr 27 13:08:32 hosta sshd[26563]: Accepted password for root from 172.16.10.2 port 43247 ssh2Apr 27 13:08:32 hosta sshd[26563]: pam_unix(sshd:session): session opened for user rootby (uid=0)Apr 27 13:08:33 hosta sshd[26563]: pam_unix(sshd:session): session closed for user rootApr 27 13:08:52 hosta sshd[26607]: Accepted password for root from 172.16.10.2 port 43248 ssh2Apr 27 13:08:52 hosta sshd[26607]: pam_unix(sshd:session): session opened for user rootby (uid=0)Apr 27 13:08:52 hosta sshd[26607]: pam_unix(sshd:session): session closed for user rootApr 27 13:09:15 hosta sshd[26658]: Accepted password for root from 172.16.10.2 port 43249 ssh2Apr 27 13:09:15 hosta sshd[26658]: pam_unix(sshd:session): session opened for user rootby (uid=0)Apr 27 13:09:15 hosta sshd[26658]: pam_unix(sshd:session): session closed for user rootApr 27 13:09:25 hosta sshd[26689]: Accepted password for root from 172.16.10.2 port 43250 ssh2Apr 27 13:09:25 hosta sshd[26689]: pam_unix(sshd:session): session opened for user rootby (uid=0)Apr 27 13:09:25 hosta sshd[26689]: pam_unix(sshd:session): session closed for user rootApr 27 13:51:27 hosta sshd[29770]: Accepted password for root from 172.16.10.220 port 4248 ssh2Apr 27 13:51:27 hosta sshd[29770]: pam_unix(sshd:session): session opened for user root by (uid=0)Apr 27 13:53:54 hosta sshd[29770]: pam_unix(sshd:session): session closed for user rootApr 27 15:13:48 hosta sshd[9309]: pam_unix(sshd:session): session closed for user rootApr 27 15:22:20 hosta sshd[12195]: pam_unix(sshd:session): session closedfor user rootApr 27 23:37:48 hosta sshd[7798]: Accepted password for root from 172.16.10.220 port 4948 ssh2Apr 27 23:37:48 hosta sshd[7798]: pam_unix(sshd:session): session opened for user root by (uid=0)Apr 28 04:30:58 hosta sshd[7798]: pam_unix(sshd:session): session closed for user rootApr 30 12:08:32 hosta sshd[15039]: Accepted password for root from 172.16.10.220 port 1637 ssh2Apr 30 12:08:32 hosta sshd[15039]: pam_unix(sshd:session): session opened for user root by (uid=0)Apr 30 12:11:05 hosta useradd[15282]: new group: name=mysql, GID=503 Apr 30 12:11:05 hosta useradd[15282]: new user: name=mysql, UID=503, GID=503, home=/home/mysql, shell=/bin/bashApr 30 12:22:18 hosta sshd[16164]: Accepted password for root from 172.16.10.2 port 47224 ssh2Apr 30 12:22:18 hosta sshd[16164]: pam_unix(sshd:session): session opened for user root by (uid=0)Apr 30 12:22:18 hosta sshd[16164]: pam_unix(sshd:session): session closed for user root6、查看ssh的详细操作记录(ssh -v, scp -v or sftp -v ...)[root@hosta .ssh]# scp -v /root/install.log hostb:/rootExecuting: program /usr/bin/ssh host hostb, user (unspecified), command scp -v -t /rootOpenSSH_4.3p2, OpenSSL 0.9.8b 04 May 2006debug1: Reading configuration data /etc/ssh/ssh_configdebug1: Applying options for *debug1: Connecting to hostb [172.16.10.2] port 22.debug1: Connection established.debug1: permanently_set_uid: 0/0debug1: identity file /root/.ssh/identity type -1debug1: identity file /root/.ssh/id_rsa type -1debug1: identity file /root/.ssh/id_dsa type 2debug1: Remote protocol version 2.0, remote software version OpenSSH_4.3 debug1: match: OpenSSH_4.3 pat OpenSSH*debug1: Enabling compatibility mode for protocol 2.0debug1: Local version string SSH-2.0-OpenSSH_4.3debug1: SSH2_MSG_KEXINIT sentdebug1: SSH2_MSG_KEXINIT receiveddebug1: kex: server->client aes128-cbc hmac-md5 nonedebug1: kex: client->server aes128-cbc hmac-md5 nonedebug1: SSH2_MSG_KEX_DH_GEX_REQUEST(1024<1024<8192) sent debug1: expecting SSH2_MSG_KEX_DH_GEX_GROUPdebug1: SSH2_MSG_KEX_DH_GEX_INIT sentdebug1: expecting SSH2_MSG_KEX_DH_GEX_REPLYdebug1: Host 'hostb' is known and matches the RSA host key.debug1: Found key in /root/.ssh/known_hosts:2debug1: ssh_rsa_verify: signature correctdebug1: SSH2_MSG_NEWKEYS sentdebug1: expecting SSH2_MSG_NEWKEYSdebug1: SSH2_MSG_NEWKEYS receiveddebug1: SSH2_MSG_SERVICE_REQUEST sentdebug1: SSH2_MSG_SERVICE_ACCEPT receiveddebug1: Authentications that can continue: publickey,gssapi-with-mic,passworddebug1: Next authentication method: gssapi-with-micdebug1: Unspecified GSS failure. Minor code may provide more information No credentials cache founddebug1: Unspecified GSS failure. Minor code may provide more information No credentials cache founddebug1: Unspecified GSS failure. Minor code may provide more information No credentials cache founddebug1: Next authentication method: publickeydebug1: Trying private key: /root/.ssh/identitydebug1: Trying private key: /root/.ssh/id_rsadebug1: Offering public key: /root/.ssh/id_dsadebug1: Server accepts key: pkalg ssh-dss blen 433debug1: read PEM private key done: type DSAdebug1: Authentication succeeded (publickey).debug1: channel 0: new [client-session]debug1: Entering interactive session.debug1: Sending environment.debug1: Sending env LANG = zh_CN.GB18030debug1: Sending command: scp -v -t /rootSending file modes: C0644 35582 install.logSink: C0644 35582 install.loginstall.log 100% 35KB 34.8 KB/s 00:00debug1: client_input_channel_req: channel 0 rtype exit-status reply 0debug1: channel 0: free: client-session, nchannels 1debug1: fd 0 clearing O_NONBLOCKdebug1: fd 1 clearing O_NONBLOCKdebug1: Transferred: stdin 0, stdout 0, stderr 0 bytes in 0.2 secondsdebug1: Bytes per second: stdin 0.0, stdout 0.0, stderr 0.0debug1: Exit status 0呵呵,这个我也经常做,补充一些:不只是root用户,如果两个联网的主机,test1用户在主机A1上,另一台主机A2,要想实现test1登陆A2时不用敲密码直接登陆,即建立信任关系:在A1上使用test1用户键入:ssh-keygen -t dsa然后:scp /home/test1/.ssh/id_dsa.pub A2_ip_address:/home/test1/.ssh/id_dsa.pub_b ak最后在A2上:cd /home/test1/.sshcat id_dsa.pub_bak >> authorized_keys就OK了。
设置SSH免登陆
node01通过SSH免密码登录到node02、node03
以root用户为例
1、使用root用户登录到node01机器,首先进入root用户的家目录下
cd/root
2、进入到.ssh目录下(注意.ssh是隐藏文件)
cd .ssh
3、在.ssh目录下执行如下命令生成私钥(id_rsa)和公钥文件(id_rsa.pub)
执行命令ssh-keygen -t rsa
遇到需要输入的提示一直按回车
4、执行完成会生成私钥(id_rsa)和公钥文件(id_rsa.pub)
公钥内容如下:(注意这是我自己node01机器的root用户公钥,每个人机器上的都不一样,不需要跟我的一致)
5、通过ssh-copy-id命令将node01这台机器root用户的公钥文件(id_rsa.pub)文件内容拷贝到node02和node03两台机器
ssh-copy-id -i node02
ssh-copy-id -i node03
6、在node02和node03的root用户的家目录下,进入到.ssh目录
cd /root/.ssh
在authorized_keys文件中已经添加了node01的公钥文件内容,可以和第4步node01机器生成的root用户公钥文件内容对比下,应该是一样的
6、在node01通过ssh登录到node02和node03,此时不在需要输入密码
ssh node01这样就可以直接登录到node02机器。
如何在CentOS上使用SSH密钥认证?在服务器管理和远程访问中,SSH 密钥认证是一种更安全、更便捷的方式。
相比于传统的用户名和密码认证,SSH 密钥认证提供了更高的安全性,同时也能减少输入密码的繁琐。
下面,我们将详细介绍如何在 CentOS 上使用 SSH 密钥认证。
首先,我们需要在本地计算机上生成 SSH 密钥对。
如果您使用的是Linux 或 macOS 系统,可以打开终端;如果是 Windows 系统,可以使用 PuTTYgen 等工具。
在终端中,输入以下命令来生成 SSH 密钥对:```sshkeygen t rsa b 4096```这里,“t”指定密钥类型为 RSA,“b”指定密钥长度为 4096 位。
您可以根据需要选择不同的密钥类型和长度。
接下来,系统会提示您输入一些信息,比如保存密钥的路径、是否设置密码等。
如果您不想设置密码,可以直接按回车键。
生成完成后,您将在指定的路径(通常是~/ssh 目录)下得到两个文件:id_rsa(私钥)和 id_rsapub(公钥)。
然后,我们需要将公钥上传到 CentOS 服务器上。
可以使用以下几种方式:1、如果您已经能够通过 SSH 密码登录到 CentOS 服务器,可以使用以下命令:```sshcopyid username@server_ip```将“username”替换为您在服务器上的用户名,“server_ip”替换为服务器的 IP 地址。
执行此命令后,系统会提示您输入服务器的密码,上传成功后,您就可以使用 SSH 密钥进行认证了。
2、如果无法通过 SSH 登录服务器,您可以手动将本地的公钥内容复制到服务器上。
在本地计算机上,使用以下命令查看公钥内容:```cat ~/ssh/id_rsapub```复制显示的内容。
接下来,通过其他方式(如 FTP 、SCP 等)登录到 CentOS 服务器,在服务器上创建或编辑~/ssh/authorized_keys 文件。
服务端SSH相关配置文件的修改
修改SSH的配置文件:
[root@localhost ~]# vi /etc/ssh/sshd_config
#Protocol 2,1SSH协议版本:将“#”删除,再将行末的“,1”删除,只允许SSH2方式的连接。
#ServerKeyBits 768密钥强度:将“#”删除,并将768改为1024,将ServerKey强度改为1024比特。
#PermitRootLogin yes 允许以root登录开关:将“#”删除,并将yes改为no。
修改为不允许用root进行登录。
#PasswordAuthentication yes密码方式的登录开关:将“#”删除,将yes改为no,修改后不允许密码方式的登录
#PermitEmptyPasswords no空密码登录开关:将“#”删除,不允许空密码登录。
保存并退出。
因为我们只想让SSH服务为管理系统提供方便,所以在不通过外网远程管理系统的情况下,只允许内网客户端通过SSH登录到服务器,以最大限度减少不安全因素。
设置方法如下:[root@localhost ~]# vi /etc/hosts.deny←修改屏蔽规则,在文尾添加相应行
#
# hosts.deny This file describes the names of the hosts which are
# *not* allowed to use the local INET services, as decided
# by the '/usr/sbin/tcpd' server.
#
# The portmap line is redundant, but it is left to remind you that
# the new secure portmap uses hosts.deny and hosts.allow. In particular
# you should know that NFS uses portmap!
sshd: ALL←添加这一行,屏蔽来自所有的SSH连接请求[root@localhost ~]# vi
/etc/hosts.allow←修改允许规则,在文尾添加相应行
#
# hosts.allow This file describes the names of the hosts which are
# allowed to use the local INET services, as decided
# by the '/usr/sbin/tcpd' server.
#
sshd: 192.168.0.←添加这一行,只允许来自内网的SSH连接请求
重新启动SSH服务
在修改完SSH的配置文件后,需要重新启动SSH服务才能使新的设置生效。
# /etc/rc.d/init.d/sshd restart
这时,以正常的密码的方式是无法登录服务器的。
SSH客户端公钥与私钥的建立
在客户端(linux)登录为需要建立密钥的用户,基于这个用户建立公钥与私钥。
(这里以oracle用户为例)
[root@localhost ~]# su - oracle//登录为一般用户oracle
[oracle@localhost ~]$ ssh-keygen -t rsa //建立公钥与私钥对
Enter file in which to save the key (/home/kaz/.ssh/id_rsa): //私钥的路径,这里保持默认直接回车
Created directory '/home/kaz/.ssh'
Enter passphrase (empty for no passphrase): //私钥的密码(自动登录就设为空)Enter same passphrase again: //再次输入口令
Your identification has been saved in /home/kaz/.ssh/id_rsa. //私钥
Your public key has been saved in /home/kaz/.ssh/id_rsa.pub. //公钥
The key fingerprint is:
tf:rs:e3:7s:28:59:5s:93:fe:33:84:01:cj:65:3b:8e oracle@
将客户端用户公钥导成服务端authorized_keys
copy客户端用户公钥到远程服务器的远程用户的home/.ssh目录下:
[oracle@localhost ~]$ cd ~/.ssh//进入用户SSH配置文件的目录
[oracle@localhost .ssh]$ ls -l
[oracle@localhost .ssh]$ cat ~/.ssh/id_rsa.pub >>~/.ssh/authorized_keys//将用户公钥导成uthorized_keys
[oracle@localhost .ssh]$ rm -f ~/.ssh/id_rsa.pub//删除原来的公钥文件
[oracle@localhost .ssh]$ chmod 400 ~/.ssh/authorized_keys//将新建立的公钥文件属性设置为400。