Dell Precision 7910机架式工作站-中文彩页
- 格式:pdf
- 大小:396.22 KB
- 文档页数:3

Dell Precision 7920 RackA6000 graphic card Installation GuideNotes, cautions, and warningsA NOTE indicates important information that helps you make better use of your product.A CAUTION indicates either potential damage to hardware or loss of data and tells you how to avoidA WARNING indicates a potential for property damage, personal injury, or death.© 2021 Dell Inc. or its subsidiaries. All rights reserved. Dell, EMC, and other trademarks are trademarks of Dell Inc. or its subsidiaries. Other trademarks may be trademarks of their respective owners.Chapter 1: Introduction (4)Product overview (4)Operating system (4)Chapter 2: Field service information (5)Safety instructions (5)Safety precautions (5)Electrostatic discharge—ESD protection (6)ESD field service kit (6)Transporting sensitive components (7)Recommended tools (8)Disassembly and reassembly (8)Chapter 3: Getting help and contacting Dell (15)Contents3Introduction Product overviewDell Precision 7920 Rack is a refresh to Dell Precision Rack 7910 2U Rack featuring the Intel EP Skylake processor update (PurleyPlatform). Supports incremental updates to graphics, manageability updates, security updates, other Dell end-user solutions, and client operating system options.Key features●8xPCIe slots●Supports 8x3.5 SATA/SAS drive (2.5 with adapters)●Maximum memory is 768 GB per processor.●Support Intel Xeon EP Processor including Top Bins.●Huge Performance increases with tuning for leading ISV workloads.Operating systemYour Precision 7920 Rack supports the following operating systems:●Windows 11 Pro, 64-bit●Windows 11 Pro for Workstations, 64-bit●Windows 10 Pro, 64-bit●Windows 7 Pro, 32-bit (downgradable)●Windows 7 Pro, 64-bit (downgradable)4IntroductionField service information Safety instructionsUse the following safety guidelines to protect your computer from potential damage and to ensure your personal safety. Unless otherwise noted, each procedure included in this document assumes that you have read the safety information that shipped with your computer.Before working inside your computer, read the safety information that is shipped with your/.Disconnect your computer from all power sources before opening the computer cover or panels.To avoid damaging the computer, ensure that the work surface is flat, dry, and clean.To avoid damaging the components and cards, handle them by their edges, and avoid touching theYou should only perform troubleshooting and repairs as authorized or directed by the Dell technical/regulatory_compliance.Before touching anything inside your computer, ground yourself by touching an unpainted metalWhen you disconnect a cable, pull it by its connector or its pull tab, not the cable itself. Some cablesPress and eject any installed card from the media-card reader.Exercise caution when handling Lithium-ion batteries in laptops. Swollen batteries should not be usedThe color of your computer and certain components may appear differently than shown in this document. Safety precautionsThe safety precautions chapter details the primary steps to be taken before performing any disassembly instructions.Observe the following safety precautions before you perform any installation or break/fix procedures involving disassembly or reassembly:●Turn off the system and all attached peripherals.●Disconnect the system and all attached peripherals from AC power.●Disconnect all network cables, telephone, and telecommunications lines from the system.●Use an ESD field service kit when working inside any desktop to avoid electrostatic discharge (ESD) damage.●After removing any system component, carefully place the removed component on an anti-static mat.●Wear shoes with non-conductive rubber soles to reduce the chance of getting electrocuted.Field service information5Standby powerDell products with standby power must be unplugged before you open the case. Systems that incorporate standby power are essentially powered while turned off. The internal power enables the system to be remotely turned on (wake on LAN) and suspended into a sleep mode and has other advanced power management features.Unplugging, pressing and holding the power button for 15 seconds should discharge residual power in the system board. BondingBonding is a method for connecting two or more grounding conductors to the same electrical potential. This is done throughthe use of a field service electrostatic discharge (ESD) kit. When connecting a bonding wire, ensure that it is connected to bare metal and never to a painted or non-metal surface. The wrist strap should be secure and in full contact with your skin, and ensure that you remove all jewelry such as watches, bracelets, or rings prior to bonding yourself and the equipment. Electrostatic discharge—ESD protectionESD is a major concern when you handle electronic components, especially sensitive components such as expansion cards, processors, memory DIMMs, and system boards. Very slight charges can damage circuits in ways that may not be obvious, such as intermittent problems or a shortened product life span. As the industry pushes for lower power requirements and increased density, ESD protection is an increasing concern.Due to the increased density of semiconductors used in recent Dell products, the sensitivity to static damage is now higher than in previous Dell products. For this reason, some previously approved methods of handling parts are no longer applicable.Two recognized types of ESD damage are catastrophic and intermittent failures.●Catastrophic – Catastrophic failures represent approximately 20 percent of ESD-related failures. The damage causesan immediate and complete loss of device functionality. An example of catastrophic failure is a memory DIMM that has received a static shock and immediately generates a "No POST/No Video" symptom with a beep code emitted for missing or nonfunctional memory.●Intermittent – Intermittent failures represent approximately 80 percent of ESD-related failures. The high rate ofintermittent failures means that most of the time when damage occurs, it is not immediately recognizable. The DIMM receives a static shock, but the tracing is merely weakened and does not immediately produce outward symptoms related to the damage. The weakened trace may take weeks or months to melt, and in the meantime may cause degradation of memory integrity, intermittent memory errors, etc.The more difficult type of damage to recognize and troubleshoot is the intermittent (also called latent or "walking wounded") failure.Perform the following steps to prevent ESD damage:●Use a wired ESD wrist strap that is properly grounded. The use of wireless anti-static straps is no longer allowed; they do notprovide adequate protection. Touching the chassis before handling parts does not ensure adequate ESD protection on parts with increased sensitivity to ESD damage.●Handle all static-sensitive components in a static-safe area. If possible, use anti-static floor pads and workbench pads.●When unpacking a static-sensitive component from its shipping carton, do not remove the component from the anti-staticpacking material until you are ready to install the component. Before unwrapping the anti-static packaging, ensure that you discharge static electricity from your body.●Before transporting a static-sensitive component, place it in an anti-static container or packaging.ESD field service kitThe unmonitored Field Service kit is the most commonly used service kit. Each Field Service kit includes three main components: anti-static mat, wrist strap, and bonding wire.Components of an ESD field service kitThe components of an ESD field service kit are:●Anti-Static Mat – The anti-static mat is dissipative and parts can be placed on it during service procedures. When using ananti-static mat, your wrist strap should be snug and the bonding wire should be connected to the mat and to any bare metal 6Field service informationon the system being worked on. Once deployed properly, service parts can be removed from the ESD bag and placed directly on the mat. ESD-sensitive items are safe in your hand, on the ESD mat, in the system, or inside a bag.●Wrist Strap and Bonding Wire – The wrist strap and bonding wire can be either directly connected between your wristand bare metal on the hardware if the ESD mat is not required, or connected to the anti-static mat to protect hardware that is temporarily placed on the mat. The physical connection of the wrist strap and bonding wire between your skin, the ESD mat, and the hardware is known as bonding. Use only Field Service kits with a wrist strap, mat, and bonding wire. Never use wireless wrist straps. Always be aware that the internal wires of a wrist strap are prone to damage from normal wear and tear, and must be checked regularly with a wrist strap tester in order to avoid accidental ESD hardware damage. It is recommended to test the wrist strap and bonding wire at least once per week.●ESD Wrist Strap Tester – The wires inside of an ESD strap are prone to damage over time. When using an unmonitoredkit, it is a best practice to regularly test the strap prior to each service call, and at a minimum, test once per week. A wrist strap tester is the best method for doing this test. If you do not have your own wrist strap tester, check with your regional office to find out if they have one. To perform the test, plug the wrist-strap's bonding-wire into the tester while it is strapped to your wrist and push the button to test. A green LED is lit if the test is successful; a red LED is lit and an alarm sounds if the test fails.●Insulator Elements – It is critical to keep ESD sensitive devices, such as plastic heat sink casings, away from internal partsthat are insulators and often highly charged.●Working Environment – Before deploying the ESD Field Service kit, assess the situation at the customer location. Forexample, deploying the kit for a server environment is different than for a desktop or portable environment. Servers are typically installed in a rack within a data center; desktops or portables are typically placed on office desks or cubicles. Always look for a large open flat work area that is free of clutter and large enough to deploy the ESD kit with additional space to accommodate the type of system that is being repaired. The workspace should also be free of insulators that can cause an ESD event. On the work area, insulators such as Styrofoam and other plastics should always be moved at least 12 inches or30 centimeters away from sensitive parts before physically handling any hardware components●ESD Packaging – All ESD-sensitive devices must be shipped and received in static-safe packaging. Metal, static-shieldedbags are preferred. However, you should always return the damaged part using the same ESD bag and packaging that the new part arrived in. The ESD bag should be folded over and taped shut and all the same foam packing material should be used in the original box that the new part arrived in. ESD-sensitive devices should be removed from packaging only at an ESD-protected work surface, and parts should never be placed on top of the ESD bag because only the inside of the bag is shielded. Always place parts in your hand, on the ESD mat, in the system, or inside an anti-static bag.●Transporting Sensitive Components – When transporting ESD sensitive components such as replacement parts or partsto be returned to Dell, it is critical to place these parts in anti-static bags for safe transport.ESD protection summaryIt is recommended that all field service technicians use the traditional wired ESD grounding wrist strap and protective anti-static mat at all times when servicing Dell products. In addition, it is critical that technicians keep sensitive parts separate from all insulator parts while performing service and that they use anti-static bags for transporting sensitive components. Transporting sensitive componentsWhen transporting ESD sensitive components such as replacement parts or parts to be returned to Dell, it is critical to place these parts in anti-static bags for safe transport.Lifting equipmentDo not lift greater than 50 pounds. Always obtain additional resources or use a mechanical lifting1.Get a firm balanced footing. Keep your feet apart for a stable base, and point your toes out.2.Tighten stomach muscles. Abdominal muscles support your spine when you lift, offsetting the force of the load.3.Lift with your legs, not your back.4.Keep the load close. The closer it is to your spine, the less force it exerts on your back.5.Keep your back upright, whether lifting or setting down the load. Do not add the weight of your body to the load. Avoidtwisting your body and back.6.Follow the same techniques in reverse to set the load down.Field service information7Recommended toolsTable 1. Recommended tools and optional toolsRecommended tools Optional tools●Key to the system keylock ●#1 and #2 Phillips screwdriver ●T30 and T8 Torx screwdrivers ●Wrist-grounding strap connected to the ground ●ESD Mat ●Needle-nose pliers to disconnect cables and connectors in hard-to-reach locations ●Small flat-head screwdriver to disconnect small cables from boardsDisassembly and reassemblyThe following sections contain the procedures for removing and replacing system components.Front BezelRemoving the optional front bezelSteps1.Locate and remove the bezel key.The bezel key is attached to the LCD bezel package.2.Unlock the bezel by using the key.3.Press the release button to release the bezel, and pull the left end of the bezel.4.Unhook the right end, and remove the bezel.8Field service informationInstalling the optional front bezelSteps1.Locate and remove the bezel key.2.Align and insert the right end of the bezel onto the system .3.Press the release button and fit the left end of the bezel onto the system.4.Lock the bezel by using the key.System coverRemoving system coverPrerequisites1.Turn off the system, including any attached peripherals.2.Disconnect the system from the electrical outlet and disconnect the peripherals.Stepsing a flat head screwdriver, rotate the latch release lock counter clockwise to the unlocked position.2.Lift the latch till the system cover slides back and the tabs on the system cover disengage from the slots on the system.3.Hold the cover on both sides, and lift the cover away from the system.Field service information9Installing system coverPrerequisites1.Ensure that all internal cables are routed correctly and connected, and no tools or extra parts are left inside the system. Steps1.Align the tabs on the system cover with the slots on the system.2.Push the system cover latch down.ing a flat head screwdriver, rotate the latch release lock clockwise to the locked position.Next steps1.Reconnect the peripherals and connect the system to the electrical outlet.2.Turn on the system, including any attached peripherals.GPU Host Card InstallationThis section describes the following hardware installation processesNVIDIA A6000 Graphics Card InstallationSteps1.Connect the GPU power cable to the connector on the system board.10Field service information2.Connect the other end of the GPU power cable to the GPU.3.Lift the expansion card latch and remove the filler bracket.You must install a filler bracket over an empty expansion card slot to maintain Federal CommunicationsThe filler bracket is necessary to maintain proper thermal conditions.4.Align the connector on the GPU with the connector on the riser.5.Insert the GPU into the riser until it is fully seated.6.Press the PCIe lock on the GPU air shroud and riser to release the PCIe card holder latch.Ensure that the GPU edges are seated properly in the GPU air shroud slot and PCIe card holder latch to secure 7.Close the expansion card latch.Figure 1. Installing GPU 1Field service information11Figure 2. Securing GPU 112Field service informationFigure 4. Securing GPU 2Field service information1314Field service informationGetting help and contacting DellSelf-help resourcesYou can get information and help on Dell products and services using these self-help resources:Table 2. Self-help resourcesSelf-help resourcesResource location Information about Dell products and services My Dell appTipsContact SupportIn Windows search, type Contact Support , and press Enter.Online help for operating system/support/windowsAccess top solutions, diagnostics, drivers and downloads, and learn more about your computer through videos, manuals anddocuments.Your Dell computer is uniquely identified by a Service Tag or Express Service Code. To view relevant support resources for your Dell computer, enter the Service Tag or Express Service Code at /support .For more information on how to find the Service Tag for your computer, see Locate the Service Tag on your computer .Dell knowledge base articles for a variety of computer concerns1.Go to /support .2.On the menu bar at the top of the Support page, selectSupport > Knowledge Base .3.In the Search field on the Knowledge Base page, type thekeyword, topic, or model number, and then click or tap the search icon to view the related articles.Contacting Dell/contactdell .Availability varies by country/region and product, and some services may not be available in your country/region. If you do not have an active Internet connection, you can find contact information about your purchase invoice,3Getting help and contacting Dell 15。
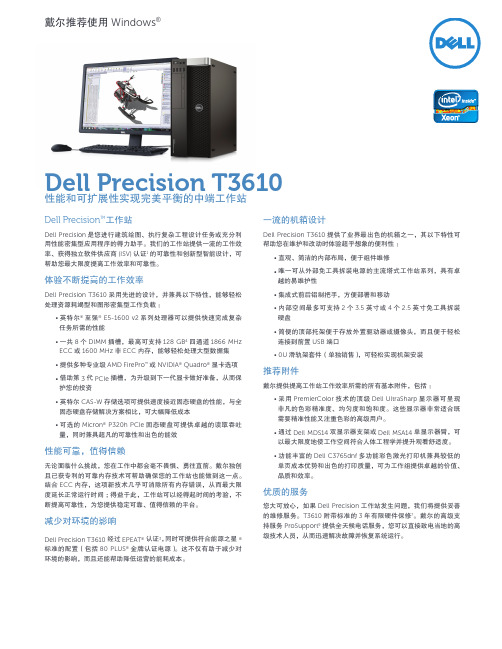
Dell Precision™工作站Dell Precision是您进行建筑绘图、执行复杂工程设计任务或充分利用性能密集型应用程序的得力助手。
我们的工作站提供一流的工作效率、获得独立软件供应商(ISV)认证1的可靠性和创新型智能设计,可帮助您最大限度提高工作效率和可靠性。
体验不断提高的工作效率Dell Precision T3610采用先进的设计,并兼具以下特性,能够轻松处理资源耗竭型和图形密集型工作负载:• 英特尔®至强® E5-1600 v2系列处理器可以提供快速完成复杂任务所需的性能• 一共8个DIMM插槽,最高可支持128 GB4四通道1866 MHz ECC或1600 MHz非ECC内存,能够轻松处理大型数据集• 提供多种专业级AMD FirePro™或NVIDIA® Quadro®显卡选项• 借助第3代PCIe插槽,为升级到下一代显卡做好准备,从而保护您的投资• 英特尔CAS-W存储选项可提供速度接近固态硬盘的性能,与全固态硬盘存储解决方案相比,可大幅降低成本• 可选的Micron® P320h PCIe固态硬盘可提供卓越的读取吞吐量,同时兼具超凡的可靠性和出色的能效性能可靠,值得信赖无论面临什么挑战,您在工作中都会毫不畏惧、勇往直前。
戴尔独创且已获专利的可靠内存技术可帮助确保您的工作站也能做到这一点。
结合ECC内存,这项新技术几乎可消除所有内存错误,从而最大限度延长正常运行时间;得益于此,工作站可以经得起时间的考验,不断提高可靠性,为您提供稳定可靠、值得信赖的平台。
减少对环境的影响Dell Precision T3610经过EPEAT®认证3,同时可提供符合能源之星®标准的配置(包括80 PLUS®金牌认证电源)。
这不仅有助于减少对环境的影响,而且还能帮助降低运营的能耗成本。
一流的机箱设计Dell Precision T3610提供了业界最出色的机箱之一,其以下特性可帮助您在维护和改动时体验超乎想象的便利性:• 直观、简洁的内部布局,便于组件维修• 唯一可从外部免工具拆装电源的主流塔式工作站系列,具有卓越的易维护性• 集成式前后铝制把手,方便部署和移动• 内部空间最多可支持2个3.5英寸或4个2.5英寸免工具拆装硬盘• 简便的顶部托架便于存放外置驱动器或摄像头,而且便于轻松连接到前置USB端口• 0U滑轨架套件(单独销售),可轻松实现机架安装推荐附件戴尔提供提高工作站工作效率所需的所有基本附件,包括:• 采用PremierColor技术的顶级Dell UltraSharp显示器可呈现非凡的色彩精准度、均匀度和饱和度。

Connecting to PCoIP Remote Access Host Cards in Dell Precision Host WorkstationsQuick Reference Guide註、警示與警告註: 「註」表示可以幫助您更有效地使用產品的重要資訊。
警示: 「警示」表示有可能會損壞硬體或導致資料遺失,並告訴您如何避免發生此類問題。
警告: 「警告」表示有可能會導致財產損失、人身傷害甚至死亡。
© 2019 年 Dell Inc. 或其子公司。
版權所有,翻印必究。
Dell、EMC 與其他商標均為 Dell Inc.或其子公司的商標。
其他商標可能為其各自擁有者的商標。
2018 - 08Rev. A011 Dell Precision 工作站搭配 PCoIP 極精簡用戶端 (4)2 安裝遠端存取主機卡 (5)3 連接纜線 (6)4 設定遠端存取主機卡 (7)5 Configuring the Wyse or Amulet DXZ4 PCoIP Zero Client (8)6 與 Dell 公司聯絡 (9)Contents3Dell Precision 工作站搭配 PCoIP 極精簡用戶端1:1 從任何地點進行遠端存取1圖形卡2遠端存取主機卡3資料中心/中心地點:Dell Precision 3930 機架式、7920 機架式及 3000、5000、7000 立式工作站4T eradici PCoIP 軟體用戶端 (Windows、Mac OS、IOS、Android 和 Chromebook)5Wyse 或 Amulet Hotkey DXZ4 PCoIP 極精簡用戶端6LAN/WAN註: 如需下載 T eradici PCoIP 軟體用戶端以及連接至 PCoIP 遠端存取主機卡的說明,可從以下 T eradici 連結中取得。
您必須透過Teradici 設定帳戶,才能取得免費用戶端軟體。

1Install the system into a rack Plaats het systeem in een rekInstallez le système dans un rackSetzen Sie das System in ein Rack einInstallare il sistema in un rack2Connect the keyboard, mouse, and monitor(optional)Sluit het toetsenbord, de muis en de monitor aan (optioneel)Connectez le clavier, la souris et le moniteur (facultatif)Schließen Sie die Tastatur, die Maus und den Monitor (optional) anConnettere la tastiera, il mouse e il monitor (opzionale)to support3Connect the system to a power sourceSluit het systeem aan op een voedingsbronConnectez le système à une source d’alimentationSchließen Sie das System an eine Energiequelle anConnettere il sistema a una fonte di alimentazione4Loop and secure the power cable in theretention clipVoer de voedingskabel door de borgclipFormez une boucle et fixez le câble d’alimentation au clip de maintienSchleifen Sie das Stromkabel durch und befestigen Sie es in der HalteklammerArrotolare e assicurare il cavo di alimentazione alla clip di contenimento5Turn on the systemSchakel het systeem inMettez le système sous tensionSchalten Sie das System einAccendere il sistema© 2014 Dell Inc.© 2014 Microsoft Corporation.Printed in China.2014-081. Power button/Power light2. NMI button3. System identification button4. VGA connector5. LCD menu buttons6. Information tag7. LCD panel8. Hard-drives9. vFlash media card slot 10. USB 2.0 connector11. USB management port/iDRAC Direct 12. Optical-drive (optional)13. System identification button 14. System identification connector15. iDRAC8 Enterprise port (optional)16. PCIe expansion card slots half height 17. Serial connector 18. VGA connector 19. USB 3.0 connectors20. PCIe Expansion card slots full height 21. Network connectors 22. Power supply1. Aan-/uitknop/stroomlampje2. NMI-knop3. Systeemidentificatieknop4. VGA-aansluiting5. Lcd-menuknoppen6. Informatielabel7. Lcd-paneel8. Harde schijven9. Sleuf voor vFlash-geheugenkaart 10. USB 2.0-aansluiting 11. USB-poort/iDRAC Direct 12. Optisch station (optioneel)13. Systeemidentificatieknop 14. Systeemidentificatieaansluiting 15. iDRAC8 Enterprise-poort(optioneel)16. PCIe-uitbredingssleuven(halve hoogte)17. Seriële aansluiting 18. VGA-aansluiting 19. USB 3.0-aansluitingen 20. PCIe-uitbredingssleuven(volledige hoogte)21. Netwerkaansluitingen 22. Voeding1. Bouton d’alimentation/Voyantd’alimentation 2. Bouton NMI3. Bouton d’identification du système4. Port VGA5. Boutons de menu de l’écrand’affichage LCD 6. Étiquette d’informations 7. Écran d’affichage LCD 8. Disques durs9. Logement pour carte mémoire vFlash 10. Port USB 2.011. Port de gestion USB/iDRAC Direct 12. Lecteur optique (en option)13. Bouton d’identification du système14. Port d’identification du système 15. Port iDRAC8 Enterprise (en option)16. Logements pour carte d’extensionPCIe demi-hauteur 17. Port série 18. Port VGA 19. Ports USB 3.020. Logements pour carte d’extensionPCIe pleine hauteur 21. Ports réseau 22. Alimentation1. Betriebsschalter/Betriebsanzeige2. NMI-Taste3. Systemidentifikationstaste4. VGA-Anschluss5. LCD-Menütasten6. Informations-Tag7. LCD-Bildschirm8. Festplatten9. vFlash-Medienkartensteckplatz 10. USB 2.0-Anschluss11. USB-Verwaltungsport/iDRAC Direct 12. Optisches Laufwerk (optional)13. Systemidentifikationstaste 14. Systemidentifikationsanschluss 15. iDRAC8 Enterprise-Anschluss(optional)16. PCIe-Erweiterungskartensteckplätzehalber Baulänge 17. Serieller Anschluss 18. VGA-Anschluss 19. USB 3.0-Anschlüsse20. PCIe-Erweiterungskartensteckplätzevoller Baulänge 21. Netzwerkanschlüsse 22. Netzteil1. Accensione/Indicatore dialimentazione 2. Pulsante NMI3. Pulsante di identificazionedel sistema 4. Connettore VGA 5. Pulsanti del menu LCD 6. Etichetta informativa 7. Pannello LCD 8. Dischi rigidi9. Slot scheda multimediale vFlash 10. Connettore USB 2.011. Posta di gestione USB/iDRAC Direct 12. Unità ottica (opzionale)13. Pulsante di identificazione del sistema14. Connettore di identificazionedel sistema 15. Porta iDRAC8 Enterprise(opzionale)16. Slot scheda di espansione PCIea mezza altezza 17. Connettore seriale 18. Connettore VGA 19. Connettori USB 3.020. Slot scheda di espansione PCIea tutta altezza 21. Connettori di rete 22. AlimentatoreFeaturesKenmerken | Caractéristiques | Funktionen | FunzioniProduct support and manualsProductondersteuning en handleidingen Support produits et manuelsProduktsupport und HandbücherSupporto tecnico e manuali del prodotto /support/support/manualsContact DellNeem contact op met Dell | Contacter Dell Kontaktaufnahme mit Dell | Contattare Dell/contactdellRegulatory and safetyRegelgeving en veiligheid | Réglementations et sécuritéSicherheitshinweise und Zulassungsinformationen Normative e sicurezza/regulatory_complianceRegulatory modelWettelijk model | Modèle réglementaireMuster-Modellnummer | Modello di conformitàE31SRegulatory typeWettelijk type | Type réglementaireMuster-Typnummer | Tipo di conformitàE31S001Computer modelComputermodel | Modèle de l’ordinateur Computermodell | Modello del computerDell Precision Rack 7910。

Dell Precision Rack 7910信息更新技术表格Dell Precision Rack 7910 信息更新本节介绍 Dell Precision Rack 7910 的可能错误信息和解决方案的相关信息。
:本技术规格表中的信息取代用户手册中的信息。
类别问题/错误信息解决方案Citrix XenServer 6.2 操作系统安装过程中系统停机USB 3.0。
:访问/manuals参阅用户,获取 Precision Rack 7910 系不支持板载 AHCI HDD 控制器。
使用 PERC 控制器。
不支持 AMD FirePro W5100 GPU。
在系统设置中选择 nVIDIA GPU。
不支持 nVIDIA Quadro GPU。
在系统设置中选择其他 nVIDIA GPU。
XenServer 6.2 操作系统安装过程中系统停机系统设置过程中必须禁用 ATS。
安装连接至 H330 PERC 控制器的 XenServer 6.2 操作系统时未检测到任何磁盘。
必须手动加载 Megaraid 驱动器。
请查询Citrix 支持网站获取最新驱动程序。
30 分钟后运行 Windows Media Player (WMP) 时视频界面冻结。
在 WMP 的 Studio 设置中禁用“Windows 媒体重定向”。
XenServer 当前不支持 SR-IOV。
将 2 个以上虚拟 CPU 分配给使用 nVIDIA GRID 显卡的 Windows 虚拟机 (VM) 时,仅有两个虚拟 CPU工作。
请参阅 nVIDIA 文档获取变通方案。
不支持 UEFI BIOS 模式。
在系统设置中选择旧式 BIOS 模式。
Vmware主机操作系统安装过程中系统停机。
在系统设置中禁用 USB 3.0。
不支持板载 AHCI HDD 控制器。
使用 PERC 控制器。
无法使用 AMD FirePro W5100 GPU。
在系统设置中选择 nVIDIA GPU。
Dell戴尔Precision T7820工作站的技术参数与您同步的思考力:英特尔®至强®处理器可扩展系列支持您处理苛刻的应用程序。
现在采用新一代双路架构,每个处理器多达28个内核(或者内置双处理器时多达56个内核),以便您可以获得高性能,实现伟大愿景。
加速每一个项目:此内存可扩展设备配备高达384 GB 2666 MHz RDIMM内存,让您能够快速运行软件,并获得实时结果。
消除干扰:超静音工作站,可让您专注于任务本身。
采用全新多通道散热设计,实现高级散热和静音功能,从而在系统运行繁重工作负载时增强冷却和安静运行特性。
专为未来需求而打造Precision 7820 Tower采用全新机箱,将广泛的功能与卓越的存储可扩展性相结合,可与您的创意同步发展。
适应您的创新:Precision 7820 Tower可随时应对复杂的项目,包括虚拟现实工作流、下一代AMD Radeon Pro™以及高性能NVIDIA Quadro®显卡。
您的工作站支持功率最高500 W 的显卡,并且未来的显卡选项最高250 W(单CPU系统带950 W PSU)。
优化音频和视频:可选的戴尔专业音频接口模块支持处理专业应用程序,可轻松满足您的音频和视频需求。
安全可靠,值得信赖确保安全借助Dell Reliable Memory Technology (RMT) Pro减少停机时间。
RMT可与ECC内存配合使用,通过在系统重新启动后映射出故障内存位置,防止计算机潜在崩溃。
可靠访问您的数据使用PCIe NVMe SSD和可选智能卡(CAC/PIV)读取器等可选的硬件和软件RAID存储选项,确定系统访问权限,提高数据可用性。
Precision 7820塔式机的基本附件借助旨在充分利用Precision 7820塔式机的附件,增强您的远程工作站体验。
深圳市怎么帮信息技术有限公司(),汇聚众品牌IT供应链,通过互联网思维与传统模式相融合,线上线下相辅相成,颠覆中小企业IT供应链寻找难、商品选择难、集中管理难等问题。
Dell Precision Tower5810/7810/7910/1700MT/1700SFF/3620MT and Rack 7910Thunderbolt Add-In-Cards Setup Guide1Topics:•Setting up the Thunderbolt Add-In-CardSetting up the Thunderbolt Add-In-CardThis section describes in brief on how to install the thunderbolt add-in-cards on a Dell Precision Tower 5810, 7810, 7910, Rack 7910, T1700 MT, T1700 SFF and 3620 MT.Pre-requisite actions before setting up a Thunderbolt card:1.To utilize a Thunderbolt Add-In-Card (AIC) make sure you have a compatible Thunderbolt system board.2.Install Thunderbolt software before installing the Add-In-Card (AIC).To setup a Thunderbolt Add-In-Card1.For Precision Tower 5810/T7810: the Thunderbolt AIC is placed in CPU1 slot 5For Precision Rack 7910: the Thunderbolt AIC NOT supportedFor Precision T1700 MT: the Thunderbolt AIC is placed in slot 4For Precision T1700 SFF: the Thunderbolt AIC is placed in slot 1For Precision T3620 MT: the Thunderbolt add in card (AIC) is placed in slot 322.Connect the display port to DisplayPort cable.Finding More Information and ResourcesSee the safety and regulatory documents that shipped with your computer and the regulatory compliance website at/regulatory_compliance for more information on:●Safety best practices●Regulatory certification●ErgonomicsSee for additional information on:3●Warranty●Terms and Conditions (U.S. only)●End User License AgreementAdditional information on your product is available at https:///support.© 2017 Dell Inc. or its subsidiaries. All rights reserved. Dell, EMC, and other trademarks are trademarks of Dell Inc. or its subsidiaries. Other trademarks may be trademarks of their respective owners.4。
内容创作利器值得信赖的戴尔Precision 7560移动工作站作者:***来源:《新潮电子》2021年第11期最近入手了一台戴尔的高端移动工作站Precision7560,想想自己也有一段时间没有好好做过工作站的详评了,所以不妨借评测之机跟大家好好聊聊工作站那些事。
多重原因带动移动工作站需求暴涨近年来,中国正处于数字经济时代的大潮中,数据便意味着石油,近几年数据海量增长的,恰是视频内容创作方面。
仅以三大短视频平台抖音、快手和B站为例,每年都有上亿规模的新增创作者,而且逐渐成熟的市场也推动创作者从个人创作向专业性创作方向发展。
工欲善其事,必先利其器,想做好图形内容创作,一台好电脑必不可少。
可能大多数人都不知道众多PC产品中,有一类天生便为了图形设计、多媒体数字内容创作而生的产品。
“我知道,我知道,不就是你说的工作站嘛”,对于前排小明的表现,我表示很欣慰,不错,都学会抢答了。
还记得数年前英特尔力推设计师电脑时,ThinkStation移动工作站产品借机大刷了一把存在感,其实在中国,也有行业用户之外的大量个人设计师将移动工作站作为图形化处理的主力机型,所以图形创作需求在中国的大涨,让这个品类需求快速增长,特别是从去年疫情起,笔记本和移动工作站同比增长超过了28%,当然同时,台式电脑和台式工作站也有一定的下跌,所以各个厂商的主流品类更倾向于推动移动工作站的产品系列。
工作站中的显赫门第——Precision与其他品类的PC相比,工作站的确是较为小众的商用机型,相对而言发布的厂商也不算多,我们熟悉的也就是戴尔、惠普、联想、东芝、微星,以及数个专业的小众品牌,相对而言,工作站产品的设计是有一定门槛的。
在这个领域中,戴尔一直都是当仁不让的“带头大哥”,全球范围曾一度保持了十多个季度出货量第一的纪录。
与其他商用系列一样,戴尔的Precision移动工作站同样按型号标称分别3系列、5系列和7系列,分别定位顶级移动工作站、高端移动工作站和主流移动工作站,在整个系列中,Precision 7560可以称为“次顶配”的机型,仅有Precision 7760的配置比它略高。
Dell戴尔Precision T7820工作站的技术参数与您同步的思考力:英特尔®至强®处理器可扩展系列支持您处理苛刻的应用程序。
现在采用新一代双路架构,每个处理器多达28个内核(或者内置双处理器时多达56个内核),以便您可以获得高性能,实现伟大愿景。
加速每一个项目:此内存可扩展设备配备高达384 GB 2666 MHz RDIMM内存,让您能够快速运行软件,并获得实时结果。
消除干扰:超静音工作站,可让您专注于任务本身。
采用全新多通道散热设计,实现高级散热和静音功能,从而在系统运行繁重工作负载时增强冷却和安静运行特性。
专为未来需求而打造Precision 7820 Tower采用全新机箱,将广泛的功能与卓越的存储可扩展性相结合,可与您的创意同步发展。
适应您的创新:Precision 7820 Tower可随时应对复杂的项目,包括虚拟现实工作流、下一代AMD Radeon Pro™以及高性能NVIDIA Quadro®显卡。
您的工作站支持功率最高500 W 的显卡,并且未来的显卡选项最高250 W(单CPU系统带950 W PSU)。
优化音频和视频:可选的戴尔专业音频接口模块支持处理专业应用程序,可轻松满足您的音频和视频需求。
安全可靠,值得信赖确保安全借助Dell Reliable Memory Technology (RMT) Pro减少停机时间。
RMT可与ECC内存配合使用,通过在系统重新启动后映射出故障内存位置,防止计算机潜在崩溃。
可靠访问您的数据使用PCIe NVMe SSD和可选智能卡(CAC/PIV)读取器等可选的硬件和软件RAID存储选项,确定系统访问权限,提高数据可用性。
Precision 7820塔式机的基本附件借助旨在充分利用Precision 7820塔式机的附件,增强您的远程工作站体验。
深圳市怎么帮信息技术有限公司(),汇聚众品牌IT供应链,通过互联网思维与传统模式相融合,线上线下相辅相成,颠覆中小企业IT供应链寻找难、商品选择难、集中管理难等问题。