VB2005程序设计实例教程
- 格式:pptx
- 大小:343.73 KB
- 文档页数:58


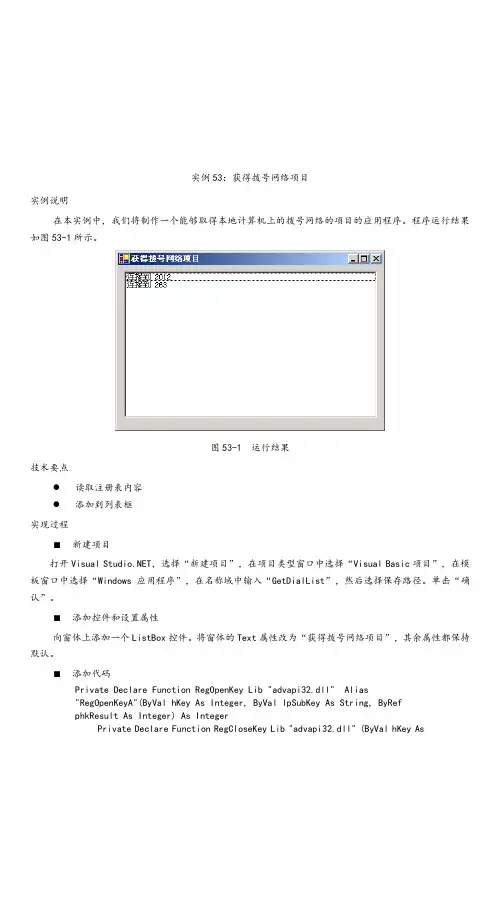
实例53:获得拨号网络项目实例说明在本实例中,我们将制作一个能够取得本地计算机上的拨号网络的项目的应用程序。
程序运行结果如图53-1所示。
图53-1 运行结果技术要点●读取注册表内容●添加到列表框实现过程■新建项目打开Visual ,选择“新建项目”,在项目类型窗口中选择“Visual Basic项目”,在模板窗口中选择“Windows应用程序”,在名称域中输入“GetDialList”,然后选择保存路径。
单击“确认”。
■添加控件和设置属性向窗体上添加一个ListBox控件。
将窗体的Text属性改为“获得拨号网络项目”,其余属性都保持默认。
■添加代码Private Declare Function RegOpenKey Lib "advapi32.dll" Alias"RegOpenKeyA"(ByVal hKey As Integer, ByVal lpSubKey As String, ByRefphkResult As Integer) As IntegerPrivate Declare Function RegCloseKey Lib "advapi32.dll" (ByVal hKey As中 级篇 167Integer) As IntegerPrivate Declare Function RegEnumKey Lib "advapi32.dll" Alias "RegEnumKeyA"(ByVal hKey As Integer, ByVal dwIndex As Integer, ByVal lpName As String, ByVal cbName As Integer) As Integer Const HKEY_CURRENT_USER As Integer = &H80000001 Const ERROR_NO_MORE_ITEMS As Short = 259Const ERROR_SUCCESS As Short = 0Private Sub Form1_Load(ByVal eventSender As System.Object, ByVal eventArgs As System.EventArgs) Handles MyBase.Load Dim hKey As Integer Dim i As IntegerDim astr As VB6.FixedLengthString = New VB6.FixedLengthString(256) If RegOpenKey(HKEY_CURRENT_USER, "RemoteAccess\Profile", hKey) = ERROR_SUCCESS ThenWhile RegEnumKey(hKey, i, astr.Value, 256) = ERROR_SUCCESSList1.Items.Add(astr.Value) i = i + 1 End While RegCloseKey(hKey) End If End Sub■运行程序单击菜单“调试|启动”或单击 图标运行程序。
安装Visual Basic2005要使用Visual Basic2005,你必须安装Visual Studio,因为Visual Basic是Visual Studio的一部分。
Visual Studio2005是一个微软开发工具的套装,它包含了微软的开发工具,如Visual Basic,C#,Visual C++,J#等。
Visual Studio有四个版本,按功能多少依次是:∙Visual Studio Team Edition∙Visual Studio Professional Edition∙Visual Studio Standard Edition∙Visual Studio Express Edition对于Visual Basic的一般用户来说,安装Visual Studio Express Edition或者Visual Studio Standard Edition就足够了。
Visual Studio2005安装详解我是依照Visual Studio Team Edition的安装过程来讲解和截屏的,如果你手里有的是Visual Studio的其它版本,也别担心,因为无论是Visual Studio的哪个版本,安装过程几乎都是一样的,最多是在安装功能选项中,有些版本功能多,有些版本功能少而已。
插入Visual Studio的安装光盘,你会看到如下画面。
请点击最上面的链接Install Visual Studio2005。
然后你会进入下面的画面,这时候安装程序会运行一段时间,运行完以后,右下角的Next 按钮就可以点击了。
点击Next按钮之后,你会被要求填写product key,请将I accept the terms of the License Agreement勾上,然后填上你的product key。
至于Name栏,一般来说是填写该软件的购买者。
所有填完之后再按Next。
Chapter 5Constructing User InterfacesIn this chapter:Application: New Windows Forms Controls . . . . . . . . . . . . . . . . . . . . . . . . . . . . . .131Application: Changes to Existing Windows Forms Controls. . . . . . . . . . . . . . . . .136 This chapter explores the controls and improvements to existing controls that are provided by version 2.0 of the Microsoft .NET Framework. These features allow you to create professional-looking applications that provide a better end-user experience and reduce your coding effort. Application: New Windows Forms ControlsThis application demonstrates many of the new controls available in Microsoft Visual Studio 2005 for creating compelling Windows Forms user interfaces.New ConceptsVisual Studio has a long history of providing a large library of prebuilt controls that allowdevelopers to quickly create user interfaces for Microsoft Windows applications. However, the capabilities and visual style of these components often resulted in applications that had a look and feel significantly different from other Microsoft products such as Microsoft Office andInternet Explorer. Visual Studio 2005 introduces many new controls to address this issue.These controls provide the same advanced look and feel and customization support asMicrosoft Office, which allows you to provide your users with a familiar experience andincreased personalization options.ToolStrip ControlToday’s professional applications provide many features that allow users to fully customizethe positioning, formatting, and content of their menus and toolbars. Users expect to be able to perform such tasks as moving toolbars around, selecting which buttons to display, and con-trolling how much information is presented with each item. In addition, they expect the ren-dering of these controls to be clean and consistent across applications. The ToolStrip is a new toolbar control that supports all these features and provides the base functionality for the131132Introducing Microsoft Visual Basic 2005 for DevelopersMenuStrip and StatusStrip controls. You are no longer limited to just adding buttons to yourtoolbars. The ToolStrip allows you to add seven different types of items, such as the ToolStrip-Button, ToolStripComboBox, ToolStripTextBox, and ToolStripSplitButton.The first thing you will notice when you add a ToolStrip to a form is that it looks like an Office toolbar by default. Many controls support a new pluggable rendering framework that allows you to select how you want the control to look. There are currently two main “looks” for the ToolStrip, and you select which one you want with the RenderMode property. Providing a value of System indicates that you want the control to follow the current Windows system displaysettings. Providing a value of Professional indicates that you want the control to look like itscounterpart in Microsoft Office.There are many new types of behavior—including rafting, merging, and item overflow—sup-ported by the ToolStrip. Rafting is the behavior that allows a user to drag and drop a toolbar to various locations on the form and have the toolbar automatically “snap” into position. Theintegrated development environment (IDE) automatically provides support for rafting by add-ing multiple RaftContainer controls to the form when you add your ToolStrip. You specify the initial location for the ToolStrip by setting its Raft property. At run time, the user will be able to move the ToolStrip to any of the other RaftContainers.Merging is the behavior you see when the items from two ToolStrips are combined into a single ToolStrip. You can specify whether or not a particular strip supports merging with the Allow-Merge property. You can then govern each item’s merge behavior with the MergeAction andMergeIndex properties.Item reordering is the behavior that allows a user to rearrange toolbar and menu items. Youcan enable item reordering by setting the AllowItemReorder property to True. At run time, users will be able to move items by dragging and dropping them while pressing the Alt key.FlowLayoutPanel and TableLayoutPanel ControlsVisual Studio 2005 provides two new layout controls that address some common controlpositioning scenarios. The normal Panel control uses absolute positioning to determine thelocation of each of its child controls. The FlowLayoutPanel, on the other hand, positions each control relative to the one just prior to it as you add them to the panel. By default, it flows con-trols from left to right and top to bottom, but you can control the flow direction by using the FlowDirection property. The FlowLayoutPanel is useful in situations where you want controls to automatically reposition themselves as the contents of one of the children changes or as the size of the panel changes.The TableLayoutPanel is a panel that contains an invisible table structure that allows you toplace a single control in each table cell. You can specify how many rows and columns the inter-nal table should have as well as the sizing rules for each row and column. The TableLayout-Panel is useful when you need to define major, fixed-size sections of a form. You can also useChapter 5:Constructing User Interfaces133 it to quickly create tabular data-entry interfaces. However, keep in mind that you can add onlya single control to each cell. So, if you want a cell to contain more that one child control, youneed to first add a Panel to the cell and then add your two child controls to the Panel.WebBrowser ControlVisual Studio 2005 now provides an optimized, managed wrapper for the wel1-knownActiveX Web browser control. This control provides access to the full DHTML rendering capa-bilities of Internet Explorer. You can use this control to add many kinds of Web browsingcapabilities to your applications. For example, you could allow users to read HTML documen-tation files from within your application. Or you could allow a user to link to content on the Internet. Using the WebBrowser control is straightforward, and it provides some powerfuloptions that enable deep integration between your DHTML and WinForm assets.You can download and display a document by simply calling the Navigate method and provid-ing a URL to the resource. Once it’s loaded, you can programmatically access the DHTMLDOM through the Document property. Through this property, you can directly read and mod-ify the structure of the document. You can perform standard navigation tasks through meth-ods such as GoForward, GoHome, GoSearch, and GoBack. You can even expose a managedobject to script code to allow script in the page to call into your managed application. All you have to do is supply an object to the ObjectForScripting property. Monitoring the progress of a download is accomplished by handling the WebBrowser’s events, such as Navigating, Navi-gated, ProgressChanged, and DocumentCompleted.ActiveDocumentHost ControlThe ActiveDocumentHost control provides a bridge between your Windows Forms application and OLE resources. You can load and display a resource by calling the LoadFrom method and providing the path to the resource. The ActiveDocumentHost will launch an instance of theapplication that is registered for that particular type of resource. For example, if you load aMicrosoft Word document, the ActiveDocumentHost will automatically launch Microsoft Word and display the document in a read-only state. By default, double-clicking the control willcause it to switch to an editable mode and display the editing application’s toolbars andmenus. You can control most aspects of this through properties such as ShowMenus andShowToolbars.WalkthroughThis walkthrough demonstrates how you can use these new controls to create WindowsForms interfaces that look more professional and are easier to use.134Introducing Microsoft Visual Basic 2005 for DevelopersCreating Office InterfacesThe DocumentBrowser form presents an interface that draws many of its design elements from various Microsoft products, including Office and Internet Explorer. Notice that the two Tool-Strips are rendered as Office-type toolbars, with a vertical gradient background and “grips” at their left edge. One of the ToolStrips includes a text box. There is also a third ToolStrip control in the bottom-left corner of the form with two items, Documents and Web Pages. This ToolStrip has been modified by setting its LayoutStyle to Vertical to give it a bit of a Microsoft Outlookstyle. The status bar at the bottom of the form is a StatusStrip control with two children, a Sta-tusStripPanel and a ToolStripProgressBar. The progress bar has been configured to displayprogress as a continuous strip by setting its Style property to Continuous.When you run the application, click and drag the tool strips to any edge of the form and you will see that they will automatically dock to that side. This action is possible because there isa RaftingContainer control at each edge of the form. These containers are automatically addedby Visual Studio when you add the ToolStrips to the form. You can also reorder items andeven move an item from one ToolStrip to another by holding down the Alt key and dragging an item.Interacting with Web ContentThe application uses the WebBrowser control to load and display Web content. At run time,click the Web Pages button in the bottom-left corner of the form. Next, enter a URL into the Address text box in the tool strip. Click the Go button to navigate to the document.Note If you do not have access to the Internet, an HTML page named “MSDN HomePage.htm” is available in the application directory.As the application loads, you should notice the progress bar and status text updating at thebottom of the form. When the document finishes loading, you will see an entry appear in the History List to the left of the browser pane. This progress monitoring is accomplished by han-dling numerous WebBrowser events.The process starts with the btnGo_Click event handler. In this procedure, you tell the Web-Browser to load a document by calling the Navigate method:wbrBrowser.Navigate(txtAddress.Text)When the WebBrowser starts navigating to the resource, it raises the Navigating event. ThewbrBrowser_Navigating event handler retrieves the URL from the event arguments and posts a message to the StatusStripPanel indicating that the download is in progress:SetStatus(“Navigating to ‘“ + e.Url + “‘“)Chapter 5:Constructing User Interfaces135 While the WebBrowser is loading the document, it periodically raises its ProgressChanged event. The wbrBrowser_ProgressChanged event handler updates the progress bar in the StatusStrip first, resetting it if it is already showing 100 percent, and then increments it by a value of 5:If pbrProgress.Value >= pbrProgress.Maximum ThenClearProgress()End IfpbrProgress.Increment(5)When the WebBrowser is finished loading the document, it raises the DocumentCompleted event. You can use this event to notify your user that the content is available or perhaps to log the results of the download. The wbrBrowser_DocumentCompleted event handler retrieves the title of the document from the URL of the document from the event arguments. This informa-tion is used to populate a new ListViewItem and added to the history list view. The procedure ends by resetting the status text and the progress bar:Dim title As String = e.UrlDim visited As String = DateTime.Now.ToString()Dim docInfo As New ListViewItem(New String(1) {title, visited})lvwHistory.Items.Add(docInfo)SetStatus(String.Empty)ClearProgress()Interacting with Document ContentThe application also allows you to load and display files that have been registered to allow OLE hosting. Office documents, sound files, and .avi movie files are all examples of “active” data. You can load a file by first selecting the Documents button in the bottom-left corner of the form. Then, enter a local path to the desired file in the Address text box and click the Go button. The document will display inside the ActiveDocumentHost. If the document is editable, you can double-click the ActiveDocumentHost to launch the document in its associated host application. The menu and toolbars of the host application will display in the Document-Browser form.The ActiveDocumentHost has fewer progress-related events than the WebBrowser control. How-ever, it does raise a Loaded event when it has finished loading and displaying the document. The ahdDocument_Loaded event handler starts by retrieving information about the loaded document. It then creates a ListViewItem and adds it to the history list view:Dim url As String = adhDocument.SourceDocumentDim visited As String = DateTime.Now.ToString()Dim docInfo As New ListViewItem(New String(1) {url, visited})lvwHistory.Items.Add(docInfo)SetStatus(String.Empty)ClearProgress()136Introducing Microsoft Visual Basic 2005 for DevelopersConclusionThe new Windows Forms controls provided by the .NET Framework 2.0 allow you to create applications that are more professional looking and more powerful than ever before without having to rely on third-party components. The ToolStrip provides you with a powerful mecha-nism for creating menu, tool, and status bars that look and behave like their counterparts in other applications your users are familiar with. This can translate directly into quicker useradoption and higher user satisfaction. The WebBrowser and ActiveDocumentHost allow you to integrate external data into your applications. The WebBrowser is designed for the reliable and versatile downloading and rendering of DHTML content, while the ActiveDocumentHost pro-vides a mechanism for hosting and editing OLE data types.Application: Changes to Existing Windows Forms Controls This application examines some changes and additions to the Windows Forms frameworkthat affect a broad set of existing and new Windows Forms controls.New ConceptsThe .NET Framework 2.0 and Visual Studio 2005 introduce many new features to Windows Forms development that will have a broad impact on how you work with Windows Formscontrols at both design time and run time. These features affect a wide range of behaviors,including control layout and positioning, run-time data entry, and application configuration and personalization.Margins and PaddingEnsuring that your controls are positioned and spaced consistently is important for creating applications that are easy to learn and navigate. Unfortunately, the process of positioning con-trols is at best laborious and time consuming. One aspect of proper positioning involves mak-ing sure that there is a consistent amount of space between controls. For example, you might have a series of buttons at the bottom of a form that need to have exactly ten pixels of space between each of them. This generally involves placing one button, recording its Left property and modifying the Left property of the next button to the desired amount. Another example is when you have a container control and you want to make sure that constituent controls are no closer than eight pixels from the edge of the container. At a minimum, this setup involves plac-ing the first control to serve as an anchor point and then aligning the other controls to it asappropriate.The .NET Framework 2.0 introduces two new concepts, margins and padding, to controls that greatly simplify the work involved in scenarios like those just mentioned. Margin is the exter-nal space between two controls, while padding is the internal space between a control’s edge and its contents. So, the right edge of one button and the left edge of another button is theChapter 5:Constructing User Interfaces137 margin between them. On the other hand, the space between a panel’s edge and its constitu-ent controls is the panel’s padding. The Control class now has Padding and Margin properties so that a control can declare and enforce its spacing requirements.The Margin and Padding properties are used by the Visual Studio IDE at design time to provide margin and padding indicators and to autosnap controls according to their Margin and Pad-ding properties. Both of these properties are of the Padding type, which is a simple structure that allows you to provide unique values for each edge of the control: Top, Bottom, Left, and Right. So, if you have a Panel whose Padding.Left is set to 5, and you are placing a child control on the Panel, the IDE will automatically provide you with feedback when the left side of the child control is five pixels from the left side of the Panel. This allows you to quickly place con-trols exactly where they need to be without having to manually set location properties. These properties are also honored at run time as controls are resized or relocated.Auto-CompletionIf you have used Internet Explorer, you have seen auto-completion in action. Auto-completion is the behavior you see when you enter data in a text control and the system automatically suggests what it thinks you might be entering. This feature is generally most beneficial when the user has to enter strings that are either long or complex. A prerequisite necessary for an auto-completion solution to work is the existence of some set of data that the system can use to look up possible matches.You can now easily add auto-completion support to text boxes and combo boxes in your Windows Forms applications. Both controls have three new properties: AutoCompleteMode, AutoCompleteSource, and AutoCompleteCustomSource. You enable auto-completion by setting the AutoCompleteMode to Append, Suggest, or SuggestAppend. Setting AutoCompleteMode to Append results in the most likely match being automatically appended to the current data. Using Suggest results in a drop-down list populated with one or more suggested completion strings. SuggestAppend performs both tasks. The control also needs a source list from which it can search for suggestions as the user enters data. The AutoCompleteSource property allows you to select from some system sources such as FileSystem, HistoryList, RecentlyUsedList, AllUrl, and CustomSource.If you select CustomSource, you must provide a list of strings to the AutoCompleteCustomSource property. This can be done at either design time or run time. Custom sources are very power-ful, as they allow you to provide auto-complete behavior for business data. For example, you could query a list of product categories from a database when the form loads and supply a list of category names to serve as both the display source and auto-complete source for a combo box. This approach would allow your users to quickly select a category without having to enter the full category name or manually navigate through a long list of items.138Introducing Microsoft Visual Basic 2005 for DevelopersConfigurationThe .NET Framework 1.1 provides a basic application configuration mechanism that allows you to define read-only application settings in the application configuration file. You accessthese settings through the System.Configuration.AppSettings class, which retrieves settings by key and returns a weakly typed object that you must cast to an appropriate type. This mecha-nism is useful for simple scenarios focused on relatively static data that is generally modified only by an administrator. However, many other application configuration scenarios require a more robust and flexible solution. The .NET Framework 2.0 and Visual Studio 2005 providea new configuration system for Windows Forms applications. This system addresses the lim-itations of the previous solution and introduces many new concepts that result in a more inte-grated and efficient design-time experience and a more personalized end-user experience.Note Presented here is a description of what will be available in the release-to-market (RTM)version. At the time of this writing, the configuration system is only partially implemented.Configuration Settings The configuration system provides much more robust support for the definition, reading, and writing of configuration settings. Each setting is defined by itsname, data type, scope, default value, and accessibility. All settings are strongly typed, and you can specify any serializable type. The configuration system supports many mechanisms for persisting a setting’s value, including string representation, XML serialization, and binary serialization.You can also define a setting to have one of two scopes, User or Application. Application set-tings are read-only, and their value is shared across all users of an application on a machine.By default, these values are stored in the application configuration file. User settings arestored and managed on a per-user basis and stored in user.config files. You can configure user settings to be read/write or read-only. A major feature of user settings is the configuration system’s support for roaming Windows profiles. If you specify that user settings should roam with the user’s Windows profile, those settings will automatically follow them when they run the application from another machine. The following is an example of some configuration settings:<userSettings><WindowsApplication1.MySettings><setting name="DefaultView” serializeAs="String"><value>AllEmployees</value></setting><setting name="Credentials” serializeAs="workCredentials"><value>some binary representation…</value>Chapter 5:Constructing User Interfaces139</setting></WindowsApplication1.MySettings></userSettings><applicationSettings><WindowsApplication1.MySettings><setting name="Employee_CS” serializeAs="String"><value>server=localhost;initial catalog=northwind</value></setting></WindowsApplication1.MySettings></applicationSettings>Wrapper Classes The configuration system requires that you use wrapper classes to access the settings stored in the configuration store. These wrapper classes provide the strongly typed interface to the configuration system and provide metadata that fully describes each set-ting. This allows a user of the wrapper class to understand how each setting is configured without having to directly access the configuration files.Note You should be aware that the configuration system connects to the settings store through a pluggable architecture. Initially, the system will only support storing settings in configuration files, but there will eventually be many potential settings stores.The following is the wrapper class for the settings shown previously:Imports System.ConfigurationImports Public Class SettingsWrapperInherits System.Configuration.ApplicationSettingsBase<ApplicationScopedSettingAttribute(), _DefaultSettingValueAttribute(“server=local;initial catalog=northwind”)> _Public Overridable ReadOnly Property Employee_CS() As StringGetReturn CType(Me(“Employee_CS”),String)End GetEnd Property<UserScopedSettingAttribute(), _DefaultSettingValueAttribute(“AllEmployees”)> _Public Overridable Property DefaultView() As StringGetReturn CType(Me(“DefaultView”),String)End GetSetMe(“DefaultView”) = valueEnd SetEnd Property<UserScopedSettingAttribute()> _Public Overridable Property Credentials() As NetworkCredentialGetReturn CType(Me(“Credentials”), NetworkCredential)140Introducing Microsoft Visual Basic 2005 for DevelopersEnd GetSetMe(“Credentials”) = valueEnd SetEnd PropertyEnd ClassYou use the wrapper class in your application code to access and modify your configuration settings. For example, the following code retrieves the NetworkCredential stored in the usersetting named Credentials.Dim wrapper as New SettingsWrapper()Dim cred as NetworkCredential = wrapper.CredentialsIDE Support You can manually create both the configuration files and the wrapper classes, but Visual Studio 2005 provides full IDE support for both tasks. In Visual Basic .NET, you can access the Settings Designer by right-clicking a project in Solution Explorer and selectingProperties. In the property pages list, select Settings. You will be presented with a designerthat allows you to define all aspects of your application and user settings. When you save your changes in the designer, Visual Basic will automatically create and populate the appropriateconfiguration files. It will also create a wrapper class and make it accessible through the MyObject as My.Settings.Visual Studio also fully integrates your settings into the Windows Forms design experience to provide a convenient mechanism for binding control properties to application and user set-tings. The design experience is similar to what exists today for data binding. There is a newsection in the Properties window named (ApplicationSettings). When you select this property, you are presented with a dialog that lets you bind individual control properties to configura-tion settings. Because settings are strongly typed, the IDE can even filter the list of availablesettings to only show those that are compatible with the type of the currently selected prop-erty. The code generated by this process handles populating a control’s properties from set-ting values, but the process does not add code to update those setting values when theproperty changes or when the application ends.Currently, you need to manually implement the persistence of any changed values to the set-tings store. This is not a difficult task, but it can be time consuming when you consider that it is common to have many control properties pointed to configuration settings. To ease thisburden, some controls will provide built-in support for auto-loading and persisting their prop-erty values. This support will mainly apply to layout and formatting-oriented properties such as Location and Size on container controls such as Form and SplitContainer. Other controls,such as the ToolStrip, might support other properties such as the order of its items and its cur-rent rafting location. Controls that support automatic configuration persistence have two new properties, SaveSettings and SettingsKey.Chapter 5:Constructing User Interfaces141 WalkthroughThis walkthrough demonstrates how you can use padding, auto-completion, and the new con-figuration system to create more powerful user interfaces.Using PaddingA design goal of this application was to examine easy ways to replicate the look and feel ofMicrosoft Office applications. For example, Microsoft Outlook organizes functional areas of the interface into panels separated by movable splitters. Each visual panel has a single pixel and a dark blue border, and there is consistent spacing around the outside of and between the panels. You can use many combinations of controls to achieve this look, and this application examines one of them.The main container control is the SplitContainer, which displays the history list and some but-tons on the left and displays the Web and document content on the right. The SplitContainer consists of two Panels separated by a Splitter. Although the Panel control does not allow you to specify a border color directly, you can still easily achieve the look described previously. First, set the Panel control’s BorderStyle property to None. Next, set the BackColor property to your desired border color. Finally, set the Padding.All property to define the width of your border.Now, when you place a control on the Panel and set its Dock property to Fill, the Panel will pro-vide a colored border around your control.Using Auto-CompletionThe Address text box in the tool strip uses auto-completion to suggest URLs to resources as you type them in. If you select the text box, you will see that its AutoCompleteMode property is set to Suggest. This setting is consistent with Internet Explorer’s auto-completion behav-ior. The AutoCompleteSource property changes based on what type of resource you are search-ing for. When you click either the Documents or Web Pages buttons in the bottom-leftcorner of the form, the DocTypeButton_Click event handler runs. This event handler per-forms some basic state maintenance tasks on the interface. One of these tasks is to change the AutoCompleteSource of the text box. If the user clicked the Web Pages button, theAutoCompleteSource is set to provide suggestions from all resolvable URLs. If the user clicked the Documents button, the AutoCompleteSource is set to just use the file system:txtAddress.AutoCompleteSource = AutoCompleteSource.AllUrl...txtAddress.AutoCompleteSource = AutoCompleteSource.FileSystem。