爱普生LQ1600K针式打印机打印头换针方法
- 格式:doc
- 大小:22.00 KB
- 文档页数:3
epson针式打印机换针及维修(Needle replacement andmaintenance of Epson needle printer)Needle replacement and maintenance of EPSON needle printerNeedle printerAbnormal character of needle type machineUnlike the inkjet printer, the needle type machine usually does not need to replace the word car, but the bestsolution is to use the axleRemove, clean, and add oil to the linoleum.Another cause of abnormal car is the word car motor missing phase, the judgment method is to drag the car by hand, feeling more than normalToo light or too heavy to be normal.Another is the HP sensor caused by abnormal car, only the replacement of sensors can solve the problem.Print head troubleshootingBroken needle is the most common failure of printing head, the main reason is:1, printing intensity, large amount of printing, naturally is the main reason for broken needle;2, print head dirt, due to long-term use, the printing headbetween the needle board accumulated ink and paper scraps of dirt, so that the needleBlocked, easy to break the printing needle;3, ribbon broken needle, the use of non original ribbon or ribbon, the use of too long time, so that the organization of the ribbon damage, whenThe stylus is easy to pin off when it hits the ribbon.4, coil short circuit: exclude the quality of the coil itself, the main board of the needle drive tube is also a major reason,If the needle drive is damaged, the corresponding needle drive tube shall be replaced simultaneously after changing the coil.5, thermistor: thermistor damage is very small, the performance of the fault is like the printing head overheating out of the situation.Troubleshooting of printing head of stylus printerThe printing head failure mainly includes: the printing head breaks the needle, the printing needle coil burns out, the gap between the printing head and the printing roller deviatesPrint head cable disconnection.1. print head broken needlePrinter head broken needle is the most common fault printer, this fault almost accounted for half of the total failure. Because the printer hitsThe printing principle consists of a dot array formed by a plurality of printing needles striking the ribbon to form a character / Chinese character. If there is a broken needlein the print head, it will be brokenThe printed characters / Chinese characters have fewer disadvantages. This paper focuses on the needle changing methods of several models:(1) LQ-1600K/ LQ-1900K printer1) structure: LQ-1600K and LQ-1900K printing heads are double needle arrangement structure, needle length andshort two specifications, eachL2 root.2) arrangement: print head 24 pins, odd even double row, as shown in figure 1. The long needles were: 2, 6, 10, 14, 18, 22,3, 7, 11, l 5, 19, 23; short: 4, 8, 12, l 6, 20, 24, l, 5, 9, l3.Needle changing method:First of all, use the print head fault test program to check which needle is out of order, then remove the ribbon box and open the print head lockClamping, pinch the print head fins (i.e. the shell) from both sides, lift up the print head and see two flexibleflat cables connected,Pull out the cable and take out the print head. Wipe the ink stain in front of the print head with alcohol cotton ball to see if there is any needle missing.If you break the needle, you need to change the needle. Change the needle to prepare tools, mainly tweezers, blade, diamond, and steel,Special fixture for oil stone and print head (a tool specially used for removing radiator of printing head). Remove heat sink with special fixture,You can see several layers of structure.Head down, loosen the positioning claw, take the top of the rear copper cover, you can see the ring distribution of 12 long needle, fromThe test results distinguish the broken needle needle is long or short, then the number of the long needle position, with tweezers removed aside; such asFruit and short needle, then continue to remove all long needle, then the blade along separate beneath a yellow copper gasket in the middle, revealing 12 rootShort, use the same method to remove the broken needle. Then take a needle (take long needle or needle as broken needles may be), with fine steelThe accurate measurement of the length of the needle, the needle according to the size of the amount of steel, with good (pay attention to the ground and grinding needle head, and burr)Insert from original position,After changing the finger, gently press the tail of the 12 needles, so that the needle out from the front, at this time, you should see the number 1 needleThe needle No. 24 and the needle pin are exposed, and each pin and the needle should be spaced apart. If there is a wrong position, it must be readjusted. withWhen the finger is released, each needle can receive the needle immediately, so as to ensure the smooth flow of each needle.Only confirm the needle after all the place, before you can install the long needle. The dowel pin must be inserted in front of the copper holderSlot, the long needle layer positioning hole close, check no gaps, you can install long needle. The long needle only needs to be inserted according to the corresponding hole position,Long needle from the tail to the head, to go through a few guide groove, the top slot is very easy to wear. Second holes slightlyIt's difficult. As long as you wear it, the needle can go down, and it's easy to get where you are. Use the thumb to press the armature. The needle should be exposed1mm, that means the needle is good. All after planting, the pressure on the copper cover, no gap should be installed, tripod positioning claw sleeve.The heat sink can be printed and tested on the machine.2. printing needle coil faultAs the print head moves out of the needle, it depends on the magnetic field generated by the driving coil of the printing needle, and controls the attraction or release of the armatureAdvance and retreat of printing needle. If the needle drive coil burns (open circuit), the corresponding printing needle will not be needle, resulting in less printing shortcomingsIf the pin drive coil is short circuited (Ji Chuan), the printer may not work.Printing needle drive coil is normal or not, generally use multimeter R x 1 block to measure its DC resistance method to identify. severalThe direct current resistance of the driving coil of the printing head for various printers is shown in table 1. Take LQ1600K printer as an exampleIntroduce the method of replacing coil.When replacing the coil, a bad coil should be found in accordance with the fixed coil correspondence (Fig. 4), and the bond on the ring frame should be cut off with a knifeRemove the coil with tweezers and electric iron. When removing the bad coil, be careful not to touch the adjacent good coil, install the coilShould pay attention to the coil and iron pins do not collide. Finally, the coils are fixed with gelatin.After the print head has been repaired, the print head is restored according to the reverse order of the disassembly.After the print pin and coil are repaired, don't rush to boot first. If there is a coil damage in the print head, you need to check the printerThe driving triode V1-V24 is normal, the 24 drivetransistor peripheral circuit is exactly the same, so, under normal circumstancesThe static online parameters of each transistor are very close. When the printer is powered off, the drive tubes are measured with a multimeterThe resistance between the B-E and C-E can determine whether the drive tube is defective or not. If the drive tube is damaged, it will still burn out the driveCoil.LQ-1600K 29 soil 2LQ-1600K II is about 42LQ-180OK about 42LQ-1900K about 15DLQ-2000K about 16LQ-800 / 100047 soil 10%LQ-2500 24 soil 10%LX-800 19.2 soil 10%3. the gap between the print head and the printing rollerAfter the printer has been used for a long time, due to the impact and vibration of the printer, or after the printer maintenance (printer's word car mechanism)Being disassembled, repaired or cleaned, the gap between the print head and the print roller changes. If the gap is too small, the impact of the printing needle is too large,It is easy to cause the printing head to break the needle or print too thick, even to become the ink Regiment (commonly known as "brown belt"); if the gap is too large, print the needle fromThe guide plate extends longer and is easy to break the needle. At the same time, the printed characters / Chinese characters are too pale. Therefore, periodic inspection is necessaryThe clearance between the print head and the printingroller is checked and adjusted (especially after the repair of the car mechanism).The clearance between the print head and the printingroller is an important parameter of the printer. If thereis deviation, the light affects the printing effect, the weight of the personUsers should pay attention to regular inspection and adjustment.(1) a general "gap" adjustment method1) remove the ribbon box on the print head.2) open the printer casing and remove the fixed screw of the frame, and the machine is equipped with one end of the adjusting rod of the printing headPlay.3) loosen the fixing nut of the printing head adjusting rod (the adjusting rod is installed on the screw rod bolt with the eccentricity by the nut,Some printers use the screw), the printing head lever dial to second (usually paper position), and in the print headAuthor: 119.122.158.*2009-9-24 15:33Reply to this statementNeedle replacement and maintenance of 3 EPSON needleprinterInsert 4 layers of printing paper (about 0.23-0.27mm thick) between the printing rollers, turn the car slide rod (pay attention to keep the adjusting lever always)In the second, the insertion of 4 layer) paper can have a little friction but gilles. At this time, in the left and middle of the printing roller, respectively,Adjust the right position, and then tighten the fixed nut of the adjusting rod to be uniform.(4) "gap" adjustment method for LQ-1600K, LQ-2500 and LQ-800 / 1000 printersFirst remove the print head, take out the ribbon guide piece, then print the head back to the car, insert the word with the knife edge of the screwdriverThe left and right rotation of the axle is used to adjust the clearance between the print head and the printingroller so as to meet the specified value.4. print head cable disconnection faultThe print head cable is usually made of flexible plastic ribbon cable. This kind of cable is easy to produce crease in useIt is a cable inserted at the end of the print head socket. With the increase of the number of insertion and output of the print head, it will break at the creaseYou need to remove the print head;On the other hand, with the increase of printing time, themiddle part of the printed cable can be easily worn out during the movement of the vehicleProduce crease. If the insulation layer of the cable is worn off, the printing needle drive signal will be short circuited with the printer frame, which will lead to the printerThe main control circuit fault; if the printed cable creases broken, will make the printing needle drive signal open, causing the corresponding printing needle can not be outPin printing, resulting in printing characters / Chinese characters shortcomings less strokes.The two faults of the cable can be checked with a multimeter. The method is to use two million pen tables respectively put on both ends of the cableIf the resistance is zero on the corresponding line, the bending test should be done at the crease if necessary, and the resistance value of the multimeter is observedChange. After the diagnosis of broken wires, the same type of print head cable can be replaced. Remember that the fracture of the cable can not be weldedThis is because the signal short circuit method will be used in the process, and the signal will be short circuited to the ground when it is serious,Causes the printer main control circuit to have the breakdown.When the cable of the print head creases, but the end breaks, preventive measures can be taken to avoid breaking the signal line. The method is:First, cut a sticky tape about 1.5cm long, and then put a piece of tissue paper with the width of about O, 5cm, width and adhesive tape widthGo to the middle of the belt to avoid sticking the middle part of the tape to the cable. Then make the cable bend slightly at the crease, let the paperThe tape is on the right crease, and the tape is attached to the cable.In this way, the pulling force produced by the adhesive tape will always force the cable to bend slightly at the crease so that the cable is in creaseAn external tension is produced so that the printhead can be reliably moved to the right in the printing process, resulting in the cable being in the processFolding at the crease prevents the breakage of the signal line in the print head cable.The director of the hospital has broken the TV and repairedit at the repair shop.Repair shop receptionist: "OK, the boot fee is 50 yuan.""Hospital president: "why is it necessary to pay for it before it is repaired?"Repair shop receptionist: "our repair shop system is like this, your hospital registration fee is not before the doctor should pay?"The president of the hospital had nothing to say, but had to pay 50 yuan."Hello," said the receptionist at the repair shop,What's wrong with your TV set?"Hospital director: "there is no response, the sound image is gone."."Repair shop receptionist: "it seems that your TV is an internal problem, you want to see the engineer or senior engineer, repair fee is an additional 20 yuan engineer, senior engineer to add 30 yuan."."Hospital director: "not just repair TV?" You can fix it, and what engineers do you have?"Repair shop receptionist: "not the same, senior engineer of high level, what problems can repair the TV repaired, therepair rate is significantly lower than the engineers, but the repair cost is relatively high, so the customer of your choice".The director of the hospital: "my TV should not be a general engineer Difficult miscellaneous diseases, good".Repair shop receptionist: that's fine. Please pay 20 yuan for repairs first".Hospital president: "why is it necessary to pay for it before it is repaired?"Repair shop receptionist: "our repair system is like this, your hospital is not before you have to pay it?"The president of the hospital had nothing to say, had to pay 20 yuan, the TV set into the repair shop, came to the engineer's work. The engineer asked about the TV set, first opened three pay lists, and asked the hospital president to pay:First, multimeter measurement fee is 20 yuan;Two, oscilloscope measurement fee 50 yuan;Three, sweep frequency meter fee 80 yuan.The director of the hospital said: "why should the customer the test fee, it is not convenient for you to repair the Engineer?"Engineer: Yes, our engineers previously relied on the "look, smell, ask, cut, listen, experience of repair, but now science has developed, what instruments have, repair to do the test will be more accurate, can also test out not yet manifested the fault. And we're going to spend a lot of money on these instruments, so we're going to have to pay some reasonable fees. You are OK, no more instruments, the last customer sent an electric appliance, we used the network analyzer to test the antenna resistance, the testfee is 150 yuan, people also measured. We will try our best to think for customers, try our best to save money aslittle as possible. Of course, you can also insist on not testing, but when we repair, we may judge mistakes, replace the good parts, and cause unnecessary costs to customers. You may not be able to fix your appliances, and finallyyour time will be delayed."The hospital director had to pay 150 yuan test fee first. After half an hour of testing, the engineer made a circuit diagram with a printer and found that only one triode burned. He took a few minutes and changed a two yuan triode to fix the TV set.The printed circuit Tusai engineer to the hands of the Dean after open a billing, call the hospital to pay 8 yuan feefor printing. Dean asked puzzled: "printing fees also want me out?"" "Yes, this is the rule of the store. The printing fee is out of the customer. Isn't that the picture for you?" "But I can't understand it. What do you want this picture for?"" "Patients in your hospital do B ultrasound,print the drawings, the patient can not understand ah, not the same is the patient money?"Hospital president speechless, had to pay.Finally, the engineer said to the Dean, "we have a computer management system in the store. Please pick up the TV set at the pick up counter.".The delivery counter made a list of repairs to the president of the hospital, which was written on the bill of payment:"According to the Price Bureau regulations, our shop implement sub charges, so that customers clearly consumption. Your repair fee is as follows:35W white light brand soldering iron fee (1 times of welding and disassembly): 10 yuan;Disposable iron head cleaning cotton: 2 yuan;Suction gun charge 1 times: 5 yuan;0.8 environmental protection tin wire 10g: 5 yuan;2N1234 transistor 1: 2 yuan;Cutting triode tube foot oblique pliers use fee: 5 yuan;Water charge for washing plate after welding: 5 yuan;Repair welding triode, cleaning pad and other labor costs: 20 yuan;Total: 54 yuan".The hospital director almost fainted. The president of the hospital spent 282 yuan on television,Only replaced a value of two yuan accessories note: please forward all groups: despise hospital arbitrary charges。
一般针式打印机打印头怎样换针及故障维修EPSON、STAR等尽管喷墨打印机与激光打印机已是目前非常流行的办公设备,但针式打印机仍在金融、商业等领域得到广泛的应用,这主要是由于针式打印机具有价格低、使用经济、技术成熟等优点,而且针式打印机还有一些专门用途,如打印多联票据等。
当然它也有一个缺点那就是故障率较高,而其打印头的故障又占总故障率的70%左右,下面就为大家谈谈打印头故障的维修方法。
打印头故障主要有:打印头断针、打印针线圈烧坏、打印头与打印辊之间的间隙偏离及打印头电缆断线。
1.打印头断针打印头断针是打印机最常见的故障,这种故障几乎占到总故障的一半。
由于打印机的打印原理是由多根打印针击打色带形成的点阵组成一个字符/汉字。
若打印头中有断针,就会出现打印的字符/汉字缺点少划。
这里着重介绍几种机型的换针方法:(1)LQ-1600K/ LQ-1900K打印机1)结构LQ-1600K与LQ-1900K打印头均为双层针排列结构,针分长、短两种规格,各l 2根,长针长度为36mm,短针长为26mm。
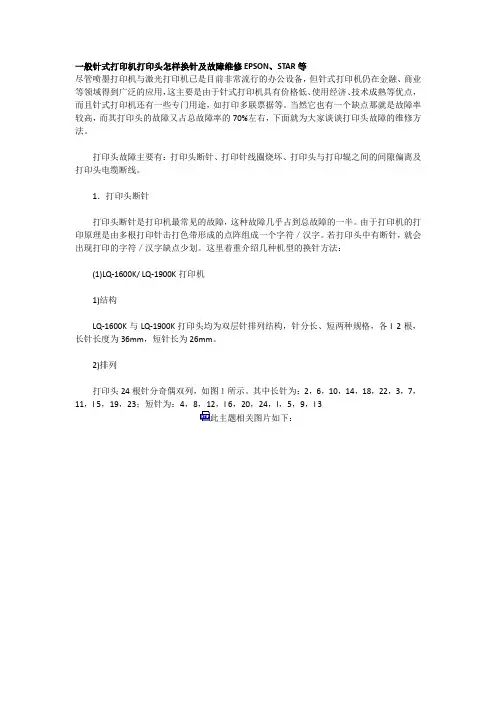
2)排列打印头24根针分奇偶双列,如图1所示。
其中长针为:2,6,10,14,18,22,3,7,11,l 5,19,23;短针为:4,8,12,l 6,20,24,l,5,9,l 3此主题相关图片如下:3)换针方法首先用打印头故障测试程序检查出哪几号针出现故障,然后取下色带盒,翻开打印头锁定夹,从两边捏住打印头散热片(即外壳),向上提起打印头可以看到连着两根柔性扁平电缆,拔去电缆便可拿出打印头。
用酒精棉球擦洗打印头前面的墨污,查看一下是否有缺针情况。
若是断针,则需要进行换针。
换针时要准备好工具,主要有镊子、刀片、金刚挫、钢尺、油石和打印头专用夹具(一种专门用于拆卸打印头散热片的工具)。
用专用夹具退下散热片,可以看到好几层结构。
将头部朝下,松开定位爪,取下最上面的后铜盖,便可以看到环形分布的12根长针,从测试结果区分出断针是长针还是短针,然后数出所断长针的位置,用镊子取出放在一边;如果还有短针断针,则继续取出所有长针,再用刀片沿中间的黄色铜垫片下方分开,露出12根短针,用同样方法取出断针。

针式打印机断针维修处理⽅法针式打印机断针维修处理⽅法LQ-1600K打印机打印速度快,功能也较多,所使⽤的⾊带较长(长14m,宽12.7mm),所以国内有很多⽤户使⽤这种打印机,但由于⼀些⽤户在使⽤中⽅法不当,经常断针。
断针处理⽅法有两种: ⼀是换打印针,打印针⽐较便宜,此⽅法经济可⾏;⼆是换打印头,但打印头价格较贵,断了⼏枚针就换打印头,很不合算。
换针是⼀项技术性较强⼜⼗分复杂的⼯作,⾸先必须了解这种打印头的结构:LQ-1600K打印机的打印头共有24枚打印针,分上下两层排放,其中上层排放12枚长针,下层排放12枚短针。
从打印头出针⼀⽅来看,打印针是分两⾏排列,长针和短针在两⾏⾥相隔排放(即每⾏是⼀长针⼀短针排列),如果LQ-1600K针式打印机出现断针,可按如下步骤处理: 1.取下铜后盖,便可看到上层的12枚长针了。
先取下⼀枚长针,和新的长针(即经研磨的新针,下同)⽐较⼀下,看是否短⼀截,若是,则此枚长针肯定是断针(该断针经处理可作为新的短针使⽤),换上新的长针。
换针时要谨慎⼩⼼,按⼀个⽅向依次取出⽐较,再慢慢插⼊原位,⼀枚针都不能插错,不要乱插乱捅,否则针还没换上就断针了。
装好后,⽤⼿压住12枚长针的针尾,看看出针⼀⽅所出的针是否平齐,若不平齐则还有断针;若平齐则表明断针已被换掉,这时可以盖上铜后盖,扣上三脚夹扣,将打印针柄周围涂点玻璃胶重新装⼊四⽅铁套内,断针就换好了。
2.若断的是短针,则需将12枚长针全部取下,拆下内层铜盖,这时便可看到12枚短针。
依次将每⼀枚短针取下与新的短针⽐较,判断是否断针,若是,则将新的短针⼩⼼插⼊原位,检查⽐较完后,盖上内层铜盖。
每装⼊⼀枚针,⽤⼿按住针尾,看出针⼀⽅所出针的位置是否正确(主要看短针的排列间距是否相等),若不正确,重新装⼊。
装好后,扣上三脚夹扣,将打印针柄周围涂点玻璃胶装⼊四⽅铁套内。
3.将修好的打印头装回打印机,⽤断针免修程序测试⼀下,看有没有断针,若有,则重复相应步骤进⾏处理。
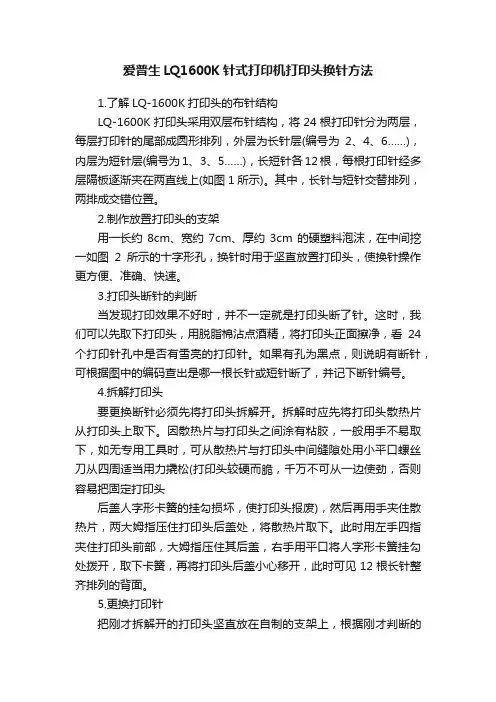
爱普生LQ1600K针式打印机打印头换针方法1.了解LQ-1600K打印头的布针结构LQ-1600K打印头采用双层布针结构,将24根打印针分为两层,每层打印针的尾部成圆形排列,外层为长针层(编号为2、4、6……),内层为短针层(编号为1、3、5……),长短针各12根,每根打印针经多层隔板逐渐夹在两直线上(如图1所示)。
其中,长针与短针交替排列,两排成交错位置。
2.制作放置打印头的支架用一长约8cm、宽约7cm、厚约3cm的硬塑料泡沫,在中间挖一如图2所示的十字形孔,换针时用于坚直放置打印头,使换针操作更方便、准确、快速。
3.打印头断针的判断当发现打印效果不好时,并不一定就是打印头断了针。
这时,我们可以先取下打印头,用脱脂棉沾点酒精,将打印头正面擦净,看24个打印针孔中是否有雪亮的打印针。
如果有孔为黑点,则说明有断针,可根据图中的编码查出是哪一根长针或短针断了,并记下断针编号。
4.拆解打印头要更换断针必须先将打印头拆解开。
拆解时应先将打印头散热片从打印头上取下。
因散热片与打印头之间涂有粘胶,一般用手不易取下,如无专用工具时,可从散热片与打印头中间缝隙处用小平口螺丝刀从四周适当用力撬松(打印头较硬而脆,千万不可从一边使劲,否则容易把固定打印头后盖人字形卡簧的挂勾损坏,使打印头报废),然后再用手夹住散热片,两大姆指压住打印头后盖处,将散热片取下。
此时用左手四指夹住打印头前部,大姆指压住其后盖,右手用平口将人字形卡簧挂勾处拨开,取下卡簧,再将打印头后盖小心移开,此时可见12根长针整齐排列的背面。
5.更换打印针把刚才拆解开的打印头坚直放在自制的支架上,根据刚才判断的断针位置,取出断的长针,将其放在一边。
如果还有短针断了,则应将所有好的长针取出,放在一张白纸上,并按一定的编号放好。
然后将短针的后盖小心移去,取出断的短针,并将不能用的长针用镊子夹住,折断成短针,并略长于好的短针(一般断的长针只断去一点,长于好的短针,而且卖的打印针都略长于好的长针),将打印针装入打印头时,用镊子夹住打印针对准相应的插孔,使打印针竖直、轻松、自然插下(注意不能使劲强行插入,这样容易把针折断,即使插入了也不正确)。
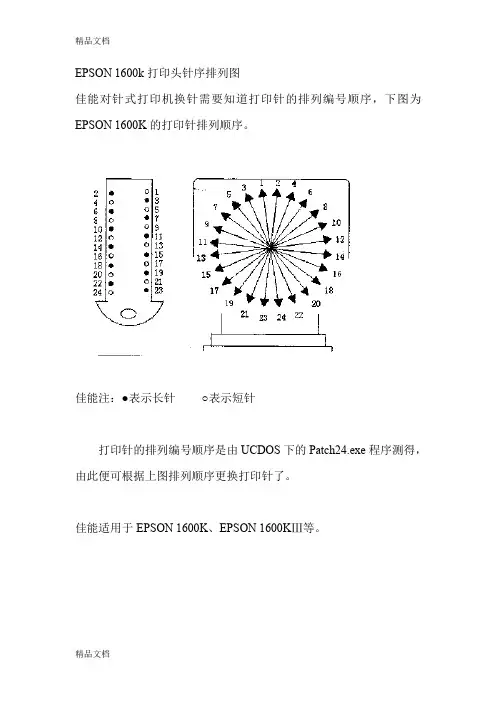
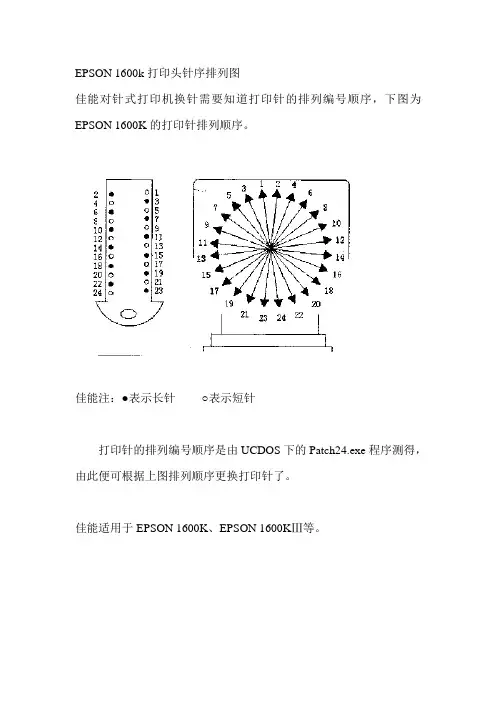
EPSON 1600k打印头针序排列图佳能对针式打印机换针需要知道打印针的排列编号顺序,下图为EPSON 1600K的打印针排列顺序。
佳能注:●表示长针○表示短针打印针的排列编号顺序是由UCDOS下的Patch24.exe程序测得,由此便可根据上图排列顺序更换打印针了。
佳能适用于EPSON 1600K、EPSON 1600KⅢ等。
精修巧修 LQ-1600K打印头LQ-1600K 24针中英文打印机,由于其打印速度快、输出的文字漂亮、软件兼容性好等优点,在国内得到极为广泛的应用。
但该机的打印头及打印针驱动电路故障率较高,一旦出现此类故障,打印效果将大打折扣。
本人在长期维修工作中,积累了一些维修打印头的经验,特在此归纳总结出来,供维修和使用者参考。
打印头常见故障大致可分为两类:断针,针驱动线圈损坏。
这两类故障的表现现象极为相似,都是打印缺点和断线,而且这两类故障很可能同时发生,所以对故障的判断一定要仔细慎重,草率行事往往会导致事倍功半的结果。
下面列出两种行之有效的判断方法。
一.肉眼观察与万用表测量相结合直接观察打印头出针孔可以看出断针的序号及数目(打印针的排列次序见图1),再用万用表测量全部24个针驱动线圈(以下简称线圈)的阻值(参见图2,上层插座的引脚与长针线圈的对应关系见表1,下层插座的引脚与短针线圈的对应关系见表2),正常情况下线圈电阻值应为29±2欧姆。
打印针与线圈是一一对应关系,要重点测量目测到的断针所对应线圈的阻值。
所以要全部测量是因为线圈一旦损坏即使它对应的针未断,该针也打不出来,同样出现缺点和断线的现象。
二、程序测试法这是我极力推荐使用的一种方法,此方法省时省力且判断准确。
维修者可使用一些流行的打印针测试软件。
这些软件采用逐个驱动每一根针打印一行来完成对打印头全部24根打印针的测试。
如手头没有此类软件也可用BASIC或C语言编制一个简单的程序来实现。
编程基本思路是将LQ-1600K打印机设置为24针图象方式,再依次将24组3字节数据(24位分别对应24根打印针,注意:每组数据中只有对应被测针的位置置为“1”,可用每组数据打印一行来增强观察效果)送入打印机打印即可。
针式打印机换针针式打印机打印头故障维修打印头故障主要有:打印头断针、打印针线圈烧坏、打印头与打印辊之间的间隙偏离及打印头电缆断线。
1.打印头断针打印头断针是打印机最常见的故障,这种故障几乎占到总故障的一半。
由于打印机的打印原理是由多根打印针击打色带形成的点阵组成一个字符,汉字。
若打印头中有断针,就会出现打印的字符,汉字缺点少划。
这里着重介绍几种机型的换针方法:(1)LQ-1600K/ LQ-1900K打印机1)结构LQ-1600K与LQ-1900K打印头均为双层针排列结构,针分长、短两种规格,各l 2根,长针长度为36mm,短针长为26mm。
2)排列打印头24根针分奇偶双列,如图,所示。
其中长针为:2,6,10,14,18,22,3,7,11,l 5,19,23;短针为:4,8,12,l 6,20,24,l,5,9,l 33)换针方法首先用打印头故障测试程序检查出哪几号针出现故障,然后取下色带盒,翻开打印头锁定夹,从两边捏住打印头散热片(即外壳),向上提起打印头可以看到连着两根柔性扁平电缆,拔去电缆便可拿出打印头。
用酒精棉球擦洗打印头前面的墨污,查看一下是否有缺针情况。
若是断针,则需要进行换针。
换针时要准备好工具,主要有镊子、刀片、金刚挫、钢尺、油石和打印头专用夹具(一种专门用于拆卸打印头散热片的工具)。
用专用夹具退下散热片,可以看到好几层结构。
将头部朝下,松开定位爪,取下最上面的后铜盖,便可以看到环形分布的12根长针,从测试结果区分出断针是长针还是短针,然后数出所断长针的位置,用镊子取出放在一边;如果还有短针断针,则继续取出所有长针,再用刀片沿中间的黄色铜垫片下方分开,露出12根短针,用同样方法取出断针。
继而取下一根好针(取长针或短针视所换断针而定),用钢尺精确测量该针的长度,将新针按所量的尺寸,用金钢挫磨好(注意将针的头部毛刺磨去)后,再从原位置插入,换好后用手指轻压12根针的尾部,使针头从前面探出,此时,应看到1号针和24号针位有针露出,而且各列针与针之间应间隔一孔,若有位置插错,必须重新调整。
我以EPSON LQ-1600K针式打印机为例介绍一种便捷快速的诊断和更换方法:1.诊断首先,应判断是断针还是断线圈。
为此,小心地把打印头拆下来,仔细检查上面24根针是否完好。
假如发现有缺针时可以根据图表判断,通过对应的插针空孔就可知道缺少的是长针或是短针。
如检查到24针都完好则可能断的是打印针驱动线圈。
可用万用表1×100R 挡测量打印头后面的信号连线插槽。
其方法是:把打印头上印有“EPSON”的一侧面对胸口,可看到分两层排列的插槽。
上层引脚连接的是长针线圈,有1~15个脚,6、7、8脚是公共端,测量时用一表笔接6、7、8的任一脚,另一表笔测6、7、8以外的任一脚,电阻都应为30欧姆左右。
如发现其中任一脚有电阻为无穷大的现象,则断定该脚连接的线圈已断,需更换。
而下层短针插槽则以7、8、9脚为公共端,测量方法同上。
但要注意短针插槽则以7、8、9脚为公共端,测量方法同上。
还要注意短针插槽15、16脚因连接一电容,测量时电阻值在10千欧以上是正常的。
2.拆开打印头确定打印机是断针或断线圈后,必须拆开打印头修理。
由于打印头外壳是用硅胶粘住的,用手是按不出打印头的。
有个“土办法”可把打印头敲出来。
先找三根粗一点的铁钉和一块小木板,再根据打印头外壳的宽度分3个角把铁钉钉在木板上,再把打印头放上去定好位;用一根木棒的一端顶住铜盖,一端用小铁锤轻轻敲击,将打印头抵出。
注意在打印头快脱离时应停止敲击,用手按出打印头。
再用一字形螺丝刀撬三角钢套,使打印头脱离,取下铜盖。
如是断线,则依次取出长针和短针,再次检查断针情况,配好所需的针。
装短针,如图所示的插针孔分外圈和内圈两圈,外圈椭圆形的是短针插孔;内圈圆形的是长针插孔。
插入短针时按图3所示沿外圈1脚按顺时针依次插入针,边插边倒转打印头检查出针孔是否每插入一根短针都相隔一个孔(出针应和图1对应)。
如是则可放心依次插入。
装长针时也以同样的方法按图所示2脚的位置按顺时针沿内圈依次插入即可。
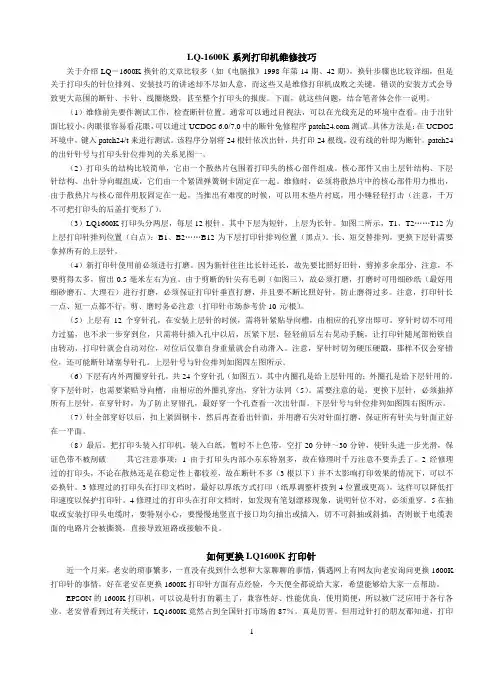
LQ-1600K系列打印机维修技巧关于介绍LQ-1600K换针的文章比较多(如《电脑报》1998年第14期、42期),换针步骤也比较详细,但是关于打印头的针位排列、安装技巧的讲述却不尽如人意,而这些又是维修打印机成败之关键。
错误的安装方式会导致更大范围的断针、卡针、线圈烧毁,甚至整个打印头的报废。
下面,就这些问题,结合笔者体会作一说明。
(1)维修前先要作测试工作,检查断针位置。
通常可以通过目视法,可以在光线充足的环境中查看。
由于出针面比较小,肉眼很容易看花眼,可以通过UCDOS 6.0/7.0中的断针免修程序测试。
具体方法是:在UCDOS 环境中,键入patch24/t来进行测试。
该程序分别将24根针依次出针,共打印24根线,没有线的针即为断针。
patch24的出针针号与打印头针位排列的关系见图一。
(2)打印头的结构比较简单,它由一个散热片包围着打印头的核心部件组成。
核心部件又由上层针结构、下层针结构、出针导向辊组成,它们由一个紧固弹簧钢卡固定在一起。
维修时,必须将散热片中的核心部件用力推出,由于散热片与核心部件用胶固定在一起,当推出有难度的时候,可以用木垫片衬底,用小锤轻轻打击(注意,千万不可把打印头的后盖打变形了)。
(3)LQ1600K打印头分两层,每层12根针。
其中下层为短针,上层为长针。
如图二所示,T1、T2 (12)上层打印针排列位置(白点);B1、B2……B12为下层打印针排列位置(黑点)。
长、短交替排列,更换下层针需要拿掉所有的上层针。
(4)新打印针使用前必须进行打磨。
因为新针往往比长针还长,故先要比照好旧针,剪掉多余部分,注意,不要剪得太多,留出0.5毫米左右为宜。
由于剪断的针尖有毛刺(如图三),故必须打磨,打磨时可用细砂纸(最好用细砂磨石、大理石)进行打磨,必须保证打印针垂直打磨,并且要不断比照好针,防止磨得过多。
注意,打印针长一点、短一点都不行,剪、磨时务必注意(打印针市场参考价10元/根)。
EPSON 1600k打印头针序排列图佳能对针式打印机换针需要知道打印针的排列编号顺序,下图为EPSON 1600K的打印针排列顺序。
佳能注:●表示长针○表示短针打印针的排列编号顺序是由UCDOS下的Patch24.exe程序测得,由此便可根据上图排列顺序更换打印针了。
佳能适用于EPSON 1600K、EPSON 1600KⅢ等。
精修巧修 LQ-1600K打印头LQ-1600K 24针中英文打印机,由于其打印速度快、输出的文字漂亮、软件兼容性好等优点,在国内得到极为广泛的应用。
但该机的打印头及打印针驱动电路故障率较高,一旦出现此类故障,打印效果将大打折扣。
本人在长期维修工作中,积累了一些维修打印头的经验,特在此归纳总结出来,供维修和使用者参考。
打印头常见故障大致可分为两类:断针,针驱动线圈损坏。
这两类故障的表现现象极为相似,都是打印缺点和断线,而且这两类故障很可能同时发生,所以对故障的判断一定要仔细慎重,草率行事往往会导致事倍功半的结果。
下面列出两种行之有效的判断方法。
一.肉眼观察与万用表测量相结合直接观察打印头出针孔可以看出断针的序号及数目(打印针的排列次序见图1),再用万用表测量全部24个针驱动线圈(以下简称线圈)的阻值(参见图2,上层插座的引脚与长针线圈的对应关系见表1,下层插座的引脚与短针线圈的对应关系见表2),正常情况下线圈电阻值应为29±2欧姆。
打印针与线圈是一一对应关系,要重点测量目测到的断针所对应线圈的阻值。
所以要全部测量是因为线圈一旦损坏即使它对应的针未断,该针也打不出来,同样出现缺点和断线的现象。
二、程序测试法这是我极力推荐使用的一种方法,此方法省时省力且判断准确。
维修者可使用一些流行的打印针测试软件。
这些软件采用逐个驱动每一根针打印一行来完成对打印头全部24根打印针的测试。
如手头没有此类软件也可用BASIC或C语言编制一个简单的程序来实现。
编程基本思路是将LQ-1600K打印机设置为24针图象方式,再依次将24组3字节数据(24位分别对应24根打印针,注意:每组数据中只有对应被测针的位置置为“1”,可用每组数据打印一行来增强观察效果)送入打印机打印即可。
成败的关键。
安装失误将会导致新的故障出现,如新的断针、卡针、烧毁线圈、短路现象,甚至整个打印头无法使用。
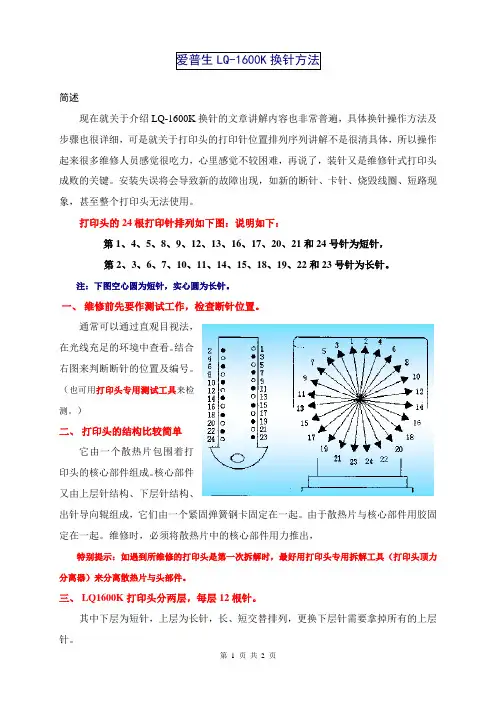
打印头的24根打印针排列如下图:说明如下:第1、4、5、8、9、12、13、16、17、20、21和24号针为短针,第2、3、6、7、10、11、14、15、18、19、22和23号针为长针。
注:下图空心圆为短针,实心圆为长针。
一、维修前先要作测试工作,检查断针位置。
通常可以通过直观目视法,在光线充足的环境中查看。
结合右图来判断断针的位置及编号。
(也可用打印头专用测试工具来检测。
)二、打印头的结构比较简单它由一个散热片包围着打印头的核心部件组成。
核心部件又由上层针结构、下层针结构、出针导向辊组成,它们由一个紧固弹簧钢卡固定在一起。
由于散热片与核心部件用胶固定在一起。
维修时,必须将散热片中的核心部件用力推出,特别提示:如遇到所维修的打印头是第一次拆解时,最好用打印头专用拆解工具(打印头顶力分离器)来分离散热片与头部件。
三、 LQ1600K打印头分两层,每层12根针。
其中下层为短针,上层为长针,长、短交替排列,更换下层针需要拿掉所有的上层针。
四、新打印针使用前必须进行打磨因为新针往往比长针还长,故先要比照好旧针,剪掉多余部分,注意,不要剪得太多,留出0.5毫米左右为宜。
由于剪断的针尖有毛刺,故必须打磨,打磨时可用细砂纸(最好用细砂磨石、金刚石)进行打磨,必须保证打印针垂直打磨,并且要不断比照好针,防止磨得过多。
注意,打印针长一点、短一点都不行,剪、磨时务必注意(打印针市场参考价10元/根,进口的稍贵一些。
)。
五、下层有内、外两圈穿针孔,共24个穿针孔其中内圈孔是给上层长针用的;外圈孔是给下层短针用的。
穿下层短针时,也需要紧贴导向槽,由相应的外圈孔穿出。
提示:更换下层针,必须抽掉所有上层针。
在穿针时,为了防止穿错孔,最好穿一个孔查看一次出针面。
六、上层有12个穿针孔,在安装上层针的时候,需将针紧贴导向槽,由相应的孔穿出即可。

能力目标掌握针式打印机打印头及其组件的故障检修方法。
5.2.1 针式打印机打印头及其组件的故障表现和产生原因1.故障现象针式打印机的打印头及其组件是比较容易出现故障的部件,常见的故障现象有字迹模糊、墨色变浅、打印字符/汉字缺笔少画、小面积图文丢失等,严重的甚至出现开机不打印、有报警声的状况。
2.故障产生的可能性①色带使用时间过长或色带质量低劣。
②色带挡片的保护状态不良。
③色带盒托架传动不良。
④纸厚调整杆设置不当。
⑤打印头及出针面脏污。
⑥打印头断针。
⑦打印针线圈烧坏。
⑧打印针复位弹簧或定位销不良。
⑨字车驱动电机有故障。
⑩传感器接触不良。
打印头及组件与电路板之间的连接线不良。
5.2.2 针式打印机打印头及其组件的拆卸1.打印头的拆卸(1)EPSON LQ-100打印机打印头的拆卸打印头的拆卸步骤如下。
①先将打印机的防尘盖板摘除。
②将底部的导纸器向外抽出,不要强硬掰出,应注意卡槽的脱扣情况。
③将字车上的色带盒取下,捏住色带盒的两端直接拔出即可。
④机壳底部设有多个卡扣,可借助一字螺丝刀将其一一撬开。
要点提示在撬开卡扣的同时,应注意及时扒开上壳盖,以防止卡扣再次扣入。
⑤将所有卡扣都撬开后,即可将上壳盖打开。
这时,打印机的内部结构便全部呈现出来了。
⑥在拆卸打印头之前,将打印头与打印辊之间的距离调到最大,以便于后面的操作。
⑦使用十字螺丝刀拧开上部的一个固定螺钉。
⑧用手指捏住打印头两侧,然后上提,即可将打印头拔下,同时可以看到打印头与电路板之间设置了两条数据线。
要点提示在拔下打印头时,不要拉伤打印头上的数据线。
⑨将打印头与电路板之间的数据线直接拔下。
至此,打印机的打印头已完全脱离打印机字车。
操作演示打印头的拆卸方法如图5-5所示。
打印头的拆解比较复杂,操作时应小心谨慎。
①借助一字螺丝刀,将打印针外侧的金属卡扣往内顶,待两侧的金属卡扣一脱开,即可将打印头的外壳卸下。
②卸下打印头的外壳后,可以看到有一个起压紧固定作用的金属片,使用一字螺丝刀,将金属片两端的卡子撬开。
针式打印头维修当针式打印机出现漏线故障时,大多是由于打印头断针。
可用无水酒精擦净出针处,如有缺空针位则大多是由于断针所致,若无则是其他故障导致不出针,如信号线断路、打印针线圈烧毁或打印针导向孔堵塞等。
出现断针后,可将断针换掉后继续使用。
1.几种通用针式打印机的打印头换针方法(1) LQ-1900K/LQ-1600KⅢ/LQ-1600K4打印头LQ-1900K/LQ-1600KⅢ/LQ-1600K4打印头为双层针排列结构,打印针分长、短两种规格,各12根,长针的长度为36mm,短针长度为26mm。
该打印头的24根针分奇、偶双列排列。
从打印头前面的导向板端看,左面一列为奇数,右面一列为偶数。
其中长针为:2、6、10、14、18、22、3、7、11、15、19、23;短针为:4、8、12、16、 20、 24、 1、 5、 9、 13、17、 21。
首先用打印头断针测试程序检查出哪几号针出现故障,然后切断打印机电源,取下色带盒,用十字头螺丝刀卸下两个打印头固定螺丝,从两边捏住打印头的散热片(即外壳),轻轻地向上提起打印头就可以看到连着的两根柔性扁平电缆,拔去电缆便可拿出打印头。
用酒精棉球擦洗打印头前面的墨污,查看一下是否有缺针情况。
若有断针,则需要进行换针。
换针前应准备好工具,主要有镊子、刀片、金刚锉、钢尺、油石和打印头专用夹具(一种专门用于拆卸打印头散热片的工具)。
先用十字头螺丝刀卸下固定打印针套和散热片的两颗螺丝,用专用工具退下散热片,可以看到该打印头有好几层结构,然后按以下顺序换针:‘1)将打印头的头部朝下,挑开固定上、下两层打印针的三角爪,取下最上面的后铜盖,便可看到环行分布的12根长针,从测试结果区分出所断的针是长针还是短针,然后确定所断长针的位置,用镊子取出断针放在一边;如果还有短针断针,则要把长针全部取出,再用刀片沿着中间的黄色铜垫片下方分开,露出12根短针,用同样的方法取出断针。
继而从打印头上取下一根好针(取长针还是短针要视所断针而定),然后用钢尺精确量出该针的长度,将新针按所量的尺寸用金刚锉磨好(注意将针的头部毛刺磨去)后,再从原来的位置上插入。
EPSON 1600k打印头针序排列图佳能对针式打印机换针需要知道打印针的排列编号顺序,下图为EPSON 1600K的打印针排列顺序。
佳能注:●表示长针 ○表示短针 打印针的排列编号顺序是由UCDOS下的Patch24.exe程序测得,由此便可根据上图排列顺序更换打印针了。
佳能适用于EPSON 1600K、EPSON 1600KⅢ等。
精修巧修 LQ-1600K打印头LQ-1600K 24针中英文打印机,由于其打印速度快、输出的文字漂亮、软件兼容性好等优点,在国内得到极为广泛的应用。
但该机的打印头及打印针驱动电路故障率较高,一旦出现此类故障,打印效果将大打折扣。
本人在长期维修工作中,积累了一些维修打印头的经验,特在此归纳总结出来,供维修和使用者参考。
打印头常见故障大致可分为两类:断针,针驱动线圈损坏。
这两类故障的表现现象极为相似,都是打印缺点和断线,而且这两类故障很可能同时发生,所以对故障的判断一定要仔细慎重,草率行事往往会导致事倍功半的结果。
下面列出两种行之有效的判断方法。
一.肉眼观察与万用表测量相结合 直接观察打印头出针孔可以看出断针的序号及数目(打印针的排列次序见图1),再用万用表测量全部24个针驱动线圈(以下简称线圈)的阻值(参见图2,上层插座的引脚与长针线圈的对应关系见表1,下层插座的引脚与短针线圈的对应关系见表2),正常情况下线圈电阻值应为29±2欧姆。
打印针与线圈是一一对应关系,要重点测量目测到的断针所对应线圈的阻值。
所以要全部测量是因为线圈一旦损坏即使它对应的针未断,该针也打不出来,同样出现缺点和断线的现象。
二、程序测试法 这是我极力推荐使用的一种方法,此方法省时省力且判断准确。
维修者可使用一些流行的打印针测试软件。
这些软件采用逐个驱动每一根针打印一行来完成对打印头全部24根打印针的测试。
如手头没有此类软件也可用BASIC或C语言编制一个简单的程序来实现。
编程基本思路是将LQ-1600K打印机设置为24针图象方式,再依次将24组3字节数据(24位分别对应24根打印针,注意:每组数据中只有对应被测针的位置置为“1”,可用每组数据打印一行来增强观察效果)送入打印机打印即可。
LQ-1600K打印机在使用一段时间后,有时候会出现缺针现象,虽然关于LQ-1600K断针维修的文章不少,笔者通过多年的换针经验,认为LQ-1600K打印机缺针故障一般有以下几种原因。
1.打印头断针从打印机上拆下打印头,用肉眼观察打印头,如果上面有明显的黑洞,则可确定为打印头断针。
LQ-1600K打印头结构如图。
换针时,可参照图上针的对应位置,用镊子取出断针,将好针插入。
如是内层针断,则需将外层针全部取出,按各自的位置做好标记,更换好内层针后,再将外层针复原。
如果没有现成的短针,可将长针截短后使用。
不论是插外层针还是内层针,插针的位置应保证准确,不可插入邻近的针眼。
判断的方法是每插入一根针后,用手指压下该针,参照上图观察它的出针孔,如正确可将其它针也按此法逐一插入,如不正确再拔出重插。
换好打印针后,装上后盖板,应无缝隙,装好三脚定位爪,套上散热片,锉去针尖的多余部分,再用油石或细砂纸打磨一下,然后准备装机调试。
调试之前,先不装色带,自检打印一张单页纸,以防新针刮破色带,这样重复几次以后,再装上色带调试,调试正确方可使用。
需要注意的是,若有多根针断,应取一根,装一根,这样比较容易穿针眼。
2.打印头驱动线圈故障如打印针未断,则打印头驱动线圈故障的可能性较大。
判定驱动线圈故障的方法是:将一根打印头电缆一端插入打印头,用万用表(以DT-930F数字万用表为例,下同)测量另一端对应的驱动线圈的直流电阻的阻值,一般驱动线圈的直流电阻应为33±2?,如果测得的阻值偏差较大,可能是线圈开路或短路,会引起不出针或出针无力的现象。
测试时可将万用表的一支表笔接公共端,另一支表笔接各个驱动线圈的对应点。
更换单个线圈时可先用吸锡器将线圈上的焊锡去掉,再用刀片将周围的胶割开,即可取下线圈。
3.打印机主板驱动管故障驱动线圈开路往往是由驱动管故障引起的。
驱动管被击穿短路,引起驱动电流过大,将驱动线圈烧坏。
判断驱动管是否有故障,可用万用表测量打印头电缆。
1.了解LQ-1600K打印头的布针结构
LQ-1600K打印头采用双层布针结构,将24根打印针分为两层,每层打印针的尾部成圆形排列,外层为长针层(编号为2、4、6……),内层为短针层(编号为1、3、5……),长短针各12根,每根打印针经多层隔板逐渐夹在两直线上(如图1所示)。
其中,长针与短针交替排列,两排成交错位置。
2.制作放置打印头的支架
用一长约8cm、宽约7cm、厚约3cm的硬塑料泡沫,在中间挖一如图2所示的十字形孔,换针时用于坚直放置打印头,使换针操作更方便、准确、快速。
3.打印头断针的判断
当发现打印效果不好时,并不一定就是打印头断了针。
这时,我们可以先取下打印头,用脱脂棉沾点酒精,将打印头正面擦净,看24个打印针孔中是否有雪亮的打印针。
如果有孔为黑点,则说明有断针,可根据图中的编码查出是哪一根长针或短针断了,并记下断针编号。
4.拆解打印头
要更换断针必须先将打印头拆解开。
拆解时应先将打印头散热片从打印头上取下。
因散热片与打印头之间涂有粘胶,一般用手不易取下,如无专用工具时,可从散热片与打印头中间缝隙处用小平口螺丝刀从四周适当用力撬松(打印头较硬而脆,千万不可从一边使劲,否则容易把固定打印头
后盖人字形卡簧的挂勾损坏,使打印头报废),然后再用手夹住散热片,两大姆指压住打印头后盖处,将散热片取下。
此时用左手四指夹住打印头前部,大姆指压住其后盖,右手用平口将人字形卡簧挂勾处拨开,取下卡簧,再将打印头后盖小心移开,此时可见12根长针整齐排列的背面。
5.更换打印针
把刚才拆解开的打印头坚直放在自制的支架上,根据刚才判断的断针位置,取出断的长针,将其放在一边。
如果还有短针断了,则应将所有好的长针取出,放在一张白纸上,并按一定的编号放好。
然后将短针的后盖小心移去,取出断的短针,并将不能用的长针用镊子夹住,折断成短针,并略长于好的短针(一般断的长针只断去一点,长于好的短针,而且卖的打印针都略长于好的长针),将打印针装入打印头时,用镊子夹住打印针对准相应的插孔,使打印针竖直、轻松、自然插下(注意不能使劲强行插入,这样容易把针折断,即使插入了也不正确)。
插入打印针后,用左手握住打印头,大姆指压住所有的打印针尾部,将打印头倒过来检查刚才所换的针是否与打印头正面的出针孔相对应,并保证此打印针中间对应的插孔是否与打印头正面的出针孔相对应,并保证此打印针中间对应的插孔完全正确(一般感觉针的位置自然垂直就是正确的)。
注意每换一针都应这样仔细检查。
如果有其中任一孔没有插对,就要取出重新插入。
否则,会导致与此孔
相对应的一针无法装入。
换完短针后,装上短针层的后盖。
将刚才取出的长针按上述的装针方法插入原来的位置,并用新针替换断针。
装完长针后,装上长针层的后盖,再将卡簧和散热片装上。
6.磨针
打印头装好后,因刚才替换上的针都比好的针长出一点,这时可用白金擦条等打磨工具,从打印针的侧面将其多余的部分磨掉,使其与原来的好针一致。
否则打印时会挂坏色带,同时色带又会将该打印针挂断。
注意磨针时不要磨伤打印头正面,因打印头正面被磨伤后,会使打印头正面与打印机拷贝杆的距离增大,严重时会影响打印效果。
最后,用酒精棉球将打印头清洗干净装上,此时打印效果就和使用新的打印头效果一样了。