长安福特各车型颜色配方大全2018-阿克苏
- 格式:xlsx
- 大小:51.67 KB
- 文档页数:62

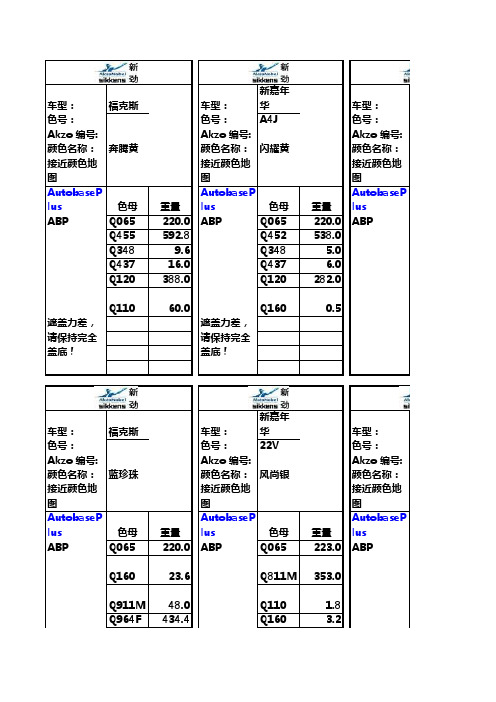
车型:福克斯车型:新嘉年华车型:色号:色号:A4J色号:Akzo 编号:Akzo 编号:Akzo 编号:颜色名称:奔腾黄颜色名称:闪耀黄颜色名称:接近颜色地图接近颜色地图接近颜色地图AutobasePlus色母重量AutobasePlus色母重量AutobasePlus ABP Q065220.0ABP Q065220.0ABPQ455592.8Q452538.0Q3489.6Q348 5.0Q43716.0Q437 6.0Q120388.0Q120282.0Q11060.0Q1600.5遮盖力差,遮盖力差,请保持完全请保持完全盖底!盖底!车型:福克斯车型:新嘉年华车型:色号:色号:22V色号:Akzo 编号:Akzo 编号:Akzo 编号:颜色名称:蓝珍珠颜色名称:风尚银颜色名称:接近颜色地图接近颜色地图接近颜色地图AutobasePlus色母重量AutobasePlus色母重量AutobasePlus ABP Q065220.0ABP Q065223.0ABPQ16023.6Q811M353.0Q911M48.0Q110 1.8Q964F434.4Q160 3.2Q673148.8Q19522.7Q72646.4Q19069.7Q19084.8Q811J288.6Q6520.5车型:嘉年华/福克斯车型:嘉年华/蒙迪欧车型:色号:NDTA色号:色号:Akzo 编号:Akzo 编号:Akzo 编号:颜色名称:激情红颜色名称:星光银颜色名称:接近颜色地图接近颜色地图接近颜色地图AutobasePlus色母重量AutobasePlus色母重量AutobasePlus ABP Q065227.5ABP Q065225.0ABPQ231539.0Q811E600.0Q160 3.0Q811J120.0Q11027.0Q455 1.3Q726124.0Q436 6.0Q43740.0Q19510.8Q1909.8色板配方车型:车型:福克斯三厢车型:色号:2MPC色号:色号:Akzo 编号:Akzo 编号:Akzo 编号:颜色名称:钛晶灰(老款)颜色名称:星海蓝颜色名称:接近颜色地图接近颜色地图接近颜色地图AutobasePlus色母重量AutobasePlus色母重量AutobasePlus ABP Q065223.0ABP Q065222.0ABPQ811M297.5Q190118.3Q811J272.0Q16023.4Q65220.7Q14027.3Q160115.6Q811E70.2Q14018.7Q678201.5Q19011.0Q964R252.2色板配方Q726 5.0Q19513.0车型:车型:车型:色号:色号:色号:Akzo 编号:Akzo 编号:Akzo 编号:颜色名称:颜色名称:颜色名称:接近颜色地图接近颜色地图接近颜色地图AutobasePlus色母重量AutobasePlus色母重量AutobasePlus ABP ABP ABP福克斯动力蓝色母重量Q065220.0 Q652240.0 Q72610.0 Q76653.0 Q811J62.0 Q811M42.0 Q964R220.0 Q110 5.0致胜CFMA天际蓝色母重量Q065220.0 Q811J175.0 Q811E375.0 Q726 6.6 Q67831.4 Q16033.0 Q436 2.0JAYC银沙黑色母重量Q065212.0 Q140338.0 Q811U25.5 Q16087.7 Q964R90.0 Q67855.2 Q19078.0 Q76616.5新嘉年华情调蓝色母重量Q065170.0 Q65275.3 Q673204.3 Q67823.3 Q72617.0 Q811J49.3 Q811M33.2 Q964R130.7 Q975S204.3色母重量。

CARD/STICKERS/POCKET (SLEEVE)Scan the QR code for instructional videos of thePro Trailer Backup Assist set up.WARNINGDriving while distracted can result in loss of vehicle control, crash and injury. We stronglyrecommend that you use extreme caution when using any device that may take your focusoff the road. Your primary responsibility is the safe operation of your vehicle. We recommendagainst the use of any hand-held device while driving and encourage the use of voice-operated systems when possible. Make sure you are aware of all applicable local laws thatmay affect the use of electronic devices while driving.September 2018First PrintingLitho in U.S.A.KL3J 19G217 RALEARN MORE ABOUT YOUR NEW VEHICLEScan the country-appropriate QR code with yoursmartphone (make sure you have a scanner appinstalled) and you can access even more informationabout your vehicle.ford.caThis Quick Start Guide is not intended to replace your vehicle Owner’s Manual which containsmore detailed information concerning the features of your vehicle, as well as importantsafety warnings designed to help reduce the risk of injury to you and your passengers. Pleaseread your entire Owner’s Manual carefully as you begin learning about your new vehicle andrefer to the appropriate chapters when questions arise. All information contained in thisQuick Reference Guide was accurate at the time of duplication. We reserve the right tochange features, operation and/or functionality of any vehicle specification at any time. Y ourFord dealer is the best source for the most current information. For detailed operating andsafety information, please consult your Owner’s Manual.United StatesFord Customer Relationship Center1-800-392-3673 (FORD)(TDD for the hearingimpaired: 1-800-232-5952)@FordServiceCanadaFord Customer Relationship Centre1-800-565-3673 (FORD)(TDD for the hearingimpaired: 1-888-658-6805)ford.ca@FordServiceCAThe Pro Trailer Backup Assist control knob on your instrument panel will forever change how you look at backing up a trailer.Turn the knob in the direction you want the trailer to go and the system takes over the steering to get it there. This frees you to focus on monitoring the mirrors and applying the brake and accelerator.The setup starts with you placing a sticker in a specific spot on your trailer, taking a few measurements and entering them into the system.It is very important to follow the setup procedurecarefully to ensure correct placement of the sticker. This guide walks you through that process, step by step, and lets you be on your way. Let's get started!WHAT IS THE PRO TRAILER BACKUP ASSIST?Control knob5-way controlsCenterScan the QR code for instructional videos of the Pro Trailer Backup Assist set up.Set up this feature by following all six steps listed in this guide. Scan the QR code with your smartphone to see the step-by-step videos. See the next page for what you need to complete the set up.1. P osition your truck and trailer. pg 5.2. F ollow the information display prompts. pg 6–9.3. P lace the sticker. pg 10–11.4. M easure key points. pg 12–13.5. E nter your measurements into the information display. pg 14–15.6. C onfirm the sticker location and calibrate the system.pg 16–17.Feature Operation. pg 18–22.TO SET UP THIS FEATURE, USE THE:(a) 5-way controls on your steering column (b) Information display in your instrument cluster (c) Pro Trailer Backup Assist control knob (d) Center displayHOW DO I USE IT?ABCRead and follow all of these steps carefully to get the best results.STEP 1: POSITION YOUR TRUCK AND TRAILER• H itch your conventional trailer to the truck. For additional information on hitching your trailer, refer to the Towing chapter of your Owner's Manual.• P ark your truck and hitched trailer on a level surface.• M ake sure that the trailer and truck are in line with each other. You can do this by putting thetruck in drive (D) and pulling straight forward.Note: For best results, use a drawbar with a rise or drop that allows the trailer to sit level to theground when attached to the vehicle.PRO TRAILER BACKUP ASSIST FEATURE SET UPPlease contact your dealership if you need assistance setting up your trailer.FOLLOW THE INFORMATION DISPLAY PROMPTSPress the down arrow on the left hand-side of the 5-way steering wheel controls to highlight Add Trailer . Press OK to confirm.Press the center button on the knob located to the right of the steering wheel to begin setting up the Pro Trailer Backup Assist.SET UP YOUR TRAILERNAME YOUR TRAILER.Use the 5-way steering wheel controls to choose the alphanumeric characters. Press the right arrow to advance to the next letter. When finished spelling out the name of the trailer, press OK to confirm. To delete a letter, press the up or down arrow key until you see a blank.SELECT THE TYPE OF BRAKE SYSTEM FOR YOUR TRAILER.Select Default if your trailer has electric, surge or no brakes. Press OK to select and advance to the next screen.SELECT THE BRAKE EFFORT FOR YOUR TRAILER.The default value is Low and is the recommended setting for most trailers. If your trailer's brakes require more initial voltage, or if you prefer more aggressive trailer braking, then select either the Medium or the High setting.CONVENTIONAL TRAILERS EXAMPLESSELECT YOUR TRAILER TYPE.Use the images to the right to help you determine your trailer type. If you have a conventional trailer, select Conventional.You cannot use the Pro Trailer Backup Assist with Fifth Wheel and Goosenecktype trailers.Next, a message appears in the information display asking if you want to add Pro Trailer Backup Assist.Straighten out the trailer, if necessary.The information display directs you to this Quick Start Guide forhow to proceed.Note: Pro Trailer Backup Assist only supports conventional trailers.STEP 3: PLACING THE STICKERYou need to place the entire sticker in the green zone on the trailer as outlined in the diagram on the nextpage. The sticker is in the back cover pocket of this guide.OUTSIDE THE VEHICLENote: An assistant can help you complete the tasks on thenext page.Make sure to gather the following items before exiting the vehicle:• T ake the measurement card and the sticker from the back of thisguide, a tape measure and a pen, and walk back to your trailer.• D etermine where to place the sticker. You must place it in the greenzone as indicated in the diagram below.• C onfirm that the sticker is visible using the center display.An assistant can remain inside the vehicle to help you do this.Sticker and measurement card (provided inside the back cover pocket of this guide).Tape measure and pen(not provided).STICKER PLACEMENT DIAGRAMNote: You must place the entire sticker within the green zone. Once you place the sticker, you cannot move it. Do not attempt to re-use stickers. Use a new sticker.STICKER PLACEMENT TIPS • P erform sticker placement whentemperatures are above 32° F (0° C).• P ut the sticker on a flat, dry, clean horizontal surface.• U sing a tape measure, find a place to put the entire sticker in range as shown below: – Within the green zone.– Between 7 inches(17 cm) and 22 inches (55 cm) from the trailer ball hitch.• M ake sure no hardware will obstruct the view from the camera to the sticker (jack handle, wiring, etc.)• Place the sticker.MEASURING KEY POINTSOUTSIDE THE VEHICLENow that the sticker is in place, you must take a few measurements.For the system to perform its best, it is important to make sure that the measurements you take are accurate.MEASUREMENT TIPS• W hen you take your measurements, round off your numbers to the nearest half-inch increment.• I f a distance ends in one-quarter of a measurement unit or greater, round up to the next half-increment. If not, round down. For example, 12 ¼ inches would be rounded up to 12 ½. 12 1/8 inches would be rounded down to 12.• B e sure to use the measurement unit that is consistent with what your vehicleuses. Use inches if your vehicle is set to U.S. units. Use centimeters if your vehicle is set to Metric units. Note: An easy way to check to see which units your vehicle uses is to look for outside temperature readings or estimated fuel economy. Fahrenheit or miles indicates U.S. units. Celsius or kilometers indicates Metric units.MEASUREMENT AThe horizontal distance from thelicense plate to the center of the ball hitch on the trailer. MEASUREMENT BThe horizontal distance from the center of the ball hitch to the center of the sticker.MEASUREMENT CThe distance from the rear-view camera to the center of the sticker.MEASUREMENT DThe horizontal distance from the tailgate to the center of the trailer axle (single axle) OR the center of thetrailer axles (two or more axles).ENTER YOUR MEASUREMENTS INTO THE INFORMATION DISPLAYINSIDE THE VEHICLEFor this part of the setup, use the information display and your 5-WAY STEERING WHEEL CONTROLS to enter the four measurements.ENTERING YOUR MEASUREMENTS• U se the up/down arrows to increase or decrease the numbers as needed. Press OK to confirm each measurement. The screen prompts you to add the next measurement.• R efer to the measurements you recorded on your measurement card and enter each one into the information display.Once you add your last measurement, the information display shows you all of your entered measurements. Review and confirm.Note: If you want to revise your measurements, highlight Change and press OK . Otherwise, press the arrow to highlight Confirm and press OK.CONFIRMING THE STICKER LOCATIONINSIDE THE VEHICLELook for the circle in the center display.Is that your sticker?Use the steering wheel controls to select Yes or No.If you select No, you may need to repeat the setup procedure from the beginning.Note: If your system cannot locate the sticker, try the following:•C lean the rear view camera lens.•M ake sure you place the entire sticker between 7 inches (17 cm) and 22 inches (55 cm) from the trailer ball hitch.•R efer to your Owner's Manual foradditional support.You'll see a confirmation message when you successfully confirmthe target.To complete the setup, you need to drive the vehicle straightforward between 4 to 24 mph (6 to 39 kph) as directed bythe information display.Note: If you turn the steering wheel during this time,calibration pauses. The information display then promptsyou to drive straight forward to complete the calibration.The information display shows a message while the systemcalibrates and another screen appears when the systemcompletes the calibration.Note: For best results, we do not recommend calibratingthe system at night.16 – 17 CALIBRATING THE SYSTEMPRO TRAILER BACKUP ASSIST FEATURE SET UP18 – 193. C ontinue following the screen prompts on the information display.Note: The system cannot operate if your hands are on the steering wheel.Remove your hands from the steering wheel to resume system operation.2. O nce the system locates your sticker, the screen prompts you to shift into reverse (R) to activate the feature.1. T o use, press the center button on the knob and watch the information display screen. Use the steering wheel controls to highlight your trailer, then press OK to select.Note: You may need to drive forward to straighten your trailer.FEATURE OPERATIONFEATURE OPERATION20 - 21•T ake your hands off the steering wheel and turn the Pro Trailer Backup Assist knob instead. The knob acts as the•O nce you have the trailer moving in the direction you want it to go, release the knob. You control the accelerator and brakeswhile the system steers the truck to keep the trailer moving straight back.Note: If you attempt to accelerate beyond the system’s threshold, the system automatically limits your vehicle's speed.TIPS•F ind an area where you can safely become familiarwith the response of your vehicle and trailer when usingthe system.•T ry backing up straight and then turning the knobslowly in the direction you want to go.•Q uickly turning and releasing the knob results ina jerky movement of the vehicle.•S ome lighting conditions may make it difficult for thesystem to locate the sticker. If this occurs, moving thetruck and trailer can help the system findthe sticker.TIPS•A s soon as you release the knob or turn it back to thecenter position, the vehicle starts following thetrailer's path.•T urn and hold the knob continuously for sharper vehicleand trailer turns.•A clean sticker provides optimal performance. Useisopropyl alcohol to clean your sticker, if required.•C AUTION:Always keep your hand close to the controlknob. You may need to redirect the trailer quickly.•Y ou may have to use the knob to correct the trailerdirection while attempting to move the trailer straightback under some conditions.FEATURE OPERATIONEven when using the Pro Trailer Backup Assist feature,be sure to use all visibility aids to help you to back up your trailer safely.Use your vehicle mirrors as your primary aid. Be sure to include the windows and the rear view camera image to view the trailer direction and determine the trailer placement.For more troubleshooting and information about Pro Trailer Backup Assist feature, please see your Owner's Manual. Note: Driving aids do not replace the need to watch where the vehicle and trailer are moving and brake when necessary.Refer to your Owner’s Manual for safety information, more details and limitations.。

(1) 6.7L Power Stroke® V8 Turbo Diesel.(2) M aximum capacity when properly equipped.See your Ford dealer for specific equipmentrequirements and other limitations.(3) F-350 DRW Regular Cab 4x2. The 2018 Super Duty reinforces its tough image and continues to meet the needs of both commercial and personal use customers. Within the toughest industries, people who do the work count on Super Duty pickups for tough-as-nails work capability on any job site. And now Super Duty is available in a 4x2 configuration on the F-450 series, for those who don’t need 4x4 capability.HORSEPOWER450 hp @ 2,800 rpm(1) TORQUE935 lb.-ft. @ 1,800 rpm(1) CONVENTIONAL TOWINGup to 21,000 lbs.(2)5TH-WHEEL TOWING up to 27,500 lbs.(2) GOOSENECK TOWING up to 34,000 lbs.(2) PAYLOADup to 7,630 lbs.(3)6.7L V8 Turbo –The Diesel LeaderDesigned, engineered and builtby Ford, our Second-Generation6.7L Power Stroke® V8 TurboDiesel engine is designed toproduce more power and torquethan ever. And the new largersingle-sequential turbochargerhelps improve airflow andperformance. You’ll reallyappreciate it when towing heavyloads uphill and at high altitudes.Rule the Class With 6.2L 2-Valve V8 GasEase your heavy-duty workload with lots of low-rpm torque. Thegas engine’s stiff SOHC valvetrain with roller-rocker shafts enablesan intake- and exhaust-port layout that optimizes airflow, helpingit produce plenty of torque down low.Balanced performance. Dual-equal variable cam timing phasesthe intake- and exhaust-valve opening and closing eventssimultaneously to optimize fuel economy, low-end torque andpeak horsepower.Alternative fuel options include a CNG/Propane Gaseous EnginePrep Package that readies your truck to be upfit for compressednatural gas (CNG), propane autogas, or as a bi-fuel vehicle with theability to seamlessly switch between CNG or propane and gasoline. POWERFUL ENGINE CHOICESSuper Duty PickupsTrailer Reverse Guidance uses 3 cameras to 5th-Wheel/Gooseneck Prep PackageAvailable on all models (Factory equipped onTrailer Reverse GuidanceUtilizes 3 cameras to provide multiple viewsTRAILER TOWING SELECTORTRAILER TOWING SELECTORTRAILER TOWING SELECTORTRAILER TOWING SELECTORTRAILER TOWING SELECTORFrontal Area is the total area in square feet that a moving vehicle and trailer exposes to airresistance. The chart above shows the maximum trailer frontal area that must be considered for a vehicle/trailer combination. Exceeding these limitations m a y significantly reduce the performance of your towing vehicle.Frontal Area Limitations/Vehicle LineConsiderationsWithF-250/F-350/F-450 75 sq. ft. All 5th-Wheel and Gooseneck Applications Super Duty60 sq. ft.A ll Other ApplicationsFrontal Area ConsiderationsF-250/F-350/F-450 Super Duty Pickups:A conventional trailer hitch receiver is standard on all Super Duty Pickups. The following configurations have a standard 2.5" receiver with a 2" reducer:– F-250 (less Trailer Tow Package)– F-350 Single Rear Wheel (142", 148", 160", 164") – F-350 Single Rear Wheel 6.2L 176"The following configurations have a standard 3" receiver with a2.5" and a 2" reducer:– F-250 equipped with Trailer Tow Package – F-350 Single Rear Wheel 6.7L 176" – F-350/F-450 Dual Rear WheelFactory-Installed Trailer Hitch Receiver OptionsNote: S ee chart below for the weight-carrying and weight-distributing capacities of these hitch receivers. (These capacities also are shown on a label affixed toeach receiver.)Weight-Carrying Max. Tongue Weight-Distributing Max. TongueMax. Trailer Load Max. Trailer Load VehicleCapacity (lbs.)(1) (lbs.)Capacity (lbs.)(1) (lbs.)F-250/F-350 Super Duty SRW15,0001,500 15,000(2) 1,500(2)F-250/F-350 Super Duty SRW w/6.7L engine 18,000 1,800 18,000(3) 1,800(3)F-350 Super Duty DRW w/6.2L engine16,700 1,670 16,700 1,670F-350 Super Duty DRW w/6.7L engine and F-450 Super Duty21,0002,10021,0002,100(1) Hitch receivers do not include a hitch ball or ball mounting. You are responsible for obtaining the proper hitch ball, ball mounting, weight-distributing equipment (i.e., equalizing arms and snap-up brackets, sway control system) and other appropriate equipment to tow both the trailer and its cargo load. (2) Not available with 6.7L diesel with 176" wheelbase. (3) Available only with 176" wheelbase.Refer to the Trailer Towing Selector chart for Maximum Loaded Trailer Weights for each vehicle.Hitch Receiver Weight CapacityNotes: • C ontent may vary depending on model, trim and/or powertrain.See your dealer for specific content information.• T railer Towing Package recommended for all light trucks that will be usedfor towing to help ensure easy, proper connection of trailer lights.F-250/F-350/ F-450 F-250ModelSuper Duty Pickup Super Duty Pickup (1)(Option Code)(Std.) (535)7-Wire Harness & 4-/7-Pin Connector X (Std.)Smart Trailer Tow Connector X(3) –Hitch ReceiverSee chart belowSee chart belowTrailer Brake Wiring/Feed Kit X(2) –Upgraded Rear Axle X(3) X Increased GCW (6.7L) X(3) X Trailer Brake Controller X(3) –Aluminum Wheels–X(4)(1) Requires 6.7L diesel engine. (2) In-cab, no controller (SRW). (3) F-350DRW/F-450 only. (4) Chrome (Lariat/King Ranch) or Polished (Platinum).Trailer Towing PackageRear Axle Ratio CodesIf you do not know the axle ratio of your vehicle, check its Truck Safety Compliance Certification Label (located on the left front door lock facing or the door latch post pillar). Below the bar code, you will see the word AXLE and a two-digit code. Use this chart to find the axle ratio that corresponds to that code:Rear Axle Non-L imited L imited ElectronicVehicle Ratio Slip Slip L ockingSuper Duty 3.31 31 Not Available 3H 3.55 35 3K 3J 3.73 37 3L 3E 4.10 Not Available 4N Not Available 4.30 Not Available 4L 4MSlide-In Camper InstallationConsult your camper manufacturer/dealer for details regarding proper installation of your slide-in camper A dimensionally stable block spacer is recommended between the headboard of the pickup box and the forward edge of the camper floor. Resting the spacer on the pickup box bed helps prevent movement and contact of the fully installed camper with the pickup box headboard or taillight rear pillarsNote: Be sure to measure your slide-in camper before attempting to install it onto the bed of the truck. Some campers may require a platform in the bed of the truck to make sure there is adequate clearance for both the box rails and cab roof of the truck.Camper Center-of-GravityAll Styleside pickups that qualify for slide-in camper bodies have camper center-of-gravity included on the Consumer Information Sheet in the glovebox Data is calculated for each individual truck, based on vehicle optionsIf vehicle does not qualify for camper use, theConsumer Information Sheet states that the vehicle is not recommended for camper use, and no center-of-gravity data is shownF-250/F-350/F-450 Super Duty Camper Package (Option Code 471)Increased capacity front springs (2 Up [4x2] or 1 Up [4x4] upgrade over springs computer-selected based on options ordered. Not included if maximum springs already selected.)Rear stabilizer bar (SRW)Rear auxiliary springs (F-250)Slide-in camper certificationCombined weight of vehicle, camper body, occupants and cargo must not exceed Gross Vehicle Weight Rating (GVWR)Camper Package (Option Code 471) required with F-250/F-350/F-450 Super Duty ®Cargo Weight Rating shown in chart is maximum allowable, assuming weight of a base vehicle with required camper option content and a 150-lb. passenger at each available seating position Ratings also assume weight of engine and standard transmission. Cargo Weight Rating shown must be further reduced by weight of transmission upgrade and any other options. Option weights and center-of-gravity information are available on the Ford Pickup Truck Consumer Information SheetI f you intend to pull a trailer in addition tocarrying your camper, see the F-Series Pickup Trailer Towing Selector charts.MAXIMUM CARGO WEIGHT WITH SLIDE-IN CAMPERNote: T he following chart lists GVWRs and Maximum Cargo Weights (with minimum equipment) by engine foreach approved pickup model: 3.5L V6 EcoBoost ®, 5.0L V8, 6.2L V8 and 6.7L Power Stroke ® Turbo Diesel V8.GVWR (lbs.) Maximum Cargo Weight Rating (lbs.)ModelWheelbase 6.2L 6.7L 6.2L Std./Opt.† 6.7L Std./Opt.†F-250 Super Duty (1)4x2 Reg. Cab 141.6"10,000 10,000 3,866/ – 3,051/ –4x2 SuperCab 148.0" 10,000 10,000 3,139/ – 2,330/ –4x2 SuperCab 164.2" 10,000 10,000 3,029/ – 2,200/ –4x2 Crew Cab 159.8" 10,000 10,000 3,041/ – 2,212/ –4x2 Crew Cab 176.0" 10,000 10,000 2,812/ – 1,983/ –4x4 Reg. Cab 141.6" 10,000 10,000 3,447/ – 2,660/ –4x4 SuperCab 148.0" 10,000 10,000 2,731/ – 1,944/ –4x4 SuperCab 164.2" 10,000 10,000 2,641/ – 1,825/ –4x4 Crew Cab 159.8" 10,000 10,000 2,645/ – 1,836/ –4x4 Crew Cab176.0" 10,000 10,000 2,389/ – 1,560/ –F-350 Super Duty (1)4x2 SRW Reg. Cab (2) 141.6" 10,000 10,600* 3,675/ – 3,638/2,9384x2 SRW SuperCab (2) 148.0" 10,000 10,800* 2,972/ – 3,059/2,2594x2 SRW SuperCab (2) 164.2" 10,300* 11,000* 3,162/2,862 3,132/2,1324x2 SRW Crew Cab (2) 159.8" 10,100* 10,900* 2,914/2,814 2,978/2,0784x2 SRW Crew Cab (2) 176.0" 10,500* 11,100* 3,087/2,587 2,940/1,8404x2 SRW Reg. Cab (3) 141.6" 10,400 11,100 4,017/ – 3,981/ –4x2 SRW SuperCab (3) 148.0" 10,500 11,200 3,414/ – 3,402/ –4x2 SRW SuperCab (3) 164.2" 10,800 11,500 3,605/ – 3,574/ –4x2 SRW SuperCab (3) 164.2" – 11,400 – / – 3,474/ –4x2 SRW Crew Cab (3) 159.8" 10,600 11,300 3,357/ – 3,321/ –4x2 SRW Crew Cab (3) 176.0" 10,900 11,500 3,430/ – 3,283/ –4x2 SRW Crew Cab (3) 176.0" – 11,400 – / – 3,183/ –4x2 DRW Reg. Cab 141.6" 14,000 14,000 7,247/ – 6,507/ –4x2 DRW SuperCab 164.2" 14,000 14,000 6,356/ – 5,637/ –4x2 DRW Crew Cab 176.0" 14,000 14,000 6,130/ – 5,406/ –4x4 SRW Reg. Cab (2) 141.6" 10,300* 11,000* 3,564/3,264 3,531/2,5314x4 SRW SuperCab (2) 148.0" 10,400* 11,100* 2,960/2,560 2,953/1,8534x4 SRW SuperCab (2) 164.2" 10,700* 11,300* 3,151/2,451 3,026/1,7264x4 SRW Crew Cab (2) 159.8" 10,500* 11,200* 2,910/2,410 2,874/1,6744x4 SRW Crew Cab (2) 176.0" 10,800* 11,500* 2,977/2,177 2,923/1,4234x4 SRW Reg. Cab (3) 141.6" 10,800 11,500 4,007/ – 3,974/ –4x4 SRW Reg. Cab (4) 141.6" 11,300 11,500 4,502/ – 3,969/ –4x4 SRW Reg. Cab (4) 141.6" – 11,400 – / – 3,869/ –4x4 SRW SuperCab (3) 148.0" 10,800 11,500 3,303/ – 3,295/ –4x4 SRW SuperCab (4) 148.0" 11,300 11,500 3,798/ – 3,291/ –4x4 SRW SuperCab (4) 148.0" – 11,400 – / – 3,191/ –4x4 SRW SuperCab (3) 164.2" 11,200 11,500 3,594/ – 3,169/ –4x4 SRW SuperCab (4) 164.2" 11,500 11,500 3,889/ – 3,164/ –4x4 SRW SuperCab (4) 164.2" 11,400 11,400 3,789/ – 3,064/ –4x4 SRW Crew Cab (3) 159.8" 10,900 11,500 3,253/ – 3,117/ –4x4 SRW Crew Cab (4) 159.8" 11,300 11,500 3,648/ – 3,112/ –4x4 SRW Crew Cab (3) 159.8" 11,300 11,500 3,419/ – 2,866/ –4x4 SRW Crew Cab (4) 159.8" – 11,400 – / – 3,012/ –4x4 SRW Crew Cab (4) 176.0" 11,500 11,500 3,614/ – 2,861/ –4x4 SRW Crew Cab (4) 176.0" 11,400 11,400 3,514/ – 2,761/ –4x4 DRW Reg. Cab 141.6" 14,000 14,000 6,837/ – 6,114/ –4x4 DRW SuperCab 164.2" 14,000 14,000 5,942/ – 5,221/ –4x4 DRW Crew Cab 176.0" 14,000 14,000 5,710/ – 4,956/ –F-450 Super Duty (1)4x2 DRW Crew Cab 176.0" – 14,000 – / – 4,793/ –4x4 DRW Crew Cab176.0"–14,000– / –4,473/ –(1) Requires Camper Package option. (2) 17" tires and wheels. (3) 18" tires and wheels. (4) 18"/20" tires and wheels. *10,000 pounds with optional 10,000 GVWR Package. † With 10,000 GVWR Package.F-SERIESPICKUP/CAMPERCOMBINATION SELECTORAFTER YOU BUY Before heading out on a trip, check your vehicle’s Owner’s Manual for break-in and severe-duty maintenance schedules (do not tow a trailer until your vehicle has been driven at least 1,000 miles). Be sure to have your fully-loaded vehicle (including passengers) and trailer weighed so as not to exceed critical weight limits. If any of these limits are exceeded, cargo should be removed from the vehicle and/or trailer until all weights are within the specified limits.BEFORE YOU BUY If you are selecting a vehicle that will be used for towing, you should determine the approximate weight of the trailer you intend to tow, including the weight of any additional cargo and fluids that you will be carrying in the trailer. Also, be sure the vehicle has the proper optional equipment. Keep in mind that performance can be severely affected in hilly terrain when the minimum acceptable powertrain combination is selected. Consider purchasing a vehicle with a more powerful engine.BrakesMany states require a separate braking system ontrailers with a loaded weight of more than 1,500pounds. For your safety, Ford Motor Companyrecommends that a separate functional brake systembe used on any towed vehicle, including those dolly-towed or towbar-towed. There are several basic typesof brake systems designed to activate trailer brakes:1. E lectronically Controlled Brakes usuallyprovide automatic and manual control of trailerbrakes. They require that the tow vehicle beequipped with a controlling device and additionalwiring for electrical power. These brakes typicallyhave a control box installed within reach ofthe driver and can be applied manually orautomatically.2. E lectric-Over-Hydraulic (EOH) TrailerBrakes are operated by an electrically poweredpump that pressurizes a hydraulic fluid reservoirbuilt into the trailer’s brake system. Many of theavailable EOH trailer brake models are compatiblewith the Ford factory installed, dash-integratedTrailer Brake Controller (TBC).3. S urge Brakes are independent hydraulic brakesactivated by a master cylinder at the junction ofthe hitch and trailer tongue. They are not controlledby the hydraulic fluid in the tow vehicle’s brakesystem, and the tow vehicle’s hydraulic systemshould never be connected directly to the trailer’shydraulic system.Be sure your trailer brakes conform to all applicablestate regulations. See Towing Safely for All Vehicleson the next page for additional braking information.Trailer LampsMake sure the trailer is equipped with lights that conformto all applicable government regulations. The trailerlighting system should not be connected directlyto the lighting system of the vehicle. See a localrecreational vehicle dealer or rental trailer agency forcorrect wiring and relays for the trailer and heavy-dutyflashers.Safety Chains– A lways use safety chains when towing. Safety chainsare used to retain connection between the towingand towed vehicle in the event of separation of thetrailer coupling or ball– C ross chains under the trailer tongue to prevent thetongue from contacting the ground if a separationoccurs. Allow only enough slack to permit full turning– be sure they do not drag on the pavement– W hen using a frame-mounted trailer hitch,attach the safety chains to the frame-mountedhitch using the recommendations supplied by thehitch manufacturer– S ee your vehicle’s Owner’s Manual for safety chainattachment information– F or rental trailers, follow rental agency instructionsfor hookup of safety chainsTrailer Wiring Harness– S ome vehicles equipped with a factory-installedTrailer Tow Package include a trailer wiring harnessand a wiring kit– T his kit includes one or more jumper harnesses(to connect to your trailer wiring connector) andinstallation instructionsWeight DistributionFor optimum handling and braking, the load must be properly distributed Keep center of gravity low for best handlingApproximately 60% of the allowable cargo weight should be in the front half of the trailer and 40% in the rear (within limits of tongue load or king pin weight) Load should be balanced from side-to-side to optimize handling and tire wear Load must be firmly secured to prevent shifting during cornering or braking, which could result in a sudden lossof controlBefore StartingBefore setting out on a trip, practice turning, stopping and backing up your trailer in an area away from heavy traffic Know clearance required for trailer roof Check equipment (make a checklist) Backing UpBack up slowly, with someone spotting near the rear of the trailer to guide you Place one hand at bottom of steering wheel and move it in the direction you want the trailer to goMake small steering inputs – slight movement of steering wheel results in much greater movement in rear of trailer TurningWhen turning, be sure to swing wide enough to allow trailer to avoid curbs and other obstructions.BrakingAllow considerably more distance for stopping with trailer attached Remember, the braking system of the tow vehicle is rated for operation at the GVWR, not GCWRIf your tow vehicle is an F-150, F-Series Super Duty®, Transit or Expedition and your trailer has electric brakes, the optional Integrated Trailer Brake Controller (TBC) assists in smooth and effective trailer braking by powering the trailer’s electric or electric-over-hydraulic brakes with proportional output based on the towing vehicle’s brake pressure If your trailer starts to sway, applybrake pedal gradually. The slidinglever on the TBC should be used onlyfor manual activation of trailer brakeswhen adjusting the gain. Misuse, suchas application during trailer sway,could cause instability of trailer and/ortow vehicleTowing On HillsDownshift the transmission to assistbraking on steep downgrades and toincrease power (reduce lugging) whenclimbing hillsWith TorqShift® transmission, selecttow/haul mode to automaticallyeliminate unwanted gear search whengoing uphill and help control vehiclespeed when going downhillParking With A TrailerWhenever possible, vehicles withtrailers should not be parked on agrade. However, if it is necessary, placewheel chocks under the trailer’s wheels,following the instructions below.Apply the foot service brakes and holdHave another person place the wheelchocks under the trailer wheels on thedowngrade sideOnce the chocks are in place, releasebrake pedal, making sure the chockswill hold the vehicle and trailerApply the parking brakeS hift automatic transmission into park,or manual transmission into reverseWith 4-wheel drive, make sure thetransfer case is not in neutral (ifapplicable)Starting Out Parked OnA GradeApply the foot service brake and holdStart the engine with transmission inpark (automatic) or neutral (manual)Shift the transmission into gear andrelease the parking brakeRelease the brake pedal and move thevehicle uphill to free the chocksApply the brake pedal while anotherperson retrieves the chocksAcceleration And PassingThe added weight of the trailer candramatically decrease the accelerationof the towing vehicle – exercise caution.When passing a slower vehicle, be sureto allow extra distance. Remember, theadded length of the trailer must clearthe other vehicle before you can pullback inSignal and make your pass on levelterrain with plenty of clearanceIf necessary, downshift for improvedaccelerationDriving With An AutomaticOverdrive TransmissionWith certain automatic overdrivetransmissions, towing – especiallyin hilly areas – may cause excessiveshifting between overdrive and the nextlower gear.To eliminate this condition and achievesteadier performance, overdrive can belocked out (see vehicle Owner’s Manual)I f excessive shifting does not occur, useoverdrive to optimize fuel economyOverdrive may also be locked out toobtain engine braking on downgradesWhen available, select tow/haul modeto automatically eliminate unwantedgear search and help control vehiclespeed when going downhillDriving With Cruise ControlTurn off the cruise control with heavyloads or in hilly terrain. The cruisecontrol may turn off automaticallywhen you are towing on long, steepgrades. Use caution while driving onwet roads and avoid using cruise controlin rainy or winter weather conditions.Tire PressureUnderinflated tires get hot and mayfail, leading to possible loss ofvehicle controlOverinflated tires may wear unevenlyand compromise traction and stoppingcapabilityTires should be checked often forconformance to recommended coldinflation pressuresSpare Tire UseA conventional, identical full-size sparetire is required for trailer towing (mini,compact and dissimilar full-size sparetires should not be used; alwaysreplace the spare tire with a new roadtire as soon as possible).On The RoadAfter about 50 miles, stop in aprotected location and double-check:Trailer hitch attachmentLights and electrical connectionsTrailer wheel lug nuts for tightnessEngine oil – check regularly through-out tripHigh Altitude OperationGasoline engines lose power by 3-4%per 1,000 ft. elevation. To maintainperformance, reduce GVWs and GCWsby 2% per 1,000 ft. elevation starting atthe 1,000 ft. elevation point.Powertrain/Frontal AreaConsiderationsThe charts in this Guide show theminimum engine size needed to movethe GCW of tow vehicle and trailer.Under certain conditions, however, (e.g.,when the trailer has a large frontal areathat adds substantial air drag or whentrailering in hilly or mountainous terrain)it is wise to choose a larger engineSelecting a trailer with a low-drag,rounded front design will help optimizeperformance and fuel economyNote: F or additional trailering informationpertaining to your vehicle, refer to thevehicle Owner’s Manual.Towing a trailer is demanding on your vehicle, your trailer and your personal driving skills.Follow some basic rules that will help you tow safely and have a lot more fun.Photography, illustrations and informationpresented herein were correct when approvedfor publishing. Ford Motor Company reservesthe right to discontinue or change at any timethe specifications or designs without incurringobligation. Some features shown or describedare optional at extra cost. Some options arerequired in combination with other options.Consult your dealer for the latest, mostcomplete information on models, features,prices and availability.Many of the recreational vehicles shown inthis brochure are modified or manufacturedby companies other than Ford MotorCompany. Ford assumes no responsibility forsuch modifications or manufacturing./towing-guides. TOWING SAFELY FOR ALL VEHICLES。


LEARN MORE ABOUT YOUR NEW VEHICLE (U.S.)ford.ca (Canada)This Quick Reference Guide is not intended to replace your vehicle Owner’s Manual, which contains more detailed information concerning the features of your vehicle, as well as important safety warnings designed to help reduce the risk of injury to you and your passengers. Please read your entire Owner’s Manual carefully as you begin learning about your new vehicle and refer to the appropriate chapters when questions arise. All information contained in this Quick Reference Guide was accurate at the time of duplication. We reserve the right to change features, operation and/or functionality of any vehicle specification at any time. Your Ford dealer is the best source for the most current information. For detailed operating and safety information, please consult your Owner’s Manual.WARNING: Driving while distracted can result in loss of vehicle control, crash and injury. We strongly recommend that you use extreme caution when using any device that may take your focus off the road. Your primary responsibility is the safe operation of your vehicle. We recommend against the use of any hand-held device while driving and encourage the use of voice-operated systems when possible. Make sure you are aware of all applicable local laws that may affect the use of electronic devices while driving.COMMONLY USED VOICE COMMANDSSYNC.® Say the Word.Press the voice button on your steering wheel and then say:2694314578102INSTRUMENT PANELCENTER CONSOLE61914151617131220 1118CAMERA LOCATIONSREAR VIEW CAMERA9SYNC ®*1011SYNC is an in-vehicle communications system that works with your Bluetooth wireless technology-enabled phone and portable media player.SYNC®3* A REVOLUTIONARY WAY TO CONNECT WITH YOUR TRUCK.SYNC®3*COMFORT 16in a variety of road conditions. To use, press the hill descent button . A light appears in the instrument cluster and a tone sounds.For more Information, see theOwner’s Manual REMOTE CONTROL WITH REMOTE STARTPress once to unlock the driver door.Press twice within three secondsto unlock all of the doors. Thedirection indicators flash.Press once to lock all the doors.The direction indicators flash.Press twice within three secondsto confirm you closed and locked allthe doors. The horn sounds and thedirection indicators flash if youclosed all of the doors.Press to activate the panicalarm when the ignition is off.Press again or switch on the ignition to deactivate the panic alarm.Car finder: Press twice within three seconds. The horn sounds and the direction indicators flash. We recommend using this method to locate your vehicle, rather than using the panic alarm.Press to lock all the doors, then presswithin three seconds. The exterior lamps flash twice. The horn sounds if the system fails to start.CONVENIENCE 18FUNCTIONWith the system engaged, the rear axle temporarily locks, allowingvehicle and objects in the green zone are farther away. Objects arecontrol knob from off to on.The indicator light appears in the information displaywhen the feature is active.Do not use the electronic locking differential on dry,ESSENTIAL INFORMATIONYour vehicle has a system that displays a low tire pressurewarning light when one or more of your tires areunder-inflated. If this happens, stop and check your tires as soonas possible. Inflate them to the proper pressure. Refer to theWheels and TiresDRIVER ASSISTANCECOLLISION WARNING SYSTEM*25DRIVER ASSISTANCE TECHNOLOGY。
汽车调漆调色口诀
1、红加黄变橙——少黄多红变深橙——少红多黄变浅黄
2、红加蓝变紫——少蓝多红变紫再加多红变玫瑰红
3、黄加蓝变绿——少黄多蓝变深蓝——少蓝多黄变浅绿
4、红加黄加少蓝变棕色——红加黄加蓝变灰黑色(按分量多少调可调出多种深浅不一的颜色)
5、红加蓝变紫再加白变浅紫
6、黄加少红变深黄加白变土黄——黄加少红变深黄——黄加蓝变绿加白变奶绿
7、红加黄加少蓝加白变浅棕——红加黄加蓝变灰黑色加多白变浅灰
8、黄加蓝变绿加蓝变蓝绿
9、红加蓝变紫再加红加白变粉紫红(玫瑰)
10、少红加白变粉红。
调色配方100种以下是一份包含100种调色配方的示例列表。
请注意,这只是一个示例列表,可以根据需要进行调整和个性化。
1. 黄色调配方:100%黄色2. 红色调配方:100%红色3. 蓝色调配方:100%蓝色4. 绿色调配方:100%绿色5. 橙色调配方:50%红色 + 50%黄色6. 紫色调配方:50%蓝色 + 50%红色7. 青色调配方:50%蓝色 + 50%绿色8. 黄绿色调配方:50%黄色 + 50%绿色9. 粉色调配方:50%红色 + 50%白色10. 棕色调配方:50%红色 + 25%绿色 + 25%蓝色11. 雾霾蓝调配方:70%灰色 + 30%蓝色12. 金色调配方:80%黄色 + 20%橙色13. 银色调配方:90%白色 + 10%黑色14. 紫红色调配方:70%红色 + 30%蓝色15. 鲜橙色调配方:80%红色 + 20%黄色16. 草绿色调配方:60%绿色 + 40%黄色17. 亮蓝色调配方:70%蓝色 + 30%白色18. 藏蓝色调配方:80%蓝色 + 20%黑色19. 天蓝色调配方:80%蓝色 + 20%白色20. 柠檬黄调配方:80%黄色 + 20%白色21. 蛋壳白调配方:90%白色 + 10%黄色22. 墨绿色调配方:70%绿色 + 30%黑色23. 淡粉色调配方:80%红色 + 20%白色24. 深灰色调配方:70%黑色 + 30%白色25. 浅灰色调配方:70%白色 + 30%黑色26. 咖啡色调配方:60%红色 + 20%绿色 + 20%蓝色28. 灰蓝色调配方:70%蓝色 + 30%灰色29. 浅黄色调配方:80%黄色 + 20%白色30. 丁香紫调配方:70%紫色 + 30%白色31. 葱绿色调配方:70%绿色 + 30%白色32. 杏黄色调配方:80%黄色 + 20%橙色33. 乳白色调配方:90%白色 + 10%黄色34. 长春藤绿调配方:70%绿色 + 30%蓝色35. 银灰色调配方:70%灰色 + 30%白色36. 玫瑰红调配方:80%红色 + 20%白色37. 珊瑚色调配方:70%红色 + 30%橙色38. 马鞍棕色调配方:70%红色 + 20%绿色 + 10%蓝色39. 绿松石色调配方:70%蓝色 + 30%绿色40. 枯木色调配方:70%棕色 + 30%黑色41. 亮紫色调配方:80%紫色 + 20%白色42. 石板灰调配方:70%灰色 + 30%蓝色43. 珍珠白调配方:90%白色 + 10%灰色44. 松绿色调配方:80%绿色 + 20%黄色45. 浓缩咖啡色调配方:80%红色 + 10%绿色 + 10%蓝色46. 亲吻红调配方:70%红色 + 30%白色47. 桃红色调配方:70%红色 + 30%粉色48. 草地绿调配方:80%绿色 + 20%黄色49. 温暖黄调配方:70%黄色 + 30%红色50. 柏绿色调配方:70%绿色 + 30%黄色51. 明亮蓝调配方:80%蓝色 + 20%白色52. 闪耀紫调配方:70%紫色 + 30%蓝色53. 高级灰调配方:80%灰色 + 20%白色54. 柠檬绿调配方:80%绿色 + 20%黄色55. 太阳黄调配方:70%黄色 + 30%橙色57. 古铜色调配方:50%红色 + 35%绿色 + 15%蓝色58. 板岩蓝调配方:60%蓝色 + 30%灰色 + 10%黑色59. 桔红色调配方:70%红色 + 30%橙色60. 青白色调配方:70%蓝色 + 30%白色61. 橄榄绿调配方:70%绿色 + 30%黄色62. 淡黄色调配方:80%黄色 + 20%白色63. 石墨灰调配方:80%黑色 + 20%灰色64. 烟白色调配方:90%白色 + 10%灰色65. 火焰红调配方:70%红色 + 30%黑色66. 瓜绿色调配方:70%绿色 + 30%黄色67. 深粉色调配方:80%红色 + 20%白色68. 深紫色调配方:70%紫色 + 30%黑色69. 中绿色调配方:60%绿色 + 40%黄色70. 薄荷绿调配方:80%绿色 + 20%白色71. 品红色调配方:70%红色 + 30%白色72. 青黑色调配方:70%蓝色 + 30%黑色73. 豆沙绿调配方:60%绿色 + 30%红色 + 10%黄色74. 葡萄紫调配方:70%紫色 + 30%红色75. 天青色调配方:70%蓝色 + 30%绿色76. 葡萄红调配方:70%红色 + 30%蓝色77. 酸橙色调配方:70%橙色 + 30%黄色78. 珍珠灰调配方:90%灰色 + 10%白色79. 浅紫色调配方:80%紫色 + 20%白色80. 水蓝色调配方:70%蓝色 + 30%白色81. 柚黄色调配方:70%黄色 + 30%橙色82. 薰衣草紫调配方:70%紫色 + 30%白色83. 温暖灰调配方:80%灰色 + 20%黄色84. 荧光绿调配方:70%绿色 + 30%黄色86. 夜空蓝调配方:70%蓝色 + 30%黑色87. 玉米黄调配方:80%黄色 + 20%白色88. 深绿色调配方:70%绿色 + 30%黑色89. 螺旋蓝调配方:70%蓝色 + 30%白色90. 钢铁灰调配方:70%灰色 + 30%黑色91. 柠檬黄调配方:80%黄色 + 20%白色92. 神秘紫调配方:70%紫色 + 30%黑色93. 荷花粉调配方:80%红色 + 20%白色94. 蒂花白调配方:90%白色 + 10%黄色95. 橄榄褐调配方:70%绿色 + 20%红色 + 10%黄色96. 芦灰色调配方:70%灰色 + 30%绿色97. 橙红色调配方:70%红色 + 30%橙色98. 草墨绿调配方:80%绿色 + 10%蓝色 + 10%黑色99. 浅粉色调配方:80%红色 + 10%白色 + 10%黄色100. 黑白灰调配方:33%黑色 + 33%白色 + 34%灰色这些调色配方只是示例,您可以根据自己的需求和喜好进行调整和创造。
菲亚特派力奥地中海蓝漆号:5972009-01-03 21:01地中海蓝漆号:597所用色母:蓝珍珠中银中粗银红口蓝靖蓝紫色黑色紫珍珠。
调色过程:蓝珍珠,中银,中粗银混入到红口蓝里加入靖蓝使侧面变清脆加入紫珍珠使正面不是很绿侧面稍红些喷涂后会像。
注意事项:1必须有比较好的光源否则极其费劲。
2配方里没有蓝珍珠但实际上用的还很多。
3喷涂样板后颜色若差不要惊慌取之湿漆与样板比较会发现不一致在样板上抹水不准确会比湿膜正面颗粒小发紫侧面黑紫黑紫的,罩上清漆会有明显改变,颗粒变大,正面开始恢复湿膜的样子侧面不如先前黑紫会变浅往蓝相了走。
4湿膜比对后侧面稍红些喷样板并罩光等待3~5分钟后比对颜色会准确。
联合灰漆号:LA7T2009-01-03 20:58联合灰漆号:LA7T所用色母:细银闪银黑色湖水蓝紫色黄珍珠蓝珍珠透明白。
调色过程:先加入细银闪银黑色找颗粒及明暗度然后加入湖水蓝紫色调色相此时侧面颜色将变深需要加入透明白进行调节(须加控色剂略多)在进行比较正面没它黄于是加入少量黄珍珠最后在加入少量控色剂。
喷涂样板后比较正面没有车身颜色深侧面没有颜色浅添加黑和透明白颜色变黄少量加入蓝珍珠使正面蓝侧面往浅走在喷板颜色趋于一致。
注意事项:灰色金属漆抹板后颜色浮色比较快因此适于在3秒内观察拎尺适于观察正面比对颜色还须喷样板后最终确认在抹上清漆后颜色会往黄了走。
速腾影像蓝漆号:LD5Q2009-01-03 20:56速腾影像蓝漆号:LD5Q所用色母:标准蓝水晶蓝珍珠黑白珍珠紫色调色过程:正常调配。
注意事项:此漆内有水晶蓝珍珠如没有水晶蓝珍珠也可加入少量水晶白珍珠。
奥迪A4凯旋金漆号:LY1X2009-01-03 20:55奥迪A4凯旋金漆号:LY1X所用色母:中闪银细银蓝珍珠靖蓝铁黄干涩红珍珠透明白控色剂。
注意事项:配方内有金珍珠没用到。
阿斯特拉灰漆号:LY7Q所用色母:中银闪银湖水蓝紫红红珍珠(少)透明白调色过程:注意事项:奥迪A6乌木黑漆号:LZ9W2009-01-03 20:54奥迪A6乌木黑漆号:LZ9W所用色母:黑色白珍珠细白珍珠蓝珍珠湖水蓝紫红泥红透明白绿珍珠。