计算机网络实验lab1
- 格式:ppt
- 大小:462.00 KB
- 文档页数:21

单元一局域网组建任务一局域网认识一、实验目的1、初步掌握计算机网络的定义,计算机网络的功能及计算机网络的分类;2、掌握按地理范围分类的四大计算机网络,即局域网、广域网、城域网和互联网。
重点了解局域网的结构及网络系统的设置;3、掌握计算机网络的五种拓扑结构,即总线型、星型、环形、树型和网状型。
重点掌握总线型、星型。
二、实验内容1、到学院网络中心、教学机房或者其他相关单位了解计算机网络结构,并画出拓扑结构图,分析属于什么网络结构;2、观察每台计算机是如何进行网络通信的,了解计算机网络中的网络设备;3、了解每台计算机上使用的网络标识、网络协议和网卡的配置。
三、实验原理1、计算机网络的定义。
计算机网络,是指将地理位置不同的具有独立功能的多台计算机及其外部设备,通过通信线路连接起来,在网络操作系统,网络管理软件及网络通信协议的管理和协调下,实现资源共享和信息传递的计算机系统。
2、计算机网络的分类。
计算机网络类型的划分标准各种各样,根据网络的覆盖范围划分为局域网、城域网、广域网、国际互联网;按网络的拓扑结构划分为总线型网络、星型网络、环型网络、树状网络、混合型网络;按传输介质划分为有线网、无线网;按网络的使用性质划分为公用网、专用网,当然还有一些其他的分类标准。
四、实验步骤组织学生三至五人为一小组,分别到学院网络中心、教学机房或者其他相关单位,完成本次实验的内容,并写出实验报告。
LAB1:观察计算机网络的组成本实验是以计算机教学机房为例,观察计算机网络的组成,并画出网络拓扑结构图(学生可以根据现有的条件,到相关的计算机网络实验实训基地观察)。
1、记录联网计算机的数量、配置、使用的操作系统、网络拓扑结构等数据;2、了解教学机房设备是如何互联的(根据现有条件,了解相应网络设备);3、认识并记录网络中使用的其他硬件设备的名称、用途及连接的方法;4、画出网络拓扑结构图;5、根据网络拓扑结构图分析网络使用的结构。
LAB2:观察计算机网络的参数设置经机房管理人员许可后,打开计算机进入系统,查看计算机的网络参数,并记录主要的网络配置参数。

lab1_网线的制作及对等网络配置和资源共享-实验报告
学号:123012009xxx 姓名:Email:xxxxx@xxxxxxxx 日期:2010年月日实验一网线制作及对等网络配置和资源共享
一、实验目的
1. 理解直连线和交叉线的应用范围,掌握直连线和交叉线的制作方法。
2.了解对等网络基本配置中包含的协议、Windows网上邻居互访的基本条件。
3. 学习所在系统共享目录的设置和使用方法
4.掌握在实验室环境和虚拟机环境下的对等配置和资源共享
二、实验环境
PC机、RJ45卡线钳、水晶头、双绞线、测试仪Windows xp或Windows 2000、局域网VMware
三、实验内容
1. 制作RJ45网线
2. TCP/IP协议和NETBUI协议的安装、卸载和配置
3. 熟悉所在机器的主机名、所属工作组,了解网络基本配置中包含的协议。
4.掌握TCP/IP协议环境下,计算机网络属性的设置,并与仅安装NETBUI 协议的环境相比较:二者是否都需要进行网络属性设置,网上邻居的访问速度如何等。
5. 设置和停止共享目录
6. 熟悉VMware,并在VMware环境下重复实现上述实验内容
四、实验要求
两人一组,完成两种标准的水晶头制作及对等网配置
五、实验项目性质
验证性
七、实验步骤
八、实验结果与分析
(描述最终得到的结果,并进行分析说明,可能的误差原因)
学号:123012009xxx 姓名:Email:xxxxx@xxxxxxxx 日期:2010年月日
七、总结
(说明实验过程中遇到的问题及解决办法;新发现或个人的收获;未解决/需进一步研讨的问题或建议新实验方法等)。
LAB-1:IEEE802标准和以太网数据链路层协议分析一.实验目的1.掌握以太网的报文格式2.掌握MAC地址、MAC广播地址的作用3.理解数据链路层协议的工作机制,掌握数据链路层帧(Ethernet II)的报文格式4.掌握网络协议编辑器软件(科来数据包生成器)的使用方法5.熟练掌握网络协议分析软件(WIRESHARK)的使用方法二.实验内容与步骤1.捕获真实的MAC帧●主机A、B作为一组,主机B启动协议分析软件,并设置只提取ICMP协议数据包的捕获过滤条件,主机A PING主机B,检查主机B捕获的数据包,并分析记录MAC帧格式●记录实验结果2.理解MAC地址的作用●主机A、B、C、D作为一组,主机A PING 主机C,主机B、D启动协议分析软件,并设置只提取源MAC地址为主机A的数据包捕获过滤条件,检查主机A所发送的ICMP数据帧,并分析该帧的内容。
●记录实验结果3.编辑并发送MAC广播帧●主机A、B、C、D作为一组,主机D启动协议编辑器,并编辑一个MAC帧(目标MAC: FFFFFFFFFFFF,源MAC: 主机D的MAC地址,协议类型或数据长度:大于0X600,数据字段:编辑长度在46-1500字节之间的数据),主机A、B、C启动协议分析软件,并设置只提取源MAC地址为主机D的数据包捕获过滤条件,主机D发送已编辑好的MAC帧,主机A、B、C捕获和检查是否有主机D所发送的MAC数据帧,并分析该帧的内容。
●记录实验结果三.实验结果分析与思考1. 在实验步骤2中,为什么有的主机会收到ICMP数据包而有的主机收不到?2. 在实验步骤3中,简述FFFFFFFFFFFF作为目标MAC地址的作用,主机A、B、C是否均可以收到主机D的广播帧?3. 结合实验结果,说明MAC广播帧的作用范围?四.实验报告1.按上述实验步骤与内容撰写实验报告(抄袭他人实验结果,双方均不计成绩)2.要求说明实验时间、地点及同级成员名单。

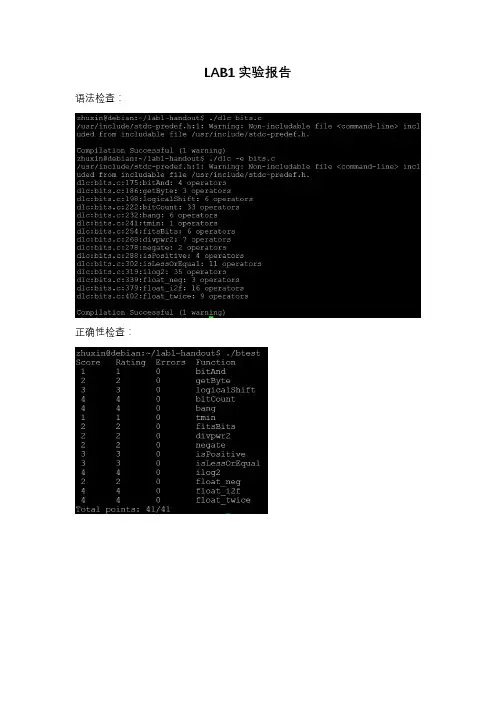
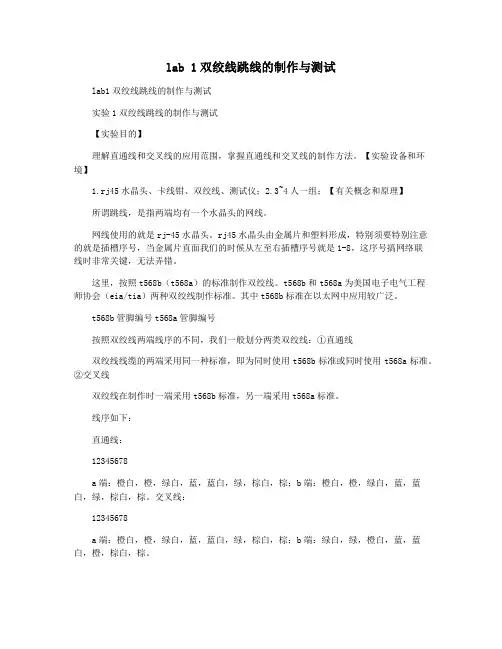
LAB1实验报告语法检查:正确性检查:1.bitAnd源代码:return ~(~x|~y);思路:可以直接运用摩尔定律,写出与的等价形式。
2.getByte源代码:return (x>>(n<<3))&0xff;思路:向右移动3n位,再用11111111B按位与,截取出所需要的字节3.logicalShift源代码:int logic=~(((1<<31)>>n)<<1);return logic&(x>>n);思路:设置一个变量logic,并通过算数移位将其前n为设置成0,后面32-n位设置为1。
利用这个变量按位与移位后的x即可。
4.bitCount源代码:int bitCount(int x) {int result;int half_one=(0x55)|(0x55<<8);int one=(half_one)|(half_one<<16);int half_two=(0x33)|(0x33<<8);int two=(half_two)|(half_two<<16);int half_three=(0x0f)|(0x0f<<8);int three=(half_three)|(half_three<<16);int four=(0xff)|(0xff<<16);int five=(0xff)|(0xff<<8);result=(x&one)+((x>>1)&one);result=(result&two)+((result>>2)&two);result=(result+(result>>4))&three;result=(result+(result>>8))&four;result=(result+(result>>16))&five;return result;}思路:主要还是使用二分法,通过以为设置五个字符串:010101010101010101010101 0101 01010011 0011 0011 0011 0011 0011 0011 00110000 1111 0000 1111 0000 1111 0000 11110000 0000 1111 1111 0000 0000 1111 11110000 0000 0000 0000 1111 1111 1111 1111分别通过按位与统计1的个数,并将个数记录在下一个字符串1出现的位置。

Lab 1Part 1: Intro LabSTEPS•Start up your favorite web browser, which will display your selected homepage. •Start up the Wireshark software. You will initially see a window•To begin packet capture, select the Capture pull down menu and select Options. This will cause the “Wireshark: Capture Options” window to be displayed•You can use most of the default values in this window, but uncheck “Hide capture info dialog” under Display Options. The network interfaces (i.e., the physical connections) that your computer has to the network will be shown in the Interface pull down menu at the top of the Capture Options window. In case your computer has more than one active network interface (e.g., if you have both a wireless and a wired Ethernet connection), you will need to select an interface that is being used to send and receive packets (mostly likely the wired interface). After selecting the network interface (or using the default interface chosen by Wireshark), click Start. Packet capture will now begin - all packets being sent/received from/by your computer are now being captured by Wireshark!•Once you begin packet capture, a packet capture summary window will appear. This window summarizes the number of packets of various types that are being captured, and (importantly!) contains the Stop button that will allow you to stop packet capture. Don’t stop packet capture yet.•While Wireshark is running, enter the URL: /wireshark-labs/INTRO-wireshark-file1.html and have that page displayed in your browser. In order to display this page, your browser will contact the HTTP server at and exchange HTTP messages with the server in order to download this page, as discussed in section 2.2 of the text. The Ethernet frames containing these HTTP messages will be captured by Wireshark.•After your browser has displayed the INTRO-wireshark-file1.html page, stop Wireshark packet capture by selecting stop in the Wireshark capture window. This will cause the Wireshark capture window to disappear and the main Wireshark window to display all packets captured since you began packet capture. You now have live packet data that contains all protocol messages exchanged between your computer and other network entities! The HTTP message exchanges with the web server should appear somewhere in the listing of packets captured. But there will be many other types of packets displayed as well. Even though the only action you took was to download a web page, there were evidently many other protocols running on your computer that are unseen by the user. We’lllearn much more about these protocols as we progress through the text! For now, you should just be aware that there is often much more going on than “meet’s the eye”!•Type in “http” (without the quotes, and in lower case – all protocol names are in lower case in Wireshark) into the display filter specification window at the top of the main Wireshark window. Then select Apply (to the right of where you entered “http”). This wil l cause only HTTP message to be displayed in the packet-listing window.•Select the first http message shown in the packet-listing window. This should be the HTTP GET message that was sent from your computer to the HTTP server. When you select the HTTP GET message, the Ethernet frame, IP datagram, TCP segment, and HTTP message header information will be displayed in the packet-header window3 . By clicking plusand-minus boxes to the left side of the packet details window, minimize the amount of Frame, Ethernet, Internet Protocol, and Transmission Control Protocol information displayed. Maximize the amount information displayed about the HTTP protocol. (Note, in particular, the minimized amount of protocol information for all protocols except HTTP, and the maximized amount of protocol information for HTTP in the packet-header window).•Exit WiresharkQuestions1、List up to 10 different protocols that appear in the protocol column in the unfiltered packet-listing window in step 7 above.EAP、NBNS、UDP、LLMNR、ARP、ICMPV6、SSDP、DHCPV6、TCP、IGMPV22. How long did it take from when the HTTP GET message was sent until the HTTP OK reply was received? (By default, the value of the Time column in the packetlisting window is the amount of time, in seconds, since Wireshark tracing began. To display the Time field in time-of-day format, select the Wireshark View pull down menu, then select Time Display Format, then select Time-of-day.)So the time is 20:17:16:703005000 – 20:17:16:275189000 = 0.427816(seconds)3. What is the Internet address of the (also known as)? What is the Internet address of your computer?So the IP address of the is 128.119.245.12, and the IP address of my computer is 172.19.4.142.4. Print the two HTTP messages displayed in step 9 above. To do so, select Print from the Wireshark File command menu, and select “Selected Packet Only” and “Print as displayed” and then click OK.The first HTTP messages:The second HTTP messages:Part 2: HTTP Lab1.The Basic HTTP GET/response interactionSTEPS•Start up your web browser.•Start up the Wireshark packet sniffer, as described in the Introductory lab (but don’t yet begin packet capture). Enter “http” (just the letters, not the quotation marks) in the display-filter-specification window, so that only captured HTTP messages will be displayed later in the packet-listing window. (We’re only interested in the HTTP protocol here, and don’t want to see the clutter of all captured packets).•Wait a bit more than one minute (we’ll see why shortly), and then begin Wireshark packet capture.•Enter the following to your browser /wireshark-labs/HTTP-wireshark-file1.html Your browser should display the very simple, one-line HTML file.•Stop Wireshark packet capture.Before we answer these questions, there are the HTTP messages.Questions1. Is your browser running HTTP version 1.0 or 1.1? What version of HTTP is the server running?Both of them are 1.12. What languages (if any) does your browser indicate that it can accept to the server?zh-CN3. What is the IP address of your computer? Of the server?The IP address of my computer is 172.19.49.122. The IP address of the server is 128.119.245.12.4. What is the status code returned from the server to your browser?2005. When was the HTML file that you are retrieving last modified at the server?Wed ,01 Apr 2015 13:14:19 GMT6. How many bytes of content are being returned to your browser?128 bytes7. By inspecting the raw data in the packet content window, do you see any headers within the data that are not displayed in the packet-listing window? If so, name one. No.2.The HTTP CONDITIONAL GET/response interactionSTEPS•Start up your web browser, and make sure your browser’s cache is cleared, as discussed above.•Start up the Wireshark packet sniffer•Enter the following URL into your browser /wireshark-labs/HTTP-wireshark-file2.html Your browser should display a very simple five-line HTML file.•Quickly enter the same URL into your browser again (or simply select the refresh button on your browser)•Stop Wireshark packet capture, and enter “http” in the display-filter-specification window, so that only captured HTTP messages will be displayed later in thepacket-listing window.•(Note: If you are unable to run Wireshark on a live network connection, you can use the http-ethereal-trace-2 packet trace to answer the questions below; seefootnote 1. This trace file was gathered while performing the steps above on one of the author’s computers.)Questions8. Inspect the contents of the first HTTP GET request from your browser to the server. Do you see an “IF-MODIFIED-SINCE” line in the HTTP GET?No9. Inspect the contents of the server response. Did the server explicitly return the contents of the file? How can you tell?Yes. Because we can see a line of “Line-based text data: text/html” and thecontent below the line.10. Now inspect the contents of the second HTTP GET request from your browser to the server. Do you see an “IF-MODIFIED-SINCE:” line in the HTTP GET? If so, what information follows the “IF-MODIFIED-SINCE:” header?Yes. Wed, 01 Apr 2015 05:59:01 GMT11. What is the HTTP status code and phrase returned from the server in response to this second HTTP GET? Did the server explicitly return the contents of the file? Explain.304 Not Modified. No, because the content have been in the cache.3.Retrieving Long DocumentsSTEPS•Start up your web browser, and make sure your browser’s cache is cleared, as discussed above.•Start up the Wireshark packet sniffer•Enter the following URL into your browser /wireshark-labs/HTTP-wireshark-file3.html Your browser should display the rather lengthy US Bill of Rights. •Stop Wireshark packet capture, and enter “http” in the display-filter-specification window, so that only captured HTTP messages will bedisplayed.•(Note: If you are unable to run Wireshark on a live network connection, you can use the http-ethereal-trace-3 packet trace to answer the questions below; seefootnote 1. This trace file was gathered while performing the steps above on one of the author’s computers.)Questions12. How many HTTP GET request messages were sent by your browser?Just one.13. How many data-containing TCP segments were needed to carry the single HTTP response?Four.14. What is the status code and phrase associated with the response to the HTTP GET request?200 ok15. Are there any HTTP status lines in the transmitted data associated with a TCP induced “Continuation”?No.4. HTML Documents with Embedded ObjectsSTEPS•Start up your web browser, and make sure your browser’s cache is cleared, as discussed above.•Start up the Wireshark packet sniffer • Enter the following URL into yourbrowser /wireshark-labs/HTTP-wireshark-file4.html Your browser should display a short HTML file with two images. These two images are referenced in the base HTML file. That is, the images themselves are notcontained in the HTML; instead the URLs for the images are contained in the downloaded HTML file. As discussed in the textbook, your browser will have to retrieve these logos from the indicated web sites. Our publisher’s logo is retrieved from the web site. The image of our book’s cover is stored at the server.•Stop Wireshark p acket capture, and enter “http” in the display-filter-specification window, so that only captured HTTP messages will be displayed.•(Note: If you are unable to run Wireshark on a live network connection, you can use the http-ethereal-trace-4 packet trace to answer the questions below; seefootnote 1. This trace file was gathered while performing the steps above on one of the author’s computers.)Questions16. How many HTTP GET request messages were sent by your browser? To which Internet addresses were these GET requests sent?There are four HTTP GET request messages were sent by my browser.One for the HTML:128.119.245.12One for an object: 165.193.140.14Two for another object: 128.119.240.90. The first time it get a 302 Found, then it send a GET message again. In the Last it get a 200 OK.17. Can you tell whether your browser downloaded the two images serially, or whether they were downloaded from the two web sites in parallel? Explain.Parallel. We can see that the second request is send just after the first request is sent, rather than waiting for the reception of the first image.5.HTTP AuthenticationSTEPS•Make sure your browser’s cache is cleared, as discussed above, and close down your browser. Then, start up your browser• Start up the Wireshark packet sniffer• Enter the following URL into your browser /wireshark-labs/protected_pages/HTTP-wiresharkfile5.html Type the requested user name and password into the pop up box.• Stop Wireshark packet capture, and enter “http” in the display-filter-specification window, so that only captured HTTP messages will be displayed later in the packet-listing window.• (Note: If you are unable to run Wireshark on a live network connection, you can use the http-ethereal-trace-5 packet trace to answer the questions below; seefootnote 1. This trace file was gathered while performing the steps above on one of the author’s comput ers.)Questions18. What is the server’s response (status code and phrase) in response to the initial HTTP GET message from your browser?401 Authorization Required。
lab 1双绞线跳线的制作与测试lab1双绞线跳线的制作与测试实验1双绞线跳线的制作与测试【实验目的】理解直通线和交叉线的应用范围,掌握直通线和交叉线的制作方法。
【实验设备和环境】1.rj45水晶头、卡线钳、双绞线、测试仪;2.3~4人一组;【有关概念和原理】所谓跳线,是指两端均有一个水晶头的网线。
网线使用的就是rj-45水晶头。
rj45水晶头由金属片和塑料形成,特别须要特别注意的就是插槽序号,当金属片直面我们的时候从左至右插槽序号就是1-8,这序号搞网络联线时非常关键,无法弄错。
这里,按照t568b(t568a)的标准制作双绞线。
t568b和t568a为美国电子电气工程师协会(eia/tia)两种双绞线制作标准。
其中t568b标准在以太网中应用较广泛。
t568b管脚编号t568a管脚编号按照双绞线两端线序的不同,我们一般划分两类双绞线:①直通线双绞线线缆的两端采用同一种标准,即为同时使用t568b标准或同时使用t568a标准。
②交叉线双绞线在制作时一端采用t568b标准,另一端采用t568a标准。
线序如下:直通线:12345678a端:橙白,橙,绿白,蓝,蓝白,绿,棕白,棕;b端:橙白,橙,绿白,蓝,蓝白,绿,棕白,棕。
交叉线:12345678a端:橙白,橙,绿白,蓝,蓝白,绿,棕白,棕;b端:绿白,绿,橙白,蓝,蓝白,橙,棕白,棕。
在展开设备相连接时,我们须要恰当的挑选线缆。
我们将设备的rj45USB分成mdi和mdix两类。
当同种类型的USB通过双绞线互连时,采用交叉线;当相同类型的USB通过双绞线互连时采用直通线。
通常主机和路由器的USB属mdi,交换机和集线器的USB属mdix。
比如,路由器和主机相连,使用交叉线;交换机和主机相连则使用直通线。
主机路由器主机交叉交叉路由器交叉交叉直通n/a直通交换机mdix交换机mdi直通直通交叉直通交叉n/an/a直通交叉直通集线器直通直通交叉直通交叉交换机mdix直通交换机mdi集线器n/a直通备注:n/a则表示不容相连接。
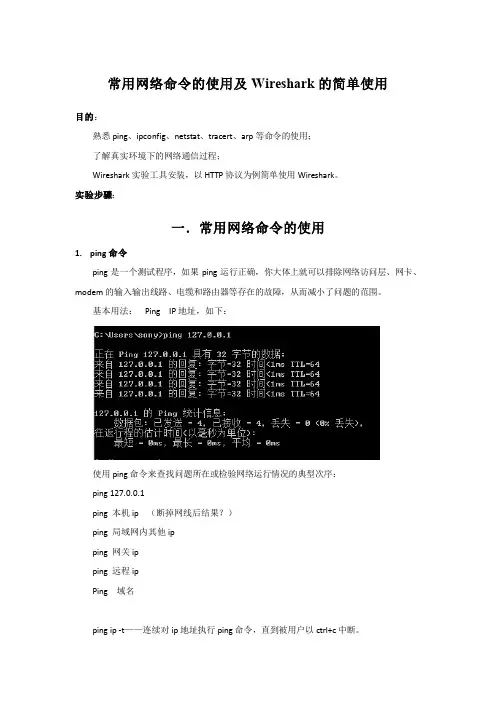
常用网络命令的使用及Wireshark的简单使用目的:熟悉ping、ipconfig、netstat、tracert、arp等命令的使用;了解真实环境下的网络通信过程;Wireshark实验工具安装,以HTTP协议为例简单使用Wireshark。
实验步骤:一.常用网络命令的使用1.ping命令ping是一个测试程序,如果ping运行正确,你大体上就可以排除网络访问层、网卡、modem的输入输出线路、电缆和路由器等存在的故障,从而减小了问题的范围。
基本用法:Ping IP地址,如下:使用ping命令来查找问题所在或检验网络运行情况的典型次序:ping 127.0.0.1ping 本机ip (断掉网线后结果?)ping 局域网内其他ipping 网关ipping 远程ipPing 域名ping ip -t——连续对ip地址执行ping命令,直到被用户以ctrl+c中断。
ping ip -l 2000——指定ping命令中的数据长度为2000字节,而不是缺省的32字节。
ping ip -n——执行特定次数的ping命令。
2.ipconfig命令该命令用于检查网络TCP/IP配置的信息,如IP地址、MAC地址、DNS等。
ipconfig、ipconfig /all、ipconfig /renew、ipconfig /release等stat命令该命令用户显示各协议相关的统计及数据,一般用于检查本地主机的各个端口的网络连接情况。
不同种类:netstat –r 显示网络各种通信协议的状态netstat –E 显示以太网层的数据统计情况netstat –A 显示网络中有效连接的信息netstat –N 显示所有已经建立的连接4.tracert命令该命令用于检查由本地主机到目标主机所经历的路由信息。
5.arp命令arp命令显示和修改地址解析协议(ARP)缓存中的项目。
二.W ireshark的简单使用1.wireshark下载安装软件下载地址:https:///download.htmlWireshark使用教程:https:///docs/安装流程:1.下载时选择与实验机器型号对应的版本2.打开wireshark安装程序3.按照默认设置完成安装2.Wireshark的简单使用:Http协议分析(详细流程见英文文档:Wireshark_HTTP_v6.1.pdf)在这部分中,我们将以Http协议为例,学习掌握Wireshark的简单使用,探讨HTTP 协议的几个方面:基本/响应交互,HTTP消息格式,检索大型HTML文件,检索HTML 文件嵌入对象,HTTP身份验证和安全。

------------------------------------------------------------------------------------------------------------------------------姓名:报名编号:学习中心:层次:(高起专或专升本)专业:客观题:谈谈你对本课程学习过程中的心得体会?实验一:PC的网络连接及测试实验目的:实验问题讨论:1.T568A 线序和T568B 线序。
2.网线制作步骤。
实验二:交换机VLAN的基本配置实验目的:实验问题讨论:1.哪些命令是将Switch B的1-6号端口划分到VLAN2?2.4台PC机之间能够ping通吗?请写出结果及其原因。
实验三:路由器静态路由配置实验目的:实验问题讨论:1.路由器静态路由配置实验,为什么需要两条配置口电缆,其作用是什么?2.通过路由器静态路由配置的实验,写出静态路由实现的功能以及静态路由配置的作用。
实验四:生成树协议STP的配置实验目的:实验问题讨论:------------------------------------------------------------------------------------------------------------------------------1.生成树协议定义?2.写出将4台交换机依次命名为SwitchA, SwitchB, SwitchC, 和SwitchD的代码。
实验五:路由器RIP的基本配置实验目的:实验问题讨论:1.如何启动RIP协议?2.启动RIP协议之后,路由表具体变化是什么?。
计算机网络实验指导书------网络与通信教研室枣庄学院信息科学与工程学院2011.12目录实验一Wireshark的安装与使用 (3)实验二使用Wireshark分析以太网帧与ARP协议 (7)实验三使用Wireshark分析IP协议 (11)实验四利用Wireshark分析ICMP (19)实验五使用Wireshark分析UDP协议 (25)实验六使用Wireshark分析TCP协议 (29)实验七利用Wireshark分析协议HTTP (35)实验八利用Wireshark分析DNS协议 (40)实验九使用Wireshark分析FTP协议(选作) (44)实验十使用Wireshark分析SMTP和POP3协议(选作) (48)实验一Wireshark的安装与使用一、实验目的1、熟悉并掌握Wireshark的基本使用;2、了解网络协议实体间进行交互以及报文交换的情况。
二、实验环境与因特网连接的计算机,操作系统为Windows,安装有Wireshark、IE等软件。
三、预备知识要深入理解网络协议,需要观察它们的工作过程并使用它们,即观察两个协议实体之间交换的报文序列,探究协议操作的细节,使协议实体执行某些动作,观察这些动作及其影响。
这种观察可以在仿真环境下或在因特网这样的真实网络环境中完成。
观察正在运行的协议实体间交换报文的基本工具被称为分组嗅探器(packet sniffer),又称分组捕获器。
顾名思义,分组嗅探器捕获(嗅探)你的计算机发送和接收的报文。
图1显示了一个分组嗅探器的结构。
图1图1右边是计算机上正常运行的协议和应用程序(如:Web浏览器和FTP客户端)。
分组嗅探器(虚线框中的部分)主要有两部分组成:第一是分组捕获器,其功能是捕获计算机发送和接收的每一个链路层帧的拷贝;第二个组成部分是分组分析器,其作用是分析并显示协议报文所有字段的内容(它能识别目前使用的各种网络协议)。
Wireshark是一种可以运行在Windows, UNIX, Linux等操作系统上的分组嗅探器,是一个开源免费软件,可以从下载。
实验一通过Console口访问路由器和交换机路由器(或交换机)没有键盘和鼠标,也没有显示设备,要初始化路由器需要把计算机的串口和路由器的Console口进行连接。
计算机的串口和路由器 (或交换机)的Console口是通过反转线(Rollover)进行连接,反转线的一端接在路由器(或交换机)的Console口上,另一端接到一个DB9-RJ45的转接头中,DB9则接在计算机的串口上。
计算机和路由器(或交换机)连接好后,就可以使用各种各样的终端软件配置路由器(或交换机)了。
1.实验目的通过本实验,掌握如下技能:(1) 计算机的串口和路由器或交换机Console口的连接方法;(2) 使用Windows系统自带的超级终端软件配置路由器或交换机;(3) 路由器或交换机的开机;(4) 熟悉路由器或交换机CLI的各种模式;(5) 掌握路由器或交换机CLI各种编辑命令;(6) 掌握路由器或交换机的IOS基本命令;(7) 查看路由器或交换机的有关信息。
2.实验环境计算机、路由器(或交换机)、RJ45和串口(DB9)转换接头、反转连接线3.实验要求与说明由于实验室条件限制,路由器或交换机有几种品牌。
每种品牌的连接方式都一样,而计算机和路由器或交换机连接上以后所显示的内容和模式有很大的区别,因此,计算机与路由器或交换机连接的实验,可以用实际路由器或交换机进行。
连接好以后,熟悉路由器或交换机CLI模式、命令及了解基本信息的实验可以通过Boson Netsim模拟软件进行。
即实验目的的前3条,使用实际的路由器或交换机进行,后4条通过模拟软件进行。
在实际做实验之前要先熟悉Boson Netsim模拟软件。
4.实验步骤(1)按照实验图1-1将计算机串口通过RJ45与串口(DB9)转换接头用反转连接线和路由器(或交换机)的Console口连接起来;实验图1-1 计算机与路由器连接图(2)打开Windows里自带的超级终端程序。
在Windows中的【开始】→【程序】→【附件】→【通讯】菜单下打开“超级终端,出现如实验图1-2所示的窗口。
实验一:常用网络命令与协议分析针对实验1.1和1.2中布置的任务撰写实验报告,实验报告内容应包括各个任务的完成方法、分析和截图说明,以及实验过程中遇到的问题与收获等部分。
实验报告提交日期:12月3日。
形式要求:打印版实验1.1 验证常用的网络命令[实验目的]:熟悉windows下的一些网络命令的功能和使用方法。
进而能用这些命令察看网络的状况并解决网络中的一些问题。
[实验要求]:1、请尝试以下一些windows下的网络命令,记录实验的过程、结果以及遇到的问题及解决方法,并撰写实验总结。
[实验过程]:实验内容(1)Ipconfig该诊断命令显示所有当前的TCP/IP 网络配置值。
该命令在运行DHCP 系统上的特殊用途,允许用户决定DHCP 配置的TCP/IP 配置值。
ipconfig [/? | /all | /release [adapter] | /renew [adapter]| /flushdns | /registerdns| /showclassid adapter |/displaydns| /setclassid adapter [classidtoset] ]/all 产生完整显示。
在没有该开关的情况下ipconfig 只显示IP 地址、子网掩码和每个网卡的默认网关值。
例如:C:\>ipconfigWindows 2000 IP ConfigurationEthernet adapter 本地连接:Connection-specific DNS Suffix . :IP Address. . . . . . . . . . . . : 10.111.142.71 //IP地址Subnet Mask . . . . . . . . . . . : 255.255.255.0 //子网掩码Default Gateway . . . . . . . . . : 10.111.142.1 //缺省网关C:\>ipconfig /displaydns //显示本机上的DNS域名解析列表C:\>ipconfig /flushdns //删除本机上的DNS域名解析列表(2)ARP:显示和修改IP地址与物理地址之间的转换表ARP -s inet_addr eth_addr [if_addr]ARP -d inet_addr [if_addr]ARP -a [inet_addr] [-N if_addr]-a 显示当前的ARP信息,可以指定网络地址-g 跟-a一样.-d 删除由inet_addr指定的主机.可以使用* 来删除所有主机.-s 添加主机,并将网络地址跟物理地址相对应,这一项是永久生效的。
LAB1 VLAN配置及VLAN间通信一、实验目的:1.掌握在一台交换机上VLAN的划分方法2.掌握跨交换机的VLAN配置方法3.掌握Trunk端口的配置方法4.掌握三层交换的原理和VLAN间通信协议二、实验内容:1.在一台交换机上划分VLAN,测试连通性2.配置Trunk端口,在两台交换机上配置VLAN,测试连通性3.利用S3610三层交换,实现VLAN间通信,测试连通性三、实验环境:1.S3610三层交换机一台,S3100两层交换机两台2.Console线3条,标准网线6根,交换机间连接线2根3.计算机6台4.每6人一组,共用一套实验设备台,分别对交换机进行配置四、实验任务分配我负责在PC机上控制交换机的“超级终端”中输入命令。
五、实验步骤:步骤一、交换机的基本配置在交换机的Console口连接的计算机上点击开始→程序→附件→通讯→超级终端,运行超级终端。
选择com1端口,设置端口属性。
如图1所示。
图1 设置COM1端口属性进入用户视图显示<Quidway>提示符,键入如下命令进入系统视图并将系统名改为S1。
⏹<H3C >system-view⏹[H3C]sysname S1⏹[S1]display ?步骤二:广播风暴实验在两台S3100之间连接成环路,每台计算机上运行Ethereal截获报文。
观察到交换机端口指示灯在不停闪烁,与S3100相连接的两台计算机运行程序变得异常缓慢,最后导致死机。
截获的报文如下图所示。
图2 广播风暴察看捕获报文的种类有ARP,NBNS,Browser,IGMP,MDNS等,其中ARP的帧结如图3所示。
图3 ARP帧结构步骤三、一台交换机上划分VLAN对一台S3100进行设置,实验中我们仅使用了两台计算机,分成两个VLAN,输入指令如下所示:⏹[S1]VLAN 2⏹[S1-VLAN 2]port e 1/0/1 e 1/0/2⏹[S1-VLAN 2]quit⏹ [S1]VLAN 3⏹[S1-VLAN 3]port e 1/0/3 e 1/0/4⏹[S1-VLAN 3]quit设置的结果如图4所示。
《计算机通信与网络实验》课程实验报告实验一 : LAB1 Coding on error dectectingalgorithms(C++)实验名称:LAB1 Coding on error dectectingalgorithms(C) 1.实验内容1. Cyclic redundancy checkUsing the polynomials below to encode random generated data stream (40-100bits). Show the FEC, and encoded data frame.CRC-4 x4+x+1 ITU G.704CRC-16 x16+x15+x2+1 IBM SDLCCRC-32 x32+x26+x23+...+x2+x+1 ZIP, RAR, IEEE 802 LAN/FDDI,IEEE 1394, PPP-FCSFor the error patter listed below, what the conclusion does the receiver get?Can the receiver findthe errors?Case Error patternNo error 0000 (0000)One error 1000 (000)Two errors 100 (001)Random errors Random error pattern2.Parity checkUsing even or odd parity check on random generated data stream (8-20bits).Show encoded data frame.For the error patter listed below, what the conclusion does the receiver get? Can the receiver find the errors?Case Error patternNo error 0000 (0000)One error 1000 (000)Two errors 100 (001)2.实验结果一、二、3.实验程序一、#include <stdio.h>#include <string.h>#include "stdlib.h"unsigned int char2int(char *str){unsigned int count=0, ret=0;for(count = 0; count<strlen(str);count++) {ret = ret<<1;if('0' != str[count]){ ret+=1;}}return ret;}unsigned int getR(char *str){unsigned int c =0 ;int ret = strlen(str)-1;for(c=0;c < strlen(str);c++){if(str[c] != '0'){return ret-c;}}}int getRi(unsigned int num){int c =0;for(;num != 0; c++){num = num>>1;}return c;}void CRC(char *scode, char *p, char*g ){unsigned int iP = char2int(p);unsigned int iG = char2int(g);unsigned int r= getR(g);unsigned int code = iP << r;unsigned int yx = code;for(;getRi(yx) >= getRi(iG);){ yx = yx ^ (iG<<(getRi(yx) - getRi(iG)));} code += yx;itoa(code,scode,2);void main(){char data[8]="" , bds[8]="",code[16]=""; printf("数据:");scanf("%s", data);printf("表达式:");scanf("%s", bds);CRC(code,data,bds);printf("编码:%s",code);}二、#include <stdio.h>#include <stdlib.h>void fun(char *s){int i=0;int sum=0;for(i=0;i<200;i++){sum=sum+s[i];}if((sum+1)%2==0){printf("+1通过偶校验");}if((sum+0)%2!=0){printf("+0通过奇校验");}if((sum+1)%2==1){printf("+1通过奇校验");}if((sum+0)%2==0){printf("+0通过偶校验");}int main(){printf("输入二进制码:\n");char scr[200];gets(scr);fun(scr);}奇校验:就是让原有数据序列中(包括你要加上的一位)1的个数为奇数。