新美式旗舰轿车凯迪拉克CT6技术参数及配置表Cadillac-GMMedia
- 格式:pdf
- 大小:298.12 KB
- 文档页数:8
12378910目录欢迎您加入日益兴旺的新型INFINITI英菲尼迪车主的行列。
我们满怀信心地向您提供该新型INFINITI英菲尼迪汽车。
它是用最新技术并在严格的质量管理下制造的。
本使用说明手册是为您了解车辆的操作和保养而准备的,有了它,您可享受久驶不损之乐趣。
在使用本车之前,请通读本手册。
另附的《保修和保养手册》对车辆的保修进行了详细的说明。
INFINITI英菲尼迪经销店最了解您汽车的情况。
如果您需要什么服务或有任何问题,我们都会运用重要的安全信息安全注意事项!遵守下列重要的驾驶规则,可确保您和乘客旅途的安全!.切勿酒后或服药后驾驶。
.务必观察限速标志,切勿超速驾驶。
.务必使用安全带及恰当的儿童保护装置。
未满13岁的儿童应坐在后座。
.务必提醒乘客车辆安全装置的正确使用方法。
.务必查阅本使用说明手册以获取重要的安全信息。
本手册说明本手册包括了有关该车型所有选装件的资料。
因此您可能会发现其中有些资料并不适用于您的车辆。
本手册中的所有资料,包括规格和插图,在本手册出版时有效。
INFINITI英菲尼迪汽车公司保留在任何时候修改车辆的规格或设计的权利,恕不另行通知。
车辆的改装不应对该车辆进行改装。
改装可能会影响车辆的性能、安全性或耐久性,甚至可能会违反政府的法规。
另外,INFINITI英菲尼迪汽车公司提供的保修服务将不包括由于改装所引起的损坏或性能问题。
请先阅读—然后安全驾驶在驾驶车辆之前,请仔细阅读本用户手册。
这能确保您熟悉车辆的控制与保养要求,有助于您安全驾驶。
在本手册中,我们使用了符号伴随警告二字。
这表示有可能导致死亡或严重人身伤害的危险。
要避免或降低这种风险,必须认真遵守操作程序。
在本手册里还使用符号伴随注意二字来表示有可能引起轻微或中度人身伤害或车辆损害的危险。
要避免或降低这种风险,必须认真遵守操作程序。
SIC0697如果您看到此符号,它表示“请勿进行此操作”或“请勿让此情况发生”。
如果您在插图中看到与此类似的符号,它表示箭头指向车头。
ct6分期方案一、CT6分期方案概述CT6分期方案是一项旨在为广大消费者提供便利和灵活支付方式的金融计划。
该计划旨在满足购车者对于购车资金需求的多样性,为他们提供更多的支付选择,并降低购车的经济负担。
下面将介绍CT6分期方案的详细内容和申请流程。
二、分期方案细则1. 分期期限CT6分期方案提供了多种不同期限的选择,消费者可以根据自身需求选择最适合的期限。
一般情况下,分期期限可以从12个月到60个月不等,具体以当期官方公布的期限为准。
2. 首付款比例购车者需要支付一定比例的首付款,以确保交易的正常进行。
首付款比例会根据购车型号和所选择的分期期限而有所不同。
购车者需要在购车前向销售人员了解具体的首付款比例要求。
3. 利率费用CT6分期方案的利率费用是根据购车者的个人情况和信用评级来确定的。
该费用会根据市场利率和个人信用情况进行适当浮动。
购车者需要向销售人员咨询具体的利率费用信息。
4. 申请条件购车者需要满足一定的条件才能申请CT6分期方案。
一般来说,购车者需要满足以下条件:- 年龄要求:年满18周岁及以上;- 身份证明:提供有效的身份证明文件;- 收入证明:提供能够支付分期款项的稳定收入证明;- 信用记录:具备较好的信用记录。
5. 申请流程购车者可以通过以下步骤顺利完成CT6分期方案的申请:- 步骤一:向指定的汽车经销商或金融机构咨询CT6分期方案的详细信息;- 步骤二:填写分期申请表格,并提供必要的材料,如身份证明、收入证明和信用记录;- 步骤三:经销商或金融机构将对购车者的申请进行评估和审核;- 步骤四:审核通过后,购车者需按约定支付首付款,并签署相关合同;- 步骤五:根据合同约定,购车者按期进行分期还款。
三、分期方案的优势1. 灵活支付方式CT6分期方案为购车者提供了多种灵活的支付方式,让购车者在经济能力允许的范围内选择最适合自己的方案。
分期付款可以分摊购车费用,减轻一次性支付的经济压力。
2. 购车门槛降低通过CT6分期方案,购车者无需一次性支付全部购车款项,降低了购车的门槛,让更多的消费者有机会购买到心仪的CT6车型。
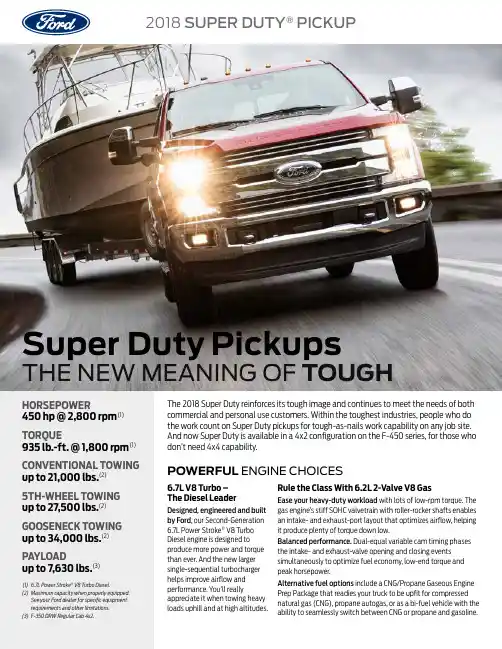
(1) 6.7L Power Stroke® V8 Turbo Diesel.(2) M aximum capacity when properly equipped.See your Ford dealer for specific equipmentrequirements and other limitations.(3) F-350 DRW Regular Cab 4x2. The 2018 Super Duty reinforces its tough image and continues to meet the needs of both commercial and personal use customers. Within the toughest industries, people who do the work count on Super Duty pickups for tough-as-nails work capability on any job site. And now Super Duty is available in a 4x2 configuration on the F-450 series, for those who don’t need 4x4 capability.HORSEPOWER450 hp @ 2,800 rpm(1) TORQUE935 lb.-ft. @ 1,800 rpm(1) CONVENTIONAL TOWINGup to 21,000 lbs.(2)5TH-WHEEL TOWING up to 27,500 lbs.(2) GOOSENECK TOWING up to 34,000 lbs.(2) PAYLOADup to 7,630 lbs.(3)6.7L V8 Turbo –The Diesel LeaderDesigned, engineered and builtby Ford, our Second-Generation6.7L Power Stroke® V8 TurboDiesel engine is designed toproduce more power and torquethan ever. And the new largersingle-sequential turbochargerhelps improve airflow andperformance. You’ll reallyappreciate it when towing heavyloads uphill and at high altitudes.Rule the Class With 6.2L 2-Valve V8 GasEase your heavy-duty workload with lots of low-rpm torque. Thegas engine’s stiff SOHC valvetrain with roller-rocker shafts enablesan intake- and exhaust-port layout that optimizes airflow, helpingit produce plenty of torque down low.Balanced performance. Dual-equal variable cam timing phasesthe intake- and exhaust-valve opening and closing eventssimultaneously to optimize fuel economy, low-end torque andpeak horsepower.Alternative fuel options include a CNG/Propane Gaseous EnginePrep Package that readies your truck to be upfit for compressednatural gas (CNG), propane autogas, or as a bi-fuel vehicle with theability to seamlessly switch between CNG or propane and gasoline. POWERFUL ENGINE CHOICESSuper Duty PickupsTrailer Reverse Guidance uses 3 cameras to 5th-Wheel/Gooseneck Prep PackageAvailable on all models (Factory equipped onTrailer Reverse GuidanceUtilizes 3 cameras to provide multiple viewsTRAILER TOWING SELECTORTRAILER TOWING SELECTORTRAILER TOWING SELECTORTRAILER TOWING SELECTORTRAILER TOWING SELECTORFrontal Area is the total area in square feet that a moving vehicle and trailer exposes to airresistance. The chart above shows the maximum trailer frontal area that must be considered for a vehicle/trailer combination. Exceeding these limitations m a y significantly reduce the performance of your towing vehicle.Frontal Area Limitations/Vehicle LineConsiderationsWithF-250/F-350/F-450 75 sq. ft. All 5th-Wheel and Gooseneck Applications Super Duty60 sq. ft.A ll Other ApplicationsFrontal Area ConsiderationsF-250/F-350/F-450 Super Duty Pickups:A conventional trailer hitch receiver is standard on all Super Duty Pickups. The following configurations have a standard 2.5" receiver with a 2" reducer:– F-250 (less Trailer Tow Package)– F-350 Single Rear Wheel (142", 148", 160", 164") – F-350 Single Rear Wheel 6.2L 176"The following configurations have a standard 3" receiver with a2.5" and a 2" reducer:– F-250 equipped with Trailer Tow Package – F-350 Single Rear Wheel 6.7L 176" – F-350/F-450 Dual Rear WheelFactory-Installed Trailer Hitch Receiver OptionsNote: S ee chart below for the weight-carrying and weight-distributing capacities of these hitch receivers. (These capacities also are shown on a label affixed toeach receiver.)Weight-Carrying Max. Tongue Weight-Distributing Max. TongueMax. Trailer Load Max. Trailer Load VehicleCapacity (lbs.)(1) (lbs.)Capacity (lbs.)(1) (lbs.)F-250/F-350 Super Duty SRW15,0001,500 15,000(2) 1,500(2)F-250/F-350 Super Duty SRW w/6.7L engine 18,000 1,800 18,000(3) 1,800(3)F-350 Super Duty DRW w/6.2L engine16,700 1,670 16,700 1,670F-350 Super Duty DRW w/6.7L engine and F-450 Super Duty21,0002,10021,0002,100(1) Hitch receivers do not include a hitch ball or ball mounting. You are responsible for obtaining the proper hitch ball, ball mounting, weight-distributing equipment (i.e., equalizing arms and snap-up brackets, sway control system) and other appropriate equipment to tow both the trailer and its cargo load. (2) Not available with 6.7L diesel with 176" wheelbase. (3) Available only with 176" wheelbase.Refer to the Trailer Towing Selector chart for Maximum Loaded Trailer Weights for each vehicle.Hitch Receiver Weight CapacityNotes: • C ontent may vary depending on model, trim and/or powertrain.See your dealer for specific content information.• T railer Towing Package recommended for all light trucks that will be usedfor towing to help ensure easy, proper connection of trailer lights.F-250/F-350/ F-450 F-250ModelSuper Duty Pickup Super Duty Pickup (1)(Option Code)(Std.) (535)7-Wire Harness & 4-/7-Pin Connector X (Std.)Smart Trailer Tow Connector X(3) –Hitch ReceiverSee chart belowSee chart belowTrailer Brake Wiring/Feed Kit X(2) –Upgraded Rear Axle X(3) X Increased GCW (6.7L) X(3) X Trailer Brake Controller X(3) –Aluminum Wheels–X(4)(1) Requires 6.7L diesel engine. (2) In-cab, no controller (SRW). (3) F-350DRW/F-450 only. (4) Chrome (Lariat/King Ranch) or Polished (Platinum).Trailer Towing PackageRear Axle Ratio CodesIf you do not know the axle ratio of your vehicle, check its Truck Safety Compliance Certification Label (located on the left front door lock facing or the door latch post pillar). Below the bar code, you will see the word AXLE and a two-digit code. Use this chart to find the axle ratio that corresponds to that code:Rear Axle Non-L imited L imited ElectronicVehicle Ratio Slip Slip L ockingSuper Duty 3.31 31 Not Available 3H 3.55 35 3K 3J 3.73 37 3L 3E 4.10 Not Available 4N Not Available 4.30 Not Available 4L 4MSlide-In Camper InstallationConsult your camper manufacturer/dealer for details regarding proper installation of your slide-in camper A dimensionally stable block spacer is recommended between the headboard of the pickup box and the forward edge of the camper floor. Resting the spacer on the pickup box bed helps prevent movement and contact of the fully installed camper with the pickup box headboard or taillight rear pillarsNote: Be sure to measure your slide-in camper before attempting to install it onto the bed of the truck. Some campers may require a platform in the bed of the truck to make sure there is adequate clearance for both the box rails and cab roof of the truck.Camper Center-of-GravityAll Styleside pickups that qualify for slide-in camper bodies have camper center-of-gravity included on the Consumer Information Sheet in the glovebox Data is calculated for each individual truck, based on vehicle optionsIf vehicle does not qualify for camper use, theConsumer Information Sheet states that the vehicle is not recommended for camper use, and no center-of-gravity data is shownF-250/F-350/F-450 Super Duty Camper Package (Option Code 471)Increased capacity front springs (2 Up [4x2] or 1 Up [4x4] upgrade over springs computer-selected based on options ordered. Not included if maximum springs already selected.)Rear stabilizer bar (SRW)Rear auxiliary springs (F-250)Slide-in camper certificationCombined weight of vehicle, camper body, occupants and cargo must not exceed Gross Vehicle Weight Rating (GVWR)Camper Package (Option Code 471) required with F-250/F-350/F-450 Super Duty ®Cargo Weight Rating shown in chart is maximum allowable, assuming weight of a base vehicle with required camper option content and a 150-lb. passenger at each available seating position Ratings also assume weight of engine and standard transmission. Cargo Weight Rating shown must be further reduced by weight of transmission upgrade and any other options. Option weights and center-of-gravity information are available on the Ford Pickup Truck Consumer Information SheetI f you intend to pull a trailer in addition tocarrying your camper, see the F-Series Pickup Trailer Towing Selector charts.MAXIMUM CARGO WEIGHT WITH SLIDE-IN CAMPERNote: T he following chart lists GVWRs and Maximum Cargo Weights (with minimum equipment) by engine foreach approved pickup model: 3.5L V6 EcoBoost ®, 5.0L V8, 6.2L V8 and 6.7L Power Stroke ® Turbo Diesel V8.GVWR (lbs.) Maximum Cargo Weight Rating (lbs.)ModelWheelbase 6.2L 6.7L 6.2L Std./Opt.† 6.7L Std./Opt.†F-250 Super Duty (1)4x2 Reg. Cab 141.6"10,000 10,000 3,866/ – 3,051/ –4x2 SuperCab 148.0" 10,000 10,000 3,139/ – 2,330/ –4x2 SuperCab 164.2" 10,000 10,000 3,029/ – 2,200/ –4x2 Crew Cab 159.8" 10,000 10,000 3,041/ – 2,212/ –4x2 Crew Cab 176.0" 10,000 10,000 2,812/ – 1,983/ –4x4 Reg. Cab 141.6" 10,000 10,000 3,447/ – 2,660/ –4x4 SuperCab 148.0" 10,000 10,000 2,731/ – 1,944/ –4x4 SuperCab 164.2" 10,000 10,000 2,641/ – 1,825/ –4x4 Crew Cab 159.8" 10,000 10,000 2,645/ – 1,836/ –4x4 Crew Cab176.0" 10,000 10,000 2,389/ – 1,560/ –F-350 Super Duty (1)4x2 SRW Reg. Cab (2) 141.6" 10,000 10,600* 3,675/ – 3,638/2,9384x2 SRW SuperCab (2) 148.0" 10,000 10,800* 2,972/ – 3,059/2,2594x2 SRW SuperCab (2) 164.2" 10,300* 11,000* 3,162/2,862 3,132/2,1324x2 SRW Crew Cab (2) 159.8" 10,100* 10,900* 2,914/2,814 2,978/2,0784x2 SRW Crew Cab (2) 176.0" 10,500* 11,100* 3,087/2,587 2,940/1,8404x2 SRW Reg. Cab (3) 141.6" 10,400 11,100 4,017/ – 3,981/ –4x2 SRW SuperCab (3) 148.0" 10,500 11,200 3,414/ – 3,402/ –4x2 SRW SuperCab (3) 164.2" 10,800 11,500 3,605/ – 3,574/ –4x2 SRW SuperCab (3) 164.2" – 11,400 – / – 3,474/ –4x2 SRW Crew Cab (3) 159.8" 10,600 11,300 3,357/ – 3,321/ –4x2 SRW Crew Cab (3) 176.0" 10,900 11,500 3,430/ – 3,283/ –4x2 SRW Crew Cab (3) 176.0" – 11,400 – / – 3,183/ –4x2 DRW Reg. Cab 141.6" 14,000 14,000 7,247/ – 6,507/ –4x2 DRW SuperCab 164.2" 14,000 14,000 6,356/ – 5,637/ –4x2 DRW Crew Cab 176.0" 14,000 14,000 6,130/ – 5,406/ –4x4 SRW Reg. Cab (2) 141.6" 10,300* 11,000* 3,564/3,264 3,531/2,5314x4 SRW SuperCab (2) 148.0" 10,400* 11,100* 2,960/2,560 2,953/1,8534x4 SRW SuperCab (2) 164.2" 10,700* 11,300* 3,151/2,451 3,026/1,7264x4 SRW Crew Cab (2) 159.8" 10,500* 11,200* 2,910/2,410 2,874/1,6744x4 SRW Crew Cab (2) 176.0" 10,800* 11,500* 2,977/2,177 2,923/1,4234x4 SRW Reg. Cab (3) 141.6" 10,800 11,500 4,007/ – 3,974/ –4x4 SRW Reg. Cab (4) 141.6" 11,300 11,500 4,502/ – 3,969/ –4x4 SRW Reg. Cab (4) 141.6" – 11,400 – / – 3,869/ –4x4 SRW SuperCab (3) 148.0" 10,800 11,500 3,303/ – 3,295/ –4x4 SRW SuperCab (4) 148.0" 11,300 11,500 3,798/ – 3,291/ –4x4 SRW SuperCab (4) 148.0" – 11,400 – / – 3,191/ –4x4 SRW SuperCab (3) 164.2" 11,200 11,500 3,594/ – 3,169/ –4x4 SRW SuperCab (4) 164.2" 11,500 11,500 3,889/ – 3,164/ –4x4 SRW SuperCab (4) 164.2" 11,400 11,400 3,789/ – 3,064/ –4x4 SRW Crew Cab (3) 159.8" 10,900 11,500 3,253/ – 3,117/ –4x4 SRW Crew Cab (4) 159.8" 11,300 11,500 3,648/ – 3,112/ –4x4 SRW Crew Cab (3) 159.8" 11,300 11,500 3,419/ – 2,866/ –4x4 SRW Crew Cab (4) 159.8" – 11,400 – / – 3,012/ –4x4 SRW Crew Cab (4) 176.0" 11,500 11,500 3,614/ – 2,861/ –4x4 SRW Crew Cab (4) 176.0" 11,400 11,400 3,514/ – 2,761/ –4x4 DRW Reg. Cab 141.6" 14,000 14,000 6,837/ – 6,114/ –4x4 DRW SuperCab 164.2" 14,000 14,000 5,942/ – 5,221/ –4x4 DRW Crew Cab 176.0" 14,000 14,000 5,710/ – 4,956/ –F-450 Super Duty (1)4x2 DRW Crew Cab 176.0" – 14,000 – / – 4,793/ –4x4 DRW Crew Cab176.0"–14,000– / –4,473/ –(1) Requires Camper Package option. (2) 17" tires and wheels. (3) 18" tires and wheels. (4) 18"/20" tires and wheels. *10,000 pounds with optional 10,000 GVWR Package. † With 10,000 GVWR Package.F-SERIESPICKUP/CAMPERCOMBINATION SELECTORAFTER YOU BUY Before heading out on a trip, check your vehicle’s Owner’s Manual for break-in and severe-duty maintenance schedules (do not tow a trailer until your vehicle has been driven at least 1,000 miles). Be sure to have your fully-loaded vehicle (including passengers) and trailer weighed so as not to exceed critical weight limits. If any of these limits are exceeded, cargo should be removed from the vehicle and/or trailer until all weights are within the specified limits.BEFORE YOU BUY If you are selecting a vehicle that will be used for towing, you should determine the approximate weight of the trailer you intend to tow, including the weight of any additional cargo and fluids that you will be carrying in the trailer. Also, be sure the vehicle has the proper optional equipment. Keep in mind that performance can be severely affected in hilly terrain when the minimum acceptable powertrain combination is selected. Consider purchasing a vehicle with a more powerful engine.BrakesMany states require a separate braking system ontrailers with a loaded weight of more than 1,500pounds. For your safety, Ford Motor Companyrecommends that a separate functional brake systembe used on any towed vehicle, including those dolly-towed or towbar-towed. There are several basic typesof brake systems designed to activate trailer brakes:1. E lectronically Controlled Brakes usuallyprovide automatic and manual control of trailerbrakes. They require that the tow vehicle beequipped with a controlling device and additionalwiring for electrical power. These brakes typicallyhave a control box installed within reach ofthe driver and can be applied manually orautomatically.2. E lectric-Over-Hydraulic (EOH) TrailerBrakes are operated by an electrically poweredpump that pressurizes a hydraulic fluid reservoirbuilt into the trailer’s brake system. Many of theavailable EOH trailer brake models are compatiblewith the Ford factory installed, dash-integratedTrailer Brake Controller (TBC).3. S urge Brakes are independent hydraulic brakesactivated by a master cylinder at the junction ofthe hitch and trailer tongue. They are not controlledby the hydraulic fluid in the tow vehicle’s brakesystem, and the tow vehicle’s hydraulic systemshould never be connected directly to the trailer’shydraulic system.Be sure your trailer brakes conform to all applicablestate regulations. See Towing Safely for All Vehicleson the next page for additional braking information.Trailer LampsMake sure the trailer is equipped with lights that conformto all applicable government regulations. The trailerlighting system should not be connected directlyto the lighting system of the vehicle. See a localrecreational vehicle dealer or rental trailer agency forcorrect wiring and relays for the trailer and heavy-dutyflashers.Safety Chains– A lways use safety chains when towing. Safety chainsare used to retain connection between the towingand towed vehicle in the event of separation of thetrailer coupling or ball– C ross chains under the trailer tongue to prevent thetongue from contacting the ground if a separationoccurs. Allow only enough slack to permit full turning– be sure they do not drag on the pavement– W hen using a frame-mounted trailer hitch,attach the safety chains to the frame-mountedhitch using the recommendations supplied by thehitch manufacturer– S ee your vehicle’s Owner’s Manual for safety chainattachment information– F or rental trailers, follow rental agency instructionsfor hookup of safety chainsTrailer Wiring Harness– S ome vehicles equipped with a factory-installedTrailer Tow Package include a trailer wiring harnessand a wiring kit– T his kit includes one or more jumper harnesses(to connect to your trailer wiring connector) andinstallation instructionsWeight DistributionFor optimum handling and braking, the load must be properly distributed Keep center of gravity low for best handlingApproximately 60% of the allowable cargo weight should be in the front half of the trailer and 40% in the rear (within limits of tongue load or king pin weight) Load should be balanced from side-to-side to optimize handling and tire wear Load must be firmly secured to prevent shifting during cornering or braking, which could result in a sudden lossof controlBefore StartingBefore setting out on a trip, practice turning, stopping and backing up your trailer in an area away from heavy traffic Know clearance required for trailer roof Check equipment (make a checklist) Backing UpBack up slowly, with someone spotting near the rear of the trailer to guide you Place one hand at bottom of steering wheel and move it in the direction you want the trailer to goMake small steering inputs – slight movement of steering wheel results in much greater movement in rear of trailer TurningWhen turning, be sure to swing wide enough to allow trailer to avoid curbs and other obstructions.BrakingAllow considerably more distance for stopping with trailer attached Remember, the braking system of the tow vehicle is rated for operation at the GVWR, not GCWRIf your tow vehicle is an F-150, F-Series Super Duty®, Transit or Expedition and your trailer has electric brakes, the optional Integrated Trailer Brake Controller (TBC) assists in smooth and effective trailer braking by powering the trailer’s electric or electric-over-hydraulic brakes with proportional output based on the towing vehicle’s brake pressure If your trailer starts to sway, applybrake pedal gradually. The slidinglever on the TBC should be used onlyfor manual activation of trailer brakeswhen adjusting the gain. Misuse, suchas application during trailer sway,could cause instability of trailer and/ortow vehicleTowing On HillsDownshift the transmission to assistbraking on steep downgrades and toincrease power (reduce lugging) whenclimbing hillsWith TorqShift® transmission, selecttow/haul mode to automaticallyeliminate unwanted gear search whengoing uphill and help control vehiclespeed when going downhillParking With A TrailerWhenever possible, vehicles withtrailers should not be parked on agrade. However, if it is necessary, placewheel chocks under the trailer’s wheels,following the instructions below.Apply the foot service brakes and holdHave another person place the wheelchocks under the trailer wheels on thedowngrade sideOnce the chocks are in place, releasebrake pedal, making sure the chockswill hold the vehicle and trailerApply the parking brakeS hift automatic transmission into park,or manual transmission into reverseWith 4-wheel drive, make sure thetransfer case is not in neutral (ifapplicable)Starting Out Parked OnA GradeApply the foot service brake and holdStart the engine with transmission inpark (automatic) or neutral (manual)Shift the transmission into gear andrelease the parking brakeRelease the brake pedal and move thevehicle uphill to free the chocksApply the brake pedal while anotherperson retrieves the chocksAcceleration And PassingThe added weight of the trailer candramatically decrease the accelerationof the towing vehicle – exercise caution.When passing a slower vehicle, be sureto allow extra distance. Remember, theadded length of the trailer must clearthe other vehicle before you can pullback inSignal and make your pass on levelterrain with plenty of clearanceIf necessary, downshift for improvedaccelerationDriving With An AutomaticOverdrive TransmissionWith certain automatic overdrivetransmissions, towing – especiallyin hilly areas – may cause excessiveshifting between overdrive and the nextlower gear.To eliminate this condition and achievesteadier performance, overdrive can belocked out (see vehicle Owner’s Manual)I f excessive shifting does not occur, useoverdrive to optimize fuel economyOverdrive may also be locked out toobtain engine braking on downgradesWhen available, select tow/haul modeto automatically eliminate unwantedgear search and help control vehiclespeed when going downhillDriving With Cruise ControlTurn off the cruise control with heavyloads or in hilly terrain. The cruisecontrol may turn off automaticallywhen you are towing on long, steepgrades. Use caution while driving onwet roads and avoid using cruise controlin rainy or winter weather conditions.Tire PressureUnderinflated tires get hot and mayfail, leading to possible loss ofvehicle controlOverinflated tires may wear unevenlyand compromise traction and stoppingcapabilityTires should be checked often forconformance to recommended coldinflation pressuresSpare Tire UseA conventional, identical full-size sparetire is required for trailer towing (mini,compact and dissimilar full-size sparetires should not be used; alwaysreplace the spare tire with a new roadtire as soon as possible).On The RoadAfter about 50 miles, stop in aprotected location and double-check:Trailer hitch attachmentLights and electrical connectionsTrailer wheel lug nuts for tightnessEngine oil – check regularly through-out tripHigh Altitude OperationGasoline engines lose power by 3-4%per 1,000 ft. elevation. To maintainperformance, reduce GVWs and GCWsby 2% per 1,000 ft. elevation starting atthe 1,000 ft. elevation point.Powertrain/Frontal AreaConsiderationsThe charts in this Guide show theminimum engine size needed to movethe GCW of tow vehicle and trailer.Under certain conditions, however, (e.g.,when the trailer has a large frontal areathat adds substantial air drag or whentrailering in hilly or mountainous terrain)it is wise to choose a larger engineSelecting a trailer with a low-drag,rounded front design will help optimizeperformance and fuel economyNote: F or additional trailering informationpertaining to your vehicle, refer to thevehicle Owner’s Manual.Towing a trailer is demanding on your vehicle, your trailer and your personal driving skills.Follow some basic rules that will help you tow safely and have a lot more fun.Photography, illustrations and informationpresented herein were correct when approvedfor publishing. Ford Motor Company reservesthe right to discontinue or change at any timethe specifications or designs without incurringobligation. Some features shown or describedare optional at extra cost. Some options arerequired in combination with other options.Consult your dealer for the latest, mostcomplete information on models, features,prices and availability.Many of the recreational vehicles shown inthis brochure are modified or manufacturedby companies other than Ford MotorCompany. Ford assumes no responsibility forsuch modifications or manufacturing./towing-guides. TOWING SAFELY FOR ALL VEHICLES。
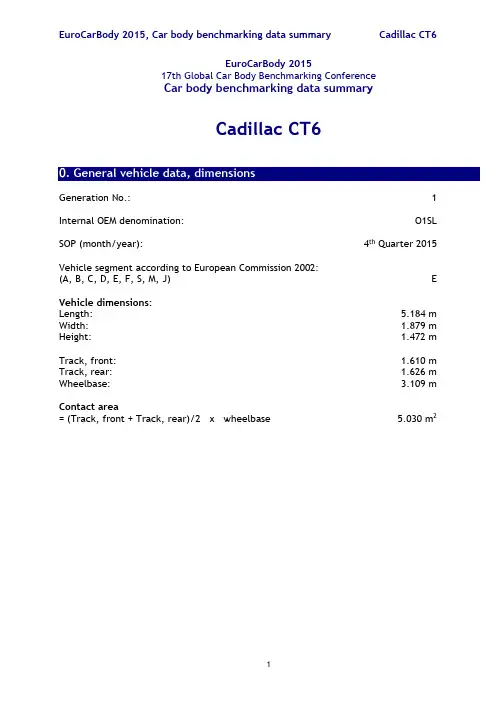

凯迪拉克CT6作者:朱江来源:《汽车之友》2015年第12期车内的Bose音响系统一共有34个扬声器世界上第一台带闭缸功能的V6双涡轮增压发动机车身大量采用铝制材料,大幅减重后轮转向技术使它的转弯直径只有11.4米不久前,凯迪拉克在纽约车展及上海车展发布了全新D级豪华轿车战略车型——CT6,采用全新的命名规则,以英文字母组合“CT”为开头,代表凯迪拉克轿车车系,数字将反映车型相应的尺寸,及其在凯迪拉克产品型谱中的定位。
未来凯迪拉克CT6将与奔驰S、奥迪A8L、宝马7系定位D级豪华车市场。
先来看看踢馆选手的尺寸。
全新凯迪拉克CT6长宽高分别为5184×1879×1472mm,轴距3109mm,论长度和轴距已经超过了标准轴距版的奔驰S级、宝马7系和奥迪A8,而且在车身大量应用铝合金材料,使其白车身的重量不仅低于标准轴距的宝马7系,甚至比长轴5系还轻。
轻质车身就给良好操控性打下基础,再加上凯迪拉克的MRC主动电磁感应悬挂更是如虎添翼。
这还没完,后轮转向技术同样出现在CT6上。
当车载电脑判断低速过弯时,后轮可与前轮反方向转动,更灵活(最大角度为3.5度)。
如果高速通过弯道,后轮则与前轮同方向转动,更稳定(最大角度2.5度)。
车内通过高档木材和真皮营造美式豪华感,只可惜略显老气,但论配置可是相当先进。
由Bose专为CT6研发的Panaray音响系统一共有34个扬声器。
拜扬声器小型化技术所赐,CT6居然在地板上布置了6个低音炮,低音炮的周围又安装了若干小扬声器,的确够下功夫。
另外,CT6的内后视镜还集成了视频显示功能,它可以显示安装在车尾的高清摄像头拍摄的实时画面。
这个技术一方面提升了清晰度,更重要的是扩大了视野,由原先普通后视镜的20度左右一下扩大到80度。
此外,后排20向电动调节座椅、夜视系统、360°摄像机、ESS2强化安全策略、以及全新一代CUE移动互联系统都在车型的配置单上。
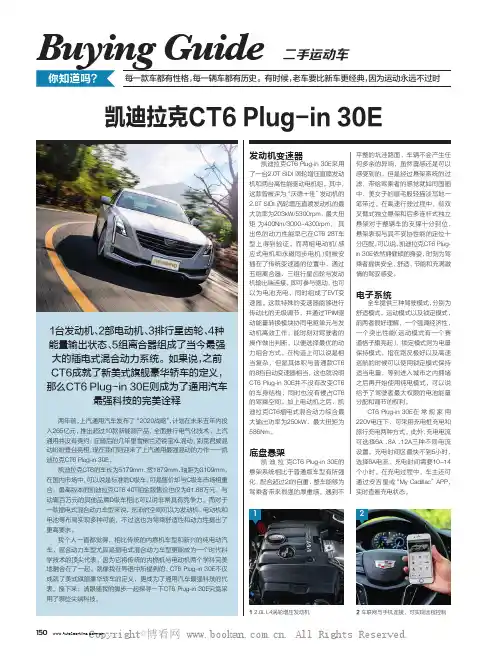
150发动机变速器凯迪拉克CT 6 Plug-in 30E 采用了一台2.0T SIDI 涡轮增压直喷发动机和两台高性能驱动电机组。
其中,这款曾被评为“沃德十佳”发动机的2.0T SIDI 涡轮增压直喷发动机的最大功率为203kW/5300rpm ,最大扭矩为400Nm/3000~4300rpm 。
其出色的动力性能早已在CT 6 28T 车型上得到验证。
而两组电动机(感应式电机和永磁同步电机)则被安插在了传统变速器的位置中,通过五组离合器,三组行星齿轮与发动机输出端连接,即可参与驱动,也可以为电池充电,同时组成了EVT 变速器。
这款特殊的变速器能够进行传动比的无级调节,并通过TPIM 驱动能量转换模块协同电驱单元与发动机高效工作,能时刻对驾驶者的操作做出判断,以便选择最优的动力组合方式。
在构造上可以说是相当复杂,但是其体积与普通款CT 6的8挡自动变速器相当,这也就说明CT 6 Plug-in 30E 并不没有改变CT 6的车身结构,同时也没有侵占CT 6的驾乘空间。
加上电动机之后,凯迪拉克CT 6插电式混合动力综合最大输出功率为250kW ,最大扭矩为586Nm 。
底盘悬架凯迪拉克CT 6 Plug-in 30E 的悬架系统相比于普通版车型有所强化,配合超过2t 的自重,整车能够为驾乘者带来很强的厚重感。
遇到不Buying Guide二手运动车两年前,上汽通用汽车发布了“2020战略”,计划在未来五年内投入265亿元,推出超过10款新能源产品,全面推行电气化技术。
上汽通用并没有爽约,在随后的几年里雪佛兰迈锐宝XL 混动、别克君威混动纷纷登台亮相,现在我们则迎来了上汽通用最强混动的力作——凯迪拉克CT 6 Plug-in 30E 。
凯迪拉克CT 6的车长为5179mm 、宽1879mm ,轴距为3109mm ,在国内市场中,可以说是标准的D 级车,可是售价却与C 级车市场相重合,最高版本的凯迪拉克CT 6 40T 铂金版售价也仅为81.88万元,与动辄百万元的其他品牌D 级车相比可以说非常具有竞争力。

凯迪拉克CT6:如何从设计感知豪华?丨深度更真实、更独立、更开放丨引言 | 作为凯迪拉克设计执行总监,安德鲁为什么斩钉截铁地认为CT6对标的是宝马7系?车聚君亲赴美国洛杉矶,为你深度解析。
凯迪拉克CT6上市前,车聚网作为国内少数媒体之一,于春节前赴洛杉矶提前体验了一把这款旗舰级产品。
纸上得来终觉浅,绝知此事要躬行。
几天亲身接触下来,车聚君觉得,之前不少关于CT6的解读,确实存在一定偏差。
豪华不能只看配置、尺寸。
更主要的,还是要看气质。
这里的气质指体现豪华的“质感”,这是一种从车的骨子里散发出来的气息,能感染我们的视觉、听觉、嗅觉、触觉,甚至能激发我们一种无法用语言表达的潜意识,或一种暗藏的回忆。
对,可以简单理解为情怀。
这里的情怀,不是那种一开桑塔纳就有德累斯顿透明工厂手工打造的幻想;也不是纽北跑不过秦的天生优越感。
它既需要历史沉淀,又需要实实在在的必杀技。
务实加务虚,才会有质感。
有了质感,才会有豪华感。
对于宝马、奔驰和凯迪拉克来说,如何让消费者最直接的感知产品定位?工业设计。
当你把一辆宝马3系和宝马7系放在一起,当你把一辆奔驰C级和奔驰S级放在一起,当你把凯迪拉克ATS-L和凯迪拉克CT6放在一起,是什么让你立马就能区分它们?如果说“尺寸”,我相信这会是一个答案,但不是一个好答案。
在家族设计逐渐流行起来的时候,距离会影响你对尺寸的判断。
这只是一种“术”上辨别。
类似的还有一些更容易上手的术:如5系的车身转向灯是不会超过A柱下缘的门板缝,但7系就会。
而豪华感,能从根本上帮我们判断一款豪华车的定位高低。
这是一种气质,也可以理解为“势”。
它不是具体某一个部位让你感到设计差异,而是散发出的整体感觉。
比如街头一闪而过一辆凯迪拉克,只有半秒时间。
只要回味一下尾灯的整体感觉是更圆润成熟一些的,还是更锋利年轻一些的,就能知道是ATS,还是XTS。
从设计上来讲,无论产品定位高低,其实对设计师的难度几乎是一样的。
因为他们要保证所有级别产品都符合品牌定位的要求,这是“道”,也是基本哲学。

ct6转弯半径定义CT6转弯半径定义CT6转弯半径是指雪佛兰CT6轿车在进行转弯时,所需行驶的最小曲线半径。
以指导意义的文章形式,下面将全面生动地介绍CT6转弯半径的含义、影响因素以及如何合理掌握转弯技巧。
1. 定义:转弯半径是车辆在转弯过程中所能够保持的最小半径。
它是衡量车辆转弯能力的指标之一。
对于雪佛兰CT6轿车而言,较小的转弯半径意味着车辆可以更灵活地应对复杂的道路情况,提升安全性和驾驶乐趣。
2. 影响因素:转弯半径受到多种因素的影响:- 车辆轮距:轮距越大,转弯半径通常越大。
CT6轿车通过调节车轴间距,能够在保证稳定性的前提下,更好地控制转弯半径。
- 车辆重心高度:重心越低,转弯稳定性越好,同时对应更小的转弯半径。
CT6轿车采用先进的底盘设计和悬挂系统,有效降低车辆的重心,提升安全性和操控性能。
- 车辆悬挂系统:合理的悬挂调校可以提供更好的支撑力,在转弯时降低车身倾斜,使得转弯半径更小且驾驶更稳定。
3. 合理掌握转弯技巧:合理掌握转弯技巧是确保车辆在转弯时能够保持稳定并正确行驶的关键。
以下几点是需要注意的:- 提前减速:在进入转弯前,提前适度减速,减少转弯时的侧倾和失控风险。
- 保持油门稳定:在转弯过程中,保持油门稳定并轻踩刹车,避免急加速或急刹车导致失控。
- 观察路况:提前观察道路情况,包括交通标志、路况等,并根据实际需要调整转弯速度和角度。
- 技巧练习:合理利用安全的驾驶环境,进行转弯技巧的练习,以提高对转弯半径的掌握能力。
总结:CT6转弯半径是衡量车辆操控性能和安全性的重要指标之一。
合理掌握转弯技巧,通过提前减速、保持油门稳定、观察路况和技巧练习等方式,能够更好地应对各种道路转弯情况,提升驾驶乐趣和行车安全。
注意:以上内容仅供参考,实际操作时请遵循交通规则,并根据道路和天气条件灵活应对。
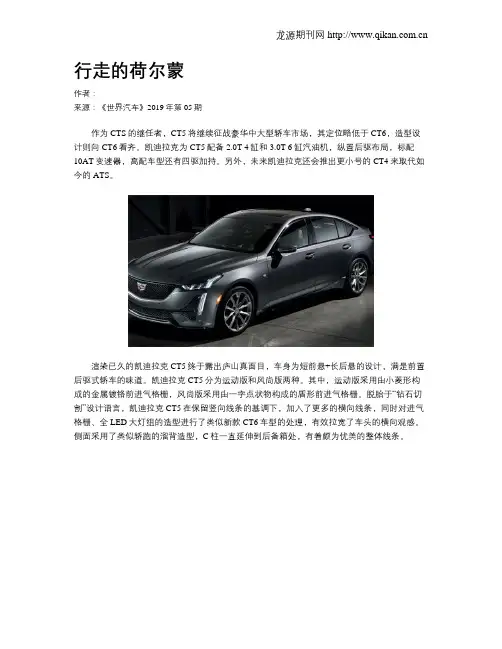
行走的荷尔蒙
作者:
来源:《世界汽车》2019年第05期
作为CTS的继任者,CT5将继续征战豪华中大型轿车市场,其定位略低于CT6,造型设计则向CT6看齐。
凯迪拉克为CT5配备2.0T 4缸和3.0T 6缸汽油机,纵置后驱布局,标配10AT变速器,高配车型还有四驱加持。
另外,未来凯迪拉克还会推出更小号的CT4来取代如今的ATS。
渲染已久的凯迪拉克CT5终于露出庐山真面目,车身为短前悬+长后悬的设计,满是前置后驱式轿车的味道。
凯迪拉克CT5分为运动版和风尚版两种。
其中,运动版采用由小菱形构成的金属镀铬前进气格栅,风尚版采用由一字点状物构成的盾形前进气格栅。
脱胎于“钻石切割”设计语言,凯迪拉克CT5在保留竖向线条的基调下,加入了更多的横向线条,同时对进气格栅、全LED大灯组的造型进行了类似新款CT6车型的处理,有效拉宽了车头的横向观感。
侧面采用了类似轿跑的溜背造型,C柱一直延伸到后备箱处,有着颇为优美的整体线条。
凯迪拉克CT5基于全新Alpha后驱/四驱架构平台进行打造,车内除了配备电子换挡杆外,还搭载第三代CUE车载系统。
动力方面则是有支持3段凸轮轴设定的2.0T LSY双涡管单涡轮增压发动机或3.0T V6双涡轮增压发动机可选,标配10AT自动变速器。
此外新车型還将奉上前双球节-后五连杆悬架系统、电传Brembo四活塞制动卡钳(运动版专享)、以及
Tour、 Sport、 Snow/Ice、My Mode4种驾驶模式。
|1M-CT6Owner’s Manual2|Thank you for purchasing a Marshall M-CT6 camera-top monitor. The M-CT6 is a great tool for focusing, composing, and viewing images/video clips directly from your digital camera/video camera. It is conveniently sized for easy transportation, and it is perfect for difficult shooting situations.To obtain the best results with your new M-CT6, please take the time to read this manual.CAUTION• Please use the supplied power sources.• Do not expose this product to excessive heat or humidity. • Avoid subjecting the unit to physical shock wherever possible. •Do not use chemical solutions to clean this unit. Simply wipe with a clean soft cloth to remove fingerprints or smudges.|3CONTENTSPRODUCT OVERVIE W .....................3-4MONITOR .............................3REMOTE CONTROL ......................4CABLES..............................4MENU OPER ATION ......................5-8SPECIFICATIONS ..........................9INCLUDED ACCESSORIES ..................10TROUBLESHOOTING ......................10BAT TERY COMPATIBILIT Y (11)MONITOR1. Volume down or adjust the value setting.2. Volume up or adjust the value setting.3. MENU: To activate OSD menu.4. Selection key to adjust phase directly or navigate through the ODS menu.5. Selection key to adjust brightness directly or navigate through the ODS menu.6. PC/AV PC. AV switch.7. Power on/off.8. Red indicator light.9. Infrared receiving Window.10. DC12V input jack 11. HDMI input jack.12. VGA input jack.13. 3.5mm earphone jack, AV input jack.14. 3.5mm headphone jack.15. Battery on/off switch.16. Speaker.17. Battery mount.1496123874513121110171615REMOTE CONTROLCABLESHDMI cablemini HDMI-to-HDMIAV CableMUTEPower ON / OFF Activate OSD menuVolume UP / adjust value of setting function Volume DOWN / adjust value of setting function Selection key / adjust brightness directly Selection key / adjust phase directly Aspect ratio switch (4:3/16:9)Menu Navigation (Flip UP/DOWN)Menu Navigation (Flip LEFT/RIGHT)Input Selection1. Yellow RCA jack for VIDEO 1 input2. White RCA jack for AUDIO input3. Yellow RCA jack for VIDEO 2 input1|5MENU OPER ATIONby a red light. Press on the unit or on the remote operational. Pressing the same button again will return the unit to STANDBY mode. Push the "PC/AV " button on the unit or the remote control to select the signal input.You can press or on the unit or on the remote control to select the items: COLOR ADJUST MENU FUNCTION SOUND and confirm by pressing on the remote control or + or - on the unit, then push on the remote control or + or - on the unit a second time to adjust the items. Push to exit the OSD after your adjustments are complete.oror6Color temperature within the OSD is adjustable also. Press on the remote control or + or - on the unit to select "Color Temp," then choose to set color temperature to: 9300 K, 6500 K, or USER or by pressing .RED, GREEN and BLUE may then be adjusted with + or - to obtain any custom settings you may require.Note: when you select “USER,” a mini pop-up box will appear in the right bottom corner of the OSD (as pictured above ).After selecting "Color " mode on the OSD, use to select and then push + or - to adjust.1. Brightness: adjusts the brightness of the image 2. Contrast: adjusts the contrast of image3. Color Temp: adjusts the color temperature of the image4.Custom Color Adjustment modeCOLORoror or|7ADJUSTOperating Screen Display1. Auto Config : adjusts settings automatically2. H Position: adjusts the picture horizontally3. V Position: adjusts the picture vertically4. Phase: adjusts the phase5. Clock: adjusts the clock, make field, and line synchronization1. Language: sets the displayed language2. H Position: adjusts the OSD window horizontally3. V Position: adjusts the OSD window vertically4. OSD Timeout: adjusts the timeout for the OSD shut-off5. Transparent:Adjust the transparency level of the OSD screenLanguage window8FUNCTIONSOUND1. Reset: resets the monitor to the original factory settings2. Display Ratio: changes the aspect ratio from 4:3 to 16:9 (4:3 is default)3. Zoom: increases the image by 10%4. LR: flip image horizontally (Mirror image)5. UD: flip image vertically (up / down)1. Volume:adjusts the monitor or headphone volumeSPECIFICATIONS|9INCLUDED ACCESSORIES• Power AC adapter• AV cable• HDMI-to-HDMI cable• Mini HDMI-to-HDMI cable• Remote control• Camera mount• Battery• Battery charger • Operation manual• Soft pouchTROUBLESHOOTINGImage is only showing black and white:Make sure the level of color saturation and brightness are correct.The power is on but there is no picture:Check your cable to make sure both ends are secure. Make sure theAV or VGA cable is tightly connected from the video out connector orVGA signal output connector. Make sure you are using the standardpower adapter supplied with the monitor.The colors are incorrect or abnormal:If any color is missing, check the cables to make sure they are securelyconnected. Broken or loose pins in the cable connector can cause abad connection.The remote control does not work:Check the battery to make sure the battery is installed properly and thatit is not depleted.If you are still experiencing problems, contact Marshall Electronicstechnical support at:(800) 800-6608 or +1 (310) 333-060610BAT TERY COMPATIBILIT YThis camera-top monitor is compatible with a variety of different DSLR and camcorder batteries, depending upon which option is purchased:Compatible DSLR BatteriesCanon BP511Canon E6Nikon EL3Compatible Camcorder BatteriesCanon BP-970GJVC BN-V438UPanasonic CGA-D54Panasonic VW-VBG6Sony NP-QM91Sony NP-F9701112Brightness X X XContrast X X XHue X NO XSaturation X X XColor Temperature X X NO AdjustAuto Config NO X NOH Position NO X NOV Position NO X NOPhase NO X NOClock NO X NO OSDLanguage X X XH Position X X XV Position X X XOSD Timeout X X XTransparent X X X FunctionReset X X XDisplay Ratio X X XZoom X NO NOLR X X XUD X X X SoundVolume X X XMENU OPTIONS CHARTMarshall Electronics1910 E. Maple AvenueEl Segundo, CA 90245 USAPhone: 310-333-0606 • 800-800-6608 • Fax: 310-333-0688Manual contents subjects to change without notice.13。
适用车型:凯迪拉克ATS-L/XTS/XT4/XT5/CT6零件名称:全新一代流媒体后视镜热线电话:400-820-1902感谢您选择和使用我司生产的全新一代流媒体后视镜产品,相信本产品能为您带来全新的驾乘体验。
如您在使用本产品过程中有任何疑问,请及时与我们取得联系。
本手册旨在为用户提供一个使用此全新一代流媒体后视镜的信息指引,在使用本产品前请仔细阅读此手册,并请妥善保存以备将来使用!特别声明1.本手册所显示的产品外观可能与实物存在差异,请以实物为准。
2.本手册使用的画面示例可能与实际画面有所不同,请以实际画面为准。
3.本手册仅作为用户操作指南,不作为维修服务依据。
产品升级和更新或相关参数变化,恕不另行通知,敬请谅解!4.本手册版权归本公司所有,未经许可,任何单位或个人不得将本手册之部分或全部内容用于商业用途。
5.本手册包括截止至该手册印刷时为最新信息。
上汽通用汽车有限公司负责该手册的修订及说明,并保留该手册印刷后更改而不另行通知的权利。
本手册中部分示意图仅供参考,若图片与实物不符,以实物为准。
6.本公司拥有本手册的最终解释权。
安全提示为保证您和您的汽车及他人的安全,请您务必做到以下一些基本要求:1.行车中请勿操作内后视镜。
2.影像有盲区,变道或转弯时请观察外后视镜。
警告:全新一代流媒体后视镜的视野有限。
可能看不见一部分道路、车辆和其他物体。
行驶或泊车时,请勿只使用此摄像头。
物体的显示距离可能比实际距离更近。
变换或并入车道时,请检查车外后视镜或者转头扫视一下。
不够小心可能导致伤害、死亡或车辆损坏。
注意事项:1.本产品不包含SD卡,用户需自行购买SD卡方可使用(支持8G~128G C10 以上的品牌高速SD卡,建议历时6个月更换一次新卡)。
2.本产品不支持Micro SD卡。
3.请在车辆断电熄火后正常插拔卡。
4.请勿自行对流媒体后视镜进行拆装,如有需要请致电400咨询电话或至4S店进行相关操作。
一、特别说明 (2)二、内后视镜面板功能 (4)三、MyCadillac APP功能说明 (5)3.1扫码绑定 (5)3.1.1 下载MyCadillac APP (5)3.1.2 绑定步骤说明 (5)3.2MyCadillac APP功能说明 (7)四、实时自检 (8)4.1屏幕显示关闭 (8)4.2屏幕显示开启 (9)4.2.1 停车实时自检 (9)4.2.2 行车实时自检 (11)五、屏幕显示关闭操作 (13)5.1锁存/终止锁存 (13)5.2屏幕显示开关 (13)六、屏幕显示开启操作 (14)6.1停车时操作 (14)6.1.1 锁存/终止锁存 (14)6.1.2 亮度调节 (14)6.1.3 角度调节 (14)6.1.4 回放 (15)6.1.4.1 回放列表 (15)6.1.4.2 回放中 (16)6.1.5 系统设置 (17)6.2行车时操作 (18)6.2.1 锁存/终止锁存 (18)6.2.2 亮度调节 (18)6.2.3 角度调节 (18)6.2.4 提示停车操作 (19)附录1故障排除 (20)附录2 有害物质声明 (21)附录3 保修服务 (22)一、特别说明1.说明书中有用矩形图片表示,图像显示实际是在异形框内。
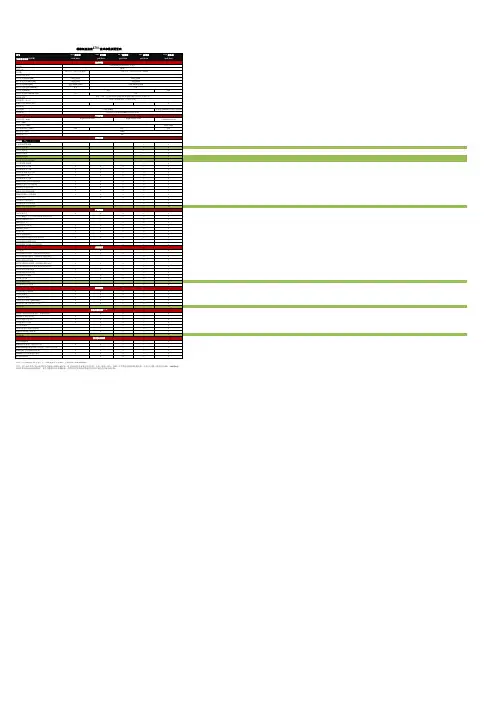
新美式旗舰轿车凯迪拉克CT6技术参数及配置表Cadillac CT6 SpecificationsAWD智能全时四轮驱动系统AWD-----S S S ARS主动式后轮转向系统ARS---S S S S S MRC主动电磁感应悬挂MRC---S S S S S 安全配备Safety Feature11种复合材料专利宇航级工艺轻量化车身11 Kinds of Composite Materials AerospaceGrade Lightweight BodyS S S S S S S SABS防抱死刹车系统ABS S S S S S S S S TCS牵引力控制系统TCS S S S S S S S S Auto hold主动式刹车保持系统Auto Hold---S S-S S ESC车身电子稳定控制系统ESC S S S S S S S S Brake-Hill Holder坡道起步辅助Brake-Hill Holder S S S S S S S S EPB电子驻车系统EPB S S S S S S S S ESS强化安全系统I:ESS I:前方行人探测预警Forward Pedestrian Probe and Warning--S S S S S S 低速自动刹车Low-speed Automatic Braking--S S S S S S 自动远光灯Automatic High Beam--S S S S S S 前方碰撞预警FCW--S S S S S S 跟车距离提醒Following Distance Warning--S S S S S S倒车后方横穿车流预警Rear Pedestrians Crossing Warning whileReversing--S S S S S S变道盲区辅助提醒功能Blind Spot Assist Alerts while Lane change--S S S S S S车道偏离警告/车道保持辅助系统Lane Departure Warning/Lane KeepingAssist--S S S S S SESS强化安全系统II:ESS II:全速防撞自动刹车Full-speed Anti-collision Automatic Braking---S S-S S倒车碰撞预警Reversing Collision Warning---S S-S S 智能主动式巡航(智能跟车/碰撞预防/自动刹车)Intelligent ACC---S S-S S 定速巡航CCS S S S--S--前后驻车辅助雷达Parking Radar (Front/Rear)S S S S S S S S 全彩倒车影像Full-color Reversing Camera-S S S S S S S 360°倒车影像360° Reversing Camera---S S-S S 360°驻车监视安保功能360° Parking Security Monitoring---S S-S S前后超大视角整车行车智能记录系统Ultra-wide Intelligent Vehicle Driving RecordSystem---S S-S S360°全模式智能自动泊车系统360° Full-mode Intelligent AutomaticParking System---S S-S S全彩HUD飞航显示仪Full-color HUD Flight Monitor----S--S。
新美式旗舰轿车凯迪拉克CT6技术参数及配置表Cadillac CT6 Specifications
AWD智能全时四轮驱动系统AWD-----S S S ARS主动式后轮转向系统ARS---S S S S S MRC主动电磁感应悬挂MRC---S S S S S 安全配备Safety Feature
11种复合材料专利宇航级工艺轻量化车身11 Kinds of Composite Materials Aerospace
Grade Lightweight Body
S S S S S S S S
ABS防抱死刹车系统ABS S S S S S S S S TCS牵引力控制系统TCS S S S S S S S S Auto hold主动式刹车保持系统Auto Hold---S S-S S ESC车身电子稳定控制系统ESC S S S S S S S S Brake-Hill Holder坡道起步辅助Brake-Hill Holder S S S S S S S S EPB电子驻车系统EPB S S S S S S S S ESS强化安全系统I:ESS I:
前方行人探测预警Forward Pedestrian Probe and Warning--S S S S S S 低速自动刹车Low-speed Automatic Braking--S S S S S S 自动远光灯Automatic High Beam--S S S S S S 前方碰撞预警FCW--S S S S S S 跟车距离提醒Following Distance Warning--S S S S S S
倒车后方横穿车流预警Rear Pedestrians Crossing Warning while
Reversing
--S S S S S S
变道盲区辅助提醒功能Blind Spot Assist Alerts while Lane change--S S S S S S
车道偏离警告/车道保持辅助系统Lane Departure Warning/Lane Keeping
Assist
--S S S S S S
ESS强化安全系统II:ESS II:
全速防撞自动刹车Full-speed Anti-collision Automatic Braking---S S-S S
倒车碰撞预警Reversing Collision Warning---S S-S S 智能主动式巡航(智能跟车/碰撞预防/自动刹车
)
Intelligent ACC---S S-S S 定速巡航CCS S S S--S--前后驻车辅助雷达Parking Radar (Front/Rear)S S S S S S S S 全彩倒车影像Full-color Reversing Camera-S S S S S S S 360°倒车影像360° Reversing Camera---S S-S S 360°驻车监视安保功能360° Parking Security Monitoring---S S-S S
前后超大视角整车行车智能记录系统Ultra-wide Intelligent Vehicle Driving Record
System
---S S-S S
360°全模式智能自动泊车系统360° Full-mode Intelligent Automatic
Parking System
---S S-S S
全彩HUD飞航显示仪Full-color HUD Flight Monitor----S--S。