千涛CATO-1全向麦克风使用说明
- 格式:doc
- 大小:392.00 KB
- 文档页数:8

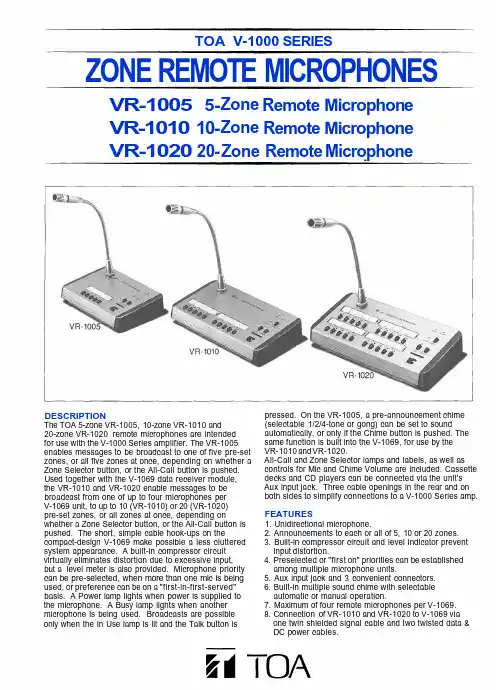
TOA V-1000 SERIESZONE REMOTE M ICROPHONESVR-1005 Remote Microphone VR-1010 10- Remote Microphone VR-1020 20- Z one Remote MicrophoneVR-1005VR-1010VR-1020DESCRIPTIONThe TOA 5-zone VR-1005, 10-zone VR-1010 and 20-zone VR-1020 remote microphones are intended for use with the V-1000 Series amplifier. The VR-1005enables messages to be broadcast to one of five pre-set zones, or all five zones at once, depending on whether a Zone Selector button, or the All-Call button is ed together with the V-1069 data receiver module,the VR-1010 and VR-1020 enable messages to be broadcast from one of up to four microphones per V-1069 unit, to up to 10 (VR-1010) or 20 (VR-1020)pre-set zones, or all zones at once, depending onwhether a Zone Selector button, or the All-Call button is pushed. The short, simple cable hook-ups on thecompact-design V-1069 make possible a less cluttered system appearance. A built-in compressor circuit virtually eliminates distortion due to excessive input,but a level meter is also provided. Microphone priority can be pre-selected, when more than one mic is being used, or preference can be on a "first-in-first-served"basis. A Power lamp lights when power is supplied to the microphone. A Busy lamp lights when another microphone is being used. Broadcasts are possible only when the In Use lamp is lit and the Talk button ispressed. On the VR-1005, a pre-announcement chime (selectable 1/2/4-tone or gong) can be set to soundautomatically, or only if the Chime button is pushed. The same function is built into the V-1069, for use by the VR-1010 and VR-1020.All-Call and Zone Selector lamps and labels, as well as controls for Mic and Chime Volume are included. Cassette decks and CD players can be connected via the unit's Aux input jack. Three cable openings in the rear and on both sides to simplify connections to a V-1000 Series amp.FEATURES1. Unidirectional microphone.2. Announcements to each or all of 5, 10 or 20 zones.3. Built-in compressor circuit and level indicator prevent input distortion.4. Preselected or "first on" priorities can be established among multiple microphone units.5. Aux input jack and 3 convenient connectors.6. Built-in multiple sound chime with selectable automatic or manual operation.7. Maximum of four remote microphones per V-1069.8. Connection of VR-1010 and VR-1020 to V-1069 via one twin shielded signal cable and two twisted data &DC power cables.Zone Zone 5-SPECIFICATIONSModel VR-1005Power Requirements 24V DCPower Consumption 130mAOutput 0dBv,balancedMicrophone Gooseneck electret condenser mic withwindscreenAUX Input -20dBv,unbalancedMake-contact ChimeOutput Control Dimensions WeightFinish Connection Cables 5 individual calls + all-call, max. 150mA DC4-tone chime, 2-tone chime, gong or 1-tonechime (selectable)5-zone + all-call224(W) x 62(H) x 155(D)mm8.8"(W)x2.4"(H)x6.1"(D)(without microphone)1.1kg(2.4lbs.)Metallic gold1 twin shielded cable (signal) and up to 17cables (control and power) (Line resistance:or less, Cable length: 1,200m or less, Outerdiameter: 10mm or less)ModelPower RequirementsPower ConsumptionOutputMicrophoneAUX InputChimeOutput ControlDimensionsWeightFinishConnection CablesVR-1010/VR-102024V DCVR-1010, 90mAVR-1020,110mA0dBv,balancedGooseneck electret condenser mic withwindscreen-20dBv,unbalance dV-1069's internal chime 4-tone chime, 2-tonechime, gong or 1-tone chime (selectable)V-1010,10-zone + all-callV-1020, 20-zone + all-call274(W) x 62(H) x 155(D)mm10.8"(W)x2.4"(H)x6.1"(D)(without microphone)1 3kg (2.9 Ibs)Metallic gold1 twin shielded cable and2 twisted pair cables(Line resistance:or less, Cable length:200m or less, Outer diameter: 10mm or less)APPEARANCE AND DIMENSIONAL DIAGRAMVR-1005 VR-1010VR-1020V-1069Data Receiver Module Model V-1069Power Requirements 24V DCPower Consumption 150mAOutput Control20-zone + all-cal lInputs 4 (0dBv,balanced)Output (signal) 1 (0dBv,balanced)Make-contact20 individual calls,max. 40mA DCChime Internal:4-tonechime, 2-tone chime, gong, or1-tone chime (selectable)Indicator 4green LEDs/1 red LEDConnection 44-pincard-edge connector (accessory) Dimensions40(W) x 129(H) x 194.3(D)mm1.6"(W)x5.1"(H)x7.7"(D)Weight 220g (0.5 Ibs.)Finish Metallic gold*Specifications are subject to change without notice.TOA Corporation Printed in Japan 833-62-344-50。
麦克风使用方法麦克风是一种常见的音频设备,广泛应用于演讲、演唱、录音和视频会议等场合。
正确地使用麦克风可以有效地传递声音,提高声音的清晰度和质量。
下面将介绍一些常见的麦克风使用方法,希望能对您有所帮助。
首先,正确的麦克风位置非常重要。
在使用麦克风时,应将其放置在离口腔适当距离的位置,通常建议距离嘴巴约10至15厘米的位置。
这样可以有效地捕捉声音,同时避免呼吸声和啸叫声的干扰,确保声音的清晰度和质量。
其次,要注意麦克风的指向性。
不同类型的麦克风具有不同的指向性特点,有的是全向麦克风,有的是单向或双向麦克风。
在使用时,应根据麦克风的指向性特点来调整其指向角度,确保其能够有效地捕捉声音,并减少周围环境的干扰。
另外,麦克风的灵敏度也是需要注意的。
在使用麦克风时,应根据实际情况来调整麦克风的灵敏度,避免出现声音过大或过小的问题。
通常来说,可以通过音频设备或混音器来调整麦克风的灵敏度,确保声音的合适大小。
此外,麦克风的连接也是需要注意的。
在连接麦克风时,应确保其与音频设备或混音器连接良好,避免出现松动或接触不良的情况。
同时,还应注意避免麦克风与其他电源或信号线路相互干扰,以确保声音的清晰度和稳定性。
最后,使用麦克风时,也要注意避免出现啸叫和杂音的情况。
在使用过程中,应避免将麦克风放置在扬声器附近,以免出现反馈啸叫。
同时,还应注意避免在强电磁场或其他干扰源附近使用,以确保声音的清晰度和稳定性。
总之,正确地使用麦克风可以有效地提高声音的传递效果和质量。
希望通过上述介绍,您能够更加准确地使用麦克风,提高声音的清晰度和质量,使其在各种场合发挥更好的效果。
无线麦克风A1-说明书(完整版)-中英文-中性成品:65x75mm 展开:585x75mm印色:K+K 正面反面无线麦克风A1-说明书(完整版)-中英文-中性成品:65x75mm 展开:585x75mm印色:K+K 正面反面This device complies with part 15 of the FCC Rules. Operation is subject to the following two conditions: (1) This device may not cause harmful interference, and (2) this device must accept any interference received, including interference that may cause undesired operation.Any Changes or modifications not expressly approved by the party responsible for compliance could void the user's authority to operate the equipment.Note: This equipment has been tested and found to comply with the limits for a Class B digital device, pursuant to part 15 of the FCC Rules. These limits are designed to provide reasonable protection against harmful interference in a residential installation. This equipment generates uses and can radiate radio frequency energy and, if not installed and used in accordance with the instructions, may cause harmful interference to radio communications. However, there is no guarantee that interference will not occur in a particular installation. If this equipment does cause harmful interference to radio or television reception, which can be determined by turning the equipment off and on, the user is encouraged to try to correct the interference by one or more of the following measures:-Reorient or relocate the receiving antenna.-Increase the separation between the equipment and receiver.-Connect the equipment into an outlet on a circuit different from that to which the receiver is connected.-Consult the dealer or an experienced radio/TV technician for help.。
今日怎么使用无线麦克风(三分钟教你看懂无线麦克风的使用方法)导读大家好,小刘来为大家解答以上问题。
怎么使用无线麦克风,三分钟教你看懂无线麦克风的使用方法很多人还不知道,现在让我们一起来看看吧!1...大家好,小刘来为大家解答以上问题。
怎么使用无线麦克风,三分钟教你看懂无线麦克风的使用方法很多人还不知道,现在让我们一起来看看吧!1、一、无线麦克风的技术发展无线麦克风从最初简易的一个无线调频发射器和无线调频接收器到目前的采用专用的PLL(频率锁相环)技术,大约经历了三个阶段。
2、目前使用的无线麦克风中有VHF、UHF和数字无线麦克风(无线话筒)。
3、(1)关于VHF无线麦克风VHF(V段)无线麦克风发射器部分主要采用几级倍频电路取得到高频信号,发射器的信号载波频率是固定的。
4、VHF无线麦克风接收机也是做成固定频率点的,因而当有干扰信号时,VHF无线麦克风很难避开,受VHF电视频道、传呼、字母机及工业污染如电焊、电机等的干扰大。
5、VHF对较小的金属物体反射小,可绕射;对人体等非金属物体可穿透;馈线的损耗低,天线可适当延长;电池使用的时间较长;但VHF 可扩展的范围太窄,多麦克使用时频率拥挤,兼容频率少;信号的动态范围小。
6、(2)关于UHF无线麦克风UHF无线麦克风发射器多数采用锁相环技术得到高频信号,UHF无线麦克风接收机多数做成接收频率可调的。
7、UHF无线麦克风可通过调节发射和接收机的频率较为轻松避开各种干扰。
8、用于专业演出的UHF无线麦克风往往做成真分集的,也就是一只麦克风用两根天线来接收,UHF无线麦克风使用中出现断点的几率极小(设计优秀的UHF真分集无线麦克风),大型专业演出无一例外采用UHF真分集无线麦克风(无线麦克风),许多著名歌手如张靓颖采用在森海赛尔定制的UHF无线麦克风(价格大约为人民币十几万)用于演出。
9、可见UHF无线麦克风比VHF无线麦克风容易受到青睐。
10、(3)关于数字无线麦克风的介绍数字无线麦克风系统是目前提供最具有代表性、保密性、操作方便等功能。
麦克风使用说明书中英译文以下是麦克风使用说明书,结合所学知识谈谈说明书翻译过程中应注意什么。
?Instruction Manual fro Sharp UD-952 Microphone Features(1) This type of microphone employs a double dome diaphragm to achieve a well balanced soundquality from the lower range to the upper range so that a crystal clear sound quality isproduced.(2) A light aluminum wire (LAW) is employed for the voice coil to achieve high quality sound.(3) A reliable Sharp brand connector is employedOperation Instructions(1) Insert the microphone plug into the microphone terminal.(2) Switch the microphone to the “ON” position.(3) Adjust the volume with the volume control knob on the amplifier before use.(4) Move the microphone switch to the “OFF”position when you finish the song or speech beforehandling the microphone to someone else.Precautions:(1) If the microphone head is covered by hand or the microphone is carried to the speaker, a sharp noise may be generated, which is caused by themicrophone picking up the sound output from the speaker. To prevent this first decrease the volume, then place the microphone in such a way that it is not pointed to the speaker. Be sure that there is a sufficient distance between the microphone and the speaker.(2) The microphone is sensitive equipment. So avoid dropping or hitting it.Don’t apply strong shock to it.(3) Don’t store the microphone in a place with high temperature or humidity.夏普UD-952麦克风指导手册特征(1)这种类型的麦克风用一个双圆顶隔膜使声音从低音到高音变化平稳以便产生清晰明亮的声音。

麦克风使用方法
麦克风是一种常见的音频设备,被广泛应用于语音录制、语音识别、语音通信等领域。
正确使用麦克风可以有效提高音频质量,让声音更加清晰、自然。
下面将介绍麦克风的使用方法,帮助您更好地使用这一设备。
首先,当您使用麦克风进行语音录制时,需要注意环境的安静程度。
尽量选择在安静的地方进行录制,避免噪音干扰。
同时,要保持麦克风与口鼻的距离适中,通常建议距离在5-10厘米左右,这样可以保证录制的声音清晰、不模糊。
其次,如果您需要进行语音识别或语音通信,可以根据实际情况选择合适的麦克风类型。
有线麦克风和无线麦克风是常见的两种类型,可以根据使用场景和个人喜好进行选择。
同时,还需要留意麦克风的指向性,不同的麦克风有不同的指向性,选择合适的指向性可以更好地捕捉声音。
另外,麦克风的放置位置也是需要注意的。
在进行语音录制或语音识别时,要将麦克风放置在合适的位置,使其能够捕捉到清晰的声音。
同时,要避免将麦克风放置在会产生共振或回声的位置,
这样可以有效避免录制或通信过程中出现的杂音问题。
最后,使用完麦克风后,要及时进行清洁和保养。
定期清洁麦
克风的话筒和过滤网,保持其清洁干净,可以有效提高录制和通信
的声音质量,延长麦克风的使用寿命。
总的来说,正确使用麦克风可以提高语音录制、语音识别和语
音通信的效果。
在选择麦克风、使用麦克风时,要注意环境、距离、指向性和放置位置等因素,保持麦克风的清洁和保养,可以让麦克
风始终保持良好的工作状态,为您的语音工作提供更好的支持。
希
望以上内容对您有所帮助,谢谢阅读!。
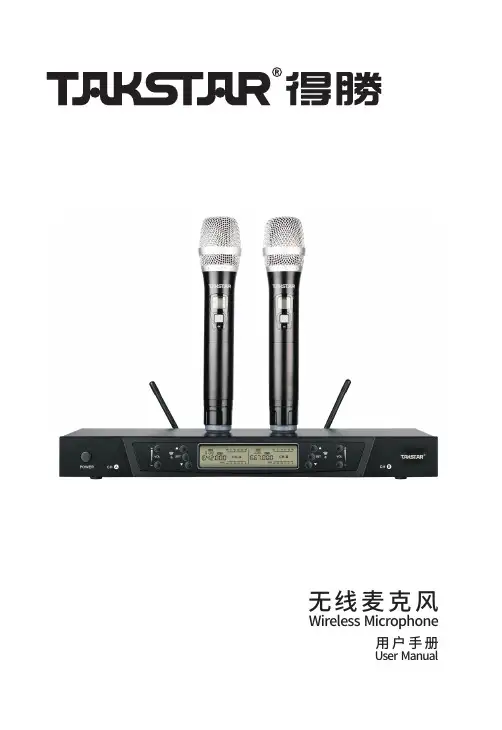
用户手册UserManual无线麦克风Wireless Microphone目录Content目录--------------------------------------------------------------------------------01 Content---------------------------------------------------------------------------01前言--------------------------------------------------------------------------------02 Foreword-------------------------------------------------------------------------10产品特性---------------------------------------------------------------------------02 Features--------------------------------------------------------------------------10适用场合---------------------------------------------------------------------------02 Application-----------------------------------------------------------------------10技术参数---------------------------------------------------------------------------02 Specification--------------------------------------------------------------------10标准配置---------------------------------------------------------------------------03 Product content-----------------------------------------------------------------11接收机功能------------------------------------------------------------------------03 Receiver function---------------------------------------------------------------11接收机LCD显示面板操作方法---------------------------------------------------04 Receiver LCD display and operation-----------------------------------------12麦克风使用和操作方法-------------------------------------------------------05-06 Microphone operation-----------------------------------------------------13-14系统操作方法----------------------------------------------------------------------07 System operation---------------------------------------------------------------15注意事项---------------------------------------------------------------------------07 Note-------------------------------------------------------------------------------15安全警告---------------------------------------------------------------------------08 Caution---------------------------------------------------------------------------16故障及解决方法-------------------------------------------------------------------09 Trouble shooting----------------------------------------------------------------17尊敬的用户:感谢您选购TAKSTAR 无线麦克风,为了您能够更好的了解使用本产品,建议您在使用前仔细阅读本说明书。
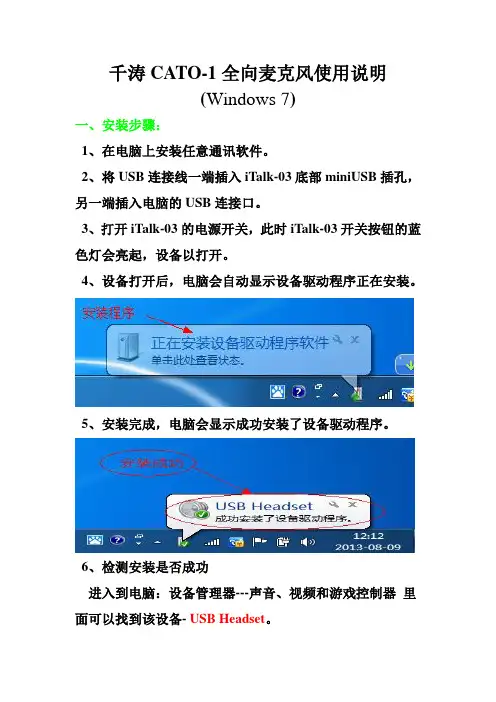
千涛CATO-1全向麦克风使用说明
(Windows 7)
一、安装步骤:
1、在电脑上安装任意通讯软件。
2、将USB连接线一端插入iTalk-03底部miniUSB插孔,另一端插入电脑的USB连接口。
3、打开iTalk-03的电源开关,此时iTalk-03开关按钮的蓝色灯会亮起,设备以打开。
4、设备打开后,电脑会自动显示设备驱动程序正在安装。
5、安装完成,电脑会显示成功安装了设备驱动程序。
6、检测安装是否成功
进入到电脑:设备管理器---声音、视频和游戏控制器里面可以找到该设备- USB Headset。
二、设备启用及属性
1、设备启用
进入控制面板
下一步
下一步:启用USB Headset 设备扬声器,点击确定
下一步:启用录音,点击确定
2、属性
扬声器-音量设置
话筒音量设置。
无线话筒使用方法无线话筒是一种方便实用的音频设备,广泛应用于会议、演讲、表演等场合。
它能够让使用者在不受束缚的情况下进行语音传输,极大地方便了用户。
然而,对于一些新手来说,可能会对无线话筒的使用方法感到困惑。
下面将为大家详细介绍无线话筒的使用方法,希望能够帮助大家更好地使用这一设备。
首先,使用无线话筒之前,我们需要确保设备已经充电。
通常情况下,无线话筒会配备充电底座,我们只需要将话筒放置在充电底座上,待充电指示灯亮起即可。
充电时间一般为2-3小时,充满电后可以使用6-8小时,因此建议提前进行充电准备,以免影响使用。
当充电完成后,我们需要打开无线话筒的电源开关。
一般来说,电源开关会设在话筒的侧面或底部,打开开关后话筒会自动连接到接收设备。
在使用过程中,我们需要注意保持话筒与接收设备的距离,以免出现信号干扰导致音频质量下降。
在使用无线话筒时,我们需要注意避免与其他无线设备频段干扰。
一般来说,无线话筒会有多个频段可供选择,我们可以根据实际情况进行调整,选择一个较为清晰的频段进行使用。
另外,使用时尽量避免在信号干扰较大的环境中操作,以免影响音频传输效果。
当我们使用无线话筒进行讲话时,需要注意保持适当的距离和角度。
一般来说,保持与嘴巴约15-20厘米的距离是比较合适的,同时注意话筒的角度,避免出现啸叫或者杂音。
在使用过程中,我们还需要注意避免突然大声喊叫或者吹气,以免影响音频传输效果。
最后,在使用完无线话筒后,我们需要及时关闭电源开关,并将话筒放置在干燥通风的地方。
如果长时间不使用,建议将电池取出,以免电池漏液损坏设备。
另外,定期对无线话筒进行清洁和维护也是非常重要的,可以有效延长设备的使用寿命。
总的来说,无线话筒是一种非常实用的音频设备,掌握好使用方法可以让我们更好地发挥它的作用。
希望通过本文的介绍,大家能够更加熟练地使用无线话筒,为各种场合的语音传输提供便利。
祝大家使用愉快!。
麦克风使用说明范文本文将介绍麦克风的使用方法及技巧,帮助用户更好地使用麦克风。
一、麦克风的分类1.麦克风按工作原理分为动圈式、电容式和半导体式。
-动圈式麦克风是一种常见的麦克风,使用简单,价格较低,适用于一般的语音录制和通话需求。
-电容式麦克风通常具有较高的灵敏度和清晰度,适用于专业音频录制和表演等需要高质量录音的场合。
-半导体式麦克风是一种新兴的技术,具有较低的功耗和较小的体积,适用于便携设备的语音输入。
2.麦克风按使用方式分为有线麦克风和无线麦克风。
-有线麦克风需要通过线缆连接到使用设备上。
这种麦克风相对稳定,适用于一些固定场合的录音和演讲。
-无线麦克风通过无线信号传输声音,具有更高的灵活性,适用于移动的表演和演讲。
二、麦克风的正确使用方法1.麦克风的安放-在使用麦克风时,应将其放在距离声源合适的位置。
一般来说,距离声源15-30厘米的位置是理想的录音距离。
-如果是夸克麦克,应将麦克风指向要捕捉的声源,避免侧面或后面的声音干扰。
-麦克风应尽量避免接触到硬表面,以免产生共振或触发噪音。
2.麦克风的设置-连接麦克风到要使用的设备上。
对于有线麦克风,将麦克风插入音频插孔;对于无线麦克风,打开麦克风和接收器的电源,并确保它们在同一信道上。
-打开设备上的录音软件或通话软件,并进行相应的设置。
选择麦克风作为音频输入设备,并调节音量和增益等参数。
-在进行正式录音或通话之前,最好进行一次测试,确保麦克风的正常工作。
三、麦克风使用的技巧1.控制噪音-在使用麦克风进行录音时,应尽量选择安静的环境。
关闭电视、电脑和其他噪音源,以避免噪音干扰录音质量。
-对于动圈式麦克风,应尽量避免使用时与麦克风太近,以免呼吸声和爆音等产生杂音。
-如果是在户外使用麦克风,可以增加风罩或风屏来减少风噪声。
2.控制音量-在录音或通话时,应注意音量的控制。
过高的音量可能会导致声音失真,过低的音量则会导致音频质量差。
-调节麦克风的增益和音量控制,使其保持在适当的范围内。
网今无线全向麦克风说明书1、安装前准备全向麦克风适合于Windows2000//Windows7andMac OS X操作系统的电脑,要求USB 接口为USB1.1或更高(建议USB2.0),并且连接互联网的电脑,已安装有网络电话功能的即时通讯或VoIP软件包本设备的USB数据线为随插即用,无须额外安装驱动程序。
2、使用前安装按图所示,先把随附的USB数据线的一端插头插入本机的USB插座里,另一端插入电脑USB插座里。
这时USB 驱动程序会自动安装在电脑上,同时电脑也向本机提供了电源,并做好了使用前的准备工作。
注意:您不能在电脑上同时连接多个传声扬声器设备包括本机请将全向麦克风直接连接至电脑。
通过 USB 集线器连接可能会引起操作问题。
3、通话在电脑上启动具有网络电话功能的软件,按照软件说明进行电话功能操作,网络电话接通后,就可以和对方进行网络电话会议了。
4、喇叭音量大小调整在会议通话过程中,如果喇叭音量太小或太大,可以先重复按下本机的“音量增加”或“音量减小”按键,调整合适的音量来满足要求,若觉得不够,可再调整电脑上的喇叭音量大小。
5、麦克风送话音量大小调整在会议通话过程中,如果对方听到声音太小或太大,可以先要求对方调节接收音量的大小来满足要求,若觉得不够,可再调整本机电脑的麦克风送话音量的大小。
6、麦克风静音在会议通话过程中,想把您的声音静音,请按主机“麦克风静音”键。
同时主机的麦克风静音指示灯会亮起,并且被启用的麦克风指示灯也会熄灭。
这时您只能听到对方的声音,而对方听不到您的声音;如要取消静音,请再一次按主机“麦克风静音”键,立即可以恢复通话。
此时主机的麦克风静音指示灯会熄灭,并且被启用的麦克风指示灯也会亮起。
7、麦克风拾音方向的选择开机默认启用三个麦克风,这时依次按下“MIC ZONE”按键,会顺序开启麦克风的拾音方向,按下此按键第一次、第二次、第三次,会从左到右顺时针方向启用单个麦克风,再继续按下去,又重新返回原先的过程。
T H E S O U N T H A T C R E A T E S L E G E N D SP/N 048524Princeton112Plus Type: PR 290Princeton 112 Plus Owner’s ManualThe Fender PRINCETON 112 Plus amplifier presents the player with the best value of any channel switching amplifier in its price class. Besides the basic complement of VOLUME, TREBLE and BASS controls in the NORMAL channel, the DRIVE channel offers completely independent tone controls including Fender’s exclusive “CONTOUR”control. This control provides midrange “tone shaping” that will continuously vary your sound from smooth and bluesy to a punchy honk, or all the way to 10 for the ultimate heavy metal overdrive! The DRIVE channel also incorporates Fender’s innovative 11 smooth clipping” circuit. This circuit concept is designed to simulate the way tubes clip and produce the overdrive distortion sound so popular with musicians today.In addition to convenient features like All Front Panel Mounted Controls and Jacks, the PRINCETON 112 Plus offers exclusiveexclusive multiplexed footswitch circuitry for selecting the DRIVE channel and for activating the lush internal reverb circuitry. Remote switching is accomplished by connecting the optional two-button footswitch to the FOOTSWITCH jack with a standard mono guitar or speaker cable. Also included are PREAMP OUTPUT and POWER AMP INPUT jacks that allow for a variety of external effects connection schemes and amplifier slaving configurations. The HEADPHONES jack automatically mutes the speaker in addition to driving Stereo or Mono headphones.The built in quality of a Fender amplifier is the result of over four decades of dedication in the combined skills of research and development by our engineers and musicians.That is why we proudly say ... FENDER, The Sound That Creates Legends.Standard Strat / General Purpose / Any Pick-Up CombinationAggression / Any Guitar / Bridge PickupStrat Blues / Neck or Middle Pickup -Chunk Rhythm / Bridge PickupEdge Tone / Any Guitar / Any PickupPrinceton 112 Plus Front Panel FunctionsM. REVERB - Adjusts the amount of reverb signal mixedwith the original dry signal for both the Normal and Drive Channels. N.FOOTSWITCH -Plug in connection for the optionalfootswitch to select between the Normal and Drive Channels and to switch the Reverb on and off. For proper operation of the footswitch, the DRIVE SELECT switch (item K) should be out. NOTE: Any good quality patch cable will work with the remote footswitch,however, a speaker grade cord is preferable to a coax guitar cable if it is availability.O.PREAMP OUT -This jack provides an unbalancedoutput signal from the preamp and can be used in conjunction with the POWER AMP IN jack (item P) as a patch point for effects units (i.e. as an effects loop). This signal can also be used to feed recording and sound reinforcement mixers. Additionally it can drive another amplifier as a slave by connecting a standard guitar cable from the PREAMP OUT jack of the master amplifier to the POWER AMP IN jack of the slave.P .POWER AMP IN -This unbalanced jack inputs signal directly to the power amp. It automatically disconnects the preamp signal when used. This is useful when using the effects loop option or when using the PRINCETON 112 Plus as a slave amplifier.Q.HEADPHONES -This jack provides an output tostandard stereo or mono headphones for private listening. NOTE: Use of this jack automatically disables the main speaker. CAUTION: Prolonged listening at high levels may be hazardous to yourhearing! This jack can also be used as an unbalanced line output, which is post effects loop, by using either a stereo or mono 1/4 inch phone plug connection.R.POWER SWITCH -This switch turns the AC power ONand OFF . When the switch is OFF the amplifier is completely shut down.LINE CORD -This amplifier is equipped with agrounding type supply cord to reduce the possibility of shock hazard. Be sure to connect it to a grounded receptacle. DO NOT ALTER THE AC PLUG.A.INPUT -A high impedance, high sensitivity plug-inconnection for instruments.B.VOLUME -Adjusts the overall loudness of the NormalChannel.C.NORMAL CHANNEL INDICATOR -This LED isilluminated when the Normal Channel is active.D.TREBLE -Adjusts the amount of boost or cut in thehigh frequency range of the Normal Channel.E.BASS -Adjusts the amount of boost or cut in the lowfrequency range of the Normal Channel.F . GAIN - Adjusts the amount of preamp amplification in theDrive Channel. Cleaner sound is achieved at lower gain settings; high gain settings will produce more sustain and distortion. This control works in conjunction with the DRIVE VOLUME control (item L) to set the overall loudness of the Drive Channel.G.DRIVE CHANNEL INDICATOR -This LED is illuminatedwhen the Drive Channel is active.H. CONTOUR - Adjusts the overall tone quality of the DriveChannel without affecting the signal level. Low CONTOUR settings will provide emphasis in the midrange frequencies whereas a higher setting will notch the midrange to produce sounds characteristics of most “metal” music.I.TREBLE -Adjusts the amount of boost or cut in the high frequency range of the Drive Channel.J.BASS -Adjusts the amount of boost or cut in the lowfrequency range of the Drive Channel.K. DRIVE SELECT - Activates the Drive Channel. NOTE:This switch disables the optional Channel Select Footswitch and the Normal Channel controls.L.VOLUME -Adjusts the overall loudness of the DriveChannel.Princeton 112 Plus SpecificationsPART NUMBER:120V VERSION: 22-6704230V VERSION: 22-6764INPUT IMPEDANCE:Greater than 1 MΩNOMINAL INPUT LEVEL:100 mvPOWER OUTPUT:65 Watts R. M.S.RATED LOAD IMPEDANCE:8ΩEFFECTS LOOP:Nominal Level--10 dBVOutput Impedance-1k.ΩInput Impedance 16kΩPOWER REQUIREMENTS:100V VERSION: 100V AC 50/60 Hz., 180W120V VERSION: 120V AC 60 Hz., 180W230V VERSION: 230V AC 50 Hz., 180W240V VERSION: 240V AC 50 Hz., 180WSPEAKER COMPLEMENT:One 8ΩSpecial Design 12” Speaker (P/N 025923)DIMENSIONS:Height: 16-1/2” (41.9cm)Width: 18-5/8” (47.3cm)Depth: 9” (22.9cm)WEIGHT:28 lbs. (12.7kg)ACCESSORIES:Remote Dual Footswitch -order Fender P/N 002-8122-000Amplifier Cover -order Fender P/N 002-9883-000 WARNING:NO USER SERVICEABLE PARTS INSIDE,REFER SERVICING TO QUALIFIEDPERSONNEL ONLY.DO NOT EXPOSE THIS EQUIPMENTTO RAIN OR MOISTURE.THIS EQUIPMENT MUST BE EARTHED.A PRODUCT OF:FENDER MUSICAL INSTRUMENTS CORP.,CORONA, CA 91720。
Talk to your audience,not to the microphone.AM-1B/1WReal-time steering array microphoneUnprecedented voice-tracking capabilityUnobstrusive desktop designFeatures a unique ability to detect the speaker’s voice, and to track and capture it clearly and reliably, even if the speak-er is moving.• Built-in voice detection/tracking sensor• Voice capture from up to 3 meters and to tracking range angles up to 180 degrees• Level compensation for reduced volume variations• Narrow (50-degree) directivity assuring minimal acoustic feedbackAdopts an innovative pad-like form permitting unobtrusive placement flat on the podium.• Removal of barrier between speaker and audience • Freedom to adopt a comfortable speaking posture• Ability to move and gesture naturallyEquipped with a built-in sensor to detect and track sound sources, the TOA Real-time Steering Array Microphone captures voices clearly and continuously from either side, above or below. This frees speakers to move back and forth in the vicinity of the podium, turn or tilt their heads to address different sections of the audience, or gesture naturally without concern for the location of the microphone. Placed unobtrusively on top of the podium or pulpit, this innova-tive voice-tracking microphone completely eliminates the interference and inconvenience of gooseneck or handheldmikes.CONNECTIONAPPEARANCEAPPLICATIONSW HUBMicrophone UnitControl UnitCAT 5Audio OutputPCDigital Mixer AM-1B Array Microphone Control Unit (common)AM-1W Array MicrophoneHouses of Worship Auditorium, seminar/meeting roomsSpecifications are subject to change without notice. (2205) 833-61-100-02-03SPECIFICATIONSArray Microphone UnitPower Source 24V DC (supplied from the Control Unit)Microphone Unidirectional electret condenser microphoneDirectivity Angle Horizontal 50° (800 Hz - 18 kHz, Array mode), 180° (Cardioid mode)Vertical: 90°Frequency Response150 Hz - 18k Hz Maximum Input Sound Pressure 100 dB SPL Operation Mute switchIndicatorMicrophone status indicator (output: green, mute: red)Microphone Cable Shielded twisted pair cable 10m (32.81 ft) with connector equivalent to TA-3Maximum Cable Length 70 m (229.66 ft) (use of the AES\EBU cable)FinishBody, punched net: Surface-treated steel plate, black, 30% glossSide cover: ABS resin black Body, punched net: Surface-treated steel plate, white(RAL9016 equivalent), 30% glossSide cover: ABS resin white (RAL9016 equivalent)Dimensions 483.9 (W) x 22.1(H) x 64.9 (D) mm (19.05" x 0.87" x 2.56") excluding cableWeight 1.2 kg (2.65 lbs.)Control UnitPower Source24V DC (supplied from an optional AC adapter)Usable DC power supply plug: 5.5 mm (0.22") outer diameter2.1 mm (0.08") inner diameter9.5 mm (0.37") long, and non-polarity typeCurrent Consumption 410 mA or less Signal to Noise Ratio 90 dB or moreInput Combined type of TA-3 (dedicated to the array microphone)Output Combined type of XLR-3-32, Removable terminal block (3 pins)Network Network I/F: 10 BASE-T/100BASE-TX, RJ-45 conncector Network protocol: TCP/IP , HTTPLevel Control Output level selection (+4 dB*1, -10 dB*2, -50dB*1)LOW CUT ON/OFF Operation Power switchIndicators Power indicator (blue), Mute indicator (red), signal indicator (green)FinishPre-coated steel plate, back, 30% glossDimensions 210 (W) x 45.7 (H) x 271.5 (D) mm (8.27" x 1.8" x 10.69")Weight1.5 kg (3.31 lbs.)TOA Corporationwww.toa.jpOperating Temperature 0 °C to +40 °C (32 °F to 104 °F)Operating Humidity 90 % RH (no condensation)Accessory Removable terminal plug (3 pins)OptionAC Adapter : AD-246Rack mounting bracket : MB-15B-BK (for rack mounting one control unit), MB-15B-J(for rack mounting two control units)Wall mounting bracket: YC-850 (for one control unit)*1) 0 dB= 0.775 V*2) 0 dB= 1 V。
产品使用简介(1)除说明书有特殊标示的操作方式以外,请勿尝试拆卸或更换产品内的任何零件。
(2)请勿将产品放入任何液体中,此产品非防水设计。
(3)如果有任何液体不小心进入产品内时,请立即断开连接并移开此产品。
(4)为避免触电,请在安装或卸载产品时,确保手上没有沾水。
(5)请勿将此产品放置于热源附近或直接暴露在火源附近。
(6)请勿将本产品放置在有强大电磁力的环境中,否则会导致产品故障。
产品概述非常感谢您使用本公司的全向麦克风产品!在使用本产品之前,请仔细阅读产品使用说明书。
本说明书介绍了全向麦克风产品的功能、安装和使用操作的一般方法。
本产品全向麦克风是一款蓝牙无线或USB有线连接的网络会议通话设备,全向麦克风设备之间蓝牙级联可扩展拾音和放音应用范围,具有回声抵消和环境降噪的最新一代语音处理算法,通话音质清晰自然,机身轻便,便于携带,安装操作方便,特别适用于手机、平板、电脑终端之间的网络会议通话等应用场景。
产品使用手册中图片为示意说明图,具体请以产品实物为准。
包装清单全向麦克风X1数据线X1使用说明书X1Product introduction(1)Do not try to disassemble or replace any parts in the product except for the operation methods marked in the manual.(2)Do not put the product into any liquid,this product is not waterproof.(3)If any liquid accidentally enters the product,please disconnect and remove the product immediately.(4)To avoid electric shock,please make sure that your hands are not wet when installing or uninstalling the product.(5)Do not place this product near a heat source or directly expose it to a fire source.(6)Do not place this product in an environment with strong electromagnetic force,otherwise it will cause product failure.product descriptionThank you very much for using the omnidirectional microphone product of our company!Before using this product,please read the product instruction manual carefully.This manual introduces the function,installation and operation of omnidirectional microphone products.This product omnidirectional microphone is a network conference call device with Bluetooth wireless or USB wired connection.Bluetooth cascading between omnidirectional microphone devices can expand the application range of sound pickup and playback.It has the latest generation of voice echo cancellation and environmental noise reduction.Processing algorithm,the sound quality of the call is clear and natural,the body is light,easy to carry,easy to install and operate,especially suitable for application scenarios such as network conference calls between mobile phones, tablets,and computer terminals.The pictures in the product manual are schematic illustrations, please refer to the actual product for details.Packing listOmnidirectional microphone X1Data cable X1Instruction manual X1产品介绍②麦克风②扬声器③蓝牙指示灯③蓝牙键⑤开关机键⑤组队级联键⑤音量“一”键⑧麦克风静音键⑧音量“+”键⑩级联指示灯⑩环形指示灯⑩充电指示灯⑩USB-C接口设备指示灯说明(1)开机:环形指示灯绿灯逐渐亮起,语音提示“开机,等待蓝牙连接”。
无线话筒怎么用无线话筒怎么用好的无线话筒,给人的使用可以带来极大的方便,同时还能给音响师现场拾音,提供艺术创作的空间。
所以,在构成一个音响系统时,或多或少的配置无线话筒。
接下来为大家介绍无线话筒怎么用。
无线话筒怎么用 1一、无线话筒的选用如果对音质要求不高,经费预算有限,使用距离不超过30m,移动幅度不大,话筒数量要求不多,一般可选择石英振荡类、单接收的无线话筒,话筒头可选择动圈式、驻极体等类型。
在小型剧场、剧院、多功能会议厅等场合,由于移动幅度较大,接收条件复杂,要求较高,建议选用PLL频率合成型无线话筒,话筒头可选电容式或动圈式的,如果有特殊要求的,可选用其他类型的话筒。
在大型剧院、体育场、演播厅等要求较高的场合,建议选用PLL频率合成接收技术的分集式无线系统。
由于这些场合话筒数量多、接收环境复杂、使用范围大,还应配置天线放大器、分配器、天线等附属设备以改善使用效果,获得较好的无线信号。
二、操作人员使用无线话筒应注意的问题1、使用前应注意的问题:操作人员应在演出前对无线话筒进行仔细检查,正确联接系统,合理架设天线,保证话筒处于正常工怍状态,主要注意以下几点。
以免在演出时无线话筒发生无声音的现象。
检查电池盒是否接触良好,电池是否有电;开机时应先打开接收机,检查RF表头,确定此通道无RF射频干扰,再开发射器;检查话筒哑音开关,确保无线发射机和话筒始终处于工作状态;将腰包发射器天线朝下挂在腰带上,避免因重力作用而下垂打弯,影响发射效果。
不要让腰包发射器与人体皮肤直接接触,因为演员演出时容易出汗,影响电子设备的正常工作;为避免载波频偏,请不要将腰包发射器与金属物体直接接触,如钥匙,皮带扣等;不要将接收机堆放在一起,以免接收机之间相互干扰。
2、使用中应注意的问题:在演出过程中,要注意观察RF射频信号指示灯是否正常,防止外来无线信号的干扰;在话筒交接时,应避免将多支开启的无线话筒堆放在一起,且不要靠近接收天线,以免产生互调干扰,影响无线话筒的使用;如声音中有杂音,可能是话筒头未安装到位,或话筒头灵敏度设定过高,也有可能是所用频点被干扰,主要有以下几方面的原因。
网络麦克风操作说明
网络麦克风操作说明
一、分区广播功能
1、点击切换键,在屏幕上切换到分区广播,点击选择。
2、屏幕显示“按数字键点击呼出”提示。
3、各数字键代表
当按下数字键,显示屏会提示相迎键对应的车间或系列名称。
4、选择好数字键,点击呼出,可进行人工语音广播。
5、人工广播完毕,点击退出,关闭麦克风送音功能。
二、对点广布功能
1、点击切换键,在屏幕上切换到对点广播,点击选择。
2、屏幕显示“按数字键输入设备号”提示。
3、各设备号对应工区名称
输入相应数字,点击选择健,屏幕上显示“数字,”点击呼出,可对相应工区进行人工广播。
也可进行多选,即输入数字点击选择键,再输入数字点击选择健,屏幕上显示“数字,数字,…”在点击呼出,可对多个工区进行广播。
4、人工广播完毕,点击退出,关闭麦克风送音功能。
千涛CATO-1全向麦克风使用说明
(Windows 7)
一、安装步骤:
1、在电脑上安装任意通讯软件。
2、将USB连接线一端插入iTalk-03底部miniUSB插孔,另一端插入电脑的USB连接口。
3、打开iTalk-03的电源开关,此时iTalk-03开关按钮的蓝色灯会亮起,设备以打开。
4、设备打开后,电脑会自动显示设备驱动程序正在安装。
5、安装完成,电脑会显示成功安装了设备驱动程序。
6、检测安装是否成功
进入到电脑:设备管理器---声音、视频和游戏控制器里面可以找到该设备- USB Headset。
二、设备启用及属性
1、设备启用
进入控制面板
下一步
下一步:启用USB Headset 设备扬声器,点击确定
下一步:启用录音,点击确定
2、属性
扬声器-音量设置
话筒音量设置。