MyEclipse_(注释模板)
- 格式:doc
- 大小:68.00 KB
- 文档页数:15
Eclipse自动添加注释我们在用Eclipse开发工具编写代码时,常常需要在类的头部加上一下注释,标明类的作者,创建时间等等。
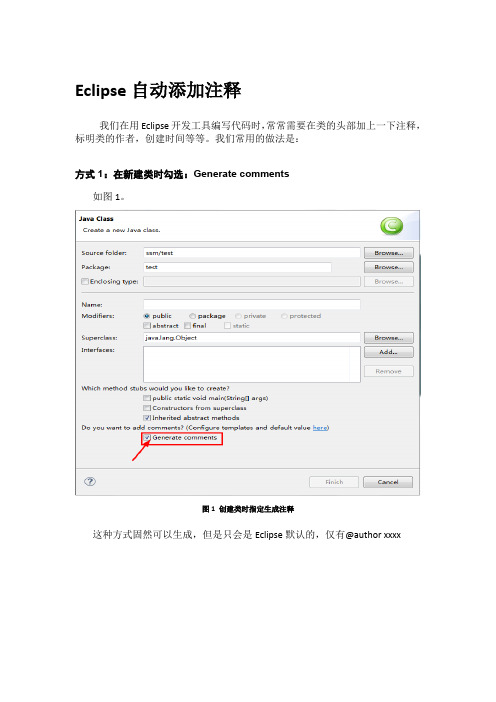
我们常用的做法是:方式1:在新建类时勾选:Generate comments如图1。
图1 创建类时指定生成注释这种方式固然可以生成,但是只会是Eclipse默认的,仅有@author xxxx方式2:快捷键生成第二种就是我们生成类的时,也许忘了勾选。
那么我们就会使用Eclipse提供的快捷键ctrl+alt+j图2 快捷键添加注释当然这种方式也需要开发者,现将鼠标定位类名行或者方法名行。
然后生成对应的注释。
那么如果我们想要自己定义自己的注释呢?方式三:自动生成自定义注释Eclipse最大好处就是很多东西都能让开发者自己来定义。
下面说说如何自定义生成注释。
3.1首先自定义注释模板打开:windows-->preference-->Java-->code style -->code templates--> code -->new java file按照如上操作打开到相应对话框,如下图3图3:注释模板对话框当进入到这个对话框后,点击右侧“Edit”编辑按钮,进入到注释模板编辑对话框,如下图4:图4 编辑自定义注释模板在这个对话框中编辑你想要的注释模板,编辑完成后点击OK。
附:注释基本模板:当点击OK退出模板编辑对话框后,勾选:automatically add comments for new methods and types,如图5图5 设置自动添加注释当然,你还可以设置很多注释,包括getter、setter等等的注释,都在这里,有兴趣的你都可以多试试。
代码篇:1.在源代码中快速跳转:eclipse中的跳转甚至比还方便,方法是按住Ctrl键,然后鼠标指向变量名,方法名,类名,就会出现链接,点击就可跳到定义处。
2.实时语法检查:编辑区右侧如果有红色小方块,直接点击就可跳到有错的行;黄色小方块是警告,可以忽略,但最好检查一下;如果某个函数尚未完成,要提醒自己注意怎么办?加上注释// TODO,右侧就会有蓝色小方块,提示你此处尚未完成。
当一个源码的右侧没有任何提示时,说明这个文件已经完成了。
3.自动生成getter/setter方法:只需要申明protected,private类成员变量,然后在Package Explore中找到该类,右键点击,选择“Source”“Generate Getters andSetters”。
4.更改类名/变量名:如果涉及到多处修改,不要直接在源码中更改,在Package Explore中找到要改名的类或变量,右键点击,选择“Refactor”“Rename”,eclipse会自动搜索所有相关代码并替换,确保不会遗漏或改错。
5.匹配Try:如果写的代码需要抛出或者捕捉异常,在JBuilder中,你需要首先引入这个异常类,然后再在写好的代码前后加try,catch或者在方法后面加throws,在eclipse里完全不必要这样,只需要写好代码,然后按ctrl + 1,这时会出来提示,提示你是throw还是catch这个异常,选择你需要的,按下enter就可以了。
6.快速书写循环代码:在写循环或者选择条件的语句时,先写出关键字如if、while,然后按alt + /自己去看有什么好处吧。
接下来会出来提示代码,按下tab可以在框框中跳,按下确定跳出代码提示。
热键篇:ctrl + D:删除行ctrl + M:当前窗口的最大化或最小化ctrl + L:跳到指定的行ctrl + 1:代码纠错提示alt + /:代码辅助提示F11:运行上次运行的程序Ctrl+E 会弹出下拉列表列出打开文件的名称,用户可以利用上下方向键选择要查看的文件或者敲入文件名,这样就会切换到相应的文件。

javadoc形式的注释Javadoc是Java语言中的一种注释方式,它是一种特殊的注释,用于生成API文档。
Javadoc注释可以包含在Java源代码中,用于描述类、方法、字段、构造函数等元素的用途和行为。
Javadoc注释是一种规范化的注释格式,它使用特殊的标记和语法来表示代码的结构和功能。
本文将介绍Javadoc形式的注释的基本语法、用法和示例。
基本语法Javadoc注释以“/**”开头,以“*/”结尾,中间是一些描述性的文本和标记。
Javadoc注释可以出现在类、方法、字段、构造函数等元素的前面,用于描述这些元素的用途和行为。
下面是一个Javadoc注释的基本结构:/*** Description* @param parameter description* @return description* @throws exception description*/其中,“Description”是注释的描述性文本,用于说明代码的作用和意义。
在Description中,可以使用HTML标记和JavaDoc标记来格式化文本和添加注释标记。
在Description中,可以使用@标记来引用其他标记,如@param、@return、@throws等。
@param标记用于描述方法或构造函数的参数,指定参数的名称和描述。
例如:/*** Returns the sum of two numbers.* @param a the first number* @param b the second number* @return the sum of a and b*/public int add(int a, int b) {return a + b;}@return标记用于描述方法的返回值,指定返回值的类型和描述。
例如:/*** Returns the maximum of two numbers.* @param a the first number* @param b the second number* @return the maximum of a and b*/public int max(int a, int b) {return (a > b) ? a : b;}@throws标记用于描述方法或构造函数可能抛出的异常,指定异常类型和描述。
MyEclipse 8.5 快捷键大全存盘Ctrl+s注释代码Ctrl+/取消注释Ctrl+\(Eclipse3已经都合并到Ctrl+/了)代码辅助Alt+/快速修复Ctrl+1代码格式化Ctrl+Shift+f整理导入Ctrl+Shift+o切换窗口Ctrl+f6 <可改为ctrl+tab方便>ctrl+shift+M 导入未引用的包ctrl+w 关闭单个窗口F3 跳转到类、变量的声明F11 运行上次程序Ctrl + F11 调试上次程序Alt + 回下一个编辑点ctrl+shift+T 查找工程中的类最经典的快捷键Ctrl+1 快速修复(最经典的快捷键,就不用多说了)Ctrl+D: 删除当前行Ctrl+Alt+↓复制当前行到下一行(复制增加)Ctrl+Alt+↑复制当前行到上一行(复制增加)Alt+↓当前行和下面一行交互位置(特别实用,可以省去先剪切,再粘贴了) Alt+↑当前行和上面一行交互位置(同上)Alt+←前一个编辑的页面Alt+→下一个编辑的页面(当然是针对上面那条来说了)Alt+Enter 显示当前选择资源(工程,or 文件or文件)的属性Shift+Enter 在当前行的下一行插入空行(这时鼠标可以在当前行的任一位置,不一定是最后)Shift+Ctrl+Enter 在当前行插入空行(原理同上条)Ctrl+Q 定位到最后编辑的地方Ctrl+L 定位在某行(对于程序超过100的人就有福音了)Ctrl+M 最大化当前的Edit或View (再按则反之)Ctrl+/ 注释当前行,再按则取消注释Ctrl+O 快速显示OutLineCtrl+T 快速显示当前类的继承结构Ctrl+W 关闭当前EditerCtrl+K 参照选中的Word快速定位到下一个Ctrl+E 快速显示当前Editer的下拉列表(如果当前页面没有显示的用黑体表示)Ctrl+/(小键盘) 折叠当前类中的所有代码Ctrl+×(小键盘) 展开当前类中的所有代码Ctrl+Space 代码助手完成一些代码的插入(但一般和输入法有冲突,可以修改输入法的热键,也可以暂用Alt+/来代替)Ctrl+Shift+E 显示管理当前打开的所有的View的管理器(可以选择关闭,激活等操作)Ctrl+J 正向增量查找(按下Ctrl+J后,你所输入的每个字母编辑器都提供快速匹配定位到某个单词,如果没有,则在stutes line中显示没有找到了,查一个单词时,特别实用,这个功能Idea两年前就有了)Ctrl+Shift+J 反向增量查找(和上条相同,只不过是从后往前查)Ctrl+Shift+F4 关闭所有打开的EditerCtrl+Shift+X 把当前选中的文本全部变为小写Ctrl+Shift+Y 把当前选中的文本全部变为小写Ctrl+Shift+F 格式化当前代码Ctrl+Shift+P 定位到对于的匹配符(譬如{}) (从前面定位后面时,光标要在匹配符里面,后面到前面,则反之)下面的快捷键是重构里面常用的,本人就自己喜欢且常用的整理一下(注:一般重构的快捷键都是Alt+Shift开头的了)Alt+Shift+R 重命名(是我自己最爱用的一个了,尤其是变量和类的Rename,比手工方法能节省很多劳动力)Alt+Shift+M 抽取方法(这是重构里面最常用的方法之一了,尤其是对一大堆泥团代码有用)Alt+Shift+C 修改函数结构(比较实用,有N个函数调用了这个方法,修改一次搞定)Alt+Shift+L 抽取本地变量( 可以直接把一些魔法数字和字符串抽取成一个变量,尤其是多处调用的时候)Alt+Shift+F 把Class中的local变量变为field变量(比较实用的功能)Alt+Shift+I 合并变量(可能这样说有点不妥Inline)Alt+Shift+V 移动函数和变量(不怎么常用)Alt+Shift+Z 重构的后悔药(Undo)Alt+左箭头,右箭头以在编辑窗口切换标签Alt+上下箭头, 以自动选择鼠标所在行,并将其上下移动Ctrl+f6 可以弹出菜单,上面列出可以切换的编辑窗口,这样不用鼠标也可切换Ctrl+f7 可以在视图之间切换,如编辑视图,输出视图,工程视图Ctrl+f8 可以在不同的观察视图中切换,就是在java视图,调试视图,等之间切换Ctrl+m 可以在最大化当前窗口和还原当前窗口之间切换Ctrl+e 弹出输入窗口,可以输入你想要编辑的代码窗口,和Ctrl+f6的功能相同,只不过一个是选择的方式,一个是输入的方式,切换窗口Ctrl+T 可以直接显示光标所在内容的类图,可以直接输入,并跳到输入内容部分按住Ctrl键,然后鼠标指向变量名,方法名,类名在源代码中快速跳转Ctrl + F11 快速执行程序Ctrl+Shift+F 程序代码自动排版Ctrl+Shift+O 自动加入引用。

java优雅注释原则和代码格式列举Java作为一种高级编程语言,注释和代码格式是编写优雅代码的重要组成部分。
本文将列举一些优雅注释原则和代码格式,并提供一些指导意义,帮助读者编写结构清晰且易于阅读的Java代码。
第一条原则是注释的准确性。
注释应该准确描述代码的功能、目的和工作原理。
它们应该足够清晰,以便其他开发人员能够理解代码的意图,并依此进行修改或扩展。
此外,注释还应该包括关于代码的重要信息,例如输入和输出的格式,以及函数或方法的预期行为。
第二条原则是注释的简洁性。
注释应该尽可能简洁明了,避免冗余和重复的描述。
在编写注释时,应该考虑到读者的时间以及注释的可读性。
过长或太多的注释可能会使人感到困惑或厌倦,因此应该尽量保持简洁。
第三条原则是注释的规范性。
代码中的注释应该遵循一定的规范和格式。
这样可以增加代码的可读性,并帮助开发人员更快地理解代码。
例如,可以使用JavaDoc样式的注释,准确地描述方法的参数、返回值和异常。
此外,注释应该按照一定的结构和顺序编写,以增加阅读的连贯性。
除了注释,代码格式也是编写优雅代码的重要方面之一。
以下列举一些常见的代码格式原则。
第一条原则是代码缩进和对齐。
在Java中,使用空格或制表符来缩进代码,并保持一致的格式。
适当的缩进和对齐可以使代码的层次结构更加清晰,便于阅读。
第二条原则是空行的使用。
通过在代码的不同部分之间插入空行,可以增加代码的可读性,并帮助读者更好地理解代码的逻辑。
例如,在方法之间插入空行,以分隔不同功能的代码块。
第三条原则是适当地使用空格。
在Java中,应该在运算符前后、逗号和分号后添加空格,以增加代码的可读性。
这可以帮助他人更容易地理解代码的逻辑和计算。
第四条原则是使用适当的命名约定。
在Java代码中,变量、方法和类的命名应该具有描述性,并遵循一定的命名约定。
例如,变量名应该以小写字母开头,采用驼峰式命名法,以提高代码的可读性和可维护性。
通过遵循这些优雅注释和代码格式原则,开发人员可以编写结构清晰、易于阅读和维护的Java代码。

一、新建项目1.新建maven项目New ->project选择Maven projectnext在filter输入webapp选择maven-archetype-webappGroup id输入inscribe,artifact id输入farsighted二、添加struts2框架1.添加struts2支持项目上点右键->myeclipse->add struts capabilities点选struts2.1和/*只勾选struts2 core lib启动tomcat,在地址栏输入localhost:8088/farsighted出现如下界面2.添加action类New ->source folder输入src/main/javaNew ->classPackage输入org.inscribe.farsighted.action,name输入LoginActionLoginAction.javapackage org.inscribe.farsighted.action;import org.apache.struts2.convention.annotation.Action;import org.apache.struts2.convention.annotation.ParentPackage; import org.apache.struts2.convention.annotation.Result;import com.opensymphony.xwork2.ActionSupport;/*** @author steve frank**/@ParentPackage("struts-default")public class LoginAction extends ActionSupport {private String name;private String password;public String getName() {return name;}public void setName(String name) { = name;}public String getPassword() {return password;}public void setPassword(String password) {this.password = password;}@Action(value = "login", results = {@Result(name = INPUT, location = "/WEB-INF/content/fail.jsp"),@Result(name = SUCCESS, location = "/WEB-INF/content/success.jsp") }) public String execute() {if (name.equals("steve") && password.equals("123"))return SUCCESS;elsereturn INPUT;}}Index.jsp<%@ page language="java" import="java.util.*" pageEncoding="UTF-8"%><%@ taglib prefix="s" uri="/struts-tags"%><!DOCTYPE HTML PUBLIC "-//W3C//DTD HTML 4.01 Transitional//EN"><html><head><title>My JSP 'index.jsp' starting page</title></head><body><s:form action="login"><s:textfield name="name" value="steve"></s:textfield><s:textfield name="password" value="123"></s:textfield><s:submit></s:submit></s:form></body></html>success.jsp<%@ page language="java" import="java.util.*" pageEncoding="UTF-8"%> <%@ taglib prefix="s" uri="/struts-tags"%><!DOCTYPE HTML PUBLIC "-//W3C//DTD HTML 4.01 Transitional//EN"><html><head><title>My JSP 'success.jsp' starting page</title></head><body><s:text name="password" /><hr /><s:property value="password" /></body></html>fail.jsp<body>登录失败,用户名或密码错误.</body>三、添加hibernate框架1.添加hibernate支持右键->myeclipse->add hibernate capabilities点选hibernate 3.3 勾选enable hibernate annotations support勾选hibernate 3.3 annotations&entity manager,hibernate 3.3 core lib,hibernate 3.3 advanced support lib点选copy checked library jars to folder and add to build-path点选newFolder :src/main/resources勾选open configuration file选择db driver:mysql去掉勾,不创建hibernatesessionfactory四、添加spring框架1.添加spring支持项目右键->myeclipse->add spring capabilities点选spring3.0勾选spring 3.0 core;spring 3.0 aop;spring3.0 persistence core; spring3.0 persistence jdbc; 勾选copy checked library contents to project folder采取默认,enable aop,new applicationcontext.xml不创建sessionfactory2.applicationContext.xml文件配置<?xml version="1.0" encoding="UTF-8"?><beans xmlns="/schema/beans"xmlns:xsi="/2001/XMLSchema-instance"xmlns:context="/schema/context"xmlns:aop="/schema/aop"xmlns:tx="/schema/tx"xsi:schemaLocation="/schema/beans/schema/beans/spring-beans.xsd/schema/context/schema/context/spring-context.xsd/schema/aop/schema/aop/spring-aop.xsd/schema/tx/schema/tx/spring-tx.xsd"> <bean id="sessionFactory"class="org.springframework.orm.hibernate3.annotation.AnnotationSessionFactoryBea n"><property name="configLocation" value="classpath:hibernate.cfg.xml"></property><property name="packagesToScan" value="org.inscribe.farsighted.model" /> </bean><!-- 使用annotation 自动注册bean,并检查@Controller, @Service, @Repository注解已被注入--><context:component-scan base-package="org.inscribe.farsighted" /><!-- 配置事务管理--><bean id="transactionManager"class="org.springframework.orm.hibernate3.HibernateTransactionManager"><property name="sessionFactory" ref="sessionFactory" /></bean><!-- 配置注解实现管理事务(cglib:proxy-target-class="true")--><tx:annotation-driven transaction-manager="transactionManager"proxy-target-class="true" /></beans>3.hibernate.cfg.xml修改<?xml version='1.0' encoding='UTF-8'?><!DOCTYPE hibernate-configuration PUBLIC"-//Hibernate/Hibernate Configuration DTD 3.0//EN""/hibernate-configuration-3.0.dtd"><!-- Generated by MyEclipse Hibernate Tools. --><hibernate-configuration><session-factory><property name="dialect">org.hibernate.dialect.MySQLDialect</property><property name="connection.url">jdbc:mysql://localhost:3306/test</property><property name="ername">root</property><property name="connection.password">admin</property><property name="connection.driver_class">com.mysql.jdbc.Driver</property><property name="myeclipse.connection.profile">MYSQL</property><!-- <mapping class="org.inscribe.farsighted.model.Student" /> --><!-- Connection Pooling Info --><property name="initialSize">5</property><property name="maxActive">100</property><property name="maxIdle">30</property><property name="maxWait">500</property><property name="defaultAutoCommit">false</property></session-factory></hibernate-configuration>4.web.xml文件配置<?xml version="1.0" encoding="UTF-8"?><web-app version="3.0" xmlns="/xml/ns/javaee"xmlns:xsi="/2001/XMLSchema-instance"xsi:schemaLocation="/xml/ns/javaee/xml/ns/javaee/web-app_3_0.xsd"><display-name></display-name><welcome-file-list><welcome-file>index.jsp</welcome-file></welcome-file-list><context-param><param-name>contextConfigLocation</param-name><param-value>classpath*:applicationContext*.xml</param-value></context-param><listener><listener-class>org.springframework.web.context.ContextLoaderListener</listener-class ></listener><filter><filter-name>struts2</filter-name><filter-class>org.apache.struts2.dispatcher.ng.filter.StrutsPrepareAndExecuteFilter </filter-class></filter><filter-mapping><filter-name>struts2</filter-name><url-pattern>/*</url-pattern></filter-mapping><filter><filter-name>Set Character Encoding</filter-name><filter-class>org.springframework.web.filter.CharacterEncodingFilter</filter-class><init-param><param-name>encoding</param-name><param-value>UTF-8</param-value></init-param><init-param><param-name>forceEncoding</param-name><param-value>true</param-value></init-param></filter><filter-mapping><filter-name>Set Character Encoding</filter-name><url-pattern>/*</url-pattern></filter-mapping></web-app>五、类的添加1.hibernate反向生成students表右键->hibernate reverse engineering选择package : com.inscribe.farsighted.model勾选create pojo<>db->点选add hibernate mapping annotations to pojo;勾选update hibernate configuration with mapping resource location勾选java data access object(dao)->勾选generate precise findby methods;点选sping daoId generation :native2.添加service接口package org.inscribe.farsighted.service;import org.inscribe.farsighted.model.Student;public interface StudentService {public Student findById(Integer id);}3.添加service实现类package org.inscribe.farsighted.service.impl;import javax.annotation.Resource;import org.inscribe.farsighted.model.Student;import org.inscribe.farsighted.model.StudentDAO;import org.inscribe.farsighted.service.StudentService;import org.springframework.stereotype.Service;@Servicepublic class StudentServiceImpl implements StudentService {@Resourceprivate StudentDAO studentDAO;@Overridepublic Student findById(Integer id) {// TODO Auto-generated method stubreturn studentDAO.findById(id);}}4.添加测试类package org.inscribe.farsighted;import org.inscribe.farsighted.model.Student;import org.inscribe.farsighted.service.StudentService;import org.springframework.context.ApplicationContext;import org.springframework.context.support.ClassPathXmlApplicationContext;public class Test {public static void main(String[] args) {ApplicationContext context = new ClassPathXmlApplicationContext("applicationContext.xml");StudentService service = (StudentService) context.getBean("studentServiceImpl");Student s=service.findById(1);System.out.println(s.getName());}}5.WEB-INF下新建Folder包结构如下6.修改输出目录Build path->configure build pathOut folder统一改default:Webapp/src/main/webapp/WEB-INF/classes更改如果无效,在pom.xml中<build>……</build>添加<sourceDirectory>src/main/java</sourceDirectory><resources><resource><directory>src/main/resources</directory></resource></resources><outputDirectory>src/main/webapp/WEB-INF/classes</outputDirectory>7.添加struts-spring支持(action注解配置支持)Build path->add librariesMyeclipse libraries勾选struts 2 spring libraries8.修改struts.xml<?xml version="1.0" encoding="UTF-8" ?><!DOCTYPE struts PUBLIC "-//Apache Software Foundation//DTD Struts Configuration2.1//EN" "/dtds/struts-2.1.dtd"><struts><!-- 开启使用开发模式,详细错误提示--><constant name="struts.devMode" value="true" /><!-- 将对象交给spring管理--><constant name="struts.objectFactory" value="spring" /><!-- 指定资源编码类型--><constant name="struts.i18n.encoding" value="UTF-8" /><!-- 指定每次请求到达,重新加载资源文件--><constant name="struts.i18n.reload" value="true" /><!-- 指定每次配置文件更改后,自动重新加载--><constant name="struts.configuration.xml.reload" value="false" /><!-- 国际化资源文件--><constant name="struts.custom.i18n.resources" value="content/Language" /><!-- 浏览器缓存--><constant name="struts.serve.static.browserCache" value="false" /><!-- 默认后缀名--><constant name="struts.action.extension" value="do,action,jhtml,," /><!-- Struts Annotation --><constant name="actionPackages" value="com.frank.action" /> </struts>9.在LoginAction.java中添加调用StudentService@Resourceprivate StudentService studentService;测试Student s = studentService.findById(1);System.out.println(s.getName());10.success.jsp中添加<hr /> ${password}11.启动tomcat,地址栏输入http://localhost:8088/farsighted/点击submit效果如下包结构如下12.测试完成.。
AndroidStudio添加⽂件注释头模板?Self Settings:as中class⽂件头注释:File -> Settings -> Editor -> File and Code Templates -> 右侧File标签 -> Class,模板填⼊如下内容:File -> Settings -> Editor -> File and Code Templates -> 右侧File标签 -> Class,模板填⼊如下内容:1/**2* Copyright (C), 2015-${YEAR}, XXX有限公司3* FileName: ${NAME}4* Author: ${USER}5* Date: ${DATE} ${TIME}6* Description: ${DESCRIPTION}7* History:8* <author> <time> <version> <desc>9* 作者姓名修改时间版本号描述10*/11 #if (${PACKAGE_NAME} != "")package ${PACKAGE_NAME};#end1213 #if (${IMPORT_BLOCK} != "")${IMPORT_BLOCK}14 #end15/**16* @ClassName: ${NAME}17* @Description: java类作⽤描述18* @Author: ${USER}19* @Date: ${DATE} ${TIME}20*/21 #parse("File Header.java")22 #if (${VISIBILITY} == "PUBLIC")public #end #if (${ABSTRACT} == "TRUE")abstract #end #if (${FINAL} == "TRUE")final #end class ${NAME} #if (${SUPERCLASS} != "")extends ${SUPERCLASS} #end #if (${INTERFACES} != "")23 }--说明:如上模板设置办法,也可以⽤于⽅法、接⼝、以及json等⽂件https:///u010503822/article/details/78545095###;设置⽂件头类注释/**** @ProjectName: ${PROJECT_NAME}* @Package: ${PACKAGE_NAME}* @ClassName: ${NAME}* @Description: java类作⽤描述* @Author: 唐朝* @CreateDate: ${DATE} ${TIME}* @UpdateUser: 更新者* @UpdateDate: ${DATE} ${TIME}* @UpdateRemark: 更新说明* @Version: 1.0*/2.配置⽅法通过短名进⾏⽣成注释cmt这个⽤于快捷⽣成,类似myeclipse的main回车的快速⽣成main⽅法。
Eclipse 配置第1章快捷键的配置(加快开发过程中代码编写)MyEclipse(Eclipse)常用快捷键预览:快捷键组合作用Ctrl+1快速修复(最经典的快捷键,就不用多说了)Ctrl+D 删除当前行Ctrl+Q 定位到最后编辑的地方Ctrl+L 定位在某行(对于程序超过100的人就有福音了)Ctrl+M 最大化当前的Edit或View (再按则反之)Ctrl+/ 注释当前行,再按则取消注释Ctrl+O 快速显示OutLineCtrl+T 快速显示当前类的继承结构Ctrl + F11 快速执行程序Ctrl+Shift+P 定位到对于的匹配符(譬如{}) (从前面定位后面时,光标要在匹配符里面,后面到前面,则反之)Ctrl+Shift+R 全局搜索文件(查找工程内的文件)重构(注:一般重构的快捷键都是Alt+Shift开头的了)Alt+Shift+R 重命名(是我自己最爱用的一个了,尤其是变量和类的Rename)变量名全局更改(对于变量的引用很有用)Alt+Shift+M 抽取方法(这是重构里面最常用的方法之一了,尤其是对一大堆泥团代码有用)Alt+Shift+C 修改函数结构(比较实用,有N个函数调用了这个方法,修改一次搞定)Alt+Shift+L 抽取本地变量( 可以直接把一些魔法数字和字符串抽取成一个变量,尤其是多处调用的时候)Alt+Shift+F 把Class中的local变量变为field变量(比较实用的功能)Alt+Shift+I 合并变量(可能这样说有点不妥Inline)Alt+Shift+V 移动函数和变量(不怎么常用)Alt+Shift+Z 重构的后悔药(Undo)Alt+Shift+S 弹出资源代码(生成set/get方法的时候可以使用)Alt+Shift+J 增加预定义注释F3 跳转到类、变量的声明Ctrl+Alt+↓复制当前行到下一行(复制增加)Ctrl+Alt+↑复制当前行到上一行(复制增加)ALT+↑当前行和上面一行交互位置(同上)Alt+↓当前行和下面一行交互位置(特别实用,可以省去先剪切,再粘贴了)Shift+Enter 在当前行的下一行插入空行(这时鼠标可以在当前行的任一位置,不一定是最后)第2章设置代码自动提示。
myeclipse编译项目1. 什么是myeclipse?myeclipse是一个基于Eclipse开发平台的Java IDE(集成开发环境)。
它是为了开发和管理Java EE项目而设计的,提供了许多强大的功能和工具,帮助开发人员提高开发效率。
其中一个重要功能就是编译项目。
2. 为何需要编译项目?在进行Java开发过程中,编写的代码需要被编译成可执行的字节码文件。
编译是将源代码转换成目标代码的过程,这样才能被计算机理解和执行。
因此,编译项目是非常关键的一步,它确保代码的正确性,并生成可运行的程序。
3. myeclipse编译项目的步骤在myeclipse中,编译项目通常需要以下步骤:3.1 打开myeclipse•首先,双击myeclipse桌面图标或通过开始菜单中的快捷方式打开myeclipse。
3.2 导入项目•在myeclipse的菜单栏中选择”File” -> “Import”。
3.3 选择项目•在导入窗口中,选择”Existing Projects into Workspace”并点击”Next”。
3.4 选择项目路径•点击”Browse”按钮选择项目所在的文件夹,并点击”Finish”。
3.5 构建项目•在myeclipse的项目资源管理器中,右键单击要编译的项目,选择”Build Project”。
3.6 编译项目•myeclipse会自动编译项目,并生成编译后的字节码文件。
编译的进度可以在myeclipse底部的状态栏中查看。
4. myeclipse编译项目的注意事项编译项目虽然是一个相对简单的过程,但仍然需要注意以下几点:4.1 项目依赖•在编译项目之前,确保项目的依赖被正确配置,并且相关的库文件已经添加到项目中。
否则,在编译过程中可能会出现找不到类或方法的错误。
4.2 代码错误•如果在编译过程中出现错误,在myeclipse的问题视图中会显示详细的错误信息。
请仔细查看错误信息并进行修复,只有没有错误的代码才能成功编译。
myeclipse2019 计算代码总行数摘要:1.MyEclipse 2019 简介2.计算代码总行数的方法3.具体操作步骤4.注意事项正文:MyEclipse 2019 是一款功能强大的Java 集成开发环境(IDE),广泛应用于企业级应用程序的开发。
在项目开发过程中,计算代码总行数对于评估项目规模和估算工作量具有重要意义。
本文将介绍如何在MyEclipse 2019 中计算代码总行数,并提供一些实用技巧。
首先,打开MyEclipse 2019,进入项目目录。
接着,在菜单栏中依次点击“Window”>“Preferences”>“General”>“Editors”>“File Associations”。
在右侧的“File Associations”窗口中,找到“.java”文件类型,然后点击“Add…”按钮。
在弹出的对话框中,将“Editor”选项卡展开,勾选“Show line numbers”复选框,点击“Apply and Close”按钮。
接下来,在项目目录中选中所有 .java 文件,右键点击选择“Analyze”>“Code Metrics”。
在弹出的“Code Metrics”窗口中,可以看到项目总行数、空行数、注释行数等信息。
但是,这个方法只能统计当前项目的代码行数,如果需要统计多个项目的代码行数,可以重复上述步骤,分别计算各个项目的代码行数,然后将结果相加。
此外,在开发过程中,还可以通过以下方法简化代码行数的统计:1.按下“Ctrl + Shift + L”快捷键,快速格式化代码,减少空行和缩进错误。
2.使用代码模板和代码生成工具,提高代码质量,减少冗余代码。
3.定期进行代码审查,确保代码符合编码规范和项目需求。
最后,需要注意的是,代码行数并非衡量代码质量的唯一标准。
在实际开发过程中,要注重代码的可读性、可维护性和可扩展性,写出高质量的代码。
本文转自:kaminlee.iteye./blog/1101938Window --> Java --> Code Style --> Code Templates --> Comments --> types --> Edit/**** 项目名称:${project_name}* 类名称:${type_name}* 类描述:* 创建人:${user}* 创建时间:${date} ${time}* 修改人:${user}* 修改时间:${date} ${time}* 修改备注:* version**/----------------------------------------------------------------------------------------------------------设置注释模板的入口:Window->Preference->Java->Code Style->Code Template 然后展开Comments节点就是所有需设置注释的元素啦。
现就每一个元素逐一介绍:文件(Files)注释标签:/*** Title: ${file_name}* Package ${package_name}* Description: ${todo}(用一句话描述该文件做什么)* author A18ccms A18ccms_gmail_* date ${date} ${time}* version V1.0*/类型(Types)注释标签(类的注释):/*** ClassName: ${type_name}* Description: ${todo}(这里用一句话描述这个类的作用)* author A18ccms a18ccms_gmail_* date ${date} ${time}** ${tags}*/字段(Fields)注释标签:/*** Fields ${field} : ${todo}(用一句话描述这个变量表示什么) */构造函数标签:/*** <p>Title: </p>* <p>Description: </p>* ${tags}*/方法(Constructor & Methods)标签:/*** Title: ${enclosing_method}* Description: ${todo}(这里用一句话描述这个方法的作用) * param ${tags} 设定文件* return ${return_type} 返回类型* throws*/覆盖方法(Overriding Methods)标签:/* (非Javadoc)* <p>Title: ${enclosing_method}</p>* <p>Description: </p>* ${tags}* ${see_to_overridden}*/代表方法(Delegate Methods)标签:/*** ${tags}* ${see_to_target}*/getter方法标签:/*** return ${bare_field_name}*/setter方法标签:/*** param ${param} 要设置的${bare_field_name}*/简单模板例子:view plaincopy to clipboardprint?<?xml version="1.0" encoding="UTF-8"?><templates><templateautoinsert="true" context="fieldcomment_context" deleted="false" description="字段的注释" enabled="true"id="org.eclipse.jdt.ui.text.codetemplates.fieldcomment"name="fieldcomment">/*** Fields ${field} : ${todo}(用一句话描述这个变量表示什么)*/</template><template autoinsert="true" context="gettercomment_context" deleted="false" description="getter 方法的注释" enabled="true"id="org.eclipse.jdt.ui.text.codetemplates.gettercomment"name="gettercomment">/*** return ${bare_field_name}*/</template><template autoinsert="true" context="constructorcomment_context" deleted="false" description="创建的构造函数的注释" enabled="true"id="org.eclipse.jdt.ui.text.codetemplates.constructorcomment"name="constructorcomment">/*** <p>Title:${file_name} </p>* <p>Description: 构造函数</p>* ${tags}*/</template><template autoinsert="true" context="filecomment_context" deleted="false" description="已创建的Java 文件的注释" enabled="true"id="org.eclipse.jdt.ui.text.codetemplates.filecomment"name="filecomment">/*** Title: ${file_name}* Package ${package_name}* Description: ${todo}(用一句话描述该文件做什么)* author DAIGUANGJIU* date ${date} ${time}* version V1.0*/</template><template autoinsert="true" context="settercomment_context" deleted="false" description="setter 方法的注释" enabled="true"id="org.eclipse.jdt.ui.text.codetemplates.settercomment"name="settercomment">/*** param ${param} 要设置的${bare_field_name}*/</template><template autoinsert="true" context="typecomment_context" deleted="false" description="创建的类型的注释" enabled="true"id="org.eclipse.jdt.ui.text.codetemplates.typecomment"name="typecomment">/*** author ${user}** ${tags}*/</template><template autoinsert="true" context="delegatecomment_context" deleted="false" description="代表方法的注释" enabled="true"id="org.eclipse.jdt.ui.text.codetemplates.delegatecomment"name="delegatecomment">/*** ${tags}* ${see_to_target}*/</template><template autoinsert="true" context="overridecomment_context" deleted="false" description="覆盖方法的注释" enabled="true"id="org.eclipse.jdt.ui.text.codetemplates.overridecomment"name="overridecomment">/** (非Javadoc)* <p>Title: ${enclosing_method}</p>* <p>Description: </p>* ${tags}* ${see_to_overridden}*/</template><template autoinsert="true" context="methodcomment_context" deleted="false" description="非覆盖方法的注释" enabled="true"id="org.eclipse.jdt.ui.text.codetemplates.methodcomment"name="methodcomment">/*** ${tags}*/</template></templa<?xml version="1.0" encoding="UTF-8"?><templates><templateautoinsert="true" context="fieldcomment_context" deleted="false" description="字段的注释" enabled="true"id="org.eclipse.jdt.ui.text.codetemplates.fieldcomment"name="fieldcomment">/*** Fields ${field} : ${todo}(用一句话描述这个变量表示什么)*/</template><template autoinsert="true" context="gettercomment_context" deleted="false" description="getter 方法的注释" enabled="true"id="org.eclipse.jdt.ui.text.codetemplates.gettercomment"name="gettercomment">/*** return ${bare_field_name}*/</template><template autoinsert="true" context="constructorcomment_context" deleted="false" description="创建的构造函数的注释" enabled="true"id="org.eclipse.jdt.ui.text.codetemplates.constructorcomment"name="constructorcomment">/*** <p>Title:${file_name} </p>* <p>Description: 构造函数</p>* ${tags}*/</template><template autoinsert="true" context="filecomment_context" deleted="false" description="已创建的Java 文件的注释" enabled="true"id="org.eclipse.jdt.ui.text.codetemplates.filecomment" name="filecomment">/** * Title: ${file_name}* Package ${package_name}* Description: ${todo}(用一句话描述该文件做什么)* author DAIGUANGJIU* date ${date} ${time}* version V1.0*/</template><template autoinsert="true" context="settercomment_context" deleted="false" description="setter 方法的注释" enabled="true"id="org.eclipse.jdt.ui.text.codetemplates.settercomment"name="settercomment">/*** param ${param} 要设置的${bare_field_name}*/</template><template autoinsert="true" context="typecomment_context" deleted="false" description="创建的类型的注释" enabled="true"id="org.eclipse.jdt.ui.text.codetemplates.typecomment"name="typecomment">/*** author ${user}** ${tags}*/</template><template autoinsert="true" context="delegatecomment_context" deleted="false" description="代表方法的注释" enabled="true"id="org.eclipse.jdt.ui.text.codetemplates.delegatecomment"name="delegatecomment">/*** ${tags}* ${see_to_target}*/</template><template autoinsert="true" context="overridecomment_context" deleted="false" description="覆盖方法的注释" enabled="true"id="org.eclipse.jdt.ui.text.codetemplates.overridecomment"name="overridecomment">/** (非Javadoc)* <p>Title: ${enclosing_method}</p>* <p>Description: </p>* ${tags}* ${see_to_overridden}*/</template><template autoinsert="true" context="methodcomment_context" deleted="false" description="非覆盖方法的注释" enabled="true"id="org.eclipse.jdt.ui.text.codetemplates.methodcomment"name="methodcomment">/*** ${tags}*/</template></templa例子2:view plaincopy to clipboardprint?<?xml version="1.0" encoding="UTF-8"?><templates><templateautoinsert="false"context="constructorcomment_context"deleted="false"description="Comment for created constructors"enabled="true"id="org.eclipse.jdt.ui.text.codetemplates.constructorcomment"name="constructorcomment">/*** 创建一个新的实例${enclosing_type}.** ${tags}*/</template><templateautoinsert="true"context="settercomment_context"deleted="false"description="Comment for setter method"enabled="true"id="org.eclipse.jdt.ui.text.codetemplates.settercomment"name="settercomment">/*** param ${param} the ${bare_field_name} to set*/</template><templateautoinsert="false"context="methodcomment_context"deleted="false"description="Comment for non-overriding methods"enabled="true"id="org.eclipse.jdt.ui.text.codetemplates.methodcomment"name="methodcomment">/*** 此方法描述的是:* author: wangxiongdx163.* version: ${date} ${time}*/</template><templateautoinsert="true"context="delegatecomment_context"deleted="false"description="Comment for delegate methods"enabled="true"id="org.eclipse.jdt.ui.text.codetemplates.delegatecomment"name="delegatecomment">/*** ${tags}* ${see_to_target}*/</template><templateautoinsert="false"context="filecomment_context"deleted="false"description="Comment for created Java files"enabled="true"id="org.eclipse.jdt.ui.text.codetemplates.filecomment"name="filecomment">/*** 文件名:${file_name}** 版本信息:* 日期:${date}* Copyright 足下Corporation ${year}* 所有**/</template><templateautoinsert="false"context="gettercomment_context"deleted="false"description="Comment for getter method"enabled="true"id="org.eclipse.jdt.ui.text.codetemplates.gettercomment"name="gettercomment">/*** ${bare_field_name}** return the ${bare_field_name}* since CodingExample Ver(编码例查看) 1.0*/</template><templateautoinsert="true"context="overridecomment_context"deleted="false"description="Comment for overriding methods"enabled="true"id="org.eclipse.jdt.ui.text.codetemplates.overridecomment"name="overridecomment">/* (non-Javadoc)* ${see_to_overridden}*/</template><templateautoinsert="false"context="fieldcomment_context"deleted="false"description="Comment for fields"enabled="true"id="org.eclipse.jdt.ui.text.codetemplates.fieldcomment"name="fieldcomment">/*** ${field}:${todo}(用一句话描述这个变量表示什么)** since Ver 1.1*/</template><templateautoinsert="false"context="typecomment_context"deleted="false"description="Comment for created types"enabled="true"id="org.eclipse.jdt.ui.text.codetemplates.typecomment"name="typecomment">/*** 此类描述的是:* author: wangxiongdx163.* version: ${date} ${time}*/</template></templates>。