Android之界面布局
- 格式:ppt
- 大小:4.37 MB
- 文档页数:41
安卓之布局总结Adroid布局有⼈形象地⽐喻,Android开发中的布局就相当于⼀栋建筑的外观架构。
布局⽤得好,这栋建筑的外观才美观⾼⼤上。
Android布局管理器Android布局管理器本⾝是⼀个界⾯控件,所有的布局管理器都是ViewGroup类的⼦类,都是可以当做容器类来使⽤的。
因此⼀个布局管理器中可以嵌套其他的布局管理器。
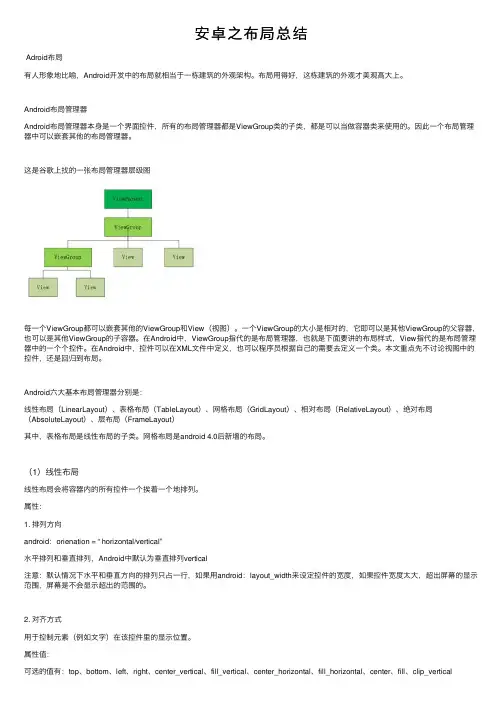
这是⾕歌上找的⼀张布局管理器层级图每⼀个ViewGroup都可以嵌套其他的ViewGroup和View(视图)。
⼀个ViewGroup的⼤⼩是相对的,它即可以是其他ViewGroup的⽗容器,也可以是其他ViewGroup的⼦容器。
在Android中,ViewGroup指代的是布局管理器,也就是下⾯要讲的布局样式,View指代的是布局管理器中的⼀个个控件。
在Android中,控件可以在XML⽂件中定义,也可以程序员根据⾃⼰的需要去定义⼀个类。
本⽂重点先不讨论视图中的控件,还是回归到布局。
Android六⼤基本布局管理器分别是:线性布局(LinearLayout)、表格布局(TableLayout)、⽹格布局(GridLayout)、相对布局(RelativeLayout)、绝对布局(AbsoluteLayout)、层布局(FrameLayout)其中,表格布局是线性布局的⼦类。
⽹格布局是android 4.0后新增的布局。
(1)线性布局线性布局会将容器内的所有控件⼀个挨着⼀个地排列。
属性:1. 排列⽅向android:orienation = “ horizontal/vertical”⽔平排列和垂直排列,Android中默认为垂直排列vertical注意:默认情况下⽔平和垂直⽅向的排列只占⼀⾏,如果⽤android:layout_width来设定控件的宽度,如果控件宽度太⼤,超出屏幕的显⽰范围,屏幕是不会显⽰超出的范围的。
2. 对齐⽅式⽤于控制元素(例如⽂字)在该控件⾥的显⽰位置。


Android开发⾃学笔记(AndroidStudio)—4.1布局组件⼀、引⾔Android的界⾯是有布局和组件协同完成的,布局好⽐是建筑⾥的框架,⽽组件则相当于建筑⾥的砖⽡。
组件按照布局的要求依次排列,就组成了⽤户所看见的界⾯。
在Android4.0之前,我们通常说Android开发五⼤布局和四⼤组件,这五⼤布局就是:1. LinearLayout 线性布局2. FrameLayout 单帧布局,也有中⽂翻译为帧布局、框架布局。
3. RelativeLayout 相对布局4. AbsoluteLayout 绝对布局5. TableLayout 表格布局⽽在Android4.0之后⼜新增了⼀种GridLayout⽹格布局。
⼆、LinearLayout线性布局线性布局是Android开发中最常见的⼀种布局⽅式,它是按照垂直或者⽔平⽅向来布局,通过“android:orientation”属性可以设置线性布局的⽅向。
属性值有垂直(vertical)和⽔平(horizontal)两种。
线性布局的排列在某⾏或者某列并不会⾃动换⾏或换列,就是说如果采⽤⽔平布局,控件宽度超过屏幕显⽰的话,后⾯的控件都将被隐藏,不会⾃动换⾏。
常⽤的属性有:1. android:orientation:可以设置布局的⽅向2. android:id - 为控件指定相应的ID3. android:text - 指定控件当中显⽰的⽂字,需要注意的是,这⾥尽量使⽤string.xml4. android:gravity - 指定控件的基本位置,⽐如说居中,居右等位置5. android:textSize - 指定控件当中字体的⼤⼩6. android:background - 指定控件所⽤的背景⾊,RGB命名法7. android:layout_width - 指定控件的宽度8. android:layout_height - 指定控件的⾼度9. android:layout_weight - 指定控件的占⽤⽐例10. android:padding - 指定控件的内边距,也就是说控件当中的内容11. android:sigleLine - 如果设置为真的话,则将控件的内容显⽰在⼀⾏当中layout_weight属性以控制各个控件在布局中的相对⼤⼩。

android ui界面设计参数讲解android:layout_width 设置组件的宽度android:layout_height 设置组件的高度android:id 给组件定义一个id值,供后期使用android:background 设置组件的背景颜色或背景图片android:text 设置组件的显示文字android:textColor 设置组件的显示文字的颜色android:layout_below 组件在参考组件的下面android:alignTop 同指定组件的顶平行android:maxLength="6" 限制输入字数android:digits='012356789abcdefghijklmnopqrstuvwxyzABCDEFGHIJKLMNOPQRSTUVWXYZ'限制输入数字和大写小写字母1. 开发更简单,执行速度高效。
2. 输入法默认会根据情况变动,比如说设置为numeric后输入法会自动仅显示数字,不会出现Qwerty中的字母。
下面我们通过EditText的layout xml文件中的相关属性来实现:1. 密码框属性android:password='true' 这条可以让EditText显示的内容自动为星号,输入时内容会在1秒内变成*字样。
2. 纯数字android:numeric='true' 这条可以让输入法自动变为数字输入键盘,同时仅允许0-9的数字输入3. 仅允许android:capitalize='cwj1987' 这样仅允许接受输入cwj1987,一般用于密码验证下面是一些扩展的风格属性一起使用。
效果:效果如下:。

第2章 Android常见界面布局《Android移动开发》学习目标/Target了解View与ViewGroup的简介,能够说出View与ViewGroup的作用和关联掌握界面布局在XML文件中与Java代码中的编写方式,能够独立编写界面布局掌握编写简单Android程序的步骤,能够编写一个HelloWorld程序掌握常见界面布局的特点及使用,能够搭建简单的界面布局章节概述/ Summary在Android应用中,界面由布局和控件组成。
布局好比是建筑里的框架,控件相当于建筑里的砖瓦。
针对界面中控件不同的排列位置,Android定义了相应的布局进行管理。
本章将针对Android界面中常见的布局进行详细地讲解。
01 02 03 04View视图界面布局编写方式界面布局的通用属性线性布局05 06相对布局表格布局07帧布局2.1View视图先定一个小目标!了解View与ViewGroup的简介,能够说出View与ViewGroup的作用和关联所有的UI元素都是通过View与ViewGroup构建的,对于一个Android应用的用户界面来说,ViewGroup作为容器盛装界面中的控件,它可以包含普通的View控件,也可以包含ViewGroup。
2.2界面布局编写方式2.2 界面布局编写方式先定一个小目标!掌握在XML文件中编写布局,能够搭建简单的布局界面掌握在Java代码中编写布局,能够搭建简单的布局界面2.2 界面布局编写方式在实现Android界面效果之前,我们首先需要编写界面布局,界面布局的编写方式有2种,第1种是在XML文件中编写布局,第2种是在Java代码中编写布局。
Ø在XML文件中编写布局:推荐此种方式编写布局u有效的将界面中的布局代码与Java代码隔离,使程序的结构更加清晰。
Ø在Java代码中编写布局u在Android中所有布局和控件的对象都可以通过new关键字创建出来,将创建的View控件添加到ViewGroup布局中,从而实现View控件在布局界面中显示。

![[Android开发学习23]界面布局之线性布局LinearLayout](https://uimg.taocdn.com/5d290c8db9d528ea81c77969.webp)
Android自适应不同分辨率或不同屏幕大小的layout布局(横屏|竖屏)一:不同的layoutAndroid手机屏幕大小不一,有480x320, 640x360, 800x480.怎样才能让App自动适应不同的屏幕呢?其实很简单,只需要在res目录下创建不同的layout文件夹,比如layout-640x360,layout-800x480,所有的layout文件在编译之后都会写入R.java里,而系统会根据屏幕的大小自己选择合适的layout进行使用。
二:hdpi、mdpi、ldpi在之前的版本中,只有一个drawable,而2.1版本中有drawable-mdpi、drawable-ldpi、drawable-hdpi三个,这三个主要是为了支持多分辨率。
drawable- hdpi、drawable- mdpi、drawable-ldpi的区别:(1)drawable-hdpi里面存放高分辨率的图片,如WVGA (480x800),FWVGA (480x854)(2)drawable-mdpi里面存放中等分辨率的图片,如HVGA (320x480)(3)drawable-ldpi里面存放低分辨率的图片,如QVGA (240x320)系统会根据机器的分辨率来分别到这几个文件夹里面去找对应的图片。
更正:应该是对应不同density 的图片在开发程序时为了兼容不同平台不同屏幕,建议各自文件夹根据需求均存放不同版本图片。
[i]备注:三者的解析度不一样,就像你把电脑的分辨率调低,图片会变大一样,反之分辨率高,图片缩小。
[/i]屏幕方向:横屏竖屏自动切换:可以在res目录下建立layout-port-800x600和layout-land两个目录,里面分别放置竖屏和横屏两种布局文件,这样在手机屏幕方向变化的时候系统会自动调用相应的布局文件,避免一种布局文件无法满足两种屏幕显示的问题。
不同分辨率横屏竖屏自动切换:以800x600为例可以在res目录下建立layout-port-800x600和layout-land-800x600两个目录不切换:以下步骤是网上流传的,不过我自己之前是通过图形化界面实现这个配置,算是殊途同归,有空我会把图片贴上来。
android实现上下左右滑动界⾯布局本⽂实例为⼤家分享了android实现滑动界⾯布局的具体代码,供⼤家参考,具体内容如下1.我使⽤的是ScrollView嵌套HorizontalScrollView让ScrollView负责上下滑动HorizontalScrollView负责左右滑动2.以下代码提供了思路和完成⼿段,请根据具体业务去进⾏修改,我试过使⽤recyclerview进⾏⾃定义,发现⼀旦有了复杂业务之后会掉帧卡顿所以使⽤了这种⽅法XML布局<?xml version="1.0" encoding="utf-8"?><.myapplication.PagerScrollViewxmlns:android="/apk/res/android"xmlns:app="/apk/res-auto"android:id="@+id/main"android:layout_width="match_parent"android:layout_height="match_parent"><LinearLayoutandroid:layout_width="match_parent"android:layout_height="match_parent"android:orientation="vertical"><HorizontalScrollViewandroid:id="@+id/hor"android:layout_width="match_parent"android:background="#e1f1f1"android:layout_height="160dp"><LinearLayoutandroid:layout_width="match_parent"android:layout_height="match_parent"android:layout_gravity="center|left"android:gravity="center"android:orientation="horizontal"><TextViewandroid:layout_width="160dp"android:layout_height="60dp"android:gravity="center"android:text="A1"/> <TextViewandroid:layout_width="160dp"android:layout_height="60dp"android:gravity="center"android:text="A2"/> <TextViewandroid:layout_width="160dp"android:layout_height="60dp"android:gravity="center"android:text="A3"/> <TextViewandroid:layout_width="160dp"android:layout_height="60dp"android:gravity="center"android:text="A4"/> <TextViewandroid:layout_width="160dp"android:layout_height="60dp"android:gravity="center"android:text="A5"/><TextViewandroid:layout_width="160dp"android:layout_height="60dp"android:gravity="center"android:text="A6"/><TextViewandroid:layout_width="160dp"android:layout_height="60dp"android:gravity="center"android:text="A1"/> <TextViewandroid:layout_width="160dp"android:layout_height="60dp"android:gravity="center"android:text="A2"/> <TextViewandroid:layout_width="160dp"android:layout_height="60dp"android:gravity="center"android:text="A3"/> <TextViewandroid:text="A4"/> <TextViewandroid:layout_width="160dp"android:layout_height="60dp"android:gravity="center"android:text="A5"/><TextViewandroid:layout_width="160dp"android:layout_height="60dp"android:gravity="center"android:text="A6"/></LinearLayout></HorizontalScrollView><HorizontalScrollViewandroid:id="@+id/hor1"android:layout_width="match_parent" android:scrollbars="none"android:background="#a2f2f2"android:layout_height="160dp"><LinearLayoutandroid:layout_width="match_parent" android:layout_height="match_parent" android:layout_gravity="center|left" android:gravity="center"android:orientation="horizontal"><TextViewandroid:layout_width="160dp"android:layout_height="60dp"android:gravity="center"android:text="A1"/> <TextViewandroid:layout_width="160dp"android:layout_height="60dp"android:gravity="center"android:text="A2"/> <TextViewandroid:layout_width="160dp"android:layout_height="60dp"android:gravity="center"android:text="A3"/> <TextViewandroid:layout_width="160dp"android:layout_height="60dp"android:gravity="center"android:text="A4"/> <TextViewandroid:layout_width="160dp"android:layout_height="60dp"android:gravity="center"android:text="A5"/><TextViewandroid:layout_width="160dp"android:layout_height="60dp"android:gravity="center"android:text="A6"/><TextViewandroid:layout_width="160dp"android:layout_height="60dp"android:gravity="center"android:text="A1"/> <TextViewandroid:layout_width="160dp"android:layout_height="60dp"android:gravity="center"android:text="A2"/> <TextViewandroid:layout_width="160dp"android:layout_height="60dp"android:gravity="center"android:text="A3"/> <TextViewandroid:layout_width="160dp"android:layout_height="60dp"android:gravity="center"android:text="A4"/> <TextViewandroid:layout_width="160dp"android:layout_height="60dp"android:gravity="center"android:text="A5"/><TextViewandroid:text="A6"/></LinearLayout></HorizontalScrollView><HorizontalScrollViewandroid:id="@+id/hor2"android:layout_width="match_parent" android:scrollbars="none"android:background="#a2a2f2"android:layout_height="160dp"><LinearLayoutandroid:layout_width="match_parent" android:layout_height="match_parent" android:layout_gravity="center|left" android:gravity="center"android:orientation="horizontal"><TextViewandroid:layout_width="160dp"android:layout_height="60dp"android:gravity="center"android:text="A1"/> <TextViewandroid:layout_width="160dp"android:layout_height="60dp"android:gravity="center"android:text="A2"/> <TextViewandroid:layout_width="160dp"android:layout_height="60dp"android:gravity="center"android:text="A3"/> <TextViewandroid:layout_width="160dp"android:layout_height="60dp"android:gravity="center"android:text="A4"/> <TextViewandroid:layout_width="160dp"android:layout_height="60dp"android:gravity="center"android:text="A5"/><TextViewandroid:layout_width="160dp"android:layout_height="60dp"android:gravity="center"android:text="A6"/><TextViewandroid:layout_width="160dp"android:layout_height="60dp"android:gravity="center"android:text="A1"/> <TextViewandroid:layout_width="160dp"android:layout_height="60dp"android:gravity="center"android:text="A2"/> <TextViewandroid:layout_width="160dp"android:layout_height="60dp"android:gravity="center"android:text="A3"/> <TextViewandroid:layout_width="160dp"android:layout_height="60dp"android:gravity="center"android:text="A4"/> <TextViewandroid:layout_width="160dp"android:layout_height="60dp"android:gravity="center"android:text="A5"/><TextViewandroid:layout_width="160dp"android:layout_height="60dp"android:gravity="center"android:text="A6"/></LinearLayout></HorizontalScrollView><HorizontalScrollViewandroid:id="@+id/hor3"android:layout_width="match_parent" android:scrollbars="none"android:background="#f3f3f3"android:layout_height="160dp"><LinearLayoutandroid:layout_width="match_parent" android:layout_height="match_parent" android:layout_gravity="center|left" android:gravity="center"android:orientation="horizontal"><TextViewandroid:layout_width="160dp"android:layout_height="60dp"android:gravity="center"android:text="A1"/> <TextViewandroid:layout_width="160dp"android:layout_height="60dp"android:gravity="center"android:text="A2"/> <TextViewandroid:layout_width="160dp"android:layout_height="60dp"android:gravity="center"android:text="A3"/> <TextViewandroid:layout_width="160dp"android:layout_height="60dp"android:gravity="center"android:text="A4"/> <TextViewandroid:layout_width="160dp"android:layout_height="60dp"android:gravity="center"android:text="A5"/><TextViewandroid:layout_width="160dp"android:layout_height="60dp"android:gravity="center"android:text="A6"/><TextViewandroid:layout_width="160dp"android:layout_height="60dp"android:gravity="center"android:text="A1"/> <TextViewandroid:layout_width="160dp"android:layout_height="60dp"android:gravity="center"android:text="A2"/> <TextViewandroid:layout_width="160dp"android:layout_height="60dp"android:gravity="center"android:text="A3"/> <TextViewandroid:layout_width="160dp"android:layout_height="60dp"android:gravity="center"android:text="A4"/> <TextViewandroid:layout_width="160dp"android:layout_height="60dp"android:gravity="center"android:text="A5"/><TextViewandroid:layout_width="160dp"android:layout_height="60dp"android:gravity="center"android:text="A6"/></LinearLayout></HorizontalScrollView><HorizontalScrollViewandroid:id="@+id/hor4"android:layout_width="match_parent" android:scrollbars="none"android:background="#a4f4f4"android:layout_height="200dp"><LinearLayoutandroid:layout_width="match_parent" android:layout_height="match_parent" android:layout_gravity="center|left" android:gravity="center"android:orientation="horizontal"><TextViewandroid:layout_width="160dp"android:layout_height="60dp"android:gravity="center"android:text="A1"/> <TextViewandroid:layout_width="160dp"android:layout_height="60dp"android:gravity="center"android:text="A2"/> <TextViewandroid:layout_width="160dp"android:layout_height="60dp"android:gravity="center"android:text="A3"/> <TextViewandroid:layout_width="160dp"android:layout_height="60dp"android:gravity="center"android:text="A4"/> <TextViewandroid:layout_width="160dp"android:layout_height="60dp"android:gravity="center"android:text="A5"/><TextViewandroid:layout_width="160dp"android:layout_height="60dp"android:gravity="center"android:text="A6"/><TextViewandroid:layout_width="160dp"android:layout_height="60dp"android:gravity="center"android:text="A1"/> <TextViewandroid:layout_width="160dp"android:layout_height="60dp"android:gravity="center"android:text="A2"/> <TextViewandroid:layout_width="160dp"android:layout_height="60dp"android:gravity="center"android:text="A3"/> <TextViewandroid:layout_width="160dp"android:layout_height="60dp"android:gravity="center"android:text="A4"/> <TextViewandroid:layout_width="160dp"android:layout_height="60dp"android:gravity="center"android:text="A5"/><TextViewandroid:layout_width="160dp"android:layout_height="60dp"android:gravity="center"android:text="A6"/></LinearLayout></HorizontalScrollView><HorizontalScrollViewandroid:id="@+id/hor5"android:layout_width="match_parent" android:scrollbars="none"android:background="#f5f5f5"android:layout_height="200dp"><LinearLayoutandroid:layout_width="match_parent" android:layout_height="match_parent" android:layout_gravity="center|left" android:gravity="center"android:orientation="horizontal"><TextViewandroid:layout_width="160dp"android:layout_height="60dp"android:gravity="center"android:text="A1"/> <TextViewandroid:layout_width="160dp"android:layout_height="60dp"android:gravity="center"android:text="A2"/> <TextViewandroid:layout_width="160dp"android:gravity="center"android:text="A3"/> <TextViewandroid:layout_width="160dp"android:layout_height="60dp"android:gravity="center"android:text="A4"/> <TextViewandroid:layout_width="160dp"android:layout_height="60dp"android:gravity="center"android:text="A5"/><TextViewandroid:layout_width="160dp"android:layout_height="60dp"android:gravity="center"android:text="A6"/><TextViewandroid:layout_width="160dp"android:layout_height="60dp"android:gravity="center"android:text="A1"/> <TextViewandroid:layout_width="160dp"android:layout_height="60dp"android:gravity="center"android:text="A2"/> <TextViewandroid:layout_width="160dp"android:layout_height="60dp"android:gravity="center"android:text="A3"/> <TextViewandroid:layout_width="160dp"android:layout_height="60dp"android:gravity="center"android:text="A4"/> <TextViewandroid:layout_width="160dp"android:layout_height="60dp"android:gravity="center"android:text="A5"/><TextViewandroid:layout_width="160dp"android:layout_height="60dp"android:gravity="center"android:text="A6"/></LinearLayout></HorizontalScrollView><HorizontalScrollViewandroid:id="@+id/hor6"android:layout_width="match_parent" android:scrollbars="none"android:background="#a5f5f5"android:layout_height="200dp"><LinearLayoutandroid:layout_width="match_parent" android:layout_height="match_parent" android:layout_gravity="center|left" android:gravity="center"android:orientation="horizontal"><TextViewandroid:layout_width="160dp"android:layout_height="60dp"android:gravity="center"android:text="A1"/> <TextViewandroid:layout_width="160dp"android:layout_height="60dp"android:gravity="center"android:text="A2"/> <TextViewandroid:layout_width="160dp"android:layout_height="60dp"android:gravity="center"android:text="A3"/> <TextViewandroid:layout_width="160dp"android:layout_height="60dp"android:gravity="center"android:text="A4"/> <TextViewandroid:layout_width="160dp"android:layout_height="60dp"android:gravity="center"android:layout_width="160dp"android:layout_height="60dp"android:gravity="center"android:text="A6"/><TextViewandroid:layout_width="160dp"android:layout_height="60dp"android:gravity="center"android:text="A1"/> <TextViewandroid:layout_width="160dp"android:layout_height="60dp"android:gravity="center"android:text="A2"/> <TextViewandroid:layout_width="160dp"android:layout_height="60dp"android:gravity="center"android:text="A3"/> <TextViewandroid:layout_width="160dp"android:layout_height="60dp"android:gravity="center"android:text="A4"/> <TextViewandroid:layout_width="160dp"android:layout_height="60dp"android:gravity="center"android:text="A5"/><TextViewandroid:layout_width="160dp"android:layout_height="60dp"android:gravity="center"android:text="A6"/></LinearLayout></HorizontalScrollView></LinearLayout></.myapplication.PagerScrollView> mainAvtivity的代码package .myapplication;import android.annotation.SuppressLint;import android.content.Context;import android.support.v7.app.AppCompatActivity; import android.os.Bundle;import android.support.v7.widget.LinearLayoutManager; import android.support.v7.widget.RecyclerView; import android.util.AttributeSet;import android.util.Log;import youtInflater;import android.view.MotionEvent;import android.view.View;import android.view.ViewGroup;import android.widget.HorizontalScrollView;import android.widget.LinearLayout;import android.widget.ScrollView;import android.widget.TextView;import android.widget.Toast;import org.w3c.dom.Text;import ng.reflect.Array;import java.util.ArrayList;import java.util.List;/*** zhaohan creat 2019/3/6*/public class MainActivity extends AppCompatActivity { String TAG = "主程序";float mPosX;float mPosY;float mCurPosX;float mCurPosY;int offset=10;//偏移量int friction = 10;//摩擦⼒final List<HorizontalScrollView> list = new ArrayList();@SuppressLint("ClickableViewAccessibility")@Overrideprotected void onCreate(Bundle savedInstanceState) {super.onCreate(savedInstanceState);setContentView(yout.activity_main);final PagerScrollView scrollView = findViewById(R.id.main);list.add((HorizontalScrollView) findViewById(R.id.hor));list.add((HorizontalScrollView) findViewById(R.id.hor1));list.add((HorizontalScrollView) findViewById(R.id.hor2));list.add((HorizontalScrollView) findViewById(R.id.hor3));list.add((HorizontalScrollView) findViewById(R.id.hor4));list.add((HorizontalScrollView) findViewById(R.id.hor5));list.add((HorizontalScrollView) findViewById(R.id.hor6));for(HorizontalScrollView horizontalScrollView:list){horizontalScrollView.setOnTouchListener(new View.OnTouchListener() {@Overridepublic boolean onTouch(View v, MotionEvent event) {switch (event.getAction()) {case MotionEvent.ACTION_DOWN:mPosX = event.getX();mPosY = event.getY();Log.w(TAG,mPosY+"");break;case MotionEvent.ACTION_MOVE:mCurPosX = event.getX();mCurPosY = event.getY();case MotionEvent.ACTION_UP:if (mCurPosX - mPosX > 0 && (Math.abs(mCurPosX - mPosX) > offset)) {int speed = 10;//速度int distance = 20;//滑动距离if((Math.abs(mCurPosX - mPosX))>50){speed = (int) Math.abs(mCurPosX - mPosX)/friction;distance = (int) Math.abs(mCurPosX - mPosX)/3;//滑动距离}//向右滑動Log.w(TAG,"向右滑动了!");while(distance>0) {distance = distance - speed;for(HorizontalScrollView horizontalScrollView:list){horizontalScrollView.smoothScrollBy(distance, 0);}}return true;//true为屏蔽范围内的其他滑动监听} else if (mCurPosX - mPosX < 0 && (Math.abs(mCurPosX - mPosX) > offset)) { int speed = 10;//速度int distance = 20;//滑动距离if((Math.abs(mCurPosX - mPosX))>50){speed = (int) Math.abs(mCurPosX - mPosX)/friction;distance = (int) Math.abs(mCurPosX - mPosX)/3;//滑动距离}//向左滑动Log.w(TAG,"向左滑动了!");//改为滑动while(distance>0){distance=distance-speed;for(HorizontalScrollView horizontalScrollView:list){horizontalScrollView.smoothScrollBy(-distance,0 );}}return true;//true为屏蔽范围内的其他滑动监听}break;}return true;//true为屏蔽范围内的其他滑动监听}});}}}class PagerScrollView extends ScrollView {private float xDistance, yDistance, xLast, yLast;public PagerScrollView(Context context) {super(context);}public PagerScrollView(Context context, AttributeSet attrs) {super(context, attrs);}public PagerScrollView(Context context, AttributeSet attrs, int defStyle) {super(context, attrs, defStyle);}@Overridepublic boolean onInterceptTouchEvent(MotionEvent ev) {switch (ev.getAction()) {case MotionEvent.ACTION_DOWN:xDistance = yDistance = 0f;xLast = ev.getX();yLast = ev.getY();break;case MotionEvent.ACTION_MOVE:final float curX = ev.getX();final float curY = ev.getY();xDistance += Math.abs(curX - xLast);yDistance += Math.abs(curY - yLast);xLast = curX;yLast = curY;/*** X轴滑动距离⼤于Y轴滑动距离,也就是⽤户横向滑动时,返回false,ScrollView不处理这次事件, * 让⼦控件中的TouchEvent去处理,所以横向滑动的事件交由ViewPager处理,* ScrollView只处理纵向滑动事件*/if (xDistance > yDistance) {return false;}}return super.onInterceptTouchEvent(ev);}}以上就是本⽂的全部内容,希望对⼤家的学习有所帮助,也希望⼤家多多⽀持。
Android系统常用布局介绍Android中的布局包括线性布局,表格布局,相对布局,帧布局,绝对布局。
下面分别对每个布局进行一个介绍。
在介绍android的布局管理器之前,有必要了解android平台下的控件类。
首先要了解的是View类,该类为所有可视化控件的基类,主要提供了控件绘制和事件处理的方法。
创建用户界面所使用的控件都继承自View,如TextView,Button,CheckBox等。
补充:另外一个需要了解的是ViewGroup类,它也是View类的子类,但是可以充当其他控件的容器。
ViewGroup的子控件既可以是普通的View,也可以是ViewGroup。
Android中的一些高级控件如Gally,GirdView等都继承自ViewGroup。
一:线性布局:LinearLayout类简介线性布局是最简单的布局之一,它提供了控件水平或者垂直排列的模型。
同时,使用此布局时可以通过设置控件的weight参数控制各个控件在容器中的相对大小。
LinearLayout布局的属性既可以在布局文件(XML)中设置,也可以通过成员方法进行设置。
案例:1.在布局管理器中实现布局:在eclipse中新建一个项目。
首先打开项目文件夹下res/values目录下的string.xml,写入一下内容:<?xml version=”1.0”encoding=”utf-8”?><resources><string name=”app_name”>LinearExample</string><string name=”button”>按钮</string><string name=”add”>添加</string></resources>说明:在string.xml中主要声明了程序中要用到的字符串资源,这样将所有字符串资源统一管理有助于提高程序的可读性及可维护性。
布局:在android中我们常用的布局方式有这么几种:1.LinearLayout (线性布局):(里面只可以有一个控件,并且不能设计这个控件的位置,控件会放到左上角)线性布局分为水平线性和垂直线性二者的属性分别为:android:orientation="horizontal" android:orientation="vertical" 。
2.RelativeLayout (相对布局):(里面可以放多个控件,但是一行只能放一个控件)附加几类RelativeLayout的属性供大家参考:第一类:属性值为true或falseandroid:layout_centerHrizontal 水平居中android:layout_centerVertical 垂直居中android:layout_centerInparent 相对于父元素完全居中android:layout_alignParentBottom 贴紧父元素的下边缘android:layout_alignParentLeft 贴紧父元素的左边缘android:layout_alignParentRight 贴紧父元素的右边缘android:layout_alignParentTop 贴紧父元素的上边缘android:layout_alignWithParentIfMissing 若找不到兄弟元素以父元素做参照物第二类:属性值必须为id的引用名“@id/id-name”android:layout_below 在某元素的下方android:layout_above 在某元素的上方android:layout_toLeftOf 在某元素的左边android:layout_toRightOf 在某元素的右边android:layout_alignTop 本元素的上边缘和某元素的的上边缘对齐android:layout_alignLeft 本元素的左边缘和某元素的的左边缘对齐android:layout_alignBottom 本元素的下边缘和某元素的的下边缘对齐android:layout_alignRight 本元素的右边缘和某元素的的右边缘对齐第三类:属性值为具体的像素值,如30dip,40pxandroid:layout_marginBottom 离某元素底边缘的距离android:layout_marginLeft 离某元素左边缘的距离android:layout_marginRight 离某元素右边缘的距离android:layout_marginTop 离某元素上边缘的距离3.TableLayout (表格布局):(这个要和TableRow配合使用,很像html 里面的table)这个表格布局不像HTML中的表格那样灵活,只能通过TableRow 属性来控制它的行而列的话里面有几个控件就是几列(一般情况)。
一、概述Android的控件体系分为三个类别:1、基本控件2、布局3、容器这三类控件主要分布在两个包中:1、android.view 提供抽象接口2、android.widget 提供系统内置的大部分控件整个系统得控件都继承自android.view.View ,而布局及容器类继承自android.view.ViewGroup。
基本控件主要包括ImageView、ProgressBar、SurfaceView、TextView、EditText等。
布局虽然布局跟容器均继承自android.view.ViewGroup,但并不像SWT那样提供了面板+布局的结构,而是每种Layout就是一中特殊的面板,包括AbsoluteLayout、FrameLayout、LinearLayout、TableLayout、RelativeLayout等。
容器这里的容器是指采用了特定的布局并且提供了行为的控件,包含ListView、GridView、Gallery、Spinner等。
二、android常用控件android常用控件之TextView、EditView、Button、Menu示例:一个计算应用程序,输入2个数字,点击按钮进行计算两个数的积并且返回结果。
当点击模拟器右侧的Menu按钮,在输入界面中显示一个有关于和退出的菜单。
项目运行效果图:开发步骤:1、新建一个Android项目2、在布局文件中依次添加EditText、TextView、EditText、Button(一定要按照界面上控件显示的顺序在布局文件中添加)3、再新建一个布局文件用来显示计算的结果;在这个布局文件中添加一个LinearLayout和一个TextView(默认的布局文件中默认就有一个LinearLayout,所以不需要手动添加,新建的布局文件默认为空,所以需要手动添加)4、编写第一个Activitya) 让Activity继承android的Activityb) 重写Activity的onCreate()方法c) 设置这个Activity的布局文件d) 根据控件id获得控件对象e) 设置控件的值,这个值引用的是string.xml中的值,所以还需要在string.xml文件中设置(最好是使用string.xml中的值,以便实现国际化);这个在布局文件中也能设置;5、新建一个Activity,ResultActivitya) 让Activity继承android的Activityb) 重写Activity的onCreate()方法c) 设置这个Activity的布局文件d) 根据控件id获得控件对象6、在第一个Activity中编写Button的监听器a) 取得两个EditText控件的值b) 创建Intent对象c) 将这两个值存放到Intent对象当中d) 使用Intent对象启用ResultActivitye) 将监听器与Button绑定7、在第二个Activity(ResultActivity)中获得Intent对象a) 获得Intent对象中保存的值并强制转换成int类型b) 计算两个值的积c) 设置控件值8、在第一个Activity中,重写onCreateOptionsMenu()方法,这个方法是用于添加菜单中的菜单项,我们添加两个菜单项9、再在第一个Activity中重写onOptionsItemSelected()方法,这个方法是当点击菜单中菜单项时调用。
Android:UI界⾯设计基础知识总结(⼀)⼤年初⼀,这⾥有我。
寒假过的很快,转眼间已经荒废了两周的学习时间,现在想来仍然是惭愧不已。
但时间已经流逝,我能做的就是抓紧当下,真正地投⼊到学习,投⼊到Android的学习中去。
现在学习主要是跟着视频教程边看边学,现将学习到的零星知识点总结如下:Android 系统中的所有 UI 类都是建⽴在 View 和 ViewGroup 两个类的基础之上的,所有 View 的⼦类称为 Widget,所有 ViewGroup 的⼦类称为 Layout。
其中 ViewGroup 是 View 的⼦类。
View 是所有 UI 组件的基类,基本上所有的⾼级 UI 组件都是继承 View 类实现的,如 TextView(⽂本框)、Button、List、EditText(编辑框)、Checkbox 等。
⼀个 View 在屏幕占据⼀块矩形区域,负责渲染这块矩形区域,也可以处理这块矩形区域发⽣的事件,并可以设置该区域是否可见以及获取焦点等。
ViewGroup 是容纳这些组件的容器,其本⾝也是从 View 中派⽣出来的,它继承于 Android.view.View,功能就是装载和管理下⼀层的 View 对象或 ViewGroup 对象,也就是说它是⼀个容纳其他元素的容器,负责对添加进来的 View 和 ViewGroup 进⾏管理和布局。
Android常⽤的UI组件:⾸先有⼀些属性是通⽤的:id=”@+id/name”创建⼀个id,系统会在R.java⽂件⾥⽣成对应的int型变量(R.java⽤来定义所有类型资源的索引)。
引⽤时:”@id/name”orientation ⽔平⽅向或垂直⽅向margin:外边距padding:内边距gravity:位置管理⼀、布局管理SDK 定义了多种布局⽅式以⽅便⽤户设计 UI。
各种布局⽅式均为 ViewGroup 类的⼦类。
主要学习的是两种最常⽤的布局,是线性布局(LinearLayout)和相对布局(RelativeLayout)。
一、Android设计常识开始介绍之前先帮大家梳理一下Android常用单位,方便各位亲们更好的掌握并了解Android端设计规范。
1。
1 Android常用单位1.1。
1。
PPI(pixels per inch):数字影像的解析度,也就是每英寸所拥有的像素数,即像素密度;PPI计算公式:ppi=√(长度像素数2 + 宽度像素数2)/屏幕对角线英寸数1.1。
2。
DPI(dots per inch):是指印刷上的计量单位,也就是每英寸上能印刷的网点数,我们设计用于显示器的默认为(72像素/英寸)就好了;1.1.3.屏幕尺寸(Screen Size):一般我们所说的手机屏幕尺寸,比如3英寸、5.5英寸等,都是指对角线的长度,而不是手机的面积;1。
1.4。
分辨率(Resolution):是指手机屏幕垂直和水平方向上的像素个数,比如分辨率为:720*1280,是指设备水平方向有720个像素点,垂直方向有1280个像素点1.1.5.px( pixels):像素,不同设备显示效果相同1。
1.6.pt( point):一个标准的长度单位,ios的逻辑单位,1Pt=1/72英寸,用于印刷业,非常简单易用;标注字体大小(72是早期台式机的DPI)1.1。
7。
sp(Scaled-independentpixels):放大像素,安卓的字体单位;1.1.8。
Dp(Density-independentpixels):是指设备的独立像素,不同的设备有不同的显示效果,它与设备硬件有关系;sp和dp基本一样,是android开发里特有的单位,都是为了保证文字在不同密度的显示屏上显示相同的效果;dp与设备硬件有关,与屏幕密度无关,sp与屏幕密度和设备硬件均无关;1.2 换算关系android开发中,文字大小的单位是sp,非文字的尺寸单位用dp,但是我们在设计稿用的单位是px。
这些单位如何换算,是设计师、开发者需要了解的关键。
*dp:以160PPI屏幕为标准,则1dp=1px。