TM101单通道保护表安装及调试指南
- 格式:doc
- 大小:102.00 KB
- 文档页数:2

说明非常感谢您使用鹰眼电子科技有限公司的CO B—E201A系列产品,在安装、操作、维修或检查本产品之前请务必要彻底阅读本说明书。
本手册内容和规格可能会根据机器版本(包括硬件和软件)而更变,恕不另行通知。
未经鹰眼电子科技有限公司许可,本手册任何部分都不可以任何形式或者通过电子或机械方法复制。
目录1.安全措施- - - - - - - - - - - - - - - - - - - - - - 3 -2.界面操作- - - - - - - - - - - - - - - - - - - - - - 4 –2-1. 主界面操作- - - - - - - - - - - - - - - - - - - - - 4 –2-2. 参数设定面板- - - - - - - - - - - - - - - - - - - - 4 –2-3. 运动控制面板- - - - - - - - - - - - - - - - - - - - 12 –2-4. 界面调试操作- - - - - - - - - - - - - - - - - - - - 13 –3.控制面板介绍- - - - - - - - - - - - - - - - - - - - - - 16 –3-1.电源控制面板- - - - - - - - - - - - - - - - - - - - 16 –3-2. 点胶快捷键面板介绍- - - - - - - - - - - - - - - - - 17 –3-3.参数控制面板- - - - - - - - - - - - - - - - - - - - - 17 –3-3-1.气路系统- - - - - - - - - - - - - - - - - - - - - - 18 –3-3-2. 温控系统- - - - - - - - - - - - - - - - - - - - - 18 –备注:设备易损件及其使用寿命- - - - - - - - - - - - - - - 19 –4.常见故障及其排除方法- - - - - - - - - - - - - - - - - - 20 –5.机台的保养方法- - - - - - - - - - - - - - - - - - - - - 21 –6.相对应标准件清单- - - - - - - - - - - - - - - - - - - - 22 –7.整机检修问题备忘录- - - - - - - - - - - - - - - - - - - 24 -1.安全措施1-1.机器搬运及安装注意事项:1.由于机器比较重,建议在搬运时要由4人以上进行。

MPS MPS--1501501010101 单通道USB 信号采集器信号采集器使用说明使用说明Ver 1.0第一章第一章 产品概述产品概述MPS MPS--150******** USB 信号采集器信号采集器一、 产品简介产品简介MPS-150101是一款基于USB 总线的实用型信号采集器。
MPS-150101能够采集±5V 之间的单端电压信号,并将采集到的数据传送到计算机进行处理、显示和记录。
结合应用软件,MPS-150101不但可以像万用表一样获得电压值,而且可以像示波器一般获取信号波形,以及更多的高级功能,如频谱分析、信号记录、信号监测等等。
MPS-150101能够提高测量测试工程师的工作效率,是测量测试工程师的必备工具。
MPS-150101采用 USB2.0全速总线接口,无需外部电源,连接计算机即可使用。
MPS-150101内部集成了高达200Ksps 采样率的10bitADC,能够以每秒1000点到每秒200000点之间可调的速率进行数据采集,每个采集周期可连续采集1800个样点。
MPS-010501具有硬件触发功能,能够设置任意触发电平和上升或下降边沿的触发模式。
同一台计算机上可以连接多个MPS-150101,多个采集器即可以独立工作,也可受软件控制协调工作,更增加了MPS-150101的使用灵活性。
MPS-150101采用跨平台的动态链接库作为驱动函数接口,可工作在 Win9X/Me、Win2000/XP 等常用操作系统下,支持VB, VC, C++Builder, Dephi,LabVIEW,Matlab 等绝大多数编程语言。
DLL 中只包含唯一的驱动函数,编程简单,使用方便。
二、 性能指标性能指标2.12.1、、USB 总线总线▪ USB2.0全速总线传输 ▪ 支持热插拔和即插即用 2.22.2、、输入输入通道通道通道 ▪ 单通道单端输入 2.32.3、、电压电压量程量程量程▪ -4.86V 到+4.86V(典型值) 2.42.4、、输入阻抗输入阻抗▪ 2MΩ 2.52.5、、采样率采样率▪ 1K 到200K 任意可调,步进为1K 2.2.66、分辨率分辨率 ▪ 10bit 2.2.77、采样采样缓存缓存缓存 ▪ 1800个样点 2.2.88、工作温度工作温度 ▪ 0℃ - 70℃三、 应用领域应用领域便携式仪表和测试设备信号在线监测与记录 虚拟示波器 传感器信号采集四、 软件软件资源资源资源Windows95/98/NT/2000/XP 下的驱动程序;通用DLL 动态链接库;LabVIEW、VB、VC 环境下的编程参考代码;配套应用软件;等。
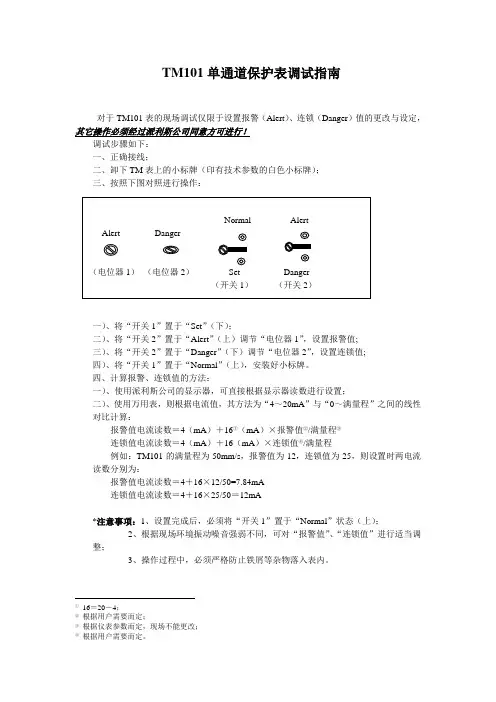
TM101单通道保护表调试指南对于TM101表的现场调试仅限于设置报警(Alert)、连锁(Danger)值的更改与设定,其它操作必须经过派利斯公司同意方可进行!调试步骤如下:一、正确接线;二、卸下TM表上的小标牌(印有技术参数的白色小标牌);三、按照下图对照进行操作:一)、将“开关1”置于“Set”(下);二)、将“开关2”置于“Alert”(上)调节“电位器1”,设置报警值;三)、将“开关2”置于“Danger”(下)调节“电位器2”,设置连锁值;四)、将“开关1”置于“Normal”(上),安装好小标牌。
四、计算报警、连锁值的方法:一)、使用派利斯公司的显示器,可直接根据显示器读数进行设置;二)、使用万用表,则根据电流值,其方法为“4~20mA”与“0~满量程”之间的线性对比计算:报警值电流读数=4(mA)+16①(mA)×报警值②/满量程③连锁值电流读数=4(mA)+16(mA)×连锁值④/满量程例如:TM101的满量程为50mm/s,报警值为12,连锁值为25,则设置时两电流读数分别为:报警值电流读数=4+16×12/50=7.84mA连锁值电流读数=4+16×25/50=12mA*注意事项:1、设置完成后,必须将“开关1”置于“Normal”状态(上);2、根据现场环境振动噪音强弱不同,可对“报警值”、“连锁值”进行适当调整;3、操作过程中,必须严格防止铁屑等杂物落入表内。
①16=20-4;②根据用户需要而定;③根据仪表参数而定,现场不能更改;④根据用户需要而定。
TM101单通道保护表的安装一: 安装步骤:TM101单通道保护表的安装一般分为两大步骤:1 探头的安装2 各仪表元件之间的正确接线二: 探头的安装探头的安装一般是在机壳上作一个φ30mm的平台,在平台上开一个M6的螺孔,将探头固定在螺孔上,无需对机器内部进行任何操作.三: 正确接线(参照TM101现场接线图)1 探头安装好后,红色电缆接A/P端,白色电缆接B/S端.2TM101表的4-20mA输出端子与上位机PLC或DCS联接,也可以接现场数显表.3TM101表的RESET/BYPASS 端子与公共端COM用于遥控报警复位.4TM101表的报警端子(ALERT)和联锁端子(DANGER)接报警连锁装置.5TM101表的电源端子(POWER)与电源相联.当所有线路联接好后,接通电源.发现OK灯亮了,说明联接正确.如果OK不亮,则检查电路电缆联接是否正确,直到OK指示灯亮为止.TM101现场接线图。

LMK-101 数字式通用型综合保护装置技术使用说明书V2.0江苏南自继保电力科技有限公司用户须知尊敬的用户:感谢您使用江苏南自继保电力科技有限公司生产的LMK-101数字式通用型综合保护装置。
在安装和使用本系列产品前,请您注意以下提示:◆在您收到产品后,请核对产品标签与您所订购的型号、规格是否相符,产品的额定电压、额定电流是否符合使用要求;◆请检查产品是否存在外观损伤;◆请检查配套物品是否齐全,包装箱内应包括以下物品:●LMK-101系列数字式综合保护装置 1台●产品调试及检验报告 1份●产品合格证 1份◆在安装、使用产品前请仔细阅读本说明书,严格按照本说明书所述进行安装连线,并设置使用。
本说明书无法涵盖所有场合或包含所有细节,如有特殊情况或疑问,在没有得到正确的指导前请不要做任何举措,请先联系我公司技术部询问相关信息,在得到确认后方可操作;◆该产品在测试和使用时,接地端子(120)及外壳要可靠接地;◆本产品在运行状态时,请勿用尖锐及细长的金属物品接触产品的空隙部分,以免触电、造成产品的损坏或保护误动作;◆请使用合格的测试仪器和设备对装置进行试验和检测;◆产品安装完毕后,请仔细检查接线,确定正确后方可通电调试,以免造成产品的损坏;◆产品出厂时的预置密码是“0000”,此密码可在“装置参数→修改密码”菜单中修改,修改后请注意保存,以免遗失;◆不可在产品运行状态下进行出口传动或修改保护定值的操作,以免造成装置误动作;◆定值整定时要按照“先整定定值,后投入保护功能”的顺序进行;◆本说明书由江苏南自继保电力科技有限公司出版,并对所示产品保留最终解释权;◆本说明书所示产品日后会有小改动,请注意核对实际产品及相关说明书;江苏南自继保电力科技有限公司 2012 年12月1目录第一章LMK-101数字式通用型综合保护装置 (4)1.1简介 (4)1.2装置功能 (4)1.3装置原理 (4)1.3.1速断保护功能 (4)1.3.2 过流保护功能 (5)1.3.3 过流加速保护 (5)1.3.4 过负荷报警 (6)1.3.5 过流反时限保护 (6)1.3.6 负序过流保护 (6)1.3.7 零序保护 (7)1.3.8 过电压保护 (7)1.3.9 低电压保护元件 (7)1.3.10 非电量保护 (8)1.3.11 CT断线告警 (8)1.3.12 相序报警 (8)1.3.13 PT断线告警 (8)1.3.14 开关位置异常告警 (8)1.3.15 弹簧未储能报警 (8)1.3.16 通信 (8)1.4定值及整定说明 (9)1.4.1 LMK-101整定值清单及说明 (9)1.4.2 LMK-101参数清单及说明 (10)21.4端子及接线原理图 (11)第二章LMK-101系列装置使用说明 (14)2.1装置外观说明 (14)2.1.1 面板布局 (14)2.1.2 液晶 (14)2.1.3 指示灯 (14)2.1.4 键盘按键 (15)2.1.5 装置机箱开孔尺寸图 (15)2.2菜单操作说明 (17)2.2.1 菜单说明 (17)2.2.2 中文主菜单 (17)2.2.3正常显示画面 (19)2.2.4主菜单操作说明 (19)2.2.5状态显示 (20)2.2.6装置参数 (20)2.2.7装置记录 (23)2.2.8就地控制 (24)2.2.9版本信息 (25)2.2.10复位装置 (25)3第一章LMK-101数字式通用型综合保护装置1.1简介LMK-101数字式通用型综合保护装置是我公司为适应我国电气成套事业发展的需要,积累多年电力自动化产品开发经验,吸收国内外先进技术,向广大电力成套厂商推出的一款经济性综合保护装置。

CDB-M-101服务器用户手册目录1简介 (4)1.1产品简介 (4)1.2技术规格 (4)1.3I/O端口 (5)1.4机箱结构 (5)1.5环境及规范 (5)2结构件与硬件安装 (5)2.1前面板安装 (5)2.2光驱安装 (5)3基础软件安装与配置 (6)3.1关闭开机logo (6)3.2BIOS配置 (7)3.3IPMI配置 (8)3.4RAID1配置 (9)3.5操作系统安装与配置 (12)3.6网卡驱动安装 (20)4第三方软件安装与配置 (21)4.1GP安装前准备 (21)4.1.1网络配置 (21)4.1.2xfs工具安装 (22)4.1.3Primary mater/standby 剩余空间划分 (22)4.2操作系统配置 (23)4.2.1/etc/hosts配置 (23)4.2.2root用户的SSH配置 (24)4.2.3Console Login Service (24)4.2.4Other Service (24)4.2.5内核参数修改 (24)4.2.6Create Group & User (25)4.2.7新建目录,修改属主 (25)4.2.8NTP Configuration (25)4.3Greenplum安装 (26)4.3.1GP安装 (26)4.3.2GP环境变量配置 (27)4.3.3GP配置文件array (27)4.3.4Hosts-setup配置文件 (28)4.3.5Master安装阶段checklist (28)5集群初始化 (28)5.1GP初始化前准备 (28)5.1.1集群组网 (28)5.1.2用户密钥交互 (29)5.1.3GP集群性能检测 (29)5.2GP初始化及集群检查 (30)5.2.1GP集群初始化 (30)5.2.2GP数据库配置 (33)5.2.3GP集群checklist (34)5.2.4配置保存 (34)5.2.5老化测试 (34)5.2.6停止数据库 (35)6现场安装部署部分 (35)6.1GP现场配置 (35)6.1.1集群组网 (35)6.1.2GP Master现场配置 (35)6.2GP集群检查 (36)6.2.1服务器checklist (36)6.2.2GP现场性能检测 (36)6.2.3GP集群checklist (37)6.2.4GP部署结束 (37)7系统故障诊断 (37)7.1系统复位介绍 (37)7.2系统首次启动 (37)7.3其他问题及解决办法 (38)7.3.1准备系统进行诊断程序 (38)7.3.2验证系统指示灯 (38)7.4具体问题 (38)7.4.1电源灯不亮 (38)7.4.2屏幕不显示字符 (39)7.4.3屏幕显示字符不正确或字符扭曲 (39)7.4.4系统风扇转动不正常 (39)7.4.5硬盘驱动器的工作指示灯不亮 (39)7.4.6可引导光盘不能自引导 (40)1简介1.1 产品简介CDB-M系列存储服务器CDB-M-101服务器,采用新一代四核英特尔至强处理器,是一款高可靠性、易扩展的2U的双路服务器。

TMX Series Professional Matrix SwitchersTMX-0401MA混合矩阵Installation and Operation Manual安装及操作手册V 1.0重要的安全说明重要的安全说明1. 在安装和使用设备前请先仔细阅读本安全操作规程。
2. 请保存好您的安全操作指南便于以后作参考用。
3. 请遵守所有设备操作指南中的“警告”事项。
4. 须遵守各项操作指南中的规章原则。
5. 清洁设备:清洁设备之前,请先关闭设备电源,从插座中拔出设备插头,将各连接的系统单元拆分出来,清洁时请用干燥的软布擦拭。
6. 未经生产厂家同意,不要使用任何不匹配的附件配置,这都有可能引起危险事故。
7. 勿将设备置于潮湿的地方或靠近热源,以免发生危险。
8. 勿将设备放置在不稳固的台面上;在运输过程中避免设备遭受强烈振动而引起损坏,建议在运输前选用合适的包装或使用原包装。
9. 请勿阻塞设备上的通风开口,并保持室内的空气通畅,便于设备的维护。
10. 供电电压:AC 100V-240V 50 Hz/60 Hz11. 接地插头:三针接地插头12. 设备连接所需要的延长电缆线请绕道穿行,勿有重物挤压,这样能有效维护系统的正常工作。
13. 确保设备不被任意拆开机壳,也不允许任何硬质导体或液态物质残留在机壳内。
14. 设备有需要维护时,不要自行拆卸,请及时与距离您最近的台电售后服务中心取得联系。
15. 所有TAIDEN产品将提供一定期限(详见保修卡)免费保修,但人为损坏除外,例如:A. 设备因人为作用被摔坏;B. 因操作员操作不当而导致设备受损;C. 自行拆卸后而导致部分设备零件受损或丢失。
16. 用指定连接电缆线连接设备。
17. 设备长期不予使用时,请关掉电源,最好拔掉电源插头。
18. 在您收到货品时,请将附置的《保修卡》填妥,并邮寄到台电客户服务中心。
这个闪电标识,是提醒使用者设备内出现的未绝缘的危险电压可能会导致人遭受电击。

TM1000AGPS Based Network Time Server Installation and Operation ManualVersion 3.3TimeMachines Inc.300 South 68th Street Place, Suite 100Lincoln, NE 68510402-486-0511Engineered and Manufactured in Lincoln, Ne, USATable of Contents1 Introduction (4)1.1 Serial Number Notes: (4)2 Installation (5)2.1 Location (5)2.2 Connections (5)2.2.1 Antenna (5)2.2.2 Power (5)2.2.3 Network (5)2.2.4 Front Panel Indications (5)3 Configuration (6)3.1 Web Page – Default password is 'tmachine' (6)3.2 Default IP address is 192.168.1.15 (6)3.2.1 Version and NTP Lookups (7)3.2.2 Network Setup (7)3.2.3 Use DHCP (7)3.2.4 IPv4 Address (7)3.2.5 IPv6 Address (8)3.2.6 IPv6 Link Local (8)3.2.7 IPv6 Temporary (8)3.2.8 Mask HTTP access on Subnet (8)3.2.9 Mask NTP access on Subnet (8)3.2.10 Netmask (8)3.2.11 Gateway (8)3.2.12 MAC (8)3.3 Leap Second Settings (9)3.3.1 Current Leap Seconds (9)3.3.2 Leap Date (9)3.3.3 New Leap Seconds (9)3.4 Satellite Status (10)3.4.1 GPS Fix, Sats, and Time Information (10)3.4.2 Location (10)3.4.3 Satellite ID and Signal Strength (10)3.4.4 Echo GPS Strings Checkbox (11)3.4.5 Serial TTL Level Outputs Checkbox (11)3.4.6 Debug Output Checkbox (11)3.4.7 Unit Name (11)3.4.8 Password (11)4 Locator Data Query (12)5 Troubleshooting (13)5.1 GPS Lock (13)5.2 Finding the IP Address (13)5.3 Resetting to Factory Defaults (13)6 Specifications (14)6.1 Time Server Features and Specifications (14)6.2 GPS Module Specifications (14)6.3 Antenna Specifications (15)The Time Machines GPS Network Time Server is a simple to use GPS based time server that will supply accurate time for all computers and time keeping devices on the network. By placing a time server on the local network, (S)NTP time packets are provided without requiring systems to go to the Internet to get a Stratum 1 time synchronization. The system uses an active GPS antenna to maintain the current time as broadcast by United States GPS satellites. With this device installed on your local network, there is no longer the worry that if the Internet connection goes down, time synchronization is lost across the network.The unit is small and can be placed anywhere within the network layout. The built in high sensitivity GPS receiver is able to lock multiple satellites from within many buildings or from a window location, removing the requirement that outdoor antennas be installed.Setup and use of this time server is straightforward. Simply connect both the included power supply and the GPS antenna to the base unit and then connect the base unit to the local network. Go to a computer on the network and browse to the device at its default address to enter the software setup within the control box. Set parameters to match your network and the system will start to send out time packets to any device on the system that asks for an update from it. Two servers can be setup to provide redundancy and more capacity.When paired with our digital Power Over Ethernet (PoE) or WiFi clocks, synchronized time is assured no matter the state of your network, or the state of the internet time server the clocks are pointed to. Accuracy is also improved because the network delay of the internet is highly variable, while the local LAN connection is likely sub-millisecond delay.TimeMachines GPS based time servers are suited to any application where coordination of events at multiple locations is required. Without coordinated network time, searching for problems across multiple system logs becomes much more difficult. Education, industrial facilities, military installations, public safety command rooms, government, broadcasting, and hospitals are all candiates for synchronized time systems.1.1 Serial Number Notes:The TM1000A has been in the market a number of years and has undergone a couple of significant hardware revisions. The serial number on the bottom of of the unit will reveal the HW revision. Some features will be available for later models only.∙TM1000A serial numbers that start with a number or the letter 'A' use versions 1.XX of the firmware. Units that start with a number only, use the Navman GPS module. Units that start with the letter 'A' were updated to the Global Top GPS module when the Navman module becameobsolete.∙TM1000A serial numbers that start with the letter 'B' use version 2.X and greater of the firmware.The major change in this version was that a newer processor is used that supports a greatercode space and opportunities for feature increases.∙Failure to observe this will cause a failure in the programming and require the unit to be returned to TimeMachines for firmware update2.1 LocationTo receive GPS signals the Time Server's antenna must be located in a location where it can “see” the sky. The GPS module itself is highly sensitive and able to “see” the GPS satellite signals from within many structures. Multi-Story, concrete, or metal structures may block the GPS signals such that the antenna must be located elsewhere. In these cases, the GPS antenna may be located in a window, although some windows employ a coating to block solar radiation that will also block GPS signals. The Time Server box can be located anywhere on the network.All that is required is power and a wired network connection.In the worst case, an outdoor antenna may be required.2.2 Connections2.2.1 AntennaThe GPS antenna is connected through the circular female SMA connector on the rear of the Time Server. By default, the GPS antenna connection provides 3.3V to power the LNA in the GPS antenna. This is correct for the supplied GPS patch antenna with the magnetic base. This voltage can be changed with a jumper on the inside of the Time Server. The Time Server has to be opened up and the jumper moved.Jumper J2Jumper J8A: 5.0V B: 3.3V (default)A: Reset to Factory B: Normal OperationThe only time this jumper would be change would be to allow use of a different antenna that requires +5V for the LNA in the antenna, or to overcome the voltage drop of a longer cable run. This might be the case for an outdoor installation.2.2.2 PowerA multi-country +5V power supply is supplied with the unit. Connect one end to a standard 110-240V outlet and the barrel connector to the rear of the Time Server. The time server will begin trying to find the GPS satellites. On power-up, synchronization to the GPS satellites will take several minutes. No battery backup of position is provided to allow for a warm start so the Time Server is always starting from scratch in determining its location to achieve GPS lock.2.2.3 NetworkConnect the 10/100 RJ45 port on the back of the Time Server to a network connection. Verify that the network settings are correct for your system. See the configuration section of this manual for more information on doing this.2.2.4 Front Panel IndicationsThe front panel of the Time Server is very basic in its appearance. Three LEDs show the current status of the unit. The POW indicator indicates that the unit is receiving power through its wall power supply. The LOCK indication indicates that the GPS has located at least three satellites. The SEC LED will blink each second showing that the GPS module is now synchronized to the GPS time signals.3 Configuration3.1 Web Page – Default password is 'tmachine'3.2 Default IP address is 192.168.1.15All Time Server parameters are accessed on the configuration web page. The page can be accessed by pointing any web browser at the IP address of the Time Server. The initial IP address is 192.168.1.15 from the factory. It can also be found by connecting a straight RS-232C serial cable to the back of the Time Server and a computer running a terminal program at 115200,N81.Illustration 1: Login Web PageIllustration 2: Setup Web Page-Version, Lookups, and Network Setup3.2.1 Version and NTP LookupsStarting in version 2.6, the upper header was updated to include the firmware version, and a running counter of NTP lookups. This counter increments by 1, for each NTP time requested by a client device on the network. Please make a note of the Firmware version before calling TimeMachines for technical support.3.2.2 Network SetupBy default the network parameters are setup to static address 192.168.1.15. The Time Server is able to use DHCP, but the rest of the network will need to be able to automatically adjust to its IP address should it change. This would involve setup with DHCP and DNS systems. Usually, static setup is recommended. Addresses in the Network section must be entered in IPv4, dotted quad, format.All Network parameters require a restart to take effect.3.2.3 Use DHCPChecking this option will tell the Time Server to ignore the other IP address settings and request an IP address from the network's DHCP server at startup.3.2.4 IPv4 AddressIf the DHCP option is not being used, then the IP address of the unit set to by entering a standard IPv4dotted quad in this field. 192.168.1.15 or 10.10.0.96 are examples of acceptable formats for this field.3.2.5 IPv6 AddressThis is the 128 bit IPv6 address of the device either statically entered of determined by DHCP. The first 64 bits indicate the network address and the last 64 bits are user defined for their network. Please note that a user should still setup the device initially using IPv4. They can then set an IPv6 address and/or view the IPv6 temporary. The web page can be accessed using an IPv4 and/or IPv6. TheTM1000 will respond to Ping, Ping6, rdate and rdate -6.3.2.6 IPv6 Link LocalThis address is only valid for communications within the network segment (link) and is required for stateless address auto-configuration. Neighbor Discovery Protocol is part of the IPv6 protocol and uses stateless address auto-configuration. This address begins with prefix fe80::/64. The last 64-bits are based on the MAC address of the TM1000. This address is unique to each TM1000 and not modifiable.3.2.7 IPv6 TemporaryThis is a default address based on the network address and the MAC address. The TM1000 uses Neighbor Discovery Protocol to find the network address. The last 64-bits are based on the TM1000's MAC address. This address is unique to each TM1000 and not modifiable. The TM1000 will default to this address to serve time if the IPv6 address has not been set, otherwise the modifiable IPv6 address is used to serve time.3.2.8 Mask HTTP access on SubnetThis checkbox will enable HTTP (web browser) access only on the timeservers configured subnet. This has the effect that the TM1000A will only respond to requests for the web page if they come from the same subnet the TM1000A is configured on. This is a security feature to limit the access to the configuration of the device only to the local subnet.3.2.9 Mask NTP access on SubnetThis checkbox will enable NTP access only on the timeservers configured subnet. This allows the time server to ignore requests for time from all devices that are not on the same subnet and provides a measure of security and protection from denial of service attacks.3.2.10 NetmaskThe Netmask entry determines what addresses on on the local network and what addresses are reached through the Gateway. Typical Netmasks are 255.255.0.0 or 255.255.255.0. Consult the network administrator for more information on who this entry should be set.3.2.11 GatewayThe Gateway IP address is used when a destination address is determine to not be on the local network. Consult the network administrator for this setting.3.2.12 MACThis is an information only field and displays the MAC address of the Time Server.3.3 Leap Second SettingsVersion 3.3 of the TM1000A firmware added setup to allow the next leap second to be reported to client devices. Its setup is done through the next three entries. As of the writing of this document, the last leap second was on December 31st, 2016 at midnight (1483142400 seconds after Unix epoch date of January 1, 1970). It went from 36 leap seconds, separating atomic time from UTC, to 37 seconds. These are the default settings for the device. These should NOT be changed until another leap second is announced.Correct values for these settings will be posted on the FAQ of our website when the next announcement occurs. When that occurs, the Current Leap Seconds setting will be changed to 37, the Day adjusted to midnight of the day it will occur (always June 30th, or December 31st), and the New Leap Seconds setting will be updated as well to the new number of leap seconds. There is some thought that the next leap second may be negative due to the earths rotation slowing. Both positive and negative leap seconds are supported through this interface. NTP will report the entire day of the leap second whether it is a positive or negative second change. Both will adjust appropriately for the lost or additional second at midnight UTC time.3.3.1 Current Leap SecondsThis is the number of leap seconds prior to the next leap second change. The last leap second was added on December 31st, 2016 (1483142400 Unix time) and when from 36 to 37 leap seconds. This value will be changed to 37 when the next leap second is announced, whether it is a positive or negative second.3.3.2 Leap DateThe Unix epoch date of January 1, 1970 is used for setting the date for the next leap second. It will be either December 31st or June 30th of some year. Right now there is no leap second announced. The same web page entry time scale is used in our TM2X00 products.3.3.3 New Leap SecondsDepending on whether the next leap second announced is positive or negative, will determine the value of the New Leap seconds. If the earth continues to slow, its value may be 36. If it speeds up, it may be 38. Time will tell.3.4 Satellite StatusThe second half of the Time Server configuration page is status information from the GPS module in the Time Server.3.4.1 GPS Fix, Sats, and Time InformationThe “GPS Fix:” label will state whether the GPS is locked to satellite signals or not. A “2D LOCK” is required for operation, however a 3D Lock is preferred. Antenna location and obstructions will govern this. The early stages of a 2D lock may have timing errors that will clear as the lock improves. A 3D Lock will provide the most stable timing, however a strong 2D lock is sufficient to obtain accurate NTP time.GPS Sats is the number of Satellites currently being used by the GPS for its lock algorithm.GPS Time is updated on each page refresh and shows a static representation of UTC time at the time page was refreshed from the GPS module.3.4.2 LocationThis shows the current Latitude and Longitude of the GPS receiver3.4.3 Satellite ID and Signal StrengthThe “Signal Strength” line will give the signal strength of the top 12 satellites being received. The possible range is from 0 to 99dB SNR. The TM1000A will use as many satellites as it can receive for the greatest possible accuracy. Satellite signals in mid to upper 30's for first 2-3 satellites is best. Signal strengths below 30 will create lock inconsistencies and potential timing problems. TheTM1000A must have a signal lock to serve time. An inconsistent lock, can create inaccurately reported time.3.4.4 Echo GPS Strings CheckboxChecking this option will tell the unit to copy all received data from the GPS module's serial port to the serial port on the back of the Time Server. The copied strings are the standard NMEA GPS data strings.3.4.5 Serial TTL Level Outputs CheckboxChecking this option will enable the TTL level outputs of the serial port. These are found on Pins 7, 8, and 1. To receive the actual NMEA strings, the “Echo GPS Strings Checkbox” must be checked.Pin 1 is the 1 PPS signal at TTL (+3.3V) levelsPin 2 is RS232 TX pin and will be the output from the GPS module, NMEA strings (DCE pinout)Pin 3 is the RS232 RX pin (DCE pinout)Pin5 is signal ground.Pin 7 is the data from the GPS module at TTL Levels and is the same as Pin 2 which is at RS-232C levelsPin 8 is data the RX data from the RS-232 serial port Pin 3.Data received on pins 3/8 is NOT echoed to the GPS module. No GPS settings can be changed from this port as it is blocked by the processor.3.4.6 Debug Output CheckboxThe debug output checkbox will tell the unit to output debug and operational information to the serial port.3.4.7 Unit NameThis can be any alpha numeric name up to 20 characters long.3.4.8 PasswordThe password field displays the current password. To change it, enter a new password, push Save and then Reboot for it to take effect. Time Server passwords are limited to12 characters. The default password is “tmachine”4 Locator Data QueryStarting in version 2.6, the Locator service employed by TimeMachines clock products is also included in the TM1000A. This makes it easier to manage and monitor a time system on a local network using the TM-Mangaer software. See the TM-Manager documentation for more information on this feature. Locator Data FormatThe Locator Data Service is a simple UDP/IP protocol that can be used by other network applications to extract status and location information from the TM1000A.Requesting information from the TM1000A is done by sending a 3 byte message to the TM1000A, using UDP/IP, to port 7372. The three bytes, in hexadecimal, are: 0xA1 0x04 0xB2 The TM1000A will also respond to a broadcast to the same port.The response packet is 80 bytes and will be formatted as follows:Bytes Description0TM1000A response value = 0x041 to 4client IP address5 to 10MAC address11 and 12firmware version Major:Minor13Lock status 0=No Lock, 1=2D Lock, or 2=3D Lock14 to 17NTP Sync count, 32 bits, MSB to LSB18 to 20Current Time, H:M:S, UTC21 to 45Location of unit 25 bytes, Latitude, Longitude, null terminated46 to 80Name of Time Server, null terminatedTM-Manager uses this protocol to find a monitor TM1000A's on the network. A Wireshark capture of that software can be used to see an example of the data transfer.5 Troubleshooting5.1 GPS LockGetting GPS lock on the Time Server is required for it to function. Most GPS lock issues come down to issues with Antenna location, or cabling. If there are problems getting GPS lock (I.e.the Lock LED doesn't turn on and the 1 PPS LED doesn't flash each second) trying moving the antenna outside and see if that resolves the issue. If it does, try a window and see if lock is maintained. If that works, move the antenna back to its original location and see if lock is lost. This will help determine where lock can be received and where it cannot. If no lock is achieved outdoors, then something is either wrong with the cabling or the Time Server itself. Contact Time Machines for help.5.2 Finding the IP AddressIf the IP address of the Time Server is forgotten, there are a few ways to go about finding its IP address. The first is to use a serial terminal program such as Hyper-Terminal or something similar. Set the communications parameters of the terminal program to 115200,N81. Connect a straight through cable between the computer and the Time Server and cycle power on the Time Server. The IP address is printed during startup.If the Time Server is using DHCP, then it is possible to look up the units IP address on the DHCP server by looking at the list of leases. Look for a MAC address in the lease list that starts with 00:50:C2. This will likely be unique in the DHCP lease list. The IP address associated with this MAC address should be tried.The third possible way to determine the IP address is to simply check several of the devices using the Time Server on the network to see how they are programmed. If they have a specific IP address programmed into them for time keeping, then that may be the Time Server's base IP address. If a domain name has been assigned to the Time Server, doing a command like “ping ” might show the time servers address as well.The TM-Manager application is a great way to monitor all TM1000A's on a network.5.3 Resetting to Factory DefaultsJumper J8A: Reset to Factory B: Normal OperationJumper J8 on the inside of the TM1000A is used to reset the units software settings to factory original. This is useful when a password is forgotten or the IP address cannot be determined. To do this, remove the 4 screws from the front panel. With some care, the jumper can be reached from the front of the unit without removing the PCB. Move J8 to the “A” position and apply power. After a few seconds, remove the power connection, replace J8 to the “B” position and reassemble the unit. It should now have the factory default password and IP address information.6 Specifications6.1 Time Server Features and Specifications•Receive time information from GPS satellites anywhere on the surface of the earth•RFC1119/1305 NTP Protocol to serve time (Network Time Protocol)•RFC1769/2030/4330 SNTP Protocol (Simple Network Time Protocol)•Server Time Level: Stratum 1•Server Time Precision: better than 5mS + network jitter.•All networked computing platforms support time synchronization either natively or with add on drivers including: Windows, Macintosh, and Linux. Many other devices can access the device as well including V oIP phones and digital clocks.•10M/100M adaptive network interface•Unit is capable of serving 135+ synchronizations per second. That provides support for over 120,000+ devices updating every 15 minutes on the network.•Active Patch GPS antenna included. Magnetic base.•Compliant with FCC Part 15, class B and CE marked for radiated emissions. Lead free.•Power Requirements: less than 4 Watts continuous.•Environmental Requirements: Commercial temperature range, -40C to +70C, 95% humidity non-condensing. Altitude -304m to 18,000m. Startup temperate is around -20C.•Networking: Static or DHCP IPv4 addressing. Standard browser interface for setup.•Serial port supports both RS-232C levels and TTL (+3.3V) outputting standard NMEA information strings, as well as the 1PPS signal at TTL levels. TTL signals can be turned off via software control.•Indications: Power, GPS Signal Lock, and 1PPS indications•Rear Connections: Power, Cat5 Ethernet, Serial, and GPS antenna via SMA connection.Supports +3.3V and 5V active GPS antennas with internal jumper setting.•Mechanical Dimensions: 5 in. x 4.2 in. x 1.3in.6.2 GPS Module Specifications•Based on SiRF GSC3e Lpx chipset.•20 channel low power receiver module•Sensitivity: -144dBm, C/N0=26dBHz•GPS Time Precision: <1us, typical +/- 300ns ref UTC.•Antenna Connection: 1575.42MHz (L1 Band) at a level between -135dBm and -159dBm into50 Ohm impedance. Maximum input return loss is -9dB.•TTFF (Time To First Fix)•Cold start @-125dBm typically 33 seconds•Re-acquisition (<10s obstruction) typically 1 second6.3 Antenna Specifications•Active patch antenna with magnetic base.•Size: 1.57 in. x 1.89 in. x 0.51 in thick, 43 grams.•Amplifier: LNA +20dB Noise: 1.5dB VSWR: 2.0 V oltage: 2.7-6.0V.•Cable: RG174, 5m length, SMA male.•Environmental: -40 to +85C•Waterproof to IPx6(Specifications are subject to change without notice)。

保护装置单体调试指南咱搞这个保护装置单体调试啊,就跟伺候一个难搞的小物件儿似的。
我一到那设备跟前儿,就瞅见那一堆线路啊、接口啥的,跟乱麻似的缠在一块儿。
我这心里就想啊,这可咋整呢?我就蹲在那儿,眼睛瞪得老大,像个铜铃似的,仔细瞧着那些个线路。
旁边有个小年轻的同事,过来问我:“哥,这从哪儿下手啊?”我瞅他一眼,说:“这就跟你找路似的,先把那大路摸清咯。
”他似懂非懂地点点头。
我就开始顺着那些大线路找,这时候手可得稳啊,稍微抖一下,指不定就碰错啥地方了。
我那手指头啊,就跟那探雷针似的,小心翼翼地在那些线路上摸索着。
这时候,机房里静悄悄的,就听见我自己的呼吸声,还有那设备发出的微弱的嗡嗡声,这气氛啊,紧张得很。
等我找到一个接口的时候,我就跟发现新大陆似的,乐了起来。
我喊那个小年轻的:“小子,过来看看,这就是个关键地儿。
”他凑过来,眼睛里满是好奇。
我就跟他说:“调试这玩意儿啊,就像解谜题,每个接口、每个线路都有它的秘密。
”然后我就拿出工具,那工具在我手里啊,就跟战士手里的枪似的,得用得顺手。
我一边操作,一边嘴里还嘟囔着:“你这个小装置啊,可得听话,别给我出啥幺蛾子。
”那小年轻的在旁边看着,时不时地问个问题,我就不耐烦地回他:“别急别急,等我弄完这一步再说。
”有时候啊,这调试就不那么顺利。
我在那儿弄了半天,那设备就是没个反应。
我就有点上火了,眉头皱得死死的,脸也憋得通红。
我就对着设备说:“你这是咋回事儿呢?我都这么伺候你了,你还不乐意了?”那小年轻的在旁边想笑又不敢笑。
我又重新检查那些线路,就跟给病人做全身检查似的,一个地方都不放过。
这时候我就想啊,这设备有时候就跟人一样,得慢慢琢磨它的脾气。
我又在心里给自己打气:“我就不信搞不定你。
”等我终于找到问题所在的时候,那感觉就像是打赢了一场仗似的。
我高兴得直跺脚,还跟那小年轻的说:“看,这就是经验,遇到问题啊,不能慌,得慢慢找。
”那小年轻的佩服得五体投地,一个劲儿地点头。

ZM101-单相计量模块说明书V1.0ZM101单相计量模块使用说明书青岛智物酷联科技有限公司版本修改说明版本号修改记录V1.0创建文档目录一模块介绍 (4)1 模块简介 (4)2 模块特性 (4)二模块功能接口介绍 (5)1 模块整体模型图 (5)2 模块引脚功能 (5)三模块硬件设计参考电路 (6)1 模块整体硬件设计模型图 (6)2 电源电路设计 (7)3 485通信电路设计 (7)四模块软件应用 (8)1 DL/T645-2007协议简述 (8)五总结 (13)一模块介绍1 模块简介ZM101系列多功能高精单相专用计量模块,模块集成模块sigma-delta ADC,参考电压电路以及所有功率,能量,有效电压,电流,功率因数以及频率测量的数字信号处理等电路,能够准确测量有功功率,有功电量,无功电量,视在电量,同时还能测量电压,电流,功率,功率因数等各种电参数。
满足用户对电力检测的各项要求。
集成MCU和计量专用芯片,用户应用简单方便,只需通过UART就可以和模块进行通信,获得电相关参数信息,方便开发设计,简化设计难度,为产品尽快上市提供帮助。
2 模块特性高精度,在输入动态工作范围5000:1内,分线性测量误差小于1% 有功测量满足0.5级,支持IEC62053-22:2003,GB/T17215.322-2008 提供基波有功功率,电能,电压,电流有效值输出提供有功功率及其电能计算提供功率因数,相位角信息输出提供电压,电流有效值计算,在500:1动态范围,有效值精度优于0.1% 提供有功反向指示提供UART通信接口,TTL工作电平,通信波特率2400-9600可调内置通信协议,支持645协议二模块功能接口介绍1 模块整体模型图2 模块引脚功能特性功能描述引脚编号引脚名称1 VCC 输入模块电源引脚。
工作电压:5V. 推荐:.该引脚可接10UF/10V电容并联100NF/10V瓷介电容进行去耦2 VBATT 输入时钟电压引脚.工作推荐电压:3V3 GND 参考地数字电源地4 P0 输入/用户可编程IO口.推荐:不使用时悬空输出5 P1 输入/用户可编程IO口.推荐:不使用时悬空输出6 P2 输入/用户可编程IO口.推荐:不使用时悬空输出7 RD 输出用户采用485通信时配合UART使用,485通信发送接收选择端口。
保护装置单体调试指南
《保护装置单体调试指南》
嘿呀,咱今天就来讲讲保护装置单体调试这档子事儿。
就说有一次啊,我去调试一个保护装置。
那场面,就跟要上战场似的。
我带着各种工具,小心翼翼地靠近那个装置,心里还默默念叨着:“宝贝儿啊,你可得好好配合我呀!”我先把那些线头啊、接口啊啥的,仔仔细细地检查了一遍,生怕有一丁点儿问题。
然后呢,我就开始通电啦。
哎呀,这时候可紧张了,就像等待开奖一样,不知道会出现啥情况。
结果呢,这装置还真就给我出了个小难题,有个指示灯就是不亮。
我这心里就开始犯嘀咕了:“这咋回事儿呀?”我就开始围着它转圈圈,东瞅瞅西看看,就跟找宝藏似的。
接着我又开始排查各种线路,一根一根地看,嘿,还真让我发现有根线好像有点松。
我赶紧把它拧紧,再一通电,嘿,那指示灯欢快地亮起来啦!就像小孩子得到了糖果一样开心。
这调试的过程啊,就跟照顾一个小婴儿似的,得特别细心、耐心。
每一个小细节都不能马虎,要不然它就给你闹脾气。
不过呢,当你成功调试好一个保护装置的时候,那种成就感,那可真是没法形容,感觉自己就像个超级英雄!
总之呢,保护装置单体调试就是这么个事儿,得认真对待,细心琢磨,才能让这些装置乖乖听话,为我们的安全保驾护航呀!哈哈!。
SMAT-M100 电力综合仪表安装和操作手册(软件版本:V3.0)北京华东西瑞电气有限公司BEIJING HUADONG —XIRUI ELECTRIC CO. , LTD.编写:审核:批准:目录第一章概述 (1)第二章安装说明 (3)第三章功能简介 (8)第四章基本操作 (11)第五章技术规格 (20)第一章概述高性能的电力综合仪表SMAT-M100仪表是一种功能强大的三相电力综合仪表,它集遥测、遥信、遥控、显示、通讯等功能于一体,具有功能齐全,经济实用、可靠性高、抗干扰能力强等众多优点,可完全取代常规的模拟式电表,代替大量单个的变送器和仪表,广泛应用于各种电力自动化系统。
SMAT-M100综合电力仪表SMAT-M100仪表通讯功能强大,具有光电隔离的RS-485通讯接口,Modbus通讯协议,通讯速率为300-19200bps可设定,通过双绞屏蔽电缆联接(最长为1200米),一条通讯链路最多可连接128台SMAT-M系列仪表。
通过面板按键可将SMAT-M100仪表设定为Y、△等多种接线方式而无须进行端子接线的改动。
继电器输出:●支持本地控制与远端控制●整定继电器输出条件●整定继电器的动作时间开关量输入:●支持对外部节点的状态监测仪表显示和测量SMAT-M100仪表提供了几十种高精度实时三相测量参数和状态参数,所有参数均能通过面板显示屏或仪表通讯口获得.独特灵活的显示面板SMAT-M100配有高亮度荧光显示面板,电压、相别、电流、电能参数同时显示三相电压或电流值也可同时显示。
SMAT-M100仪表面板上有三个薄膜按键,用于观察所有测量参数和状态信息,或者用于编程功能。
SMAT-M100仪表基本设置参数的编程可以通过面板快速而简便地完成。
基本参数包括电压和电流变比、仪表地址、波特率、接线方式等。
所有的设置和信息断电后均能保存,所有编程都有密码保护。
第二章安装说明2.1 安装注意事项2.1.1 电气环境●安装SMAT-M100仪表时必须保证仪表的可靠接地,保护端子(SHLD/FG)作为SMAT-M100仪表地保护地,同时连接外壳,必须使用良好的导线连接到开关装置的地,以使噪音抑制和瞬间保护电路和功能能正常发挥。
目录安全上的注意----------------------------------------------- 3壹、PT-1161简介 ------------------------------------------- 41.1主要用途及使用范围 ------------------------------------- 41.2主要功能特性 ------------------------------------------- 41.3正常工作条件 ------------------------------------------- 41.4主要规格及技术参数 ------------------------------------- 4贰、下位机液晶屏操作指南---------------------------------- 5-9 2.1 开机后直接进入测试界面--------------------------------- 52.2测试参数设置界面一 ------------------------------------- 5-6 2.3测试参数设置界面二 ------------------------------------- 62.4测试参数设置界面三 ------------------------------------- 6-7 2.5查看界面 ----------------------------------------------- 72.6系统参数设置界面一 ------------------------------------- 7-8 2.7系统参数设置界面二 ------------------------------------- 82.8 测试的过程--------------------------------------------- 8-9 叁、上位机软件操作指南------------------------------------ 10-153.1 联机--------------------------------------------------- 10 3.2 校准--------------------------------------------------- 10-11 3.3 编辑试品信息------------------------------------------- 11-12 3.4 编辑测试方法------------------------------------------- 12-13 3.5 报表设置----------------------------------------------- 13-14 3.6 试验步骤----------------------------------------------- 14-15 3.7名词解释及使用技巧 ------------------------------------- 15 3.8附加功能 ----------------------------------------------- 15 肆、品质保证---------------------------------------------- 15-16 伍、备注--------------------------------------------------- 17安全上的注意1.安全上的記號:在本手冊中,關於安全上的注意事項以及使用儀器時有下列重要的各顯示事項,爲了防止意外事故及危險,請務必遵守下列危險、警告、注意的記言:危險:此顯示的項目,表示爲如不遵照操作者有可能受到傷害。
TM101单通道保护表调试指南
对于TM101表的现场调试仅限于设置报警(Alert)、连锁(Danger)值的更改与设定,其它操作必须经过派利斯公司同意方可进行!
调试步骤如下:
一、正确接线;
二、卸下TM表上的小标牌(印有技术参数的白色小标牌);
三、按照下图对照进行操作:
一)、将“开关1”置于“Set”(下);
二)、将“开关2”置于“Alert”(上)调节“电位器1”,设置报警值;
三)、将“开关2”置于“Danger”(下)调节“电位器2”,设置连锁值;
四)、将“开关1”置于“Normal”(上),安装好小标牌。
四、计算报警、连锁值的方法:
一)、使用派利斯公司的显示器,可直接根据显示器读数进行设置;
二)、使用万用表,则根据电流值,其方法为“4~20mA”与“0~满量程”之间的线性对比计算:
报警值电流读数=4(mA)+16①(mA)×报警值②/满量程③
连锁值电流读数=4(mA)+16(mA)×连锁值④/满量程
例如:TM101的满量程为50mm/s,报警值为12,连锁值为25,则设置时两电流读数分别为:
报警值电流读数=4+16×12/50=7.84mA
连锁值电流读数=4+16×25/50=12mA
*注意事项:1、设置完成后,必须将“开关1”置于“Normal”状态(上);
2、根据现场环境振动噪音强弱不同,可对“报警值”、“连锁值”进行适当调
整;
3、操作过程中,必须严格防止铁屑等杂物落入表内。
①16=20-4;
②根据用户需要而定;
③根据仪表参数而定,现场不能更改;
④根据用户需要而定。
TM101单通道保护表的安装
一: 安装步骤:
TM101单通道保护表的安装一般分为两大步骤:
1 探头的安装
2 各仪表元件之间的正确接线
二: 探头的安装
探头的安装一般是在机壳上作一个φ30mm的平台,在平台上开一个M6的螺孔,将探头固定在螺孔上,无需对机器内部进行任何操作.
三: 正确接线(参照TM101现场接线图)
1 探头安装好后,红色电缆接A/P端,白色电缆接B/S端.
2TM101表的4-20mA输出端子与上位机PLC或DCS联接,也可以接现场数显表.
3TM101表的RESET/BYPASS 端子与公共端COM用于遥控报警复位.
4TM101表的报警端子(ALERT)和联锁端子(DANGER)接报警连锁装置.
5TM101表的电源端子(POWER)与电源相联.当所有线路联接好后,接通电源.发现OK灯亮了,说明联接正确.如果OK不亮,则检查电路电缆联接是否正确,直到OK指
示灯亮为止.
TM101现场接线图。