如何进行配置更新V2
- 格式:pdf
- 大小:1.17 MB
- 文档页数:10

华为v2路由器使用说明书华为v2路由器使用说明书华为v2路由器是一款高性能、智能化的家用网络设备。
它具有强大的信号覆盖能力、稳定的网络连接和丰富的功能,能够满足用户对高速上网、安全稳定的网络环境的需求。
本文将为您介绍华为v2路由器的操作方法和注意事项,帮助您更好地使用和管理您的家庭网络。
1. 连接与设置首先,将华为v2路由器正确地接入电源,并使用网线将路由器与宽带猫进行连接。
一般情况下,路由器电源指示灯应亮起,表示已成功供电。
接下来,使用电脑或手机等设备连接到与路由器同一局域网的Wi-Fi信号中。
打开浏览器,在地址栏输入路由器的默认IP地址(如192.168.3.1),按下回车键。
2. 设置管理密码首次登录路由器管理界面时,系统会提示您设置一个管理密码。
请设置一个强度较高的密码,并妥善保管,确保网络安全。
3. Wi-Fi设置进入路由器管理界面后,您可以点击“无线网络设置”进行Wi-Fi 网络的配置。
您可以设置Wi-Fi的名称、密码、频段等参数。
建议设置一个易于记忆,但难以被他人猜测的密码,以保护您的网络安全。
4. 客户端管理通过页面的“客户端管理”功能,您可以查看已连接到路由器的设备列表,并管理这些设备的接入权限。
您可以设定策略,限制某些设备的上网时间或屏蔽某些设备的接入。
5. 家长控制华为v2路由器还具备优秀的家长控制功能。
在“家长控制”界面中,您可以设置特定时间段内,指定设备无法访问特定网站。
这个功能特别适用于家庭环境中有学生的家庭,可以帮助培养孩子良好的上网习惯。
6. 云端管理华为v2路由器支持云端管理功能,通过手机应用或电脑客户端,您可以远程管理您的路由器。
无论您身在何处,都可以随时随地对网络进行优化、调整设置,非常方便。
7. 更新和安全为保障您的网络安全,及时检查并安装路由器的软件更新非常重要。
在路由器管理界面的“系统工具”中,您可以检查软件的最新版本,并进行升级。
此外,建议您启用防火墙和WPA2加密等安全设置,以最大程度地保障网络安全。
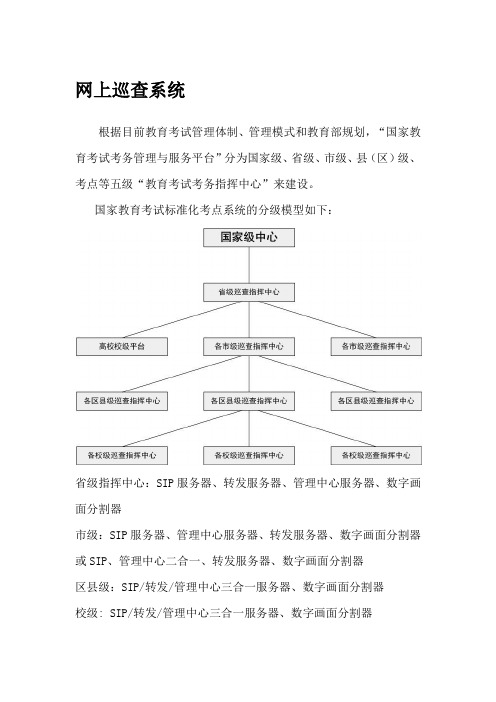
网上巡查系统根据目前教育考试管理体制、管理模式和教育部规划,“国家教育考试考务管理与服务平台”分为国家级、省级、市级、县(区)级、考点等五级“教育考试考务指挥中心”来建设。
国家教育考试标准化考点系统的分级模型如下:省级指挥中心:SIP服务器、转发服务器、管理中心服务器、数字画面分割器市级:SIP服务器、管理中心服务器、转发服务器、数字画面分割器或SIP、管理中心二合一、转发服务器、数字画面分割器区县级:SIP/转发/管理中心三合一服务器、数字画面分割器校级: SIP/转发/管理中心三合一服务器、数字画面分割器、流媒体服务器监控系统的组成:1、前端设备2、编码设备3、传输设备4、解码设备5、存储设备SIP、转发、管理中心三合一服务器包含有SIP模块、转发模块和管理平台模块。
巡查系统管理平台是整个系统的控制中心,包括用户认证软件、路由控制等模块,系统内各种设备在运行时都会登陆到注册中心上,根据注册信息更新中心数据库中的相关字段,调度模块协调系统内相关设备间的通信流程,完成系统域、子域、用户、设备的管理,这里的域、子域主要是指寻查中心及其下属寻查中心,用户主要包括系统管理员和远程客户端,设备主要是指SIP网关、转发服务器以及流媒体服务器等。
SIP服务功能:SIP网关可以看做SIP的服务器代理,系统内的所有终端都都通过它接受SIP的后台服务,SIP网关也是上下级巡查中心间实现控制信令交互的关键,上下级巡查中心都是SIP网关实现控制信令的通信。
转发服务功能:多个用户并发访问同一个音视频流资源的情况下,为了减轻视频编码设备的压力和节约网络带宽,通过视频转发模块与视频编码设备建立单路连接,然后采用组播、分发或广播的方式将音视频流转发给用户,提供了多级转发、带宽自动适应等功能。
数字画面分割器数字画面分割器是嵌入式设备,通过网络输入,2路VGA输出。
数字画面分割器能将巡查图像和视频会议图像进行解码输出到电视墙上,支持2×1、2×2、2×4、2×6、2×10、2×13、2×16等画面分割模式。
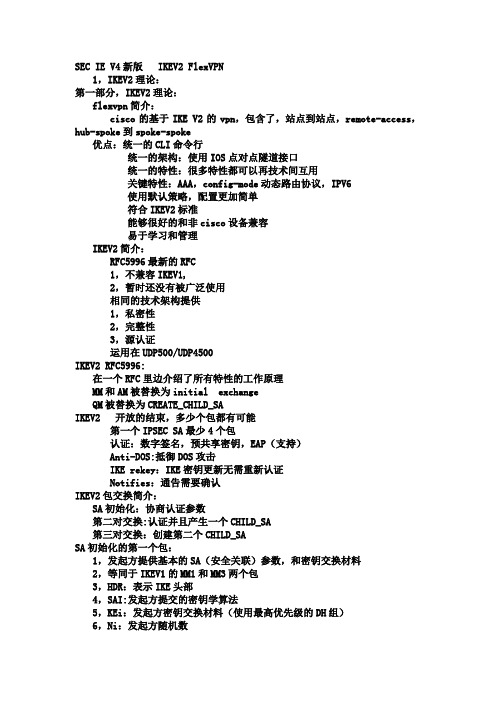
SEC IE V4新版 IKEV2 FlexVPN1,IKEV2理论:第一部分,IKEV2理论:flexvpn简介:cisco的基于IKE V2的vpn,包含了,站点到站点,remote-access,hub-spoke到spoke-spoke优点:统一的CLI命令行统一的架构:使用IOS点对点隧道接口统一的特性:很多特性都可以再技术间互用关键特性:AAA,config-mode动态路由协议,IPV6使用默认策略,配置更加简单符合IKEV2标准能够很好的和非cisco设备兼容易于学习和管理IKEV2简介:RFC5996最新的RFC1,不兼容IKEV1,2,暂时还没有被广泛使用相同的技术架构提供1,私密性2,完整性3,源认证运用在UDP500/UDP4500IKEV2 RFC5996:在一个RFC里边介绍了所有特性的工作原理MM和AM被替换为initial exchangeQM被替换为CREATE_CHILD_SAIKEV2 开放的结束,多少个包都有可能第一个IPSEC SA最少4个包认证:数字签名,预共享密钥,EAP(支持)Anti-DOS:抵御DOS攻击IKE rekey:IKE密钥更新无需重新认证Notifies:通告需要确认IKEV2包交换简介:SA初始化:协商认证参数第二对交换:认证并且产生一个CHILD_SA第三对交换:创建第二个CHILD_SASA初始化的第一个包:1,发起方提供基本的SA(安全关联)参数,和密钥交换材料2,等同于IKEV1的MM1和MM3两个包3,HDR:表示IKE头部4,SAI:发起方提交的密钥学算法5,KEi:发起方密钥交换材料(使用最高优先级的DH组)6,Ni:发起方随机数接收方回应的包:1,响应方发回一个可以接受的参数,并且附上密钥交换材料和可选的证书请求2,等同于IKEV1的MM2和MM4包3,HDR:IKE头部4,SAr:被响应方选择的密码学算法5,KEr:响应方密钥交换材料6,NR:响应方随机数7,CertReq:证书请求(可选)一二个包做第一阶段的策略协商,和DH密钥交换IKE认证:1,与穿件child SA相关的认证材料和参数等同于IKEV1的MM5和QM的第一部分2,SK:负载被加密并完整性保护3,IDi;发起方ID4,Cert:发起方证书(可选)5,CertReq:证书请求(可选)6,IDr:期望的响应者ID(选项)7,AUTH:发起方的认证数据(如果发起方使用EAP认证,这个字段就不存在)8,转换集和流量选择器(感兴趣流)information exchanges1,用户日常事务管理删除通告活动性价差初始化联系故障报告(各种通告,例如:在kei中的DH组不可接受)必须确认,将会重传,直到放弃,被安全保护的,仅仅在initial exchange之后用于configuration exchange,类似于IKEV1的mode-configEAP:1,使用EAP替代X-AUTH2,EAP认证框架,提供了多种认证方式3,隧道级EAP_TLS,EAP/PSK,EAP-PEAP4,无隧道(推荐):EAP-MS-CHAPV2,EAP-GTC,EAP-MD55,作为IKE-AUTH交换的一种增强6,仅仅用于让响应放认证发起方7,响应方必须使用证书认证8,会适当增加包数量(12-16)第二部分:2.1标准IOS vs ASA crypto MAPASA不能做隧道级VPN实验拓扑:IOS:配置IKEV2 policy (可选)Branch上配置:crypto ikev2 proposal yeslab-IKEV2-Proposalencryption 3des aes-cbc-256integrity sha256 sha512group 2 5 14策略是排列组合:crypto ikev2 policy yeslab-IKEV2-Policyproposal yeslab-IKEV2-Proposal查看默认的策略:配置预共享密钥:crypto ikev2 keyring yeslab-keyringpeer Center-ASA (名字只是一个标示)address 61.128.1.1pre-shared-key yeslab-pre-key配置ikev2 profile:crypto ikev2 profile yeslab-ikev2-profilematch identity remote address 61.128.1.1 255.255.255.255 identity local address 202.100.1.1authentication remote pre-shareauthentication local pre-sharekeyring local yeslab-keyring配置转换集:(可以配置多个)crypto ipsec transform-set trans esp-des esp-md5-hmacmode tunnelcrypto ipsec transform-set trans2 esp-3des esp-sha256-hmac mode tunnel (默认是隧道级)查看默认transform:配置感兴趣流:ip access-list extended yeslab-vpn-trafficpermit ip 172.16.1.0 0.0.0.255 10.1.1.0 0.0.0.255配置crypto map:crypto map yeslab-crypto-map 10 ipsec-isakmpset peer 61.128.1.1set transform-set trans trans2set ikev2-profile yeslab-ikev2-profilematch address yeslab-vpn-traffic在接口上调用:interface FastEthernet0/0ip address 202.100.1.1 255.255.255.0crypto map yeslab-crypto-map在防火墙上的配置:在outside接口激活IKEV2crypto ikev2 enable outside配置ikev2 policy:crypto ikev2 policy 10encryption aes-256 desintegrity sha256 shagroup 2 1prf sha256 shalifetime seconds 86400配置tunnel-group:tunnel-group 202.100.1.1 type ipsec-l2ltunnel-group 202.100.1.1 ipsec-attributesikev2 remote-authentication pre-shared-key yeslab-pre-keyikev2 local-authentication pre-shared-key yeslab-pre-key配置转换集:crypto ipsec ikev2 ipsec-proposal yeslab-transprotocol esp encryption aes-192 desprotocol esp integrity sha-1 md5配置感兴趣流:access-list yeslab-vpn-traffic extended permit ip 10.1.1.0 255.255.255.0 172.16.1.0 255.255.255.0配置crypto map:crypto map yeslab-crypto-map 10 match address yeslab-vpn-traffic crypto map yeslab-crypto-map 10 set peer 202.100.1.1crypto map yeslab-crypto-map 10 set ikev2 ipsec-proposal yeslab-trans 调用crypto map到outside接口:crypto map yeslab-crypto-map interface outside查看效果:第二部分:2.2 IOS最精简配置:第一步:配置keyringcrypto ikev2 keyring yeslab-keyringpeer Center-ASAaddress 61.128.1.1pre-shared-key yeslab-pre-key第二步:配置ikev2 profile:crypto ikev2 profile yeslab-ikev2-profilematch identity remote address 61.128.1.1 255.255.255.255identity local address 202.100.1.1authentication remote pre-shareauthentication local pre-sharekeyring local yeslab-keyring第三步:配置感兴趣流:ip access-list extended yeslab-vpn-trafficpermit ip 172.16.1.0 0.0.0.255 10.1.1.0 0.0.0.255第四步:配置crypto map:crypto map yeslab-crypto-map 10 ipsec-isakmpset peer 61.128.1.1set ikev2-profile yeslab-ikev2-profilematch address yeslab-vpn-traffic第五步:调用crypto map:interface FastEthernet0/0ip address 202.100.1.1 255.255.255.0crypto map yeslab-crypto-map第二部分:异步密钥配置:IOS端配置:crypto ikev2 keyring yeslab-keyringpeer Center-ASAaddress 61.128.1.1pre-shared-key local yeslab-branch-keypre-shared-key remote yeslab-asa-key防火墙端配置:tunnel-group 202.100.1.1 type ipsec-l2ltunnel-group 202.100.1.1 ipsec-attributesikev2 remote-authentication pre-shared-key yeslab-branch-key ikev2 local-authentication pre-shared-key yeslab-asa-key第三部分:3.1最基本IOS VS IOS SVTI实验拓扑图:配置:alias exec i show ip inter briealias exec e show crypto engine connections activealias exec c configure terminalSite1配置:第一步,配置keyring:crypto ikev2 keyring yeslab-keyringpeer Site2address 61.128.1.1pre-shared-key yeslab-pre-key第二步,配置ikev2 profile:crypto ikev2 profile yeslab-ikev2-profilematch identity remote address 61.128.1.1 255.255.255.255identity local address 202.100.1.1authentication remote pre-shareauthentication local pre-sharekeyring local yeslab-keyring配置ipsec profile:crypto ipsec profile defaultset ikev2-profile yeslab-ikev2-profile配置tunnel接口:interface Tunnel0ip address 192.168.1.1 255.255.255.0tunnel source FastEthernet0/0tunnel mode ipsec ipv4tunnel destination 61.128.1.1tunnel protection ipsec profile default站点二上的配置:crypto ikev2 keyring yeslab-keyringpeer Site1address 202.100.1.1pre-shared-key yeslab-pre-key########################################################### crypto ikev2 profile yeslab-ikev2-profilematch identity remote address 202.100.1.1 255.255.255.255identity local address 61.128.1.1authentication remote pre-shareauthentication local pre-sharekeyring local yeslab-keyring############################################################## crypto ipsec profile yeslab-ipsec-profileset ikev2-profile yeslab-ikev2-profile############################################################## interface Tunnel0ip address 192.168.1.2 255.255.255.0tunnel source FastEthernet0/1tunnel mode ipsec ipv4tunnel destination 202.100.1.1tunnel protection ipsec profile yeslab-ipsec-profile配置动态路由协议:!interface Loopback0ip address 10.1.1.1 255.255.255.0ip ospf 1 area 0interface Tunnel0ip address 192.168.1.2 255.255.255.0ip ospf 1 area 0在两个上面都得宣告!!!!!!!!!!!!!!测试:配置异步密钥:site1上配置:crypto ikev2 keyring yeslab-keyringpeer Site2address 61.128.1.1pre-shared-key local yeslab-site1-keypre-shared-key remote yeslab-site2-keysite2上配置:crypto ikev2 keyring yeslab-keyringpeer Site1address 202.100.1.1pre-shared-key local yeslab-site2-keypre-shared-key remote yeslab-site1-key第三部分 3.3双向证书认证:用internet做证书服务器:首先要让时间同步:在做时间同步的时候,是不同步时区的,需要手动给设置:clock timezone GMT +8在internet上配置时间clock set 21:16:00 Feb 6 2014在全局配置模式下:ntp master在站点以上配置:1,手动设置时区2,配置ntp server 202.100.1.10 (站点一)ntp server 61.128.1.10(站点二)配置证书服务器:ip http serverip domain name crypto pki server CAissuer-nmae cn=, ou=mingjiaosecdatabase level completegrant autono shutdown会出现一个密码,加密密钥用的在站点一上配置:ip domain name crypto pki trustpoint CAenrollment url http://202.100.1.10:80subject-name cn=, ou=mingjiaosecrevocation-check crl(此命令为自动产生)获取证书:crypto pki authenticate CA申请个人证书:crypto pki enroll CA站点二上的配置和站点一上的配置基本上一样,只是在添加个人信息的时候不能配置一样了就行crypto pki certificate map yeslab-Cert-Map 10subject-name co ou = mingjiaosec第二步:crypto ikev2 profile yeslab-ikev2-profilematch certificate yeslab-Cert-Mapauthentication remote rsa-sigauthentication local rsa-sigpki trustpoint CA站点二的配置是一样的:::::::其他的配置和原有的都是一样的,除了删除掉keyring第四部分 3.4证书+预共享密钥认证站点一把预共享密钥拿出来,站点二来认证站点二把证书拿出来,站点一来用证书认证和异步密钥认证有点像其中一个站点上的配置:crypto ikev2 profile yeslab-ikev2-profilematch certificate yeslab-Cert-Map (匹配远端证书)identity local address 202.100.1.1 (我给远端的个人ID)authentication remote rsa-sig (远端给我的是证书)authentication local pre-share (我给远端的是预共享密钥)keyring local yeslab-keyring (我提供给远端的预共享密钥)pki trustpoint CA (认证远端用的trustpoint)其中的站点二上面有一点不一样的:identity local fqdn (可选,我给远端的个人ID)第四部分 4.3证书认证Client to Server DVTI配置Server:aaa new-modelaaa authentication login noacs line noneline con 0password ciscologin authentication noacsline aux 0login authentication noacsaaa authorization network yelab-local-group-author-list local配置授权策略:ip access-list standard server-networkpermit 10.1.1.0 0.0.0.255ip local pool yeslab-address-pool 192.168.1.100 192.168.1.200crypto ikev2 authorization policy yeslab-ikev2-author-policypool yeslab-address-poolroute set access-list server-network配置ikev2 keyring:crypto ikev2 keyring yeslab-ikev2-keyringpeer Flex-VPNaddress 202.100.1.1pre-shared-key local yeslab-serverpre-shared-key remote yeslab-client配置ikev2 profile:crypto ikev2 profile yeslab-ikev2-profilematch identity remote address 202.100.1.1 255.255.255.255identity local address 61.128.1.1authentication remote pre-shareauthentication local pre-sharekeyring local yeslab-ikev2-keyringaaa authorization group psk list yelab-local-group-author-list yeslab-ikev2-author-policyvirtual-template 1定义ipsec profile:crypto ipsec profile yeslab-ipsec-profileset ikev2-profile yeslab-ikev2-profile定义虚接口:interface Virtual-Template1 type tunnelip unnumbered FastEthernet0/1tunnel mode ipsec ipv4tunnel protection ipsec profile yeslab-ipsec-profileClient端配置:aaa new-modelaaa authentication login noacs line noneaaa authorization network yeslab-localo-group-author-list local配置授权策略:ip access-list standard client-networkpermit 172.16.1.0 0.0.0.255crypto ikev2 authorization policy yeslab-ikev2-author-policyroute set access-list client-network (推送给远端的本地网段)配置keyring:crypto ikev2 keyring yeslab-ikev2-keyringpeer Serveraddress 61.128.1.1pre-shared-key local yeslab-clientpre-shared-key remote yeslab-server配置ikev2 profile:crypto ikev2 profile yeslab-ikev2-profilematch identity remote address 61.128.1.1 255.255.255.255identity local address 202.100.1.1authentication remote pre-shareauthentication local pre-sharekeyring local yeslab-ikev2-keyringaaa authorization group psk list yeslab-localo-group-author-list yeslab-ikev2-author-policy配置ipsec profile:crypto ipsec profile yeslab-ipsec-profileset ikev2-profile yeslab-ikev2-profile配置tunnel接口,然后调用策略:interface Tunnel0ip address negotiatedtunnel source FastEthernet0/0tunnel mode ipsec ipv4tunnel destination dynamictunnel protection ipsec profile yeslab-ipsec-profile配置flex-vpn拨号:crypto ikev2 client flexvpn yeslab-flex-clientpeer 1 61.128.1.1client connect Tunnel0测试:第四部分 4.2server端的额外授权可以在授权策略下面添加:crypto ikev2 authorization policy yeslab-ikev2-author-policy dns 202.100.1.1configuration url 4.3部分证书认证client to server DVTI实验拓扑:Server端配置:严重注意:配置之前手动同步设备时间:ip domain name ip name-server 192.168.1.188ip domain-lookupcrypto pki trustpoint CAenrollment terminalfqdn subject-name cn=, ou=mingjiaorevocation-check nonersakeypair 1024eku request server-auth 增强的密钥使用客户端(Client)配置:ip domain name ip name-server 192.168.1.188ip domain-lookupcrypto pki trustpoint CAenrollment terminalfqdn subject-name cn=, ou=hardwareclient revocation-check nonersakeypair 1024eku request client-auth这一部分微软的证书,不知道搞了一半::::::::第五部分: Spoke to Spoke FlexVPN实验拓扑:配置:配置NTP(时间同步非常重要)Hub配置:clock timezone GMT +8clock set 21:50:00 Feb 7 2014ntp masterSpoke上配置:clock timezone GMT +8ntp server 202.100.1.100查看信息:在Hub上配置证书服务器:ip http serverip domain name crypto pki server CAdatabase level completeissuer-name cn=, ou=mingjiaogrant autono shutdown######################################################crypto pki trustpoint HubCAenrollment url http://202.100.1.100:80subject-name cn=, ou=mingjiaorevocation-check crleku request server-auth client-auth#########################################################Hub(config)#crypto pki authenticate HubCA (获取根证书)Certificate has the following attributes:Fingerprint MD5: E974A03D FED8FA24 E20D47CE 676528DCFingerprint SHA1: DA0F896A 3C2FB901 A51F06D5 E38221A7 36E1D8E1% Do you accept this certificate? [yes/no]: yesTrustpoint CA certificate accepted.Hub(config)#crypto pki enroll HubCA (申请个人证书)%% Start certificate enrollment ..% Create a challenge password. You will need to verbally provide this password to the CA Administrator in order to revoke your certificate. For security reasons your password will not be saved in the configuration.Please make a note of it.Password:Feb 7 14:15:09.819: %CRYPTO-6-AUTOGEN: Generated new 512 bit key pair Re-enter password:% Passwords did not match. Aborted.Hub(config)#crypto pki enroll HubCA%% Start certificate enrollment ..% Create a challenge password. You will need to verbally provide this password to the CA Administrator in order to revoke your certificate. For security reasons your password will not be saved in the configuration.Please make a note of it.Password:Re-enter password:% The subject name in the certificate will include: cn=, ou=mingjiao% The subject name in the certificate will include: % Include the router serial number in the subject name? [yes/no]: NO % Include an IP address in the subject name? [no]:Request certificate from CA? [yes/no]: yes% Certificate request sent to Certificate Authority% The 'show crypto ca certificate HubCA verbose' command will show the fingerprint.Hub(config)#Feb 7 14:15:39.299: CRYPTO_PKI: Certificate Request Fingerprint MD5: D6D119B4 DA9F28EF 1BCB6E4A 1F77A1CAFeb 7 14:15:39.299: CRYPTO_PKI: Certificate Request Fingerprint SHA1: A97350E9 D16AE047 74650B73 C3A4A942 B0E984CEHub(config)#Feb 7 14:15:40.931: %PKI-6-CERTRET: Certificate received from Certificate AuthorityHub(config)#在spoke1上配置:ip domain name crypto pki trustpoint CAenrollment url http://202.100.1.100:80subject-name cn=, ou=mingjiaorevocation-check crl#################################################################### Spoke1(config)#crypto pki authenticate CACertificate has the following attributes:Fingerprint MD5: E974A03D FED8FA24 E20D47CE 676528DCFingerprint SHA1: DA0F896A 3C2FB901 A51F06D5 E38221A7 36E1D8E1% Do you accept this certificate? [yes/no]: yesTrustpoint CA certificate accepted.Spoke1(config)#crypto pki enroll CA (申请个人证书)%% Start certificate enrollment ..% Create a challenge password. You will need to verbally provide this password to the CA Administrator in order to revoke your certificate. For security reasons your password will not be saved in the configuration.Please make a note of it.Password:Feb 7 14:20:39.588: RSA key size needs to be atleast 768 bits for ssh version 2Feb 7 14:20:39.588: %SSH-5-ENABLED: SSH 1.5 has been enabledFeb 7 14:20:39.596: %CRYPTO-6-AUTOGEN: Generated new 512 bit key pair Re-enter password:% The subject name in the certificate will include: cn=, ou=mingjiao% The subject name in the certificate will include: % Include the router serial number in the subject name? [yes/no]: NO % Include an IP address in the subject name? [no]:Request certificate from CA? [yes/no]: YES% Certificate request sent to Certificate Authority% The 'show crypto pki certificate verbose CA' commandwill show the fingerprint.Spoke1(config)#Feb 7 14:20:48.559: CRYPTO_PKI: Certificate Request Fingerprint MD5: 72A03334 AF05EFFB 840A7A3F B064CB4CFeb 7 14:20:48.571: CRYPTO_PKI: Certificate Request Fingerprint SHA1: BFA872E8 B616BBF6 29A09082 9E66FDFB ABB15760Spoke1(config)#Feb 7 14:20:49.479: %PKI-6-CERTRET: Certificate received from Certificate AuthoritySpoke1(config)#Spoke1(config)#Spoke2 和Spoke1的配置是一样的在Hub上配置:ip local pool yeslab-address-pool 172.16.1.1 172.16.1.100aaa authorization network yeslab-author-network-list localip access-list standard spoke-to-spoke-networkpermit 192.168.0.0 0.0.255.255crypto ikev2 authorization policy yeslab-ikev2-author-policy pool yeslab-address-pooldef-domain route set interfaceroute set access-list spoke-to-spoke-network################################################################## crypto pki certificate map yeslab-cert-map 10subject-name co ou=mingjiao################################################################## crypto ikev2 profile yeslab-ikev2-profilematch certificate yeslab-cert-mapauthentication remote rsa-sigauthentication local rsa-sigpki trustpoint HubCAaaa authorization group cert list yeslab-author-network-list yeslab-ikev2-author-policyvirtual-template 1############################################################### crypto ipsec profile yeslab-ipsec-profileset ikev2-profile yeslab-ikev2-profile################################################################ interface Virtual-Template 1 type tunnelip unnumbered loopback 0ip nhrp network-id 10ip nhrp redirect (重定向,优化路由)tunnel protection ipsec profile yeslab-ipsec-profileSpoke1上配置:aaa authorization network yeslab-author-network-list local配置author policy:ip access-list standard yeslab-spoke1-networkpermit 192.168.1.0 0.0.0.255crypto ikev2 authorization policy yeslab-ikev2-author-policy route set interfaceroute set access-list yeslab-spoke1-network##########################################crypto pki certificate map yeslab-cert-map 10subject-name co ou = mingjiao##############################################crypto ikev2 profile yeslab-ikev2-profilematch certificate yeslab-cert-mapauthentication remote rsa-sigauthentication local rsa-sigpki trustpoint CAaaa authorization group cert list yeslab-author-network-listyeslab-ikev2-author-policyvirtual-template 1######################################################crypto ipsec profile yeslab-ipsec-profileset ikev2-profile yeslab-ikev2-profile###################################################interface Tunnel0ip address negotiatedip nhrp network-id 10ip nhrp shortcut virtual-template 1ip nhrp redirecttunnel source FastEthernet0/0tunnel destination 202.100.1.100tunnel protection ipsec profile yeslab-ipsec-profile##########################################################interface Virtual-Template1 type tunnelip unnumbered Tunnel0ip nhrp network-id 10ip nhrp shortcut virtual-template 1ip nhrp redirecttunnel protection ipsec profile yeslab-ipsec-profileSpoke 2的配置和Spoke1的配置基本上是一样的:aaa authorization network yeslab-author-network-list local配置author policy:ip access-list standard yeslab-spoke2-networkpermit 192.168.2.0 0.0.0.255crypto ikev2 authorization policy yeslab-ikev2-author-policy route set interfaceroute set access-list yeslab-spoke2-network##########################################crypto pki certificate map yeslab-cert-map 10subject-name co ou = mingjiao##############################################crypto ikev2 profile yeslab-ikev2-profilematch certificate yeslab-cert-mapauthentication remote rsa-sigauthentication local rsa-sigpki trustpoint CAaaa authorization group cert list yeslab-author-network-list yeslab-ikev2-author-policyvirtual-template 1######################################################crypto ipsec profile yeslab-ipsec-profileset ikev2-profile yeslab-ikev2-profile###################################################interface Tunnel0ip address negotiatedip nhrp network-id 10ip nhrp shortcut virtual-template 1ip nhrp redirecttunnel source FastEthernet0/0tunnel destination 202.100.1.100tunnel protection ipsec profile yeslab-ipsec-profile##########################################################interface Virtual-Template1 type tunnelip unnumbered Tunnel0ip nhrp network-id 10ip nhrp shortcut virtual-template 1ip nhrp redirecttunnel protection ipsec profile yeslab-ipsec-profile如果查看的配置没有什么问题的时候,最好把tunnel接口给shutdow 在no shutdown第六部分:anyconnect 3.0 to ASA实验拓扑图:配置:1,受信任的根证书颁发机构颁发的证书2,证书时间有效3,主机名匹配配置NTP(时间同步非常重要)internet上配置;clock timezone GMT +8clock 23:57:00 Feb 7 2014ntp master在防火墙上配置:clock timezone GMT +8ntp server 61.128.1.10在证书服务器上配置;ip domain name crypto pki server CAdatabase level completeissuer-name cn=, ou=mingjiaogrant autono shutdown在防火墙的的配置:配置trustpoint:domain-name crypto key generate rsa label modulus 1024############################################################crypto ca trustpoint CAenrollment url http://61.128.1.10:80fqdn subject-name cn=, ou=mingjiaokeypair crl configure认证证书服务器,获取根证书:crypto ca authenticate CAciscoasa(config)# crypto ca enroll CAWARNING: The certificate enrollment is configured with an fqdnthat differs from the system fqdn. If this certificate will beused for VPN authentication this may cause connection problems.Would you like to continue with this enrollment? [yes/no]: YES% Start certificate enrollment ..% Create a challenge password. You will need to verbally provide this password to the CA Administrator in order to revoke your certificate. For security reasons your password will not be saved in the configuration.Please make a note of it.Password: *****Re-enter password: *****% The subject name in the certificate will be: cn=, ou=mingjiao% The fully-qualified domain name in the certificate will be: % Include the device serial number in the subject name? [yes/no]: NORequest certificate from CA? [yes/no]: YES% Certificate request sent to Certificate Authorityciscoasa(config)# The certificate has been granted by CA!ciscoasa(config)#配置SSL使用“CA”颁发的证书ssl trust-point CA查看profile配置:可以通过ASDM和anyconnect profile-Editor产生webvpnenable outsideanyconnect image disk0:/anyconnect-win-3.0.0629-k9.pkg 1anyconnect enableip local pool yeslab-pool 123.1.1.100-123.1.1.200#############################################################group-policy yeslab-policy internalgroup-policy yeslab-policy attributesvpn-tunnel-protocol ikev2 ssl-client ssl-clientlessaddress-pools value yeslab-pool##########################################################username cisco password 3USUcOPFUiMCO4Jk encrypted privilege 15 username yeslabuser password gTDvPxdKMDeb2yL7 encryptedusername yeslabuser attributesvpn-group-policy yeslab-policy#########################################################crypto ikev2 policy 10encryption 3desintegrity shagroup 2prf shalifetime seconds 86400############################################################### crypto ipsec ikev2 ipsec-proposal yeslab-ikev2-proposalprotocol esp encryption 3desprotocol esp integrity sha-1##############################################################crypto ikev2 enable outside client-services port 443crypto ikev2 remote-access trustpoint CA#################################################################### crypto dynamic-map yeslab-dymap 100 set ikev2 ipsec-proposal yeslab-ikev2-proposalcrypto map yeslab-map 1000 ipsec-isakmp dynamic yeslab-dymapcrypto map yeslab-map interface outsidewebvpnanyconnect profiles yeslab disk0:/yeslab.xml group-policy yeslab-policy attributes webvpnanyconnect profiles value yeslab type user。

Windows CMD命令行中的系统更新和补丁管理技巧随着计算机技术的不断发展,操作系统的更新和补丁管理成为了维护系统安全和性能的重要环节。
在Windows系统中,CMD命令行是一种常用的管理工具,它提供了许多有用的命令和技巧,帮助用户更好地管理系统更新和补丁。
本文将介绍一些在CMD命令行中进行系统更新和补丁管理的技巧,帮助用户更高效地维护系统。
首先,我们来了解一些常用的系统更新命令。
在CMD命令行中,可以使用"wuauclt"命令来手动触发系统更新。
通过运行"wuauclt /detectnow"命令,系统将立即检测是否有可用的更新,并开始下载和安装。
此外,"wuauclt/showwindowsupdate"命令可以打开Windows更新设置界面,方便用户进行更新配置的调整。
除了手动触发更新,我们还可以通过CMD命令行来查看和管理系统更新的状态。
运行"wmic qfe list"命令,系统将列出已安装的所有补丁和更新的信息,包括补丁编号、发布日期等。
通过这个命令,用户可以快速了解系统的更新情况,并及时安装缺失的补丁。
在进行系统更新和补丁管理时,有时候我们可能需要暂时禁用自动更新功能。
通过运行"sc config wuauserv start=disabled"命令,系统将停止自动更新服务,用户可以在需要的时候手动开启更新。
同样地,运行"sc config wuauserv start=auto"命令可以重新启用自动更新服务。
除了系统更新,CMD命令行还提供了一些实用的补丁管理技巧。
在Windows 系统中,有时候我们可能需要卸载某个已安装的补丁。
通过运行"wusa /uninstall /kb:补丁编号"命令,系统将卸载指定的补丁。
这个命令可以帮助用户解决某些补丁安装后引发的问题,恢复系统的正常运行。


H3C交换机snmp的v3及v1v2配置目录H3C交换机上应用配置及撤除方法 (2)一、配置说明 (2)1.启动/关闭SNMP Agent服务 (2)2.使能或禁止SNMP相应版本 (2)3.配置团体名(community name) (2)4.配置或删除一个SNMP组 (2)5.添加/删除用户 (2)6.配置管理员的标识及联系方法(syscontact) (3)7.允许/禁止发送trap报文 (3)8.配置本地设备的引擎id (3)9.配置trap目标主机的地址 (3)10.配置防火墙位置(syslocation) (3)11.指定发送trap的源地址 (3)12.视图配置信息 (4)13.配置消息包的最大值 (4)14.配置trap报文的保存时间 (4)二、H3C上snmp配置实现 (4)1.Snmp版本v1&v2在H3C中配置: (4)2.Snmp版本v3在h3c中配置: (5)三、配置telnet或ssh终端管理配置方法: (5)1、方法1:配置telnet (5)2、方法2:配置H3C ssh的全部过程 (5)四、配置HTTP (6)五、端口绑定 (7)●范例1 (7)●范例2 (7)●范例3 (7)●撤销该配置方法如下: (7)●查询 (7)H3C交换机上应用配置及撤除方法一、配置说明1.启动/关闭SNMP Agent服务在系统视图模式下:启用:snmp-agent关闭:undo snmp-agent注:缺省情况下snmp agent是关闭的2.使能或禁止SNMP相应版本在系统视图下:使能SNMP协议相应版本:snmp-agent sys-info version v1Snmp-agent sys-info version v2cSnmp-agent sys-info version v3Snmp-agent sys-info version al l禁止SNMP协议相应版本:undo snmp-agent sys-info version v1Undo snmp-agent sys-info version v2cUndo sump-agent sys-info version v3Undo sump-agent sys-info version all3.配置团体名(community name)在系统视图模式下:配置团体名及访问权限:snmp-agent community{raid/write} community-name [[mib-view view-name] /[acl acl-number]] 取消配置的团体名:undo sump-agent community community-name4.配置或删除一个SNMP组在系统视图模式下:配置一个SNMP组:snmp-agent group{v1/v2c} group-name [read-view read-view] [write-view write-view ][notify-view notify-view][acl acl-number]snmp-agent group v3group-name [authentication/privacy] [read-view read-view] [write-view write-view ][notify-view notify-view][acl acl-number]删除一个SNMP组:undo snmp-agent group {v1/v2} group-nameUndo snmp-agent group v3 group-name [authentication/privacy]5.添加/删除用户为SNMP组添加一个新用户:snmp-agent usm-user {v1/v2c} user-name group-name [acl acl-number]Snmp-agent usm-user v3user-name group-name [[authentication-mode {md5/sha} auth-password] [privacy-mode des56 priv-password]] [acl acl-number]删除SNMP的一个用户:Undo snmp-agent usm-user {v1/v2c} user-name group-nameUndo snmp-agent usm-user v3 user-name group-name [engineid engine-id/local]6.配置管理员的标识及联系方法(syscontact)Syscontact是是mib ii中system组的一个管理变量,内容为被管理设备的标识及联系方法,可以配置此参数,将重要信息存储在防火墙中,以便出现问题时查询使用。
V2.0LinkProV2.0系统软件配置说明竭诚感谢您使用本公司的产品本手册就产品的使用方法与安全事项进行说明*熟读本手册,并在使用过程中注意安全。
*保留本手册,放在合适的地方以便随时查阅。
更新日期:2021年2月目录1说明 (4)2配置界面介绍 (4)3更新日志 (12)安全注意阅读本手册后,请妥善保管以便查阅。
这里展示的是注意事项和安全相关的重大内容,所以请一定要遵守,标志意思如下:警告在操作时违反本警告事项所示的内容,可能会导致人员死亡或重伤。
注意在操作时违反本注意事项所示的内容,可能会导致人员负伤或造成物品损坏。
提醒在操作时使您能正确使用产品时,所务必遵守的相关使用的事1说明本文档是在用户搭建好定位基站以及将基站与服务器连接后需要查阅的手册,用户需要将所有基站通过网线连接到同一局域网当中,然后PC 服务器端也连接到这个局域网中,这样才可以通过软件对基站的进行参数配置,控制基站的定位功能的起止,获取标签位置信息等。
2配置界面介绍打开软件并成功连接服务器后,定位系统设置界面如图:界面功能详见下表:相关说明:1.记录定位信息该功能可以随时在系统运行时勾选。
在勾选后,系统将会记录每一次定位时标签具体的定位信息。
其中包括标签的ID、位置xyz坐标、本次计算由哪几个基站来定位解算、定位解算时间。
定位记录的信息将会存放在系统安装目录的Log文件夹中。
2.组别配置点击“组别配置”按钮后会显示如图:基站组别配置是为了分区域定位设置的,需要设置每个基站所处的组别以及组别的阈值,为了便于说明,举例如下:假设图中黑色框组成的区域为用户需要定位的区域,A~K为该区域布置的基站,此时可以将基站分为五组,如图红色细线框住的五个区域(新增五个基站组别),组别0(由基站A、B、C、D组成)和组别1(由基站B、C、D、E组成)是进行二维定位的,其余组别进行一维定位。
配置时,先创建五个组别,之后将A、F基站配置到组别0,将B、E基站配置到组别0和组别1,将C、D基站配置到组别1,将G、H基站配置到组别2,将J基站分配到组别3和组别4,将I基站分配到组别3,将K基站分配到组别4。
金电网安安全隔离与信息交换系统FerryWay V2。
0操作手册文件编号:FWUS01目录第一章管理员使用指南 (1)一、运行环境 (1)二、运行说明 (1)1。
登陆 (1)2.网络管理 (1)2。
1网卡绑定 (1)2.2内端机 (2)2.3外端机 (2)2.4 DNS配置 (2)2。
5 路由管理 (2)3.策略管理 (3)3.1客户端地址 (3)3.2 HTTP URL (4)3.3 HTTP响应内容类型 (4)3。
4 HTTP响应内容敏感词 (5)3。
5 HTTP请求方法 (5)3.6 FTP命令 (6)3.7 FTP下载敏感词 (6)3.8 FTP上传敏感词 (7)3。
9 FTP可下载文件名 (7)3.10 FTP可上传文件名 (7)3.12 FTP 可下载文件类型 (8)3.13 FTP 可上传文件类型 (8)3。
14 FTP可删除文件类型 (9)3。
15 FTP可下载文件大小 (9)3.16邮件发件人 (9)3。
17邮件收件人 (10)3。
18 邮件主题敏感词 (10)3.19 邮件内容敏感词 (10)4.通道管理 (11)4。
1浏览应用通道 (11)4.2添加新的应用通道 (11)4.3修改应用通道设置 (11)4。
4删除应用通道 (12)4.5停启用应用通道 (12)4.6刷新 (12)6。
用户管理 (12)6.1浏览 (12)6。
2添加新用户 (12)6。
3修改用户密码 (12)6.4删除用户 (12)6。
5刷新 (13)7。
设备管理 (13)7。
1 系统设置 (13)8.HA设置 (13)8。
1浏览 (13)8.2编辑HA主地址 (14)8.3 HA网卡 (14)9.用户配置管理 (14)9.1用户配置导入导出 (14)10.日志管理 (15)10。
1 系统资源日志 (15)10.2 连接数日志 (15)10.3策略审计日志 (15)10。
4管理端审计日志 (16)10。
5 Syslog配置 (16)11.退出 (16)第二章管理软件常见报错信息FAQ (17)报错情况1 (17)报错情况2 (17)报错情况3 (17)第三章注意事项 (18)注意事项是为保护用户和其他人免遭可能发生的人体伤害、财产损失或者其他损害以及如何正确、顺利地操作设备提供了重要信息,把可能发生的危害减少到最低点。
IronPort C-Series邮件网关配置指南IronPort Systems目录1.前言 (3)2.配置准备 (3)3.INBOUND模式 (3)3.1.网络拓扑 (3)3.2.需求说明 (4)3.3.配置步骤 (4)4.INBOUND+OUTBOUND模式 (9)4.1.网络拓扑 (9)4.2.需求说明 (10)4.3.配置步骤-用单个L ISTENER实现 (10)4.4.配置步骤-用两个L ISTENER实现 (12)5.INBOUND+ CLIENT SMTP模式 (14)5.1.网络拓扑 (14)5.2.需求说明 (14)5.3.配置步骤 (15)6.附录:邮件网关安装配置表 (18)6.1.邮件系统概况 (18)6.2.I RON P ORT邮件网关配置 (18)1.前言本文专门针对IronPort邮件安全网关(Email Security Appliance,简称ESA)在常见的用户环境中,给出了用户需求,配置准备和配置步骤。
本文介绍了三种常见的用户配置环境:¾Inbound模式¾Inbound+Outbound模式¾Inbound+Client SMTP模式使用本文档的工程师,至少需要了解以下知识:(1)SMTP和POP3基本原理(2)DNS原理及A记录、MX记录、PTR记录等概念(3)LDAP基本概念(4)常见邮件系统(如Exchange,Domino等)与邮件网关相关的配置,如LDAP,Smart Host或Relay Host等。
本文档中用到的所有命令和截图都是基于AsyncOS 6.0.0。
2.配置准备在配置ESA之前,要做好以下准备工作:(1) 根据ESA的Serial Number,申请设备测试License。
(2) 将AsyncOS升级到最新版本。
(3) 按照邮件系统的基本状况和安装配置表(见附件)逐项填写,将帮助了解用户的邮件系统和邮件收发流程。
如何进行配置更新
一、您将收到一个hplp格式的文件,比如9112450.hplp。
将激光器开机,如是德国版激光器,将钥
匙开关打到TEST位置,如是美国版激光器将钥匙打到ON位置。
使用网线连接电脑和激光器。
二、激光器通讯连接上以后,如果是英文版,可以改变成中文版,如图例所示;
三、使用版本大于2.71的LaserNet软件,查看版本号选择:帮助→关于LaserNet,如图例所示;
四、在LaserNet软件上选择:设置→激光→改变访问级别→Supervisor;然后系统会弹出对话框要
求输入密码;此密码默认为空密码,直接点击OK键即可。
五、在LaserNet软件上选择:设置→激光→配置更新,如图例所示;
六、找到并点击选择hplp配置更新文件,再点击打开,如图例所示;
七、等待更新完成之后,软件将会显示:配置更新已成功!
八、关闭激光器,将电源钥匙从TEST打到OFF,等待至少五秒钟以后,再将电源钥匙打回TEST。
九、检查希望的配置更新是否已经成功。