NS3中文教程
- 格式:docx
- 大小:136.67 KB
- 文档页数:44

1.Ns3 的安装:开发环境配置:sudo apt-get install gcc g++ python python-dev //C++和python安装,必装sudo apt-get install mercurial //NS3代码维护使用的源码版本控制管理系统sudo apt-get install bzr //运行python绑定ns-3-dev需要bazaar这个组件sudo apt-get install libgtk2.0-0 libgtk2.0-dev //基于GTK的配置系统sudo apt-get install gdb valgrind //调试工具sudo apt-get install doxygen graphviz imagemagick //文档生成器sudo apt-get install texlive texlive-latex-extra //文档生成器,从源代码中生成说明文档sudo apt-get install texinfo dia texlive-extra-utils texi2html //ns-3手册和tutorial编写查看工具sudo apt-get install flex bison //仿真必需的词法分析器和语法分析生成器,必装sudo apt-get install libgoocanvas-dev //部分移动场景仿真的可视化测试需要这个组件sudo apt-get install tcpdump //读取pcap的packet traces,即包嗅探器sudo apt-get install sqlite sqlite3 libsqlite3-dev //支持统计特性的数据库软件sudo apt-get install libxml2 //xml的配置存储软件sudo apt-get install python-pygraphviz python-kiwi python-pygoocanvas //Gustavo's ns-3-pyviz的可视化软件sudo apt-get install qt4-qmakesudo apt-get install qt4-dev-tools安装完成后:进入ns-allinone-3.16目录sudo ./build.py之后进入ns-allinone-3.16/ns-3.16sudo ./waf -check返回目录ns-allinone-3.16进入目录netanim-3.103sudo make cleansudo qmake NetAnim.prosudo make之后sudo ls可以看见绿色的NetAnim这个东西就成功了sudo ./NetAnim 打开仿真界面安装全部完成2.ns3仿真的运行ctrl+alt+t调出终端,进入ns-allinone-3.16目录,输入cd ns-3.16/ 进入ns-3.16文件夹输入cd examples/tutorial/ 进入examples里面的tutorial文件夹(里面有刚刚上手专用的实例,我们就用这个来调试)在tutorial目录下,输入cp ~/ns-allinone/ns-3.16/scratch/ ,将这个文件复制到ns-3.16的scratch文件夹里面. 具体位置由实际的自己的计算机的文件目录所定。
Symbian 3rd汉化教程pda 汉化组Flox 出品.pda..写在前面的:其实汉化不是一个技术活,只要你有点耐心,只要你对英文掌握还可以,其实就能够汉化一个很不错的作品。
请你不要认为汉化只是简单的查找替换,只要你用心,汉化作品同样可以很有艺术性。
教程一共分为两个部分,第一个部分为手动汉化部分,第二个部分为工具汉化部分。
如果你只想尽快的看到自己的汉化作品,请跳过第一部分,但是,你将体会不到手动汉化的乐趣。
只要你掌握了手动汉化的方法,任何软件都难不倒你阅读本教程你必须了解的一些东西:1.第三版和第二版不同,所以解包和打包工具不同。
不可以用第二版的解包工具去解包第三版的软件。
2.第三版汉化基本上只是Ascii 编码的汉化,所以本文着重介绍A 码汉化3.第三版部分资源存在于exe 中,无法直接汉化,必须脱壳汉化再加壳,后面会具体说明,并提供脱壳工具下载。
汉化工具:1.Hexwork shop——手动汉化手机软件的工具2.中英文字符编码——用来查询中文字符的Ascii 代码3.ExeUnpres——Ganthur 写的exe 脱壳工具Part1:手动汉化教程对于汉化,你必须有一个感性的认识,那就是解包——汉化——再打包的过程。
所以,你想要汉化软件,第一个步骤就是解包软件。
现在解包一般是使用专门的解包工具,如:SISware,SISVue 等由于SISware 在部分电脑上无法运行,这里用SISVue 这款小巧的解包工具做例子。
SISVue 主界面如图所示:打开一个3rd的软件后,如图所示:在SISVue 的主界面中,可以看到你要解包的软件的pkg 文件(后面将会提到pkg 的作用)点击“文件”——“解包”,选择解包的路径,就能解包软件。
一般来说,需要汉化的一般是.rsc 文件,也有部分为.r01 文件。
都可以用HexWorkshop打开。
可能出现的问题:由于部分软件的.rsc 文件为多语言版本,直接在电脑上通过解包后得到的.rsc 文件可能并非为英文版,所以,就必须先在手机安装,再把需要汉化的.rsc 文件复制出来。
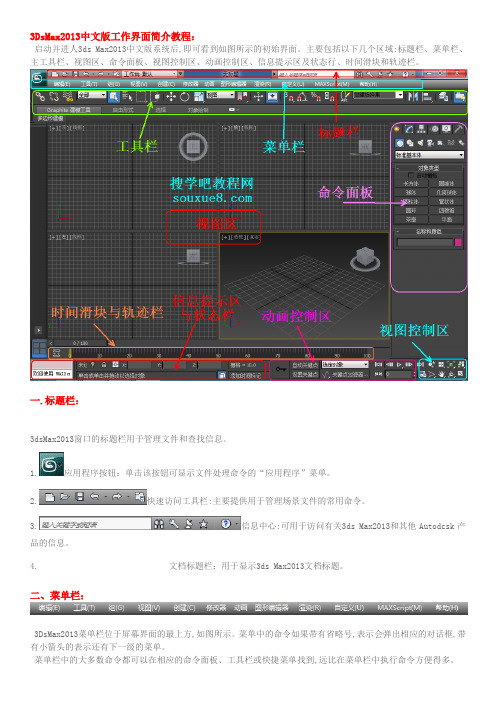
3DsMax2013中文版工作界面简介教程:启动并进人3ds Max2013中文版系统后,即可看到如图所示的初始界面。
主要包括以下几个区域:标题栏、菜单栏、主工具栏、视图区、命令面板、视图控制区、动画控制区、信息提示区及状态行、时间滑块和轨迹栏。
一.标题栏:3dsMax2013窗口的标题栏用于管理文件和查找信息。
1.应用程序按钮:单击该按钮可显示文件处理命令的“应用程序”菜单。
2.快速访问工具栏:主要提供用于管理场景文件的常用命令。
3.信息中心:可用于访问有关3ds Max2013和其他Autodcsk产品的信息。
4.文档标题栏:用于显示3ds Max2013文档标题。
二、菜单栏:3DsMax2013菜单栏位于屏幕界面的最上方,如图所示。
菜单中的命令如果带有省略号,表示会弹出相应的对话框,带有小箭头的表示还有下一级的菜单。
菜单栏中的大多数命令都可以在相应的命令面板、工具栏或快捷菜单找到,远比在菜单栏中执行命令方便得多。
三、主工具栏:在3DsMax2013莱单栏的下方有一栏工具按钮,称为主工具栏,通过主工具栏可以快速访问3ds Max2013中很多常见任务的工具和对话框。
如图所示。
将鼠标移动到按钮之间的空白处,鼠标箭头会变为状,这时可以拖动鼠标来左右滑动主工具栏,以看到隐藏的工具按钮。
在主工具栏中,有些按钮的右下角有一个小三角形标记,这表示此按钮下还隐藏有多重按钮选择。
当不知道命令按钮名称时,可以将鼠标箭头放置在按钮上停留几秒钟,就会出现这个按钮的中文命令提示。
提示:找回丢失的主工具栏的方法:单击菜单栏中的【自定义】|【显示】|【显示主工具栏】命令,即可显示或关闭主工具栏,也可以按键盘上的【Alt+6】键进行切换。
四、视图区:视图区位于界面的正中央,几乎所有的操作,包括建模、赋予材质、设置灯光等工作都要在此完成。
当首次打开3ds Max2013中文版时,系统缺省状态是以四个视图的划分方式显示的,它们是顶视图、前视图、左视图和透视视图,这是标淮的划分方式,也是比较通用的划分方式。

NS3安装与脚本说明⽂档NS-3说明⽂档第⼀章主要内容:⼀、配置⼆、下载ns-3三、建⽴ns-3项⽬四、测试ns-3五、运⾏⼀个脚本⼀、配置本次的使⽤环境是linux/Ubuntu。
在安装ns-3之前,需要输⼊以下命令,进⾏事先的配置。
1、如果对C++组件的需求⽐较少,输⼊以下命令:sudo apt-get install gcc g++ python如果对python组件的需求⽐较少,输⼊以下命令:sudo apt-get install gcc g++ python python-dev以上命令⼆者选⼀。
之后的命令依次输⼊。
2、sudo apt-get install mercurial3、sudo apt-get install bzr4、sudo apt-get install gdb valgrind5、sudo apt-get install gsl-bin libgsl0-dev libgsl0ldbl6、sudo apt-get install flex bison libfl-dev7、sudo apt-get install g++-3.4 gcc-3.48、sudo apt-get install tcpdump9、sudo apt-get install sqlite sqlite3 libsqlite3-dev10、sudo apt-get install libxml2 libxml2-dev11、sudo apt-get install libgtk2.0-0 libgtk2.0-dev12、sudo apt-get install vtun lxc13、sudo apt-get install uncrustify14、sudo apt-get install doxygen graphviz imagemagick15、sudo apt-get install texlive texlive-extra-utils texlive-latex-extra16、sudo apt-get install python-sphinx dia17、sudo apt-get install python-pygraphviz python-kiwi python-pygoocanvas libgoocanvas-dev18、sudo apt-get install libboost-signals-dev libboost-filesystem-dev19、sudo apt-get install openmpi*⼆、下载ns-3最简单的下载⽅法是,在linux下输⼊以下命令:cdmkdir tarballscd tarballswget /doc/31786f7cf011f18583d049649b6648d7c0c7085d.html /releases/ns-allinone-3.13.tar.bz2tar xjf ns-allinone-3.13.tar.bz2如果进⼊虚拟机中ns-allinone-3.13⽂件夹中,可以看到以下⽂件:build.py ns-3.13/ pybindgen-0.15.0.795/ util.pyconstants.py nsc-0.5.2/ README那么ns-3已经下载成功,并解压完毕。
最新GNS3-2.2.7模拟器完整安装及使用教程(关联Wireshark、xShell6和GNS3.VM.VMware.Workstation.2.2.7)-收藏一篇就够别在碰壁现阶段学习经常使用的路由交换设备主要来自于思科、华为和华三三家,当然还有中兴、锐捷、神州数码等厂商,这三家的设备操作配置大致类似,却又不尽相同。
因为实体设备通常都非常昂贵,购买设备学习也是不现实的。
所以我们通常会使用各厂商提供的模拟器来学习。
华为的模拟器是eNSP,华三的则是H3C Cloud Lib,思科则是大名鼎鼎的GNS3、Cisco Packet Tracer、WEB-IOU、EVE-NG。
今天笔者拿GNS3-2.2.7 目前最新版本来安装。
一、准备工具①GNS3-2.2.7-all-in-one.exe②GNS3.VM.VMware.Workstation.2.2.7.zip/对应版本的GNS3虚拟机③Cisco IOU-ISO.zip (L2/L3设备镜像)④IOS.rar (含从C1700 到C7200 的各种路由器bin 镜像)⑤Xshell6_wm.exe 或者SecureCRT⑥VMware-workstation-full-15.5.2-15785246.exe下载链接VMware-workstation-full-15.5.2-15785246:https://pan.baidu./s/1k3UKDc6NRbl8DtgCNxG4AA提取码:bolqGNS3:https://pan.baidu./s/1NDxi-l5i4YtP6nzzmpGebg提取码:te21二、GNS3软件介绍三、软件安装3.1 安装GNS3-2.2.7-all-in-one.exe双击GNS3-2.2.7-all-in-one.exe(需要连网,安装需要依赖的组件,当然知道怎么安装组件的也可以不用连网)安装包含Wireshark点击I Agree点击Next选择Custom,注意Tools的选择注意:Tools:选择安装的位置安装过程中会弹出依赖的组件,点击Next点击I Agree点击Next点击Finish其他组件安装步骤一样输入邮箱点击Next选择No,下一步。

3DsMax2013中文版工作界面简介教程:启动并进人3ds Max2013中文版系统后,即可看到如图所示的初始界面。
主要包括以下几个区域:标题栏、菜单栏、主工具栏、视图区、命令面板、视图控制区、动画控制区、信息提示区及状态行、时间滑块和轨迹栏。
一.标题栏:3dsMax2013窗口的标题栏用于管理文件和查找信息。
1.应用程序按钮:单击该按钮可显示文件处理命令的“应用程序”菜单。
2.快速访问工具栏:主要提供用于管理场景文件的常用命令。
3.信息中心:可用于访问有关3ds Max2013和其他Autodcsk产品的信息。
4.文档标题栏:用于显示3ds Max2013文档标题。
二、菜单栏:3DsMax2013菜单栏位于屏幕界面的最上方,如图所示。
菜单中的命令如果带有省略号,表示会弹出相应的对话框,带有小箭头的表示还有下一级的菜单。
菜单栏中的大多数命令都可以在相应的命令面板、工具栏或快捷菜单找到,远比在菜单栏中执行命令方便得多。
三、主工具栏:在3DsMax2013莱单栏的下方有一栏工具按钮,称为主工具栏,通过主工具栏可以快速访问3ds Max2013中很多常见任务的工具和对话框。
如图所示。
将鼠标移动到按钮之间的空白处,鼠标箭头会变为状,这时可以拖动鼠标来左右滑动主工具栏,以看到隐藏的工具按钮。
在主工具栏中,有些按钮的右下角有一个小三角形标记,这表示此按钮下还隐藏有多重按钮选择。
当不知道命令按钮名称时,可以将鼠标箭头放置在按钮上停留几秒钟,就会出现这个按钮的中文命令提示。
提示:找回丢失的主工具栏的方法:单击菜单栏中的【自定义】|【显示】|【显示主工具栏】命令,即可显示或关闭主工具栏,也可以按键盘上的【Alt+6】键进行切换。
四、视图区:视图区位于界面的正中央,几乎所有的操作,包括建模、赋予材质、设置灯光等工作都要在此完成。
当首次打开3ds Max2013中文版时,系统缺省状态是以四个视图的划分方式显示的,它们是顶视图、前视图、左视图和透视视图,这是标淮的划分方式,也是比较通用的划分方式。
第1章3ds Max 2013设计概述1.1 三维动画与3ds Max 2013简介1.2 3ds Max 2013的设计环境1.2.1 认识工作界面1.2.2 设置工作环境1.3 3ds Max 2013项目开发流程1.4 3ds Max 2013基础操作1.4.1 文件操作1.4.2 选择对象1.4.3 编辑对象1.5 教师辅导1.6 一章一技巧——常用快捷键第2章三维建模2.1 基本体建模——制作“自行车车轮”2.1.1 基础知识——基本体的创建2.1.2 案例剖析——制作“自行车车轮”2.1.3 拓展案例——制作“精美小屋”2.2 修改器建模——制作“飞鱼导弹”2.2.1 基础知识——修改器的应用2.2.2 案例剖析——制作“飞鱼导弹”2.2.3 拓展案例——制作“卡通企鹅”2.3 教师辅导2.4 一章一技巧——使用自动栅格创建对象第3章二维建模3.1 二维图形的创建和编辑——制作“中式屏风”3.1.1 基础知识——二维图形的创建和编辑3.1.2 案例剖析——制作“中式屏风”3.1.3 拓展案例——制作“古典折扇”3.2 二维建模的方法——制作“立体广告文字”3.2.1 基础知识——二维转三维的方法3.2.2 案例剖析——制作“立体广告文字”3.2.3 拓展案例——制作“酷爽冰淇淋”3.3 教师辅导3.4 一章一技巧——创建确切长度的样条线第4章高级建模4.1 复合建模4.1.1 基础知识——认识复合工具4.1.2 案例剖析——制作“时尚鼠标”4.1.3 拓展案例——制作“红玫瑰”4.2 多边形建模4.2.1 基础知识——多边形建模思想4.2.2 案例剖析——制作“水晶鞋”4.2.3 拓展案例——制作“马克杯”4.3 综合案例——制作“直板手机”4.4 教师辅导4.5 一章一技巧——软选择的使用第5章渲染基础5.1 三维世界中的照明方式5.2 mental ray渲染器简介5.3 使用最终聚集实现间接光照5.3.1 基础知识5.3.2 案例剖析——制作“落地窗式客厅效果”5.3.3 拓展案例——制作“书房效果”5.4 全局光照配合最终聚集实现间接光照5.4.1 基础知识5.4.2 案例剖析——制作“阳光休闲大厅”5.4.3 拓展案例——制作“夜间客厅效果”5.5 教师辅导5.6 一章一技巧——巧用光度学自由灯光补光第6章材质基础6.1 Arch & Design(mi)材质简介6.2 乳胶漆、木地板材质——制作“房间一角”6.2.1 基础知识——乳胶漆、木地板材质的制作方法6.2.2 案例剖析——制作“房间一角”6.3 透明材质——制作“玻璃水杯”6.3.1 基础知识——玻璃材质简介6.3.2 案例剖析——制作“玻璃水杯”6.3.3 拓展案例——制作“雕花圆盘”6.4 金属材质——制作“牛顿撞撞球”6.4.1 基础知识——金属材质简介6.4.2 案例剖析——制作“牛顿撞撞球”6.5 石材材质——制作“浴室效果”6.5.1 基础知识——石材材质简介6.5.2 案例剖析——制作“浴室效果”6.6 教师辅导6.7 一章一技巧——3ds Max归档操作第7章贴图基础7.1 基本贴图手法7.1.1 基础知识——认识2D贴图和3D贴图7.1.2 案例剖析——制作“汽车人影集”7.1.3 拓展案例——制作“熔岩星球”7.2 合成器贴图和颜色贴图——制作“精美酒瓶”7.2.1 基础知识——认识合成器贴图和颜色贴图7.2.2 案例剖析——制作“精美酒瓶”7.2.3 拓展案例——制作“被遗忘的角落”7.3 教师辅导7.4 一章一技巧——反射与折射贴图第8章摄影机与灯光8.1 摄影机8.1.1 基础知识——摄影机及其应用8.1.2 案例剖析——制作“画室景深效果”8.1.3 拓展案例——制作“穿越动画”8.2 灯光8.2.1 基础知识——灯光及其应用8.2.2 案例剖析——制作“夜景照明”8.2.3 拓展案例——制作“日光照明”8.3 教师辅导8.4 一章一技巧——安全框的使用第9章环境和效果9.1 环境9.1.1 基础知识——大气效果的应用9.1.2 案例剖析——制作“美丽海岛”9.1.3 拓展案例——制作“水底世界”9.2 效果9.2.1 基础知识——效果的应用9.2.2 案例剖析——制作“浪漫烛光”9.2.3 拓展案例——制作“烈日晴空”9.3 教师辅导9.4 一章一技巧——合并效果第10章动画制作基础10.1 关键帧动画——制作“翻书效果”10.1.1 基础知识——认识动画10.1.2 案例剖析——制作“翻书效果”10.1.3 拓展案例——制作“水墨画效果”10.2 IK动画——制作“连杆的运动效果”10.2.1 基础知识——创建IK动画的方法10.2.2 案例剖析——制作“连杆的运动效果”10.2.3 拓展案例——制作“炫光夺目”10.3 Reactor动画——制作“打保龄球效果”10.3.1 基础知识——认识刚体和柔体10.3.2 案例剖析——制作“打保龄球效果”10.3.3 拓展案例——制作“旗帜飘扬”10.4 Biped骨骼动画——制作“足迹动画”10.4.1 基础知识——认识Biped骨骼10.4.2 案例剖析——制作“足迹动画”10.4.3 拓展案例——制作“角色蒙皮”10.5 教师辅导10.6 一章一技巧——关键帧的操作技巧第11章粒子系统与空间扭曲11.1 空间扭曲在粒子系统中的应用11.1.1 基础知识——认识空间扭曲11.1.2 案例剖析——制作“清清流水”11.1.3 拓展案例——制作“蜡烛余烟”11.2 非事件驱动粒子系统的动画应用11.2.1 基础知识——认识非事件驱动粒子系统11.2.2 案例剖析——制作“野外篝火”11.2.3 拓展案例——制作“夜空礼花”11.3 事件驱动粒子系统的动画应用11.3.1 基础知识——认识事件驱动粒子系统11.3.2 案例剖析——制作“片头动画”11.3.3 拓展案例——制作“灰飞烟灭”11.4 教师辅导11.5 一章一技巧——AfterBurn插件的使用。
GNS3教程Version 0.5by Longbow2008-12-8目录译序 (3)GNS3 图形化网络模拟器 (4)Windows用户的GNS3 Quick Start Guide (6)Step 1:下载GNS3 (6)Step 2:安装GNS3 (7)Step 3:配置IOS (8)创建简单的网络拓扑 (9)GNS3的主界面 (13)创建复杂的网络拓扑 (14)在网路拓扑中添加PC (17)使用PuTTY或TeraTerm等终端程序 (23)使用软件WinTabber来组织多个Telnent窗口 (24)内存和CPU利用率问题 (25)IOS映像文件的解压缩 (27)Frame Relay、ATM、Ethernet交换设备 (27)分组捕获 (28)保存和load网络拓扑 (29)Client/Server和Multi-Server模式 (30)Console工作区和Dynagen命令 (30)PIX防火墙仿真 (30)GNS3的图标管理 (30)相关资源 (31)译序Dynamips作为一款十分优秀的Cisco路由器模拟软件,实验模拟效果远比Boson NetSim更加真实可信。
Boson NetSim是对IOS命令行的模拟,而Dynamips 是通过在计算机中构建运行IOS的虚拟机来真正运行IOS实现对Cisco路由器的模拟。
Gynagen是一种基本文本的Dynamips前端系统,初学者使用Dynamips时总是感觉存在一定程度的不便和困难。
当前,如果对Dynamips非常熟悉,无须任何前端系统就可以很好地进行相关网络模拟。
就像一个用户可以在命令行中实现在图形界面中完成的所有任务一样。
GNS3的推出在一定程度上解决了Dynamips不如Boson NetSim易用的问题,受到了Dynamips初学者的欢迎。
Dynamips的图形化前端系统除了GNS3外,还有GynamipsGUI。
ns-3Testing and Validationns-3projectfeedback:ns-developers@Simulator version:ns-3-dev20August2010This is an ns-3reference manual.Primary documentation for the ns-3project is available in Doxygen,several documents,and the wiki:•ns-3Doxygen:Documentation of the public APIs of the simulator•ns-3Tutorial•ns-3Manual•ns-3Testing and Validation(this document)•ns-3wikiThis document is written in GNU Texinfo and is to be maintained in revision control on the ns-3code server.Both PDF and HTML versions should be available on the server. Changes to the document should be discussed on the ns-developers@ mailing list. This software is free software;you can redistribute it and/or modify it under the terms of the GNU General Public License as published by the Free Software Foundation;either version2of the License,or(at your option)any later version.This software is distributed in the hope that it will be useful,but WITHOUT ANY WAR-RANTY;without even the implied warranty of MERCHANTABILITY or FITNESS FOR A PARTICULAR PURPOSE.See the GNU General Public License for more details.You should have received a copy of the GNU General Public License along with this program. If not,see /licenses/.iShort Contents1Overview (1)2Background (2)Part I:Testing (6)3Testing Framework (7)4How to write tests (18)Part II:Validation (19)5Random Variables (20)6Propagation Loss Models (21)7References (23)Chapter1:Overview11OverviewThis document is concerned with the testing and validation of ns-3software.This document provides•background about terminology and software testing(Chapter2);•a description of the ns-3testing framework(Chapter3);•a guide to model developers or new model contributors for how to write tests(Chapter4);•validation and verification results reported to date(Chapters5-onward).In brief,the first three chapters should be read by ns developers and contributors who need to understand how to contribute test code and validated programs,and the remainder of the document provides space for people to report on what aspects of selected models have been validated.2Background¨This chapter may be skipped by readers familiar with the basics of software testing.©Writing defect-free software is a difficult proposition.There are many dimensions to the problem and there is much confusion regarding what is meant by different terms in different contexts.We have found it worthwhile to spend a little time reviewing the subject and defining some terms.Software testing may be loosely defined as the process of executing a program with the intent of finding errors.When one enters a discussion regarding software testing,it quickly becomes apparent that there are many distinct mind-sets with which one can approach the subject.For example,one could break the process into broad functional categories like“correct-ness testing,”“performance testing,”“robustness testing”and“security testing.”Another way to look at the problem is by life-cycle:“requirements testing,”“design testing,”“accep-tance testing,”and“maintenance testing.”Yet another view is by the scope of the tested system.In this case one may speak of“unit testing,”“component testing,”“integration testing,”and“system testing.”These terms are also not standardized in any way,and so “maintenance testing”and“regression testing”may be heard interchangeably.Additionally, these terms are often misused.There are also a number of different philosophical approaches to software testing.For example,some organizations advocate writing test programs before actually implementing the desired software,yielding“test-driven development.”Some organizations advocate testing from a customer perspective as soon as possible,following a parallel with the agile development process:“test early and test often.”This is sometimes called“agile testing.”It seems that there is at least one approach to testing for every development methodology.The ns-3project is not in the business of advocating for any one of these processes,but the project as a whole has requirements that help inform the test process.Like all major software products,ns-3has a number of qualities that must be presentfor the product to succeed.From a testing perspective,some of these qualities that mustbe addressed are that ns-3must be“correct,”“robust,”“performant”and“maintainable.”Ideally there should be metrics for each of these dimensions that are checked by the teststo identify when the product fails to meet its expectations/requirements.2.1CorrectnessThe essential purpose of testing is to determine that a piece of software behaves“correctly.”For ns-3this means that if we simulate something,the simulation should faithfully represent some physical entity or process to a specified accuracy and precision.It turns out that there are two perspectives from which one can view correctness.Ver-ifying that a particular model is implemented according to its specification is generically called verification.The process of deciding that the model is correct for its intended use is generically called validation.2.2Validation and VerificationA computer model is a mathematical or logical representation of something.It can represent a vehicle,an elephant(see David Harel’s talk about modeling an elephant at SIMUTools 2009,or a networking card.Models can also represent processes such as global warming, freeway traffic flow or a specification of a networking protocol.Models can be completely faithful representations of a logical process specification,but they necessarily can never completely simulate a physical object or process.In most cases,a number of simplifications are made to the model to make simulation computationally tractable.Every model has a target system that it is attempting to simulate.The first step in creating a simulation model is to identify this target system and the level of detail and accuracy that the simulation is desired to reproduce.In the case of a logical process,the target system may be identified as“TCP as defined by RFC793.”In this case,it will probably be desirable to create a model that completely and faithfully reproduces RFC 793.In the case of a physical process this will not be possible.If,for example,you would like to simulate a wireless networking card,you may determine that you need,“an accurate MAC-level implementation of the802.11specification and[...]a not-so-slow PHY-level model of the802.11a specification.”Once this is done,one can develop an abstract model of the target system.This is typically an exercise in managing the tradeoffs between complexity,resource requirements and accuracy.The process of developing an abstract model has been called model quali-fication in the literature.In the case of a TCP protocol,this process results in a design for a collection of objects,interactions and behaviors that will fully implement RFC793in ns-3.In the case of the wireless card,this process results in a number of tradeoffs to allow the physical layer to be simulated and the design of a network device and channel for ns-3, along with the desired objects,interactions and behaviors.This abstract model is then developed into an ns-3model that implements the abstract model as a computer program.The process of getting the implementation to agree with the abstract model is called model verification in the literature.The process so far is open loop.What remains is to make a determination that a given ns-3model has some connection to some reality–that a model is an accurate representation of a real system,whether a logical process or a physical entity.If one is going to use a simulation model to try and predict how some real system is going to behave,there must be some reason to believe your results–i.e.,can one trust that an inference made from the model translates into a correct prediction for the real system.The process of getting the ns-3model behavior to agree with the desired target system behavior as defined by the model qualification process is called model validation in the literature.In the case of a TCP implementation,you may want to compare the behavior of your ns-3 TCP model to some reference implementation in order to validate your model.In the case of a wireless physical layer simulation,you may want to compare the behavior of your model to that of real hardware in a controlled setting,The ns-3testing environment provides tools to allow for both model validation and testing,and encourages the publication of validation results.2.3RobustnessRobustness is the quality of being able to withstand stresses,or changes in environments, inputs or calculations,etc.A system or design is“robust”if it can deal with such changes with minimal loss of functionality.This kind of testing is usually done with a particular focus.For example,the system as a whole can be run on many different system configurations to demonstrate that it can perform correctly in a large number of environments.The system can be also be stressed by operating close to or beyond capacity by generating or simulating resource exhaustion of various kinds.This genre of testing is called“stress testing.”The system and its components may be exposed to so-called“clean tests”that demon-strate a positive result–that is that the system operates correctly in response to a large variation of expected configurations.The system and its components may also be exposed to“dirty tests”which provide inputs outside the expected range.For example,if a module expects a zero-terminated string representation of an integer,a dirty test might provide an unterminated string of random characters to verify that the system does not crash as a result of this unexpected input. Unfortunately,detecting such“dirty”input and taking preventive measures to ensure the system does not fail catastrophically can require a huge amount of development overhead.In order to reduce development time,a decision was taken early on in the project to minimize the amount of parameter validation and error handling in the ns-3codebase.For this reason,we do not spend much time on dirty testing–it would just uncover the results of the design decision we know we took.We do want to demonstrate that ns-3software does work across some set of conditions. We borrow a couple of definitions to narrow this down a bit.The domain of applicability is a set of prescribed conditions for which the model has been tested,compared against reality to the extent possible,and judged suitable for use.The range of accuracy is an agreement between the computerized model and reality within a domain of applicability.The ns-3testing environment provides tools to allow for setting up and running test environments over multiple systems(buildbot)and provides classes to encourage clean tests to verify the operation of the system over the expected“domain of applicability”and“range of accuracy.”2.4PerformantOkay,“performant”isn’t a real English word.It is,however,a very concise neologism that is quite often used to describe what we want ns-3to be:powerful and fast enough to get the job done.This is really about the broad subject of software performance testing.One of the key things that is done is to compare two systems to find which performs better(cf benchmarks). This is used to demonstrate that,for example,ns-3can perform a basic kind of simulation at least as fast as a competing tool,or can be used to identify parts of the system that perform badly.In the ns-3test framework,we provide support for timing various kinds of tests.2.5MaintainabilityA software product must be maintainable.This is,again,a very broad statement,but a testing framework can help with the task.Once a model has been developed,validated and verified,we can repeatedly execute the suite of tests for the entire system to ensure that it remains valid and verified over its lifetime.When a feature stops functioning as intended after some kind of change to the system is integrated,it is called generically a regression.Originally the term regression referred to a change that caused a previously fixed bug to reappear,but the term has evolved to describe any kind of change that breaks existing functionality.There are many kinds of regressions that may occur in practice.A local regression is one in which a change affects the changed component directly.For example,if a component is modified to allocate and free memory but stale pointers are used,the component itself fails.A remote regression is one in which a change to one component breaks functionality in another component.This reflects violation of an implied but possibly unrecognized contract between components.An unmasked regression is one that creates a situation where a previously existing bug that had no affect is suddenly exposed in the system.This may be as simple as exercising a code path for the first time.A performance regression is one that causes the performance requirements of the system to be violated.For example,doing some work in a low level function that may be repeated large numbers of times may suddenly render the system unusable from certain perspectives.The ns-3testing framework provides tools for automating the process used to validate and verify the code in nightly test suites to help quickly identify possible regressions.Part I:Testing6 Part I:Testing3Testing Frameworkns-3consists of a simulation core engine,a set of models,example programs,and tests.Over time,new contributors contribute models,tests,and examples.A Python test program‘test.py’serves as the test execution manager;test.py can run test code and examplesto look for regressions,can output the results into a number of forms,and can manage code coverage analysis tools.On top of this,we layer‘Buildbots’that are automated build robots that perform robustness testing by running the test framework on different systems and with different configuration options.¨Insert figure showing the components here©3.1BuildbotsAt the highest level of ns-3testing are the buildbots(build robots).If you are unfamiliar with this system look at /buildbot/docs/0.7.11/.Thisis an open-source automated system that allows ns-3to be rebuilt and tested each time something has changed.By running the buildbots on a number of different systems we can ensure that ns-3builds and executes properly on all of its supported systems.Users(and developers)typically will not interact with the buildbot system other thanto read its messages regarding test results.If a failure is detected in one of the automated build and test jobs,the buildbot will send an email to the ns-developers mailing list.This email will look something like:The Buildbot has detected a new failure of osx-ppc-g++-4.2on NsNam.Full details are available at::8010/builders/osx-ppc-g%2B%2B-4.2/builds/0Buildbot URL::8010/Buildslave for this Build:darwin-ppcBuild Reason:The web-page’force build’button was pressed by’ww’:wwBuild Source Stamp:HEADBlamelist:BUILD FAILED:failed shell_5shell_6shell_7shell_8shell_9shell_10shell_11shell_12sincerely,-The BuildbotIn the full details URL shown in the email,one can search for the keyword failed and select the stdio link for the corresponding step to see the reason for the failure.The buildbot will do its job quietly if there are no errors,and the system will undergo build and test cycles every day to verify that all is well.3.2Test.pyThe buildbots use a Python program,test.py,that is responsible for running all of the tests and collecting the resulting reports into a human-readable form.This program is also available for use by users and developers as well.test.py is very flexible in allowing the user to specify the number and kind of tests to run;and also the amount and kind of output to generate.By default,test.py will run all available tests and report status back in a very concise form.Running the command,./test.pywill result in a number of PASS,FAIL,CRASH or SKIP indications followed by the kind of test that was run and its display name.Waf:Entering directory‘/home/craigdo/repos/ns-3-allinone-test/ns-3-dev/build’Waf:Leaving directory‘/home/craigdo/repos/ns-3-allinone-test/ns-3-dev/build’’build’finished successfully(0.939s)FAIL:TestSuite ns3-wifi-propagation-loss-modelsPASS:TestSuite object-name-servicePASS:TestSuite pcap-file-objectPASS:TestSuite ns3-tcp-cwnd...PASS:TestSuite ns3-tcp-interoperabilityPASS:Example csma-broadcastPASS:Example csma-multicastThis mode is indented to be used by users who are interested in determining if their distribution is working correctly,and by developers who are interested in determining if changes they have made have caused any regressions.There are a number of options available to control the behavior of test.py.if you run test.py--help you should see a command summary like:Usage:test.py[options]Options:-h,--help show this help message and exit-c KIND,--constrain=KINDconstrain the test-runner by kind of test -e EXAMPLE,--example=EXAMPLEspecify a single example to run-g,--grind run the test suites and examples using valgrind -k,--kinds print the kinds of tests available-l,--list print the list of known tests-m,--multiple report multiple failures from test suites and testcases-n,--nowaf do not run waf before starting testing-s TEST-SUITE,--suite=TEST-SUITEspecify a single test suite to run-v,--verbose print progress and informational messages-w HTML-FILE,--web=HTML-FILE,--html=HTML-FILEwrite detailed test results into HTML-FILE.html -r,--retain retain all temporary files(which are normallydeleted)-t TEXT-FILE,--text=TEXT-FILEwrite detailed test results into TEXT-FILE.txt -x XML-FILE,--xml=XML-FILEwrite detailed test results into XML-FILE.xml If one specifies an optional output style,one can generate detailed descriptions of the tests and status.Available styles are text and HTML.The buildbots will select the HTML option to generate HTML test reports for the nightly builds using,./test.py--html=nightly.htmlIn this case,an HTML file named“nightly.html”would be created with a pretty summary of the testing done.A“human readable”format is available for users interested in the details../test.py--text=results.txtIn the example above,the test suite checking the ns-3wireless device propagation loss models failed.By default no further information is provided.To further explore the failure,test.py allows a single test suite to be specified.Running the command,./test.py--suite=ns3-wifi-propagation-loss-modelsresults in that single test suite being run.FAIL:TestSuite ns3-wifi-propagation-loss-modelsTo find detailed information regarding the failure,one must specify the kind of output desired.For example,most people will probably be interested in a text file:./test.py--suite=ns3-wifi-propagation-loss-models--text=results.txt This will result in that single test suite being run with the test status written to the file “results.txt”.You should find something similar to the following in that file:FAIL:Test Suite‘‘ns3-wifi-propagation-loss-models’’(real0.02user0.01system0.00) PASS:Test Case"Check...Friis...model..."(real0.01user0.00system0.00)FAIL:Test Case"Check...Log Distance...model"(real0.01user0.01system0.00)Details:Message:Got unexpected SNR valueCondition:[long description of what actually failed]Actual:176.395Limit:176.407+-0.0005File:../src/test/ns3wifi/Line:360Notice that the Test Suite is composed of two Test Cases.The first test case checked the Friis propagation loss model and passed.The second test case failed checking the Log Distance propagation model.In this case,an SNR of176.395was found,and the test expected a value of176.407correct to three decimal places.The file which implemented the failing test is listed as well as the line of code which triggered the failure.If you desire,you could just as easily have written an HTML file using the--html option as described above.Typically a user will run all tests at least once after downloading ns-3to ensure that his or her environment has been built correctly and is generating correct results according to the test suites.Developers will typically run the test suites before and after making a change to ensure that they have not introduced a regression with their changes.In this case, developers may not want to run all tests,but only a subset.For example,the developer might only want to run the unit tests periodically while making changes to a repository.Inthis case,test.py can be told to constrain the types of tests being run to a particular classof tests.The following command will result in only the unit tests being run:./test.py--constrain=unitSimilarly,the following command will result in only the example smoke tests being run:./test.py--constrain=unitTo see a quick list of the legal kinds of constraints,you can ask for them to be listed.The following command./test.py--kindswill result in the following list being displayed:Waf:Entering directory‘/home/craigdo/repos/ns-3-allinone-test/ns-3-dev/build’Waf:Leaving directory‘/home/craigdo/repos/ns-3-allinone-test/ns-3-dev/build’’build’finished successfully(0.939s)Waf:Entering directory‘/home/craigdo/repos/ns-3-allinone-test/ns-3-de bvt:Build Verification Tests(to see if build completed successfully)core:Run all TestSuite-based tests(exclude examples)example:Examples(to see if example programs run successfully)performance:Performance Tests(check to see if the system is as fast as expected)system:System Tests(spans modules to check integration of modules)unit:Unit Tests(within modules to check basic functionality)Any of these kinds of test can be provided as a constraint using the--constraintoption.To see a quick list of all of the test suites available,you can ask for them to be listed.The following command,./test.py--listwill result in a list of the test suite being displayed,similar to:Waf:Entering directory‘/home/craigdo/repos/ns-3-allinone-test/ns-3-dev/build’Waf:Leaving directory‘/home/craigdo/repos/ns-3-allinone-test/ns-3-dev/build’’build’finished successfully(0.939s)histogramns3-wifi-interferencens3-tcp-cwndns3-tcp-interoperabilitysampledevices-mesh-flamedevices-mesh-dot11sdevices-mesh...object-name-servicecallbackattributesconfigglobal-valuecommand-linebasic-random-numberobjectAny of these listed suites can be selected to be run by itself using the--suite optionas shown above.Similarly to test suites,one can run a single example program using the--exampleoption../test.py--example=udp-echoresults in that single example being run.PASS:Example udp-echoNormally when example programs are executed,they write a large amount of trace file data.This is normally saved to the base directory of the distribution(e.g.,/home/user/ns-3-dev).When test.py runs an example,it really is completely unconcerned with the trace files.It just wants to to determine if the example can be built and run without error.Since this is the case,the trace files are written into a/tmp/unchecked-traces directory.If you run the above example,you should be able to find the associated udp-echo.tr and udp-echo-n-1.pcap files there.The list of available examples is defined by the contents of the“examples”directory in the distribution.If you select an example for execution using the--example option, test.py will not make any attempt to decide if the example has been configured or not,it will just try to run it and report the result of the attempt.When test.py runs,by default it will first ensure that the system has been completely built.This can be defeated by selecting the--nowaf option../test.py--list--nowafwill result in a list of the currently built test suites being displayed,similar to:ns3-wifi-propagation-loss-modelsns3-tcp-cwndns3-tcp-interoperabilitypcap-file-objectobject-name-servicerandom-number-generatorsNote the absence of the Waf build messages.test.py also supports running the test suites and examples under valgrind.Valgrind is a flexible program for debugging and profiling Linux executables.By default,valgrind runs a tool called memcheck,which performs a range of memory-checking functions,including detecting accesses to uninitialised memory,misuse of allocated memory(double frees,access after free,etc.)and detecting memory leaks.This can be selected by using the--grind option../test.py--grindAs it runs,test.py and the programs that it runs indirectly,generate large numbers of temporary ually,the content of these files is not interesting,however in some cases it can be useful(for debugging purposes)to view these files.test.py provides a--retain option which will cause these temporary files to be kept after the run is completed.The files are saved in a directory named testpy-output under a subdirectory named according to the current Coordinated Universal Time(also known as Greenwich Mean Time)../test.py--retainFinally,test.py provides a--verbose option which will print large amounts of infor-mation about its progress.It is not expected that this will be terribly useful unless there is an error.In this case,you can get access to the standard output and standard error reported by running test suites and examples.Select verbose in the following way:./test.py--verboseAll of these options can be mixed and matched.For example,to run all of the ns-3core test suites under valgrind,in verbose mode,while generating an HTML output file,one would do:./test.py--verbose--grind--constrain=core--html=results.html3.3Test TaxonomyAs mentioned above,tests are grouped into a number of broadly defined classifications to allow users to selectively run tests to address the different kinds of testing that need to be done.•Build Verification Tests•Unit Tests•System Tests•Examples•Performance Tests3.3.1Build Verification TestsThese are relatively simple tests that are built along with the distribution and are used to make sure that the build is pretty much working.Our current unit tests live in the source files of the code they test and are built into the ns-3modules;and so fit the description of BVTs.BVTs live in the same source code that is built into the ns-3code.Our current tests are examples of this kind of test.3.3.2Unit TestsUnit tests are more involved tests that go into detail to make sure that a piece of code works as advertised in isolation.There is really no reason for this kind of test to be built into an ns-3module.It turns out,for example,that the unit tests for the object name service are about the same size as the object name service code itself.Unit tests are tests that check a single bit of functionality that are not built into the ns-3code,but live in the same directory as the code it tests.It is possible that these tests check integration of multiple implementation files in a module as well.The file src/core/ is an example of this kind of test.The file src/common/ is another example that uses a known good pcap file as a test vector file.This file is stored locally in the src/common directory.3.3.3System TestsSystem tests are those that involve more than one module in the system.We have lots of this kind of test running in our current regression framework,but they are typically overloaded examples.We provide a new place for this kind of test in the directory“src/test”.The file src/test/ns3tcp/ is an example of this kind of test.It uses NSC TCP to test the ns-3TCP implementation.Often there will be test vectors required for this kind of test,and they are stored in the directory where the test lives.For example, ns3tcp-interop-response-vectors.pcap is a file consisting of a number of TCP headers that are used as the expected responses of the ns-3TCP under test to a stimulus generated by the NSC TCP which is used as a“known good”implementation.。
一、简介1. 什么是NS-3?NS是一个离散事件驱动网络模拟器。
官方定义:(from /)ns-3 is a discrete-event network simulator for Internet systems, targeted primarily for research and educational use. ns-3 is free software, licensed under the GNU GPLv2 license, and is publicly available for research, development, and use.ns-3 is intended as an eventual replacement for the popular ns-2 simulator. The project acronym “nsnam” derives historically from the concatenation of ns (network simulator) and nam (network animator).2. NS-3 vs NS-2NS-3虽然冠以一个“3”,但事实上跟它广泛流行的前任NS-2并非一脉相承,或者从使用角度上说,仅仅继承了一个名称而已。
NS-3基本上是一个新的模拟器,不支持NS-2的API。
NS-3是完全用C++编写的(也有可选的Python接口),而NS-2一部分模块使用C++而另一部分使用OTcl。
因而NS-3最大的特点就是脚本可以C++或Python语言,而在NS-2中,我们使用的是OTcl。
NS-3的功能仍旧在开发中,因此它远没有NS-2完善(当然NS-2的维护也在进行中)。
NS-3并不包含目前所有NS-2的功能,但它具有某些新的特性:正确的多网卡处理、IP寻址策略的使用、更详细的802.11模块等等。
Latest stable release: ns-3.2.1 (November 20, 2008)4. NS-3的一些名词解释POSIX:Portable Operating System Interface一组操作系统API的协议/标准族,最开始为了Unix系统上的可移植性而开发的,也适用于其他操作系统。
Doxygen:Documentation Generator支持C++、C、Java、Objective-C、Python、IDL、Fortran、VHDL、PHP、C#等各种语言的文档生成器,用于从源代码中生成说明文档。
(类似于我之前使用过的Sandcastle,貌似更加强大些,有必要得学习一下。
)nam:Network Animator基于Tcl/TK的网络动画演示工具,能提供拓扑和包级别的动画以及数据流观察。
(参考/nsnam/nam/)MercurialNS-3代码维护使用的源码版本控制管理系统WafNS-3项目使用的新一代的基于Python的构建系统(Build System)WireShark一种GUI包嗅探器。
由于NS-3能生成.pcap文件,因此可以使用类似于WireShark的软件对数据进行分析tcpdump另一种包嗅探器。
在Linux下使用CLI进行数据分析2 资源/docs/release/tutorial/tutorial_5.html#Resources2.1 网络资源NS-3用户有必要知道几个重要的网站:主站点位于,提供NS-3系统的基本信息。
详细文档位于主站点的/documents.html. 您也可以从这个网页上得到系统架构的相关信息。
维基百科网页/wiki可以作为NS-3主站点的补充。
您可以在那里找到用户和开发者的FAQs,以及相关问题的解决途径,第三方的共享代码、论文等等。
NS-3的源码可以在找到。
读者也可以在名为ns3-dev的源码仓库找到当前的NS-3开发树。
还有NS-3的之前发行版本和最新测试版本的代码。
2.2 源码管理系统Mercurial复杂的软件系统需要一种途径,用于管理和组织对现有代码和文档的修改。
有很多种方法可以实现这种管理,读者可能已听说过某些版本控制软件,CVS (Concurrent Version System)或许是其中最常见的一个。
NS-3项目采用Mercurial系统作为它的源码管理系统。
尽管读者在阅读本教程时不需要知道太多的Mercurial相关知识,但我们建议读者能够熟悉Mercurial,并用于查看NS-3源码。
Mercurial的网址为/mercurial/,读者可以从上面获取到这个软件配置管理系统(Software Configuration management, SCM)的二进制程序和源码。
Mercurial的开发者Selenic提供了一个Mercurial教程,网址为/mercurial/wiki/index.cgi/Tutorial/,以及快速入门指南:/mercurial/wiki/index.cgi/QuickStart/ .在NS-3的主页上,读者也可以获取到有关Mercurial和NS-3配合使用的最常用信息。
2.3 编译系统Waf读者下载NS-3的源码到本地系统之后,需要对源码进行编译来生成可执行程序。
正如源码管理方式多种多样,编译源码也有多种工具。
最常用的工具是make. Make最出名的一点:它可能是编译大型和高可配置型系统最难的一种方法。
因此,有很多替代工具被开发出来。
最近,大型高可配置系统的编译工具大多选择用Python语言来开发。
NS-3的编译系统采用了Waf。
它是用Python开发的新一代编译管理系统。
读者不必掌握python,即可编译现有的NS-3项目。
如果读者想要扩展现有的NS-3系统,大多数情况只需了解Python知识的很少且非常直观的一个子集。
对于想了解Waf细节的读者,可以访问/p/waf/ .2.4 开发环境正如以上所述,NS-3的脚本由C++或者Python编写。
从NS-3.2开始,NS3的API提供了python语言接口,但是所有的模块都是由C++编写的。
这里,我们假定读者掌握C++知识和了解面向对象的相关概念。
我们将在用到一些高级的概念或者读者可能不熟悉的语言特性、习惯用语或设计模式时适当地花些时间复习它们。
但是我们也不希望本教程变成C++教程,所以我们希望读者能够掌握基本的C++命令。
在网站上和书籍中,你可以找到无数的关于C++知识的信息。
如果读者是个C++新手,那么您在继续阅读本指南之前可能需要找一些C++教程或者网站,至少必须熟悉一下C++的基本语言特征。
例如,Cplusplus教程。
NS-3系统开发过程中使用了许多的GNU 工具链(toolchain)组件。
所谓软件的工具链是指在给定环境中可用编程工具的集合。
如果读者想要快速地了解一下GNU 工具链所包含的内容,请浏览/wiki/GNU_toolchain . NS-3使用gcc,GNU binutils,以及gdb. 但是,我们并不使用GNU编译系统工具(build system tools),既不用make,也不用autotools,而是使用Waf来作为编译管理工具。
通常,NS-3使用者的工作环境为Linux或者类Linux系统。
对于Windows 环境,有几种可以不同程度模拟Linux环境的软件,比如Cygwin。
NS-3支持在Cygwin环境下的开发。
Windows用户可以浏览/获取该软件(虽然有许多工程维护者使用MinGW,但是MinGW现在还没有得到官方支持)。
Cygwin可以提供许多流行的Linux系统命令。
但是,某些情况下它也会出现问题,因为它毕竟只是Linux系统的模拟。
Cygwin和Windows中其他程序的交互也有可能会导致程序出现问题。
如果读者正在使用Cygwin或者MinGW;并使用着Logitech的某些软件产品,我们或许可以让您少点麻烦:建议您去看一看MinGW FAQ。
搜索Logitech并阅读FAQ条目:“为什么当我编译源码时,make经常崩溃,留下一个sh.exe.stackdump文件”。
无论您相信与否,当运行Logitech时,Logitech 进程监视器潜入了每个正在系统中运行的动态连接库(DLL)当中。
它可能导致您的Cygwin或者MinGw的动态连接库奇怪地中止,常常也会阻止调试器的运行。
所以当运行Cygwin的时候,一定要小心您的Logitech软件。
替代Cygwin的一种选择是安装虚拟机,比如在VMware上安装Linux虚拟机。
2.5 套接字编程我们假定读者对本教程所举例子中的Berkeley套接字API基本熟悉。
如果您不了解套接字,我们建议您学习一下这些API和一些常见的使用例程。
TCP/IP Sockets in C这本书可以帮助您很好地理解TCP/IP套接字。
网站/~donahoo/practical/CSockets/包含了Socket in C书中所举例子的源码。
如果读者理解了该书中的前四章(如果读者没有这本书的话,可以看上面网站中的源代码),您会更好的理解本教程的内容。
这里还有一本关于多播套接字(Multicast Sockets)的书籍(Multicast Sockets, Makofske and Almeroth)。
如果您想学习本书中有关多播的例子,该书里面有些资料您可能需要了解。
NS3的两个例子/* -*- Mode:C++; c-file-style:"gnu"; indent-tabs-mode:nil; -*- */ //Emacs模式行,GPL boilerplate#include "ns3/core-module.h" //#include "ns3/simulator-module.h"#include "ns3/node-module.h"#include "ns3/helper-module.h"// Default Network Topology//// 10.1.1.0// n0 -------------- n1 n2 n3 n4// point-to-point | | | |// ================// LAN 10.1.2.0using namespace ns3;NS_LOG_COMPONENT_DEFINE ("SecondScriptExample");intmain (int argc, char *argv[]){bool verbose = true; //定义变量,用于决定是否开启两个UdpApplication的Logging组件;默认true开启uint32_t nCsma = 3; //LAN中另有3个nodeCommandLine cmd;cmd.AddValue ("nCsma", "Number of \"extra\" CSMA nodes/devices", nCsma); cmd.AddValue ("verbose", "Tell echo applications to log if true", verbose); //命令行参数设置是否开启loggingcmd.Parse (argc,argv);if (verbose){LogComponentEnable("UdpEchoClientApplication", LOG_LEVEL_INFO); LogComponentEnable("UdpEchoServerApplication", LOG_LEVEL_INFO);}nCsma = nCsma == 0 ? 1 : nCsma; //三目运算符还可以这样写。