GOPRO中文说明书
- 格式:pdf
- 大小:1.31 MB
- 文档页数:10

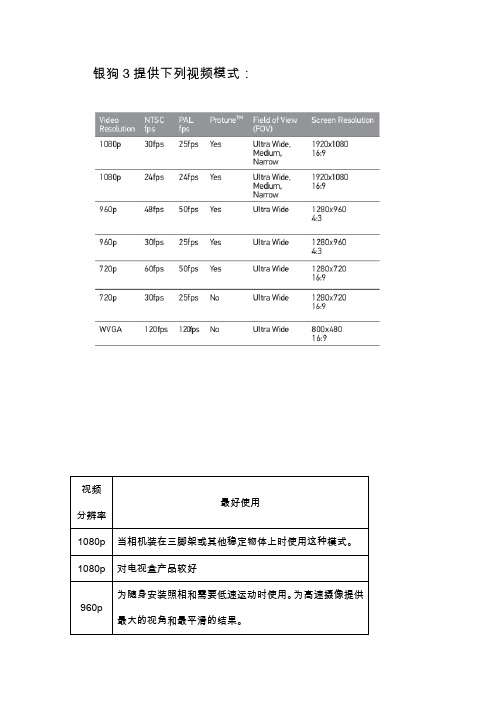
银狗3提供下列视频模式:提示:设置专业模式为开为专业视频产品提供高质量摄制,中性色彩和24fps视频。
更多信息请看专业页面。
照片分辨率模式狗3能以11MP,8MP 和5MP 的分辨率照相。
对相片分辨率的任何改变也将影响在照相、连拍和延时模式中拍的照片。
连拍选项连拍模式在按下时拍成组照片。
照片能以下列频率拍摄:3张/秒5张/秒10张/秒(默认)10张/2秒延时在延时模式中有数种时间间隔选项可用,包括0.5,1,2,5,10,30和60秒。
摄制设置菜单摄制设置允许你调整下列高级相机设置:完整的摄制选项列表请看摄制设置部分。
系统菜单系统菜单允许你调整下列相机设置:完整的选项列表请看系统菜单部分。
无线控制狗3的内置Wi-Fi允许你通过GoPro App连接Wi-Fi遥控器或手机/笔记本。
当Wi-Fi开启时,你的Wi-Fi状态指示灯将闪蓝色。
开启/关闭Wi-Fi:按下开启/关闭Wi-Fi。
当Wi-Fi开启时上次打开的Wi-Fi模式将被激活。
完整的无线功能列表请看无线控制部分。
删除删除最后一个文件或所有文件并且格式化存储卡。
当删除最后一个或所有时,状态指示灯闪烁至操作完成。
删除最后一个或所有:1.确认相机在设置模式。
如果没有显示,反复按直到出现为止。
2. 按进入设置菜单。
3.用循环设置至位置。
4.按进入删除。
5.用循环选项。
6.按选择高亮选项7.按住两秒或者循环至并按。
退出从屏幕,按下退出设置菜单。
提示:如果你任何时候想退出相机设置菜单,按住两秒。
摄制设置进入摄制设置菜单:1.确认相机在设置模式,如果没有显示,反复按直到出现为止。
2.按进入设置菜单。
3.用循环设置至位置。
4.按进入摄制设置。
5.用循环选项。
6.按选择选项。
7.有些选项有子菜单。
使用循环子菜单。
8. 按选择高亮选项。
9.按住两秒或者循环至并按。
你能在摄制设置菜单中定制你的狗3摄制视频和照片的方式,比如朝向,循环录像和白平衡。
朝向狗3是朝下安装的但想让文件在观看或编辑时正着显示怎么办?这个设置消除了在记录后颠倒你的视频和图片的需要。

To download this user manual in a different language, visit /getstarted .Pour télécharger ce manuel de l’utilisateur dans une autre langue, rendez-vous sur /getstarted .Wenn Sie dieses Benutzerhandbuch in einer anderen Sprache herunterladen möchten, besuchen Sie /getstarted . Per scaricare questo manuale utente in un’altra lingua, visita /getstarted .Para descargar este manual de usuario en otro idioma, visite /getstarted .Para baixar este manual do usuário em outro idioma, acesse /getstarted .このユーザーマニュアルの他言語版をダウンロードするには、 /getstarted にアクセスしてください。
若要下載其他語言版本的使用說明書,請前往: /getstarted 。
如需下载本用户手册的其他语言版本,请访问 /getstarted 。
Чтобы загрузить это руководство пользователя на другом языке, посетите страницу /getstarted./ 加入 GoPro 的行列/GoPro /GoPro/GoPro/GoPro/ 目錄電池48疑難排解50客服支援52法規資訊52基本操作6開始使用8相機顯示器15相機模式16瀏覽設定選單17相機選單 + 圖示18拍攝影片20拍攝相片22拍攝 Burst Photo (連續快拍相片)23拍攝 Time Lapse Photo (縮時相片)24連線至 GoPro App 25將檔案傳輸至電腦26播放影片及相片27設定29Setup (設定)模式35重要訊息41相機保護殼43安裝固定座45/ 目錄7. Micro-USB 連接埠8. microSD 記憶卡插槽(不含 microSD 記憶卡)/ 基本操作1. Shutter/Select(快門/選取)按鍵2. 相機狀態螢幕3. Settings/T ag(設定/標記)按鍵4. Power/Mode(電源/模式)按鍵5. 無線狀態指示燈(藍色)6. 相機狀態指示燈(紅色)/基本操作/ 開始使用備註:相機無法自保護殼中取出。


目录目录HERO7 Black 惊艳问世4安装摄像机6了解 GoPro11使用 QuikCapture20添加 HiLight 标记22录制视频23视频设置27拍照30照片设置34拍摄延时录像36延时拍摄设置37流媒体直播39拍摄动景40曝光控制42连接至外部麦克风45利用语音命令控制 GoPro46播放媒体文件50将摄像机连接高清电视使用54连接至其他设备56传输媒体文件58自定义您的 GoPro63重要提醒信息69重置摄像机71安装 GoPro73卸下侧盖79维护81电池信息82故障排除85技术规格:视频86技术规格:照片100技术规格:延时拍摄104技术规格:Protune109客户支持117商标117 HEVC 预先通知118法规信息118HERO7 Black 惊艳问世1.2.3. 状态屏幕4. 麦克风5. 侧盖6. 闩锁释放按钮7. USB-C 端口8. 微型 HDMI 端口(不包括连接线)9. 触屏10. 扬声器11.12. 电池13. microSD 卡槽14. 电池护盖HERO7 Black 惊艳问世了解如何使用 GoPro 随附的配件。
请参阅安装 GoPro(第 73 页)。
MICROSD 卡您需要一张 microSD 卡(单独出售)才能保存视频和照片。
使用符合以下要求的品牌名称卡:• microSD、microSDHC 或 microSDXC 存储卡• Class 10 或 UHS-I 等级• 容量高达 256GB有关推荐使用的 microSD 卡的列表,请访问/microsdcards。
注意:务必先洗手并擦干再处理 SD 卡。
查看制造商指南,了解存储卡可接受的温度范围和其他重要信息。
专业提示:定期将 SD 卡重新格式化,让其保持良好状况。
这将擦除所有媒体文件,因此务必先保存。
1. 向下轻扫以访问面板。
2. 点击偏好 > 重置 > 格式化 SD 卡。
要了解如何保存视频和照片,请参阅传输媒体文件(第 58 页)。

WeightCamera: 3.1oz (89g)Camera with housing: 5.4oz (152g) Video ModeVideo ResolutionsVideo Resolution Frames Per Second (fps)NTSC/PALField of View (FOV)ScreenResolution4K 30, 25, 24 Ultra Wide 3840x2160 4K SuperView 24 Ultra Wide 3840x2160 2.7K 601, 50, 48, 30, 25, 24 Ultra Wide, Medium 2704x1520 2.7K SuperView 30, 25 Ultra Wide 2704x1520 2.7K 4:3 30, 25 Ultra Wide 2704x2028 1440p 80, 60, 50, 48, 30, 25, 24 Ultra Wide 1920x14401080p 120, 90, 60, 50, 48, 30, 25, 24 Ultra Wide, Medium,Narrow21920x10801080pSuperView80, 60, 50, 48, 30, 25, 24 Ultra Wide 1920x1080 960p 120, 60, 50 Ultra Wide 1280x960720p 2401, 120, 60, 50, 30 , 25 Ultra Wide, Medium,Narrow31280x720720p SuperView 120, 60, 50 Ultra Wide 1280x720 WVGA 240 Ultra Wide 848x480Video FormatH.264 codec, .mp4 file formatTime Lapse Video1Automatically creates video from frames captured at set intervals. Available only in 4K and 2.7K 4:3 resolutions.Time Lapse Video Intervals0.5, 1, 2, 5, 10, 30 and 60 secondsVideo + PhotoRecord video and capture Time Lapse photos at the same time. Available intervals are 5, 10, 30 and 60 seconds.Video Resolution Video Frames per Second (fps) Video FOV1440p 25, 24 Ultra Wide1080p 30, 25, 24 Ultra Wide, Medium, Narrow720p 60, 50, 30, 25 Ultra Wide, Medium, Narrow4LoopingRecord a continuous video loop that overwrites itself until you press the shutter button to stop it and save.Advanced Video Capture SettingsSuperView™SuperView video mode captures the world's most immersive wide-angle perspective. It allows you to capture more of yourself and your surroundings in the shot, and it provides full widescreen playback.SuperView SettingsSuperView Mode Video Resolution4K SuperView 3840 x 21602.7K SuperView 2704 x 15201080p SuperView 1920 x 1080720p SuperView 1280 x 720Auto Low LightAuto Low Light mode automatically adjusts frame rates according to lighting conditions for enhanced low-light performance. Frame rates are adjusted in medium- and low-light conditions. Playback occurs at the selected resolution and frame rate.Photo ModePhoto ResolutionsResolution Field of View (FOV) Screen Resolution12MP (Default) Wide 4000 x 30007MP Wide, Medium 3000 x 22505MP Medium 2560 x 1920Continuous Photo (up to 30 seconds)Hold down the shutter button to continuously capture a series of photos until shutter button is released.Continuous Interval3 photos/1 second (Default)5 photos/1 second10 photos/1 secondNight PhotoCapture a single photo with a customizable exposure time of up to 30 seconds.ShutterApplies only to Night Photo and Night Lapse and determines the amount of time that the shutter is open.Shutter Setting DescriptionAuto (Default) Up to 2 secondsFixed 2, 5, 10, 15, 20 or 30 secondsMulti-Shot ModePhoto ResolutionsResolution Field of View (FOV) Screen Resolution12MP (Default) Wide 4000 x 30007MP Wide, Medium 3000 x 22505MP Medium 2560 x 1920BurstCapture up to 30 photos per second.Burst Rate30 photos/1 second (Default), 30 photos/2 seconds, 30 photos/3 seconds, 30 photos/6 seconds1 10 photos/1 second, 10 photos/2 seconds, 10 photos/3 seconds5 photos/1 second3 photos/1 secondTime LapseAutomatically capture a series of photos at timed intervals.Time Lapse Photo Intervals0.5, 1, 2, 5, 10, 30 and 60 secondsNight LapseCapture a series of photos at specific intervals and exposure times.Night Lapse Photo Intervals15, 20, 30 and 60 seconds2, 5, 30 and 60 minutesShutterApplies only to Night Photo and Night Lapse and determines the amount of time that the shutter is open.Shutter Setting DescriptionAuto (Default) Up to 2 secondsFixed 2, 5, 10, 15, 20 or 30 secondsAdvanced Video and Photo Capture SettingsProtune™Protune unlocks the camera's full potential, delivering minimally compressed, cinema-caliber video optimized for professional productions, and advanced manual controls for photos and video. Flex your creativity with customizable settings for Color, ISO Limit, White Balance, Sharpness and Exposure—and enjoy the greatest degree of manual control available in a GoPro camera.∙Captures images with less compression, giving content creators higher quality for professional productions.∙Protune enables manual control of White Balance, Color, ISO Limit, Sharpness, Shutter and Exposure Value Compensation for advanced control and customization of your videos and photos.∙Protune is available for all video and photo resolutions.Protune SettingsWhite BalanceAdjusts the overall color tone of videos and photos.White BalanceSettingRecommended Lighting ConditionsAuto (Default) Automatically adjusts the color tone based on the environmental conditions3000K Warm light (incandescent or sunrise/sunset lighting) 5500K Slightly cool light (cool fluorescent, average daylight) 6500K Cool light (overcast conditions)Native Industry standardized optimized colorColorAllows you to adjust the color profile of your video footage or photos.Color Setting Resulting Color ProfileGoPro Color(Default)GoPro color-corrected profile (same great color as when Protune is turned off)Flat Flat, neutral color profile that can be color-corrected to better match footage captured with other equipment, offering more flexibility in post-productionISO LimitAdjusts the camera's sensitivity in low-light environments, and creates a balance between brightness and resulting image noise. Image noise refers to the degree of graininess in the image. Protune for Video ISO LimitSetting Resulting Video Quality6400 Brighter video in low light, highest image noise3200 Brighter video in low light, increased image noise1600 (Default) Moderately bright video in low light, moderate image noise800 Darker video in low light, marginal image noise400 Darker video in low light, minimum image noiseProtune for Photo ISO LimitSetting Resulting Photo Quality800 (Default) Darker photo in very low light, increased image noise400 Darker photo in low light, moderate image noise200 Bright photo in indoor lighting, marginal image noise100 Bright photo in outdoor daylight, minimal image noiseSharpnessControls the sharpness of your video footage or photos.Sharpness Setting Resulting QualityHigh (Default) Ultra sharp video or photoMedium Moderately sharp video or photoLow Softer video or photo that allows for more flexibility in post-production Exposure Value Compensation (EV COMP)Affects the brightness of your video. Adjusting this setting can improve image quality when shooting in environments with contrasting lighting conditions.EV COMP Settings-2.0-1.5-1.0-0.50 (Default)+0.5+1.0+1.5+2.0Spot MeterSpot Meter is ideal for filming within a dark space with the camera pointed towards a brighter setting (such as filming the outdoors from within a car).QuikCaptureWith the press of a button, the camera automatically turns on and begins recording video or capturing Time Lapse photos.Image Quality + Optics∙Ultra sharp image quality with all-glass lens∙Ultra wide-angle field of view with reduced distortionBattery + Charging∙Rechargeable lithium-ion battery∙Rated at 1160mAH, 3.8V, 4.4WhBattery LifeThe chart below indicates the approximate continuous recording time (hr:min) you can expect when shooting in various video modes using a fully charged battery.5With Wi-Fi Off With Wi-Fi On+ Using Wi-FiWith Wi-Fi On+ Using GoProWith Wi-Fi Off+ Using BatteryWith Wi-Fi Off +Using LCDRemote App BacPac™Touch BacPac™Video Mode EstimatedTimeEstimatedTimeEstimatedTimeEstimated Time Estimated Time4K 30fps 1:05 0:55 0:50 2:00 0:502.7K 48fps 1:05 1:00 0:55 2:10 0:552.7K 30fps(4:3)1:10 1:05 0:55 2:15 0:551080p 120fps 1:10 1:05 1:00 2:20 0:551080p 60fps 1:20 1:15 1:10 2:30 1:101080p 30fpsSuperView1:30 1:20 1:15 2:45 1:15720p 120fps 1:50 1:40 1:30 3:00 1:20Audio∙Format: 48kHz sampling rate, AAC compression∙Advanced AGC (automatic gain control) with multi-band compressor∙Internal Microphone:o Monoo Approximately 2x greater dynamic range (compared to the HERO3+ Black Edition)∙External Microphone:o Stereo supported with 3.5mm microphone adapter (sold separately)o High quality ADC (analog to digital converter) to support studio quality external microphones (compared to HERO4 Silver). See list of supported microphones.PortsMini USB∙Charging∙Connecting to a computer for playback/file transfer/charging∙Supports 3.5mm stereo microphone via optional adapter (sold separately)∙Supports playback to composite TV via optional cable (sold separately)Micro HDMI∙Supports playback to HDTV via optional cable (sold separately)∙HDMI playback is certified up to 1080pmicroSD∙Memory cardStorage∙microSD memory card with a Class 10 or UHS-1 rating required. See list of recommended microSD cards∙Up to 64GB capacity supported∙Record times vary with resolutions and frame ratesPhoto + Video PlaybackHDTVMicro HDMI to HDMI cable required (sold separately)Note: HDMI playback depends on the resolution of the device and is certified up to 1080p.TVMini USB to composite cable required (sold separately)Direct playback may be available using the microSD card and a USB card reader (sold separately). See list of 4k TVs that support SD card playback.LCD Touch BacPac™ (sold separately)Attach to your camera for preview and play back of videos and photos.GoPro AppUse your phone or tablet to preview and play back videos and photos.ComputerConnect via mini USB to USB cable (included), or copy files from the microSD card to your computer.Minimum system requirements for best playback on Mac® and Windows® computers∙Mac OS® X 10.8 and later / Microsoft Windows 7, 8.x∙Intel®Core 2 Duo™ or Intel®Dual Core™∙4GB RAM∙Mac: Graphics card shipped with Intel® Dual Core™ Macs or better / Windows: Graphics card that supports OpenGL1.2 or later∙5400 RPM internal hard drive (7200 RPM drive or SSD recommended)∙See minimum system requirements for 4k editing and playback here1May require a camera software update. Learn more.21080p120 and 1080p90 are available in Ultra Wide and Narrow FOVs only.3720p240 is available in Narrow FOV only.4Ultra Wide is not available for 60 fps.5Actual performance may vary based on settings, environmental conditions and other factors. Maximum battery capacity will normally decrease with time and use.。
用 户 手 册Join the GoPro party at /gopro to see what other GoPro owners are capturing and sharing. Share your footage and join the GoPro movement!加入来欣赏其他并分享你的精彩时刻吧!/gopro GoPro 社区用户拍摄的作品。
GoProTABLE OF CONTENTSAccessories 4Mounts + Accessories 5HERO3+ Features 6Camera LCD Status Screen 8Camera Menu Flow Chart 9Camera Software Updates 10Basics 10Camera Modes 13Camera Settings 20Capture Settings 32Set Up40Wi-Fi + Wi-Fi Remote 48Connecting to GoPro App51Storage/microSD™ Cards 52System Requirements 53Transferring Files 54Playback 55Battery57Important Warning Messages 60Camera Housing 61Using the Mounts65Handling the Wi-Fi Remote 67Customer Support68配件配件与支架特性相机状态屏幕软件更新基本功能相机模式相机设置拍摄设置设置操作无线和遥控器存储卡系统要求拷贝文件回放电池相机菜单流程图连接到GoPro App 重要警告相机壳使用安装底座使用遥控器客户支持目录4LCD Touch BacPacBattery BacPacWi-Fi RemoteThe FrameWEAR IT. MOUNT IT. LOVE IT.HERO3+Wrist HousingStandard HousingRechargeable BatteryDive HousingLens Replacement KitProtective Lens + CoversMore HERO3+ accessories available at 功能配件配件5Helmet Front Mount ChestyHandlebar/Seatpost/Pole MountSurfboard MountsFloaty BackdoorHead Strap + QuickClipSuction CupVented HelmetStrapRoll Bar Mount Tripod Mounts Anti-Fog InsertsJaws Flex Clamp MountCurved + Flat Adhesive MountsSide Mount Camera TethersDual Battery Charger支架和配件查看更多HERO3+ 特性1.2.3.4.5.6.7.8.状态指示灯(红色)LCD状态显示屏状态指示灯(蓝色)接口卡槽接口(支持混合立体声麦克风适配器,不含)Wi-FiMicro HDMIm icroSD TMmini-USB(包装内不含有视频线)(包装内不含有存储卡)电缆,3.5毫米A/C6713.HERO3+ 特性9.10.11.12.接口电池后盖报警器 HERO Wi-Fi 麦克风8相机状态屏幕LCD屏显示下列HERO3的模式与设置信息1. 2. 3. 4. 5. 6. 7. 相机模式/视野录制模式(未显示)分辨率/每秒帧数时间间隔设定(未显示)计数器时间/存储/文件电量注意:图标的显示会根据你相机当前模式不同而改变9* P layback only appears in LCD Status Screen if camera is connected to a TV or LCD Touch BacPac™ (optional accessory, sold separately).**White Balance only appears if Protune™ is turned ON .相机菜单流程图**白平衡设置只会在*回放模式的状态只会在相机连接电视或者扩展液晶触屏上显示Protune 模式开启后才会显示。
请访问/support下载《用户手册》/ 您好!恭喜您购得 HERO3 White 相机。
本《快速入门指南》将向您介绍 GoPro相机的基础知识,以便您捕捉生活中的精彩瞬间。
如需了解更多信息,请访问 /support 下载《用户手册》。
加入 GOPRO MOVEMENT (GOPRO 运动乐章)/GoPro/GoPro /GoPro/GoPro在使用 GoPro 相机,欢享精彩人生时,请始终注意周围环境,以避免伤到自己和他人,同时避免您的相机受到损坏。
使用 GoPro 相机前,请阅读相机随附的《重要产品和安全信息指南》,了解其中有关安全保护措施的全部内容。
/ 基础知识/ 入门打开和关闭相机开机:按 Power/Mode 按钮。
关机:按住 Power/Mode 按钮两秒钟。
相机状态屏幕Power/Mode第 1 步从保护盒中取出相机。
第 2 步卸下相机侧盖并插入 microSD 卡。
(须为 Class 10 或 UHS-1,单独出售。
)第 3 步卸下相机后盖并插入电池。
第 4 步用随附的 USB数据线为电池充电。
/ 选择相机模式打开相机并反复按Power/Mode 按钮以浏览各相机模式。
*回放功能仅当相机连接到电视或 LCD Touch BacPac(单独销售)上时才会显示。
/ 录制视频与拍摄照片视频录制视频。
照片拍摄单张照片。
定时拍摄按所设时间间隔拍摄多张照片。
设置调整相机的设置。
回放*在电视或 LCD TouchBacPac™上回放内容。
连拍连续拍摄照片。
选择相机模式,然后按Shutter/Select 按钮以开始/停止录制视频或拍摄照片。
/ 调整相机的设置如需了解更多信息,请访问 1. 按 Power/Mode 按钮“设置”模式 [ ]。
2. 按 Shutter/Select 以进入“设置”菜单。
3. 按 Power/Mode 按钮 4. 按 Shutter/Select ,选择您所需的选项。
gopro-hero中文说明书用户手册翻译:心有多远目录附件(略)安装附件(略)狗3特征 (3)相机LCD状态屏幕 (4)相机用户界面流程图 (4)软件升级 (5)基础 (6)相机模式 (6)相机设置 (10)删除 (14)摄制设置 (15)准备 (19)无线控制 (23)存储/SD卡 (24)系统要求 (24)转移文件 (25)回放 (26)电池电量 (27)重要警告信息 (27)相机装配(略) (28)售后服务 (29)狗3特征1.状态指示灯(红色)2.快门/选择按钮3.LCD状态显示屏4.Wi-Fi状态指示灯(蓝色)5.电源/模式按钮6.微型HDMI接口(不含电缆)7.微型SD卡槽(不含SD卡)8.微型USB接口(支持混合A/C电缆,3.5mm立体声麦克适配器,不含)9.系统接口10.电池盖11.Wi-Fi开/关键12.报警器相机LCD状态显示屏LCD显示屏显示狗3的下列状态和设置信息:1.相机模式/FOV(视图框)2.摄制设置模式(没显示)3.分辨率/FPS帧每秒4.时间间隔设置(没显示)5.计数器6.时间/存储/文件7.电量注意:以上显示图标会因你的相机所处状态而变化相机用户界面流程图注意:白平衡和回放只有在相应功能开启时才显示。
软件升级狗通过软件升级来增加新的产品升级。
检查一下你的相机或其他狗产品是否有新的升级,访问:/update 。
使用你的狗3:基础开始在第一次使用你的狗3前:1.首先标签朝前,最窄的一边往卡槽中插入一张microSD?, micro SDHC?或 micro SDXC?卡。
推荐使用Class 4以上的高速卡,当使用0.5秒延时或者专业模式录像需要Class 10的卡。
2.将电池装入相机中。
3.给电池充电。
包含的锂离子电池已被部分充电。
用USB线将相机和电源如电脑、充电器连接。
使用上述方法充电不会对相机和电池造成损害。
提示:相机在关闭和充电时状态指示灯会显示:充电时状态指示灯亮。