HFP80 V2中英文说明书
- 格式:pdf
- 大小:9.54 MB
- 文档页数:11

1Sine wave output filter with a voltage dc linkSee below:Approvals and CompliancesDescription- Design corresponding to UL 1283, CSA 22.2 No. 8, IEC/EN60939- Enhancement of the system efficiencyApplications- Optimized for long motor cables (up to 1000 m) and operation under full load- Equipped with voltage connection to converter dc link circuit for best results- Frequency converters in uninterruptible power supplies, elevators, he-ating-, ventilating- and air conditioning-systems, traction and conveyer systems- Cost saving technologie, increase of motor life time, deployment of flexible lightweight unshielded instead of expensive shielded motor ca-bles, reduced fitting workWeblinkspdf datasheet , html-datasheet , General Product Information , Distributor-Stock-Check , Detailed request for product , MicrositeT echnical DataRated Current 4 - 16 A @ Ta 40 °C Rated voltage 500/288 VAC: 50/60 HzApproval for4 - 16 A @ Ta °C / 500/288 VAC; 50 Hz Overload Current 1.5 x Ir for 1 minute, per hour Dielectric Strength500/288 VAC:1.1 kVDC between L-L2.5 kVDC between L-PE Test voltage (2 sec)Weight16 - 24 kg Material: Housing Metal Sealing CompoundUL 94V-2MountingScrew-on mounting on chassis, from topTerminalScrew clamps Operating Temperature -25 °C to 100 °CClimatic Category 25/100/21 acc. to IEC 60068-1Degree of Protection IP 20 acc. to IEC 60529Protection ClassSuitable for appliances with protection class I acc. to IEC 61140Approvals and CompliancesDetailed information on product approvals, code requirements, usage instructions and detailed test conditions can be looked up in Details about ApprovalsApplication standardsApplication standards where the product can be usedOrganizationDesignStandardDescriptionDesigned for applications acc.IEC/UL 60950IEC 60950-1 includes the basic requirements for the safety of information technology equipment.CompliancesThe product complies with following Guide LinesIdentification Details Initiator DescriptionCE declaration of conformity SCHURTER AG The CE marking declares that the product complies with the applicablerequirements laid down in the harmonisation of Community legislation onits affixing in accordance with EU Regulation 765/2008.RoHS SCHURTER AG EU Directive RoHS 2011/65/EUChina RoHS SCHURTER AG The law SJ / T 11363-2006 (China RoHS) has been in force since 1 March2007. It is similar to the EU directive RoHS.REACH SCHURTER AG On 1 June 2007, Regulation (EC) No 1907/2006 on the Registration,Evaluation, Authorization and Restriction of Chemicals 1 (abbreviated as"REACH") entered into force.Dimension [mm]Case 2G1) Inverter 2) Motor 3) Shield 4) Shielded cable 5) Endsleeves 6) Ground 7) Shieldes cable 8) Operation Mode2Case IB1) Inverter 2) Motor 3) Shield 4) Shielded cable 5) Endsleeves 6) Ground 7) Shieldes cable 8) Operation ModeCase 2H1) Inverter 2) Motor 3) Shield 4) Shielded cable 5) Endsleeves 6) Ground 7) Shieldes cable 8) Operation Mode34Case 2I1) Inverter 2) Motor 3) Shield 4) Shielded cable 5) Endsleeves 6) Ground 7) Shieldes cable 8) Operation ModeDiagramsNote:The inverter switching frequency must lie within the range from 2 to 20kHz. A switching frequency below or above the mentioned range will result in poor per-formances. Sine wave output filters with dc-link produce leakage currents. These leakage currents could, in combination with certain OEM inverter types, disturb ove-rall system performance, causing a "over current or short to earth" error message on the inverter. For such cases Schurter suggests the following three solutions or a combination of each:1) Increasing the switching frequency of the inverter (drawback: increased power loss in the inverter)2) Activating the low leakage sine wave output filter operation mode by removing the factory set detachable screw (drawback: light increase of the leakage current in the motor)3) Connecting a ground wire choke type DEH in the inverters earth connection (drawback: additional component)1) Inverter 2) Ground choke 3) DC-Link 4) Sine wave output filter 5) MotorUIUIA)B)All VariantsPackaging unit 1 PcsThe specifications, descriptions and illustrations indicated in this document are based on current information. All content is subject to modifications and amendments. Information furnished is believed15.6.2185。

SPEEDLIGHTSQUICK START GUIDEVisit /firmware to download the latest firmwareIncluded Components & OverviewFJ80 II Speedlight, FJ80 II Lithium Polymer Battery, Battery Charger, Shoe Stand, USB-A to USB-C Cable, Travel CaseMain MenuLanguage English DECIMAL Display OK Factory Reset Page 3/3Canon Nikon Sony FujiOlympuLumixVersion Page 1/3 1.0Screen 21.5OFF ON ON 00Auto-Off X-Sync Beep ON Freeze RT ID#OK Settings MenuVersion Page 2/31.0AF BeamAUTOLanguage EnglishDECIMALDisplay OKFactory ResetVersion Page 1/31.0Screen 21.5OFF ONON 00Auto-Off X-Sync BeepONFreezeRT ID#OKSettings MenuSpeedlight MenuA Camera Brand Selection,Sync Function SelectionB Flash Mode Icon, Lock Icon, Battery Icon Indicator CPower Output Value / FEC ±3D Mode Selection, Zoom Selection, Modeling Lamp SettingESelection Control Arrows, OK ButtonClient MenuA FJ Wireless Enabled, ChannelSelection, Group SelectionB Flash Mode Icon, Lock Icon, Battery Icon IndicatorC Power Output Value / FEC ±3D Sync Function IconE Mode Selection, Zoom Selection, Modeling Lamp SettingFSelection Control Arrows, OK ButtonHost MenuA Camera Brand Selection, Channel Selection, Group SelectionB Lock Icon, Battery IconIndicatorCTTL / M Group Designations, Power Output Value / FEC ±3, Modeling Lamp Control D Sync Function Selection, Zoom Selection, Host Speedlight Enable/Disable ESelection Control Arrows, OK ButtonIntroductionThis guide covers setup, controls, and basic operation.Visit /documentation and scroll to the Supportsection to download the complete FJ80 II User Manual.Warning• IMPORTANT: During operation, the temperature of the speedlight lens and various components of the F J80 II speedlight may increase. Please use caution while using to avoid severe burns or injuries.• Use only with the Westcott F J80 II Lithium Polymer Battery and Charger.• Do not touch the speedlight lens after immediate use to avoid potential injury.• Never leave unattended around children and/or pets.• Always confirm proper installation, locking, and unlocking when adding or removing from the camera hot shoe. Failure to completely rotate could result in damaging the locking pin.• Keep away from fire, water, and moisture.• Do not submerge in water.• Avoid drastic temperature changes before, during, or after use.• Always remove the F J80 II Lithium Polymer Battery from the F J80 II Speedlight during travel/ storage to avoid accidental operation, which could lead to overheating or permanent damage.• Do not force adjust or add excessive weight to the speedlight head.• Only use the F J80 II Speedlight with F J80 Series compatible mounts, brackets, modifiers and/or accessories.• Do not attempt to modify any Westcott products. Contact Westcott for assistance.• The maximum operating temperature is 14~122°F (-10~50°C).Dual-Stage Heat ProtectionThe F J80 II is equipped with a self-monitoring system ensuring safe operation during continued full-power use during a short timeframe. The monitoring system provides a staged automatic protection scenario;• Stage 1: Once the speedlight reaches an internal operating temperature of 212°F (100°C), the screen will display a yellow OH. The recycle time will also increase to 2 seconds in efforts to cool the unit while allowing for further operation.• Stage 2: Once the strobe reaches an internal operating temperature of 266°F (130°C), the screen will display a red OH icon. The recycle time will increase an additional 2 seconds in efforts to cool the unit while allowing for further operation.• Once the unit has cooled, the red OH will disappear from the touchscreen, and it will then be safe to continue operation.Note: The LED modeling lamp will be disabled during OH in efforts to minimize heat.Getting StartedCharging the F J80 II Lithium Polymer Battery1. Ensure the F J80 II is OFF by long-pressing the Power button until the LCD screen turns off.2. Remove the battery from the F J80 II by pressing the two release buttons on the sides of thebattery and gently pull the battery away from the F J80 II battery port.3. Connect the USB-C Cord to the F J80 II Battery Charger and plug the AC adapter into a wall outlet.4. Align the metal contacts on the back of the FJ80 II battery with the contacts on the FJ80 IIcharger; while pressing the buttons on the side of the battery, gently insert the battery into the charger and gently press down until the battery locks into place.5. The battery is charged and can be safely removed from the charger when all of the LEDindicator lights turns green.6. Remove the battery from the charger by pressing the side release buttons and gently pullingaway from the charger.Battery Charger LED Indicator Light Colors:Green:• No Battery Inserted: One indicator illuminated green means the charger is plugged into a power outlet and ready to charge the F J80 II Li-po Battery.• Battery Inserted: The F J80 II Battery is fully-charged and ready to be removed from the charger. Orange:• Battery Inserted: The F J80 II Battery is correctly inserted and charging.Attaching the Lithium Polymer BatteryAttach the F J80 II Battery into the speedlight by aligning the metal contacts on the back of the battery to the contacts on the F J80 II battery port and gently press the battery into the port until it clicks into place.Powering On1. Ensure the F J80 II battery has been fully charged.2. Ensure the battery is securely attached to the F J80 II.3. Turn the speedlight ON by long-pressing the Power button, then tap the blue power logo on thescreen until the start-up screen appears.Note: The F J80 II LCD T ouchscreen is protected by a removable clear screen protector that can be removed at any time by gently pulling the film away from the display.MountingAttaching to a Camera or the Cold Shoe Stand1. Ensure the F J80 II is OFF and rotate the dial all the way to the right.2. Slide the F J80 II Speedlight base into the camera’s hot shoe or cold shoe stand with thetouchscreen facing the same direction as the rear of the camera or channel opening on the back of the shoe stand. (Note: Using the F J80 II M on Sony cameras REQUIRES the #4711 F J Adapter for Sony Cameras.)3. Rotate the Shoe Lock dial left until it’s securely mounted to the camera. Do not overtighten. Detaching from a Camera or the Cold Shoe Stand1. Ensure the F J80 II is OFF.2. Rotate the Shoe Lock dial left to right. (Note: Ensure that the dial has been completely movedto the right. Otherwise, the locking pin may be permanently damaged upon removal of thespeedlight.)3. Securely grasp the sides of the FJ80 II Speedlight, gently slide the speedlight towards the rearof the camera or cold shoe stand, and completely remove it from the camera’s hot shoe or cold shoe stand.Note: Never force or remove the F J80 II into or away from the camera’s hot shoe. Attaching & Removing ModifiersAttaching the F J80 II Magnetic Modifiers (Sold Separately)1. Ensure all modifiers have been removed and the F J80 II’s articulating flash head has cooled.2. Grasp the edges of the modifier’s magnetic ring, align the magnetic ring with the F J80 II’s face, andgently affix it into place. (Note: The magnetic ring may require a slight turn to ensure proper seating.)3.Remove the magnetic modifier by grasping the magnetic ring and pulling away from the speedlight head.F J80 Creative Pack#4755Diffusion Dome#47575" Reflector#4748Snoot with Honeycomb Grid#4746Magnetic Grid & Gel Pack#4758Updating FirmwareIMPORTANT• If the FJ80 II doesn’t display as an external device after connecting to a computer, disconnect the USB cable from both devices and restart the computer and firmware update process.• It’s recommended that the firmware update installation process be completed onlywhen the connected computer’s power level is ≥ 25%. Loss of power of any type during this process could render the FJ80 II inoperable and require professional repair.• Removing the USB cable from the FJ80 II without properly ejecting the device from your computer could render the trigger inoperable and require professional repair.• Copying the firmware from your computer to the FJ80 II may take a few minutes and/or halt the copying process. Should this happen, close the copy progress window and try again. Further copying issues may require the computer to be restarted.The FJ80 II is designed with a USB-C port to allow for firmware updates and charging. Future firmware updates may result in performance enhancements and modified menu options.The FJ80 II’s firmware version is displayed on the start-up screen. Please visit /firmware to update your FJ80 II to the latest firmware. Follow the instructions included with the firmware download to update.WarrantyWestcott’s warranty obligations for this product are limited to the following terms.The F.J. Westcott Co. (“Westcott”) warrants this Westcott branded product against defects in materials and workmanship under normal use for a period of ONE (1) YEAR from the date of retail purchase from Westcott or an authorized retailer by the original end-user purchaser (“Warranty Period”). If a defect arises and a valid claim is received within the Warranty Period, at its option and to the extent permitted by law, Westcott will either (1) repair the defect at no charge, using new or refurbished replacement parts, or (2) exchange the product with a product that is new or which has been manufactured from new or serviceable used partsand is at least functionally equivalent to the original product. This Limited Warranty applies only to products manufactured by or for Westcott that can be identified by the Westcott trademark, trade name, or logo affixed to them.This warranty does not apply to: (a) damage caused by accident, abuse, misuse, flood, fire, earthquake, mold, or other external causes; (b) damage caused by operating the product outside the permitted or intended uses described by Westcott; (c) a product or part that has been modified to alter functionality or capability without the written permission of Westcott; or (d) cosmetic damage, including but not limited to scratches, dents and broken plastic.Disclaimer: By purchasing, borrowing and/or using this product for any event, both public or private, you,the customer, accepts all responsibility and releases Westcott, and its associates, of any and all liability inthe event of manufacturer’s defect, malfunction or misuse of the product which may lead to further injuriesor complications unforeseen by the user. Westcott is not responsible for any potential or incurred damage caused by failure to properly mount, hang, or store the product, which includes, but is not limited to damage to cameras, electronics, electrical equipment, buildings, building materials, personal injury, death, or disability, fire damage, or any and all other damage not mentioned previously.Please contact Westcott Customer Support for a Return Authorization Number “RMA” prior to requesting warranty service. This RMA must be clearly written on the outside of the box to the left of the shipping label. Items sent in without pre-authorization or that do not fall under the limited warranty will be returned at the expense of the sender.Phone: 419-243-7311Email:**********************Shipping: F.J. Westcott Co, 1425-B Holland Rd. Maumee, OH 43537Visit for videos, pro tips, inspiration, and more!Westcott products are made to the company’s traditionally high standards of quality and comply withall applicable government safety regulations and requirements. In an effort to provide the best quality products possible, we periodically make product modifications. Actual products may not be identicalto items pictured. Made in China. ©F.J. Westcott Co. All rights reserved. J1022。
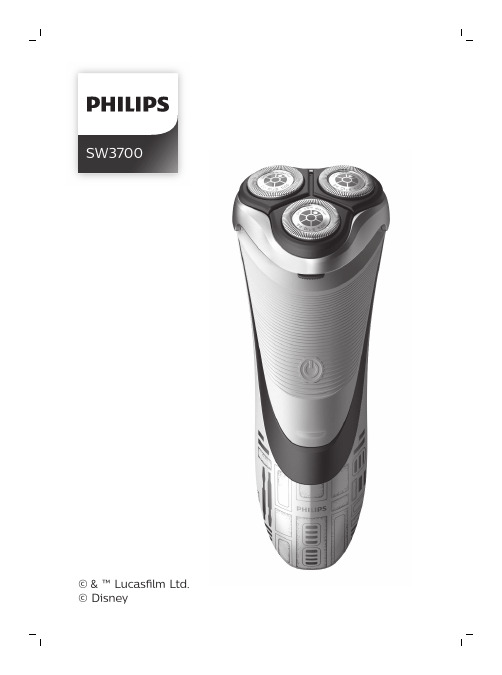
SW3700English 6简体中文 19IntroductionCongratulations on your purchase and welcome to Philips! To fully benefit from the support that Philips offers, register your product at/welcome .Please read this user manual, as it contains information about the features of this shaver as well as some tips to make shaving easier and more enjoyable.General description (Fig. 1)1Protective cap2Shaving unit3Shaving unit release button4On/off button5Charging light6Socket for small plug7Trimmer8Trimmer release slide switch9Supply unit10Small plugImportant safety informationRead this important information carefully before you use the appliance and its accessories and save it for future reference. The accessories supplied may vary for different products.Danger-Keep the supply unit dry.6EnglishWarning-To charge the battery, only use the detachable supply unit (HQ850) provided with the appliance.-The supply unit contains a transformer. Do not cut off the supply unit to replace it with another plug, as this causes a hazardous situation.-This appliance can be used by children aged from 8 years and above and persons with reduced physical, sensory or mental capabilities or lack of experience and knowledge if they have been given supervision or instruction concerning use of the appliance in a safe way and understand the hazards involved. Children shall not play with the appliance. Cleaning and user maintenance shall not be made by children without supervision.-Always unplug the shaver before you clean it under the tap.-Always check the appliance before you use it.Do not use the appliance if it is damaged, as this may cause injury. Always replace a damaged part with one of the original type.-Do not open the appliance to replace the rechargeable battery.Caution -Never immerse the cleaning system or the charging stand in water and do not rinse it under the tap.-Never immerse the shaver in water. Do not use the shaver in the bath or in the shower.-Never use water hotter than 60°C to rinse the shaver.-Only use this appliance for its intended purpose as shown in the user manual.-For hygienic reasons, the appliance should only be used by one person.7English-Never use compressed air, scouring pads,abrasive cleaning agents or aggressive liquids such as petrol or acetone to clean theappliance.-If your shaver comes with a cleaning system,always use the original Philips cleaning fluid (cartridge or bottle, depending on the type of cleaning system).-Always place the cleaning system on a stable,level and horizontal surface to prevent leakage.-If your cleaning system uses a cleaning cartridge, always make sure the cartridge compartment is closed before you use the cleaning system to clean or charge the shaver.-When the cleaning system is ready for use, do not move it to prevent leakage of cleaning fluid.-Water may drip from the socket at the bottom of the shaver when you rinse it. This is normal and not dangerous because all electronics are enclosed in a sealed power unit inside the shaver.-Do not use the supply unit in or near wallsockets that contain an electric air freshener to prevent irreparable damage to the supply unit.Electromagnetic fields (EMF)-This Philips appliance complies with allapplicable standards and regulations regarding exposure to electromagnetic fields.General-This shaver can be safely cleaned under the tap.-The supply unit is suitable for mains voltages ranging from 100 to 240 volts.-The supply unit transforms 100-240 volts to a safe low voltage of less than 24 volts.8EnglishChargingCharge the shaver before you use it for the firsttime and when the display indicates that thebattery is almost empty.Charging takes approx. 8 hours. A fully chargedshaver has a shaving time of up to 40 minutes.Note: You cannot use the shaver while it ischarging.Note: Depending on your shaving/styling behaviorand beard type, the operating time may vary overtime.Charging with the supply unit1Make sure the shaver is switched off.2Put the small plug in the shaver and put thesupply unit in the wall socket.-The charging light on the shaver indicates thecharging status (see 'Charge indications').3After charging, remove the supply unit from thewall socket and pull the small plug out of theshaver.Charge indicationsWhen the battery is almost empty, the charging light starts to flash red.When you switch off the shaver, the charging light continues to flash red for a few seconds.9EnglishWhen the shaver is charging, the charging light flashes green.When the battery is fully charged, the charging light lights up green continuously.Note: After approx. 30 minutes, the charging light goes out to save energy.rinsed under running tap water.-Use this shaver for its intended household use as described in this manual.-For hygienic reasons, the shaver should only be used by one person.-Trimming is easier when the skin and hair are dry.Note: This shaver can only be used without a cord.Skin adaptation period Your first shaves may not bring you the result you expect and your skin may even become slightly irritated. This is normal. Your skin and beard needtime to adapt to any new shaving system. To allow your skin to adapt to this new appliance, we advise you to shave regularly (at least 3 times a week) and exclusively with this appliance for a period of 3weeks.For the best results on skin comfort, pre-trim your beard if you have not shaved for 3 days or longer.When you press the on/off button for the very first time, the charging light flashes in an irregular pattern.Charge the shaver before use.1To switch the shaver on or off, press the on/off button once.1Switch the shaver on.2Move the shaving heads over your skin in both straight and circular movements to catch all hairs growing in different directions. Exertgentle pressure for a close comfortable shave.Note: Do not press too hard, this can cause skin irritation.3Switch off and clean the shaver after each use.4Put the protective cap on the shaver to protect shaving heads.11EnglishUsing the trimmerYou can use the trimmer to groom your sideburns and moustache.1Push the trimmer release slide switch downwards to open the trimmer.2Switch the shaver on.3Hold the trimmer perpendicular to the skin and move it downwards while exerting gentle pressure.4Switch off and clean the trimmer after each use.5Close the trimmer (‘click’).-Regular cleaning guarantees better shaving results.-Never clean, remove or replace the shaving unit while the shaver is switched on.-Do not apply pressure to shaving head combs.-Do not touch shaving heads with hard objects as this may dent or damage the precision-made slotted combs.-Do not use abrasives, scourers or aggressive liquids such as gasoline or acetone to clean the shaver.12EnglishCleaning the shaver under the tapClean the shaver after every shave for optimal2Rinse the shaving unit under a warm tap.3Press the unit release button to open the shaving unit.4Rinse the shaving unit and hair chamber undera warm tap.5Carefully shake off excess water and let the shaver air dry.6Close the shaving unit.Clean the trimmer after each use.1Switch the shaver off.13English2Push the trimmer release slide switch down to open the trimmer.3Switch the shaver on and rinse the trimmer under the tap.4Switch the shaver off after cleaning.5Carefully shake off excess water and let the trimmer air dry.6Close the trimmer (‘click’).Tip: For optimal performance, lubricate the teeth of the attachment with a drop of sewing machine oil regularly.For maximum shaving performance, we advise you to replace the shaving heads every two years.Replace damaged shaving heads immediately.Always replace the shaving heads with original Philips shaving heads.1Switch the shaver off and disconnect it from the wall socket.Press the shaving unit release button to open the shaving unit. Pull the shaving unit off the shaver.14EnglishPut the protective cap on the shaver to preventdamage.Note: Always let the shaver dry completely beforestoring.To buy accessories or spare parts, visit/service or go to yourPhilips dealer. You can also contact the PhilipsConsumer Care Center in your country (see theinternational warranty leaflet for contact details).The following accessories and spare parts areavailable:-SH30 Philips Shaving Heads.-HQ110 Philips shaving head cleaning spray Recycling-Do not throw away the product with the normalhousehold waste at the end of its life, but handit in at an official collection point for recycling.By doing this, you help to preserve theenvironment.-This product contains a built-in rechargeablebattery which shall not be disposed of withnormal household waste. We strongly adviseyou to take your product to an official collectionpoint or a Philips service centre to have aprofessional remove the rechargeable battery.-Follow your country’s rules for the separatecollection of electrical and electronic productsand rechargeable batteries. Correct disposalhelps prevent negative consequences for theenvironment and human health.16EnglishRemoving the rechargeable batteryshaver or in the hair chamber. If so, remove them.2Remove the outer panels of the shaver with a screwdriver or other tool. If necessary, alsoremove additional screws and/or parts until you see the printed circuit board with therechargeable battery.3Remove the rechargeable battery.Warranty and supportIf you need information or support, please visit /support or read theinternational warranty leaflet.Warranty restrictionsThe shaving heads (cutters and guards) are not covered by the terms of the international warranty because they are subject to wear.TroubleshootingThis chapter summarizes the most commonproblems you could encounter with the appliance.If you are unable to solve the problem with the information below, visit/support17Englishfor a list of frequently asked questions or contact the Consumer Care Center in your country.Problem Possible cause Solution The appliance do es not shave as well as it used to.The shaving heads are damaged or worn.Replace the shaving heads.Long hairs obstruct the shaving heads.Clean the shaving heads one by one.You have not inserted the shaving heads properly.Make sure that the projections of the shaving heads fit exactly into the recesses.The appliance does not work when I press the on/off button.The rechargeable battery is empty.Recharge the battery.The temperature of the appliance is too high. In this case,the appliance does not work.As soon as thetemperature of the appliance has dropped sufficiently, you can switchon the appliance again.18English介绍感谢您的惠顾,欢迎光临飞利浦! 为了让您能充分享受飞利浦提供的支持,请在 /welcome 上注册您的产品。

Copyright©2020–RICHTECH SYSTEM LTDAll rights reserved.Document NO:RICHTECHV2PRO001Document revision:First edition,June,2020.Operation GuidelinesNoticePlease follow the recommendations listed below foroptimal performance.Please make sure that the system is deployed in a well-lit areaAvoid direct sunlight when possiblePlease stay still during the scanning processDo not place unit outside in rain or weatherThe system detects skin surface temperature which is typically1°F lower than internal body temperatureIf you have trouble setting up the device,please refer to the tutorial videos located on our website:https:///tutorial-videosWarranty Information can be found at https:///product-warrantyCertificationsCE inspection test,certificate number BKC200507AC,in line with the following standards: EN55032:2015EN IEC61000-3-2:2019,EN61000-3-3:2013+A1:2019EN55035:2017FCC inspection test,certificate number BKC200508AC,in line with the following standards: FCC PART15Subpart BRoHS test,certificate number BKC200509AC,in line with the following standards:IEC62321-4:2013+A1:2017IEC62321-5:2013IEC62321-6:2015IEC62321-7-1:2015IEC62321-7-2:2017IEC62321-8:2017Contents1.Introduction (1)1.1Features (1)1.2Setup (2)1.3Product overview (2)1.3.1Device structure (2)1.3.2Screen and icon (3)2.Software (3)2.1V2pro connect to the network (3)2.2Setting of V2pro IP address (5)3.Management terminal(web) (6)3.1Login interface (6)3.2Settings (9)3.2.1Account (9)3.2.2System (9)3.2.3Maintenance (10)3.2.4Screen (11)3.2.5Network (12)3.2.6Advanced (13)3.2.7Storage (15)3.2.8AI settings (15)3.2.9Face library (17)3.2.10Integration (20)3.2.11Error Message (21)3.2.12Volume (21)3.2.13V2pro connected to pc directly by ethernet cable (22)4.Desktop Management Terminal (23)4.1Setup (23)4.2Main interface (25)4.2.1Support (26)4.2.2Setting (26)4.3User (27)4.3.1Live (27)4.3.2Add user (28)4.3.3User management (28)4.3.4Records query (29)4.4Settings (29)4.4.1Net config (29)4.4.2System Config (30)5.Maintenance (31)6.Specification (31)7.Warranty (33)The Automated AI Temperature Screening System(AATSS)V2Pro is your company’s first line of defense against COVID-19and other infectious diseases.As a fully automated system,the AATSS V2Pro provides extremely accurate temperature readings,immediate temperature alerts through multiple notification channels,and automatically records data for easy recordkeeping and reporting.It can also integrate with access control systems to enforce company temperature,identity,and PPE policies. Both the CDC and FDA recommend having routine temperature screening for employees upon arriving at work.When deployed as part of a multilayered preventative response to COVID-19,the AATSS V2Pro will protect your employees and facilitate the re-opening of your business.The AATSS V2Pro is the ultimate all-in-one solution for contactless temperature screening.1.1Features∙ADA Compliant–full customization of data storage and display∙RTSP live feed for security camera integrations∙Adjustable confidence levels for facial recognition∙Advanced facial recognition software allows for temperature screening and facial recognition even when user is wearing a face mask∙Multiple access control options–Temperature,Identity,Face mask∙Automated data collection through facial recognition and temperature screening ∙Dual fill lights provide illumination to improve face recognition accuracy∙Deep thermal sensor housing provides resistance against sunlight interference,providing better outdoor performance∙Security system integration capability through Wiegand protocol∙Database level high-security encryption and secured HTTPS data transmissions for HIPAA Compliance∙Email,SMS and desktop push notifications to a secretary/security desk upon abnormal temperature screening◆1.2SetupSoftware RequirementsOperating System:Windows10or aboveInternet Explorer:Version10or abovePlease follow the network setup tutorial on our website:https:///tutorial-videosOnce the system is setup on your network,simply open IE10+and navigate to the static IP address you assigned to the system to access its settings.◆1.3Product overview1.3.1Device structureFront view Side view1.3.2Screen and iconNote:we recommend using Window10when managing the AATSS V2pro.2.1V2pro connect to the networkIf you need to manage the V2pro through a network,please connect the base to your router through an ethernet cable,see below exampleIf there is more than one network interface card(NIC)in your pc,please choose the same network that connected to V2pro,and disable the other NIC,see below.The default mode of V2pro to connect to Internet is DHCP(Dynamic Host Configuration Protocol).Device will be obtained the IP address automatically.How to check the IP address:there will be appeared IP address after device is switched on20seconds on the screen,IP address will be showed1min at most.See below example IP address is192.168.0.252.2Setting of V2pro IP addressPlease visit the IP address as shown on screen in your Internet Explorer(10or above), follow the guide to download plug-in and log into the web terminal.Default username:AdminPassword:123456In Network-LAN,please close the enabling of DHCP.Then click the Save button to save the settingsV2pro will reboot again,the IP address will be adjusted to static IP address,e.g. 192.168.0.25.Gateway is192.168.0.13.1Login interfaceWhen you open the management terminal(web)first time,please input the device IP address,e.g.http://192.168.0.8There is note to recommend you to install the extension, please click”install”to make the installation as follow.Default username:adminPassword:123456Camera life feed-real-time monitoring screen3.2Settings3.2.1AccountYou may change the username and password,and add a user that only have access to browse date,no permission to change settings.3.2.2Systema.System Info.You can change the device name here.b.System time.You can change the time zone and set time preferences.3.2.3Maintenancea.UpgradeStep1:Click“Browse”and select the firmware update file(s),then client upgrade button to upgrade.Step2:Click“client upgrade”to update the systemStep3:Then perform a Factory Reset to restarted the system and finished the upgrade.Reboot–Choose how often you wish to refresh the systemb.System log3.2.4ScreenScreen Parameter Options:Auto mode,Always bright,Time.3.2.5Network3.2.6Advanceda.Email–An alert will be set to the recipient email addresses when an abnormal temperature is detected.SMS alerts can also send using this function by using your wireless carrier’s email-to-SMS function.Please see chart below for how to format the SMS email address. (Not all carriers are listed)Carrier Email FormatAT&T**************.netT-Mobile******************Verizon****************Sprint**************************.comXfinity Mobile****************Virgin Mobile****************Metro PCS*********************Boost Mobile************************.comCricket**************************.netGoogle Fi(Project Fi)*************Ting*******************.comU.S.Cellular*****************.netb.FTP–Can be used to transfer files from the device to your pcc.RTSP–Full camera feed streaming,provides easy integration into existing security camera systems3.2.7StorageYou can see the device’s available storage here.3.2.8AI settingsBasic Default OptionsFace Recognition Enable EnableDisableFace matching Enable EnableDisable(You must enable face matching in order tosee this option under Integration)Sensitivity400-100(The lower the setting,the faster thesystem can recognize faces.However,itmay recognize other objects as faces if thesetting is too low)Snapshot pixels Customize/AutomaticMinimum Snapshot Pixels220(30-300)Maximum Snapshot Pixels420(300-500)AdvancedDetection Interval4(4-20)sLiveness Detection Enable Enable:Anti-spoofing feature,requires areal live person and not just a picture of aperson’s faceDisableThreshold7Mask Detection Enable Enable:Detect face masksDisableTemperature Screening Enable Enable:Disable:Temp.Unit Celsius or FahrenheitTemp.Alert range:(98.6-99.5°F)(37.0-37.5°c)Other ConfigFTP Upload EnableFace Tracking Enable Enable:Green square will be shown on thescreen to display face trackingDisable3.2.9Face libraryYou can import pictures from your PC,or use a snapshot directly.Fill out the picture’s information below it to add to the whitelist,uncategorized or blacklist database.You can preview the image hereYou can change the similarity range from0(easier to recognize)to100(difficult to detect).The default setting at85provides strong security while allowing reliable and consistent recognition.You can check all the saved records here.3.2.10IntegrationBasic Configurations Default DescriptionIntegration Mode Door ModeUI Refresh Delay4(2-10s)User info Display Disable Option to display user’s info Temperature display Show Option to display thetemperature Save Snapshot Enable Option to save snapshot Save Temperature Record Enable Option to save temperature Entry ControlFace Matching Identity verificationTemperature Enable Temperature verification Mask Detection Mask verification3.2.11Error MessageYou can set error message as you will.3.2.12VolumeHere you can adjust the volume settings,enable audio,or disable it.3.2.13V2pro connected to pc directly by ethernet cableHow to connect v2pro directly to your pc,in case of no network or emergency. please see below steps:e ethernet cable to connect v2pro and pc.2.Open the Desktop management terminal,obtain the v2pro IP address and gatewayaddress,e.g.192.168.1.83.PC IP address should be static address.Gateway should be same with V2pro IPaddress4.Type http://192.168.1.8in your IE explore or Chrome to open the webpage tomanage your device.4.1Setupplease install the ConfigTool for AATSS V2pro on your pc. Installation steps:Download the ConfigTool,then install it as below4.2Main interfaceHere you can see a list of all your AATSS V2Pro devices,IP addresses,firmware versions and other details.You can apply updates to multiple devices through this terminal,as well as view data and adjust settings for individual devices.4.2.1SupportClick“support”,it appears software information4.2.2SettingClick“settings”,if there is more than one NIC,and devices couldn’t be showed on list, you need to change the IP address by Select Network Adapter,see below.4.3User4.3.1LiveThis screen provides a live feed of all temperature screenings currently being conducted.If an abnormal temperature is detected,the system will provide an audible alarm to notify the person viewing the screen.4.3.2Add userHere you may add users to the whitelist,blacklist and uncategorized databases.4.3.3User managementHere you can edit user information.4.3.4Records queryYou can find all records here.4.4Settings4.4.1Net configYou can set the IP address here,please use a static IP address.4.4.2System ConfigYou may adjust system settings and reboot the device here.You may change the photo right below the screen,format:24bit BMP,resolution: 285x179see below.∙Thermal infrared detection works best indoors.The AATSS V2Pro is resistant to sunlight interference and can be used outdoors,however,please avoid directsunlight on the device or the face of the person being screened when possible.We recommend a well shaded area for best performance.Limit exposure to weather and rain.∙When installing the AATSS V2Pro,please avoid heat sources such as vents and hot electronic equipment.∙Standard cleaning products can be used to clean the system.∙We recommend restarting the device once a day to ensure normal functionCAMERAResolution2million pixels1920x1080PType120°wide-angle dynamicFocusing Distance50-80cmWhite Balancing AUTOSCREENResolution600x1024Size7.0-inch IPS LCD DisplayPROCESSORCPU RK3288QuadcoreInternal Storage Capacity4GB eMMCAutomatic memory management.Can store100,000log entriesand10,000individual identities. ACCESSORIESFill Light Dual fill lightINTERFACEOperating System LinuxNetwork Module Network Module Ethernet(Wi-Fi coming soon) Audio Audio2.5W/4R SpeakersSerial Communication Serial Communication1RS232serial portRelay Output1open door signal output(Dry contact)Wiegand One Wiegand26/34output,one Wiegand26/34input(Dry contact)LAN1RJ45Ethernet socketINFRARED THERMAL MODULETemperature Detection Distance 1.6–2.6ftMeasurement Resolution0.018°FTemperature Measurement Accuracy≤±0.5°F(Medical Grade)Temperature Measurement Range93.2°F~107.6°FAbnormal Temperature Alarm Customizable–Email/SMS/Push notification(Default isaudible alarm)GENERALPower Supply DC12VOperating Temp.50°F-140°FStorage Temp.60°F-140°FPower Consumption4W(Min)Dimensions9”x4.72”x1.18”Weight 2.2poundsIf return is due to manufacturing defect all shipping costs will be covered. *********************** +1-866-204-2158。

Philipswireless portable speakerBluetooth ®Guesture control, splash proof Built-in microphone for calls 8W, rechargeable batterySB7220Big sound, shockingly clearTough it out loud and proud on the splash- and drop-proof Philips Shoqbox SB7200 series. Take your music outdoors on this rugged road warrior that lets you enjoy music wirelessly - and fearlessly - in big, deep yet clear sound.Sound Performance•Powered by 2 neodymium drivers •Loud and clear sound•Pair 2 shoqboxes into L-R speakers Versatility•Bluetooth streaming•Swipe sensor to skip songs •Built-in mic for speaker phone •Voice prompt for feedbackPortability•Drop it, splash it and just keep on using it •Built-in lithium batteryHighlightsPowered by 2 neodymium driversIt is built with 2 neodymium speaker drivers and wOOx system; simply the great sound you could ever expect from a speaker that small. Big sound, shocking clarity and deep bass to allow you to enjoy the best sound performance anywhere.Bluetooth portable speakers Bluetooth is a short range wirelesscommunication technology that is both robust and energy-efficient. The technology allows easy wireless connection to other Bluetooth devices, so you can play your favorite music from any smartphones, tablets or even laptops including iPod or iPhone on Bluetooth-enabled speaker easily.Drop and splash proofThis Philips SHOQBOX is made to withstand splash and drop, prefect for outdooradventurists. No worries about rain or spills thanks to the splash protective design. Therubber casing is a specialized tough material that can withstand drops and rough use. Simply drop it in your bag or hang it on your back pack. Prefect for the outdoors that requires an extra dose of ruggedness.Motion sensorSHOQBOX is equipped with a motion senor. Simply swipe over the sensor from left to right or right to left, to skip to the next or last track. Put your hand over the sensor for a second to pause the music. Do it again to put it back on. Easy gesture control allows you to control your music the simplest way.Built-in micWith its built-in microphone, it also works as a speaker phone. When a call comes in, the music is put on pause and you can talk via the speaker. Call for a business meeting. Or, call your friend from a party. Either way, it works great.Voice promptThe voice prompt is available in different languages. It gives instant feedback on battery level or alert whether the speaker is connected properly to your device.Pairing 2 shoqboxesYou can pair 2 SHOQBOX speakers with the smart sensor for a stereo system of Left and Right channels. Simply place the two speakers side by side and swipe your hands over both sensors from outside in simultaneously. Perfect for a party or gathering. Enjoy bigstereo sound from music, movies and games.Issue date 2020-07-08 Version: 3.1.412 NC: 8670 000 94976 EAN: 69 23410 71788 4© 2020 Koninklijke Philips N.V.All Rights reserved.Specifications are subject to change without notice. Trademarks are the property of Koninklijke Philips N.V. or their respective owners.SpecificationsCompatibility•Works with:most Bluetooth smartphones, tablets, music devices•iPad: iPad 1, iPad 2, new iPad•iPhone: iPhone 3, iPhone 3GS, iPhone 4, iPhone 4S •iPod touch: 3rd generation or later•Android tablets & smartphones: with Android 2.1 and Bluetooth 2.1 or above•other music devices: with Bluetooth 2.1 or above Convenience•Smart sensor: for skipping songs and pairing 2 Shoqboxes into L-R speaker•Voice feedback: on battery level Connectivity•Audio Connections: 3.5mm Line in •Bluetooth profiles: A2DP, AVRCP, HFP, HSP •Bluetooth range: Line of sight, 10M or 30FT Sound•Output power (RMS): 2 x 4W •Sound System: Stereo•Speakers: 2 x 1"Loudspeakers•Loudspeaker enhancement: wOOx Bass Radiator•Speaker drivers: Neodynium magnet systemPower•Power supply: 100-240VAC, 50/60Hz•Battery type: lithium (built-in)•Operating time on battery: 8 hrAccessories•Included accessories: AC Power Cord, USB cablefor PC charging, Warranty certificate, World WideWarranty leaflet, Quick install guideDimensions•Product dimensions (WxDxH): 72 x 68 x 179 mm•Packaging dimensions (WxDxH): 133 x 100 x 200mm•Product weight: 0.488 kg•Weight incl. Packaging: 0.953 kg*Drop proof is measured from approximate height of 0.8m. Dropprotection varies depending on drop conditions.*The body of SHOQBOX offers "splash-proof" water resistanceequivalent to IEC 60529 IPX4. It is not waterproof and should neverbe immersed in water and should not be used in bathrooms.*Battery life varies by use and settings.。

1st操作手册单芯光纤熔接机在操作设备前请仔细阅读本操作手册遵守手册中的所有安全指导和警告请妥善保管本手册内容如有变更恕不另行通知对于从非授权经销商处采购到的商品本公司概不予以负责版权声明熔接机内安装的操作软件以及相关文件受版权法,国际条约的相关规定以及其他知识产权保护法所保护。
复制或部分复制本操作手册而不注明的行为是被禁止的。
除非用于个人,未经本公司的同意禁止侵犯本公司的著作版权。
---航空运输警告---本产品含有锂电池。
在运输本产品时,请告知运输公司本产品含有锂电池。
请遵守运输公司的相关规定。
勿将橡胶防撞垫从熔接机上卸下或咨询代理商关于如何卸下的操作方法。
在缺少橡胶防撞垫的情况下拧紧螺丝会损坏内部的机械部件。
在缺少防护垫的情况下会减低熔接机的环境适应能力。
安全信息 (1)一般信息 (6)介绍 (6)80S的新功能 (7)熔接机部件 (8)其他在熔接操作时的必需品 (9)产品描述 (10)熔接机的功能与描述 (10)按键条的操作 (12)基本操作 (13)熔接准备工作 (13)电源 (15)打开/关闭熔接机 (21)Up/Down 键功能 (22)熔接机设置检查 (23)改变防风盖操作模式 (24)选择熔接模式 (25)选择加热模式 (26)光纤的制备 (29)放电校正 (34)熔接步骤 (36)熔接记录存储 (40)如何输入标题/评论/密码 (40)拉力测试 (41)取出熔接后的光纤 (41)熔接质量维护 (43)熔接前的清洁和检查 (43)定期的清洁和检查 (45)警告显示 (46)熔接菜单 (48)熔接菜单内容 (48)熔接模式 (49)选择熔接模式 (50)手动熔接模式 (59)ECF熔接 (60)熔接设置 (62)熔接记录 (63)光纤影像 (65)熔接记录注释 (66)加热菜单 (67)选择加热模式 (67)关于热熔头熔接部分的加热 (70)维护 (71)维护菜单信息 (71)更换电极 (72)稳定电极 (73)放电计数清零 (73)切割刀计数清零 (74)马达驱动 (74)自我诊断测试 (75)灰尘检查 (76)放电校正 (77)马达校正 (79)维护信息 (79)机器设置 (80)管理菜单 (81)出错信息表 (82)问题和故障排除 (88)供电 (88)熔接操作 (89)加热操作 (91)管理操作 (91)其他功能 (92)保证书和联系方式 (93)保证书 (93)联系方式 (94)本熔接机是基于用于通讯目的的硅光纤而设计的,切勿使用本设备进行其他操作。
8PARTS MANUAL 8.1LIFT ASSEMBLY8.2LIFT ASSEMBLY PARTS LISTITEM QTY DESCRIPTION PART #1 1 TOWER WELDMENT, POWER SIDE 4-1010WELDMENT 4-0766 2 2 CARRIAGEBEARING 2-0772 3 8 GLIDENIPPLE 6-0000 4 4 GREASE7 2 PIN, CABLE EQUALIZATION 1-1887PULLEY 1-18988 6 2-POST9 2 HITCH PIN, 1/8” DIA 6-184111 8 LOCKWASHER,1/2”ID 6-0059 13 8 FLAT WASHER, 1/2”ID SAE 6-02481/2”-13UNC 6-0035NUT,14 13 HEXPIN 1-233715 2 SAFETY16 4 SNAP RING ¾” EXT 6-244517 8 FLAT WASHER, 51/64”ID x 1”OD x 1/16”THK. 6-080818 1 SAFETY DOG WELDMENT, POWER SIDE 2-190119 4 SELF TAPPING SCREW, #10 X 3/8” LG. 6-0169SPRING 1-111520 2 SAFETY21 6 SELF TAPPING SCREW, #12 x 1/2”LG. 6-113422 3 SHOULDER BOLT, 3/8”DIA. x 1”LG. 6-0206PULLEY 1-041523 2 SAFETY24 3 SAFETY CABLE PULLEY 1-111625 1 SHOULDER BOLT, 3/8” x 1 1/2” LG. 6-08015/32” 6-2074 26 1 THIMBLE,DECAL 6-1767 27 1 CAPACITYPLATE 6-111128 1 SERIAL29 1 TOWER WELDMENT, SLAVE SIDE 4-101130 1 SAFETY DOG, SLAVE SIDE 2-087231 1 SHOULDER BOLT, 3/8”DIA. x 1 1/2”LG. 6-0801BAR 1-1380 32 1 ACTUATORGUARD 6-140433 1 FOAM34 1 CROSSMEMBERWELDMENT 2-1952 35 4 CROSSMEMBER PULLEY PIPE, 1/2"LG. 1-16233/4”ID 6-0738 36 16 FLATWASHER,37 2 CROSSMEMBER PULLEY PIPE, 1 3/4"LG. 1-162638 2 CROSSMEMBER PULLEY SHAFT 2-125139 4 COTTER PIN, 1/8”DIA. x 1 ½”LG. 6-097840 1 SAFETY COVER cw/DECALS, POWER SIDE 0-020441 1 SAFETY COVER cw/DECALS, SLAVE SIDE 0-0203LOCKSPRING 1-294242 4 ARM43 4 SPRING RETAINER CAP 6-308644 4 ARM LOCK HANDLE WELDMENT 1-291445 4 HEX BOLT, 5/16”-18UNC x 3/4” LG. 6-0423PIN 2-159446 4 ARM47 4 HEX BOLT, 5/16”-18UNC x 1 1/4” LG. 6-2059RESTRAINTGEAR 1-2618 48 4 ARM3/8UNCx3/4”LG. 6-0030BOLT,49 4 HEX50 2 INNER ARM WELDMENT 3-0924ITEM QTY DESCRIPTION PART #WELDMENT 3-0920ARM51 2 OUTER52 2 LOCKING ARM ASSEMBLY cw/ARM RESTRAINT PIN 4-1118-6PADASSEMBLY 1-263453 4 STACK54 3 HEX BOLT, ¼” x ¾” LG 6-0178PAD 3-0872 55 4 RUBERWELDMENT 2-1993 56 4 STACKPAD57 4 STACK PAD ADAPTER 3” 1-199358 4 STACK PAD ADAPTER 6” 2-158059 2 STACK PAD ADAPTER HOLDER 1-2012ID 6-00561/4”60 10 LOCKWASHER,61 10 ROUND HEAD SCREW, 1/4”-20UNC x 3/8” LG. 6-13533/4”-10UNC 6-0737 NUT,62 10 HEX3/4”ID 6-0738 WASHER,63 10 FLAT64 10 WEDGE ANCHOR, 3/4”-10UNC x 5 1/2”LG. 6-1379KNOB 6-113565 1 PLASTIC66 1 SAFETY RELEASE HANDLE 1-111367 8 HEX BOLT, 1/2”-13UNC x 1 1/4” LG. 6-0046GROMMET 6-1507 68 3 RUBBERCABLE 1-178669 2 EQUALIZING70 1 SAFETY RELEASE CABLE 1-205871 7 HEX HD. NUT 1/4”NC 6-003272 2 6/32 SCREW (ELECTRICAL BOX) 6-146673 1 MICROSWITCH 6-091674 1 LIMIT SWITCH MTG. BRACKET 2-114375 1 ELECTRICAL UTILITY BOX 6-1403CONNECTOR 6-113376 1 CABLE77 1 ELEC. CABLE 12/3 x 117”LG. 6-1173EXTENSION 1-137978 1 ACTUATOR79 1 HEX HD. BOLT 1/4”NC x 2”LG. 6-074180 2 HEX HD. BOLT 1/4”NC x 1 1/4”LG. 6-002781 1 HEX HD. BOLT 1/4”NC x 1 ½”LG. 6-020582 2 SHOULDER BOLT, 3/8”DIA. x 5/8”LG. 6-0069NUT,5/16”-18UNC 6-0294 83 2 HEXBRACKET 1-1378 84 1 ACTUATORMTG.85 2 WIRE ROPE CLIP, 1/16” 6-206086 3 ELECTRICAL CABLE CLIP, 5/8” ID 6-17591/2” 6-0536 87 6 TUBECLAMP,88 4 FLATWASHER, 3/8”ID SAE 6-006289 8 FLATWASHER, 5/16”ID 6-029590 1 OUTER ARM WELDMENT F.R. 2-229691 1 OUTER ARM WELDMENT F.L. 2-230092 1 TELESCOPIC ARM ASSEMBLY C/W ARM RESTRAINT PIN F.R. 4-1146-693 1 TELESCOPIC ARM ASSEMBLY C/W ARM RESTRAINT PIN F.L. 4-1145-694 2 INNER ARM WELDMENT 2-227995 4 ALLEN HEAD FLAT SCREW ¼”- 20 X ¾” LG. 6-108696 2 INTERMEDIATE ARM WELDMENT 2-228298 4 ¼” FLAT WASHER SAE 6-00608.3HYDRAULIC SYSTEM8.4HYDRAULIC SYSTEM PARTS LISTITEM QTY DESCRIPTION PART #1 1 POWER PACK, 208-230V, 1PH 6-2055POWER PACK, 208-230V, 3PH 6-2665DECAL 6-2094OPERATION”2 1 “LIFT5/16”-18UNC 6-0294NUT,3 4 HEXWASHER,5/16”I.D. 6-0674 4 4 LOCKROD 2-1254 5 2 PISTONTUBE 2-1255016 2 CYLINDER7 2 MALE NIPPLE, 1/4”NPT 6-20958 2 1/8”NPT TO 1/4” JIC 6-02809 2 FLOWCONTROL 6-151010 2 PISTON 1-146711 2 PISTON SEAL KIT 0-033712 4 FLATWASHER,5/16”I.D. 6-02955/16”-18UNCx1”LG. 6-0293BOLT,13 4 HEXTEE 6-150614 1 BRANCH15 1 HYDRAULIC HOSE (LONG) 2-148616 1 HYDRAULIC HOSE (SHORT) 2-1230KIT 0-033817 2 GLAND18 2 1/4”CAP 6-1884JIC* CYLINDER ASSEMBLY (NOT INCL. FLOW CONTROL) 3-0621013 PH POWERPACK INCLUDES THE FOLLOWING (NOT SHOWN)* 1 CONTACTOR BOX (REMOVE JUMPER & WIRE FOR 3PH) 6-1575* 1 CONTACTORBRACKET 2-1130PLATE 1-1369 * 1 COVER* 2 HEX BOLT, ¼”-NC x 1” LG 6-0008¼” 6-0056 * 4 LOCKWASHER,* 2 HEX NUT, ¼”-NC 6-0032RELIEF 6-0094 * 2 STRAIN14/4 8-0287 * 2FTCABLE,8.5POWER PACK:8.6POWER PACK PARTS LIST:#6-2055 (AB-1381) 208-230V/1PH/60Hz#6-2665 (AD-1044) 208-230V/3PH/60HzITEM QTY. DESCRIPTION PART #6-1087CHECK1 1 VALVECARTRIDGE6-2136AUTOHOISTINSTALLATION2 1 LABEL6-1376&BLADDERCAP4 1 BREATHER6 1 MOTOR AC 208-230V. 2HP/1PH/60Hz, BLK 6-24742HP/3PH/60Hz,208-230V.BLK 6-1079AC1 MOTOR6-2149AUTOHOIST7 1 LABELWARNING9 1 SPRING 0.480” x 0.063” x 0.42” COMP 6-215121.5”6-2152ODx10 1 RETURNHOSE3/8”6-2153NUTTUBE11 1 COMPRESSION6-2154SLEEVE12 1 COMPRESSIONTUBE6-2155AUTOHOISTUNIVERSAL13 1 ENDHEAD14 1 PUMPASSY 2.5 CC/REV. SHORT SPLINE 6-195815 1 RELIEF ASSEMBLY FIXED 190 BAR 6-131916 1 VALVE CARTRIDGE RELEASE MANUAL 6-088017 1 WIRING ASSEMBLY AC 1PH FENNER 6-2473TORX6-10903.00”G8x18 2 BOLT5/16”-246-07741.260”SAE9T-20/4019 1 COUPLING6-2157SAE20 1 PLUMBINGPLUG9/16”21 1 SEAL SHAFT 0.500” x 1.00” x 0.25” 6-215822 1 WASHER 0.338” x 0.625” x 0.060” STEEL 6-21596-21613/8”NPT24 1 PLUMBINGPLUG25 1 PLUMBING MAGNET 6-216227 2 SCREW TAPTITE M6 x 1.0 12MM TORX 6-216428 1 COVER ASSY SUCTION 6-2165ADJ.6-2166INLETHOSECLAMP29 1 PLUMBING1.00”6-1392SHCSx30 1 BOLT5/16”-186-2167STEEL0.250”31 1 NUT ¾”-16 x 1” HEX xTOOTHLOCK 6-2168INT.32 1 WASHER¾”33 1 BRACKET – HANDLE ASSY REL BLACK 6-077634 4 BOLT M6 x 1.0 35MM SOC HD 6-2169HI-COLLARLOCK6-2170 35 4 WASHER¼”37 4 BOLT #12-24 x 0.50’ HEX WSHRHD 6-109138 1 PLUMBING ASSY INLET 17.24 (3) 6-0786CAPASSEMBLY 6-1089VALVE39 1 RELIEF22.50”OSBLK 6-1399 40 1 TANK6.7PLASTICWHITE6-1846LONG8”41 1 CABLETIE6-0875BUNA42 1 O-RING2-348。
1981HFP S ERIES A CTIVE P ROBES 1GHz to 2.5 GHzProbing SolutionsHFP Series Active ProbesUnique Probe TipsSince different situations call for probing at different points, theHFP Series includes 5 different types of probe tips. The Straight Tip is ideal for general purpose browsing, and the Sharp Tip or Bent Sharp Tip can be used for easy access to tightly spaced test points or circuit vias. Use the Discrete SMD Tip for probing on surface mount capacitors, resistors, or other components. The IC Lead Tip enables probing on small geometry IC legs and is insulated to prevent any shorting between the test points. In addition to these unique probe tips, traditional IC clips and flexible wire leads are also included.Convenient GroundingAccessoriesJust as important as getting accessto critical test points is the abilityto easily ground the probe. It is idealto keep the ground loop as smallas possible to eliminate any groundeffects on the signal. The HFP Seriesincludes several grounding accessoriesto simplify the process. Wedge theflexible IC Ground Blade betweentwo legs of an IC for a solid groundcontact without risking a short. Usethe Bendable Pogo Ground to probea test point and ground that areextremely close together,as with aBGA. The Ground Spring can be usedto easily connect to a square pin thatis next to the test point.Easy-T o-UseIn many cases it is important tohave up to 4 probes connected totightly packed test points in yourcircuit. For this, take advantageof the unique FreeHand probe holder,which allows you to set up all theprobes once, and keeps your handsfree to make measurements on theoscilloscope. Easily identify whichprobe is for which channel by lookingat the patented AutoColor ID feature.All probes light up with an LEDcolor matched to the channel it isbeing used on.Hands free probing.2Engineers often find the need to probe a variety of different devices and test points in their designs.In order to do this,today’s probes need to be versatile,small,and lightweight while maintaining the necessary bandwidth to capture high-speed signals.As probing points get smaller and closer together,LeCroy’s HFP Series of active probes provide the ability to meet all of your difficult probing challenges.Unique Probing AccessoriesUse the Discrete SMD Tip for a tight fit on surface mount capacitors, resistors, or other components.Use the Bendable Pogo Ground with the Straight or Sharp Tip to probe signal and ground points that are extremely close together.Use the insulated IC Lead Tip with IC Ground Blade to probe small-geometry IC legs without shorting any test e the Discrete SMD Tip with the Ground Spring to probe square pins.Use the Solder-In Ground lead with any probe tip to make a good ground connection and browse with the HFP .Use the Bent Sharp Tip to probe a test point in a tightspace or where the probe cannot be oriented perpendicular to the circuit.3Specifications and Ordering InformationHFP1000HFP1500HFP2500Electrical CharacteristicsBandwidth (probe only) 1 GHz1.5 GHz 2.5 GHz Input Capacitance0.7 pF at 1 GHzDC Input Resistance100 kΩInput Dynamic Range±8 VProbe Offset Range NA±12 V±12 V Attenuation÷10Attenuation Accuracy±1%Output Zero< 4 mV, referred to inputOffset Accuracy±(1% of offset value + 4 mV)General CharacteristicsCable Length1.3 mProbe Head Size (L WH)61 mm x 7.3 mm x 13.1 mmInput Sockets Signal and ground socketscompatible with 0.635 mm (0.025")square pins, 0.91 mm (0.036")maximum diameter (for round pins)Included with Standard ConfigurationInstruction Manual, EnglishCertificate of Calibration1-year Warranty Included with HFP1000HFP1500HFP2500 Standard ConfigurationStraight Tip444Sharp Tip444Bent Tip44 Discrete SMD Tip44IC Lead Tip44 Square Pin Ground Spring111 Flexible IC Ground111 Bendable Pogo Ground112 Solder-In Ground112Short Single Lead11Long Single Lead1Right-angle Short Single Lead121Right-angle Long Single Lead121Clips (0.8 mm)222 FreeHand Probe Holder11 Replaceable Cartridge111 Microclips (0.5 mm)2Low C Tip Cartridge1Soft Accessory Case11HFPDS_W1_29Sept06Specifications Ordering InformationProduct Description Product Code 1GHz, 0.7 pF Active Probe (÷10), Small Form Factor HFP10001.5 GHz, 0.7 pF Active Probe (÷10), Small Form Factor HFP15002.5 GHz, 0.7 pF Active Probe (÷10), Small Form Factor HFP2500 Standard Accessory Kit for HFP2500PK108 Standard Accessory kit for HFP1500PK109 Standard Accessory Kit for HFP1000PK110 Soft Accessory Case SAC-01 Straight Tip PACC-PT001 Sharp Tip PACC-PT002 IC Lead Tip PACC-PT003 SMD Discrete Tip PACC-PT004 Bent Sharp Tip PACC-PT005 Freehand Probe Holder PACC-MS001 Replaceable Cartridge PACC-MS002 Low C Cartridge PACC-MS003 Solder-In Ground PACC-CD007Product Description Product Code Bendable Pogo Ground PACC-CD008 Flexible IC Ground PACC-CD009 Ground Spring Hook PACC-LD001 Square Pin Ground Spring PACC-LD002 Short Right-angle Lead PACC-LD003 Long Right-angle Lead PACC-LD004 Short Single Lead PACC-LD005 Long Single Lead PACC-LD006 0.8 mm Clips PK006-4 Microclip PACC-CL001 HFP1000 Instruction Manual, English HFP1000-OM-E HFP1500 Instruction Manual, English HFP1500-OM-E HFP2500 Instruction Manual, English HFP2500-OM-E Customer ServiceLeCroy oscilloscopes and probes are designed, built, and tested to ensure high reliability. In the unlikely event you experience difficulties, our digital oscilloscopes are fully warranted for three years and our probes are warranted for one year.This warranty includes:•No charge for return shipping •Long-term 7-year support •Upgrade to latest software at no chargeLocal sales offices are located throughout the world.T o find the most convenient one visit 1-800-5-LeCroy ©2006 by LeCroy Corporation. All rights reserved. Specifications, prices, availability, and delivery subject to change without notice. Product or brand names are trademarks or requested trademarks of their respective holders.。