Linux文件编程
- 格式:ppt
- 大小:800.00 KB
- 文档页数:34

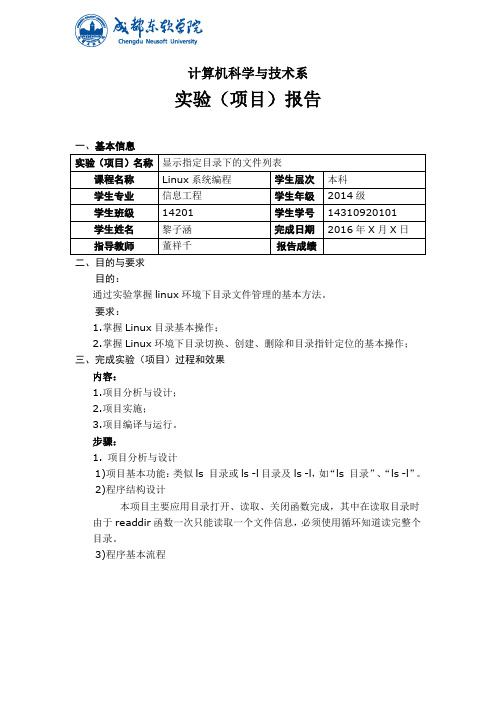
计算机科学与技术系实验(项目)报告一、基本信息二、目的与要求目的:通过实验掌握linux环境下目录文件管理的基本方法。
要求:1.掌握Linux目录基本操作;2.掌握Linux环境下目录切换、创建、删除和目录指针定位的基本操作;三、完成实验(项目)过程和效果内容:1.项目分析与设计;2.项目实施;3.项目编译与运行。
步骤:1.项目分析与设计1)项目基本功能:类似ls 目录或ls -l目录及ls -l,如“ls 目录”、“ls -l”。
2)程序结构设计本项目主要应用目录打开、读取、关闭函数完成,其中在读取目录时由于readdir函数一次只能读取一个文件信息,必须使用循环知道读完整个目录。
3)程序基本流程2.项目实施d1=opendir(name);if(d1==NULL){perror("opendir");exit(1);}getcwd(workdir,50);chdir(name);errno=0;dent1=readdir(d1);while( dent1!=NULL){if(dent1->d_name[0]!='.'){if(flag==0)printf("%s\t",dent1->d_name);elseprintlong(dent1->d_name);}dent1=readdir(d1);}if(errno!=0)perror("readdir");if(flag==0)printf("\n");closedir(d1);chdir(workdir);。
3.项目的实施与运行四、知识应用以及经验总结实现一个程序必须要经过反复的调试,写程序必须要保持着清醒的头脑,不然逻辑不清楚将会影响接踵而至的错误。
一个项目,归根结底,得依赖着实现它功能的函数,这些函数需要哪些头文件,这些函数之间又需要哪些联系,将需要我们通过程序将他们联系在一起实现功能。


实验报告linux编程实验报告:Linux编程引言:Linux操作系统是一种开源的操作系统,具有高度的灵活性和可定制性。
在本次实验中,我们将探索Linux编程的基本概念和技术。
通过编写简单的程序,我们将了解Linux系统的工作原理以及如何利用其强大的功能来开发应用程序。
一、Linux操作系统简介Linux操作系统是一种基于Unix的开源操作系统,它由许多不同的组件组成,包括内核、命令行工具和图形界面等。
Linux操作系统具有许多优势,如稳定性、安全性和可扩展性。
它广泛用于服务器、嵌入式设备和个人电脑等领域。
二、Linux编程环境搭建1. 安装Linux操作系统:选择适合自己的Linux发行版,如Ubuntu、Fedora等,并按照官方指南进行安装。
2. 安装开发工具:在Linux系统上进行编程需要安装一些开发工具,如GCC编译器、GNU调试器(GDB)等。
三、Linux编程基础1. Shell脚本编程:Shell是Linux系统的命令行解释器,通过编写Shell脚本可以实现自动化任务和批处理任务。
Shell脚本使用一些特定的语法和命令来执行任务。
2. C语言编程:C语言是Linux系统中最常用的编程语言之一,通过编写C程序可以实现更高级的功能。
C语言提供了丰富的库函数和系统调用,可以与Linux系统进行交互。
四、Linux系统编程1. 进程管理:Linux系统是一个多进程的操作系统,通过编写程序可以创建、管理和控制进程。
可以使用fork()和exec()等系统调用来创建新进程,使用wait()和kill()等系统调用来管理进程。
2. 文件操作:Linux系统中的文件操作是非常重要的一部分,通过编写程序可以实现文件的读取、写入和修改等功能。
可以使用open()、read()和write()等系统调用来进行文件操作。
3. 网络编程:Linux系统支持网络编程,通过编写程序可以实现网络通信的功能。
可以使用socket()和bind()等系统调用来创建和管理网络套接字。
![[精品]linux下编译运行程序命令大全](https://img.taocdn.com/s1/m/1bcf1624f78a6529647d5366.png)

Linux编程简单⽰例代码 Linux进程管理编辑a.c ⽂件#include <stdio.h>#include <unistd.h>int main(){printf( "Message aaaa\n" );if ( fork() ) {sleep(4);printf( "Message bbbb\n" );if ( fork() ) {sleep(2);printf( "Message cccc\n" );}else{sleep(1);printf( "Message dddd\n" );}}else{sleep(1);printf( "Message eeee\n" );if ( fork() ) {sleep(2);printf( "Message ffff\n" );}else{sleep(6);printf( "Message gggg\n" );}}return0;}编译 a.c ⽂件运⾏ a.out./a.outLinux信号处理编辑 a.c ⽂件编译 a.c ⽂件gcc a.c运⾏ a.out ⽂件./a.outLinux多线程Lin编辑 a.c#include <stdio.h>#include <string.h>#include <unistd.h>#include <pthread.h>char buffer[100] = "Hello" ;pthread_t id ;void *mystart(void *param){int i;for (i=0; i<10; i++) {printf( "Thread %d [%s]\n", i, buffer );sleep(1);}return NULL ;}int main(){int i;pthread_create( &id, NULL, mystart, NULL );for (i-0; i<15; i++) {printf( "Main %d [%s]\n", i, buffer );if ( i == 5 ) {strcpy( buffer, "-----" );}sleep(1);}printf( "Hello,world.\n" );return0;}编译运⾏Linux 管道#include <stdio.h>#include <sys/stat.h>#include <fcntl.h>#include <unistd.h>#include <stdlib.h>void readMessage(int fd){int k;char b[8];for(;;){k = read(fd,b,1);if(k!=1) break;putchar(b[0]);}}int main(){int pipefd[2];pipe(pipefd);{int i;for(i=0;i<10;i++){write(pipefd[1],"hello\n",6); }}else{readMessage(pipefd[0]);}}编译运⾏Linux makefile⽂件编写 add.c show.c a.c 三个⽂件// add.c⽂件:#include <stdio.h>void add(int *a,int *b){scanf("%d %d",a,b);}// show.c ⽂件:#include <stdio.h>void show(int c){printf("%d\n",c);}// a.c ⽂件:#include <stdio.h>void add(int *a,int *b);void show(int c);int main(){int a,b,c;add(&a,&b);c=a+b;show(c);return0;}编写makefile⽂件myapp : a.o show.o add.ogcc a.o show.o add.o -o myappa.o : a.cgcc -c a.cshow.o : show.cgcc -c show.cgcc -c add.c运⾏ makefile ⽂件make运⾏ myapp./myapp基本I/O⽂件操作编写w.c写⽂件:#include <stdio.h>#include <sys/stat.h>#include <fcntl.h>#include <unistd.h>int main(){int fd = open("myfile.txt",O_WRONLY|O_CREAT,0644);if(fd<0){printf("File cannot open!\n");return1;}write(fd,"wjwwjwwjwwjwwjw",15);close(fd);return0;}运⾏ w.c ⽂件编写读⽂件r.c#include <stdio.h>#include <sys/stat.h>#include <unistd.h>#include <fcntl.h>#include <sys/types.h>int main(){int k;char b[1000];int fd = open("myfile.txt",O_RDONLY);if(fd < 0){perror("cannot open file!");return1;}k = read(fd,b,1000); printf("%d\n",k);b[k]=0;printf("%d\n",b);close(fd);return0;}运⾏ a.out完成!。

Linux命令行技巧如何创建和编辑文本文件在Linux操作系统中,命令行是一种在终端窗口通过键盘输入命令来与计算机进行交互的方式。
在日常使用中,我们经常需要创建和编辑文本文件。
本文将介绍一些Linux命令行的技巧,帮助您更高效地创建和编辑文本文件。
1. 创建文本文件在Linux命令行中,可以使用touch命令来创建空白文本文件。
请按照以下步骤操作:步骤一:打开终端窗口。
步骤二:切换到要创建文件的目录。
例如,要在家目录下创建一个名为mytext.txt的文件,可以使用以下命令:cd ~步骤三:输入以下命令来创建文本文件:touch mytext.txt通过以上步骤,您就成功地创建了一个名为mytext.txt的空白文本文件。
2. 编辑文本文件Linux命令行提供了多个文本编辑器,常用的有vi和nano。
下面将介绍这两个编辑器的基本用法。
2.1 使用vi编辑器vi是Linux下功能强大的文本编辑器,具有丰富的编辑功能。
请按照以下步骤操作:步骤一:打开终端窗口。
步骤二:切换到要编辑文件的目录。
步骤三:输入以下命令来打开文本文件:vi mytext.txt步骤四:进入编辑模式,按下i键。
此时,您可以开始编辑文件内容。
步骤五:编辑完成后,按下ESC键退出编辑模式。
然后输入以下命令保存并退出::wq通过以上步骤,您就成功地使用vi编辑器创建并编辑了文本文件。
2.2 使用nano编辑器nano是一个易于使用的文本编辑器,简单直观。
请按照以下步骤操作:步骤一:打开终端窗口。
步骤二:切换到要编辑文件的目录。
步骤三:输入以下命令来打开文本文件:nano mytext.txt步骤四:开始编辑文件内容。
步骤五:编辑完成后,按下Ctrl + X组合键,然后按下Y键确认保存修改。
通过以上步骤,您就成功地使用nano编辑器创建并编辑了文本文件。
总结:Linux命令行提供了多种创建和编辑文本文件的技巧。
通过使用touch命令创建文件,并结合vi或nano编辑器,您可以轻松地在命令行下创建和编辑文本文件。
linux下c程序的编写实验报告实验主题:在Linux下编写C程序的实验报告一、引言(150-200字)Linux是一种广泛应用的操作系统,具有高度开放性和灵活性,也是许多程序员首选的开发环境。
在Linux中,通过编写C程序可以实现各种应用和功能。
本实验旨在通过一步一步的说明和回答,介绍在Linux下编写C 程序的基本步骤和方法。
二、实验步骤(400-500字)1. 设置编程环境在Linux中编写C程序,首先需要安装相关的开发工具和编译器。
常用的编译器有gcc和clang,可以通过包管理器进行安装。
同时,也需要一个文本编辑器来编写C代码,比如vim或者emacs。
2. 编写Hello World程序Hello World程序是C语言学习的经典入门程序,它可以在屏幕上输出"Hello World"。
在文本编辑器中新建一个文件,命名为hello.c,然后在文件中输入以下代码:#include <stdio.h>int main() {printf("Hello World\n");return 0;}保存文件后,使用gcc编译器将该文件编译成可执行文件。
在终端中执行以下命令:gcc -o hello hello.c此时会生成一个名为hello的可执行文件。
通过执行该文件,可以在终端中看到输出结果"Hello World"。
3. 命令行参数和用户输入C程序可以接受命令行参数和用户输入,从而实现更复杂的功能。
在上一步编写的程序的基础上,我们尝试接收用户输入的姓名,并输出相应的问候语。
在hello.c文件中添加以下代码段:#include <stdio.h>int main(int argc, char *argv[]) {char name[100];printf("Please enter your name: ");scanf("s", name);printf("Hello, s!\n", name);return 0;}重新编译程序并执行,可以看到在终端中会提示用户输入姓名,并输出相应的问候语。
《Linux高级系统编程》教学教案一、教学目标1. 让学生掌握Linux系统编程的基本概念和原理。
2. 培养学生熟练使用Linux系统编程API的能力。
3. 使学生了解Linux系统编程的高级主题和技巧。
4. 培养学生解决实际问题的能力,提高他们在Linux环境下的软件开发水平。
二、教学内容1. Linux系统编程概述讲解Linux系统编程的基本概念、特点和优势。
2. 文件I/O操作介绍Linux文件I/O模型,讲解文件的打开、关闭、读写、同步等操作。
3. 进程管理讲解Linux进程的概念、创建、终止、进程间通信等知识。
4. 线程管理介绍Linux线程的基本概念、创建、同步、互斥等知识。
5. 高级I/O操作讲解Linux高级I/O操作,如异步I/O、直接I/O、内存映射I/O等。
三、教学方法1. 讲授法:讲解基本概念、原理和知识点。
2. 案例教学法:通过实际案例让学生掌握编程技巧和方法。
3. 实验教学法:安排实验课程,让学生亲自动手实践,提高实际操作能力。
四、教学环境1. 教室环境:投影仪、计算机、网络等。
2. 实验环境:装有Linux操作系统的计算机、网络等。
五、教学评估1. 课堂问答:检查学生对课堂知识的理解和掌握程度。
2. 实验报告:评估学生在实验过程中的动手能力和解决问题能力。
3. 课程作业:检查学生对课程知识点的综合运用能力。
4. 期末考试:全面评估学生对本门课程的掌握程度。
六、信号处理1. 信号基本概念讲解信号的定义、作用和信号处理的基本方法。
2. 信号处理函数介绍Linux信号处理函数,如signal(), rse(), sigaction()等。
3. 信号在进程和线程中的处理讲解信号在进程和线程中的传播和处理机制。
七、同步与互斥1. 同步与互斥基本概念讲解同步与互斥的概念、作用和应用场景。
2. 互斥锁介绍Linux互斥锁的使用,如pthread_mutex_lock(), pthread_mutex_unlock()等。
Linux常⽤命令之⽂件编辑命令vimvi命令vi命令是UNIX操作系统和类UNIX操作系统中最通⽤的全屏幕纯⽂本编辑器。
Linux中的vi编辑器叫vim,它是vi的增强版(vi Improved),与vi编辑器完全兼容,⽽且实现了很多增强功能。
vi编辑器⽀持编辑模式和命令模式,编辑模式下可以完成⽂本的编辑功能,命令模式下可以完成对⽂件的操作命令,要正确使⽤vi编辑器就必须熟练掌握着两种模式的切换。
默认情况下,打开vi编辑器后⾃动进⼊命令模式。
从编辑模式切换到命令模式使⽤“esc”键,从命令模式切换到编辑模式使⽤“A”、“a”、“O”、“o”、“I”、“i”键。
vi编辑器提供了丰富的内置命令,有些内置命令使⽤键盘组合键即可完成,有些内置命令则需要以冒号“:”开头输⼊。
常⽤内置命令如下:Ctrl+u:向⽂件⾸翻半屏;Ctrl+d:向⽂件尾翻半屏;Ctrl+f:向⽂件尾翻⼀屏;Ctrl+b:向⽂件⾸翻⼀屏;Esc:从编辑模式切换到命令模式;ZZ:命令模式下保存当前⽂件所做的修改后退出vi;:⾏号:光标跳转到指定⾏的⾏⾸;:$:光标跳转到最后⼀⾏的⾏⾸;x或X:删除⼀个字符,x删除光标后的,⽽X删除光标前的;D:删除从当前光标到光标所在⾏尾的全部字符;:删除光标⾏正⾏内容;ndd:删除当前⾏及其后n-1⾏;nyy:将当前⾏及其下n⾏的内容保存到寄存器?中,其中?为⼀个字母,n为⼀个数字;p:粘贴⽂本操作,⽤于将缓存区的内容粘贴到当前光标所在位置的下⽅;P:粘贴⽂本操作,⽤于将缓存区的内容粘贴到当前光标所在位置的上⽅;/字符串:⽂本查找操作,⽤于从当前光标所在位置开始向⽂件尾部查找指定字符串的内容,查找的字符串会被加亮显⽰;?name:⽂本查找操作,⽤于从当前光标所在位置开始向⽂件头部查找指定字符串的内容,查找的字符串会被加亮显⽰;a,bs/F/T:替换⽂本操作,⽤于在第a⾏到第b⾏之间,将F字符串换成T字符串。
/proc文件系统编程在Linux中有一个另外的机制来使内核及内核模块发送信息给进程——/proc文件系统。
./proc文件系统在Linux中有一个另外的机制来使内核及内核模块发送信息给进程——/proc文件系统。
/proc文件系统最初是设计使得容易得到进程的信息(从名字可以看出),现在却被任意一块有内容需要报告的内核使用,比如拥有模块列表的/proc/modules和拥有内存使用统计信息的/proc/meminfo。
使用proc文件系统的方法很象使用设备驱动——你创建一个数据结构,使之包含/proc文件需要的全部信息,包括所有函数的句柄(在我们的例子里只有一个,在试图读取/proc 文件时调用)。
然后,用init_module注册这个结构,用cleanup_module注销。
我们使用proc_register_dynamic(注3.1)的原因是我们不希望决定以后在文件中使用的索引节点数,而是让内核来决定它,为了防止冲突。
标准的文件系统是在磁盘上而不是在内存(/proc的位置在内存),在这种情况下节点数是一个指向文件的索引节点所在磁盘地址的指针。
这个索引节点包含了文件的有关信息比如文件的访问权限以及指向磁盘地址的指真或者文件数据的位置。
因为在文件打开或关闭时我们没有调用,所以在模块里无处可放宏MOD_INC_USE_COUNT和MOD_DEC_USE_COUNT,而且如果文件被打开了或者模块被删除了,就没有办法来避免这个结果。
下一章我们将会看到一个更困难的处理/proc的方法,但是也更加灵活,也能够解决这个问题。
ex procfs.c/* procfs.c - create a "file" in /proc* Copyright (C) 1998-1999 by Ori Pomerantz*//* The necessary header files *//* Standard in kernel modules */#include <linux/kernel.h> /* We're doing kernel work */#include <linux/module.h> /* Specifically, a module *//* Deal with CONFIG_MODVERSIONS */#if CONFIG_MODVERSIONS==1#define MODVERSIONS#include <linux/modversions.h>#endif/* Necessary because we use the proc fs */#include <linux/proc_fs.h>/* In 2.2.3 /usr/include/linux/version.h includes a* macro for this, but 2.0.35 doesn't - so I add it* here if necessary. */#ifndef KERNEL_VERSION#define KERNEL_VERSION(a,b,c) ((a)*65536+(b)*256+(c)) #endif/* Put data into the proc fs file.Arguments=========1. The buffer where the data is to be inserted, ifyou decide to use it.2. A pointer to a pointer to characters. This isuseful if you don't want to use the bufferallocated by the kernel.3. The current position in the file.4. The size of the buffer in the first argument.5. Zero (for future use?).Usage and Return Value======================If you use your own buffer, like I do, put itslocation in the second argument and return the number of bytes used in the buffer.A return value of zero means you have no further information at this time (end of file). A negativereturn value is an error condition.For More Information====================The way I discovered what to do with this function wasn't by reading documentation, but by reading the code which used it. I just looked to see what usesthe get_info field of proc_dir_entry struct (I used a combination of find and grep, if you're interested),and I saw that it is used in /fs/proc/array.c.If something is unknown about the kernel, this is usually the way to go. In Linux we have the great advantage of having the kernel source code for free - use it.*/int procfile_read(char *buffer,char **buffer_location,off_t offset,int buffer_length,int zero){int len; /* The number of bytes actually used *//* This is static so it will still be in memory* when we leave this function */static char my_buffer[80];static int count = 1;/* We give all of our information in one go, so if the * user asks us if we have more information the* answer should always be no.** This is important because the standard read* function from the library would continue to issue * the read system call until the kernel replies* that it has no more information, or until its* buffer is filled.*/if (offset > 0)return 0;/* Fill the buffer and get its length */len = sprintf(my_buffer,"For the %d%s time, go away! ", count,(count % 100 > 10 && count % 100 < 14) ? "th" : (count % 10 == 1) ? "st" :(count % 10 == 2) ? "nd" :(count % 10 == 3) ? "rd" : "th" );count++;/* Tell the function which called us where the* buffer is */*buffer_location = my_buffer;/* Return the length */return len;}struct proc_dir_entry Our_Proc_File ={0, /* Inode number - ignore, it will be filled by* proc_register[_dynamic] */4, /* Length of the file name */"test", /* The file name */S_IFREG | S_IRUGO, /* File mode - this is a regular * file which can be read by its* owner, its group, and everybody* else */1, /* Number of links (directories where the* file is referenced) */0, 0, /* The uid and gid for the file - we give it* to root */80, /* The size of the file reported by ls. */NULL, /* functions which can be done on the inode * (linking, removing, etc.) - we don't* support any. */procfile_read, /* The read function for this file,* the function called when somebody* tries to read something from it. */NULL /* We could have here a function to fill the* file's inode, to enable us to play with* permissions, ownership, etc. */};/* Initialize the module - register the proc file */int init_module(){/* Success if proc_register[_dynamic] is a success,* failure otherwise. */#if LINUX_VERSION_CODE > KERNEL_VERSION(2,2,0) /* In version 2.2, proc_register assign a dynamic* inode number automatically if it is zero in the* structure , so there's no more need for* proc_register_dynamic*/return proc_register(&proc_root, &Our_Proc_File);#elsereturn proc_register_dynamic(&proc_root, &Our_Proc_File); #endif/* proc_root is the root directory for the proc* fs (/proc). This is where we want our file to be* located.*/}/* Cleanup - unregister our file from /proc */void cleanup_module(){proc_unregister(&proc_root, Our_Proc_File.low_ino);}。