MAS-100Eco空气浮游菌采样器操作规程
- 格式:doc
- 大小:366.00 KB
- 文档页数:8
文件制修订记录型号:MAS-100Eco1.基本原理MAS-100Eco空气浮游菌采样器是一个高性能的仪器。
利用Anderson原理,抽取空气通过穿孔板,气流中的微生物撞击培养皿中的琼脂表面。
完成采样周期之后,将该培养皿放到适宜条件下培养,计数,得出空气中的含菌量。
2.功能设置2.1 电池充电用充电器充电MAS-100Eco,一个完整的充电周期大约需要9小时,充电完后大约可以抽取18000L的空气。
2.2 更换电池电池位于MAS-100Eco底版下,底版可以借助穿孔盖打开,取下穿孔盖,置于底板位置,确保穿孔盖与底板上的3个支沟完全契合。
顺时针旋转,并移走底板。
如果不能即时充电,可以插入2节新的充电电池(镍-氢电池)或2节1.5V的碱性电池。
2.3 低电量指示运行时,显示“Lowbatt”,表示电池将耗尽。
为保障采样不中断,可立即充电或更换新电池。
2.4 气流受阻MAS-100Eco以100L升/分钟空气流量进行抽气,若显示“Airblock”红灯和绿灯不停闪烁,表示气流受阻。
可能原因是:培养皿太满,导致穿孔盖上的小孔被堵住;或是防尘罩没有移开,移开培养皿,重新开始测试。
按“yes”或“no”取消错误的信息。
2.5 启动MAS-100Eco按“yes”启动MAS-100Eco。
显示屏自动显示软件的版本,时间和日期。
如果启动之后没有任何操作,大约100秒后,MAS-100Eco将自动关机,这样可以延长电池的寿命。
2.6 最后体积如果按“yes”,程序提示最后一次采样的体积,接受按“yes”,拒绝按“no”。
如果按“no”,可以在1~1000升中选择其他的预设体积。
2.7 预设体积MAS-100Eco提供以下预设体积:V1:10L,V2:20L,V3:50L,V4:100L,V5:200L,V6:500L。
上述每一个体积值都可以被重新设置成介于1~1000升之间的任一数值。
2.8 修改日期和时间启动MAS-100Eco,日期将显示之前选定的格式。
MAS 100 NT 空气浮游菌采样器标准操作规程1、目的制定MAS 100 NT 空气浮游菌采样器标准操作规程。
2、职责适用于MAS 100 NT 空气浮游菌采样器。
3、范围仪器操作者:负责实施本规程;质控负责人:负责实施过程进行监督。
4、内容4.1准备操作4.1.1电源要求(1)电源要求:可连接100/240V, 50-60kHz工作电源工作,或者只使用电池工作。
(2)采样体积:可以设定在1-2000L之间任意值4.1.2初次使用前的调整(1)在初次使用MAS 100 NT需经过校验后使用,需要即时设定“校验提示”功能(售后服务人员提供支持)。
(2)调整采样头初次使用时,需要使用3mm 直径的Allen Key 对采样头的培养皿夹的松紧进行调整以达到紧密卡合培养皿的目的。
(若更换不同外径的培养皿,也请进行此操作)(3)标准平皿的放置取下穿孔盖,将配制好的平皿培养基至于采样头上。
用3mm 直径的Allen Key(内六角螺丝刀)调整3个蓝色夹块,直至培养皿被稳定固定。
将采样头水平放置,确认培养皿已妥善放置。
在此后的使用过程中,除非因使用不同品牌培养皿而导致外径不一需要重新调整蓝色夹块外,其他情况下无需重新调整夹块的松紧。
(4)第一次连接电脑第一次连接电脑时,请首先安装USB 驱动程序。
驱动程序位于CD 光盘的“Dricer FTDXXX 文件”内。
(5)可用新功能:SQS 连续分段式采样新开发的软件系统支持MAS 100 NT 系统在只利用一块琼脂平皿的情况下进行延时分段式采样。
因此,在保证微生物活性的前提下,可以在数小时内进行多达50 次的分段累积采样。
这样的最大好处是可以避免因为操作者不停更换平板而带来的可能产生的二次污染。
这对于无菌环境的空气质量控制有非常重要的意义。
同时,通过在数小时内的连续采样,使采样结果的随机性得到改善,得到的结果也更科学、客观。
此外,因为不用更换更多的90mm 平皿,大大节省了实验材料和人力。
浮游菌采样器操作规程浮游菌采样器主要用于采集水中的浮游菌,可以帮助研究人员了解水体中浮游菌群落的组成和变化趋势,为水生态系统的研究提供重要依据。
浮游菌采样器的特点是采样快速、操作简单、取样量大、样品质量好等。
二、浮游菌采样器的结构和组成浮游菌采样器由采样器本体、滤膜、过滤器等组成。
采样器本体主要由采样头、采样管、手柄等组成。
滤膜是用于过滤水样的部件,是采样操作中最关键的部分之一。
过滤器则是用于将过滤后的水样从滤膜中取出的部件。
三、浮游菌采样器的操作步骤1. 准备工作:将浮游菌采样器取出并检查是否完好无损,将采样头和采样管拆开,准备滤膜和过滤器。
2. 操作步骤:(1) 将采样头插入采样管中,用力固定。
(2) 将滤膜安装在采样头上,注意滤膜的方向应与采样头相同。
(3) 将采样管插入水中,使采样头尽量靠近水底,并在不断移动采样器的同时进行采样。
(4) 采样时间一般为5-10分钟,在采样过程中要注意不要碰到水底或者岸边,以免污染样品。
(5) 将采样器取出,拆下采样头和采样管,将滤膜用过滤器取出,将过滤器盖好,标明采样时间和地点等信息。
(6) 将过滤后的水样排空,清洗采样器和滤膜,并做好采样器的保养工作。
四、浮游菌采样器的注意事项1. 在进行采样操作前,要检查采样器和滤膜是否完好无损,以免出现漏水等情况。
2. 采样时要注意不要碰到水底或者岸边,以免污染样品。
3. 采样时间一般为5-10分钟,不要过长或过短。
4. 采样完毕后要立即将采样器拆开取出滤膜,并做好标记和记录工作。
5. 采样器使用后要及时清洗和保养,保证下次使用时的可靠性和准确性。
以上就是浮游菌采样器的操作规程,希望能够为大家在水生态系统的研究中提供一些帮助。
浮游空气微生物采样器安全操作及保养规程1. 引言本文档旨在介绍浮游空气微生物采样器的安全操作和保养规程,以确保采样器的正常运行和使用者的安全。
浮游空气微生物采样器是一种常用于环境空气微生物监测的仪器,能够快速、准确地采集空气中的微生物样本。
使用者在操作浮游空气微生物采样器时,必须遵循本规程的要求,严格按照操作步骤进行操作,从而确保数据的可靠性与准确性。
2. 安全操作规程2.1 准备工作在操作浮游空气微生物采样器之前,应进行以下准备工作:1.确保操作者已经接受相关培训,并掌握使用浮游空气微生物采样器的技能;2.检查采样器及其附件是否完整,如有损坏或缺失应及时修复或更换;3.确保工作环境卫生整洁,使操作能够在清洁的环境中进行;4.确保工作台面平整,没有杂物阻碍操作;5.打开采样器前,确认电源已接通并工作正常。
2.2 操作步骤按照以下步骤进行浮游空气微生物采样器的操作:1.注水:打开采样器,将指定体积的蒸馏水加入到采样器的注水瓶中;2.校准流量:将测定仪器流量,确保其达到规定的采样体积,根据仪器的说明书调整流量;3.定位采样点:根据要求,选择采样点并合理定位采样器;4.启动采样:按照仪器的操作说明,启动浮游空气微生物采样器,开始采样;5.采样时间:根据需要,确定采样时间,并保持稳定的采样流量;6.结束采样:在指定采样时间结束后,关闭采样器,并记录采样时长;7.清理工作:将采样器的采样头部取下,进行清洁和消毒处理;将采样器的其他部件进行清理和保养,确保其正常运行。
2.3 注意事项在操作浮游空气微生物采样器时,需注意以下事项:1.避免在环境温度过高或过低的条件下操作采样器;2.避免将采样器放置在有强烈振动或冲击的地方;3.避免将采样器放置在潮湿或易爆的环境中;4.避免使用不当的介质或溶液;5.避免将采样头部暴露在阳光下;6.避免操作过程中拖动仪器;7.避免过度注水,以免溢出或影响采样结果。
3. 保养规程为确保浮游空气微生物采样器的正常使用寿命和采样效果,需进行定期的保养工作。
广州市华粤行仪器有限公司Merck MAS 100 NT空气浮游菌采样器 操作说明书 Professional Microbial Air Monitoring System for the Microbiological Testing of AirMerck MAS 100 NT浮游菌/空气微生物采样器:世界领先的空气微生物采样系统 MAS 100 NT(New type)于2008年7月中旬正式面市,全面取代原型号MAS 100目录:1、 注意事项--------------------------------------------------------------------------4 1.1 重要的安全设施1.2 MAS 100 NT的操作1.3 使用环境条件1.4 质保1.5 机器故障处理2、 介绍------------------------------------------------------------------------------5 2.1 功能概览2.2 MAS 100 NT详述2.3 采样头2.4 通讯2.5 MAS 100 NT操作操作程序设定3、 基本原理-------------------------------------------------------------------------64、 MAS 100 NT重要优点--------------------------------------------------------------74.1 MAS 100 NT与MAS 100的对比5、 初次使用MAS 100 NT注意事项------------------------------------------------------8 5.1 采样头的调整5.2 标准平皿的放置5.3 接触平皿的放置5.4 第一次连接电脑5.5 新功能:SQS连续分段式采样6、 基本功能-------------------------------------------------------------------------9 6.1 概览6.2 显示屏6.3 初次使用:同时激活校验提示功能6.4 MAS 100 NT的启动与关闭6.5 开机界面7、 操作----------------------------------------------------------------------------10 7.1 MAS 100 NT开机7.2 标准模式7.3 手动或者模版模式(HACCP设计模式)7.4 模版模式7.5 软件报告格式示例7.6 采样程序设定7.7 标准模式或者SQS分段连续采样模式7.8 更改采样体积7.9 SQS或者连续采样模式8 菜单设置-----------------------------------------------------------------------12 8.1 关机8.2 工作模式选择8.3 程序设定8.4 标准体积设置8.5 操作延时/等待功能8.6 用户选择8.7 预设参数的打印8.8 采样记录8.9 报警记录8.10 设备配置8.11 时间日期设定8.12 语言选择8.13 背景显示对比度8.14 设备信息8.15 系统信息9 报警号及描述--------------------------------------------------------------------169.1 报警号示例10 通过电脑操作锁定MAS 100 NT-----------------------------------------------------1711 采样结果校正--------------------------------------------------------------------17 11.1 Feller校正表:使用300孔穿孔盖进行采样的结果校正11.2 Feller校正表:使用400孔穿孔盖进行采样的结果校正12 技术参数------------------------------------------------------------------------2012.1 环境条件13 装箱单-------------------------------------------------------------------------2114 日常保养及维护-----------------------------------------------------------------2115 质保---------------------------------------------------------------------------211 注意事项1.1 重要的安全设施1.2 MAS 100 NT的操作请在使用前仔细阅读说明书。
洁净室浮游菌采样器安全操作及保养规程洁净室浮游菌采样器是一种用于采集空气中微生物的设备,主要用于医院、实验室、制药工厂等场所的微生物监测和控制。
正确的操作和保养可以确保采集到准确的数据,并延长设备的使用寿命。
本文将介绍洁净室浮游菌采样器的安全操作及保养规程。
安全操作规程准备工作在进行浮游菌采样前,需要做好以下准备工作:1.检查设备:检查采样器是否有损坏、电源线是否良好、滤膜是否完好等。
2.准备滤膜:根据实验要求选择合适的滤膜,并在无尘室或其他洁净环境下将其装备好。
3.设置采样时间:根据实验要求设置采样时间,并记录采样点位和采样时间。
采样操作在进行浮游菌采样时,需要做好以下操作:1.确保无尘室内的空气清洁,避免采集到杂质。
避免在人员活动频繁的时间段进行采集。
2.将滤膜装备好后,将采样器插入电源并按下电源按钮,待指示灯亮起后方可进行采样。
3.将采样器放置在采样点位,尽量避免与其他物品接触,待采样时间结束后自动停止。
如采样过程中需要移动采样器,需关闭电源并等待5分钟后再进行移动。
4.采样完毕后,关闭电源、拔出滤膜,并盖好滤膜保存在无菌袋内,交由实验室人员进行后续处理。
避免污染在使用浮游菌采样器时,需要避免以下操作:1.避免人员在采集过程中过度活动,以免引入额外的微生物。
2.避免在霉菌严重的地方或空气流动不良的地方进行采集。
3.避免使用不干净的手或工具触碰采样器,以免污染采样器和滤膜。
保养规程日常保养在日常使用中,需要做好以下保养工作:1.定期更换滤膜:根据采样频率,定期更换滤膜并检查滤膜是否完好。
2.定期清洗设备:使用无菌棉球或棉签清洗采样器的表面,定期对内部和滤膜进行清洁。
3.定期校准:根据厂家要求,定期对采样器进行校准。
维护保养在长期使用中,需要做好以下维护工作:1.定期检查设备:定期检查采样器是否有变形、损坏等状况,及时进行清洗或更换配件。
2.定期更换配件:根据厂家要求,定期更换电源线、零件等配件。
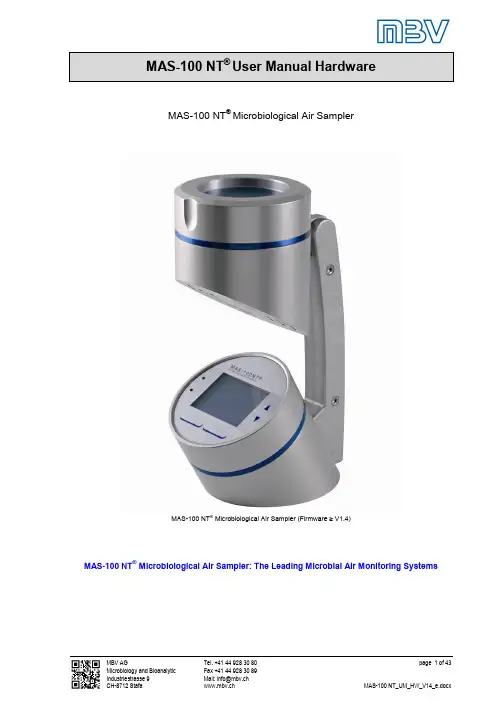
MAS-100 NT® Microbiological Air SamplerMAS-100 NT® Microbiological Air Sampler (Firmware ≥ V1.4)MAS-100 NT® Microbiological Air Sampler: The Leading Microbial Air Monitoring SystemsIndex1Warning notices 4 1.1Operating the MAS-100 NT®4 1.2Environmental Conditions 4 1.3Warranty 4 1.4Malfunction of Instrument 4 2Introduction 5 2.1General Description 5 2.2Description of the MAS-100 NT®5 2.3Sampling Head 6 2.4Communication 6 2.5Programming the MAS-100 NT®6 2.6PC software MAS-100 NT® Portable Air Sampler C&C 6 3Firmware update MAS-100 NT®7 3.1Installation USB Driver on Windows Systems 10 4Basic Principle 11 5Most Important Advantages of the MAS-100 NT®12 5.1Comparison old MAS-100® with new MAS-100 NT®13 6First Time Use of MAS-100 NT®14 6.1Adjusting Sampling Plates on the MAS-100 NT®14 6.2Adjusting Petri dish 14 6.3Adjusting Contact plates 15 6.4Mounting to a Tripod 15 6.5New: SQS- Sequential Air Sampling 16 7General Functions 17 7.1Overview 17 7.2Control interface 17 7.3First Time Use of MAS-100 NT® = Activation of Calibration Reminder 18 7.4Message on display if calibration reminder is activated 18 7.5Switching ON and OFF the MAS-100 NT®19 7.6Charging the MAS-100 NT®19 7.7Intro Screens 19 8Operation 20 8.1Standard Mode MAS-100 NT® (STD) or Sequential Sampling Mode (SQS) 20 8.2Manual or Template Mode 20 8.3Working with Templates 21 8.4Example of Protocol Created by the Software 22 8.5Template Data 23 8.6Process Settings 23 8.7Standard or SQS Sampling Mode 24 8.8Change the Sampling Volume 24 8.9Working with the SQS or Sequential Sampling Mode 24 9Menu Settings 25 9.1Shut Down 25 9.2Mode Selection 25 9.3Template Data 26 9.4Process Settings: 26 9.5Standard Volumes 26 9.6Delay Data 26 9.7User Selection 27 9.8Print Settings 27 9.9Sample Log 27 9.10Alarm Log 28 9.11Config Device 28 9.12Time and Date 289.16System Info 29 10Printer Configuration 30 10.1General procedure of the printer configuration for MAS-100 NT Air Samplers 30 10.2Printer Epson TM-U220D 30 10.3Samsung Bixolon-275AG 30 10.4Other printer 30 10.5Manual input of the printer without SW 31 10.6MAS-100 NT online printing activation 31 11Cleaning and disinfection of MAS-100 NT® air sampler 32 11.1Air sampler housing 32 11.2Sampling head 32 11.3Inner parts of the air sampler 32 11.4Use of gases for disinfection 32 12Adjustment of Flow Sensor or Calibration of instrument 33 12.1Definition of Adjustment and Calibration 33 13Alarm ID and Description 33 13.1Alarm ID’s33 14Block Manual Interventions on the MAS-100 NT®34 15Interpreting the Results 34 15.1Feller Conversion Table for Sampling Head with 300 Holes 35 15.2Feller Conversion Table for Sampling Head with 400 Holes 36 16Technical Specifications 37 16.1Environmental Conditions 38 17Calibration Certificates 38 17.1Particle emission of MAS-100 NT®39 18Components Checklist 40 19Care and Maintenance 40 20Warranty 40 21CE-Conformity Certificate 41 22Revision History 421Warning notices1.1Operating the MAS-100 NT ®Read all instruction carefully before operating the instrument. The MAS-100 NT ®must be operated by specialized laboratory people only. They have to be aware and trained to work with laboratory instruments.1.2 Environmental ConditionsPlease read the instructions in chapter 16.11.3 WarrantyOnly special trained people certified by the manufacturer (MBV AG, Switzerland) are allowed to service the instrument. Instruments which have the seal destroyed will lose their warranty immediately.1.4 Malfunction of InstrumentIf the instrument doesn’t work according to this instruction manual please send it back to the manufacturer immediately.2 IntroductionMicro-organisms in the air are a potential risk for contaminating raw materials, semi-finished or end products and processes. Therefore the control of the contamination in the air is very important. The following industries are performing air monitoring as a standard procedure:∙pharmaceutical industry∙food industry∙hospitals∙cosmetics industry∙environment2.1 General DescriptionAccording to “The Rules Governing Medicinal Products1” and the International StandardISO 14698-1/22, the air must be analyzed for the presence of micro organisms.The new MAS-100 NT® is a new designed unit for microbiological air monitoring. The microbiological sampling is based on the well known and as standard method established impaction principle3. It works like all other MAS-Systems with standard 90mm Petri dishes or with the adapter for contact plates. The MAS-100 NT® is a further development of the standard MAS-1004 system.The major advantages are the compact design, the improved security features and the enhanced connection possibilities. The new sampler is very easy to handle. Hard- and software have been developed according to GAMP 45. The total system is fully validated. Improved communication likeRS-232, USB, are available. All functions and parameters as well as the calibration procedure may be done with the new MAS-100 NT® calibration and communication-software. They may also be programmed directly on the unit. A big display on the unit allows the selection of all relevant factors. An alarm- and sample-log records the last 100 events and may be exported or printed at any time. As in other MAS-Systems the mass flow is measured and guarantees a flow of 100 liters/min.The MAS-100 NT® is validated according to the EN ISO 14698 standard.2.2 Description of the MAS-100 NT®The MAS-100 NT® is an improved version of the MAS-100. Improved electronic communication features, validated software, easy and automatic calibration and added safety feature makes this air sampler unique. The impaction speed was also improved and the system is now delivered with a sampling head of 300 x 0.6mm holes. All parameters are controlled and changed from the software or may be programmed directly on the unit.Note: The MAS-100 NT® air sampler has been developed according toGAMP 4. The Soft- and Firmware are validated.1 The Rules Governing Medicinal Products In The European Community Vol. IV: Guide to Good Manufacturing practice for medicinal products, 1992072 ISO EN 14698-1 and 2 Clean rooms and associated controlled environments- Biocontamination control Part 1 and Part 2 (Ref. Number: ISO 14698 -1:2003(E))3 New Sampler for the Collection, Sizing, and Enumeration of Viable Airborne Particles, A. Andersen, U.S. Army Chemical Corps Proving Groung, Dugway, Utha., 19584 MAS-100, Qualification of air sampler systems: The MAS-100, Meier R. und Zingre H., (Swiss Pharma 1-2/00)2.3 Sampling HeadThe new (300 holes x 0.6mm) sampling head is specially designed for standard Petri dishes and improved impaction speed. The sampling heads are exchangeable.You can use either the 300 x 0.6mm or if you wish to continue using the 400 x 0.7mm lid. Please make sure that you select the appropriate lid in the Menu Device Info (9.15)New 300 x 0.6mm Sampling head (perforated lid) Anodized in blue Impaction speed <20m/sOld 400 x 0.7mm Sampling head (perforated lid) Anodized silver Impaction speed <11m/s2.4 CommunicationUp-to-date communication: USB, RS-232 with other systems (PC, Printer; DA-100 NT).2.5Programming the MAS-100 NT ®All functions may be programmed over the display or over the MAS-100 NT ®Software delivered with each system. This Manual will describe mainly the programming over the display. For more information on software programming, please consult software manual.2.6PC software MAS-100 NT ® Portable Air Sampler C&CThe “MAS-100 NT ®Portable Air Sampler C&C ” is a new validated communication and calibration software. It is delivered with the system. The software permits to select between 5 different accesslevels to set, read and program individual parameters in the MAS-100 NT ®(operating under Windows 2000 or higher)A special calibration menu with the possibility of fully automatic calibration (adjustment of flow sensor,calibration of MAS-100 NT ®and printing calibration certificate) is available.A new alarm- and sample-log file is implemented and stores 100 events of each type. The logs may be printed or exported into Excel.Note: The previous sampling head (400 x 0.7mm) is still available on demand Note: See MBV website (www.mbv.ch ) for latest software versions. Note: See MBV website (www.mbv.ch ) for latest software versions. Note: The MAS-100 NT ®is validated to ISO 14698-1 and -2, 2003/093 Firmware update MAS-100 NT®Download tool needed: Tool software on MBV website www.mbv.chBefore updating the Firmware on the MAS-100 NT® the latest PC Software needs to bedownloaded and installed. The windows drivers for communication with the MAS-100 NT® are included in the PC Software. The drivers are installed automatically after the PC software isinstalled and the MAS-100 NT® is connected to the PC via USB for the first time. After installation of the drivers, the PC Software needs to be closed.If you encounter problems with installation of the drivers, please read chapter 3.1.1. Go to MBV website – Software MAS-100 NT2. Download latest Firmware Download Tool V12xx.zip3. When asked, download or open the zip-file (in Win XP, follow the instructions of theAssistant, in Win 7, Explorer-window will open with the “Download_MBV_V12xx.exe”)4. Download latest Firmware Update V 1.x and safe the zip-file to your favourite folder5. Extract the Firmware Update V 1.x in your favourite folder. This will be a file named: “MBVMAS-100 NT, V1.x (15).Tim”6. Execute the “Download_MBV_V12xx.exe”-file (the PC- Software needs to be closed)7. Accept the Security Warning and execute8. Firmware Download Wizard is opened9. In the Firmware Download Wizard choose “Select File”10. Select the file “MBV MAS-100 NT, V1.x (15).Tim” from your favourite folder11. Press next; Switch on the MAS-100 NT® while holding the ON-Button until successfulmessage appears12. Press button Start download, the loaded firmware will be downloaded to the MAS-100 NT®.Do not interrupt the Download Process!13. Download should be successful. If not, shut down device and restart procedure.14. Disconnect the MAS-100 NT® from the USB port of your PC and restart yourMAS-100 NT® device, use the scroll down button and go to System Info15. Press select, and have a look to the line SW Version – Firmware update was successful ifthe downloaded Firmware-Version 1.x is written into System infoNote: A detailed view of the Firmware Update follows on the next pages.1. Start the Firmware Download Utility (Wizard)2. Press Select File / Select the file “MBV MAS-100 NT, V1.x (15).Tim” from your hard disk3. Press Next4. Switch on the MAS-100 NT®5. Press button Start download, the loaded Firmware will be downloaded to the MAS-100 NT®6. Do not interrupt the download process!7. Download successful. The device is automatically shut down. Exit Wizard.8. Disconnect the MAS-100 NT® from the USB port of your PC and restart the MAS-100 NT®, use the scroll down button and go to System Info9. Press select, and have a look to the line SW Version – Firmware update was successful if the downloaded Firmware-Version 1.x is written into System infoNote: See MBV website (www.mbv.ch) for latest Software and Firmware Versions.3.1 Installation USB Driver on Windows SystemsThe needed drivers are installed automatically after the PC software is installed and the MAS-100 is connected to the PC via USB for the first time. If not, go to System, Hardware Manager; under theUSB-Controller section, choose the “FTDI FT8U2XX Device” to update the driver manually. Choose the automatic search function. If you need to install manually, read the following instructions.1. On the first screen of the wizard, select checkbox: “No, not this time” to avoid searching for asuitable driver and press next2. On the second scree n of the wizard select checkbox “Install from a list or specified location(Advanced)” and press next3. On the third screen of the wizard set the checkbox “include this locat ion in the search:” andselect the subdirectory “Driver FTDXX” of the location where you installed the MAS-100 NTPortable Air Sampler software (in most cases in C:\Program Files\MBV\MAS-100 NTPortable\Driver FTDXX) and press next4. Windows will start to install the driver and shows a warning message (Windows Logo TestWarning)MBV tested the driver thoroughly and did not find any risk of impairing or destabilizing the Windows operating system and therefore recommends pressing the button 'Continue Anyway' to continue installation of the driver.5. Now the device driver FDTI FT8U2XX is being installed6. When the installation of the driver has finished successfully, Windows shows the followingmessage: “Completing the Found New Hardware Wizard”.Press “Finish”- Button7. The USB driver is now installed and the MAS-100 Portable Air Sampler software ready to use4 Basic PrincipleThe MAS-100 NT® is a high-performance instrument that is based on the principle of the Andersen air sampler (see 2.1), which aspirates air through a perforated plate. The resultant airflow is directed onto a standard agar poured plate. After the collection cycle, the Petri dish is incubated and the colony forming units (CFU) are counted. The MAS-100 NT® operates with a high-performance suction device, and the aspirated volume is continuously monitored. The system measures the inflow of air and regulates the aspirated volume to a constant value of 100 Standard6 liters per minute.The MAS-100 NT® automatically regulates this volume according to pressure and temperature so that it gives comparable results all the time. For measurement in pharmaceutical industry the recommended sampling volume – according to international guidelines – should be 1000 liters.6 Standard Liter = volume at 1013.25 mbar and 20°C Air inlet Petri dish Anemometer BlowerAir outlet5 Most Important Advantages of the MAS-100 NT®∙new: illuminated easy navigation display∙new: multi lingual, implemented languages, English, French and German (other languages on demand) (Spanish in preparation)∙new: automatic calibration cycle and automatic printing of calibration certificate∙new: validated hard and software (up to 100 tests programmable)∙new: validation documents according to ISO 14698∙new: data logging for sample and alarms∙new: USB communication for error-free results and automatic record-keeping∙new: long live Lithium-ions rechargeable batteries∙new: improved design∙calibration reminder∙Adapter-Kit for RODAC-Plates (6.3)∙SQS-Cycle (see point 6.5) may be selected. If this cycle is activated, the desired volume may be split up to 50 sequences over a period of total 24 hours∙anemometer for mass flow control∙indication of low airflow∙real time clock and calendar∙compact and easy to use∙easy and automatic adjustment and calibration∙adjustable for different Petri dish sizes∙battery operation∙Full recharge time approx. 3.5 hours∙Total running time approx. 5.5 hours∙Total aspiration approx. 33000 litres∙according to international Guidelines: Isokinetic measurement, 0.45 m/sec, 100 litres/minute∙sampling volume adjustable from 1 – 2000 litres5.1 Comparison old MAS-100® with new MAS-100 NT®400 x 0,7mm Sampling head 300 x 0,6mm Sampling head(400 x 0.7mm Sampling head onrequest)32 characters LCD display Graphic illuminated displayyes - no navigation Menu guided navigation with upand down arrow and directmenu selection buttonsMenu in English Menu in English, French,German, Spanish, Polish,Czech, Italian and Portuguese RS-232 communication USB communicationSoftware Improved Software withWindows login and reporting6 First Time Use of MAS-100 NT®If the MAS-100 NT®is used for the first time or after a calibration the “calibration reminder" has to be set. (see 7.3)6.1 Adjusting Sampling Plates on the MAS-100 NT®Before using the MAS-100 NT® for the fist time you will need to adjust the Petri dish support.6.2 Adjusting Petri dishLift off the perforated lid and place a Petri dish on the dish support. Use a 3 mm Allen key to adjust the three blue jaws until the Petri dish is securely supported and there is no clearance (see picture). Check that the Petri dish is properly supported by turning the sampling head to the horizontal position. The Petri dish support is now adjusted. The procedure need only be repeated if you change Petri dish manufacturer.Note: Do not over-tighten the blue jaws. If you do, the Petri dish may break andshed plastic debris in the aspiration unit and block the motor.6.3 Adjusting Contact platesNew: The MAS-100 NT ®may be used with commercially available contact plates. The use of a special Adapter No. 1.09214.0001 and Sampling head N0. 1.09213.0001 is necessary.∙ Take the Allen key and exchange the 3existing blue jaws by removing the Allenscrews and replace with the 3 new blue jaws.∙ Place the positioning template and mark thecentre (see picture) with a marker pen.∙ Remove the positioning template and put theAdapter ring as shown in the picture bellow.∙ Put the contact plate in the adaptor andtighten the 3 Allen screws. The marked point should be in the centre of the contact plate as shown in the picture.Note:∙ Tighten the blue jaws and make sure that thestainless steel adapter holds firmly.6.4Mounting to a TripodThe MAS-100 NT ®may be used with a Tripod. The Tripod and the special “quick -change adapter” are available from your supplier.6.5New: SQS- Sequential Air Sampling 7A newly developed control system allows a measurement with the MAS-100 NT ®over a prolonged time with a single agar plate. Hereby, without any microbial loss, up to 50 air samples can be accumulated on the same Petri dish over a period of several hours.The main advantage of this method is that the risk of secondary contamination by the operators during the exchange of plates is reduced to a minimum. This is very important for ambient air monitoring in sterile zones. In addition, by collecting sequential samples over a prolonged period of time the randomization is improved and thus a more reliable result obtained. Moreover, instead of several 90mm standard Petri dishes, only one dish has to be evaluated, thus reducing the expenditure on equipment and labor.Illustration of a sequence7SQS-Sequential air sampling; Validation of the microbial count in the air using the MAS-100; Swiss Pharma 26 (2004) No.11, 9-11Time1. s a m p l i n gp a u s e2. s a m p l i n gp a u s e3. s a m p l i n gp a u s e4. s a m p l i n gp a u s e5. s a m p l i n gp a u s e6. s a m p l i n gp a u s e7. s a m p l i n gp a u s e8. s a m p l i n gp a u s e9. s a m p l i n gp a u s e10. s a m p l i n g24. m i n48. m i n72. m i n96. m i n120. m i n144. m i n168. m i n192. m i n216. m i n240. m i n7 General Functions7.1 OverviewThe MAS-100 NT® has built-in multilingual dialogue software. To navigate through the graphic display just follow the proposals indicated on the screen. There are four buttons, two underneath the screen for accepting the proposed action and the arrows at the right side of the screen to navigate up and down the screen.7.2 Control interfaceThe MAS-100 NT® has an illuminated graphic display. Follow the text on the screen by pressing the button [3], [4] or the arrow keys [1], [2] to choose a mode or select values.The top line shows date, time and the status of the battery.To start the instrument, press the left down button (4) for about 2 seconds. The blue diode will light up.142 37.3 First Time Use of MAS-100 NT® = Activation of Calibration ReminderThe MAS-100 NT® has a built-in calibration reminder. If theMAS-100 NT® is used the first time a screen comes up with the questionof setting the time you want to be reminded that the instrument should berecalibrated. The manufacturer recommends recalibrating the instrumentat least once a year. Choose a value from 1 to 12 months. 0 means, thatthe reminder is disabled.Accept by pressing OK. With Back the first screen is displayed again.After activation, fill in the calibration certificate with the date on which theinstrument was first used and the date for recalibration.Please configure instrument to your specification (e.g. language, date format, etc.)see config device 9.117.4 Message on display if calibration reminder is activatedIf the calibration reminder is activated the MAS-100 NT® will display aWarning before each run: Recalibration needed!The MAS-100 NT® can still be operated. Recalibration should beperformed as soon as possible.If the calibration reminder is activated and in the PC software“Block measurement if calibration validity expired” box is activated it isnot possible to start a sampling. An Alarm: “Recalibration needed!” is displayed on the MAS-100 NT®. To be able to continue it is compulsory to calibrate the instrument. Software setting in the Adjustment / Calibration MenuNote: The manufacturer suggests setting the calibration reminder for 12months from first switch on.Note: You have to select a figure and press the “A ccept” button in order toinitialize the instrument. If you press “not accept” the MAS-100 NT® willnot work!Note: Adjustment and Calibration should performed only by either authorizedpersonnel or authorized service center using DA-100 or DA-100 NT.MAS-100 NT7.5Switching ON and OFF the MAS-100 NT ®To switch on the MAS-100 NT ®press the left button (4) under the screen for about 2 seconds until the blue LED (run) lights up. The program will start.To switch off press “Menu” select “Shut Down” and press “select” again and press the “ok” button for the question “Shut down device?” If no further manipulations are made on the Instrument and no run is started, the instrument will switch off automatically after 5 minutes.Connect the charger to the power and to the MAS-100 NT ®,the instrument will switch on automatically and can’t be shut down.7.6Charging the MAS-100 NT ®The MAS-100 NT ®has to be charged before first time use. The battery sign is fully black when fully loaded. With decreasing battery capacity the battery becomes transparent.If the transparency reaches ¾ of the battery it should be recharged.Connect the charger to the power and to the MAS-100 NT ®. Make sure that the red point of the charging plug matches the black point of the handle. See picture.The MAS-100 NT ®wi ll switch on automatically and can’t be shut down. Shut down function is disabled. A connector symbol is blinking duringcharging. When fully charged, the connector symbol is permanently on.∙ Full recharge time approx. 3.5 hours ∙ Total running time approx. 5.5 hours ∙ Total aspiration approx. 33000 liters7.7 Intro ScreensAfter switching on the MAS-100 NT ®there are two screens appearing. Both of them may be canceled (see 9.15)The first and second screen shows some information about theMAS-100 NT ®.Name: Each instrument may have an individual name. This may be programmed with the PC-Software. Dep.: Second possibility to specify the instrument for example “Department”.S/N: Serial number S. Head: The sampling head which has to be used with this instrument.Next Cal.: The time remaining until the next calibration is due. After about 5 seconds the screen changes to the start screen. Bypressing the ok button it will change without delay to the start screen.Note: Both intro screens may be cancelled. (see: Skip intro 9.15)8 Operation8.1 Standard Mode MAS-100 NT® (STD) or Sequential Sampling Mode (SQS) Standard mode sample the selected Volume within one sampling process. (see SQS Sequential Sampling chapter 8.9 for splitting the selected volume into fractions)Press “Start” to start sampling.Press menu to select menuIf the Delay is deactivated (see 9.6) the Delay will not be displayedThe screen will switch back to the first screen after 3 secondsIf the User Selection is deactivated the User will not be displayed. (seedeactivation of User in chapter 9.7)8.2 Manual or Template ModeChoose Mode selection and press Select.Choose Manual or Template ModeTemplate: Up to 10 templates may be programmed in the PC-Softwareand downloaded to the MAS-100 NT® with USB cable.(see Manual for PC-software)Note: Before operating the air sampler you will need to read through Section 7“General functions”.Note: If no templates are present on the MAS-100 NT®the message: “Thereare no templates saved!” is displayed.8.3Working with TemplatesWith the software the user is able to create templates for the download tothe MAS-100 NT ®. Up to 10 templates or a total of 100 sampling places also called CCP, “critical control point” may be stored on theMAS-100 NT ®.The user can select a template for example “Template 1” and theLocation and Device, all these names may be changed or renamed in the PC-softwareStart the sampling on the MAS-100 NT ®. After the test the values are uploaded to the PC and the values are used to create an automatic protocol. For further Informations please read the Software Manual.Note: Templates can only be generated using the PC software8.4 Example of Protocol Created by the SoftwareNote: The report logo can be changed via the PC software.8.5 Template DataTemplate Data permits to clear the data collected in a Template and reuse the same template again. It may also be used to erase a complete Template.Select “Template Data” and choose the Template with the up and down arrows. Press “Select” and decide whether you want to delete the data inthe “Template” or only the Da ta collected in the selected Template.To be sure that no important data is erased by accident theMAS-100 NT ®asks again if you really want to delete the data or delete the Template. Accept with ok or press “Back” to go back twice to themain Menu8.6Process SettingsPress Menu and select Process Settings. Press Select to activate next screen.Note: To delete the templates or the data in the template the “Protected Mode”in the PC-Software must be inactive.8.7 Standard or SQS Sampling ModeSelect STD or SQS with arrow keys.Press Change and select STD for Standard sampling or SQS for Sequential sampling (see 6.5)8.8Change the Sampling VolumeSelect Volume with up and down arrows. Press Change and select thedesired volume with the up and down arrows.Press Save and twice Back to go to the Start screen.Insert space between 1000 and l8.9 Working with the SQS or Sequential Sampling ModeThe SQS 8Sequential Sampling splits the selected volume into fractions over a selected time. The Standard mode samples the selected volume within one sampling process. (see chapter 6.5)Select Menu and Process settings, then Change and select SQS(sequential sampling Mode) with the up or down arrows. Save to store new value. Press Change and select next parameter and change it to your requirements. Volume: 0 - 2000 l (selects the Standard Volumes, see 9.5) Fractions: 2 - 50Duration: 23:59 hThe Start screen shows now that the SQS Mode is selected with 10 fractions of a total of 1000l (100 l / fraction) and the sample is taken over the time of 4 hours beginning from start time.The sampling process may be stopped at any time by pressing Abort.8SQS-Sequential air sampling; Validation of the microbial count in the air using the MAS-100; Swiss Pharma 26 (2004) No.11, 9-11Note: The minimum Volume for 1 Fraction is 20 liters。
浮游菌采样器操作规程
1.确保采样器清洁干燥,并使用无菌棉球擦拭采样器内部和外部表面。
2. 连接采样器和相应的采样管,确保连接牢固。
3. 在采样前,进行预冲洗,即将采样器中的水排放一部分,以排除管道中的空气和杂质。
4. 选择采样点,将采样器缓慢下沉至所需深度,并记录采样深度和采样时间。
5. 按照采样需要,选择适当的采样量。
如需多个时间点、多个深度采样,需在每次采样前清洗采样器。
6. 采样后,将采样器缓慢上升至水面,取出采样器。
7. 立即将采样管关闭,并将采样器中的水倒入采样管中。
8. 将采样管标识,记录采样点、采样时间和采样深度。
9. 将采样管放入冷藏保存,并在48小时内进行实验。
注意事项:
1. 采样前应检查采样器和采样管的密封性。
2. 采样时应避免对周围环境造成干扰。
3. 采样器和采样管应避免暴露在阳光直射下或高温环境中。
4. 采样器和采样管应放在干燥、阴凉、避光处保存。
5. 采样过程中应注意个人防护,穿戴手套等防护用品。
- 1 -。
目录List1.目的(Object) (3)2.范围(Scope ) (3)3.职责(Responsibility) (3)4.内容(Content) (3)4.1仪器外表 (3)4.2仪器基本原理 (4)4.3仪器操作 (4)4.4设置菜单功能 (6)4.5维护保养 (7)5.相关文件(Related to document ) (10)6 .文件变更历史(History of document change) (11)1.目的(Object )建立MAS-100 Eco空气浮游菌采样器操作规程,以便于检验人员在实际操作过程中按仪器规程进行操作。
2.范围(Scope)适用于MAS-100 Eco空气浮游菌采样器的操作。
3.职责(Resp on sibility)QC部:负责按本程序的相关规定对MAS-100 Eco空气浮游菌采样器进行操作管理。
QA部:负责本程序的批准及对MAS-100 Eco空气浮游菌采样器操作管理进行监督。
4.内容(Content)4.1仪器外表4.2仪器基本原理MAS-100 Eco 空气浮游菌采样器是一个高性能的仪器,利用 Andersen 撞击法原理,抽取 空气通过有400个孔的穿孔板,抽吸速率为每分钟 100升,气流中的微生物附着在含有琼 脂的培养皿中。
完成采样周期之后,将该培养皿放到适宜条件下培养,然后确定菌落总数。
4.3仪器操作4.3.1启动MAS-100 Eco 空气浮游菌采样器按“ yes ”打开MAS-100 Eco 空气浮游菌采样器,显示屏上会自动显示软件版本,然后是日防尘罩穿孔盖,向左旋开内为培养皿便携手柄底板,内有充电电池no 键 yes 键J 」期和时间。
注意:如果开启之后没有任何操作,大约100秒以后,MAS-100 Eco空气浮游菌采样器将自动关机。
432空气采样4.321把MAS-100 Eco空气浮游菌采样器置于固定的平面上。
4.322向左旋转,打开穿孔盖(附防尘盖)。
中国总代理:Nano电子商城Merck MAS 100 NT空气浮游菌采样器 操作说明书 Professional Microbial Air Monitoring System for the Microbiological Testing of AirMerck MAS 100 NT浮游菌/空气微生物采样器:世界领先的空气微生物采样系统MAS 100 NT(New type)于2008年7月中旬正式面市,全面取代原型号MAS 100目录:1、 注意事项--------------------------------------------------------------------------4 1.1 重要的安全设施1.2 MAS 100 NT的操作1.3 使用环境条件1.4 质保1.5 机器故障处理2、 介绍------------------------------------------------------------------------------5 2.1 功能概览2.2 MAS 100 NT详述2.3 采样头2.4 通讯2.5 MAS 100 NT操作操作程序设定3、 基本原理-------------------------------------------------------------------------64、 MAS 100 NT重要优点--------------------------------------------------------------74.1 MAS 100 NT与MAS 100的对比5、 初次使用MAS 100 NT注意事项------------------------------------------------------8 5.1 采样头的调整5.2 标准平皿的放置5.3 接触平皿的放置5.4 第一次连接电脑5.5 新功能:SQS连续分段式采样6、 基本功能-------------------------------------------------------------------------9 6.1 概览6.2 显示屏6.3 初次使用:同时激活校验提示功能6.4 MAS 100 NT的启动与关闭6.5 开机界面7、 操作----------------------------------------------------------------------------10 7.1 MAS 100 NT开机7.2 标准模式7.3 手动或者模版模式(HACCP设计模式)7.4 模版模式7.5 软件报告格式示例7.6 采样程序设定7.7 标准模式或者SQS分段连续采样模式7.8 更改采样体积7.9 SQS或者连续采样模式8 菜单设置-----------------------------------------------------------------------12 8.1 关机8.2 工作模式选择8.3 程序设定8.4 标准体积设置8.5 操作延时/等待功能8.6 用户选择8.7 预设参数的打印8.8 采样记录8.9 报警记录8.10 设备配置8.11 时间日期设定8.12 语言选择8.13 背景显示对比度8.14 设备信息8.15 系统信息9 报警号及描述--------------------------------------------------------------------169.1 报警号示例10 通过电脑操作锁定MAS 100 NT-----------------------------------------------------1711 采样结果校正--------------------------------------------------------------------17 11.1 Feller校正表:使用300孔穿孔盖进行采样的结果校正11.2 Feller校正表:使用400孔穿孔盖进行采样的结果校正12 技术参数------------------------------------------------------------------------2012.1 环境条件13 装箱单-------------------------------------------------------------------------2114 日常保养及维护-----------------------------------------------------------------2115 质保---------------------------------------------------------------------------211 注意事项1.1 重要的安全设施1.2 MAS 100 NT的操作请在使用前仔细阅读说明书。
浮游菌采样器操作规程
《浮游菌采样器操作规程》
一、设备准备
1. 确保浮游菌采样器处于干净的状态,无杂物和污垢。
2. 检查浮游菌采样器的储罐和管路是否完好,无漏水和损坏。
3. 检查浮游菌采样器的电源和电路是否正常。
二、样品采集
1. 打开浮游菌采样器的电源开关,确保设备正常运行。
2. 将浮游菌采样器放置在采样点位置,保持水面水深和采样器相对高度稳定。
3. 设置采样时间和间隔,关闭浮游菌采样器的盖子。
4. 等待采样结束后,关闭电源开关,取出储罐中的样品。
三、样品处理
1. 将采集的样品倒入干净的容器中,避免样品与外界污染。
2. 将浮游菌采样器清洗干净,包括储罐和管路。
四、记录和报告
1. 记录采样的时间、地点、采样参数和操作情况。
2. 对采集的样品进行标注和保存,便于后续分析和研究。
3. 编制采样报告,包括采样结果和相关数据。
五、安全与维护
1. 注意采样过程中的安全问题,避免发生意外。
2. 定期对浮游菌采样器进行检查和维护,确保设备正常运行。
六、其他注意事项
1. 严格按照操作规程进行操作,防止操作失误。
2. 在采样过程中要保持环境的整洁和安静,避免外界干扰。
以上为浮游菌采样器操作规程,请严格按照规定操作,确保采样过程的准确和可靠。
浮游菌采样器采样操作过程
浮游菌采样器是一种高效的多孔吸入式尘菌采样器。
它根据颗粒撞击原理和等速采样理论设计,采样直接,采样口风速与洁净室内风速基本一致,能更准确地反映洁净室内的微生物浓度。
采样时,带尘菌空气高速通过微孔,被撞击在培养皿内的琼脂表面;这些活体微生物在培养过程中,发生动态再水化过程,高速生长,从而更快得出结果。
采样操作过程:
一、准备工作
1、将制作好的培养基倒入已灭菌的培养皿中,30~35℃预培养48小时,确证无菌后使用。
2、将仪器用紫外灯照射或用75%酒精擦拭后,以无菌状态传入洁净室。
二、操作方法
1、将浮游菌采集器放置在工作台面上,用采样口直接采样。
如测量位置较高可使用采样管,把管子延伸到所要采样的空间。
2、打开电源通电,根据选择的周期按设置键。
设置键可设置1~10、20、30~90分钟分18档调节,即每按1次设置键,增加10分钟。
3、将盛有培养基的培养皿置于转盘上,放上外罩,压紧压块使之外罩与底座密封。
4、调节刻度盘,旋转调节钮,使狭缝与培养基保持在2mm距离。
5、按启动键,本机待机15秒后,泵开始抽气,转盘开始360°旋转,调节流量旋钮,使流量计浮子上端与50L刻度线相平。
采样完成,拧下外罩,迅速把平皿上盖盖上并取出,并按上述方法放入新的平皿进行第二次采样(若使用采样管,
则换上预先消毒过的第二根采样管)。
6、取出的平皿放置30~35℃培养箱培养,2天后计数。
7、使用完毕后,填写《检验仪器设备使用记录》。
目录List1. 目的(Object) (4)2. 范围(Scope) (4)3. 职责(Responsibility) (4)4. 内容(Content) (4)4.1仪器外表 (4)4.2仪器基本原理 (5)4.3仪器操作 (5)4.4设置菜单功能 (7)4.5维护保养 (7)5. 相关文件(Related to document ) (10)6.文件变更历史(History of document change) (10)1. 目的(Object)建立MAS-100 Eco空气浮游菌采样器操作规程,以便于检验人员在实际操作过程中按仪器规程进行操作。
2. 范围(Scope)适用于MAS-100 Eco空气浮游菌采样器的操作。
3. 职责(Responsibility)QC部:负责按本程序的相关规定对MAS-100 Eco空气浮游菌采样器进行操作管理。
QA部:负责本程序的批准及对MAS-100 Eco空气浮游菌采样器操作管理进行监督。
4. 内容(Content)4.1仪器外表防尘罩穿孔盖,向左旋开内为培养皿托架no键yes键便携手柄底板,内有充电电池4.2仪器基本原理MAS-100 Eco空气浮游菌采样器是一个高性能的仪器,利用Andersen 撞击法原理,抽取空气通过有400个孔的穿孔板,抽吸速率为每分钟100升,气流中的微生物附着在含有琼脂的培养皿中。
完成采样周期之后,将该培养皿放到适宜条件下培养,然后确定菌落总数。
4.3仪器操作4.3.1启动MAS-100 Eco空气浮游菌采样器按“yes”打开MAS-100 Eco空气浮游菌采样器,显示屏上会自动显示软件版本,然后是日期和时间。
注意:如果开启之后没有任何操作,大约100秒以后,MAS-100 Eco空气浮游菌采样器将自动关机。
4.3.2空气采样4.3.2.1把MAS-100 Eco空气浮游菌采样器置于固定的平面上。
4.3.2.2向左旋转,打开穿孔盖(附防尘盖)。
浮游菌采样器操作规程
浮游菌采样器是一种用于采集水中浮游菌的装置,由采样器本体和采样瓶两部分组成。
采样器本体通过过滤水体中的浮游生物将其捕获,然后将浮游生物存放于采样瓶中。
二、浮游菌采样器操作规程
1.操作前准备
(1)检查采样器本体的过滤网是否干净,如发现有脏污请清洗干净。
(2)检查采样瓶是否干净,如发现有残留物请清洗干净。
(3)检查采样器本体和采样瓶是否完好无损,如发现有破损请更换。
(4)准备好采样器支架,将采样器固定在支架上。
2.进行采样
(1)选择采样点,根据需要采集的水域进行选择。
(2)将采样器本体插入水中,注意保持采样器本体与采样瓶之间的连接。
(3)缓慢向上提起采样器本体,在提起过程中要注意不要将采水管和采样瓶脱离连接。
(4)将采样器本体从水中取出,检查采样瓶中的水样是否符合要求,如不符合要求则需重新采集。
3.采样后处理
(1)将采样瓶中的水样倒入标准贮液中,避免水样污染。
(2)将采样器本体和采样瓶用清水冲洗干净,放置于通风干燥处。
(3)将采样器支架拆卸并清洗干净。
三、注意事项
(1)采样器本体和采样瓶使用前必须清洗干净,避免污染水样。
(2)采样器使用过程中应保持采样器本体与采样瓶之间的连接,避免漏采。
(3)采样器使用完毕后要及时清洗干净并放置于通风干燥处,避免细菌滋生。
(4)采样器的采样点选择要根据需要采集的水域进行选择,避免采集到不相关的样品。
(5)采样器的采样操作要注意安全,如有需要请佩戴防护用品。
浮游菌采样器生产安全操作及保养规程一、前言浮游菌采样器是一种用于采集海洋浮游生物的工具,它的使用需要遵守一定的操作规程,才能有效保证采样质量和操作安全。
本文将介绍浮游菌采样器的生产安全操作及保养规程,以供参考。
二、生产安全操作规程1. 浮游菌采样器的检查和确认在使用浮游菌采样器之前,需要对其进行检查确认。
具体方法如下:•检查所有部件,确定是否完好无损。
•核实采样器的操作方法和使用说明书是否齐全。
•初次使用或使用前对采样器进行洗消。
2. 浮游菌采样器的组装和调试组装浮游菌采样器前,需要根据使用说明书指导,将其能齐全组装好,调试好,主要步骤如下:•核实所有部件是否齐全无损。
•按照说明书要求安装、调整和固定各部件。
•调试浮游菌采样器,测试其正常工作和操作流畅。
3. 浮游菌采样器的稳定运行稳定的运行是保证浮游菌采样器正常工作的关键,主要包括以下几个方面:•核实浮游菌采样器是否在一个平稳的位置。
•确保采样器的稳定运行,防止出现不定期抖动、旋转、摇晃等情况。
•在采集过程中不得进行调整或移动采样器。
4. 浮游菌采样器的使用技巧使用浮游菌采样器,需要注意以下技巧:•浮游菌采样器不能用于急流、潮汐总量较小的浅滩或河流。
•最佳采样结果要求采样器在采样前充分洗消并排气。
•当打开采样瓶时,一定要轻柔,并反复带动压差一二次。
•采集结束后,立刻将采样器放到离海较近、控温、消毒的露天位置排压、消毒,尽量避免采样器的细菌生长,影响样品质量。
•在使用过程中需注意操作流畅,不得进行过猛过急的动作。
•定期对浮游菌采样器进行维护和保养,确保工作状态正常。
5. 浮游菌采样器的存储和维护为确保浮游菌采样器的质量,必须进行存储和维护。
具体方法如下:•将浮游菌采样器存放在干燥、避免日光直射的地方。
•经过 salt spray testing 等测试的采样器,应在定期内进行外观检查和维护。
•在碰撞过程中,应注意保护和防护相关部位。
•定期检查采样器的外观、内部机构以及各个接口的紧密程度。
目录List
1. 目的(Object) (3)
2. 范围(Scope) (3)
3. 职责(Responsibility) (3)
4. 内容(Content) (3)
4.1仪器外表 (3)
4.2仪器基本原理 (4)
4.3仪器操作 (4)
4.4设置菜单功能 (6)
4.5维护保养 (7)
5. 相关文件(Related to document ) (10)
6.文件变更历史(History of document change) (11)
1. 目的(Object)
建立MAS-100 Eco空气浮游菌采样器操作规程,以便于检验人员在实际操作过程中按仪器规程进行操作。
2. 范围(Scope)
适用于MAS-100 Eco空气浮游菌采样器的操作。
3. 职责(Responsibility)
QC部:负责按本程序的相关规定对MAS-100 Eco空气浮游菌采样器进行操作管理。
QA部:负责本程序的批准及对MAS-100 Eco空气浮游菌采样器操作管理进行监督。
4. 内容(Content)
4.1仪器外表
保养规程
The operation procedure of air sampling of
MAS-100 Eco
防尘罩
穿孔盖,向左旋开内为培养皿
no键
yes键
便携手柄
底板,内有充电电池
4.2仪器基本原理
MAS-100 Eco空气浮游菌采样器是一个高性能的仪器,利用Andersen 撞击法原理,抽取空气通过有400个孔的穿孔板,抽吸速率为每分钟100升,气流中的微生物附着在含有琼脂的培养皿中。
完成采样周期之后,将该培养皿放到适宜条件下培养,然后确定菌落总数。
4.3仪器操作
4.3.1启动MAS-100 Eco空气浮游菌采样器
按“yes”打开MAS-100 Eco空气浮游菌采样器,显示屏上会自动显示软件版本,然后是日
期和时间。
注意:如果开启之后没有任何操作,大约100秒以后,MAS-100 Eco空气浮游菌采样器将自动关机。
4.3.2空气采样
4.3.2.1把MAS-100 Eco空气浮游菌采样器置于固定的平面上。
4.3.2.2向左旋转,打开穿孔盖(附防尘盖)。
4.3.2.3取下培养皿的盖子。
4.3.2.4将含有培养基的培养皿(90mm)置于培养皿托架上,需用3mm的内六角扳手调节托架的3个蓝色培养皿夹使培养皿固定在托架上,培养皿夹不要太紧,否则可能导致培养皿破裂。
4.3.2.5向右旋转,关闭MAS-100 Eco空气浮游菌采样器的穿孔盖。
4.3.2.6通过移动便携手柄,调整采样头的气流方向至水平和垂直之间的任何角度。
4.3.2.7采样器显示屏处于时间界面,按“yes”进入体积选择界面,按“no”翻选所需的体积参数(有V1-V6共6个体积可供选择),按“yes”确定所需的体积参数,显示START ?Y/N,按“yes”开始选择采样,显示屏显示DELAY ON (延迟启动),按“yes”进入时延功能,“DELAY”和一个暗条同时出现在显示屏上,“Stop”下的红灯会在整个延时周期中(可设定)闪烁。
之后仪器开始采集空气,“Stop”下的红灯停止闪烁,“Run”下的绿灯不停闪烁,显示屏上方显示所选择的体积参数,下方显示一个暗条,暗条表示还要采集的空气的体积值。
4.3.2.8采样结束后,显示屏上会出现总体积和“END”的字样。
4.3.2.9 打开穿孔盖,从仪器中移走培养皿,盖上培养皿盖;从4.3.2.3开始进行下一次采样。
4.3.2.10采样结束后,如果没有任何操作,大约100秒之后,MAS-100 Eco将自动关机,要立即关闭MAS-100 Eco,可长按“no”键2-3秒。
4.3.2.11培养皿在相应的条件下进行培养后计数,计数所得的微生物数应根据Feller统计校正表(见附录)进行对照得出概率统计总数,然后再根据采样总体积换算成每立方米生物体数。
4.4设置菜单功能
4.4.1进入设置菜单
设置菜单可以在上述4.3.2.7项下出现“START ?Y/N”提示时,长按“no”键6秒进入。
显示屏左上方显示SETUP ,自动跳过后显示V1:0010 Y/N。
4.4.2自定义体积
继续按“yes”翻选所需设置的体积,总共有6个预设体积值可供选择,按“no”进入要设置的体积项并按键增加1单位的体积,直至所需的体积。
4.4.3延时设置
继续按“yes”确定后进入DELAY ON (延迟启动)设置,按“yes”进入时间设置,显示屏显示DELAY 1m,按“no”键修改延迟启动时间。
4.4.4设置欧盟/美国的日期格式
继续按“yes”确定,进入设置欧盟/美国的日期格式,提示“DATE EUR”或者“DATE US”,
按“no”在两个选项之间切换,EUR对欧洲,US为美国日期格式。
4.4.5修改日期、时间及退出菜单
继续按“yes”接受显示格式,并进入到下一个提示,接下来,日期将显示成之前选定的格式,按“no”显示年的设置,按“no”增加显示值,直到符合要求为止。
按“yes”,进入下一个提示,到最后一项是“EXIT”提示,按“yes”退出设置菜单或者按“no”返回到第一个提示。
4.5维护保养
4.5.1电池充电
当充电器连接到MAS-100 Eco上,充电插座旁的灯就会点亮。
当断开连接,灯就会熄灭。
一个完整的充电周期大约需要9小时,第一次充电时,应电池用完后连续充12个小时。
随着时间的推移,即使不使用,电池中的电量也会流失,所以厂家建议在进行测试之前,可以给仪器通宵充电,这样可以保证在采样时有足够的电量。
充电过程中也可以进行空气采样。
4.5.2 更换电池
如果不能即时给MAS-100 Eco电池充电,可以插入2节新的可充镍-氢电池或是2节1.5伏的碱性电池(AA)。
电池位于MAS-100 Eco的底板下,底板可以借助穿孔盖打开,步骤如下:取下穿孔盖,置于底板位置,确保穿孔盖与底板上的3个支沟完全契合。
顺时针旋转,并移走底板。
(注意:只能用穿孔盖移去底板)
4.5.3清洁
每次使用之前穿孔盖和防尘罩都应进行高温消毒121℃20min,当需要将MAS-100 Eco移动到无菌区域或者洁净区时,可以先用75%的酒精擦拭机身,在采样周期与周期之间,可以用75%的酒精对穿孔盖进行清洁,确保穿孔盖上的小孔没有堵塞。
4.5.4气流受阻
显示屏上显示“AIRBLOCK”,红灯和绿灯不停的闪烁,原因是MAS-100 Eco中一个电子传感器间接检测100升/分钟的空气流量,这个值不能保持,就会出现上述情况。
这时可以检查:1.防尘罩有没有移开;2.穿孔盖上的小孔有没有被堵住。
排除后故障可解除,若不能解除,应送厂家进行维修。
4.5.5校验
应当定期(每年一次)对MAS-100 Eco采样体积每分钟100升进行校验。