solarwinds10操作手册
- 格式:pdf
- 大小:1.46 MB
- 文档页数:28

Enterprises are under tremendous pressure to do more with less, roll out new businessservices faster, fit more servers into the same space, and comply with new regulations, all while their budgets are shrinking and headcount is frozen. Can an operating system really help you address these issues and turn IT into a business advantage? The answer is yes, with the Solaris™ Operating System.The Solaris OS is the strategic platform for today’s demanding enterprise. It’s the only open operating system that has delivered proven results, running everything from mission-critical enterprise databases to high performance Web farms, from large-scale SMP systems to industry-standard x86 systems from HP, IBM, Dell, and Sun.For customers facing challenging business and technical requirements — such as lowering costs, simplifying system administration, and maintaining high service levels — the Solaris 10 OS is the ideal cross-platform choice. Its innovative, built-in features deliver break-through virtualization and utilization, high availability, advanced security, and industry leading performance to meet these stringent requirements — all at a great price.Ten things to know about the Solaris OS1. Great productThe constant demonstrated innovation within the Solaris OS pays off by delivering benefits that can save companies time, hardware costs, power and cooling, while preserving investments in software and training. In short: innovation matters, because it saves you money.2. Great priceSolaris 10 support pricing is 20% to 50% lower than equivalent support from other open OS vendors. No-cost end user licensing lowers barriers to entry, while overall efficiency lowers costs of operation.3. Open sourceThe Solaris OS code base is the foundation of the OpenSolaris™ open source community (visit ). In addition, the Solaris OS includes the leading Web 2.0 open source packages, ready to run and optimized for the over 1,000 x64 and SPARC system platforms supported by Solaris 10.4. Application compatibility — guaranteed The Solaris OS delivers binary compatibility from release to release and source compati-bility between SPARC® and x86 processors; with the Solaris Application Guarantee backing it, it’s something you can count on. And for the ultimate in conversion ease, use Solaris 8 and Solaris 9 Containers on Solaris 10, a “Physical to Virtual”way to quickly and easily run your existing application environ-ments on the latest SPARC systems.5. One Solaris — same features on hundreds of systemsWith a single source code base, the Solaris OS runs on x86 and SPARC and processor-based systems — and delivers the same features on all platforms. You can develop and optimize applications on the Solaris OS for use on over 1000 system models from leading vendors such as Sun, HP, IBM, and Dell.<HighlightsThe Solaris™ Operating Systemmeets and exceeds expectations for:•Virtualization: Optimize resourceutilization to deliver predictableservice levels with SolarisContainers•Networking: Attain near-wirespeedthroughput with the open, program-mable Solaris networking stack•Security: Implement a securefoundation for deploying serviceswith Solaris leading-edge securityfeatures•Availability: Increase uptime withPredictive Self Healing6. Designed to run securely all the timeThe leading-edge security features in the Solaris 10 OS help you reduce the risk of intrusions, secure your applications and data, assign the minimum set of privileges and roles needed by users and applications, and control access to data based on its sensitivity label. Solaris 10 has been inde-pendently evaluated at EAL4+ at three Protection Profiles, one of the highest levels of Common Criteria certifications.7. Designed for observabilitySolaris Dynamic Tracing (DTrace) technology makes it fast and easy to identify perform-ance bottlenecks, especially on production systems. System administrators can use this to troubleshoot even the most difficult problems in minutes instead of days; devel-opers can use it to optimize applications, with significant performance gains possible — real-world use has yielded increases up to 50 times previous performance.8. Designed for virtualizationSolaris 10 has powerful virtualization features built in at no additional charge. With Solaris Containers, you can maintain a one application per virtual server deploy-ment model while consolidating dozens or even hundreds of applications onto one server and OS instance. Share hardware resources while maintaining predictable service levels; increase utilization rates, cut system and licensing costs while gaining the ability to quickly provision and move workloads from system to system. Logical Domains and Xen-based paravirtualization support add even more virtualization flexibility.9.Designed for high availabilityPredictive Self Healing is a key feature in the Solaris 10 OS that helps you increase system and service availability. It automati-cally detects, diagnoses, and isolates system and software faults before they cause downtime. And it spans the full range from diagnosis to recovery on SPARC, AMD Opteron™ and Athlon, and Intel® Xeon®and Core Duo processor-based systems.10.Designed for performanceThe Solaris 10 OS has set over 244 priceperformance records since its release,unleashing even more power from existingapplications. Download the latest Sun™Studio compilers and developer tools tobring even greater performance to yourapplications.For business, industry, and developersThe Solaris 10 OS offers the technology, flexi-bility, and versatility you need to get down tobusiness immediately, whether you’re a smalldeveloper, a large enterprise, or anything inbetween.OpenSolaris participation and OS releaseMore than an open source project, OpenSolarisis also a community, a Web site for collabora-tion — and now provides a supported, leadingedge release every six months. The OpenSolarisrelease is available at , andSolaris source code, downloads, developertools, mailing lists, user groups, and events areall available at . OpenSolaristechnology features a single source base forSPARC and x86 platforms. It includes the keyinnovations delivered in the Solaris 10 OS, aswell as providing access to new technologiesas they’re being developed. The OpenSolarisproject and release provide a low-risk optionfor evaluating emerging OS technologies, plusan excellent opportunity to participate inshaping the direction of the Solaris OS.Development toolsDevelopers need integrated, ready-to-use toolsthat are compatible with all the environmentsin which they must deploy applications. Withthat in mind, Sun includes popular softwaretools from the free and open source world andcomplements them with access to key Sundeveloper technologies like the Sun Studiocompilers and tools and unique Solaris 10utilities such as DTrace.Solaris 10 technologiesWith the Solaris OS, you get compelling newfeatures that your applications can take advan-tage of immediately with few, if any, changes.Binary and source compatibility with previousreleases also helps make it easier to move toSolaris 10 from earlier releases of Solaris.DTraceSystem administrators, integrators, and devel-opers can use the dynamic instrumentation andtracing capabilities in the Solaris OS to see what’sreally going on in the system. Solaris DTracecan be safely used on production systems —without modifying applications. It is a powerfultool that gives a comprehensive view of theentire system, from kernel to application, eventhose running in a Java™ Virtual Machine. Thislevel of insight reduces the time for diagnosingproblems from days and weeks to minutes andhours and ultimately reduces the time to fixthose problems.Solaris ContainersSolaris Containers is an OS-level virtualizationtechnology built into the Solaris 10 OS. Usingflexible, software-defined boundaries to isolatesoftware applications and services, this break-through approach allows multiple privateexecution environments to be created withina single instance of the Solaris OS. Each envi-ronment has its own identity, including adiscrete network stack, separate from theunderlying hardware, so it behaves as if it’srunning on its own system — making consoli-dation simple, safe, and secure.By dynamically controlling application andresource priorities, businesses can define andachieve predictable service levels. Systemadministrators can easily meet changingrequirements by quickly provisioning newSolaris Containers or moving them from systemto system or disk to disk within the same systemas capacity or configuration needs change.Containers can be patched in parallel, increasing speed by up to 300% on systems with multiple containers configured. This also raises the bar on the number of contain-ers that can be realistically run on a system. Containers also offer the ability to emulate other environments, prior Solaris releases, such as Solaris 8 and Solaris 9, as well as support for Linux applications.In addition to Solaris Containers, Sun also offers Logical Domains (LDoms), a hardware partitioning technology that allows multiple instances of the Solaris OS to run on a single Sun CoolThreads™ server.Solaris ZFSThe Solaris ZFS file system is designed from the ground up to deliver a general-purpose file system that spans from the desktop to the datacenter. Anyone who has ever lost important files, run out of space on a partition, spent weekends adding new storage to servers, tried to grow or shrink a file system, or experienced data corruption knows the limitations of tradi-tional file systems and volume managers. Solaris ZFS addresses these challenges efficiently and with minimal manual intervention.Predictive Self HealingPredictive Self Healing is an innovative capability in the Solaris 10 OS that automatically diagnoses, isolates, and helps you recover from many hardware and application faults. As a result, business-critical applications and essential system services can continue uninterrupted in the event of software failures, major hardware component failures, and even software config-uration problems.• Solaris Fault Manager continuously monitorsdata relating to hardware and softwareerrors. It automatically and silently detectsand diagnoses the underlying problem andcan automatically take the faulty componentoffline on SPARC, Intel Xeon, and AMD Opteronprocessor based systems. Easy-to-understanddiagnostic messages link to articles in Sun’sknowledge base to help clearly guide admin-istrators through corrective tasks requiringhuman intervention.• Solaris Service Manager (SMF) creates astandardized control mechanism for applica-tion services by turning them into first-classobjects that administrators can observe andmanage in a uniform way. These servicescan automatically be restarted if they’reaccidentally terminated by an administrator,fail as the result of a software programmingerror, or interrupted by an underlyinghardware problem.PerformanceOptimizing performance and efficiency inSolaris 10 is the result of many factors: under-lying technologies, system configuration andutilization, tools, applications, and systemtuning. An enhanced networking stack mini-mizes latency and offers improved networkperformance for most applications out ofthe box.With DTrace, you can delve deeply into today’scomplex systems when troubleshooting systemicproblems or diagnosing performance bottlenecks— in real time and on the fly. Additional built-in technologies that help deliver increasedapplication performance include:• High-performance networking stack• Filesystem performance• Tools and libraries• Multiple page-size support (MPSS)• Memory placement optimization (MPO)SecuritySecurity is more than a mix of technologies;it’s an ongoing discipline. Sun understandsthis and continues its 20-year commitment toenhancing security in the Solaris OS. SolarisUser and Process Rights Management plusSolaris Containers enable the secure hostingof hundreds of applications and multiplecustomers on the same system. Administratorscan use features such as Secure by Default tominimize and harden the Solaris OS even more.Additionally, Solaris Trusted Extensions providestrue multi-level security for the first time in acommercial-grade OS, running all your existingapplications and supported on over 1,000different system models.• Verify your system’s integrity by employingSolaris Secure Execution and file verificationfeatures• Reduce risk by granting only the privilegesneeded for users and processes• Simplify administration and increase privacyand performance by using the standards-based Solaris Cryptographic Framework• Secure your system using dynamic serviceprofiles, including a built-in, reduced-exposurenetwork services profile• Control access to data based on its sensitivitylevel by using the labeled security technologyin Solaris Trusted ExtensionsNetworkingExponential growth in Web connectivity, services,and applications is generating a critical needfor increased network performance. With theSolaris 10 OS, Sun meets current and futurenetworking challenges by significantly improvingnetwork performance without requiring changesto existing applications. The Solaris 10 OS speedsapplication performance via the Network Layer7 Cache and enhanced TCP/IP and UDP/IPperformance. The latest networking techno-logies, such as 10-Gigabit Ethernet and hardwareoff-loading, are all supported out of the box.Additionally, the Solaris 10 OS supports current IPv6 specifications, high availability, streaming, and Voice over IP (VoIP) networking through extended routing and protocol support —meeting the carrier-grade needs of a growing customer base.Platform choiceThe Solaris 10 OS is optimized for Sun and third-party systems running 64-bit SPARC, AMD, and Intel processors. This makes it possible to create horizontally and vertically scaled infra-structures and offers the flexibility to easily add compute resources. The OS runs on hardware ranging from laptops and single-board computers to datacenter and grid installations, while serving applications ranging from military command-and-control systems to telecommunications switch gear and stock trading.InteroperabilityThe Solaris 10 OS provides interoperability from the desktop to the datacenter across a range of hardware systems, operating platforms, and technologies, making it the ideal platform for today’s heterogeneous compute environments. Not only does it interoperate with both Linux and Microsoft Windows, it also supports popular open source applications and open standards such as Universal Description, Discovery, and Integration (UDDI); Simple Object Access Protocol (SOAP); Web Services Description Language (WSDL); and eXtensible Markup Language (XML).• Source and binary compatibility for Linux applications and interoperability with Microsoft Windows systems• Includes Perl, PHP, and other widely used scripting languages• Includes Apache, Samba, sendmail, IP Filter, BIND, and other popular open source software • Supports Java application development and deployment with the Java Platform, Enterprise Edition (Java EE) and Java Platform, Standard Edition (Java SE)• Includes authentication support for LDAP-based directory servers and Kerberos-based infrastructures© 2009 Sun Microsystems, Inc. All rights reserved. Sun, Sun Microsystems, Solaris, OpenSolaris, Java , and CoolThreads are trademarks or registered trademarks of Sun Microsystems, Inc. or its subsidiaries in the United States and other countries. All SPARC trademarks are used under license and are trademarks or registered trademarks of SPARC International, Inc. in the US and other countries. Products bearing SPARC trademarks are based upon an architecture developed by Sun Microsystems, Inc. AMD, Opteron, the AMD logo, the AMD Opteron logo are trademarks or registered trademarks of Advanced Micro Devices. Intel® Xeon® is a trademark or registered trademark of Intel Corporation or its subsidiaries in the United States and other countries. Information subject to change without notice. SunWIN #420130 Lit. #SWDS12147-4 09/09 Sun Microsystems, Inc.4150 Network Circle, Santa Clara, CA 95054 USA Phone1-650-960-1300 or 1-800-555-9SUN Web 。
windows10使用手册摘要:1.Windows 10 简介2.Windows 10 新特性3.操作系统安装与升级4.系统设置与优化5.软件安装与卸载6.文件管理与操作7.网络设置与使用8.安全防护与维护9.常见问题与解决方法正文:【Windows 10 简介】Windows 10 是微软公司推出的一款操作系统,自2015 年7 月29 日发布以来,凭借其出色的性能和全新的功能受到了广泛好评。
Windows 10 提供了多种版本,以满足不同用户的需求,包括家庭版、专业版、企业版等。
【Windows 10 新特性】Windows 10 具有诸多新特性,如全新的开始菜单、多任务切换、虚拟桌面、Windows Hello 面部识别等,为用户带来了全新的使用体验。
同时,Windows 10 还具有强大的兼容性,支持运行Windows 7 和Windows 8.1 的应用程序。
【操作系统安装与升级】安装Windows 10 操作系统有多种方式,可以通过U 盘、DVD 或ISO 镜像文件进行安装。
对于已经安装了Windows 7 或Windows 8.1 的用户,可以通过官方提供的升级工具进行升级。
在升级前,建议用户备份好个人数据,以免丢失。
【系统设置与优化】Windows 10 提供了丰富的系统设置选项,包括个性化、电源、网络、存储等。
用户可以根据自己的需求进行设置。
为了提高系统性能,用户还可以进行一些优化操作,如关闭不必要的启动项、清理系统垃圾、磁盘碎片整理等。
【软件安装与卸载】在Windows 10 中,可以通过Microsoft 商店、浏览器或其他第三方软件下载安装软件。
安装软件时,请务必从官方渠道下载,以确保软件的安全性。
卸载软件时,可以在“控制面板”中的“卸载程序”选项中进行操作。
【文件管理与操作】Windows 10 提供了强大的文件管理功能,用户可以通过文件资源管理器创建、删除、移动、复制文件等。
About the T utorialWindows 10 is the latest OS version from Microsoft. This tutorial gives you all the in-depth information on this new operating system and its procedures, right from what all hardware and other system components are required to install this OS in your system, to its advanced features and other uses.Windows 10 combines the features from its two previous versions for making it further user friendly for desktops as well as laptops and mobile devices. This is an introductory tutorial that explains all the fundamentals of Windows 10.AudienceThis tutorial has been designed for all those readers who want to learn the features of Windows 10. It is especially going to be useful for all those professionals who are required to install and use this operating system to perform various duties in their respective organizations.PrerequisitesWe assume the readers of this tutorial have a practical experience of handling a Windows based Laptop or Desktop. In addition, it is going to help if the readers have a basic knowledge of how to install and use an operating system.Disclaimer & CopyrightCopyright 2018 by Tutorials Point (I) Pvt. Ltd.All the content and graphics published in this e-book are the property of Tutorials Point (I) Pvt. Ltd. The user of this e-book is prohibited to reuse, retain, copy, distribute or republish any contents or a part of contents of this e-book in any manner without written consent of the publisher.We strive to update the contents of our website and tutorials as timely and as precisely as possible, however, the contents may contain inaccuracies or errors. Tutorials Point (I) Pvt. Ltd. provides no guarantee regarding the accuracy, timeliness or completeness of our website or its contents including this tutorial. If you discover any errors on our websiteorinthistutorial,******************************************T able of ContentsAbout the Tutorial (1)Audience (2)Prerequisites (2)Disclaimer & Copyright (2)Table of Contents (3)1.WINDOWS 10 – OVERVIEW (7)2.WINDOWS 10 – INSTALLATION (8)System Requirements (8)Upgrade (8)Clean Install (12)3.WINDOWS 10 – GETTING STARTED (14)4.WINDOWS 10 – GUI BASICS (16)Windows (16)Icons (17)Desktop Background (18)5.WINDOWS 10 – NAVIGATION (20)Start Menu (20)File Explorer (21)Virtual Desktops (22)6.WINDOWS 10 – START MENU (23)Left Pane (24)Search Box (25)Right Pane (27)Pin an Application to the Taskbar (29)8.WINDOWS 10 – TABLET MODE (32)How to Activate the Tablet Mode? (32)9.WINDOWS 10 – FILE EXPLORER (34)The File Explorer Ribbon (35)10.WINDOWS 10 – CORTANA (37)Activating Cortana (38)Personalizing Cortana (40)11.WINDOWS 10 – NOTIFICATIONS (42)Customizing Notifications (43)12.WINDOWS 10 – QUICK ACTIONS (44)Customizing Quick Actions (44)13.WINDOWS 10 – CLOUD (46)Using OneDrive (47)14.WINDOWS 10 – UNIVERSAL APPS (49)15.WINDOWS 10 – MULTIPLE DESKTOPS (50)16.WINDOWS 10 – USERS MANAGEMENT (51)17.WINDOWS 10 – SECURITY (54)User Account Control (54)Windows Defender (57)Windows Firewall (58)18.WINDOWS 10 – PARENTAL CONTROL (60)20.WINDOWS 10 – WEB BROWSING (68)Adding a Web Page to your Favorites (69)Reviewing Browsing History (70)21.WINDOWS 10 – NETWORKING (71)Wired Connection (Ethernet) (71)Wireless Connection (Wi-Fi) (72)22.WINDOWS 10 – VIRTULIZATION (74)Pre-requisites in Windows 10 (74)Enabling Virtualization in the BIOS (76)Setting Up Hyper-V (78)Using Hyper-V to Create a Virtual Machine (80)23.WINDOWS 10 – REMOTE ACCESS (84)Allowing Remote Access to your Computer (84)Use Remote Desktop to access another Computer (86)24.WINDOWS 10 – BACKUP & RECOVERY (88)File History (88)Backup & Restore (Windows 7) (90)Creating a System Image (93)Resetting the PC (95)Advanced Options (96)25.WINDOWS 10 – PROJECT SPARTAN (98)26.WINDOWS 10 – APPS MANAGEMENT (99)Uninstalling Applications (100)Uninstalling an Application from the Settings window (102)Uninstalling Applications from the Control Panel (104)27.WINDOWS 10 – EMAIL MANAGEMENT (106)Configuring the Mail App (106)28.WINDOWS 10 – KEYBOARD SHORTCUTS (109)Window Snapping (109)29.WINDOWS 10 – SYSTEM TRAY (111)30.WINDOWS 10 – MEDIA MANAGEMENT (113)Media Applications (114)31.WINDOWS 10 – FAVORITE SETTINGS (116)Unpin your Favorite Settings (119)32.WINDOWS 10 – SHORTCUTS (120)Creating a Shortcut (120)33.WINDOWS 10 – PHONES (123)Windows 101.W INDOWS 10 – OVERVIEWWindows 10 is the most recent version of the operating system from Microsoft. Officially it was released in 2015 and was initially offered free of charge to legitimate users of Windows 7 and Windows 8.1. This new version combines features from those two previous installments to suit the users in a better way for both desktop/laptop computers as well as mobile devices.The most notable change in Windows 10 is that Microsoft replaced the Start screen tiles from Windows 8, and brought back the Start Menu. They also removed the vertical toolbars (or “charms”) that appeared from the sides of the screen. These changes make this Windows version easier to use for users of both desktop/laptops and mobile devices.Windows 102.W INDOWS 10 – INSTALLATIONThere are two approaches you can take for installing Windows 10 in your computer: Upgrade or a Clean Install.Typically, when you upgrade your operating system, all your documents and applications remain unchanged, whereas with a clean install you would be starting again from scratch. But one important thing to verify first is if your computer has the necessary hardware to support Windows 10.System RequirementsAlthough most computers nowadays probably have the necessary requirements for Windows 10. It will certainly be useful to know them in case you want to upgrade from an older system.The main requirements are:∙ A processor (CPU) with a clock rate of at least 1GHz.∙At least 1 to 2GB of memory (RAM), but Microsoft recommends 4GB.∙At least 16GB space in your hard disk.One important thing to note is that the installation process itself will verify your computer hardware and let you know if it qualifies for a Windows 10 upgrade or not. If not, then you will need to upgrade your hardware.UpgradeIf your computer qualifies for a Windows 10 upgrade, then you can follow these steps to perform the upgrade:Step 1: Look for the Windows 10 notification in the lower-right corner of the screen. This is a one-year-only offer that Microsoft is extending to valid users of Windows 7 and Windows 8.1.Step 2: By clicking on the notification, it will start the download and installation process of Windows 10 in your system.The download required for the upgrade is quite large, so make sure you have a stable Internet connection and continuous power for your computer to avoid interruptions during the process.Step 3: After the download is complete, it will prompt you to accept Microsoft’s license terms.Step 4: After agreeing to the terms, it will ask if you want to install the upgrade at that moment or schedule it for later.Since the upgrade process can take approximately 2 hours, it will be helpful to schedule it for a time, that will be more suitable to you.Step 5: Once the upgrade starts, the system will perform a series of tasks, during which you will see the following screen.During this time, your computer will reboot a couple of times, so don’t worry. The process itself will take you through the steps to complete the upgrade.Step 6: As the upgrade approaches its end, it will ask you to configure some basic Windows settings. You can choose to use Express settings, which will apply the most common or recommended settings, or you can choose to customize the settings as you please.Step 7: After the upgrade finishes, you’ll see the Windows welcome screen.Clean InstallIf your computer has an older operating system like Windows XP or Vista, you won’t be able to upgrade for free. In these cases, you’ll need to buy a boxed copy of Windows 10 to have a valid license for the installation. Windows 10 will have a starting price of $119.End of ebook previewIf you liked what you saw…Buy it from our store @ https://。

windows10使用手册Windows 10使用手册Windows 10是微软公司推出的一款操作系统,它以其强大的功能和稳定性受到广大用户的喜爱和选择。
本手册旨在向用户介绍Windows 10的基本操作、常用功能和高级技巧,帮助用户更好地使用和掌握这一操作系统。
第一部分:基本操作1.登录和账户管理在启动Windows 10后,您需要通过登录账户来访问操作系统。
您可以选择使用Microsoft账户或本地账户登录。
Microsoft账户可以同步您的重要文件、设置和应用程序,使您可以在不同设备之间进行无缝切换。
2.开始菜单Windows 10的开始菜单集合了传统的开始菜单和Windows 8的磁贴界面,提供了更加便捷和直观的操作方式。
您可以在开始菜单中访问常用的应用程序、设置和文件,并通过右侧的磁贴快速启动您的常用应用。
3.任务视图和多任务管理Windows 10引入了任务视图功能,可让您以全新的方式管理多个任务和窗口。
通过点击任务栏上的任务视图按钮,您可以轻松地切换、添加或关闭打开的应用程序和窗口,提高工作效率。
第二部分:常用功能1.文件资源管理器文件资源管理器是Windows 10中管理文件和文件夹的主要工具。
您可以使用文件资源管理器复制、移动、重命名、删除和搜索文件,以及创建和管理文件夹。
此外,您还可以通过资源管理器访问网络共享文件夹和外部存储设备。
2.通知中心通知中心可以帮助您及时了解有关系统和应用程序的重要通知,并方便您进行快速操作。
您可以通过任务栏上的通知图标打开通知中心,查看来自应用程序、系统更新和其他事件的通知消息,并进行相应的操作。
3.应用商店Windows 10的应用商店为用户提供了丰富多样的应用程序和游戏下载。
您可以在应用商店中浏览不同类别的应用,安装并更新您感兴趣的应用程序。
应用商店还支持付费和免费应用的购买和下载。
第三部分:高级技巧1.桌面和任务栏定制Windows 10允许用户对桌面和任务栏进行个性化定制。

windows10使用手册(原创实用版)目录1.Windows 10 简介2.安装与升级3.系统设置与个性化4.操作中心与任务栏5.文件资源管理器与存储6.应用商店与软件安装7.网络设置与连接8.账户管理与安全9.常见问题与解决方案10.结语正文【Windows 10 简介】Windows 10 是微软公司推出的一款操作系统,旨在为用户带来更加高效、便捷的计算体验。
相较于前代操作系统,Windows 10 在性能、安全性和用户体验方面都有所提升。
【安装与升级】安装 Windows 10 可以通过购买正版授权或者升级现有操作系统来完成。
对于符合升级条件的 Windows 7 和 Windows 8 用户,可以通过官方渠道免费升级至 Windows 10。
【系统设置与个性化】在 Windows 10 中,用户可以通过“设置”应用对系统进行个性化设置,包括界面语言、地区和时间、输入法等。
此外,还可以对系统性能、隐私和安全等方面进行调整。
【操作中心与任务栏】操作中心是 Windows 10 中的一个集成式功能区,可以快速访问常用功能和设置。
任务栏则是操作系统底部的一条长条,上面包含开始菜单、应用程序图标和系统通知等。
【文件资源管理器与存储】文件资源管理器是 Windows 10 中用于管理和操作文件的工具。
用户可以通过它浏览、打开和保存文件,同时还可以对文件进行排序、筛选和搜索等操作。
【应用商店与软件安装】应用商店是 Windows 10 用户获取应用程序的主要途径。
用户可以在这里下载、安装和管理各种应用,包括 Microsoft Office、游戏等。
【网络设置与连接】Windows 10 支持多种网络连接方式,包括有线、无线和移动数据等。
用户可以通过系统设置来管理网络连接,并进行相关的配置。
【账户管理与安全】Windows 10 支持创建多个用户账户,并设置各自的权限。
此外,系统还提供了多种安全功能,如 Windows Defender 杀毒软件、防火墙等,以保障用户数据的安全。
Windows 10Windows 10 桌面作業系統大量授權參考指南目錄Windows 10 版本和相關產品 (3)Windows 10 版本 (3)Windows 桌面方案透過大量授權方案提供 (3)Windows 10 專業版升級授權 (4)Windows 10 企業版升級授權 (4)Windows 10 教育版升級 (擁有軟體保證) (5)合格的作業系統 (6)Windows 即服務:Windows 10 安全性和功能更新 (7)各個授權產品項目的分支選項 (9)Windows 軟體保證和 Windows 虛擬桌面存取 (VDA) (9)Windows 軟體保證和 Windows VDA 的權益 (9)以裝置為單位的 Windows 軟體保證和 Windows VDA 授權 (11)以使用者為單位的 Windows 軟體保證和 Windows VDA 授權 (11)透過 Windows 軟體保證和 Windows VDA 取得的 Windows 企業版存取權限 (14)Windows 企業版的永久使用權 (14)Microsoft Desktop Optimization Pack (15)Windows To Go 權限 (15)Windows 10 降級使用權 (16)大量啟用 (17)透過金鑰管理服務和多重啟用金鑰進行啟用程序 (17)透過 Microsoft Active Directory 進行啟用程序 (17)Get Genuine Windows Agreement (18)大量授權方案提供的 Windows 授權 (19)大量授權方案提供的 Windows 桌面產品選項 (19)如何透過大量授權取得授權 (20)完整套件產品Windows 10 桌面作業系統大量授權參考指南Windows 10 教育版升級Windows 10 教育版僅供大量授權方案的學術客戶使用。
Windows 10 教育版包含Windows 10 企業版的各項功能,可因應現代教育機構在進階安全性以及全方位裝置控管方面的需求。
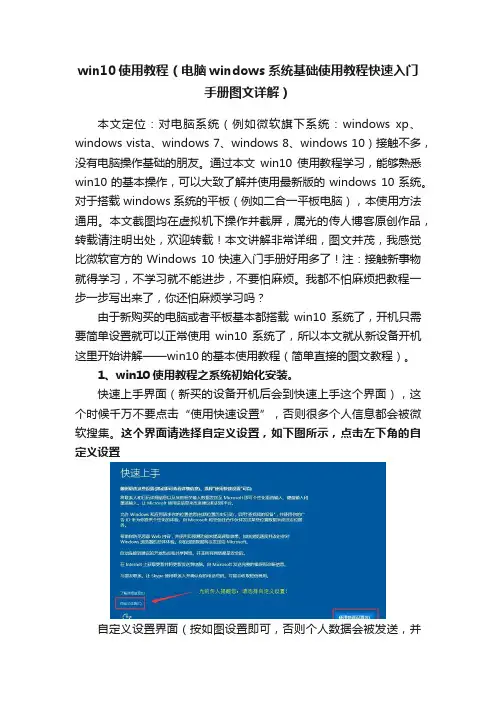
win10使用教程(电脑windows系统基础使用教程快速入门手册图文详解)本文定位:对电脑系统(例如微软旗下系统:windows xp、windows vista、windows 7、windows 8、windows 10)接触不多,没有电脑操作基础的朋友。
通过本文win10使用教程学习,能够熟悉win10的基本操作,可以大致了解并使用最新版的windows 10系统。
对于搭载windows系统的平板(例如二合一平板电脑),本使用方法通用。
本文截图均在虚拟机下操作并截屏,属光的传人博客原创作品,转载请注明出处,欢迎转载!本文讲解非常详细,图文并茂,我感觉比微软官方的Windows 10快速入门手册好用多了!注:接触新事物就得学习,不学习就不能进步,不要怕麻烦。
我都不怕麻烦把教程一步一步写出来了,你还怕麻烦学习吗?由于新购买的电脑或者平板基本都搭载win10系统了,开机只需要简单设置就可以正常使用win10系统了,所以本文就从新设备开机这里开始讲解——win10的基本使用教程(简单直接的图文教程)。
1、win10使用教程之系统初始化安装。
快速上手界面(新买的设备开机后会到快速上手这个界面),这个时候千万不要点击“使用快速设置”,否则很多个人信息都会被微软搜集。
这个界面请选择自定义设置,如下图所示,点击左下角的自定义设置自定义设置界面(按如图设置即可,否则个人数据会被发送,并且有微软广告推送):下一步四项也是可以关闭的。
再点击下一步:最后点击下一步,将会重启并设置win10登录账号等信息。
重启后进入以下界面“谁是这台电脑的所有者”,根据需要自行选择(个人电脑就选择“我拥有它”),然后下一步。
点击下一步进入个性化设置,如图所示,跳过此步骤即可。
跳过此步骤后,为这台电脑创建一个账户(需要记住密码,以后开机需要输入密码才能进入)点击下一步,出现一些文字轮播完成后,即大功告成,进入系统桌面,win10系统初始化也就完成了!2、win10系统使用教程之初步认识。
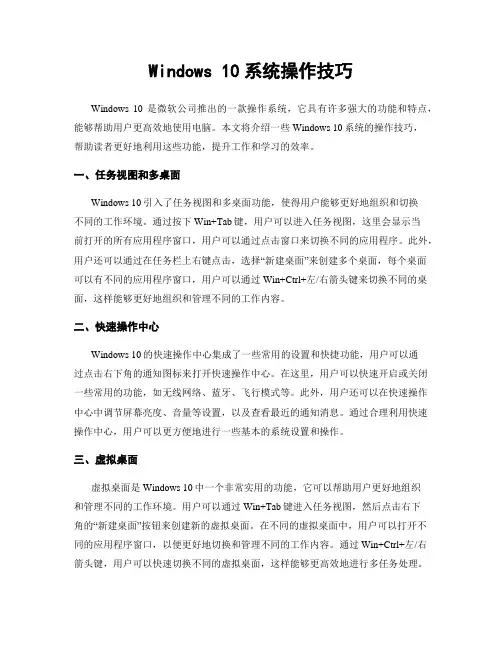
Windows 10系统操作技巧Windows 10是微软公司推出的一款操作系统,它具有许多强大的功能和特点,能够帮助用户更高效地使用电脑。
本文将介绍一些Windows 10系统的操作技巧,帮助读者更好地利用这些功能,提升工作和学习的效率。
一、任务视图和多桌面Windows 10引入了任务视图和多桌面功能,使得用户能够更好地组织和切换不同的工作环境。
通过按下Win+Tab键,用户可以进入任务视图,这里会显示当前打开的所有应用程序窗口,用户可以通过点击窗口来切换不同的应用程序。
此外,用户还可以通过在任务栏上右键点击,选择“新建桌面”来创建多个桌面,每个桌面可以有不同的应用程序窗口,用户可以通过Win+Ctrl+左/右箭头键来切换不同的桌面,这样能够更好地组织和管理不同的工作内容。
二、快速操作中心Windows 10的快速操作中心集成了一些常用的设置和快捷功能,用户可以通过点击右下角的通知图标来打开快速操作中心。
在这里,用户可以快速开启或关闭一些常用的功能,如无线网络、蓝牙、飞行模式等。
此外,用户还可以在快速操作中心中调节屏幕亮度、音量等设置,以及查看最近的通知消息。
通过合理利用快速操作中心,用户可以更方便地进行一些基本的系统设置和操作。
三、虚拟桌面虚拟桌面是Windows 10中一个非常实用的功能,它可以帮助用户更好地组织和管理不同的工作环境。
用户可以通过Win+Tab键进入任务视图,然后点击右下角的“新建桌面”按钮来创建新的虚拟桌面。
在不同的虚拟桌面中,用户可以打开不同的应用程序窗口,以便更好地切换和管理不同的工作内容。
通过Win+Ctrl+左/右箭头键,用户可以快速切换不同的虚拟桌面,这样能够更高效地进行多任务处理。
四、快捷键Windows 10提供了许多实用的快捷键,可以帮助用户更快速地完成一些操作。
以下是一些常用的快捷键:1. Win键:打开或关闭开始菜单。
2. Win+D键:显示桌面。
3. Win+E键:打开资源管理器。
Oracle®Solaris108/11安装指南:基本安装文件号码E240472011年8月版权所有©2011,Oracle和/或其附属公司。
保留所有权利。
本软件和相关文档是根据许可证协议提供的,该许可证协议中规定了关于使用和公开本软件和相关文档的各种限制,并受知识产权法的保护。
除非在许可证协议中明确许可或适用法律明确授权,否则不得以任何形式、任何方式使用、拷贝、复制、翻译、广播、修改、授权、传播、分发、展示、执行、发布或显示本软件和相关文档的任何部分。
除非法律要求实现互操作,否则严禁对本软件进行逆向工程设计、反汇编或反编译。
此文档所含信息可能随时被修改,恕不另行通知,我们不保证该信息没有错误。
如果贵方发现任何问题,请书面通知我们。
如果将本软件或相关文档交付给美国政府,或者交付给以美国政府名义获得许可证的任何机构,必须符合以下规定:ERNMENT RIGHTSPrograms,software,databases,and related documentation and technical data delivered to ernment customers are"commercial computer software"or "commercial technical data"pursuant to the applicable Federal Acquisition Regulation and agency-specific supplemental regulations.As such,the use,duplication, disclosure,modification,and adaptation shall be subject to the restrictions and license terms set forth in the applicable Government contract,and,to the extent applicable by the terms of the Government contract,the additional rights set forth in FAR52.227-19,Commercial Computer Software License(December2007). Oracle America,Inc.,500Oracle Parkway,Redwood City,CA94065.本软件或硬件是为了在各种信息管理应用领域内的一般使用而开发的。
Introducing Predictive Self-HealingThe Solaris™ 10 Operating System (OS) introduces a new architecture for building anddeploying systems and services capable of Predictive Self-Healing. This technology enables Sun™ systems to accurately predict component failures and mitigate many serious problems —before they actually occur. Solaris Fault Manager and Solaris Service Manager are the two main components of Predictive Self-Healing. Solaris Fault Manager receives data relating to hardware and software errors and automatically diagnoses the underlying problem. Once diagnosed, Solaris Fault Manager automatically responds by offlining faulty components. Solaris Service Manager makes services, rather than processes, into first-class citizens, permitting automatic self-healing. Base Solaris services have service descriptions which include full dependency information for start, stop, and restart; applications can easily be converted to run under Solaris Service Manager.Maximizing availabilityPredictive Self-Healing is designed to maximize the availability of the system and application services by automatically diagnosing, isolating, and recovering from faults. This helps to not only reduce hardware failures but also to reduce the impact of application failures,leading to increased system and application availability. •Reducing Hardware Failures—A self-healing system automatically diagnoses problems, and the results can be used to trigger auto-mated reactions such as dynamically taking a CPU,regions of memory, and I/O devices off line before these components can cause system failures. Solaris Fault Manager isolates and disables faulty components, and helps ensure continuous service even before admin-istrators know there is a problem. In addition, remote service agents can retrieve informa-tion from Sun that is vital to diagnosing the underlying root cause of the failure. •Reducing the Impact of Service Failures—If an application service should fail, the built-in service restart mechanism in the Solaris 10 OS automatically restarts the application or service. This mechanism also extends into Sun Cluster software failover environments for even higher availability.Automatic diagnosis and recoveryfrom failuresWith Solaris Fault Manager, the system auto-matically diagnoses faulty components, a function that in some cases can reduce analysis time from days to seconds. Once diagnosed, the system can quickly take corrective action and automatically restore application services. This powerful technology ensures that business-critical applications and essential system services can continue uninterrupted in the event of software failures, major hardware component failures, and even software misconfiguration problems.<Highlights•Maximized system and serviceavailability through predictivediagnosis and isolation of faultycomponents•Automatic diagnosis of failedcomponents and automaticrestart of failed services inmilliseconds•Simplified administration modelfor managing services, reducingcost of ownership•Fast and easy repair of problemswith links to knowledge articles•Scalable architecture can berapidly upgraded and adapted tonew problems — without requiringdowntimeCustomers can now deliver higher levels of availability and application services while minimizing downtime and associated adminis-trative costs. Reduced downtime can potentially save companies $10,000 to $6 million per hour for mission-critical environments.Simplified administrationSolaris Service Manager reduces complexity by abstracting problem diagnosis and services in a manner that is transparent to users and applications. It simplifies common administrative tasks, speeds system boot, and significantly reduces human errors associated with system failures that can lead to service downtime and inefficient management of the system.Admin-istrative tasks such as enabling and disabling services and changing properties are simplified and secure, with an undo capability to revert changes. In addition, service information is stored in a central repository,making the systems easier to manage and maintain. Self-healing technology can also help improve the productivity of support staff. They can now spend much less time investigating and resolving issues,resulting in a higher ratio of supported systems per individual. Plus, a self-healing system can lead to reduced administration costs — systems that perform many complex tasks without user intervention require staff with less expertise, experience, and salary.Fast and easy repairSolaris Fault Manager issues easy-to-understand diagnosis messages that link to knowledge articles at /msg. By providing system administrators with unique event IDs, they can access detailed information in knowledge articles, which describe what failure occurred and what the system did to fix it. These knowl-edge articles guide system administrators through any tasks that require human interven-tion, including repairs, and explain predicted or detected problems using clear language and links to repair procedures and documentation —all of which greatly reduces the complexity of repairing the system.Scalable and flexible architectureThe scalable architecture of Sun’s Predictive Self-Healing technology can be rapidly evolved to new problems and updated as new diagnosis and availability technologies are added to the system. Most future updates can be dynamically loaded and unloaded from the system while it is running and can be upgraded on the fly without requiring downtime or losing previous diagnosis data.ConclusionWith businesses operating around the clock and demanding uninterrupted service, service availability is of paramount importance. Predictive Self-Healing delivers the next generation of availability technology today, including features that keep systems and services running and simple for administrators. Over time, a rapidly evolving ecosystem of self-healing components can help provide consistent, easy-to-use, and always-available Sun systems.©2005 Sun Microsystems, Inc. All rights reserved. Sun, Sun Microsystems, the Sun logo, Solaris, the Solaris logo, and The Network is the Computer are trademarks or registered trademarks of Sun Microsystems, Inc. in theUnited States and other countries. Information subject to change without notice.11/05Sun Microsystems, Inc.4150 Network Circle, Santa Clara, CA 95054 USA Phone 1-650-960-1300 or 1-800-555-9SUN Web 2。
Solaris 10 的基本操作作者:田逸(sery@)《开放系统世界》2006年第9期欢迎转载,版权所有登录系统把solaris 10正确的安装到计算机上以后,接下来要做的第一件事情便是登录到solaris 系统。
Solaris 10提供了两种登录到桌面环境的方式:通用桌面环境CDE(Common Desktop Environment )和JA V A桌面系统(JA V A Desktop System)。
用鼠标点击“选项”—〉“会话过程”来决定是以CDE还是JDS来登录到桌面控制环境。
CDE是solaris 默认的桌面登录环境,JDS相对于CDE来讲,做了更多的改进,也更加人性化,直观的感觉就是很像微软的Windows了。
不管采用那种桌面环境,毫无选择的需要输入用户名和密码;初次使用solaris 10可能只用一个用户root,然后输入安装过程中指定的root密码,如果输入正确无误,登录过程就算完成,solaris的大门从此就向你打开了。
Solaris 是基于网络的应用环境,在实际的应用中,我们不一定每次都坐在安装了solaris 10操作系统的服务器的面前,更多的情况是通过远程工具来登录和进行各种操作以及管理维护。
Solaris 10用OpenSsh服务来接受远程客户端的登录和管理,通过诸如SecureCRT这样的工具,可以轻易的管理和操纵远在地球另外一端的solaris服务器。
关于怎样设置sshd 服务和使用远程工具管理solaris ,将在后面逐一介绍。
熟悉环境登录进入桌面环境以后,就可以使用鼠标象操作MS windows 一样来驾驭solaris,如果读者有使用MS windows 的经验,建议登录的“会话选项”为JDS-JA V A桌面系统,在这里笔者以JDS为例来介绍solaris 10的操作环境。
Solaris 10 的JDS真的可以给人一个惊喜,它与MS windows好相似呢!用鼠标点击屏幕左下角的“启动”,就会弹出与MS windows “开始”相似的菜单。
win10的使用教程Windows 10的使用教程Windows 10是微软推出的最新操作系统,于2015年正式发布。
它与之前的Windows版本相比,提供了更快、更稳定和更安全的用户体验。
本文将介绍一些Windows 10的基本功能和操作,以帮助您更好地使用这个操作系统。
1. 开始菜单:Windows 10提供了重新设计的开始菜单,它集成了传统的开始菜单和Windows 8中的开始屏幕。
您可以在其中搜索应用程序、文件和设置,还可以查看最近使用过的文件和常用应用的动态图标。
2. 桌面:桌面是Windows 10的核心界面,您可以在桌面上放置各种快捷方式和文件。
通过鼠标右键单击桌面,您可以访问一些常用的选项,如更改背景、调整分辨率等。
3. 任务栏:任务栏位于屏幕底部,它包含了启动菜单、快捷启动图标和系统托盘。
您可以通过拖动和右键单击来自定义任务栏,以满足您的个人需求。
4. 多任务操作:Windows 10支持多任务操作,您可以在同一屏幕上同时运行多个应用程序。
您可以使用任务视图按钮(位于任务栏上),或者使用Win+Tab快捷键来打开任务视图,以快速切换和管理不同的应用程序。
5. 虚拟桌面:Windows 10引入了虚拟桌面功能,您可以创建多个独立的桌面,以便更好地组织和管理不同的任务。
您可以使用任务视图按钮或Win+Ctrl+D快捷键来创建新的虚拟桌面,使用Win+Ctrl+左/右箭头快捷键在不同的桌面之间切换。
6. 文件资源管理器:Windows 10中的文件资源管理器带有新的功能和界面改进。
您可以使用它来浏览、复制、删除和重命名文件,还可以创建、删除和管理文件夹。
您可以通过在任务栏上单击资源管理器图标或使用Win+E快捷键来打开文件资源管理器。
7. 通知中心:Windows 10引入了全新的通知中心,它可以显示来自各种应用程序的通知和提醒。
您可以通过单击任务栏上的通知中心图标或使用Win+A快捷键来打开通知中心。
SolarWinds网管子系统使用和维护手册2011年06月目录SolarWinds网管子系统使用和维护手册第一章文档介绍1.1 文档目的1.2 文档范围1.3 读者对象1.4 术语与缩写解释第二章系统的使用2.1 ×××主界面介绍2.2 ××××××××2.2附件1 SolarWinds check list1、检查内容2、检查方法3、检查项目和结果记录表文档介绍文档目的本文档目的在于为Solarwinds系统日常运行维护人员提供详尽的使用和维护操作步骤。
文档范围本文档主要内容包括SolarWinds网管系统使用、维护的实施操作步骤。
读者对象本文档主要针对:S olarwinds维护人员;术语与缩写解释无SolarWinds系统Web前台的使用SolarWinds启动服务Orion Service Manager --Solarwinds的服务管理器,可以对Solarwinds的所有服务进行开启、关闭等操作。
SolarWinds主界面介绍用户通过浏览器方式访问SolarWinds网管系统,初次安装默认管理员用户:admin密码为空。
图2.1 登陆验证界面在上一步骤输入正确的管理员帐号名称和口令后,就会弹出如图2.2所示的SolarWinds 主界面。
图2.2 SolarWinds主界面2.主视图登录主视图可以在账户管理中的账户设置上实现变更。
3.工具条1)注销(Logout)注销当前用户2)帮助(Help)登录到的官方网站寻求帮助。
注:不同的用户可以定义不同的视图结构,详见2.7 系统管理的第三部分账户管理。
Settings一、Getting arted With Orion1.Discovery centrial是用来管理设备自动发现的,通过Network Sonar discovery 来配置网络发现,点击打开后可以看到以下选项:网络扫描发现:扫描设备节点和磁盘卷信息接口扫描发现:扫描设备的接口信息虚拟化扫描发现:虚拟设备扫描发现相关信息流量分析扫描发现:扫描发现NTA流量分析相关信息2.Network Sonar Discovery是用来扫描发现网络设备的工具,也是自动添加节点的工具。
Windows10的基本操作内容与步骤1.概述W i nd ow s10作为当前最为流行的操作系统之一,为用户提供了许多强大的功能和灵活的操作方式。
本文将介绍W in do ws10的一些基本操作内容与步骤,帮助用户更好地了解和使用该操作系统。
2.开机与关机2.1开机要开机,首先需要确保计算机已经连接到电源,并且电源已经打开。
接下来,按下电源按钮,计算机将开始启动。
在启动过程中,系统会进行一系列自检和加载操作系统的步骤。
当屏幕出现W in do ws10的启动画面后,就表示计算机已经成功开机。
2.2关机要关机,可以通过点击开始菜单,并选择“关机”选项来进行操作。
在关机菜单中,用户可以选择直接关机、重新启动或进入睡眠模式等选项。
选择关机后,系统会依次关闭正在运行的程序和服务,并最终关闭计算机。
3.用户界面W i nd ow s10采用了全新的用户界面设计,提供了更加简洁和直观的操作方式。
3.1开始菜单开始菜单是W in do ws10的核心功能之一,可以通过点击任务栏左下角的W in do ws图标来打开。
开始菜单中包含了各种常用的应用程序、设置选项和文件夹快捷方式等。
用户可以通过在开始菜单中进行搜索、固定常用程序和自定义布局等方式,来快速访问和启动各种功能和应用程序。
3.2任务栏任务栏位于桌面底部,提供了许多常用的快捷方式和系统工具。
在任务栏上可以固定应用程序、查看已打开的窗口、调整音量和网络设置等。
用户还可以通过任务栏上的通知区域来查看系统通知和快速访问常用的系统功能。
3.3桌面桌面是Wi nd ow s10的主要工作区域,用户可以在桌面上放置各种文件、文件夹和快捷方式等。
通过鼠标右键点击桌面,可以打开上下文菜单,用户可以通过该菜单来调整桌面背景、显示图标等个性化设置。
4.文件管理W i nd ow s10提供了强大而直观的文件管理功能,使用户可以轻松管理和组织文件和文件夹。
4.1文件资源管理器文件资源管理器是Wi n do ws10中用于管理文件和文件夹的主要工具。
windows10使用手册Windows 10使用手册Windows 10是微软推出的最新操作系统,它具有许多强大的功能和改进。
本手册将介绍Windows 10的基本操作和一些常用功能,帮助用户更好地使用这个操作系统。
1. 桌面和开始菜单:Windows 10的桌面和开始菜单与之前的版本类似,但也有一些新的特性。
用户可以通过单击“开始”按钮来打开开始菜单,其中包含常用应用程序、设置和文件夹。
桌面上的图标可以随意排列和组织。
2. 任务栏:Windows 10的任务栏位于桌面底部,用于快速访问常用应用程序和系统功能。
用户可以将任何应用程序固定到任务栏上,并通过单击图标来打开它们。
任务栏还包括通知图标和系统托盘,用于显示消息和系统状态。
3. 多任务处理:Windows 10允许用户同时运行多个应用程序并进行多任务处理。
用户可以使用任务视图查看所有打开的应用程序,也可以使用快捷键Alt + Tab在应用程序之间切换。
此外,用户还可以将应用程序分割成不同的窗口,以便同时查看多个应用程序。
4. 文件管理:Windows 10提供了强大的文件管理功能。
用户可以使用“文件资源管理器”浏览和组织文件和文件夹。
用户可以创建新的文件夹,复制、移动和删除文件,以及对文件进行重命名。
通过右键单击文件或文件夹,用户可以访问各种操作选项。
5. 设置和个性化:Windows 10允许用户根据自己的喜好进行个性化设置。
用户可以更改壁纸、颜色和字体,选择不同的主题,以及调整系统声音和显示设置。
此外,用户还可以根据自己的偏好调整电源和睡眠设置。
6. 网络和互联网:Windows 10支持各种网络连接和互联网功能。
用户可以使用网络设置连接无线网络或有线网络。
Windows 10还集成了Web浏览器Microsoft Edge,用户可以使用它来浏览互联网、搜索信息和访问网页。
请注意,以上仅为Windows 10的一些基本功能和操作介绍。
ContentsWelcome to Windows 10 Technical Preview (2)The Start menu (2)Cortana (5)Action center (7)Apps for everything (8)Settings and personalization (11)File Explorer (12)Keyboard and touch (14)Coming soon (15)Updates and feedback (19)Welcome to Windows 10 Technical PreviewWindows 10 Technical Preview ushers in a new generation of Windows. From big screens to small screens to no screensat all, Windows 10 extends across a range of devices to bring you a more personal computing experience for everythingyou do.Windows 10 Tech Preview provides an advance look at some exciting new additions that will empower you to dogreat things, including these:Cortana — the more personal digital assistant loved by Windows Phone users is now available across all yourWindows devices to help make things easier throughout your day. Cortana is available in select global marketsat launch.Project Spartan—the next-generation browser designed to put the Web to work makes its debut.Xbox for Windows 10—the biggest Xbox franchises, the best of Xbox Live and DirectX12 technology come to your PC so your gaming experience–including the games you love and the friends you game with–is better than ever.DirectX 12 is only available with supported games and graphics chips.Updated apps — built-in apps like Photos, People, Music, Maps, Mail, and Calendar now look and work the sameacross all of your devices.And that ’ s just the beginning. Use this Quick Guide to learn more about the latest release of Windows 10 Technical Preview,from updated features and functionality to innovative ways to have fun and get things done. A whole new worldof Windows is waiting to be discovered.The Start menuThe Start menu just keeps getting better—it’ s more personal, moreorganized, and more fun than before.To get there, select the Start button on your desktop, or press the Start button on your keyboard or device. Then, jumpright in and make it yours. Pin your favorite apps and content, arrange items into groups, move and resize tiles, and evenchange the size of the Start menu itself.The Start menu can be customized to suit your needsYour apps —right at your fingertipsHere ’ s what you’ ll see on the left side of the Start menu:Places — the fastest way to access your Settings, Documents, and File Explorer.Most used—the apps that you use every day, front and center.Recently added—the place to find any new apps you install from Windows Store.All apps—a list of all your installed apps, arranged for easy alphabetical browsing.If you see an arrow next to an app, hover over it to see a list of your recently used files for that app. Then, select any file inthe list to open it.And don’ t forget that you can always use the search box (located next to Start on the taskbar) to find the app youlooking for. It’ s a fast and convenient way to search for apps, help, files, settingsyou name it—across your PC, the web,—and OneDrive.Pin all your favorite things to StartIf you want fast access to the things that matter most to you—whether it’ s favorite, appsprograms, folders, people, orwebsites — pin them to Start.To pin an app or other item, press and hold (or right-click) whatever it is you want to pin, and then select Pin to Start .Get up-to-the-minute updates with Live TilesNew email, your next appointment, or the weekend weather: Live Tiles deliver updates from your apps right on yourStart screen so you can easily see what’ s happening in your world and jump right into an app when you. need toShowcase the content you loveShowcase tiles give you quick access to the content you care about from your favorite apps. Pin your favorite album fromthe Music app so your top songs are always accessible, or pin your latest book from the Kindle app to keep your readingat the ready. Pinning content to your Start screen works just like pinning apps: just press and hold (or right-click) the content you want to pin, and then select Pin to Start .Resize your tilesPress and hold (or right-click) a tile to change its size. Drag it to move it around. Don’ t worry about running out of space –the Start menu will automatically resize to hold everything.Stay organized with tile groupsIf your Start menu starts to feel cluttered, try moving some of your pinned apps into a group of similar items. Justmove a tile to an open space, and when a gray divider bar appears, release the tile. Then move more tiles in or outof the group to suit your needs.To give your new group a name, press and hold (or right-click) in an open space above your new group and selectName groups .Go full screenIf you want to see everything on Start in a single view, select the Resize button to make Start full screen. Select it again to go back to the previous size.The full-screen view of Start lets you see everything at onceSeamlessly switch between keyboard and touchIf you ’ re using a 2-in- 1 device, you ’ ll enjoy smoother transitions between laptop and tablet modes. Windows will detect when you add or remove a keyboard and instantly and beautifully optimize the display for type or touch.You have the powerThe power button is right at the top of Start. Want to sign out of your PC, switch accounts, or change your accountpicture? Just select your name in the upper-left corner of Start.CortanaThink of Cortana as your personal digital assistant. Cortana can help you search for stuff on your device or the web, manageyour calendar, and even tell you jokes. The more you use Cortana, the more Cortana learns about your interests.To get started with Cortana, type a question into the search box on the taskbar, or select the microphone icon and talk.Cortana Home gives you helpful info at a glanceTo open Cortana Home, click the search boxCortana Home is the place to go for personal suggestions, a daily glance of the day ahead, recommendationsfor restaurants to check out, and more. You can get to Cortana Home by clicking the search box or the Live Tile.Keep track of your preferences in Cortana’ s NotebookThe Notebook is where Cortana keeps track of what you like and what you want. Use it to control what Cortana knowsabout you, including your interests, favorite places, and the "quiet hours" when you don’ t w To open Cortana’ s Notebook,clickthe icon in the upper-left corner of the Cortana window, and then select NotebookCortana makes it easy to keep up with your scheduleCortana is the best personal assistant for reminding you about all the important things in your life. Time-based, location-based, and people-based reminders all trigger at the right time on any device, making sure that you never miss a thing.To set a reminder using your voice, select the microphone icon and then say what you want Cortana to remind you about.Start b y saying“ Remind me to” and then add any details you need. You can includeatime, location, or even the name ofone of your contacts when setting the reminder as well. For example, you can say“ Remind me to feed the or,“ Remind me to waterthe plants when I get home.” If more information is needed to set the reminder, Cortana will askyou for it.Let Cortana find what you’ re looking forWhen you search from the taskbar, Cortana will be your guide.Cortana provides helpful search results from your PC, the web, and OneDriveAfter you enter a search term, select Search my stuff to find results for apps, settings, photos, videos, and music. Cortanashows you results from your PC, the web, and OneDrive.You can also use Cortana for help with troubleshooting. If you run into a problem or have a question about how to getthings done, just type something about it into the search box. Cortana will provide instant answers or links to helpfulwebsites. And for serious issues, Cortana will point you t o the Answer Desk, where you’ ll be connected with live help. Change Cortana’ s settingsTo get to Cortana’ s settings, select the icon in the upper-leftcorner of the Cortana window, and then select Settings. Thisis where you can set preferences for things like battery, speech, and search. It(If you’ sdoalso where yo turn Cortana off, you can still search all the same places from the search box.)Action centerAction center puts important notifications—from your apps and elsewhere—right on your taskbar. Use action center toquickly change settings or tackle important tasks without interrupting your workflow. Open action center and you'll seeyour latest app notifications along with new quick actions, which get you to your most-frequently used settings andapps instantly.To open action center, select the action center icon on the taskbar.Notifications at a glanceIf a notification catches your eye, expand it to see more details. From there, you’omllhave the o the notification without having to open the related app. Don't want to take any action? Just clear the notification.Action center makes it easy to respond to important notificationsThe fast track to settings and appsQuick actions take you right to the settings and apps you’ re likely to use often, from Bluetooth to brightness. Yo pick the four you’ ll see first wheneveryouopen action center, and you can expand to see the rest. Select one to turn asetting on or off or to open an app.Apps for everythingWindows includes great built-in apps for photos, music, movies, and email that look and work the same across all your devices so that you can get things done from your PC, your tablet, or your phone. The Windows Store has thousands more — from marquee games to apps that help you stay in touch and be more productive. Here are a few highlights.PhotosTake your best shots—and the Photos app will make them look even better.The Photos app brings together photos and videos from your all your devices—regardless of where theyhave to do is make sure that your photos are set up to automatically upload to OneDrive fromThe Photos app brings out the best in your photos and keeps them organized, tooMake them look their bestThe Photos app covers all the basics. But it also goes the extra mile to make sure the photos on your PC are worthshowing off. It looks for problems with red eye, color, lighting, or even a crooked landscape, and makes improvements behind the scenes. And your originals are always saved, so if you ever see changes you donthem.To see what ’ s been fixed1. Open a photo in the app, and look for the Enhance button (it only appears on photos stored on your PC,not the ones on OneDrive). If the button has a colored background, your photo was enhanced. If not, it didnneed any improvements — it's already great!2. Select Enhance to go back and forth between the original and the enhanced version. ’ re stored. All yoall of your devices.Turn off enhancements on all your photos by going to Settings and turning off Automatically enhance myphotos when they can be improved.Show off those enhanced photosWhen your photos look great, you may want to brag a little—but you’ ll need to share those enhanced photos from thePhotos app. (When you share them from other places, you’ ll share the originals.)To share just one photo, look for the Share button when you open a photo. To share lots of photos, go toCollection> Select, and then select the ones you want to share.The Xbox appWhether you’ re out and about or just in another room, bring your Xbox friends, activity, game history, an d achievementsalong with you on your Windows 10 PC with the Xbox app.Sign in to the Xbox appFirst, make sure you sign in using the same Microsoft account that you use to sign in to your Xbox. That way, allyour Xbox info will follow you to the app.Keep up with your favorite gamesTake a look at the game hub page for your favorite game. You’ ll see how close you are to unlocking the ga achievements, and be able to watch game clips that other Xbox gamers have made. Just go to Home and thenselect a game in your recent games list to open its hub.Extend the Xbox experience across devicesMultiplayer gaming is now possible across devices between Windows 10 and Xbox One. And only Windows 10 andXbox offer in-home game streaming from Xbox One to Windows 10.Better gamingDirectX 12 delivers rich graphic fidelity and can improve performance of your games even on existing hardware. AndGameDVR is built in so you can easily record and share your favorite gaming moments in any game.MapsMaps just got a refresh, so explore the latest additions and discover new ways to find your way around.Get directions to any destination with MapsDownload mapsWhen you’ re offthe beaten path or exploring a new country, you can’ t always rely on the Internet for direction Download the maps you need and take them with you—select Settings> System , choose Maps , and then selectDownload a map.Traffic alertsCortana notifies you when it ’ s time to goproviding an– update on traffic and estimated travel time. Alerts are alsointegrated with your Calendar app to help keep you on track of your schedule.Get directionsSelect Directions and enter your origin and destination for a list of directions you can print or share. Take the busor walk? Change how you travel and the app will give you the appropriate directions every time. In the Maps app, select Settings> Preferred directions, and then choose your preference.Switch between traffic or aerial viewsOn the map, select Map views, and select what you want to see. You'll also find buttons to Rotate, Tilt,or Zoom in and Zoom out.SearchSearch for anything—an address, a business, a landmark, or a city—and get interesting details such as info fromWikipedia, reviews, or hours of operation.Settings and personalizationChange your settings and personalization options to make your PC uniquely yours.A new look for SettingsSettings has a new look, with revamped categories that make it easier to find what you’ re looFind your PC’ s settings by going to Start and then selecting Settings . Then, browse the categories or use the searchbox. You can also search for advanced settings, like the stuff you want to change in Control Panel.Updated categories in Settings help you find what you’ re looking for fasterFile ExplorerNew features in File Explorer help you organize better and find things faster, with quick access to yourfiles from any PC.File Explorer improvements give you more ways to get to your most important files and locationsQuick access to the files that matter mostThe Quick access page in File Explorer is the shortest route to files you often use. Look in Recent files for the stuff you’ ve been working on lately and pin folders to keep them handy.To make sure a folder shows up in Quick access, press and hold (or right-click) it, and then select Pin to Quick access. Apin icon shows you which folders you’ ve pinned, so it’ s easy to tell them apart from the rest.Help keep some files privateIf you want to change what shows up in Quick access, you’ ve got a couple of options, depending on what you wanHide files and folders from Quick access by pressing and holding (or right-clicking) the file or folder and selecting Hidefrom recent or Hide from frequent. To stop hiding things from Quick access, clear your File Explorer history (View >Options > Clear ).You can change most other settings in View > Options .Get to your OneDrive files from File ExplorerSign in to any PC, tablet, or phone with your Microsoft account and you OneDrive’ llfilesbe ablefrom toFileget to your Explorer. Changes you make will sync to OneDrive, keeping your files up to date everywhere.Windows10快速指南If you use the recommended OneDrive settings during setup, all your OneDrive files will automatically sync to FileExplorer, as long as you have fewer than 500 MB of files already saved in OneDrive and enough space on your PC ortab let. Otherwise, you’ ll be asked what you want to sync.Add files to OneDriveDrag your files into the OneDrive folder in File Explorer.Save files to OneDriveChoose OneDrive as the save location when you save a file in Word, Excel, or another app.A new way to share your filesYou ’ re probably already familiar with sharing files with specific people on a network, and in email, but now you can use thenew Share button to share files using apps. In File Explorer, go to Share > Share, and then choose the app you want to use.Keyboard and touchNew keyboard features help make writing a pleasure on PCs. And new touchpad gestures make it a breeze to navigateyour PC and get things done.You write, your PC typesThe onscreen keyboard on your PC or tablet gives you the option to write with your mouse, finger, or pen. Whateveryou write will automatically turn to text.Try the latest touchpad gesturesWe’ ve made a few changes and improvements to gestures. You’ ll need a precision touchpad to useise,them all. Othe experiment to see which ones work with your PC. To see if your PC has a precision touchpad, go to Settings , select PCand devices , and then select Mouse and touchpad.Once you're all set, try some of the new gestures we've added:If you want to Do thisOpen the task view to see all your open Swipe three fingers up.windows.Show the desktop.Swipe three fingers down.Switch between open windows.Swipe three fingers right or left—swipe slowly to flipthrough all open windows.Coming soonProject SpartanProject Spartan is an all-new browser purpose-built to deliver a better Web experience–one that’ s made for easy sharing, reading, researching, and getting things done online.Write on webpages.Only Spartan has built-in inking for writing or typing on webpages and easily sharing withothers.Best reading. Spartan delivers the best built-in reading experience. A new reading mode lets you enjoy online articles ina cleaner, clutter-free layout, while an offline feature saves and organizes articles so you can conveniently return tothem later with no need for an Internet connection.Find it faster.In a big improvement over typical address bars, Spartan makes recommendations to speed you to youronline destination. You can also activate Cortana cise controls to receive’s p roactivere updates on flights, deliveries,or anything else you’ re tracking.Quickly move into action.Only Spartan lets you move quickly from browsing to doing. With Cortana enabled, youcan make a restaurant reservation right from the review, or highlight an unfamiliar term to bring up a contextualexplanation–all done quickly and easily without leaving the page you’ re on.Spartan allows you to write notes directly on webpages and clip web content to share with othersPeople & MessagingThese are the apps for keeping the people who matter most to you close to you. By pinning your favorite contacts, youget instant access to your people from anywhere in Windows. With one click, you can connect via email, SMS, phone, orSkype with anyone on any platform. Skype is now built- in to all your communications, so it ’ s easier to do more thin together with more people.The People app gives you more ways to connect so it’ s easier to do more things together with more peopleMail & CalendarCrafting emails is easier now that the familiar and rich capabilities of Microsoft Word are built in -- insert tables, add pictures, and use bullets and color to get your point across. New touch gestures help you better manage your inbox and the new navigation bar is great for switching easily between email and calendar to get things done.The Mail app is now integrated with Word and Calendar to give you more features and flexibilityMusic & VideoEnjoying music and videos is simple, fast and elegant on Windows. Get access to over 47 million tracks with the Xbox Music Pass and to the latest movies and shows in full HD on the Video app. Only on Windows can you buy content once to play it anywhere. Even existing media library and playlists imported from iTunes are accessible across your favorite Windows, iOS and Android devices through the power of OneDrive.Your favorite movies and TV shows are waiting to be watched in the Video appUpdates and feedbackYour mission, should you choose to accept it: to help us build a better Windows.Join the Windows Insider Program to get more frequent preview builds and a direct pipeline for sendingyour feedback.Use the Feedback app to tell us what you think, and check out the Insider Hub for the latest news andmission updates. This is the preferred method for Insiders to provide feedback.Get technical with Microsoft engineers and other Insiders in the Technical Preview forum.Choose how often you get new buildsOnce you’ re an Insider, you’ ll be able to get more frequent updates if you want. With more frequent updates, you'll see the latest features sooner, but you're more likely to run into bugs.1. Go to Start> Settings > Update and recovery> Windows Update, and then select Advanced options.2. Under Choose how preview builds are installed, select the top list, and then choose Fast or Slow .Give us your feedback!Use the Windows Feedback app to tell us which features you love, which features you could do without, or whensomething could be better.1. To open the Windows Feedback app on your PC, go to Start , enter the phrase Windows Feedback , then selectWindows Feedback .2. See if someone else has given similar feedback by entering the topic, such as Microsoft Music .Check for feedback from others before providing your own3. If you find similar feedback, select it, add more details if you want, then select Me too.4.To narrow your search to a specific category, pick the category that most closely matches your feedback (so it gets tothe right people quickly). For example, for feedback about the Music app, select Apps > Music .5. If you don’ t find any similar feedback,lectse New feedback, and choose a topic from Select a category and thenSelect a subcategory.6.Enter your feedback (the more details the better!), add a screenshot if you can, and you're done.Windows10快速指南Stay in touch with the Insider hubWhen you join the Insider Program you also get the Insider Hub app, where you can keep up on the latest Insider news,rate builds, and carry out feedback missions (should you choose to accept them). The Insider Hub is already pinned toStart, so you can use it right away.We'll keep updating the Insider Hub with new features, so use the Windows Feedback app to let us know how wecan make it better.The Insider Hub is the place to get the latest news and updates and provide feedback about Windows 10 Technical PreviewThis is prerelease software AppsWindows 10 Technical Preview may be substantially modified before Some apps sold separately; apps vary by market.it’ s commercially released. Microsoft makes no warranties, express orimplied, with respect to the information provided here. Some productfeatures and functionality may require additional hardware or software.Page | 2021 / 21。
Solarwinds软件安装设置操作手册
目录
一. Solarwinds介绍 (1)
二. Solarwinds软件的安装. (2)
三. 增加网络设备节点. (9)
四. 通过WEB网页,添加网络节点. (12)
五. 增加WEB用户账号. (16)
六. 给用户账号划分网络设备 (18)
七. WEB页网络设备显示分组. (20)
八. Solarwinds软件报警设置: (21)
九. 制作拓扑图 (26)
一. Solarwinds介绍
SolarWinds Engineers Edition v8一款非常出色的网络工具箱,功能绝对专业的网络管理工具组,适合专业的网管工程师使用。
它的用途十分广泛,涵盖了从简单、变化的ping 监控器及子网计算器(Subnet calculators)到更为复杂的性能监控器和地址管理功能,大幅的简化网管工程师对于网络的管理工作负担与提升效率,支持在线下载单个升级文件。
SolarWinds是基于SNMP网络管理协议的一款全球领先的网络管理软件可以形象地展现出实时的网络状况,大大提高我们对用户线路的管理力度。
SolarWinds网络性能监视器利用SNMP,即可在一台计算机上实现远程管理所有支持这种协议的网络设备,包括监视网络状态,修改网络设备配置,接收网络事件警告等
注:Solarwinds安装前需要安装IIS,net frawork 3.5等工具,及需连接SQL数据库.
二. Solarwinds软件的安装.
1.双击Solarwinds 10.0的安装程序,会提示前期需要安装的相关组件.点”install”安装.
2.安装完成后,开始安装Solarwinds软件.点”Next”下一步.
3.选择程序安装路径,可安装到其它盘.如下图:
4.开始拷贝文件到安装目录,点”Next”,开始安装(需要几分钟的时间)
5.安装完成后,提示安装软件许可证.选择”Skip this and enter software license key now”,输入许可证信息.如下图:
6.打开软件安装包里面的”Keygen.exe”文件,输入提示的序列号,计算出许可证信息.输入下面的许可证文本框中.点”Continue”继续完成激活软件.点”Finish”完成软件的安装
6.软件安装完成后,自动运行solarwinds配置程序,如下图,点”Next”下一步:
7.进入到数据库设置,在”SQL Server”处可选择SQL服务器,或直接输入数据库服务器的IP地址.及连接数据库服务器的用户名和密码,完成后点”Next”,如下图.
9.创建一个新数据库或使用一个已存在的数据库,此处选择新建一个数据库,名称为:solarwinds.点”Next”,如下图:
10.为上面的数据库创建一个登录账号,完成后点”Next”,下一步:
11.WEB站点设备,设置分配的IP地址(此处为所有未分配的地址),端口号,站点的根目录.
其中端口号若设置为80端口,会提示创建一个新80端口站点,默认站点将停止运行,如下图.
此处选择1080端口点”Next”,如下图.
12.安装solarwinds服务,全选,点”Next”,显示前面设置的配置信息,点”Next”,继续安装.如下图.
13.上面的安装将花费几分钟的时间,安装完成后点”Finish”,完成服务的安装工作.
14.自动弹出solarwinds登录页面.可用admin登录,密码为空.登录后请修改密码.
15.全部安装工作完成.
三. 增加网络设备节点.
1.打开” 开始程序”‐“Solarwinds Orion”‐”system Manager”,solarwinds软件系统管理程序.
如下系统管理窗口,如下图.
2.选择菜单栏”Nodes”‐“Add Node”,打开增加节点窗口.(或直接点击工具栏”New”按钮)
3.输入监控网络设备的IP地址,设置的SNMP团体名称.点”Next”,如下图:
注:snmp community string 为网络设备SNMP服务设置的团体名称.如下图
4.选择对网络设备监控的项,如下图,可全选,或只选择活动的端口.点”OK”完成添加网络节点.
5.在”system Manager”窗口看到新增加的网络节点.如下图.
6.登录WEB网页,查看新增加的网络节点.如下图.
四. 通过WEB网页,添加网络节点.
1.用管理员账号登录到Solarwinds WEB页面中,点击右上角的”Setting”,如下图.
2.进入到WEB设置界面,如下图.
3.点击”Add a Node”,增加监控设备,如下图.
4.输入监控设备的IP地址及团体名称.如下图.点”Next”继续.
5.选择监控项,选择”ALL”全选,点”NEXT”继续.出现的窗口保持默认,点”NEXT”继续.
6.改变新增加网络设备的相关属性,如下图.点”OK,ADD NODE”继续.提示”网络设备”添加成功.如下图.
7.回到”HOME”页,查看新增加的设备.如下图.
8.网络设备节点管理,点”manage Nodes”,如下图.
9.选中相关节点,可以进行修改属性,删除节点等操作.如下图.
五. 增加WEB用户账号.
1.更改账号密码.点”Account manager”,打开账号管理窗口,如下图.
注:系统安装完毕后,会默认有两个账号:admin和guest,密码都为空.
2.选中admin用户,点击”Change Password”,更改密码.输入新密码,点”Change password”更改密码.提示更改成功.
3.点击上图中的” ADD”按钮增加账号, (Delete为删除账号),如下图.增加一个”test”账号.
4.点”SUBMIT”按钮打开账号设置界面,如下图.
5.上图设置好后,点”SUBMIT”按钮提交设置,在账号管理下面,可看到新增加的账号名称.如下图.
六. 给用户账号划分网络设备
1.在”Account Manage”中,选择相应用户名,点”EDIT”,或点”ADD”新增用户账号,找到”Account Limitations”账号限制,可以点击下图中的”Add Limitation”进行设置,出现下面的内容,此处选择一个”Group of Nodes”一组设备来进行限制.
2.出现所有网络设备节点,选择一部分,(选择后,账号可以在WEB上看到在此选择的监控设备),点”SEBMIT”提交.在”account limitations”处可以看到选择的设备名称.如下图.
3.用新增加的test用户名登录到solarwinds WEB网页,可以看到刚选择的网络设备.如下图.
七. WEB页网络设备显示分组.
1.用管理员账号登录,默认是通过vendor,status分组.可以对显示方式进行调整.如以区域名称,公司名称进行级组显示.如下图.
2.在上图中点”EDIT”按钮,按自己的需要设置分组方式,可分三级.
3.选择好后,点”submit”提交.显示效果如下:
八. Solarwinds软件报警设置:
1. 打开” 开始程序”‐“Solarwinds Orion”‐”system Manager”,solarwinds软件系统管理程序.如下系统管理窗口,如下图.选择”Alerts”.
2.弹出报警日志设置窗口,如下图: (分为基本报警配置,及高级报警配置)
3.选择”Configure Basic Alerts”,配置基本警报: 配置当网络节点DOWN时,向服务器发出日报报警.如下图.
3.新增一个”Node status is down”,当设备是DOWN状态时,发送报警日报.在上图中点”New Alert”.出现下图.
4.选中”Property To Monitor”选项卡,选择监控的属性为”Node Status”‐“Status”.如下图.
5.选中”Monitored Network Objects”选项卡,选择要监控的网络设备.如下图.
6.选中”Alert Trigger”选项卡,设置触发条件.如下图.
7.选中”Time of Day”选项卡,设置监控的时间,默认配置.如下图.
8.选中”Alert suppression”选项卡,设置是否忽略此日报报警设置,选择不忽略.如下图.
9.选中”Actions”选项卡,设置动作,点”Add Alert Action”,可以选择发送邮件或日报等信息.此处选择发送系统信息,点”OK”进入到设置界面.如下图.
10.在”Target Machine”目标机器下面输入Solarwinds服务器的IP地址.如下图.
11.在”Trigger Message”触发信息里面设置信息.如下图.
12.在”reset Message”里面输入重置信息.点”OK”完成设置.
13.设置完成后,点”OK”完成报警的添加.
14.当网络设备DOWN后,会在WEB界面上提示下面的信息.如下图.
注:其它还可以设置增加”重启”报警,内存或CPU使用率高报警等.
九. 制作拓扑图
1.打开”开始程序”‐“Solarwinds”‐“Network Atlas”程序.如下图.
2.出现连接到solarwinds服务器的登录界面.输入管理员名称及密码,地址,点”Connect”连接.如下图.
3.连接成功后,出现如下界面,
4.选择”New Map”新建拓扑图,如下图.
5.根据实际的网络拓扑,拖放设备及连接设备,如下图.
6.完成后,点保存,输入拓扑图的名称,如下图.
7.用管理员账号登录到”WEB”控制台中,在”NETWORK map”中点击”EDIT”,如下图.
8.在”Select network map”中选择要使用的网络拓扑图,点”SUBMIT”提交,如下图.
9.完成后,效果如下:。