Touch Panel Training_20120120
- 格式:pdf
- 大小:11.16 MB
- 文档页数:37


Touch Panel設計簡介一.TP種類及應用簡介二.RTP設計簡介三.FIP設計簡介四.ATT設計簡介六.RFQ 需求資料目錄五.各結構比較1.TP應用領域公共場所:銀行ATM,圖書館檢索系統,車站自動售票機汽車用:衛星導航儀民生用:手機,PDA,筆計本電腦,數位相機工廠自動化:人機介面2.TP按其原理分類如下電阻式:偵測觸碰點電壓變化電容式:偵測觸碰點電容變化近場感應式:偵測觸碰點電(磁)場變化超音波式:超音波矩陣遮斷紅外線式:光矩陣遮斷X G T 技術:複合電阻與電容式3. ~~~TP 種類Resistive Touch Panel (RTP)Field Induce Pad (FIP)Advanced Touch Technology (ATT)Wintek 專有名詞Capacitive Touch Panel (CTP)Apple 專有名詞=Wintek 專有名詞1.RTP結構介紹1.RTP 結構介紹a.F/G(ITO Film/ITO Glass)V/AIT O Gla s s ITO FilmDCT a =0.15ABCDEF XLXRYUYD各層厚度:ITO Film 0.188/0.125DCT 0.06Insulation layer+銀電極0.04ITO Glass 0.5/0.71.RTP 結構介紹b. D/F/G (Decoration FILM/ITO Film/ITO Glass)1.RTP結構介紹c. D/F/F (Decoration FILM/Up ITO Film/Down ITO Film)Deco film OCA ITO film DCTITO film OCAPC substrateFPC 各層厚度:Deco Film: 0.188/0.125 OCA(PSA): 0.05UP ITO Film 0.18/0.125 OCA 0.025 Down ITO Film 0.18/0.125Lens: 0.7~1.22.RTP 設計注意事項“A”LensDeco filmaLensbUV“A”防水膠二.RTP設計簡介 1.MRTP結構介紹a. MRTP走線+=ITO FilmITO GlassAssemblyM-RTP 有兩種Type: F/G and G/G F/G Type: ITO Film(0.188) +DCT(0.06)+ITO Glass(0.7~1.5) G/G Type: ITO Glass + 框膠(0.2)+ITO Glass, 需設計密封口(10*0.8),置於FPC對過的玻璃邊上二.RTP設計簡介 1.MRTP結構介紹b. F/F &G/G結構F/G TypeITO Film 絕緣層 FPC Cu 0.5 FPCITO Glass0.3 0.30.5G/G Type0.1 UP ITO Glass 0.3min FPC Cu FPC0.3 Down ITO Glass三.FIP設計簡介 1.結構介紹a. G/GLens INK ASF OCA Sensor透明孔 IR孔材料搭配: Lens 0.7~1.1 Ink 0.009max ASF 0.075 OCA 0.125,0.175,0.2.. Sensor 0.4,0.5HTCLOGOIC三.FIP設計簡介 1.結構介紹b. G/F/FPET Film材料搭配: Lens 0.7~1.1 Ink 0.009max OCA 0.05 Up ITO Film 0.125/0.18 OCA 0.05 Down TIO Film 0.125/0.18 ……HTCICiii三.FIP設計簡介 1.結構介紹b. G/F/FFlex LensPET PSA Down ITO Film PSA Up ITO FilmPSAPETPSA三.FIP設計簡介 1.結構介紹b. G/F/FItem Film / Film Film / Film Double side ITOCover LensBM BM BMCover LensMetal Y-ITOCover LensPSABM BM Metal Y-ITOStructureITO FilmPSAAg Ag Y-ITO Ag Ag ITO FilmPSABMPET FilmAg X-ITOPET FilmX-ITOPET FilmX-ITO X-ITOPSAPSAPSAX-ITOITO FilmX-ITOAg ITO FilmPET FilmPET FilmPET FilmMetal trace process Trace Pitch (Line width/Line space) Thickness (Lens 0.7mm) StatusScreen printingPhotolithographyPhotolithography100um/100um50um/50um30um/30um1.025mm Mass production1.025mm Mass production1.0mm Sample (2010 Q3)三.FIP設計簡介 2.FIP設計注意事項a. Sensor A/A與 Lens INK Open關係INK OPENLCD A/A Sensor A/ALCD A/A +1.0 = INK Open INK Open +1.0 = Sensor A/A三.FIP設計簡介 2.FIP設計注意事項b. Sensor 與 Lens搭配SensorNotes: 1.a=0.35min 2.Sensor四角不可倒R角 3.如Border需求,可設計倒C角aHTCC角三.FIP設計簡介 2.FIP設計注意事項c. 何時設計Shield pad 目的:降低LCD Noise干擾X Y PattenITO GlassShield layer GapLCMFlex shield pad三.FIP設計簡介 2.FIP設計注意事項d. Lens 設計注意事項A BA>=1.2 B>=2C 0.15INK Thickness 9um max技術參數: DOL CS 油墨附住性 穿透率 硬度 油墨厚度 Ball Drope. PSA 設計注意事項2.FIP 設計注意事項PSA1.PSA需完全覆蓋Trace走線2.PSA OD內縮Sensor 單邊0.33.需設計對位mark4.需預留重離型膜尺寸a= 7mm5.PSA常用厚度0.175a技術參數:透光率霧度(HAZE)剝離力上下離型膜離型力f. Sensor border 評估2.FIP 設計注意事項Trace with 0.03Trace pitch 0.06a 線離邊0.8b 至A/A 1.0mini. Same sideab16 x 8c左border0.8+0.1+8*0.06 +0.3=1.68下border1.8+0.5+(8+7+1)*0.06 +0.3=2.56ESD Ring2.FIP設計注意事項f. Sensor border評估ii. Both side2.FIP設計注意事項f. Sensor border評估雙側上下對分iii.3.FIP G/G Flow Chartcleaning and inspection UV glue Coating CuringACF AttachmentACF Attachment 2lens &Sensor Glass assembly CGFlex BondingFlex Bonding 2Appearance Inspection OCA AttachmentLabel Printing FI UV glue curingAutoclaveGasket Attachment Protective film AttachmentFinal appearance inspection對位本壓QC AppearanceInspectionPackagingBonding TestFinal Test。


WinCEWinCE1WinCE Touch Panel驱动详解WinCE中的Touch Panel驱动是由GWES模块来管理的,Touch Panel驱动接收用户的触摸信息,并将其转换为屏幕上的坐标信息,传给GWES模块。
在WinCE中,Touch Panel驱动是分层的,分为MDD层和PDD层,这和其他WinCE设备驱动是一样的。
MDD层由微软提供,用户只需要实现MDD和PDD层间的 DDSI函数就可以了。
如图WinCE中的GWES模块负责加载和管理Touch Panel驱动,Touch Panel的MDD层向上提供DDI接口,PDD层是针对硬件的实现,对MDD层提供DDSI接口。
1 Touch Panel驱动中的数据结构(1) TOUCH_PANEL_SAMPLE_FLAGS用于描述一个采样点的信息,这些信息被定义在一个枚举结构中:enum enumTouchPanelSampleFlags {TouchSampleValidFlag = 0x01,TouchSampleDownFlag = 0x02,TouchSampleIsCalibratedFlag = 0x04,TouchSamplePreviousDownFlag = 0x08,TouchSampleIgnore = 0x10,TouchSampleMouse = 0x40000000};TouchSampleValidFlag:一个有效的采样值TouchSampleDownFlag:第一次按触摸屏时,返回该flagTouchSampleIsCalibratedFlag:采样的x和y坐标值不需要再被校验了TouchSamplePreviousDownFlag:表示上一次采样状态是按在触摸屏上 TouchSampleIgnore:忽略这次采样值TouchSampleMouse:预留(2) TPDC_CALIBRATION_POINT用于描述一个校验点的相关信息,结构如下:struct TPDC_CALIBRATION_POINT {INT PointNumber;INT cDisplayWidth;INT cDisplayHeight;INT CalibrationX;INT CalibrationY;};PointNumber:校验点索引值,用于描述校验点在LCD上的位置0:中间1:左上2:左下3:右下4:右上cDisplayWidth:显示的宽度cDisplayHeight:显示的高度CalibrationX:校验点的x坐标值CalibrationY:校验点的y坐标值(3) TPDC_CALIBRATION_POINT_COUNT用于描述需要校验的点的个数,结构如下:struct TPDC_CALIBRATION_POINT_COUNT {DDI_TOUCH_PANEL_CALIBRATION_FLAGS flags;INT cCalibrationPoints;};flags:一般为0cCalibrationPoints:需要校验的点的个数,一般是5(4) gIntrTouch和gIntrTouchChanged这是两个被MDD层用到的中断,需要在PDD层中定义,如下:DWORD gIntrTouch = SYSINTR_NOP;DWORD gIntrTouchChanged = SYSINTR_NOP;gIntrTouch用于描述触摸屏中断,要和硬件的触摸屏中断相关联。


InTouch及Historian 培训大纲和进度表Wonderware 蜚声世界、屡获殊荣的InTouch® HMI软件,可用于可视化和工业过程控制,它提供了无比的易用性和易于配置的图形。
10.1版本提供显著的增强从而可以大大地提高运行和工程的生产率。
通过使用其强大的向导和新的Wonderware®智能符号使用户可以快速创建并部署客户化的应用程序,连接并传递实时信息。
通过运用InTouch ,您可以创建强大的、功能齐全的应用程序,充分利用Microsoft Windows的关键功能,包括ActiveX 控件、向导、常规对象以及创建InTouch QuickScript 等来进行充分地扩展。
InTouch应用足够的灵活,可以确保 InTouch 应用程序满足客户目前的需求,并可根据将来的需求进行扩展,同时还能保留原来的工程投资和成果。
此外,InTouch HMI 具备相当的开放性和可扩展性,提供了无与伦比的连接功能,可以同行业内的广泛的自动化设备相连接。
第一章-简介●课程安排●FactorySuite A2 产品概览●InTouch10.1简介●系统要求●安装InTouch第二章-标记名字典●标记名字典特殊功能●标记名类型●定义新的标记名●创建InTouch SuperTag●远程标记名引用●打印标记名字典详细资料●标记名点域第三章-创建动画链接●通用动画链接功能●创建触动链接●创建用输入触动链接●创建显示链接●创建值显示链接●提示条和鼠标控制功能●SmartSymbol功能第四章-在InTouch 中创建QuickScript ●QuickScript编辑器●InTouch的脚本种类●ActiveX事件脚本●QuickFunction●脚本编辑样式和语法●导入QuickScript●脚本函数●脚本打印第五章-安全性●安全性的类型●配置安全性●安全性脚本函数●安全性系统标记名第六章-报警/事件●报警的背景知识●报警与事件●报警优先级●报警组●分布式报警系统●分布式报警属性和函数●报警确认模型●报警点域●报警实用程序●报警控件第七章-实时趋势和历史趋势●实时趋势●历史趋势●在运行时配置历史趋势●历史趋势点域●历史趋势类型函数第八章-I/O通讯●支持的通讯协议●Wonderware SuiteLink●InTouch I/O 地址命名惯例●InTouch I/O地址●InTouch访问名●在InTouch中定义I/O项目●配置I/OServer和DAServer 第九章-运行期间的语言切换●配置第二语言●运行期间语言切换第十章-InTouch与ArchestrA的集成●关于InTouch与ArchestrA的集成介绍●在IDE中管理InTouch应用程序●在WindouwMaker中使用ArchestrA Symbols●运行托管模式的InTouch应用程序InTouch及Historian 培训进度表备注:教师对具体培训进度可以适当调整。
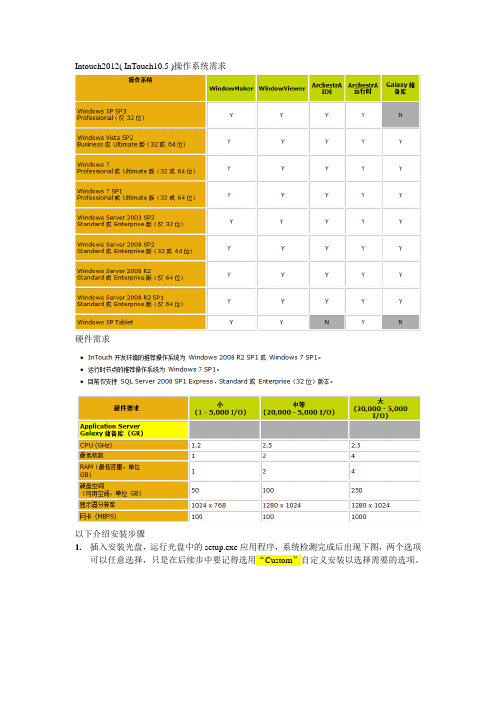
Intouch2012( InTouch10.5 )操作系统需求硬件需求以下介绍安装步骤1.插入安装光盘,运行光盘中的setup.exe应用程序,系统检测完成后出现下图,两个选项可以任意选择,只是在后续步中要记得选用“Custom”自定义安装以选择需要的选项。
2.点击“next”按钮, 显示需要安装的选项,此时选择“Custom”,如下图3.点击“next”按钮,显示所包含的产品或组件,如下图所示,根据需要选择你想要安装的相关功能,其中FsGateway和Application Server 下的Bootstrap是必须安装的。
4.点击“next”按钮,显示需要安装哪种语言版本的,在此选中文简体。
5.点击“next”按钮,显示许可协议,如下图6.点击“next”按钮,(在本机第一次安装请看后续说明)显示安装前所需组件,首次安装时需要选择Install Prerequisites,安装所需组件后会提示重启计算机,重启后再进行到此步便可继续了,如下图7.点击“next”按钮,显示所选中需要安装的产品,如下图8.点击“Install”,安装过程开始更新系统9.安装完成后点击“Finish”,系统会提示重新启动以完成安装,重启即可首先要强调InTouch2012 Licnese需要两个文件wwsuit.lic和Archestra.lic说明:在第6步中,如果你是在一台新机器上第一次安装Intouch,会显示设置用户名和密码对话框,此用户名和密码在Intouch节点间通讯时会用到,请在相互通讯的机器上设置相同的用户名和密码。
在实际工作中请创建一个新的账户。
如果你在上一步没有创建新账户,点击下一步按钮,可能会弹出密码策略警告对话框,内容为,(用户账户administration的密码必须不会过期,而且不能被更改,Intouch才能正常工作,这个账户被设置了密码会过期或密码可以被更改的选项。
您可以单击上一步输入另外的用户名,或者以此用户名继续)以上因为Intouch曾经安装过,所以没出现,因此没有抓图(10.1版InTouch曾抓图如下)如果你已经拥有一个具有管理员权限的用户名和密码,可以直接输入且不要选择创建本地帐户,如果此时你选择创建本地帐户会提示你此帐户已存在请你重试;如果你要新增一个用户名和密码可直接输入并选择创建本地帐户,如果此时你不选择创建本地帐户,点下一步会提示用户名不存在。

TouchWin使用手册Human Machine InterfaceTouchWin使用手册●安全注意事项●在设计系统时,请仔细阅读相关手册,同时要非常注意安全。
此外,实习时请特别注意以下几点,正确操作设备。
◎实习注意事项◎注意●请遵照讲师或说明书上的展开实习。
●请不要随意安装实习机的模块,改装接线。
否则会引起故障、误动作、损失、火灾。
●实习机发出异臭/弄音时,请关闭电源开关。
危险●通电时请不要接触端子,以免引起触电。
●请不要打开盖板。
TouchWin使用手册前言PLC(Programmable Logical Controller)通常称为可编程逻辑控制器,是一种以微处理器为基础,综合现代计算机技术、自动控制技术和通信发展起来的一种通用的工业自动控制装置,由于它拥有体积小、功能强、程序设计简单、维护方便等优点,特别是它适应恶劣工业环境的能力和它的高可靠性,使它的应用越来越广泛,已经被称为现代工业的三大支柱(即PLC、机器人和CAD/CAM)之一。
人机界面是在操作人员与机器设备之间作双向沟通的桥梁,用户可以自由的组合文字、按钮、图形、数字等来处理或监控管理及应付随时可能变化信息的多功能显示屏幕。
随着机械设备的飞速发展,以往的操作界面需要熟练的操作员才可以操作,而且操作困难,无法提高工作效率。
但是使用人机界面能够明确指示并告知操作员机器设备目前的状态,使操作变得简单生动,并且减少操作上的失误,即使是新手也可以很轻松地操作整个机器设备。
使用人机界面还可以使机器的配线标准化、简单化,同时也能减少PLC监控器所需的I/O点数,降低生产成本,同时由于面板控制的小型化及高性能,相对地提高了整个设备的附加价值。
TouchWin使用手册目录前言------------------------------------------------------------------------------------------------------4目录-----------------------------------------------------------------------------------------------------5硬件篇--------------------------------------------------------------------------------------------------71 产品概述------------------------------------------------------------------------------------------------------------71-1 功能------------------------------------------------------------------------------------------------------------8 1-2 一般规格------------------------------------------------------------------------------------------------------9 1-3 各部分名称--------------------------------------------------------------------------------------------------112 外形尺寸----------------------------------------------------------------------------------------------------------132-1 TP460-L尺寸-----------------------------------------------------------------------------------------------13 2-2 TP560-L/TP560-T尺寸------------------------------------------------------------------------------------133 安装方法----------------------------------------------------------------------------------------------------------14软件篇-------------------------------------------------------------------------------------------------151 关于作图软件----------------------------------------------------------------------------------------------------151-1 软件的安装-------------------------------------------------------------------------------------------------15 1-2 软件画面的构成-------------------------------------------------------------------------------------------162 入门须知----------------------------------------------------------------------------------------------------------192-1 新建工程----------------------------------------------------------------------------------------------------192-1-1 新建画面或窗口--------------------------------------------------------------------------------------21 2-2 画面或窗口标题的设定----------------------------------------------------------------------------------23 2-3 图形的制作-------------------------------------------------------------------------------------------------262-3-1 画直线、长方形、圆-------------------------------------------------------------------------------262-3-2 画多边形、折线--------------------------------------------------------------------------------------272-3-3 画圆弧--------------------------------------------------------------------------------------------------282-3-4 尺寸的变更--------------------------------------------------------------------------------------------282-3-5 选中对象的移动--------------------------------------------------------------------------------------292-3-6 选中对象的剪切、复制和粘贴-------------------------------------------------------------------30 3部件----------------------------------------------------------------------------------------------------------------31 3-1 文字串设置-------------------------------------------------------------------------------------------------31 3-2 动态文字串-------------------------------------------------------------------------------------------------33 3-3 指示灯-------------------------------------------------------------------------------------------------------35 3-4 位操作按钮-------------------------------------------------------------------------------------------------37 3-5 指示灯按钮-------------------------------------------------------------------------------------------------39 3-6 画面跳转----------------------------------------------------------------------------------------------------41 3-7 数据显示----------------------------------------------------------------------------------------------------42 3-8 报警数据显示----------------------------------------------------------------------------------------------44 3-9 字符显示----------------------------------------------------------------------------------------------------45 3-10 数据输入---------------------------------------------------------------------------------------------------45 3-11 小键盘------------------------------------------------------------------------------------------------------46 3-12 用户输入---------------------------------------------------------------------------------------------------46 3-13 窗口调用---------------------------------------------------------------------------------------------------47 3-14 垂直棒图---------------------------------------------------------------------------------------------------48 3-15 水平棒图---------------------------------------------------------------------------------------------------50 3-16 动态图片---------------------------------------------------------------------------------------------------524 系统参数----------------------------------------------------------------------------------------------------------544-1 系统设置----------------------------------------------------------------------------------------------------54TouchWin使用手册4-1-1 启动画面和背景设定-------------------------------------------------------------------------------54 4-1-2 口令设置-----------------------------------------------------------------------------------------------54 4-1-3 屏幕保护-----------------------------------------------------------------------------------------------54 4-2 交互控制----------------------------------------------------------------------------------------------------55 4-3 PLC类型选择-----------------------------------------------------------------------------------------------55 5 保存与下载-------------------------------------------------------------------------------------------------------565-1 保存工程----------------------------------------------------------------------------------------------------56 5-2 下载----------------------------------------------------------------------------------------------------------57 6 特殊功能----------------------------------------------------------------------------------------------------------58应用篇-------------------------------------------------------------------------------------------------591 TP系列操作方法------------------------------------------------------------------------------------------------591-1 TP系列连机通讯-------------------------------------------------------------------------------------------59 1-2 TP系列触摸屏口令----------------------------------------------------------------------------------------59 附录----------------------------------------------------------------------------------------------------62 1 PLC连接方法--------------------------------------------------------------------------------------------------621-1 信捷FC系列-----------------------------------------------------------------------------------------------62 1-2 三菱FX系列-----------------------------------------------------------------------------------------------64 1-3 西门子S7-200系列---------------------------------------------------------------------------------------67 1-4 欧姆龙C系列----------------------------------------------------------------------------------------------68 1-5 光洋S系列-------------------------------------------------------------------------------------------------70 1-6 台达DVP系列---------------------------------------------------------------------------------------------73 1-7 LG Master-k系列PLC------------------------------------------------------------------------------------75 1-8 松下FP系列PLC-----------------------------------------------------------------------------------------77 1-9 施耐德PLC-------------------------------------------------------------------------------------------------80TouchWin 使用手册硬件篇1 产品概述TP 系列触摸屏工业显示器是代替控制面板和键盘的又一新突破,是机器的又一新面孔。

Level-Up® With OneControl™ Touch PanelOWNER'S MANUALTable of ContentsSystem Information3 Safety Information3 Red/Green LED Indicator 4 Touch Pad Diagram - Auto Leveling Control4 Operation - Auto Leveling Control Touch Pad 5 Unhitching Instructions 5 Auto Level 5 Auto Level Sequence 5 Hitch Recognition - Reconnecting to Tow Vehicle 5 Touch Panel Diagram - MyRV OneControl Touch Panel6 Operation - MyRV OneControl Touch Panel7 Standard Mode and Menu 7 Basic Jack Operation 7 Unhitching Instructions 8 Auto Level 8 Auto Level Sequence 8 Hitch Recognition - Reconnecting to Tow Vehicle 8 Zero Point Calibration 9 To Set the Zero Point 9 Touch Pad Diagram - OneControl App From MyRV10 Operation - OneControl App11 Accessing the OneControl App 11 Standard Mode and Menu 12 Basic Jack Operation 12 Unhitching Instructions 13 Auto Level 13 Auto Level Sequence 13 Touch Pad Diagram - Linc Remote Control - Optional13 Configuring Linc Remote to Sync to MyRV One Control Touch Panel 14 Basic Jack Operation 15 Unhitching Instructions 15 Auto Level 15 Auto Level Sequence 15 Maintenance16 Fluid Recommendation 16 Preventative Maintenance 16 Manual Override 16 Troubleshooting18 Error Display In LCD Screen 18 Level-Up Towable OCTP Assembly19 Level-Up Towable OCTP Components20-26 Notes27System InformationThe LCI Level-Up® OneControl TM Touch Panel is an automatic leveling system control for fifth wheelapplications. It interfaces to the LCI Level-Up pump/jack system to level the trailer. The system utilizes one main control board and a separate waterproof remote level sensor to measure and manage level point, and can be operated from several user interface devices, including:Auto Leveling Control Touch Pad - Mounted outside the trailer within view of the hitch.MyRV® OneControl Touch Panel (OCTP) - Mounted on a wall inside the living space of the trailer.MyRV OneControl Leveling App - The app is available on iTunes® for iPhone® and iPad® and also on Google Play™ for Android™ users. iTunes®, iPhone® and iPad® are registered trademarks of Apple Inc. Google Play™ and Android™ are trademarks of Google Inc.Linc® Remote Control - Optional.The LCI Level-Up OneControl Touch Panel is for fifth wheel applications only.Safety InformationBe sure to park the trailer on solid, level ground. Ensure all jack landing locations are cleared of debris and obstructions and also free of depressions. People and pets should be clear of trailer while operating the leveling system. Ensure the battery of the trailer is fully charged or that the trailer is plugged into shore power prior to attempting to operate the system. Level-Up requires a minimum of 12.75V DC from the battery for proper operation. Be sure to keep hands and other body parts clear of fluid leaks. Hydraulic fluid leaks in the Lippert Leveling System may be under high pressure and can cause serious skin-penetrating injuries.Lippert Components Inc. recommends that a trained professional be employed to change the tires on the trailer. Ensure that the trailer is properly supported with jack stands, or other adequate devices, under the frame of the trailer prior to commencing any service or repair procedure. Any attempts to change the tires or perform other service while trailer is supported solely by the LCI Level-Up could result in death, serious injury,trailer or property damage.DescriptionRed/Green LED - Indicates the status of the system.Up Arrow - Extends front jacks (landing gear).To turn on the touch pad, press the Up and Down arrow buttonsFig. 1 ABCEFDOperation - Auto Leveling Control Touch PadUnhitching InstructionsNOTE: Prior to unhitching from the tow vehicle, ensure trailer is parked on a level surface and chock the tires of the trailer.1. To turn on the touch pad, press both "UP" and "DOWN" arrows (Fig. 1B and Fig. 1C) at the same time.The green indicator LED (Fig. 1A) will turn on.NOTE: The touch pad will remain on as long as the user is pressing buttons. It will time out after approximately 7 minutes without use.2. Press the "UP" arrow (Fig. 1B) to extend the front jacks and lift the front of trailer to take the weight ofthe trailer off of the hitch.3. Uncouple the trailer connection on the tow vehicle.4. Pull tow vehicle away and park at a safe distance.Auto LevelNOTE: Once the automatic leveling cycle has been started, it is important that there is no movement in the trailer until the trailer has completed the leveling process. Failure to remain still during the levelingcycle could have an effect on the performance of the leveling system.1. After unhitching from tow vehicle press "AUTO LEVEL" (Fig. 1D).NOTE: Pressing any button during an Auto Level sequence will abort the auto leveling cycle.Auto Level SequenceNOTE: Sequence may vary slightly based on the height of the trailer king pin prior to leveling.1. When the Auto Level sequence begins, the front of the trailer will seek a position near a level state,then the trailer will level from front to back.2. The left side jack(s) extend to ground (left mid and left rear).3. The right side jack(s) extend to ground (right mid and right rear).4. Jack pairs will extend as needed in order to level the trailer.NOTE: Step 4 may repeat several times if the controller deems necessary.NOTE: If the AUTO LEVEL sequence does not perform as described above, place the system in manual mode and test that the jacks operate correctly by pushing their coordinating buttons on theOneControl Touch Panel inside the trailer; e.g., "FRONT" button operates only the front jacks, etc.See Operation - MyRV OneControl Touch Panel in this manual.Hitch Recognition - Reconnecting to Tow Vehicle1. To turn on the touch pad, press both "UP" and "DOWN" arrows (Fig. 1B and Fig. 1C) at the same time.The green indicator LED (Fig. 1A) will turn on.2. Press "HITCH HEIGHT" (Fig. 1E). The rear jacks will retract.3. The front of the trailer will raise to the height where the auto level sequence was started.NOTE: If the front of the trailer was below level when the Auto Level process was initiated, the hitch recognition feature will retract the rear jacks but will not retract the front jacks to lower the trailerto the initial hitch height. This feature helps prevent injury and/or damage to anything underneaththe trailer.4. Connect tow vehicle and make sure trailer and hitch are connected and locked.5. Press "RETRACT ALL" System will immediately retract all jacks.AFGBCA BUnhitching InstructionsNOTE: Prior to unhitching from the tow vehicle, ensure trailer is parked on a level surface and chock the tires of the trailer.1. Push touch panel “ON/OFF” (Fig. 2K) to turn system on (See "Standard Mode and Menu" to reachstandard mode.)2. Push "EXTEND" (FIG. 2J), then "FRONT" button (Fig. 2) to extend front jacks and lift front of the trailer totake the weight of the trailer off of the hitch.3. Uncouple the trailer connection on the tow vehicle.4. Pull tow vehicle away and park at a safe distance.Auto LevelNOTE: Once the automatic leveling cycle has been started, it is important that there is no movement in the trailer until the trailer has completed the leveling process. Failure to remain still during the levelingcycle could have an effect on the performance of the leveling system.1. After unhitching from tow vehicle press "AUTO LEVEL" (Fig. 2L).NOTE: Pressing "ABORT" during an Auto Level sequence will abort the auto leveling cycle.Auto Level SequenceNOTE: Sequence may vary slightly based on the height of the trailer king pin prior to leveling.1. When the Auto Level sequence begins, the front of the trailer will seek a position near a level state,then the trailer will level from front to back.2. The left side jack(s) extend to ground (left mid and left rear).3. The right side jack(s) extend to ground (right mid and right rear).4. Jack pairs will extend as needed in order to level the trailer.NOTE: Step 4 may repeat several times if the controller deems necessary.NOTE: If the "AUTO LEVEL" sequence does not perform as described above, place the system in manual mode and test that the jacks operate correctly by pushing their coordinating buttons on the touchpanel; e.g., "FRONT" button operates only the front jacks, etc.Hitch Recognition - Reconnecting to Tow Vehicle1. Push touch panel “ON/OFF” (Fig. 2K) to turn system on (See "Standard Mode and Menu" to reachstandard mode.)2. Press "AUTO HITCH" (Fig. 2M). Rear jacks will retract.3. The front of the trailer will raise to the height where the auto level sequence was started.NOTE: If the front of the trailer was below level when the Auto Level process was initiated, the hitch recognition feature will retract the rear jacks but will not retract the front jacks to lower the trailer tothe initial hitch height. This feature helps prevent injury and/or damage to anything underneath thetrailer.4. Connect tow vehicle and make sure trailer and hitch are connected and locked.5. On the Standard Mode screen (Fig. 2) use the "UP" and "DOWN" arrows (Fig. 2B) to scroll to "AUTORETRACT" (Fig. 2F).6. Push “ENTER” (Fig. 2H). System will immediately retract all jacks.A AA ACD EH I J KFront JacksRear JacksFig. 11CEA B DCallout DescriptionA Retract - Retracts front jacks and rear jacks.B Extend - Extends front jacks and rear jacks.C Help - Provides contact information for LCI.D Front Arrow - Operates front jacks.E Left Arrow - Operates left rear jacks.F Right Arrow - Operates right rear jacks.G Rear Arrow - Operates rear jacks.H Auto Level- Initiates Auto Level sequence.IPower Button - Turns remote control on and off.Unhitching InstructionsNOTE: Prior to unhitching from the tow vehicle, ensure trailer is parked on a level surface and chock thetires of the trailer.1. Push "Extend" (Fig. 10I) and "FRONT" buttons (Fig. 10) to extend front jacks and lift front of trailer to take the weight of the trailer off of the hitch.2. Uncouple the trailer connection on the tow vehicle.3.Pull tow vehicle away and park at a safe distance.Auto LevelNOTE: Once the automatic leveling cycle has been started, it is important that there is no movement in thetrailer until the trailer has completed the leveling process. Failure to remain still during the leveling cycle could have an effect on the performance of the leveling system. 1.After unhitching from tow vehicle press "AUTO LEVEL" (Fig. 10J).NOTE: Pressing "ABORT" during an Auto Level sequence will abort the auto leveling cycle.Auto Level SequenceNOTE: Sequence may vary slightly based on the height of the trailer king pin prior to leveling. 1. When the Auto Level sequence begins, the front of the trailer will seek a position near a level state, then the trailer will level from front to back.2. The left side jack(s) extend to ground (left mid and left rear).3. The right side jack(s) extend to ground (right mid and right rear).4.Jack pairs will extend as needed in order to level the trailer.NOTE: Step 4 may repeat several times if the controller deems necessary.NOTE: If the AUTO LEVEL sequence does not perform as described above, place the system in manualmode and test that the jacks operate correctly by pushing their coordinating buttons on the touch panel in manual mode, e.g., "FRONT" button operates only the front jacks, etc.Touch Pad Diagram - Linc Remote Control - OptionalED G F ICA BHFig. 14AFig. 15ABA ANOTE: If the Auto Level sequence does not perform as described above, test that the jacks operatecorrectly by pushing their coordinating buttons on the Linc remote; e.g., "FRONT" button operates only the front jacks, etc. The jacks can also be tested in manual mode on the OneControl Touch Panel (Fig. 2). See Operation - MyRV OneControl Touch Panel.Maintenance Fluid RecommendationAutomatic transmission fluid (ATF) with Dexron ® III or Mercon ® V or a blend of both is recommended by Lippert Components, Inc. For a list of approved fluid specifications, see TI-188. To obtain this Technical Information sheet on-line, go to /support-lci4a3lcd. Then click on the Technical Information Sheets tab. Look for TI-188: Hydraulic Operation Fluid Recommendation within the listing.NOTE: In colder temperatures (less than 10 ° F) the jacks may extend and retract slowly due to the fluid'smolecular nature. For cold weather operation, fluid specially formulated for low temperatures may be desirable.Preventative Maintenance1.Check hydraulic fluid in reservoir every 12 months. If fluid is a clear, red color, do not change. If fluid is milky, pink and murky, and not clear red in color, drain reservoir and add new fluid. Hydraulic fluid in reservoir should be changed a minimum of every five years.NOTE: Check the fluid only when all the jacks are fully retracted.NOTE: When checking the hydraulic fluid level, fill to within 1/4" to 1/2" of fill spout.2. Inspect and clean all power unit electrical connections every 12 months. If corrosion is evident, use a small amount of lubricant to remove corrosion. Contacts must be cleaned with a non-residue cleaner prior to use. LCI recommends the use of an electrical contact cleaner spray.3.Remove dirt and road debris from jacks as needed.4.If jacks are down for extended periods, it is recommended to spray exposed jack rods with a drysilicone lubricant every three months for protection. If the trailer is located in a salty environment, it is recommended to spray the rods every four to six weeks.Manual OverrideThe LCI Level-Up Automatic Leveling System can be manually operated with an electric drill. In the event of electrical or system failure, this manual method of extending and retracting the jacks can be used. See the instructions below.NOTE: Unhook the power unit motor from the power source prior to attempting the manual overrideprocedure.The coach should be supported at both front and rear axles with jack stands before working underneath. Failure to do so may result in death, serious personal injury or severe product orproperty damage.ABAAADO NOT over-tighten override set screws, as this can damage the valves.DO NOT use an impact wrench to perform any of the override procedures, as this mayLCD Message What's Happening?What Should Be Done?"EXCESS ANGLE"Unsecured controller.Uneven or sloped site.Check and secure controller placement.Relocate the trailer."EXCESSIVE ANGLE"Controller not properly secured.Check and secure controller placement.Excessive angle reached during manual operation.Relocate the coach."BAD CALIBRATION"Sensor calibration values are out of range.Replace controller."FEATURE DISABLED"Hitch recognition requested but no hitch height set.Perform "AUTO LEVEL" sequence to establish hitch height.Zero point not set.Set zero point."LOW VOLTAGE"Bad connection or wiring. Discharged or bad battery.Check wiring - repair or replace. Test battery voltage under load - charge or replace."OUT OF STROKE"Unsecured controller.Uneven or sloped site.Check and secure controller placement.Relocate the trailer."EXTERNAL SENSOR"Bad connection or wiring.Replace or repair connection to rear remote sensor."JACK TIME OUT"System could not level in expected time.Check for obstructions, leaks, fluid level and voltage to power unit motor under load. "AUTO LEVEL FAILURE"Unsecured controller.Voltage drop.Check and secure controller placement.Test battery voltage under load - charge or replace."FUNCTION ABORTED"User has aborted an automatic leveling sequence.Restart the sequence.Troubleshooting Error Display In LCD ScreenFaults can only be cleared via the OneControl Touch Panel or OneControl Leveling App through MyRV. The only exception is when the Auto Leveling Control mini-touch pad (Fig. 1) was used to abort an auto-sequence. In this case the fault can be cleared by pressing any Auto Leveling Control button.CDFGHCurrentL RU Gen IYAEAFAGALAPAQAW ANAOBFBIBGDescriptionManifoldRestricted ManifoldRetract Valve BlockNotesThe contents of this manual are proprietary and copyright protected by Lippert Components, Inc. (“LCI”). LCI prohibits the copying or dissemination of portions of this manual unless prior written consent from an authorized LCI representative has been provided. Any unauthorized use shall void any applicable warranty. The information contained in this manual is subject to change without notice and at the sole discretion of LCI.Revised editions are available for free download from .Please recycle all obsolete materials.For all concerns or questions, please contactLippert Components, Inc.Ph: (574) 537-8900 | Web: | Email: ************************。

第一讲InTouch概述主讲:钱立湘极易组态软件专业培训网内容1.组态软件发展2.Wonderware公司介绍3.InTouch发展4.教程内容介绍1.组态软件发展-DCS发展PLC和DCS的发展1. “组态”的概念是伴随着集散型控制系统(Distributed Control System 简称DCS)的出现才开始被广大的生产过程自动化技术人员所熟知的。
2.在控制系统中使用的各种仪表中,早期的控制仪表是气动PID调节器,后来发展为气动单元组合仪表,50年代后出现电动单元组合仪表。
70年代中期随着微处理器的出现,诞生了第一代DCS:Honeywell公司的TDC 20001.组态软件发展-DCS发展3.由于每一套DCS都是比较通用的控制系统,可以应用到很多的领域中为了使用户在不需要编代码程序的情况下,便可生成适合自己需求的应用系统,每个DCS 厂商在DCS中都预装了系统软件和应用软件,而其中的应用软件,实际上就是组态软件,但一直没有人给出明确定义,只是将使用这种应用软件设计生成目标应用系统的过程称为“组态(Config)”或“做组态”。
1.组态软件发展-PLC发展背景:20世纪60年代,自动化生产控制系统基本上由继电器控制装置组成。
问题:可靠性差:维修困难灵活性差:改造工期长,费用高1968年,美国通用汽车公司(GM)公开招标,要求取代继电器,提出“GM十条”:(1)编程方便,现场可修改程序;(2)维修方便,采用模块化结构;(3)可靠性高于继电器控制装置;(4)体积小于继电器控制装置;(5)数据可直接送入管理计算机;(6)成本可于继电器控制装置竞争;(7)输入可以是交流115V(8)输出AC115V,2A以上,能直接驱动电磁阀;(9)扩展时,系统更改小(10)用户存储容量至少4KB1.组态软件发展-PLC发展继电器控制系统PLC发展继电器控制接线复杂功能完备灵活性高通用性好计算机继电器接触器控制系统简单易懂操作方便价格便宜++编程简单掌握快附加要求=新型控制器对新型的控制器的具体设想1.组态软件发展-PLC诞生1968年,PLC之父Dick Morley说:“It was New Year’s Day of 1968,and I knew I was going to have a hangover.”之后,他和他的团队冲刺了一年多,1969年,终于制成了模块化的数字式控制器(Modular Digital Controller),开创了PLC的新纪元。

TouchScreen驱动分析在用户的笔或者手指触摸屏幕的时候,驱动必须随时返回坐标值,当笔或者手指离开屏幕后,必须产生事件来标记“抬笔”事件。
10.1.2 注册表设置下面是触摸屏驱动的注册表设置。
[HKEY_LOCAL_MACHINE\ControlPanel]InputConfig"=dword:3 ; 3 => 键盘和触摸屏[HKEY_LOCAL_MACHINE\HARDWARE\DEVICEMAP\TOUCH]"DriverName"="touch.dll""MaxCalError"=dword:1010.1.3 数据结构1.TOUCH_PANEL_SAMPLE_FLAGS本数据结构绘出返回到系统的坐标值的属性。
2.TPDC_CALIBRATION_POINT本数据结构由TouchDriverCalibrationPointGet.例程代码组成,并运行在系统启动时,用户可以看见屏幕上会有一个X,从中间再到四周指引用户矫正坐标值。
TouchDriverCalibrationPointGet例程通常利用屏幕的高和宽来确定中心和四周的坐标值。
struct TPDC_CALIBRATION_POINT {INT PointNumber;INT cDisplayWidth;INT cDisplayHeight;INT CalibrationX;INT CalibrationY;};3.TPDC_SAMPLE_RATE本数据结构由DdsiTouchPanelGetDeviceCaps例程代码组成。
struct TPDC_SAMPLE_RATE {INT SamplesPerSecondLow;INT SamplesPerSecondHigh;INT CurrentSampleRateSetting;};数据结构中成员说明SamplesPerSecondLow低采样率值。

触摸屏驱动分析: (本机驱动) (2009-12-13 19:22)分类:驱动触摸屏驱动为本机驱动,由微软提供有通用层 MDD,我们只需要编写PDD层就可以了。
触摸屏驱动由GWES 加载,GWES 通过MDD层的DDI设备驱动程序接口函数(Device Driver Interface,DDI),实现和驱动程序的交互,而PDD层则通过实现DDSI接口函数(Device Driver Service Provider Interface, DDSI),来完成对系统的支持和对硬件的控制。
他们的关系是:MDD 链接PDD 层并定义它希望调用的函数接口:设备驱动程序提供器接口。
同时MDD 把不同的函数集提供给操作系统。
Windows CE 的触摸屏驱动链接了tch_cal.lib 和tchmdd.lib 两个静态链接库。
所以在编写source檔时,要记得加上:SOURCELIBS= \$(_COMMONOAKROOT)\lib\$(_CPUINDPATH)\tch_cal.l ib \$(_COMMONOAKROOT)\lib\$(_CPUINDPATH)\tchmdd.li b标准接口声明(touch.def檔中声明)TouchPanelGetDeviceCaps;TouchPanelEnable;TouchPanelDisable;TouchPanelSetMode;TouchPanelReadCalibrationPoint;TouchPanelReadCalibrationAbort;TouchPanelSetCalibration;TouchPanelCalibrateAPoint;TouchPanelPowerHandler;详解:DDI界面是在WINCE500\PUBLIC\COMMON\OAK\DRIVERS\TOUCH\TCHMAIN中的tchmain.c檔中实现,在此檔中,MDD通过调用PDD的DDSI接口来实现DDI 函数.DDI 接口包括TouchPanelGetDeviceCaps、TouchPanelEnable、TouchPanelDisable、TouchPanelSetMode、TouchPanelReadCalibrationPoint、TouchPanelReadCalibrationAbort、TouchPanelSetCalibration、TouchPanelCalibrateAPoint、TouchPanelPowerHandler。


触摸查询一体机触摸屏驱动及USB驱动安装说明书
1.安装/卸载
下载适合触摸屏的驱动文件,运行驱动包中的“Setup.exe”文件,就能快速安装上触摸屏驱动。
双击“Setup”
单击“下一步”
单击“完成”,驱动程序安装完成。
完成后弹出校正屏幕界面,用手指轻触屏幕上的圆点校正屏幕,校正完成后点击“确定”退出程序。
如果要重新校正触摸屏,请您点击“开始”菜单,指向“所有程序”,然后再指向“益图电子USB驱动”,点击“校正程序”,或者点击“开始”菜单,打开电脑的“控制面板”,然后双击触摸屏控制面板图标即图标“Etwotouch 设置”,您就能在相应的窗口修改触摸屏设置。
要注意的是,如果Windows XP 系统的控制面板为分类视图,请您切换到经典视图,这样才能看到
“Etwotouch 设置”。
如果想卸载触摸屏驱动,请点击“开始”菜单,指向“程序”,然后再指向“益图电子USB驱动”,点击“卸载驱动”。
安装触摸屏驱动后,您可以任意改变触摸屏的USB接口。
如果还没有校正触摸屏,请校正。
校正后就能正常使用我们的触摸屏。
2.安装包中文件的说明
该触摸屏驱动安装包包含了以下文件:
3. 注意事项
本驱动要求当前使用系统有鼠标类驱动“MOUCLASS.SYS”和HID类驱动“HIDUSB.SYS”。
这个两个文件是系统自带的,如果这两个文件丢失或者损坏,本驱动将不能正常工作。
如果触摸屏出现点击无反应,外接USB接口键盘和鼠标无法识别的情况,请使用PS/2接口的键盘和鼠标,重新安装触摸屏驱动程序即可解决。