Oracle-11g图形界面创建数据库操作指南
- 格式:doc
- 大小:1.33 MB
- 文档页数:22

Oracle 11g表空间——创建和扩展(永久)表空间本文内容创建(永久)表空间查看表空间扩展表空间创建(永久)表空间Oracle 按照区和段空间进行管理表空间。
区管理方式 - 针对区的分配方式的不同,有两种方式:字典管理方式(dictionary-managed tablespace,DMT)和本地管理方式(local-managed tablespace,LMT)。
Oracle 10g 开始强烈建议使用 LMT 方式。
从 Oracle 9i 开始,创建表空间时默认使用 LMT。
其中,LMT 区的分配方式:统一(UNIFORM)- 统一分配。
指定表空间中所有区的大小都相同。
默认值是 1MB。
自动(AUTOALLOCATE 或 SYSTEM)- 自动分配。
指定有 Oracle 系统来自动管理区的大小。
这是默认设置。
段管理方式– LMT 方式,除了可以指定区的分配方式外,还可以指定段的管理方式。
段空间管理方式主要是指 Oracle 用来管理段中已用数据块和空闲数据块的机制。
分为两种:手动(MANUAL)- Oracle 将使用空闲列表(free list)管理段的已用数据块和空闲数据块。
这是传统的段空间管理方式,为了与以前的版本兼容。
自动(AUTO)- Oracle 将使用位图(bitmap)来管理段的已用数据块和空闲数据块。
通过位图中单元的取值判断段中的数据块是否可用。
字典管理方式没有段管理。
下面示例演示用本地管理方式创建表空间。
这是 Oracle 推荐的方式。
示例 1:使用 AUTOALLOCATE 区分配方式。
创建表空间 mytbs01,数据文件是D:\oracledata\mytbs01_1.dbf,大小为 2M,并指定区分配方式为 AUTOALLOCATE。
create tablespace mytbs01datafile 'D:\oracledata\mytbs01_1.dbf' size 2Mautoallocate;示例 2:使用 UNIFORM 区分配方式。
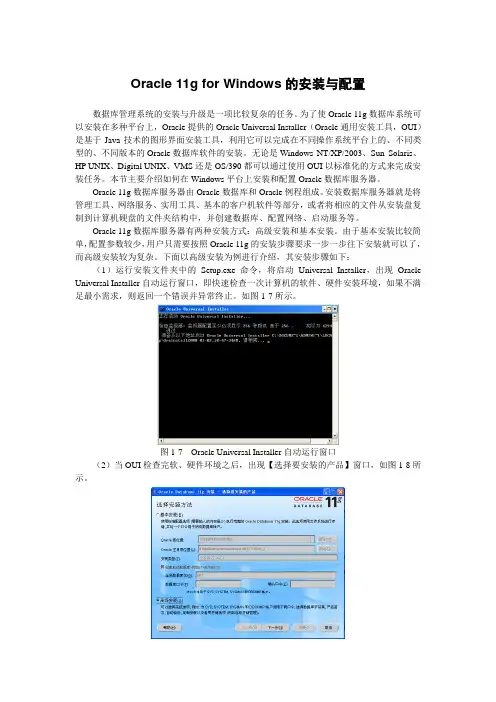
Oracle 11g for Windows的安装与配置数据库管理系统的安装与升级是一项比较复杂的任务。
为了使Oracle 11g数据库系统可以安装在多种平台上,Oracle提供的Oracle Universal Installer(Oracle通用安装工具,OUI)是基于Java技术的图形界面安装工具,利用它可以完成在不同操作系统平台上的、不同类型的、不同版本的Oracle数据库软件的安装。
无论是Windows NT/XP/2003、Sun Solaris、HP UNIX、Digital UNIX、VMS还是OS/390都可以通过使用OUI以标准化的方式来完成安装任务。
本节主要介绍如何在Windows平台上安装和配置Oracle数据库服务器。
Oracle 11g数据库服务器由Oracle数据库和Oracle例程组成。
安装数据库服务器就是将管理工具、网络服务、实用工具、基本的客户机软件等部分,或者将相应的文件从安装盘复制到计算机硬盘的文件夹结构中,并创建数据库、配置网络、启动服务等。
Oracle 11g数据库服务器有两种安装方式:高级安装和基本安装。
由于基本安装比较简单,配置参数较少,用户只需要按照Oracle 11g的安装步骤要求一步一步往下安装就可以了,而高级安装较为复杂。
下面以高级安装为例进行介绍,其安装步骤如下:(1)运行安装文件夹中的Setup.exe命令,将启动Universal Installer,出现Oracle Universal Installer自动运行窗口,即快速检查一次计算机的软件、硬件安装环境,如果不满足最小需求,则返回一个错误并异常终止。
如图1-7所示。
图1-7 Oracle Universal Installer自动运行窗口(2)当OUI检查完软、硬件环境之后,出现【选择要安装的产品】窗口,如图1-8所示。
图1-8 选择要安装的产品如果想快速地安装Oracle 11g数据库,可以单击【基本安装】单选按钮,再输入数据库登录密码,然后单击【下一步】按钮开始基本安装。
Oracle HTTP Server 11g R1 Configuration for FLEXCUBEOracle FLEXCUBE Universal BankingRelease 12.4.0.0.0[May] [2017]Table of Contents1.PURPOSE (3)2.INTRODUCTION TO ORACLE HTTP SERVER (OHS) (3)2.1HTTP L ISTENER (3)2.2M ODULES (MODS) (3)3.INSTALLATION OF OHS 11G (4)4.CONFIGURE ORACLE HTTP SERVER INFRONT OF WEBLOGIC SERVER (11)4.1F OR W EB L OGIC IN SINGLE INSTANCE (11)4.2F OR W EBLOGIC INSTANCES IN CLUSTER (12)5.ENABLE “WEBLOGIC PLU G-IN ENABLED” FLAG I N WEBLOGIC (13)PRESSION RULE SETTING (13)6.1L OADING MOD_DEFLATE (13)6.2C ONFIGURING FILE TYPES (14)6.3HTTPD.CONF FILE CHANGES (14)7.CONFIGURING SSL FOR ORACLE HTTP SERVER (16)7.1SSL CONFIGURATION FOR I NBOUND R EQUEST TO O RACLE HTTP S ERVER (16)7.1.1Create a new Wallet and import Certificate (16)7.1.2Configuring Wallet in ssl.conf file (20)7.2C ONFIGURING SSL BETWEEN O RACLE HTTP S ERVER AND O RACLE W EBLOGIC S ERVER (21)7.2.1Turn off KeepAliveEnabled (21)7.2.2To enable one-way SSL (21)7.2.3To enable two-way SSL (22)8.SAMPLE CONFIGURATION FILES (23)9.STARTING, STOPPING, AND RESTARTING ORACLE HTTP SERVER (23)9.1S TART (23)9.2S TOP (23)9.3R ESTART (23)10.TEST THE APPLICATION (24)11.SERVER LOGS LOCATION (24)12.REFERENCES (24)1. PurposeThe objective of this document is to explain the installation and configuration of Oracle HTTP Server 11g R1(11.1.1.6.0). This includes setting up of server details, configuration of compression rules and enabling SSL.2. Introduction to Oracle HTTP Server (OHS)Oracle HTTP Server is the Web server component for Oracle Fusion Middleware. It is based on Apache web server, and includes all base Apache modules and modules developed specifically by Oracle. It provides a HTTP listener for Oracle WebLogic Server and the framework for hosting static pages, dynamic pages, and applications over the Web. Key aspects of Oracle HTTP Server are its technology, its serving of both static and dynamic content and its integration with both Oracle and non-Oracle products.Oracle HTTP Server consists of several components that run within the same process. These components provide the extensive list of features that Oracle HTTP Server offers when handling client requests.Following are the major components:2.1 HTTP ListenerOracle HTTP Server is based on an Apache HTTP listener to serve client requests. An HTTP server listener handles incoming requests and routes them to the appropriate processing utility.2.2 Modules (mods)Modules extend the basic functionality of Oracle HTTP Server, and support integration between Oracle HTTP Server and other Oracle Fusion Middleware components. There are modules developed specifically by Oracle for Oracle HTTP Server. Ex: mod_wl_ohs, mod_plsqlOracle HTTP Server also includes the base Apache and third-party modules out-of-the-box.These modules are not developed by Oracle. Ex: mod_proxy, mod_perl3. Installation of OHS 11gInvoke the setup exe to start the installationSelect Skip Software UpdatesSelect Install and ConfigureSelect only Oracle HTTP ServerEnter the required OHS instance and component namesThis completes the installation of Oracle HTTP Server with <Instance> and <component>. Example: Instance is instance1 and component is ohs1.If you would like to change the port after the installation(OHS Listen Port) edit$ORACLE_INSTANCE/config/OHS/<component_name>/httpd.conf and change the listen port.NOTE: This port is for http protocol and not for https.4. Configure Oracle HTTP Server infront of Weblogic ServerIn Oracle HTTP Server requests from Oracle HTTP Server to Weblogic server are proxied usingmod_wl_ohs module. This configuration file needs to be modified to include the Weblogic server and port details.mod_wl_ohs.conf file is located at${ORACLE_INSTANCE}/config/OHS/{COMPONENT_NAME}/mod_wl_ohs.confAdd the below directives to mod_wl_ohs.conf file.4.1 For WebLogic in single instance<Location /<<context/url>> >SetHandler weblogic-handlerWebLogicHost <<server name>>WeblogicPort <<port>></Location>Example:<Location /FCJNeoWeb>SetHandler weblogic-handlerWebLogicHost wlserver1WeblogicPort 7707</Location>This will forward /FCJNeoWeb from HTTP server to /FCJNeoWeb on WebLogic Server wlserver1: 77074.2 For Weblogic instances in cluster<Location /<<context/url>> >SetHandler weblogic-handlerWebLogicCluster <server1>:<port1>,<server2>:<port2></Location>Example<Location / FCJNeoWeb >SetHandler weblogic-handlerWebLogicCluster wlserver1:7010, wlserver2:7010</Location>This will forward /FCJNeoWeb from HTTP server to /FCJNeoWeb on WebLogic Cluster wlserver1:7010 and wlserver2:70105.Enable “WebLogic Plug-In Enabled” flag in weblogicThis flag needs to be enabled in weblogic if it is accessed through proxy plugins. When the WebLogic plugin is enabled, a call to getRemoteAddr will return the address of the browser client from the proprietary WL-Proxy-Client-IP header instead of the web server.a. Plugin flag at managed server leveli. Click on ‘Environment’- > 'Servers' -> '<ManagedServer>' -> 'General' -> 'Advanced'ii. Check the 'WebLogic Plug-In Enabled' box.iii. Click 'Save'iv. Restart the Server.b. Plugin flag at domain levelv. Click on <Domain> -> 'Web Applications'vi. Check the 'WebLogic Plug-In Enabled' box.vii. Click 'Save'viii. Restart the server.6. Compression rule settingContent compression in Oracle HTTP Server is done using mod_deflate. This can compress HTML, text or XML files to approx. 20 - 30% of their original sizes, thus saving on server traffic. However, compressing files causes a slightly higher load on the server, but clients' connection times to server is reduced.6.1 Loading mod_deflatemod_deflate is used for compression in OHS and this is installed in Oracle HTTP Server under location "${ORACLE_HOME}/OHS/modules/mod_deflate.so"But it might not be loaded.To load the file add the below directive in mod_wl_ohs.conf fileLoadModule deflate_module "${ORACLE_HOME}/OHS/modules/mod_deflate.so"6.2 Configuring file typesmod_deflate also requires to specify which type files are going to be compressed.In the LOCATION section of mod_wl_ohs.conf file add the below entries.AddOutputFilterByType DEFLATE text/plainAddOutputFilterByType DEFLATE text/xmlAddOutputFilterByType DEFLATE application/xhtml+xmlAddOutputFilterByType DEFLATE text/cssAddOutputFilterByType DEFLATE application/xmlAddOutputFilterByType DEFLATE application/x-javascriptAddOutputFilterByType DEFLATE text/htmlSetOutputFilter DEFLATEImages are supposed to be in a compressed format, and therefore are bypassed by mod_deflate.6.3 httpd.conf file changesThis is a server configuration file which typically contains directives that affect how the server runs, such as user and group IDs it should use, and location of other files. Cross check the existence of mod_wl_ohs.conf include in httpd.conf file.httpd.conf file is present under location“${ORACLE_INSTANCE}/config/OHS/{COMPONENT_NAME}/httpd.conf”In this file cross check for the below entryinclude "${ORACLE_INSTANCE}/config/OHS/${COMPONENT_NAME}/mod_wl_ohs.conf"If above include entry is not present, then add the above include section.7. Configuring SSL for Oracle HTTP ServerSecure Sockets Layer (SSL) is required to run any Web site securely. Secure Sockets Layer (SSL) is an encrypted communication protocol that is designed to securely send messages across the Internet.Reading of “SSL_Configuration on Weblogic” document provide d as part of FCUBS installation isrecommended before proceeding with further setup.In Oracle HTTP server, SSL configuration can be done between1. Browser to Oracle HTTP Server(Mandatory)2. Oracle HTTP Server to Oracle Weblogic Server(If required)7.1 SSL configuration for Inbound Request to Oracle HTTP ServerPerform these tasks to enable and configure SSL between browser and Oracle HTTP Server.1. Obtain a certificate from CA or create a self signed certificate.2. Create an Oracle Wallet which contains the above SSL Certificate. The default wallet that isautomatically installed with Oracle HTTP Server is for testing purposes only. The default wallet is located in "${ORACLE_INSTANCE}/config/OHS/${COMPONENT_NAME}/keystores/default"3. Configuring Wallet in ssl.conf file7.1.1 Create a new Wallet and import Certificate1. Go to the \Oracle_WT1\bin\launch.exe, this will launch your wallet manager2. Click on Create new and then click no option.3. Enter the wallet password and click on OK, this will create a new wallet.4. Not it will ask for certificate request creation, Click on NO to proceed5. Right click on trusted certificates and then import trusted certificate.6. Browse to the folder where certificate is stored and click on Open7. Click on Save Wallet button on the left side navigation and save the wallet either to defaultlocation("${ORACLE_INSTANCE}/config/OHS/${COMPONENT_NAME}/keystores/default") or folder of your choice.8. Click on Wallet tab and enable Auto Login7.1.2 Configuring Wallet in ssl.conf fileIn ssl.conf file the newly created wallet need to updated. This file is located under folder"${ORACLE_INSTANCE}/config/OHS/${COMPONENT_NAME}/1. Change the SSLWallet directive to point to the location of new wallet created.SSLWallet "${ORACLE_INSTANCE}/config/${COMPONENT_TYPE}/${COMPONENT_NAME}/keystores/"2. Change the Listen port number in ssl.conf file to the SSL enabled port, by default the value is 44437.2 Configuring SSL between Oracle HTTP Server and Oracle Weblogic ServerSSL for outbound requests from Oracle HTTP Server are configured in mod_wl_ohs.Refer to “SSL_Configura tion on Weblogic” document for weblogic server setting mentioned in below section.7.2.1 Turn off KeepAliveEnabledThe below parameter in mod_wl_ohs should be turned off, by default it is on. Add the below directive under LOCATION section of mod_wl_ohs fileKeepAliveEnabled OFF7.2.2 To enable one-way SSL1. Generate a custom keystore identity.jks for Weblogic Server containing a certificate.2. At Identity section in Keystores tab in weblogic Admin Console for server seta. The custom trust store with the identity.jks file locationb. The keystore type as JKSc. The passphrase used to created the keystore3. Copy the certificate to Oracle HTTP Server and import the new certificate into OHS wallet as a trustedcertificate.4. Add following new directive in mod_wl_ohs.conf to point to the wallet locationWlSSLWallet "${ORACLE_INSTANCE}/config/OHS/{COMPONENT_NAME}/keystores/default"5. Change the port in mod_wl_ohs file to point to SSL port of Weblogic server.6. Restart both Weblogic Server and Oracle HTTP Server7.2.3 To enable two-way SSL1. Perform one-way SSL configuration steps2. Generate a new trust store, trust.jks for Weblogic server3. Keystore created for one-way SSL could be used, but it is recommended to create a separate truststore4. Export the user certificate from Oracle HTTP Server wallet, and import it into truststore created above5. At Trust section in Keystores tab in Weblogic Admin Console for the server seta. The custom trust store with the trust.jks file locationb. The keystore type as JKSc. The passphrase used to created the keystore6. Under the SSL tabEnsure trusted CA is set as from Custom Trust Keystore.7. Restart Weblogic Server8. Sample Configuration Fileshttpd.conf mod_wl_ohs.conf ssl.conf9. Starting, Stopping, and Restarting Oracle HTTP ServerNavigate to the below location in command prompt ${ORACLE_INSTANCE}/bin/ and run below commands 9.1 Startopmnctl startproc ias-component={COMPONENT_NAME}Example: opmnctl startproc ias-component=ohs19.2 Stopopmnctl stopproc ias-component={COMPONENT_NAME}Example: opmnctl stopproc ias-component=ohs19.3 Restartopmnctl restartproc ias-component={COMPONENT_NAME}Example: opmnctl restartproc ias-component=ohs110. Test the applicationTest the application deployed on Weblogic using Oracle HTTP Server after restarting both the oracle http server and weblogic serverhttps://ohs_servername:ohs_https_port/<<context/url>>http://ohs_servername:ohs_http_port/<<context/url>>ohs_servername: server on which OHS is deployedohs_https_port: port number mentioned against LISTEN directive in SSL.conf fileohs_http_port: port number mentioned against LISTEN directive in httpd.conf fileExample:https://localhost:4443/FCJNeoWeb/welcome.jspOrhttp://localhost:7777/FCJNeoWeb/welcome.jsp11. Server Logs LocationOracle HTTP Server Logs are generated under folder${ORACLE_INSTANCE}/diagnostics/logs/OHS/{COMPONENT_NAME}/12. ReferencesSSL_Configuration.doc for Weblogic provided as part of FCUBS installation./cd/E16764_01/web.1111/e10144/under_mods.htm/cd/E25054_01/core.1111/e10105/sslconfig.htmOracle_HTTP_Server_Configuration[May] [2017]Version 12.4.0.0.0Oracle Financial Services Software LimitedOracle ParkOff Western Express HighwayGoregaon (East)Mumbai, Maharashtra 400 063IndiaWorldwide Inquiries:Phone: +91 22 6718 3000Fax:+91 22 6718 3001/financialservices/Copyright © 2007, 2017, Oracle and/or its affiliates. All rights reserved.Oracle and Java are registered trademarks of Oracle and/or its affiliates. Other names may be trademarks of their respective owners. U.S. GOVERNMENT END USERS: Oracle programs, including any operating system, integrated software, any programs installed on the hardware, and/or documentation, delivered to U.S. Government end users are "commercial computer software" pursuant to the applicable Federal Acquisition Regulation and agency-specific supplemental regulations. As such, use, duplication, disclosure, modification, and adaptation of the programs, including any operating system, integrated software, any programs installed on the hardware, and/or documentation, shall be subject to license terms and license restrictions applicable to the programs. No other rights are granted to the U.S. Government.This software or hardware is developed for general use in a variety of information management applications. It is not developed or intended for use in any inherently dangerous applications, including applications that may create a risk of personal injury. If you use this software or hardware in dangerous applications, then you shall be responsible to take all appropriate failsafe, backup, redundancy, and other measures to ensure its safe use. Oracle Corporation and its affiliates disclaim any liability for any damages caused by use of this software or hardware in dangerous applications.This software and related documentation are provided under a license agreement containing restrictions on use and disclosure and are protected by intellectual property laws. Except as expressly permitted in your license agreement or allowed by law, you may not use, copy, reproduce, translate, broadcast, modify, license, transmit, distribute, exhibit, perform, publish or display any part, in any form, or by any means. Reverse engineering, disassembly, or decompilation of this software, unless required by law for interoperability, is prohibited.The information contained herein is subject to change without notice and is not warranted to be error-free. If you find any errors, please report them to us in writing.This software or hardware and documentation may provide access to or information on content, products and services from third parties. Oracle Corporation and its affiliates are not responsible for and expressly disclaim all warranties of any kind with respect to third-party content, products, and services. Oracle Corporation and its affiliates will not be responsible for any loss, costs, or damages incurred due to your access to or use of third-party content, products, or services.。

Linux系统(X64)安装Oracle11g完整安装图⽂教程另附基本操作⼀、修改操作系统核⼼参数在Root⽤户下执⾏以下步骤:1)修改⽤户的SHELL的限制,修改/etc/security/limits.conf⽂件输⼊命令:vi /etc/security/limits.conf,按i键进⼊编辑模式,将下列内容加⼊该⽂件。
oracle soft nproc 2047oracle hard nproc 16384oracle soft nofile 1024oracle hard nofile 65536编辑完成后按Esc键,输⼊“:wq”存盘退出2)修改/etc/pam.d/login ⽂件,输⼊命令:vi /etc/pam.d/login,按i键进⼊编辑模式,将下列内容加⼊该⽂件。
session required /lib/security/pam_limits.sosession required pam_limits.so编辑完成后按Esc键,输⼊“:wq”存盘退出3)修改linux内核,修改/etc/sysctl.conf⽂件,输⼊命令: vi /etc/sysctl.conf ,按i键进⼊编辑模式,将下列内容加⼊该⽂件fs.file-max = 6815744fs.aio-max-nr = 1048576kernel.shmall = 2097152kernel.shmmax = 2147483648kernel.shmmni = 4096kernel.sem = 250 32000 100 128net.ipv4.ip_local_port_range = 9000 65500net.core.rmem_default = 4194304net.core.rmem_max = 4194304net.core.wmem_default = 262144net.core.wmem_max = 1048576编辑完成后按Esc键,输⼊“:wq”存盘退出4)要使 /etc/sysctl.conf 更改⽴即⽣效,执⾏以下命令。
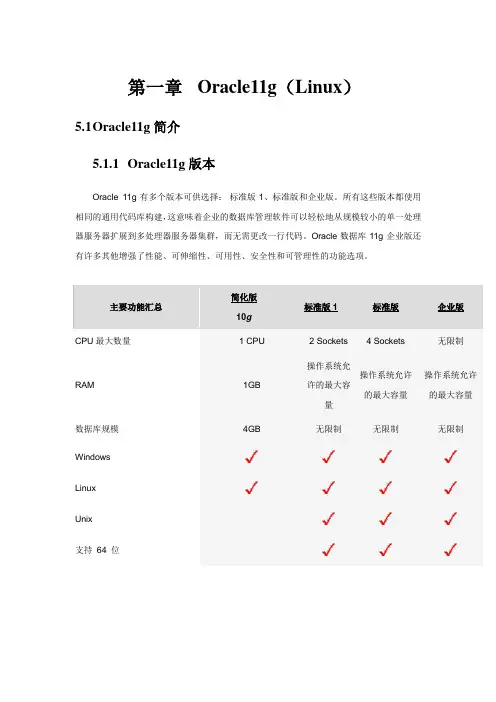
第一章 Oracle11g (Linux )5.1 O racle11g 简介 5.1.1 Oracle11g 版本Oracle 11g 有多个版本可供选择: 标准版1、标准版和企业版。
所有这些版本都使用相同的通用代码库构建,这意味着企业的数据库管理软件可以轻松地从规模较小的单一处理器服务器扩展到多处理器服务器集群,而无需更改一行代码。
Oracle 数据库11g 企业版还有许多其他增强了性能、可伸缩性、可用性、安全性和可管理性的功能选项。
主要功能汇总简化版10g标准版1标准版企业版CPU 最大数量1 CPU2 Sockets 4 Sockets无限制RAM1GB操作系统允许的最大容量操作系统允许的最大容量操作系统允许的最大容量 数据库规模 4GB无限制无限制无限制 WindowsLinuxUnix支持 64 位5.2安装环境5.2.1硬件环境1.Linux(RedHat6_32bit服务版)操作系统主机一台,IP地址为172.16.165.2422.Linux系统安装Oracle系统要求:内存必须高于1G的物理内存交换区间一般为内存的2倍,例如:1G的内存可以设置swap 分区为3G大小硬盘5G以上5.2.2软件环境Oracle11g服务器安装包,安装包本地位置为:\\172.16.165.144\工具软件\Oracle11g安装平台为RedHat6_32bit的Linux操作系统5.3安装步骤5.2.1卸载Oracle如果在系统中本身已经安装了Oracle数据库,则在安装之前需要先将其卸载完全方可进行重新安装。
下面为大家讲解Linux操作系统下的Oracle数据库的卸载。
1.使用SQL*PLUS停止数据库。
在桌面上右键选择“打开一个终端”[oracle@redhat 6 ~]$ sqlplus /nologSQL> connect / as sysdbaSQL> shutdown immediateSQL> exit2.停止Listener[oracle@redhat 6 ~]$ lsnrctl stop3.停止HTTP服务[root@redhat6 desktop]# service httpd stop4.用su或者重新登录到root(如想重新安装可以保留oracle用户,省得输入环境变量了)5.将安装目录删除[root@redhat6 desktop]# rm -rf /u01/app/oracle/6.将/usr/bin下的文件删除[root@redhat6 desktop]# rm /usr/local/bin/dbhome[root@redhat6 desktop]# rm /usr/local/bin/oraenv[root@redhat6 desktop]# rm /usr/local/bin/coraenv7.将/etc/oratab删除[root@redhat6 desktop]# rm /etc/oratab8.将/etc/oraInst.loc删除[root@redhat6 desktop]# rm /etc/oraInst.loc9.将oracle用户删除(若要重新安装,可以不删除)[root@redhat6 desktop]# userdel –r oracle10.将用户组删除(若要重新安装,可以不删除)[root@redhat6 desktop]# groupdel oinstall[root@redhat6 desktop]# groupdel dba11.将启动服务删除[root@redhat6 desktop]# chkconfig --del dbora到此为止,Oracle11g就从Linux系统中完全的卸载成功了。
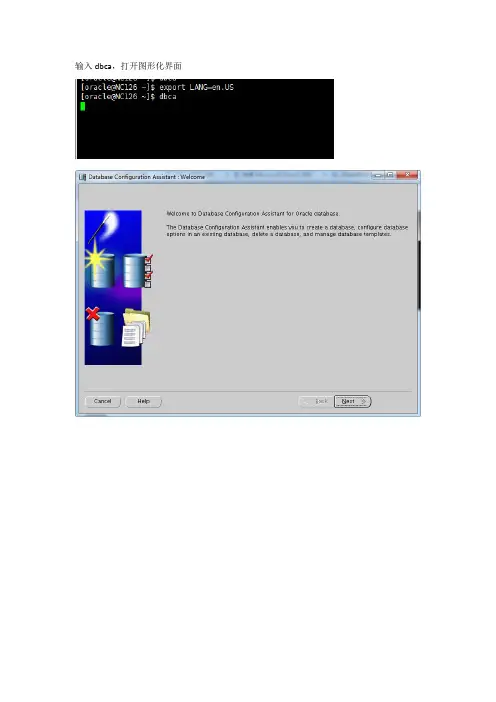
输入dbca,打开图形化界面
选择Custom Database
指定实例名:
指定用户口令:
此处指定是否使用归档(生产环境建议开启归档;测试环境不需要归档,取消勾选。
)
取消不用的插件:
指定SGA的大小(建议为服务器物理内存的40%-60%即可)
Processes建议修改为500-1500(根据并发判断)
修改字符集为:ZHS16GBK
点击下方按钮All Initiallzation Parameters
点击按钮Show Advanced Parameters:
修改db_writer_processes 为2(缺省值为1)
修改open_cursors 为1000(缺省值为300)
点击Close
点击NEXT:
在这里可以修改默认表空间的路径、大小等信息:
Redolog 建议增加为4组,每组500M (缺省3组,每组50M)
点击Finish,
点击OK ,开始创建数据库
经过等待,弹出下列窗口则说明数据库实例创建成功。

Oracle建库步骤一、使用root用户登录系统,并修改oracle用户的密码。
二、用oracle用户借助图形化界面工具登录服务器。
本文档中,使用xmanager工具登录。
三、设置DISPLAY参数。
四、运行dbca命令,开始建库。
五、选择建立一个新库。
六、选择库模板,可以根据自己需要选择。
本文档选择定制数据库模板。
七、输入库名和实例名。
本文档库名和实例名使用test。
八、选择管理方式。
本文档不启用EM管理,也不启用自动维护任务。
九、设置sys和system的密码。
十、选择数据文件位置。
本文档中,数据文件模式选做file system模式,存放位置选择/oradb。
十一、恢复配置。
因暂缺集中备份环境,所以要求大家不要开启归档。
(如果开启归档,归档文件又没有得到及时清理的话,将会占用大量存储空间。
如果文件系统被占满,Oracle数据库将停止服务。
)十二、数据库附带工具选择。
十三、数据库参数选择。
Memory可以按照系统默认选择。
block size关系到数据文件的大小,如果bs选择为4k,则数据文件最大为16G,如果bs选择为8k,则数据文件最大为32G,请大家自行决定。
字符集选择,请大家按照自己的需求选择。
一旦选择,将很难更改,请慎重。
连接模式采用默认即可。
十四、数据库存储。
大家可以先建立库。
库建成后可以手动调整。
十五、建库。
十六、建库过程,时间比较长。
十七、使用命令netca建立监听。
服务器磁盘分配一般C盘100G装系统、D盘80G放ORACLE基目录和软件位置、E盘剩余空间(最大)放数据库目录。
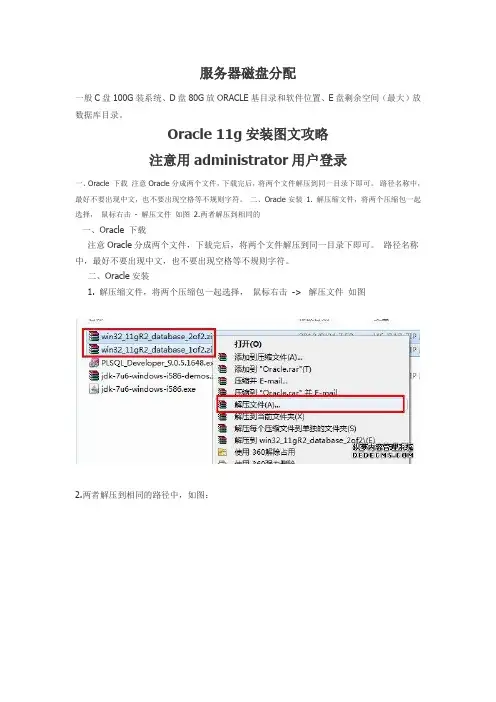
Oracle 11g安装图文攻略注意用administrator用户登录一、Oracle 下载注意Oracle分成两个文件,下载完后,将两个文件解压到同一目录下即可。
路径名称中,最好不要出现中文,也不要出现空格等不规则字符。
二、Oracle安装1. 解压缩文件,将两个压缩包一起选择,鼠标右击- 解压文件如图2.两者解压到相同的一、Oracle 下载注意Oracle分成两个文件,下载完后,将两个文件解压到同一目录下即可。
路径名称中,最好不要出现中文,也不要出现空格等不规则字符。
二、Oracle安装1. 解压缩文件,将两个压缩包一起选择,鼠标右击-> 解压文件如图2.两者解压到相同的路径中,如图:3. 到相应的解压路径上面,找到可执行安装文件【setup.exe 】双击安装。
如图:4. 安装第一步:配置安全更新,这步可将自己的电子邮件地址填写进去(也可以不填写,只是收到一些没什么用的邮件而已)。
取消下面的“我希望通过My Oracle Support接受安全更新(W)”。
如图:5. 安全选项,直接选择默认创建和配置一个数据库(安装完数据库管理软件后,系统会自动创建一个数据库实例)。
如图:6. 系统类,直接选择默认的桌面类就可以了。
(若安装到的电脑是,个人笔记本或个人使用的电脑使用此选项) 服务器类直接点击这里跳转如图:7. 典型安装。
重要步骤。
建议只需要将Oracle基目录更新下,目录路径不要含有中文或其它的特殊字符。
全局数据库名可以默认,且口令密码,必须要牢记。
密码输入时,有提示警告,不符合Oracel建议时不用管。
(因Oracel建议的密码规则比较麻烦,必须是大写字母加小写字母加数字,而且必须是8位以上。
麻烦,可以输入平常自己习惯的短小密码即可) 如图:8. 若输入的口令短小简单,安装时会提示如下。

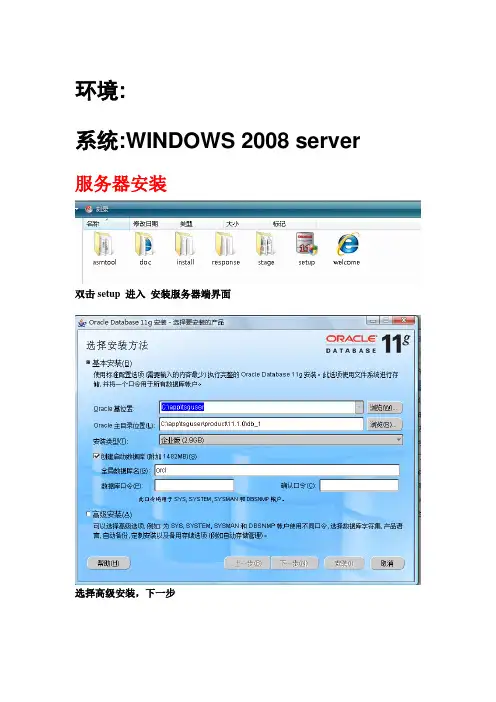
环境:
系统:WINDOWS 2008 server 服务器安装
双击setup 进入安装服务器端界面
选择高级安装,下一步
选择定制。
默认就行,如果需要改动ORACLE安装地址选择第一个浏览,确定地址,下一步。
下一步
检查通过,就可以下一步。
选择组件,全选。
下一步
创建数据库,下一步
点安装。
安装界面如下图。
默认下一步。
默认下一步
下一步
下一步
点完成。
选择一般用途就行了
输入服务器名,下一步
下一步
选择所有账户同一命令:GDLISNET
下一步
一直下一步到如下
分配内存,尽量大点。
调整大小,进程200~500
字符集选择上图所示,下一步,直到完成都是默认就行。
点完成
客户端安装:
双击setup
进入安装客户端界面
点下一步
如果是管理员安装选择管理员安装,点击下一步开始安装.
如果是普通老师机器上安装,则选择自定义,点下一步开始安装.
检查条件,如果条件不够会报警,下一步, 选择组件:选择如下
选择好组件后下一步开始安装客户端
端口号默认就行
点安装
安装界面如下
安装完成后会自动跳出配置窗口如下
下一步
默认本地命名就行了,下一步
服务器名:我们软件是GDLISNET,下一步
默认下一步
主机名输入服务器IP地址。
下一步
点测试,下一步
连接成功服务器成功,客户端安装完成。
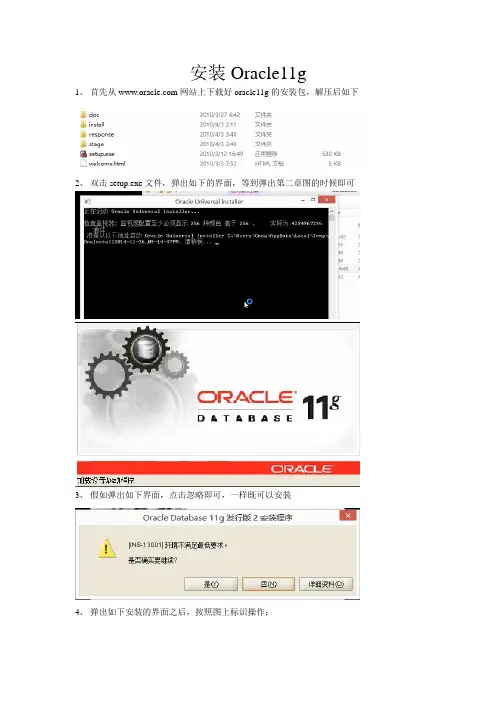
安装Oracle11g
1、首先从网站上下载好oracle11g的安装包,解压后如下
2、双击setup.exe文件,弹出如下的界面,等到弹出第二章图的时候即可
3、假如弹出如下界面,点击忽略即可,一样既可以安装
4、弹出如下安装的界面之后,按照图上标识操作;
弹出如下窗口之后,点击是
5、选择创建和配置数据库,点击下一步;
6、选择单实例数据库安装,点击下一步;
6、选择高级安装,点击下一步;
7、一般有默认的中文,点击下一步;
8、选择企业版,下一步;
9、修改路径后,点击下一步;
10、选择一般用途,点击下一步;
11、设置数据库名称,点击下一步;
12、此选项卡默认
13、单击字符集选项卡,选择UTF-8的编码;
14、选择实例方案选项卡,选择好创建具有实例方案的数据库,点击下一步;
15、此步骤默认,直接下一步;
16、此步骤,默认下一步;
17、此步骤,默认下一步;
18、选择使用相同口令,下一步;
19、弹出以下弹框,选择是;
20、选择完成,开始安装;
21、然后,在安装完成后,假如你需要修改刚刚你填写的口令的话,选择口令管理,将以下
五个用户修改下密码,并解锁;超级管理账户:sys
密码:change_on_install;
普通管理账户:system
密码:manager;
经典账户:scott
密码:tiger;
大数据账户:sh
密码:sh
以上为学习所用的用户和密码;OK 到此安装完成了;。
Oracle 11g图形界面创建数据库实例注:以oracle11g为例,在windowsXP操作系统测试通过。
Step1创建数据库实例:进入开始->所有程序->Oracle-OraDB11g_home1->配置和移植工具->Database Configuration Assistant进入后如图所示:页脚内容1点击下一步默认选项创建数据库,点击下一步:页脚内容2默认一般事务和用途,点击下一步:输入数据库名和sid,以sinosoft为例,(注:如果提示没有创建监听器,请在开始->所有程序->Oracle-OraDB11g_home1->配置和移植工具->Net Configuration Assistant进行配置,这里就不一一熬述了)点击下一步:页脚内容3默认选项,点击下一步:为不同账户设置不同的口令,我们选择所有账户使用统一管理口令:sinosoft,点击下一步:页脚内容4点击下一步:点击下一步:页脚内容5点击下一步:点击下一步:页脚内容6点击字符集,设置数据库字符集为GBk还是UTF-8,点击下一步:点击下一步:页脚内容7点击下一步:点击下一步:页脚内容8点击完成:点击确定:页脚内容9正在启动并创建oracle实例:记录下URL: https://PC-Zheng:5500/em,因为我们等下要用它登陆控制台创建表空间;点击退出完成数据库实例创建。
Step2 创建表空间在IE中打开https://PC-Zheng:5500/em(如果显示无法找到网站,请在控制面板—管理工具—服务中启页脚内容10动OracleDBConsolet 服务)出现登陆窗口,我们用sys登陆,密码是我们之前设置的口令:sinosoft,连接身份选sysdab,点击登录:页脚内容11登录进去后点击“服务器”,点击表空间来创建表空间:点击创建:页脚内容12输入名称:sinosoft_tablespace 点击右下脚添加数据文件输入文件名:sinosoft_file,选择文件大小(不能超过4GB,windows系统文件最大限制为4GB),填入自动扩展增量,点击右下脚继续,然后再点击确定:页脚内容13这时我们的表空间就创建好了Step3 创建角色如图所示,在服务器—安全性下点击角色页脚内容14点击创建:输入我们角色的名称以及口令,这个名称和口令将会在pl/sql连接时所用,选择默认表空间,选择完后点击角色:页脚内容15点击编辑列表:将CONNECT DBA RESOURCE unlimited加入到角色当中,点击确定,再点击应用,角色创建完成。
Oracle11g数据库的手工创建1、参考文档Oracle11g Release 2 (11.2) ;2、具体的创建步骤2.1 指定一个实例ID,即SID$ ORACLE_SID = orcl1$ export ORACLE_SID2.2 环境变量的设定$ vi .bash_profileORACLE_BASE=/u01/app/oracle/product/11.2.0ORACLE_HOME=$ORACLE_BASE/db_1ORACLE_SID=orcl1PATH=$ORACLE_HOME/bin:$PATHexport ORACLE_BASE ORACLE_HOME ORACLE_SID PATH保存,退出!2.3 选择数据库管理员的认证方法2.3.1 基于密码文件,通过以下命令创建密码文件$ ORAPWD FILE=orapworcl1 ENTRIES=102.3.2 基于操作系统认证本示例采用基于操作系统的认证,即使用oracle用户连接数据库$ sqlplus /nolog> conn / as sysdba2.4 创建初始化参数文件初始化参数文件,可以采用数据库软件安装后的一个init.ora,如果以前创建过数据库,则在$ORACLE_HOME/dbs下存在一个init.ora$ cp init.ora initorcl1.ora修改initorcl1.ora中的数据,一个简单的initorcl1.ora如下所示:# specific hardware and needs. You may also consider using Database# Configuration Assistant tool (DBCA) to create INIT file and to size your# initial set of tablespaces based on the user input.####################################################### # Change '<ORACLE_BASE>' to point to the oracle base (the one you specify at# install time)db_name='orcl1'memory_target=400Mprocesses = 150audit_file_dest='/u01/app/oracle/product/11.2.0/admin/orcl1/ adump'audit_trail ='db'db_block_size=8192db_domain=''db_recovery_file_dest='/u01/app/oracle/product/11.2.0/flash _recovery_area'db_recovery_file_dest_size=2Gdiagnostic_dest='/u01/app/oracle/product/11.2.0'dispatchers='(PROTOCOL=TCP) (SERVICE=ORCLXDB)'open_cursors=300remote_login_passwordfile='EXCLUSIVE'undo_tablespace='UNDOTBS1'# You may want to ensure that control files are created on separate physical# devicescontrol_files = ('/u01/app/oracle/product/11.2.0/oradata/orcl1/control01.ctl','/u01/app/oracle/product/11.2.0/oradata/orcl1/control02.ctl','/u01/app/oracle/product/11.2.0/oradata/orcl1/control03.ctl')compatible ='11.2.0'2.5 创建一个实例(Windows Only)<略,具体参考Oracle11g release2 Docs>2.6 连接到一个实例$ sqlplus /nologSQL*Plus: Release 11.2.0.1.0 Production on Sat Jun 911:07:07 2012Copyright (c) 1982, 2009, Oracle. All rights reserved.>conn / as sysdbaConnected to an idle instance.2.7 创建一个spfile文件> create spfile from pfile1 file created.2.8 启动实例(nomount模式)> startup nomount2.9 执行创建数据库SQL创建数据库的create database命令相对来说比较复杂,因此,最好将SQL写入一个createDB.sql文件中,然后再去调用,另外由于创建数据库需要在一些特定目录中写入数据,因此首先我们得准备好这些目录,如下1、准备所需的目录$ pwd/u01/app/oracle/product/11.2.0 ----这是ORACLE_BASE 目录$ cd admin$ mkdir orcl1$ cd orcl1$ mkdir adump$ mkdir dpdump$ mkdir pfile$ cd ../../oradata$ mkdir orcl12、准备createDB.sql【注意Create database命令不要出现空行,要不执行会报错!】spool dbcreate.logCREATE DATABASE "orcl1"USER SYS identified by oracleUSER SYSTEM identified by oracleCHARACTER SET AL32UTF8NATIONAL CHARACTER SET AL16UTF16CONTROLFILE REUSEMAXDATAFILES 20MAXINSTANCES 2MAXLOGFILES 5MAXLOGMEMBERS 5MAXLOGHISTORY 100LOGFILEGROUP 1('/u01/app/oracle/product/11.2.0/oradata/orcl1/redo01.log') size 50M BLOCKSIZE 512,GROUP 2('/u01/app/oracle/product/11.2.0/oradata/orcl1/redo02.log') size 50M BLOCKSIZE 512,GROUP 3('/u01/app/oracle/product/11.2.0/oradata/orcl1/redo03.log') size 50M BLOCKSIZE 512EXTENT MANAGEMENT LOCALDATAFILE'/u01/app/oracle/product/11.2.0/oradata/orcl1/system01.dbf' size 500M REUSESYSAUX DATAFILE'/u01/app/oracle/product/11.2.0/oradata/orcl1/sysaux01.dbf' size 500M REUSEDEFAULT TEMPORARY TABLESPACE temporcl1TEMPFILE'/u01/app/oracle/product/11.2.0/oradata/orcl1/temp01.dbf' size 100M REUSEUNDO TABLESPACE UNDOTBS1'/u01/app/oracle/product/11.2.0/oradata/orcl1/undotbs01.dbf' size 100M REUSEAUTOEXTEND ON MAXSIZE UNLIMITEDDEFAULT TABLESPACE usersDATAFILE'/u01/app/oracle/product/11.2.0/oradata/orcl1/users01.dbf' size 500M REUSEAUTOEXTEND ON MAXSIZE UNLIMITED;3、>@$ORACLE_HOME/dbs/createDB.sql等待执行,可以在$ORACLE_BASE/diag/rdbms/orcl1/orcl1/trace目录中使用$ tail -f alert_orcl1.log查看创建进度2.10 创建额外的表空间上面创建的一些系统表空间和部分表空间,为了应用需要可以类似下面增加一些表空间,createTBS.sql如下:--应用表空间CREATE TABLESPACE app_tbs LOGGINGDATAFILE'/u01/app/oracle/product/11.2.0/oradata/orcl1/apps01.dbf' SIZE 100M REUSEAUTOEXTEND ON NEXT 1024K MAXSIZE UNLIMITED EXTENT MANAGEMENT LOCAL;--应用索引空间CREATE TABLESPACE idx_tbs LOGGING'/u01/app/oracle/product/11.2.0/oradata/orcl1/idx01.dbf' SIZE 20M REUSEAUTOEXTEND ON NEXT 1024K MAXSIZE UNLIMITED EXTENT MANAGEMENT LOCAL;2.11 运行创建数据字典视图的脚本至2.10已经创建完一个数据库,但是还需要做一些创建数据字典等的工作,数据库才能正常提供使用,比如PL/SQL等,依次执行如下命令:> @?/rdbms/admin/catalog.sql> @?/rdbms/admin/catproc.sql> @?/sqlplus/admin/pupbld.sql至此创建的数据库orcl1能够正常提供服务了,当然还可以有选择的执行类似于2.11的其他脚本,以及做一些备份工作,这里就不涉及了。
LinuxCentOS7安装Oracle11gR2数据库详细步骤开始之前先唠叨⼏句,前些天公司新购置了服务器,需要将公司内的Oracle数据迁移到阿⾥云上,迁移之前呢需要提前部署好Oracle数据库,为此呢,我就开始折腾Oracle 11g R2版本的数据库部署安装了,因为之前没装过,所以只能找度娘了,折腾我⼤半天时间终于搞定,下⾯呢主要是想记录下⾃⼰的⼼得,希望能给⼤家带来帮助⼀、环境要求系统环境:CentOS Linux release 7.6.1810 (Core)Oracle版本:Oracle Database 11g R2(下载这两个包linux.x64_11gR2_database_1of2.zip、linux.x64_11gR2_database_2of2.zip)Oracle软件的下载⾃⼰可以去官⽹下载,官⽹提供了不同版本的下载包,⾃⼰按需下载即可⼆、前期准备2.1 配置防⽕墙防⽕墙的相关配置,可以参考另⼀篇博⽂:。
这⾥建议开启防⽕墙,同时建1521端⼝加⼊防⽕墙策略,记住,修改防⽕墙策略后需要重启防⽕墙。
注意,如果在安装的过程遇到中⽂乱码,可通过以下命令安装中⽂包:2.2 修改Selinux配置[root@micle ~]: sed -i 's#SELINUX=.*#SELINUX=disabled#g' /etc/selinux/config[root@micle ~]: sed -i 's/SELINUX=enforcing/SELINUX=disabled/' /etc/selinux/config grep SELINUX=disabled /etc/selinux/config[root@micle ~]: setenforce 0[root@micle ~]: getenforce2.3 创建Oracle⽤户和⽤户组[root@micle ~] groupadd oinstall[root@micle ~] groupadd dba[root@micle ~] useradd -g oinstall -G dba -m oracle[root@micle ~] passwd oracle2.4 修改⽤户限制执⾏vim /etc/security/limits.conf⽂件,修改操作系统对oracle⽤户资源的限制:[root@micle ~] vim /etc/security/limits.conf#oracleoracle soft nproc 131072oracle hard nproc 131072oracle soft nofile 131072oracle hard nofile 131072oracle soft core unlimitedoracle hard core unlimitedoracle soft memlock 50000000oracle hard memlock 500000002.5 修改Linux系统内核参数和资源限制编辑/etc/sysctl.conf⽂件,设置相关参数的系统默认值,以下是我配置的相关参数,⾃⼰可以根据实际情况调整:[root@micle ~] vim /etc/sysctl.confvm.swappiness = 0net.ipv4.neigh.default.gc_stale_time = 120net.ipv4.conf.all.rp_filter = 0net.ipv4.conf.default.rp_filter = 0net.ipv4.conf.default.arp_announce = 2net.ipv4.conf.lo.arp_announce = 2net.ipv4.conf.all.arp_announce = 2net.ipv4.tcp_max_tw_buckets = 5000net.ipv4.tcp_syncookies = 1net.ipv4.tcp_max_syn_backlog = 1024net.ipv4.tcp_synack_retries = 2net.ipv6.conf.all.disable_ipv6 = 1net.ipv6.conf.default.disable_ipv6 = 1net.ipv6.conf.lo.disable_ipv6 = 1kernel.sysrq = 1####oraclefs.aio-max-nr = 1048576fs.file-max = 6815744kernel.shmall = 2097152kernel.shmmax = 536870912kernel.shmmni = 4096kernel.sem = 250 32000 100 128net.ipv4.ip_local_port_range = 9000 65500net.core.rmem_default = 262144net.core.rmem_max = 4194304net.core.wmem_default = 262144net.core.wmem_max = 10485762.6 yum安装依赖包[root@micle ~] yum -y install binutils compat compat-libstdc gcc gcc-c++ glibc glibc-devel ksh libaio libaio-devel libgcc libstdc++ libstdc++-devel libXi libXtst make sysstat unixODBC unixODBC-devel2.7 图形化界⾯安装环境准备我这⾥选择的是通过VNC Server安装的,具体安装⽅式可以参考:[root@micle ~] yum -y groupinstall "GNOME Desktop" "Graphical Administration Tools"三、开始安装Oracle 11g R23.1 创建安装⽬录我是打算安装在/ora/⽬录下,这个⽬录可以根据⾃⼰实际情况调整[root@micle ~] mkdir -p /ora/oracle3.2 配置环境变量将ORACLE_HOME 设置为安装⽬录product 下默认⽬录3.3 修改Oracle ⽤户环境变量3.4 图形化安装以图形化界⾯开始安装Oracle 数据库,安装步骤与Windows 安装步骤类似切换oracle ⽤户,进⼊图形化桌⾯安装⽅式去掉订阅邮件,此时会弹出警告提⽰,说你没有接受产品更新邮件推送,点“Yes”就好,然后点下⼀步[root@micle ~] mkdir -p /ora/oracle[root@micle ~] unzip -d /ora/ linux.x64_11gR2_database_1of2.zip[root@micle ~] unzip -d /ora/ linux.x64_11gR2_database_2of2.zip[root@micle ~] chown -R oracle:oinstall /ora[root@micle ~] chmod 775 -R /ora [root@micle ~] vim /etc/profile#oracleexport ORACLE_HOME=/ora/oracle/product/11.2.0/db_1export ORACLE_SID=orclif [ $USER = "oracle" ]; thenif [ $SHELL = "/bin/ksh" ]; thenulimit -p 16384ulimit -n 65536 else ulimit -u 16384 -n 65536 fifi[root@micle ~] vim /ora/oracle/.bash_profileexport ORACLE_BASE=/ora/oracleexport ORACLE_HOME=$ORACLE_BASE/product/11.2.0/db_1export ORACLE_SID=orclexport ORACLE_TERM=xterm export PATH=$ORACLE_HOME/bin:/usr/sbin:$PATHexport LD_LIBRARY_PATH=$ORACLE_HOME/lib:/lib:/usr/libexport NLS_LANG=AMERICAN_AMERICA.ZHS16GBKPATH=$PATH:$HOME/.local/bin:$HOME/binexport PATH[root@micle database]# cd /ora/database/[root@micle database]# su - oracle //注意空格,不能少上⼀次登录:五 4⽉ 3 10:05:20 CST 2020pts/0 上[oracle@oracle ~]$ ./runInstaller选择默认创建和配置⼀个数据库,稍后再配置初始化数据,然后点下⼀步这⾥当然选择服务器类型了,然后点下⼀步选择单列数据库,然后点下⼀步我默认选择典型安装,也可以选择⾼级安装,⾼级安装步骤和配置会多点,安装步骤更多,看⾃⼰实际需要选择典型安装Oracle基本配置:最好保持和ORACLE_BASE&&ORACLE_HOME配置环境变量⼀致,点击yes注意,这⾥会出现⼀个问题,尤其是在Linux图形界⾯安装时,信息提⽰框弹出被遮盖,我的解决办法是:Alt+D 解决预安装先决条件检查:查看缺失的依赖包检测后⼀般都会出现⼀些failed,因为有些包还没有安装,我们安装这些包就⾏,切记不要选择“Igrnore all”(全部忽略),不然你会后悔的[root@micle database]# yum -y install libaio-0.3.105 compat-libstdc++-33-3.2.3 libgcc-3.4.6 libstdc++-3.4.6 unixODBC-2.2.11 unixODBC-devel-2.2.11 pdksh-5.2.14点击"Check Again"后,之前提⽰包全部完成,剩下的可以忽略直接下⼀步,在Summary界⾯,保持默认,点击Finish,开始安装安装过程中,差不多需要15分钟左右,会有⼀些错误提⽰,没影响,选择continue和默认即可,这⾥可能⼜会出现该死的信息提⽰框显⽰不全问题,还是上⾯的解决⽅式:Alt+D 解决安装完成后会提⽰需要执⾏两个sh脚本,重新打开⼀个tab页,⽤root账户执⾏两个脚本完成所有安装步骤登录root ⽤户,到下⾯的两个⽬录下执⾏脚本即可。
安装Oracle前linux系统参数的配置检查下列包是否安装,如果未安装则要先安装。
# rpm -qa | grep make gcc glibc 等等binutils-2.17.50.0.6-2.el5compat-libstdc++-33-3.2.3-61elfutils-libelf-0.125-3.el5elfutils-libelf-devel-0.125glibc-2.5-12glibc-common-2.5-12glibc-devel-2.5-12gcc-4.1.1-52gcc-c++-4.1.1-52libaio-0.3.106libaio-devel-0.3.106libgcc-4.1.1-52libstdc++-4.1.1libstdc++-devel-4.1.1-52.e15make-3.81-1.1sysstat-7.0.0unixODBC-2.2.11unixODBC-devel-2.2.11在安装Oracle 11g前,先关闭系统防火墙,禁用selinux;需要手工更改系统的内核参数以及创建oracle用户和用户组,具体操作步骤如下所述。
(1)创建oracle用户和oinstall、dba用户组命令如下所示。
# /usr/sbin/groupadd oinstall //创建用户组oinstall# /usr/sbin/groupadd dba //创建用户组dba# /usr/sbin/useradd -m -g oinstall -G dba oracle //创建用户oracle# id oracle //查看用户oracle的属性uid=512(oracle) gid=1005(oinstall) groups=1005(oinstall),1006(dba)(2)设置oracle用户的口令,命令如下所示。
# passwd oracle //设置oracle用户的口令Changing password for user oracle.New UNIX password:BAD PASSWORD: it is too simplistic/systematicRetype new UNIX password:passwd: all authentication tokens updated successfully.//口令更改成功(3)创建Oracle的安装目录。
Oracle 11gr2 软件安装和数据库创建步骤详解本文是一篇step-by-step 文档,演示了如何安装oracle 数据库软件以及使用DBCA创建数据库。
同时,我们对每一步的功能,注意事项和容易犯的错误都进行了描述。
希望对大家了解数据库安装过程有所帮助。
安装数据库软件Start The Installer请参考各平台对应的安装手册,在满足安装前提条件下运行如下命令来启动数据库安装:$ /media/database/runInstallerConfigure Security Updatess本步骤可以选择提供您的My Oracle Support email来接收Oracle安全通知,安装产品和初始化Oracle配置管理器。
●EMAIL:填写您的My Oracle Support email或者用户名●I wish to receive security update via My Oracle Support. 该项选中则表明您期望通过My Oracle Support来接收安全更新。
推荐选项:如果您有My Oracle Support账户,建议填写您的EMAIL和密码来接收Oracle安全更新;否则您可以跳过该步骤。
如果您跳过该步骤,会弹出一个警告:点击Yes来确认您的选择:Download Software Updates从Oracle11.2.0.2开始,您可以使用软件更新选项来动态下载和应用最新的软件更新,该步骤可以为本次的安装选择软件更新,比如推荐的更新,PSU或者其他推荐的补丁:该步骤有3个选项:●Use My Oracle Support credentials for download: 该选项指的是在线下载更新,需要您的主机能连上My Oracle Support网站,并且需要提供您的My Oracle Support账户和密码●Use pre-download software update: 该选项适用于您已经将所需的软件更新下载到本地,您可以直接指定本地的已经下载了软件更新的路径。
Linux上Oracle11g安装步骤图解安装准备⼯作⽬录下载地址:选择需要的oracle安装⽂件下载联机⽂档:可以下载其PDF⽂档参考(其中的有关Linux安装向导是最权威的安装⼿册)数据库安装硬件配置要求:最⼩内存 1 GB of RAM虚拟内存容量Available RAM Swap Space RequiredBetween 1 GB and 2 GB 1.5 times the size of RAMBetween 2 GB and 16 GB Equal to the size of RAMMore than 16 GB16 GB硬盘空间要求数据库软件硬盘空间需求:Installation Type Requirement for Software Files (GB)Enterprise Edition 3.95Standard Edition 3.88数据⽂件硬盘空间需求:Installation Type Requirement for Data Files (GB)Enterprise Edition 1.7Standard Edition 1.5检查的命令内存# grep MemTotal /proc/meminfo交换空间# grep SwapTotal /proc/meminfo磁盘空间# df -ah平台查看联机⽂档,可以看出Oracle 11g⽀持Linux操作系统下⾯是 X86(32位)上Linux其中Red Hat 4与Oracle Linux 4对应,以及与Cent OS 4对应(版本要对应)通过查看Oracle安装⽂档中列出的Package Requirements可以查看在不同平台上需要的软件包,下⾯列出Asianux 3, Oracle Enterprise Linux 5.0, and Red Hat Enterprise Linux 5.0的要求,检查下系统是否安装过这些包,如果没在对应的系统光盘查找对应的rpm包并安装。
Oracle 11g图形界面创建数据库操作指南注:以oracle11g为例,在windowsXP操作系统测试通过。
Step1创建数据库实例:进入开始->所有程序->Oracle-OraDB11g_home1->配置和移植工具->Database Configuration Assistant进入后如图所示:点击下一步默认选项创建数据库,点击下一步:默认一般事务和用途,点击下一步:输入数据库名和sid,以sinosoft为例,(注:如果提示没有创建监听器,请在开始->所有程序->Oracle-OraDB11g_home1->配置和移植工具->Net Configuration Assistant进行配置,这里就不一一熬述了)点击下一步:默认选项,点击下一步:为不同账户设置不同的口令,我们选择所有账户使用统一管理口令:sinosoft,点击下一步:点击下一步:点击下一步:点击下一步:点击下一步:点击字符集,设置数据库字符集为GBk还是UTF-8,点击下一步:点击下一步:点击下一步:点击下一步:点击完成:点击确定:正在启动并创建oracle实例:记录下URL: https://PC-Zheng:5500/em,因为我们等下要用它登陆控制台创建表空间;点击退出完成数据库实例创建。
Step2 创建表空间在IE中打开https://PC-Zheng:5500/em(如果显示无法找到网站,请在控制面板—管理工具—服务中启动OracleDBConsolet 服务)出现登陆窗口,我们用sys登陆,密码是我们之前设置的口令:sinosoft,连接身份选sysdab,点击登录:登录进去后点击“服务器”,点击表空间来创建表空间:点击创建:输入名称:sinosoft_tablespace 点击右下脚添加数据文件输入文件名:sinosoft_file,选择文件大小(不能超过4GB,windows系统文件最大限制为4GB),填入自动扩展增量,点击右下脚继续,然后再点击确定:这时我们的表空间就创建好了Step3 创建角色如图所示,在服务器—安全性下点击角色点击创建:输入我们角色的名称以及口令,这个名称和口令将会在pl/sql连接时所用,选择默认表空间,选择完后点击角色:点击编辑列表:将CONNECT DBA RESOURCE unlimited加入到角色当中,点击确定,再点击应用,角色创建完成。
Step4 配置tnsnames.ora在oracle\product\11.1.0\db_1\NETWORK\ADMIN路径下找到tnsnames.ora,(如果没有请新建一个并在头部加入:# tnsnames.ora Network Configuration File: ‘填入你tnsnames.ora文件所在的绝对路径,如:E:\oracle\product\10.2.0\db_1\network\admin\tnsnames.ora’# Generated by Oracle configuration tools.)用UE打开,加入字符串:sinosoft =(DESCRIPTION =(ADDRESS = (PROTOCOL = TCP)(HOST = 192.168.5.31)(PORT = 1521))(CONNECT_DATA =(SID = sinosoft)(SERVICE_NAME = sinosoft)))保存,打开PL/SQL:用户名口令为创建角色时所建的用户名密码,数据库位创建的sinosoft数据库实例,连接选为SYSDBA即可登录Step5 导入dmp文件以将lloyds_new_arch.dmp导入sinosoft数据库为例,在登录PL/SQL后,授权yltest,具体命令为(请在之前进入控制台创建临时表空间):create user yltestidentified by yltestdefault tablespace SINOSOFT_TABLESPACE2temporary tablespace sinosoft_tempprofile DEFAULT;-- Grant/Revoke role privilegesgrant connect to yltest;grant dba to yltest;grant resource to yltest;-- Grant/Revoke system privilegesgrant create any table to yltest;grant create procedure to yltest;grant create session to yltest;grant debug connect session to yltest;grant select any table to yltest;grant unlimited tablespace to yltest;执行完毕后,运行dos窗口,开始—运行—cmd,假设dmp文件路径为:D:\dmp\lloyds_new_arch.dmp将命令: imp yltest/yltest@sinosoft file=D:\dmp\lloyds_new_arch.dmp log=yltest full=y ignore=y粘贴于命令行中回车即可导入dmp文件到sinosoft库中。
至此数据库完全建立成功附SQL命令创建相关操作:--建立表空间create tablespace SINOSOFT_TABLESPACE logging datafile 'E:\ORACLE\ORADATA\DB11G\LLOYDS_TEST_DF.dbf' size 4096m autoextend on next 512m extent management local;--建立临时表空间create temporary tablespace SINOSOFT_TEMP tempfile 'E:\ORACLE\ORADATA\DB11G\LLOYDS_TEST_TMP_DF.dbf' size 512m autoextend on next 50m extent management local;--建立用户Create the user create user yltest identified by sinosoft_test default tablespace SINOSOFT_TABLESPACE temporary tablespace SINOSOFT_TEMP;Grant/Revoke role privileges grant connect to yltest; grant dba to yltest; grant resource to yltest; -- Grant/Revoke system privileges grant unlimited tablespace to yltest;--dmp导入imp yltest/yltest@sinosoft file=D:\dmp\lloyds_new_arch.dmp log=yltest full=y ignore=y//////////////////////////////////Oracle 11g 常用命令!表空间命令2009年05月20日星期三 14:371.查看oracle数据有多少表空间SELECT COUNT(*) FROM DBA_DATA_FILES;SELECT FILE_NAME,TABLESPACE_NAME,BYTES,USER_BLOCKS FROMDBA_DATA_FILES;SELECT TABLESPACE_NAME FROM DBA_DATA_FILES;2.删除表空间drop tablespace opencmstest including contents;3.创建表空间#------------------------------------------------------------------------------------创建临时表空间create temporary tablespace tmp_jportaltempfile '/u01/app/oracle/database/tmp_jportal.dbf'Size 32mautoextend onextent management local;#------------------------------------------------------------------------------------创建表空间create tablespace jportalloggingdatafile '/u01/app/oracle/database/jportal.dbf'Size 32mautoextend onextent management local;#------------------------------------------------------------------------------------创建用户create user jboss identified by jbossdefault tablespace jportaltemporary tablespace tmp_jportal;#------------------------------------------------------------------------------------授权给用户GRANT CREATE USER,DROP USER,ALTER USER ,CREATE ANY VIEW ,DROP ANY VIEW,EXP_FULL_DATABASE,IMP_FULL_DATABASE,DBA,CONNECT,RESOURCE,CREATE SESSION TO jboss。