PowerCenter9在Linux上的安装手册
- 格式:pdf
- 大小:1.58 MB
- 文档页数:22
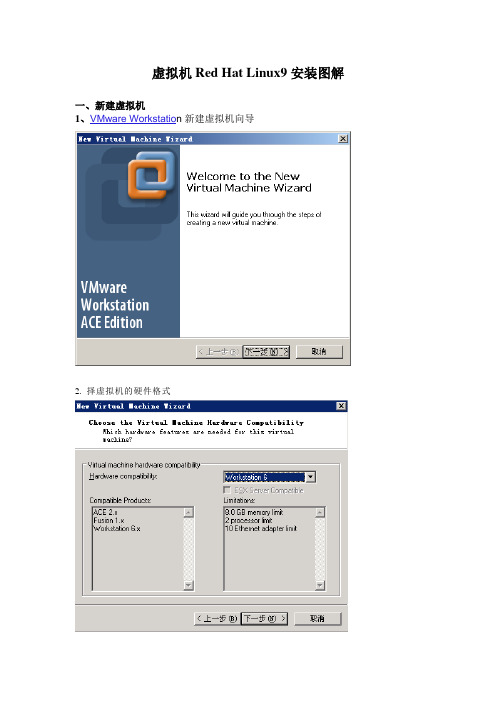
虚拟机Red Hat Linux9安装图解一、新建虚拟机1、VMware Workstatio n新建虚拟机向导2.择虚拟机的硬件格式3、选择操作系统的类型4、定制虚拟机的名称和存储位置5、选择CPU的数量6、设置虚拟机的使用内存7、网络连接的类型(1)选择第一项,使用桥接网卡(VMnet0虚拟网卡),表示当前虚拟机与主机(指运行VMware Workstation软件的计算机)在同一个网络中。
(2)选择第二项,使用NAT网卡(VMnet8虚拟网卡),表示虚拟机通过主机单向访问主机及主机之外的网络,主机之外的网络中的计算机,不能访问该虚拟机。
(3)选择第三项,只使用本地网络(VMnet1虚拟网卡),表示虚拟机只能访问主机及所有使用VMnet1虚拟网卡的虚拟机。
主机之外的网络中的计算机不能访问该虚拟机,也不能被该虚拟机所访问。
(4)选择第四项,没有网络连接,表明该虚拟机与主机没有网络连接。
8、选择虚拟机的SCSI卡的型号,默认即可9、创建一个新的虚拟磁盘10、选择虚拟磁盘的接口方式11、定制分配虚拟机下操作系统的磁盘空间二、虚拟机安装Linux1、开始安装Linux,选择图像模式下安装,还是文本模式下安装注:此过程受内存的限制,如果内存太小,会自动选择文本模式2、检测第一张光盘3、第一张光盘检测结束4、安装的欢迎界面5、选择安装过程中的语言6、键盘配置:英文7、鼠标配置8、选择安装类型操作10、开始分区11、新建Swap分区(虚拟内存:物理内存的2倍,强制主分区)12、新建Boot分区(默认100M ,Ext3,强制主分区)13、新建根分区(“/”)14、分区的配置情况15、系统引导程序Grub16、网络配置17、语言支持18、选择时区19、选择要安装的软件包。
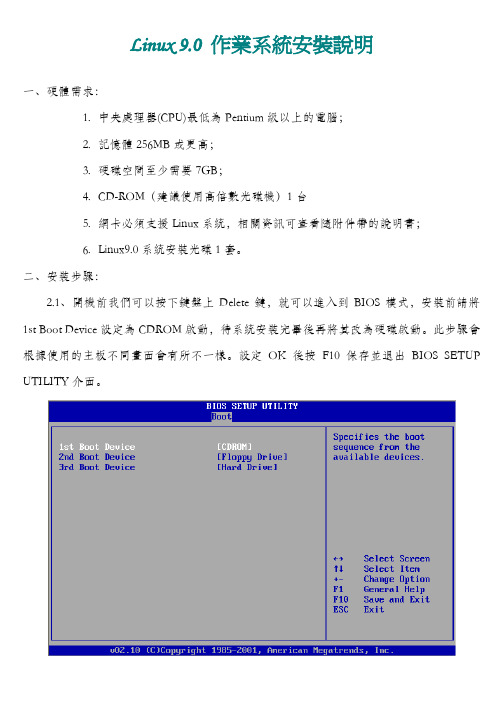
Linux 9.0 作業系統安裝說明一、硬體需求:1.中央處理器(CPU)最低為Pentium級以上的電腦;2.記憶體256MB或更高;3.硬碟空間至少需要7GB;4.CD-ROM(建議使用高倍數光碟機)1台5.網卡必須支援Linux系統,相關資訊可查看隨附件帶的說明書;6.Linux9.0系統安裝光碟1套。
二、安裝步驟:2.1、開機前我們可以按下鍵盤上Delete鍵,就可以進入到BIOS模式,安裝前請將1st Boot Device設定為CDROM啟動,待系統安裝完畢後再將其改為硬碟啟動。
此步驟會根據使用的主板不同畫面會有所不一樣。
設定OK後按F10保存並退出BIOS SETUP UTILITY介面。
2.2、RedHat 9.0共有四張光碟,其中第四張為額外資料光碟,我們先將RedHat Linux 9.0作業系統的第一張光碟放入光碟機,然後開機,在以下提示按〈ENTER〉使用圖形化介面安裝。
2.3、通過對系統硬體的檢測後(大概需要1分鐘左右),會出現如下介面,我們按〈Next〉按鈕繼續。
2.4、選擇你在安裝過程中所使用的語言,在這裏的語言選擇將會影響到你後續在圖形介面中所用的語言,在這裏你可以選擇你熟悉和喜愛的語言按〈Next〉繼續。
2.5、这里是设定键盘和鼠标的类型,键盘与鼠标在硬件上被定义为:输入/输出设备。
我在此计算机会自动侦测我们的键盘和鼠标,我们就使用默认设置,按〈Next〉继续。
2.6、這一步選擇你將安裝Linux 9.0作業系統的類型,你可以根據你的需要自行選擇安裝,因本次教程是為SIP Server架設為目的,所以一定要選擇【自訂安裝】,選擇下一步繼續。
2.7、選擇磁碟分割方式,在這裏有兩種方式可選,我們建議使用第二種:使用Disk Druid 分割磁碟,也就是手動分割。
2.8、在這裏可以看出我們使用的是一塊從未進行任何分區的硬碟,我們要做的是選取如圖所示的【剩餘空間】,再點擊【編輯】按鈕。
Installing Linux on Power Systems serversVersion 1.0.1IBM®Quick Start Guide for installing Linux on Power Systems servers This guide helps you install Linux on a stand-alone Power Systems server that has a graphics card.OverviewUse this information to install Linux on a Power Systems server that has a graphics card installed. This installation assumes an unmanaged (stand-alone) system.1Step 1: Complete the prerequisitesBefore you install Linux on your system, ensure that you have the following items:•USB keyboard and mouse•Monitor•Power cords and outlet for your system. Depending on your configuration, your system might require 220 V. For instructions, see the IBM Knowledge Center and search for your Power hardware model: IBM Knowledge Center.•Distribution media2Step 2: Prepare to power onBefore you power on the system, follow these steps:•If your system belongs in a rack, install your system into that rack. For instructions, see the IBM Knowledge Center and search for your Power hardware model: IBM Knowledge Center.•Remove the shipping brackets from the power supplies. Ensure that the power supplies are fully seated in the system.•Connect the monitor, mouse, and keyboard•Connect the power cords to the system and plug them into the outlets.After you connect the power cords, your firmware boots. Wait for a few minutes for this process to complete. Look for the green power LED on the control panel to start flashing, indicating that it is ready to use, and for the prompt 01 N V=N to display in the control panel window.For information about accessing and using the control panel, see the Control panel topic at https:///BdYjwz.3Step 3: Power on the systemAfter the firmware boots, you can power on the system. Press and hold the white power-on button on the front of the control panel for 3 seconds to start the server.As the system powers up, you might notice the following:•System reference codes display on the control panel while the system is being started.•The power LED continues to flash and speeds up.•The system cooling fans are activated after approximately 30 seconds and begin to accelerate to operating speed.•The power LED on the control panel stops flashing and remains on, indicating that system power is on.Note: If you system fails to start, verify that the prompt 01 N V=N is displaying in the control panel and green power LED is flashing green.When the system is powered on, the monitor activates and the Boot selection window is displayed.Note: You can also connect to your system using the Advanced System Management Interface (ASMI). Forinstructions, see the IBM Knowledge Center and search for your Power hardware model: IBM Knowledge Center.4Step 4: Boot the installer kernelTo set up your server to boot the Linux installer kernel, follow these steps:a.At the Boot selection window, enter 1 to select the SMS Menu. Enter 1 before the firmware boot screen iscompletely shown on the display, because it will disappear when complete. If you miss the screen, reboot thesystem.b.At this time, you can insert the distribution media into the disk drive.c.Enter 2 to Continue to password entry on the Language selection menu. Enter admin.d.On the main SMS menu, enter 5 to select the Select Boot Options option.e.Enter 1 to select Install/Boot Device.f.Enter 7 to view all of the available boot devices.g.Enter the number corresponding to the device you want to use. If your device is not displayed, you can enter N todisplay more.h.Enter 2 to perform a Normal Mode Boot.i.Enter 1 to leave the SMS menu and to start the boot process.j.At the boot prompt from the installer, type linux when installing Red Hat Enterprise Linux or install when installing SUSE Linux Enterprise Server and press Enter. The kernel will begin loading.k.Follow the installer screens to install Linux.5Step 5: Install additional softwareAdditional software is available from the IBM Linux on PowerTools Repository. The IBM Tools Repository is alsocalled the Yum Repository. To install the IBM Tools Repository, follow these steps:a.Download the ibm-power-repo RPM package from https:///BdxnTB. Use the same package for Red HatEnterprise Linux and SUSE Enterprise Linux Server.b.Install the ibm-power-repo RPM package. Run the command: rpm -ivh ibm-power-repo versionnumberAfter you have installed the IBM Tools Repository, you can use it to install the following:•Service and Productivity tools:–For Red Hat Enterprise Linux: yum install ibm-power-nonmanaged-distro where distro is the distribution that you are installing.–For SUSE Linux Enterprise Server: yum install ibm-power-nonmanaged-distro where distro is the distribution that you are installing.•IBM Advance Toolchain for Linux on Power–On Red Hat Enterprise Linux: yum install advance-toolchain-at6* where advance-toolchain-at6 is the version of IBM Advance Toolchain for PowerLinux that you want to install.–On SUSE Linux Enterprise Server: zypper install advance-toolchain-at6* where advance-toolchain-at6 is the version of IBM Advance Toolchain for PowerLinux that you want to install.•IBM SDK for PowerLinux–On Red Hat Enterprise Linux: yum install ibm-sdk-lop.ppc64–On SUSE Linux Enterprise Server: zypper install ibm-sdk-lop.ppc64For more information about using the IBM Linux on Power Tools Repository, see https://ibm/biz.BdYjwG.6Step 6: TroubleshootCheck the control panel for any codes that might be displayed. For example, the code 11002613 indicates thatthere is a problem with power. Ensure that the power supplies are seated correctly and that you are using thecorrect power cords.You can look up any codes that are displayed in IBM Knowledge Center.More informationFor more information, see the following resources:•Linux information for IBM systems at https:///support/knowledgecenter/linuxonibm/liaaa/ic-homepage.htm•IBM Knowledge Center: https:///support/knowledgecenter/.•The Linux on Power developer portal at https:///linuxonpower/.© Copyright IBM® Corp. 2018. U.S. Government Users Restricted Rights - Use, duplication or disclosure restricted by GSA ADP Schedule Contract with IBM Corp.IBM, the IBM logo, and ® are trademarks or registered trademarks of International Business Machines Corp., registered in many jurisdictions worldwide. Other product and service names might be trademarks of IBM or other companies. A current list of IBM trademarks is available on the Web at "Copyright and trademark information" (/legal/copytrade.shtml).。
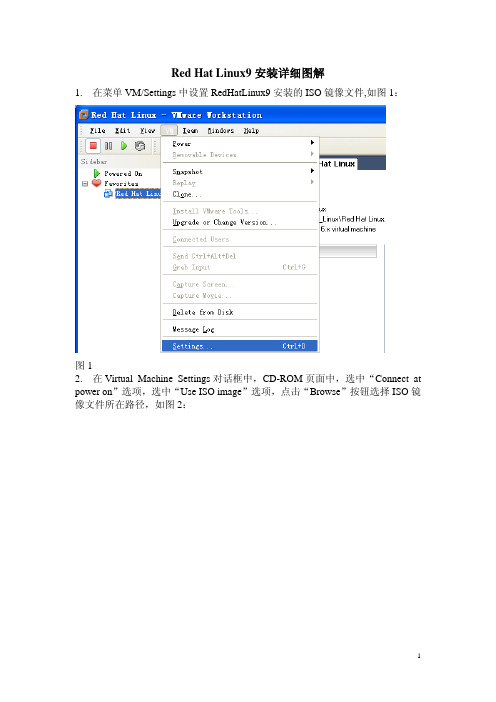
Red Hat Linux9安装详细图解1. 在菜单VM/Settings中设置RedHatLinux9安装的ISO镜像文件,如图1:图12. 在Virtual Machine Settings对话框中,CD-ROM页面中,选中“Connect at power on”选项,选中“Use ISO image”选项,点击“Browse”按钮选择ISO镜像文件所在路径,如图2:图23.点击“OK”关闭对话框;4. 单击Favorites下虚拟机Red Hat Linux,再点击“Power on this Virtual Machine”开始系统的安装,如图3;图35. 出现Linux安装启动界面,如图4:6.回车,出现图5:7.不检查CD,按“Tab”键切换到“Skip”按钮,按回车,如图6:8. 开始安装,如图7:9. 如图8:图810.直接用鼠标点击“Next”按钮或用“Tab”键切换到“Next”按钮按回车,图9:图911.利用“↑↓←→”选择安装简体中文版,点击“Next”按钮,选择键盘,如图10:图1012.点击“Next”,选择鼠标,如图11:13.点击“Next”,选择安装类型为“定制”,如图12:14.点击“Next”,如图13:15.点击“Next”,如图14:16.选择“是”,出现图15:17.点击“下一步”,出现图16:18.选择“是”,删除分区,出现图17:19.点击“下一步”,出现图18:图18击“下一步”,出现图19:20.点图19击“下一步”,出现图20:21.点图2022.信任的设备项选中eth0,允许进入项选中WWW、FTP、SSH、DHCP、Mail和Telnet,如图21:图21击“下一步”,出现图22:23.点24. 点击“下一步”,出现图23:图2325. 点击“下一步”,设置根指令,出现图24:26.输入根指令并确认,如图25:图2527.点击“下一步”,出现图26:28.点击“下一步”,出现图27:图2729.除默认选项外,另应用程序项选中编辑器,服务器项选中服务器配置工具、万维网服务器、邮件服务器、Windows文件服务器、DNS名称服务器、FTP 服务器、SQL数据库服务器、网络服务器,开发项选中开发工具、内核开发、X软件开发、GNOME软件开发和KDE软件开发,系统项选中管理工具和系统工具,点击“下一步”,出现图28:30. 开始安装软件包,如图29:31.出现图30时,在VM/Settings中仿造第2步设置第二张安装盘的ISO镜像文件的存放路径,点击“OK”,如图31:图30图3132.点击“确定”,继续第二张盘的安装;33.同样地,重新指定第三张安装盘ISO镜像文件的存放地址,完成第三张盘的安装,直至所有软件包安装完毕,出现图32:图3234.选择“否,我不想创建引导盘”,如图33:图33图3436.点击“下一步”,出现图35:图35图3638.点击“下一步”,出现图37:图3739.点击“退出”,重启系统,进入Red Hat Linux9的配置,如图38:图3840.点击“前进”,出现图39:图3941.输入用户名、全名、口令并确认口令,创建一个非管理员用户,如图40:42.点击“前进”,出现图41:图413.点击“前进”,出现图42:444.点击“前进”,出现图43:45.选择“否,我不想注册我的系统”,如图44:46.点击“前进”,出现图45:47.点击“前进”,出现图46:48.点击“前进”,系统自动重启,出现图47:图4749.输入根用户名或前面所创建的非管理员的用户名均可,但考虑到后面须在根用户目录下安装Vmware Tools、交叉编译环境arm-linux-gcc、设置网络和设置共享文件夹等操作,这里建议输入根用户名root,后面要求输入密码时也是输入根用户的密码,如图48:50.回车,出现图49:51.输入根用户密码,如图50:图5052.回车,系统启动,至此,基于虚拟机的RedHatLinux9系统安装、配置完毕,如图51:图51。

Dell™ PowerEdge™系统SUSE® Linux Enterprise Server 9(适用于 x86_64 技术)安装说明与重要信息注和注意注:“注”表示可以帮助您更好地使用计算机的重要信息。
注意:“注意”表示可能会损坏硬件或导致数据丢失,并告诉您如何避免此类问题。
____________________本说明文件中的信息如有更改,恕不另行通知。
©2006-2008Dell Inc.版权所有,翻印必究。
未经 Dell Inc.书面许可,不准以任何形式进行复制。
本文中使用的商标:Dell、DELL徽标、PowerEdge和OpenManage是 Dell Inc. 的商标;SUSE是 Novell, Inc. 在美国和其它国家/地区的注册商标;Intel是 Intel Corporation 的注册商标。
本文中述及的其它商标或产品名称可能指拥有相应商标和名称的实体或其生产的产品。
Dell Inc. 对本公司的商标和产品名称之外的其它商标和产品名称不拥有任何专有权。
2008 年 2 月Rev. A04目录安装和重新安装 SUSE Linux Enterprise Server 9 (5)使用 Dell Systems Build and Update Utility 介质 (5)使用 SUSE Linux 介质安装 SUSE LinuxEnterprise Server 9 (6)在具有 Dell 公用程序分区的系统上安装 (7)获取用于设备驱动程序的 DKMS 框架 (7)使用 YOU 对系统软件包进行更新 (7)配置系统设置 (7)重要信息 (8)配置了 nVidia 芯片集的系统无法引导 (8)SATA 光盘驱动器不支持 SUSE LinuxEnterprise Server 9 (8)运行 SUSE Linux Enterprise Server 9 的系统显示错误的 CPU 核心信息 (9)NIC 的 Linux 列举 (9)当 RAM 大于 2.5 GB 时,USB 子系统不起作用 (9)在具有 3 GB 以上 RAM 的 SATA系统上运行SUSE Linux Enterprise Server 9 时,系统挂起 (9)为 CERC SATA 六通道 RAID 控制器安装 SUSE LinuxEnterprise Server 9 时出现问题 (10)执行非匿名 FTP 安装 (10)新增的 NX 支持可能导致第三方应用程序发生分段错误 (10)存在 DRAC 时显示较大的虚拟分辨率 (10)在少于四个 CPU 的 PowerEdge 6800 和 6850 上安装挂起 (11)在 RAM 低于 512 MB 的系统上安装 (11)在 PowerEdge SC430、SC830 和 SC850 上安装SUSE Linux Enterprise Server 9 (11)目录3在 Adaptec 39320 SCSI控制器上安装 SUSE LinuxEnterprise Server 9 (11)在 KDE Konsole 未接收到 Dell OpenManage™ ServerAdministrator 警报 (11)SNMP 应用程序中显示错误的 IP 地址 (12)在探测显示器时,出现 sax2 问题 (12)按下电源按钮可能无法关闭系统 (12)在通过 DRAC 远程控制台进行连接时,发生鼠标轨迹同步问题 (12)使用 snmpconf 写入配置文件后,显示 Glibc 错误 (13)系统时间可能与硬件时钟不一致 (13)当向系统添加或从系统中卸下 PCI 卡时,X Window 系统无法启动 (13)查找更多信息 (14)4目录本说明文件提供以下信息:•在 Dell™系统上安装和重新安装 SUSE® Linux Enterprise Server 9 的说明•其它帮助来源安装和重新安装 SUSE Linux Enterprise Server 9使用以下方法之一,在您的系统上安装或重新安装 SUSE Linux Enterprise Server:•使用 Dell Systems Build and Update Utility介质•使用 SUSE 安装介质进行自定义安装Dell 建议用Dell Systems Build and Update Utility介质安装和重新安装SUSE Linux Enterprise Server 9。

SUSE LINUX9安装说明第一步、安装前期的准备该操作系统安装光盘由以下六张光盘组成:SUSE SLES9 Service-Pack Version 4 CD 1SUSE SLES9 Service-Pack Version 4 CD 2SUSE SLES9 Service-Pack Version 4 CD 3SUSE SLES9 Service-Pack Version 4 CD 4SUSE Linux Enterprise Server 9 CD 1SUSE Linux Enterprise Server 9 CD 2SUSE Linux Enterprise Server 9 CD 3SUSE Linux Enterprise Server 9 CD 4SUSE Linux Enterprise Server 9 CD 5SUSE Linux Enterprise Server 9 CD 6本操作系统在部分服务器安装时,存在两个问题需要注意:安装程序不能启动图形模式;只能先装英文版,再打汉字补丁包。
以下是详细安装步骤。
第二步、安装过程1、电脑开机,及时插入光盘SUSE SLES9 Service-Pack Version 4CD 1,出现以下提示信息:You are about to install 32-bit software on a 64-bit computer.按回车确认。
2、显示如下画面:3、显示如下画面:插入光盘SUSE Linux Enterprise Server 9 CD 1,按回车确认。
4、特别注意:有的服务器会出现以下提示信息:Your computer does not fulfill all requirements for a graphical installation.There is less than 96MB memory or the X server could not be started.As a fallback,the text front-end of Yast will guide you throough the installation.This front-end offers the same functionality as the graphical one,but the screens diff from those in the manual.这段话的意思是安装程序不能启动图形模式,安装程序只能按照非图形模式运行。
红旗LINUX安装手册
V1.0
北京中电达通通信技术股份有限公司DATACOMO COMMUNICATIONS TECHNOLOGY INC.
将系统盘放进光驱,出现如下界面,按enter键,如图:
等待出现如下界面后,选择SKIP,如图:
等待出现如下界面后,选择NEXT,如图:
出现如下界面后,选择“简体中文”,如图:
出现如下界面后,选择“接受”并点下一步,如图:
出现如下界面后,选择“是”并点下一步,如图:
出现如下界面后,选择“建立自定义的分区结构”并点下一步,如图:
对硬盘进行分区,/boot分区100M,swap分区一般为内存容量的2倍,/分区为余下的全部容量,如图:
然后默认点击下一步到网卡配置,点击编辑,为网卡配置上相应的IP地址,如图:
配置完成后,点击下一步选择时区,如图:
点击下一步输入root帐户的密码,如图:
点击下一步选择“定制安装”,如图:
选择所有大项,并点击“可选的软件包”选择里面所有的细项,如图:
然后继续点击下一步,开始安装。
安装结束后,需要对系统安装工具盘,将工具盘放入光驱中,等待出现如下界面:
点击“下一步”输入服务号:
选择“完全安装”
选择“是”:
更换系统盘:
更换工具盘:
安装结束。
虚拟机安装RedHat linux 9服务器——inktripod 安装需要的工具:1.RedHat 9的三张iso镜像文件2.Vmware workstation 9.0(其他版本VM虚拟机安装过程都差不多)安装过程如下:1.新建虚拟机2.点击“标准—>下一步”3.如下图所示,点击“我以后再安装操作系统—>下一步”4点击“linux—>Red Hat Linux—>下一步”5.如下图所示,“虚拟机名称”可以随便改,安装“位置”也可以通过“浏览”来定位,点击“下一步”6.如下图所示,若磁盘空间够大,“最大磁盘空间”可以增加,最好不要减少,不然可能影响所安装的虚拟机性能,“虚拟机磁盘拆分成多个文件”有利于虚拟机移植。
点击“下一步”7.点击“完成”8.如下图所示,双击“CD/DVD(IDE)”,确保选择“打开电源时连接”,“使用ISO镜像文件”,“浏览”,选择红帽子的第一个ISO镜像,点选下面的“确定”9.打开此虚拟机电源10.出现如下图所示界面时,回车11.出现CD Found窗口时,通过方向键选择“Skip”,回车12.点击“Next”13.选择语言,推荐使用英语,因为Red Hat 9对中文支持的不太好,很容易出现乱码,影响阅读。
(实话说:英语不太好,点选简体中文)点击“Next”14.键盘配置,默认的U.S.English就好,现在市面上的大多数键盘都是美国英语式类型。
点击“下一步”15.鼠标配置,默认PS/2就行,也可以根据自己的情况选择,右侧有设置帮助,如下图16.安装类型选择“服务器”,点击“下一步”17.磁盘分区,点选“用Disk Druid手工分区”,点击“下一步”18.出现下图所示的窗口时,点击“是”19.分区,分区有不同的分法,网上随便百度一下就能找到很多。
这里我选择的是/,/boot,swap三个分区。
假若磁盘空间足够大的话还可以增加分区,如/home,这个分区主要保存用户数据和用户的相关配置文件,如/usr,这个分区存放的是应用程序的信息等等。
—Informatica Powercenter安装、配置及简单使用文档文档控制变更记录3日期作者版本变更参考目录1概述 (1)1.1读者对象 (1)1.2参考文档 (1)2软件简介 (2)2.1概念 (2)2.2作用 (2)3安装准备 (4)3.1系统要求 (4)3.2数据库账户 (5)3.3注意事项 (5)4POWERCENTER安装 (6)4.1服务器端安装 (6)4.1.1运行安装向导 (6)4.1.2选择安装类型 (7)4.1.3选择License Key (8)4.1.4选择安装路径 (10)4.1.5设置https协议 (10)4.1.6域选择与配置 (13)4.1.7配置节点 (15)4.1.8选择System账户 (16)4.1.9安装成功 (16)4.2客户端安装 (18)4.2.1运行安装向导 (18)4.2.2选择安装类型 (19)4.2.3选择安装路径 (20)4.2.4安装成功 (22)4.3官方文档安装 .......................................................................................................... 错误!未定义书签。
4.3.1运行安装向导................................................................................................. 错误!未定义书签。
4.3.2选择安装路径................................................................................................. 错误!未定义书签。
4.3.3安装成功......................................................................................................... 错误!未定义书签。
SUSE 9操作系统安装指导手册中兴通讯股份有限公司变更记录/ 工程文档 / 培训资料 / 其它目录第1章安装Suse Linux操作系统 (3)1.1 安装准备 (3)1.2 操作系统的安装步骤 (3)1.3 安装后的配置 (13)1.4 配置网络环境 (15)第1章安装Suse Linux操作系统本安装文档针对X86平台,在X86平台上安装SLES9(SUSE Linux Enterprise Server Version 9)系统都适用此文档。
在商用环境中,很多平台是基于X86_64的,但我们的业务程序目前是在X86_32环境下开发的,所以仍然要安装X86_32的SLES9。
1.1 安装准备检查软件安装盘是否已配备齐全,包括:1.SUSE LINUX操作系统安装盘前四张(SUSE Linux Enterprise Server 9),我们安装的一共有12张盘和2张刻录的SP2补丁盘,我们安装时用的是其中Interl X86平台的前四张。
2.SLES9 ServicePack3-i386-CD的前两张3.安装说明:市场上常见的X86架构的PC服务器,都自带有一张启动盘。
在进行一般的操作系统安装时,都用这张启动盘引导系统,然后再进行操作系统的安装。
可是有些启动盘不支持X86的SLES9安装,此时,就需要用SLES9的SP3 CD1来引导系统,并进行安装。
SP3 CD1中含有大多数RAID卡和SCSI控制器的驱动程序,能让安装光盘准确地识别出服务上的硬盘。
注意:一定要用SP3 CD1来引导安装操作系统,安装完系统和会自动识别出光纤卡。
1.2 操作系统的安装步骤准备好SLES9的安装介质,包含系统安装光盘的前四张说明:一共有12张盘和2张刻录的SP2补丁盘,我们安装时用的是其中Interl X86平台的前四张和SP3补丁光盘的前两张SLES9-ServicePack3-i386-CD1,CD2)。
Informatica 9 安装手册
修订记录
目录
一、文档说明 (4)
二、安装前系统环境准备 (4)
1.确认系统需求 (4)
2.检查Informatica环境变量 (5)
3.确定端口 (5)
4.创建Informatica用户 (5)
三、安装介质准备 (6)
四、安装Informatica 服务端 (6)
1.创建informatica安装用户并设置安装目录 (6)
2.表空间及数据库用户准备 (6)
3.准备安装介质 (7)
4.运行install.sh,开始安装 (7)
5.选择图形化方式进行全新安装 (8)
6.选择安装类型 (8)
7.系统环境检查 (9)
8.指定license,设定安装目录 (9)
9.安装概要 (10)
10.安装过程 (10)
11.创建Domain并启用HTTPS安全管理 (11)
12.设置配置Domain的数据库连接信息 (11)
13.配置Domain和Node信息 (12)
14.安装结束 (12)
五、安装informaitca客户端 (13)
六、安装之后的设置 (18)
1.配置环境变量 (18)
2.安装/配置数据库客户端 (19)
七、Informatica服务端创建服务 (20)
八、验证安装结果 (22)
一、文档说明
二、安装前系统环境准备
1.确认系统需求
Domain和应用服务的系统需求
可以在同一机器配置Informatica Domain和一个node,所有application服务运行在同一node。
如果创建包括多个node的domain,可以将application服务运行不同的node上。
Informatica node支持以下Unix或Linux安装平台:
✓Sun Solaris
✓HP-UX
✓IBM AIX
✓Red Hat Linux
✓SUSE Linux
下表中列出了Informatica Domain包括不同node配置的最小系统需求:
安装过程中临时磁盘空间需求
在安装过程中会产生大量的临时文件,确保有足够的可用临时空间。
安装结束后,会删除临
时文件并释放占用的临时空间。
下表列出了安装过程中需要的临时空间大小:
2.检查Informatica环境变量
使用安装Informatica的用户设置环境变量,不正确的配置环境变量可能导致安装失败。
下表中列出了在Unix或Linux系统需要设置的环境变量。
3.确定端口
✓为domain和各组件指定的端口号必须唯一
✓domain及其组件的端口号不能在应用服务进程范围内
✓指定的端口号最大值至少比最小值大3,例如最小值为6400,则最大值至少为6403 ✓为Domain,domain和node组件,applications Services进程指定的端口号必须在1025~65535之间
4.创建Informatica用户
✓创建特定的用户来运行Informatica daemon
✓确认Informatica 用户对安装目录有写权限
三、安装介质准备
✓查看系统版本,uname -a
✓下载相应的informatica软件包
四、安装Informatica 服务端
1.创建informatica安装用户并设置安装目录
2.表空间及数据库用户准备
3.准备安装介质
4.运行install.sh,开始安装
5.选择图形化方式进行全新安装
6.选择安装类型
7.系统环境检查
8.指定license,设定安装目录
9.安装概要
10.安装过程
11.创建Domain并启用HTTPS安全管理
12.设置配置Domain的数据库连接信息
13.配置Domain和Node信息
14.安装结束
五、安装informaitca客户端
六、安装之后的设置
1.配置环境变量
下表中列出了需要设置的环境变量
⏹Informatica 环境变量:
✓INFA_JA V A_OPTS
默认情况下,Informatica使用512MB系统内存,可以通过设置该变量修改
Informatica可以使用的内存数量。
例如:
在UNIX系统中,使用C shell设置Informatica使用内存为1GB;
setenv INFA_JA V A_OPTS "-Xmx1024m"
在Windows系统中,配置INFA_JA V A_OPTS系统变量;
在HP-UX 64bit系统中,需添加-d64开关;
设置修改后,重启node使配置生效。
✓INFA_DOMAINS_FILE
安装助手会在Informatica安装目录创建domains.infa文件,该文件记录了一个
domain中node的连接信息,包括domain names,domain host names,domain host port
names。
INFA_DOMAINS_FILE变量的值包括路径和domains.infa文件名。
设置该变量后可
以在目录中直接使用infacmd和pmcmd命令。
在Windows系统中,设置该变量为系统变量。
✓INFA_HOME
该变量指明了Informatica的安装目录
⏹Locale环境变量
使用LANG,LC_CTYPE或者LC_ALL设置UNIX代码页。
确认locale变量设置的代码页与Informatica repository资料库的代码页相同,否则不能创建repository服务。
使用命令locale -a来确认locale变量设置的代码页与资料库中的代码页一致或兼容。
Locale on Linux:
Linux允许不同的值表示相同的locale变量。
例如,"utf8","UTF-8","UTF8","utf-8”
表示相同
Locale for Oracle Database Clients:
Oracle数据库客户端,通过设置NLS_LANG来指定登录的数据库客户端和服务端的locale。
例如:setenv NLS_LANG american_america.UTF8
⏹Library path环境变量
为运行PowerCenter Integration Services和PownerCenter Repository Services进程需要配置library path环境变量。
library path变量依不同的UNIX平台和数据库而有所不同。
✓Solaris and Linux:
在Solaris和Linux系统,配置LD_LIBRARY_PA TH变量,其值根据数据库的
不同而有所不同
2.安装/配置数据库客户端
在以下node安装数据库客户端并配置连通性:
✓gateway node
✓运行PowerCenter Integration Service 和PowerCenter Repository Service的node 七、Informatica服务端创建服务
1.创建Repository资料库
2.创建数据分析资料库
3.创建元数据管理资料库
八、验证安装结果
1. Create Folder
2. Import source definition from test txt file
3. Import target definition from test txt file ( same as source file)
4. create a mapping
5. create a simple workflow ( one session from previous mapping)
6 . execute and monitor the workflow
7. make sure no error for all steps.。